Brita WD 3020 User manual

Instructions for use

2
Index
Installation Video
I. Congratulations Page 3
II. Quality from the very start Page 4
III. Important notes Page 15
IV. BRITA, quality and satisfaction guaranteed Page 16
ENGLISH

ENGLISH 3
Your BRITA Dispenser, is the key to cleaner,
clearer great tasting filtered water
Next to hot and cold unfiltered water,
your BRITA system offers many advantages
• Great tasting filtered water at your fingertips
• Filtered water is ideal for bringing out the full potential of your
food and tastes great for everyday drinking
• Water is a fundamental part of food preparation and can
influence the results of your cooking at home. The BRITA
Dispenser is easy to install replacing your existing tap and
can make a wonderful difference to your cooking.
• Stylish European design will complement any kitchen
• It is economical, convenient and easy to use
• Allows for filtered and unfiltered water
The P 1000 Cartridge: BRITA's advanced filtration
technology in a compact and long lasting cartridge.
The P 1000 has a constant filtration performance for limescale
reduction thanks to its multilevel BRITA filtration system.
The professional filter head allows three filtration settings for
medium hard, hard and very hard water.
Depending on the by-pass setting, metal ions such as lead and
copper can be reduced from the drinking water during the flow
process.
The P 1000 filter cartridge reduces limescale and substances,
e.g. chlorine, that affect taste and odour.
Lifetime of the P 1000 filter cartridge
The lifetime of the P 1000 cartridge is dependant on your individ-
ual volume usage and your water conditions. For optimum BRITA
filtration performance, we recommend a minimum exchange of
your cartridge every 12 months. Exchange will be prompted by
your BRITA Dispenser Cartridge Status Indicator, shown by the
colour of the LED.
For more information regarding the BRITA Cartridge Status
Indicator, see chapter 3.
I. Congratulations on your new BRITA® Dispenser
You are assured of BRITA quality and our commitment to our
customers.
BRITA Dispenser
P 1000
filter cartridge

4 ENGLISH
II. Quality from the very start
1 Terms of warranty
The BRITA Dispenser is subject to the statutory guarantee of
2 years. A guarantee claim may be asserted only if all instructions in
this handbook are followed and observed.
2 Contents of the BRITA Water Filter Kit
To ensure you get the best result from your BRITA Water Filter Kit,
please follow these instructions carefully.
Your BRITA Water Filter Kit includes the following
(see fig. 1):
1. Filter head with three settings including a convenient locking
handle
2. Flexible wall mount
3. P 1000 water filter cartridge
4. BRITA Dispenser (design may differ from image shown)
5. BRITA Cartridge Status Indicator
6. Battery (CR2032)
7. Hose (1) length = 800 mm, 3/8" nut on one side and M8 con-
nector on the other side, 2 Hoses (2+3), length = 450 mm,
3/8" nut on one side and M8 connectors on the other side
8. Hose (4), length = 800 mm and 3/8" nut on both sides
9. 2 Adapters 1/2" female thread to 3/8" male thread (Only in UK)
10. Usage Instructions
11. Carbonate hardness testing strip
12. T-piece
13. Gaskets
Recommended tools for installation: a pipe wrench, an Allen key
(4 mm), a wrench and a screwdriver.
For wall mounting the cartridge (optional), you need: two screws
(e.g. 5 mm thread diameter) and, if required, two wall plugs suitable
for your type of wall.
1. 2.
3.
4.
5.
6.
7.
8.
10.
(fig. 1)
9.
11.
12. 13.
ENGLISH 5
3 BRITA Dispenser – easy installation
Before starting, please check that you have all the components
listed above (see fig. 1) as well as the recommended tools.
There are 7 steps to the installation.
!
Prior to installation, read the "Technical Data" (chapter 7)
and the "Important Notes" (chapter 9). The system cannot
be installed with a low pressure boiler as this might lead to
water damages. After storage and transport below 0°C,
the product must be stored in the open original packaging
for at least 24 hours at the stated ambient temperatures
(chapter 7) for operation.
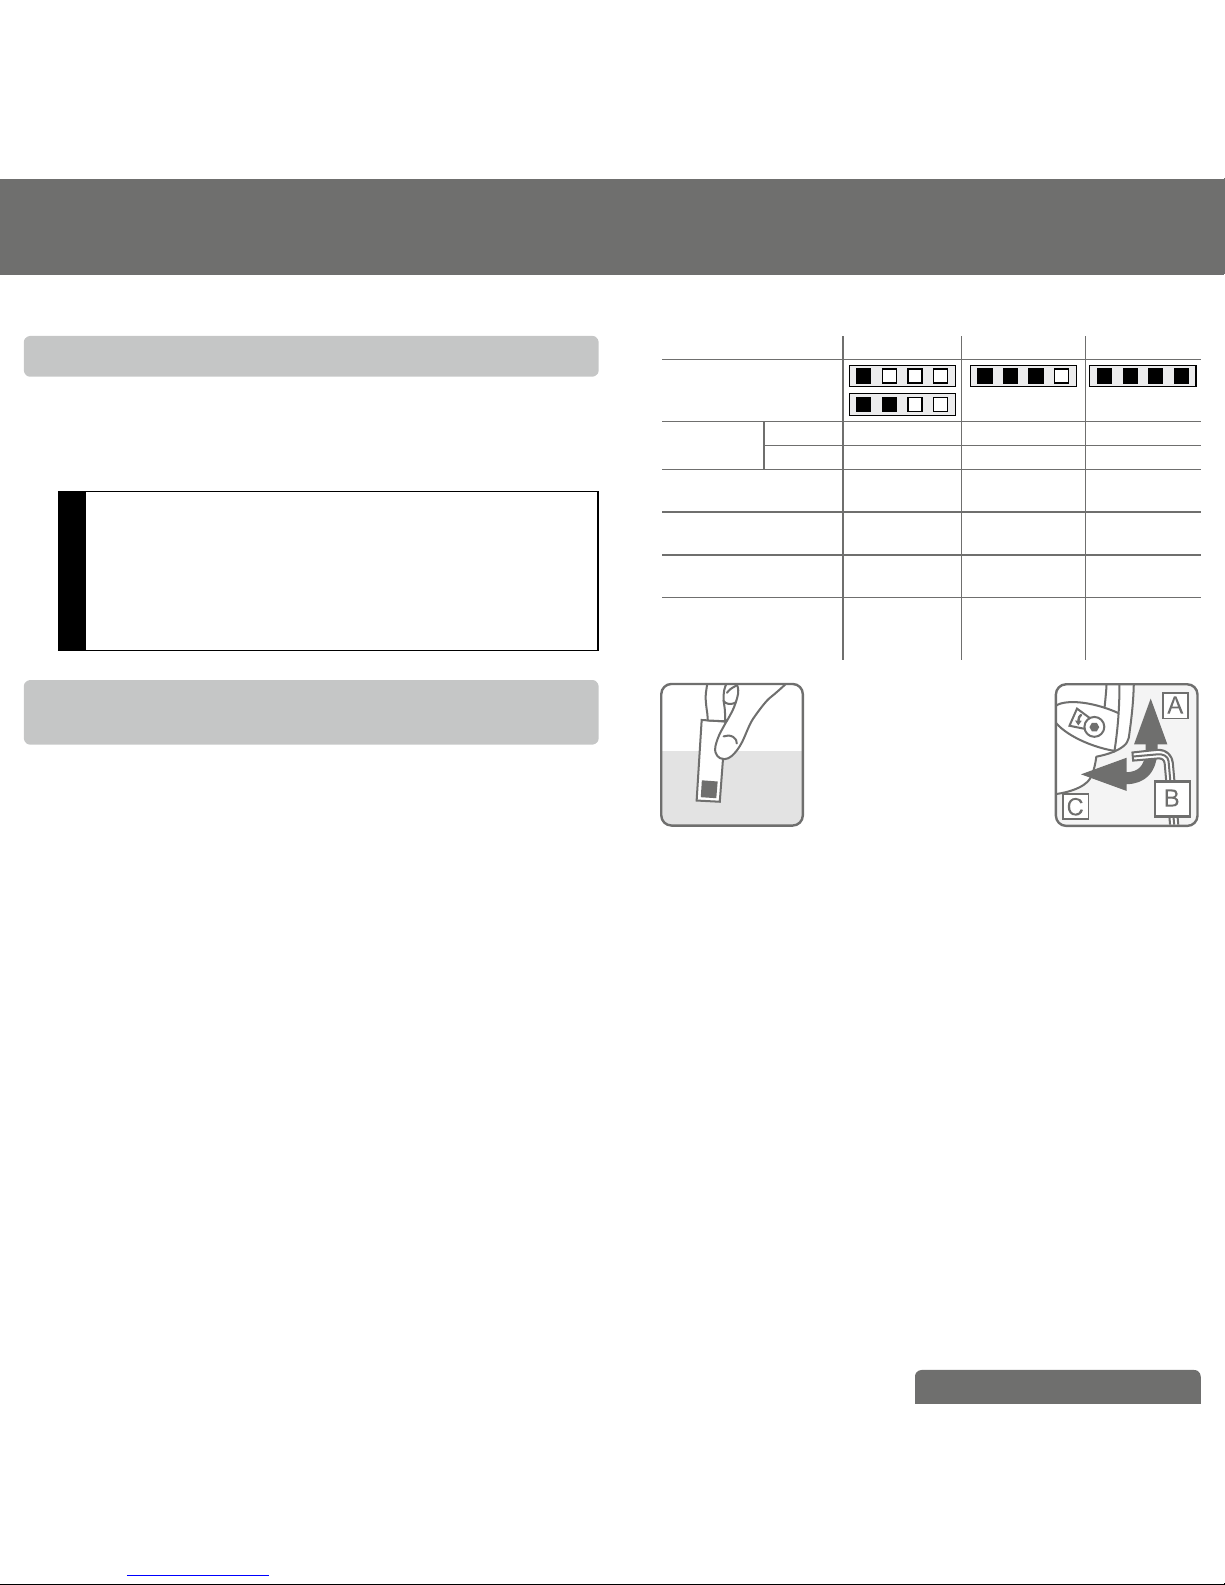
3.1 Step 1: Selecting the carbonate hardness
setting (A/B/C) on the filter head
The filter head offers three settings for medium hard water (A), hard
water (B) and very hard water (C). Please follow the instructions
below to adjust to the right setting for your local water.
First carry out a carbonate hardness test using the supplied testing
strip. The strip can be found in the outer wrapping of these Usage
Instructions.
Using the testing strip:
• Immerse all reaction zones of the test strip in a glass of your
regular tap water (15 - 30 °C) for 1 second (not in running water!).
(fig. 2).
• Shake off excess liquid from the strip and after 1 min check how
many reaction zones changed their colour on the test strip.
Depending on the number of reaction zones that changed their
colour, we recommend setting your filter head as follows:
Setting A B C
number of reaction
zones that changed
their colour
capacity P 1000 up to 1200 L up to 600 L up to 400 L
P 3000 up to 3400L up to 1700 L up to 1100 L
German Carbonate
Hardness [°dH]
up to 10 10 to 17 above 17 dH
English Carbonate
Hardness [°eH]
up to 13 13 to 21 above 21
French Carbonate
Hardness [°fH]
up to 18 18 to 30 above 30
Milligram per
Litre CaCO3
[mg/L CaCO3]
178 178 to 303 above 303
(fig. 2)
(fig. 3)
Now you can change the setting for the hardness of your water.
The filter head is set to "B" by default. To change the setting, use
an Allen key (4 mm). Turn in the direction of the arrow until the
"C" symbol appears in the window. Turn against the direction of
the arrow until the "A" symbol appears in the window (fig. 3). The
filter head contains a flow regulator already installed. It guarantees
smooth water flow from your BRITA Dispenser even at higher
water pressures.
6 ENGLISH
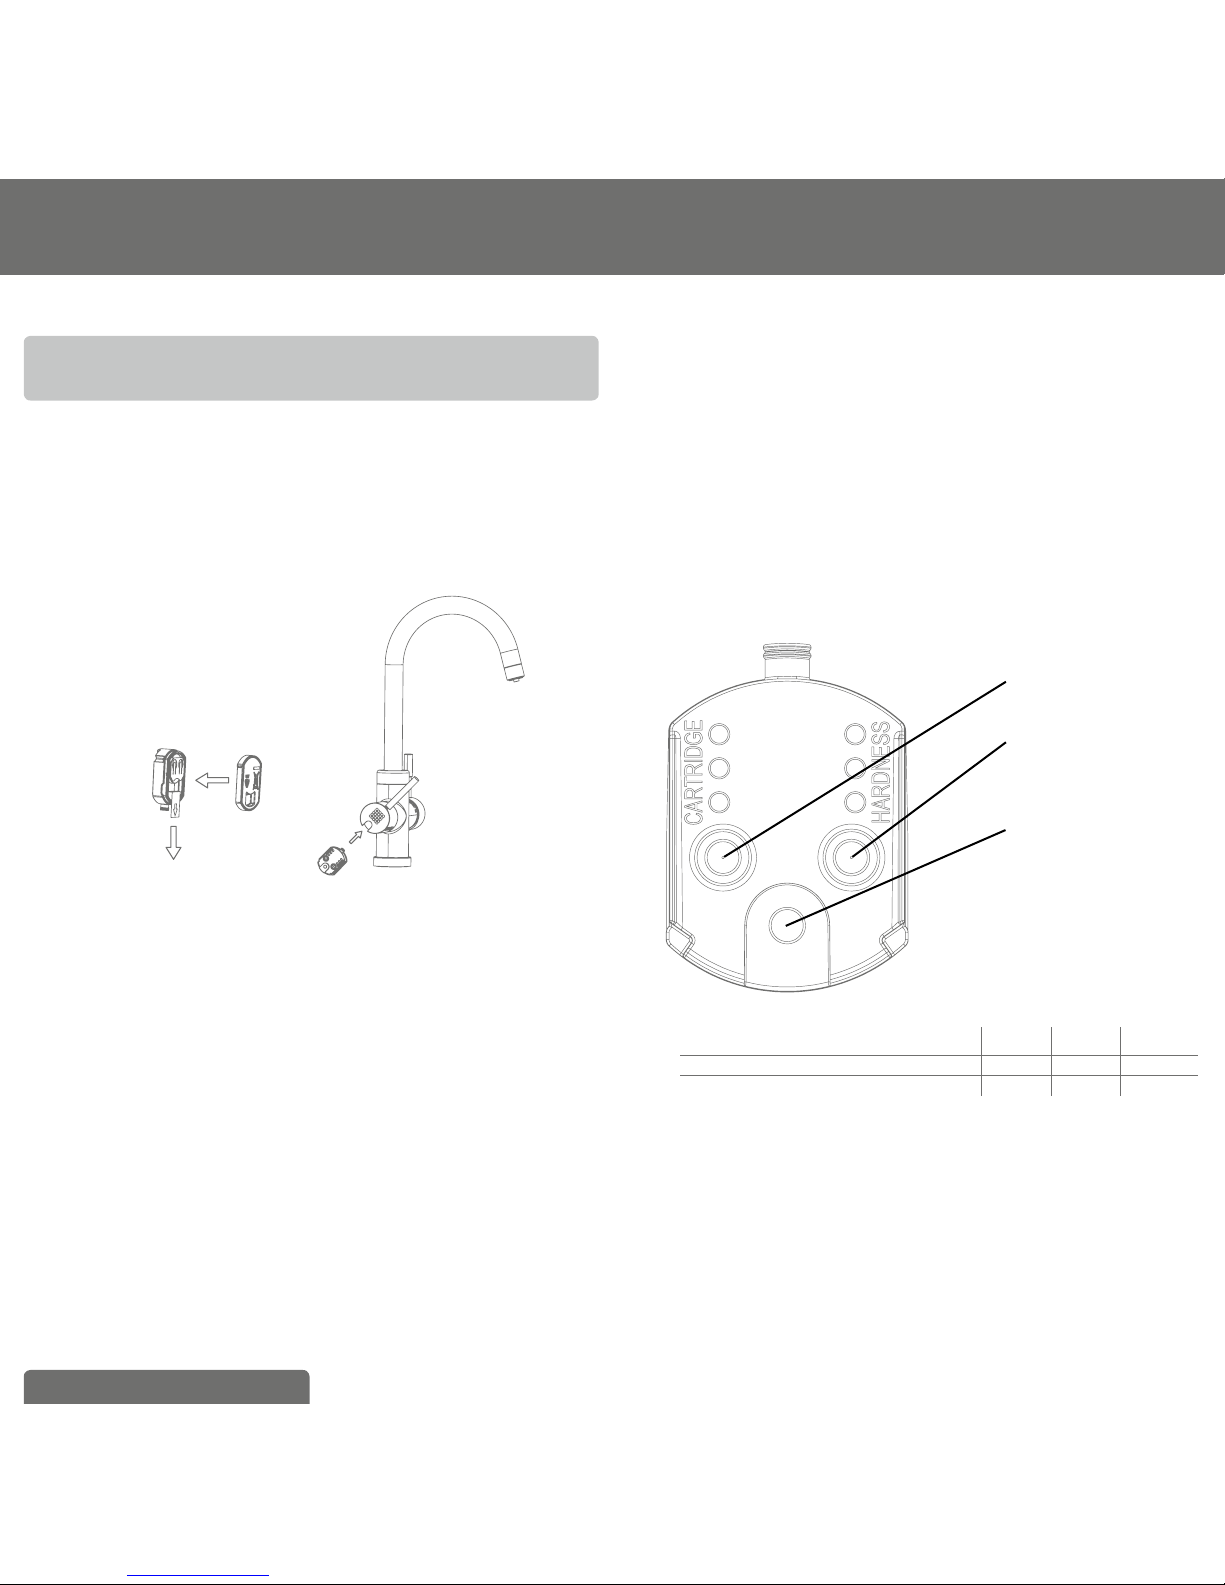
3.2 Step 2: Starting the BRITA Cartridge
Status Indicator
The BRITA Cartridge Status Indicator reminds you through three dif-
ferent coloured flashing lights when to exchange the filter cartridge.
A Commissioning:
Remove the battery strip (fig. 4). All LEDs should flash shortly.
Close the compartment. Keep the Reset Button pushed down for
three seconds until a small green light flashes three times at the
top.
(fig. 4)
B Initial programming of the BRITA Cartridge Status
Indicator:
Depending on the setting you chose for the filter head (step
1), you will programm the BRITA Cartridge Status Indicator as
follows (see fig. 5):
a Push the button on the right side (HARDNESS) to choose the
water hardness. If you push the button once, two yellow LEDs
will flash (default hardness setting: B). Then push the button until
your correct water hardness setting appears:
To choose the water hardness setting C, push the button until
one yellow LED flashes.
To choose the water hardness setting B, push the button until
two yellow LEDs flash.
To choose the water hardness setting A, push the button until
three yellow LEDs flash (see table below).
b Push the button on the left side (CARTRIDGE) to set the car-
tridge you are using. If you push the button once, two yellow
LEDs will flash (default cartridge setting: P 1000). Then push the
button until the correct setting for filter cartridge appears:
If you are using the filter cartridge A 1000, push the button, until
one yellow LED flashes.
If you are using the filter cartridge P 1000, push the button, until
two yellow LEDs flash.
If you are using the filter cartridge P 3000, push the button, until
three yellow LEDs flash (see table below).
c To change a setting, simply push the button until the right
number of lights are flashing.
d Insert the BRITA Cartridge Status Indicator into the BRITA
branded lever (see fig. 4).
(fig. 5)
1. Cartridge Button
2. Hardness Button
3. Reset Button
1 LED 2 LEDs 3 LEDs
water hardness setting (HARDNESS) CBA
cartridge setting (CARTRIDGE) A 1000 P 1000 P 3000
C How the BRITA Cartridge Status Indicator works
To ensure optimal performance, you should change the filter
cartridge on a regular basis. The BRITA Cartridge Status Indicator in
the BRITA lever tells you when to change the filter cartridge.
D Signals
The three lights in the BRITA branded lever are only activated in the
filtering position. They indicate:
- Green light: The BRITA filter is working at optimum performance.

ENGLISH 7
- Yellow light: 90 % of the filter capacity has been used. Remember
to buy a new replacement filter cartridge.
- Red light: The filter cartridge needs to be changed.
E Reprogramming the BRITA Cartridge Status Indicator
If the maximum volume is reached or the cartridge has been used
for 12 months, the BRITA Cartridge Status Indicator’s LED will start
flashing red (only if BRITA lever is in the filtering position).
In this case the filter cartridge should be replaced (chapter 4). Once
the cartridge has been replaced the BRITA Cartridge Status Indica-
tor has to be reset. For this purpose push the reset button (fig. 5)
of the Cartridge Status Indicator for three seconds until it starts
flashing green (for this step, you do not need to remove the BRITA
Cartridge Status Indicator from the BRITA lever).
After replacing of the empty battery the commissioning should be
followed in accordance with section 3.2.
Technical data:
• Battery: 1x CR2032 (removable)
• lifetime of battery: app. 2 years
!Do not immerse Cartridge Status Indicator in water
3.3 Step 3: Installing the BRITA Dispenser
To install the BRITA Dispenser, firstly ensure you have all the
components required.
!Please, make sure that there is enough room and access
under the sink to allow for the installation of the filter head
and cartridge, and to connect the two supplied hoses.
WD 3020
1. BRITA Dispenser with 3 hoses
2. BRITA Cartridge Status Indicator
3. O-Ring
4. Shank
5. Joint (Is only necessary for installa-
tion of the dispenser if you directly
mount it onto your sink. If you
mount it onto your countertop-plate,
you do not necessarily need this
part. It helps stabilizing the tap at
your sink)
6. Flat Gasket
7. Flange
8. Hex nut
WD 3030/WD 3040 and WD 3050
(fig. 7)
1.
2.
3.
4.
5.
6.
7.
8.
1. BRITA Dispenser (design may differ)
with 3 hoses
2. BRITA Cartridge Status Indicator
3. Base
4. Shank
5. Joint (Is only necessary for installa-
tion of the dispenser if you directly
mount it onto your sink. If you
mount it onto your countertop-plate,
you do not necessarily need this
part. It helps stabilizing the tap at
your sink)
6. Flat Gasket
7. Flange
8. Hex nut
7.
8.
1.
2.
3.
4.
5.
6.
(fig. 6)

8 ENGLISH
A First of all, unmount your existing kitchen tap.
a) Turn off the cold and hot water supplies
b) Please make sure you release any pressure by opening all
levers.
!No water should run through the existing kitchen tap.
c) Unscrew the existing hoses from the cold and hot water
supply.
!We recommend placing a suitable container under the water
supply as there will be water left in the hoses which will run
down when you unscrew them.
d) Unscrew your kitchen tap – there is no standard mounting but
in general a pipe wrench will help you to unmount it.
e) Pull out both your kitchen tap and the hoses.
B You’re now ready to install the BRITA Dispenser.
First of all, screw the shank (4) into the BRITA Dispenser (1).
Screw the hoses into the dispenser (see fig. 8).
Screw the M8 connector of the hose with the blue stripe into the
hole C .
Screw the M8 connector of the hose with the red stripe into the
hole H.
Screw the M8 connector of the 800 mm hose into the hole B.
(fig. 8)
WD 3020/ WD 3030/ WD 3040 and WD 3050
C
B H
!Ensure the connections are screwed tight, but avoid over
tightening!
Then put the base or O-Ring (3) over the hole and fix the BRITA
Dispenser (1) in place using the supplied joint (5), the flat gasket (6),
flange (7) and the hex nut (8).
3.4 Step 4: Attaching the hoses
!We recommend that you arrange all the parts you need in
front of you before you begin.
For wall mounting (optional), you will need: two screws (e.g. 5 mm
thread diameter) and, if required, two wall plugs suitable for your
type of wall.
Please follow the diagram below (see fig. 9) and perform the steps
in the right order.
A Connect supplied T-piece on your cold water supply
a) Insert one 3/8" gasket into the female nut of the supplied T-piece.
b) Connect this end of the T-piece to your cold water supply.
!
If you do have an additional free 3/8" cold water supply for
the BRITA Dispenser in your kitchen, you do not need to
install the supplied T-piece!
If your cold water supply does not fit the 3/8" connector
of the T-piece, use the supplied adapter if required. Please
insert the 1/2" gasket into the female nut of the adapter first.
Your Water Filter Kit comes with two 1/2" adapters. Please
go to your nearest supplier for adapters in other sizes.
B Connect the hose with the blue stripe to one side of the T-piece.
C Take the hose with two 3/8" connectors. Insert the 3/8" gaskets
into the respective female threads of the two hose ends.
Connect one end with the free side of the T-Piece.
D Now connect the other end to the filter head inlet. This is labelled
“IN” (inlet) and marked with an arrow. Make sure that the gas-
kets are seated correctly!
E Connect the 800 mm hose which is connected with the dis-
penser with the outlet of the filter head labelled with an "OUT"
arrow. Make sure that also here the gaskets are seated correctly!
F Connect the hose with the red stripe with your hot water supply.
If your hot water supply does not fit the 3/8" connector, use the
supplied adapter if required. Please insert the 1/2" gasket into
the female nut of the adapter first.
G Make sure all connections are tightened properly. Avoid over
tightening.

ENGLISH 9
(fig. 9)
Hot water
supply
Cold water
supply
!
The max. tightening torque for the G3/8" connections may
not exceed 14 Nm! Only hose connections with gaskets
(13) may be used – hoses with conical screw connections
damage the connections of the filter head and invalidate any
warranty claims!
3.5 Step 5: Inserting the filter cartridge (see fig. 10)
A Remove protective strap (1).
B Insert the filter cartridge (4) vertically into the filter head (5).
C Turn the locking handle (3) until you feel it engages.
(fig. 10)
A.
B.
3.
2.
1.
4.
5.
!The filter cartridge can only be inserted when the locking
handle is open.
Make sure that the filter cartridge is positioned correctly.

10 ENGLISH
3.6 Step 6 (optional): Space-saving wall mount
to install the cartridge under the sink
(see fig. 11)
!
During assembly, note the installation dimensions, bending
radii of the hoses and dimensions of the accessories. The
system can be operated vertically and horizontally. When
using the wall mount, install vertically only!
A Attach the wall mount in place using the two matching screws
and use two wall plugs, if necessary, depending on the type of
wall.
B Engage the filter head (2) in the wall mount (1). Please use the
fixation holes (4).
1.
2.
3.
4.
(fig. 11)
3.7 Step 7: Commissioning
Before use, make sure that you have followed all the steps
correctly and all the parts are fitted. Place a suitable container
under the cartridge to catch any leakages.
A Turn on the cold and hot water supplies and check the system
carefully for any leaks.
B Open the BRITA Dispenser and allow water to run until the fil-
tered water runs clear and without any bubbles (at least 2 litres).
4 Replacing the filter cartridge
If the maximum volume is reached or the cartridge has been used
for 12 months from commissioning, the BRITA Status Indicator will
flash red to remind you that the cartridge needs to be replaced.
Read Important Notes (chapter 9) prior to exchange. After storage
and transport below 0°C, the product must be stored in the open
original packaging for at least 24 hours at the stated ambient tem-
peratures (chapter 7) for operation.
NOTE
The filter cartridge can be pivoted by 90° in the wall mount
for easy removal. When the locking handle is open, the
water supply to the cartridge is interrupted and by-passing
with direct water flow from the water inlet to the outlet is
possible.
Replacing the P 1000 (see fig. 10):
A Open the locking handle (3).
B Place a suitable container under the flush hose to catch the rinse
water. Open the flush valve (2) and release pressure from the
system. Close the flush valve (2) again.
C Remove the exhausted filter cartridge (4) from the filter head (5)
– please be aware, the cartridge is firmly embedded so you can
give it a firm pull without worrying about breaking it.
D Insert the new filter cartridge (see chapter 3.5).
E Close the locking handle (3).
F Reset the BRITA Cartridge Status Indicator (chapter 5).
G Open the BRITA branded lever on your BRITA Dispenser and
rinse through until the filtered water runs clear and without any
bubbles (at least 2 litres).
Replacing the P 3000 refill cartridge is exactly the same as
replacing the P 1000. The P 3000 lasts up to 3400 liters with the
A-setting, up to 1700 liters with the B-setting and up 1100 liters
with the C-setting. Please take this into consideration while reset-
ting your BRITA Cartridge Status Indicator.
This manual suits for next models
3
Table of contents
Popular Dispenser manuals by other brands

Silver King
Silver King Majestic SK12MAJ Technical manual and replacement parts list

Franke
Franke F3Dn Twin Service manual

STIEBEL ELTRON
STIEBEL ELTRON UltraHot Plus Operation and installation instructions

DAN DRYER
DAN DRYER 282 installation guide

Essity
Essity Tork 473208 manual

CBS
CBS SD300BU-88 COMPONENT MAINTENANCE MANUAL WITH ILLUSTRATED PARTS LIST


