Britannia OMAGGIO User manual

1 of 11
USER INSTRUCTIONS
INSTALLATION INSTRUCTIONS
MODEL : OMAGGIO
CHIMNEY HOOD
COD. 3952041

2 of 11
Britannia Living Ltd For Nationwide Service contact
Britannia House Tel. 0870 863 8680 (Option 3)
Bristol Avenue Fax 01253 471140
Blackpool
FY2 0JF
Important safety information
information
These warnings are provided in the interests of safety. Ensure that you understand them all
before installing or using this appliance. Your safety is of paramount importance. If you are
unsure about the meaning of any of these warnings please contact the help line above.
Installation
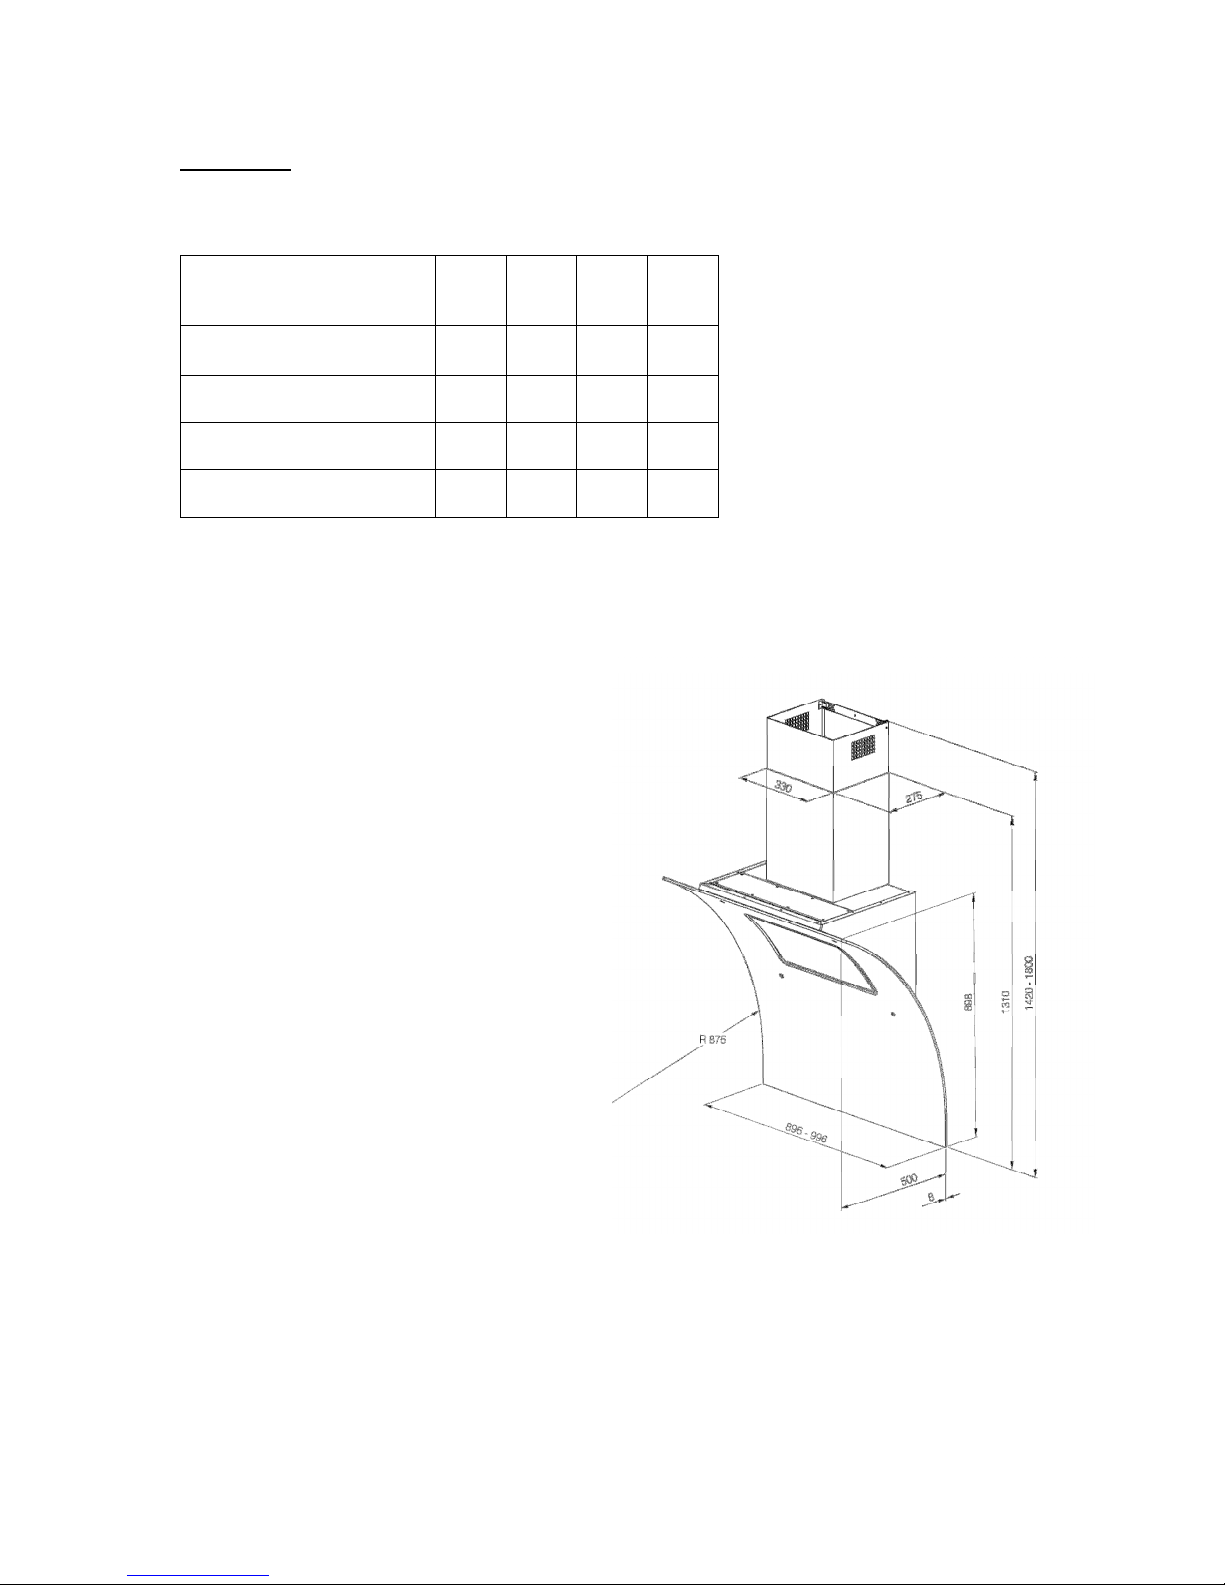
This hood must be installed in accordance with the installation instructions and all measurements
must be adhered to.
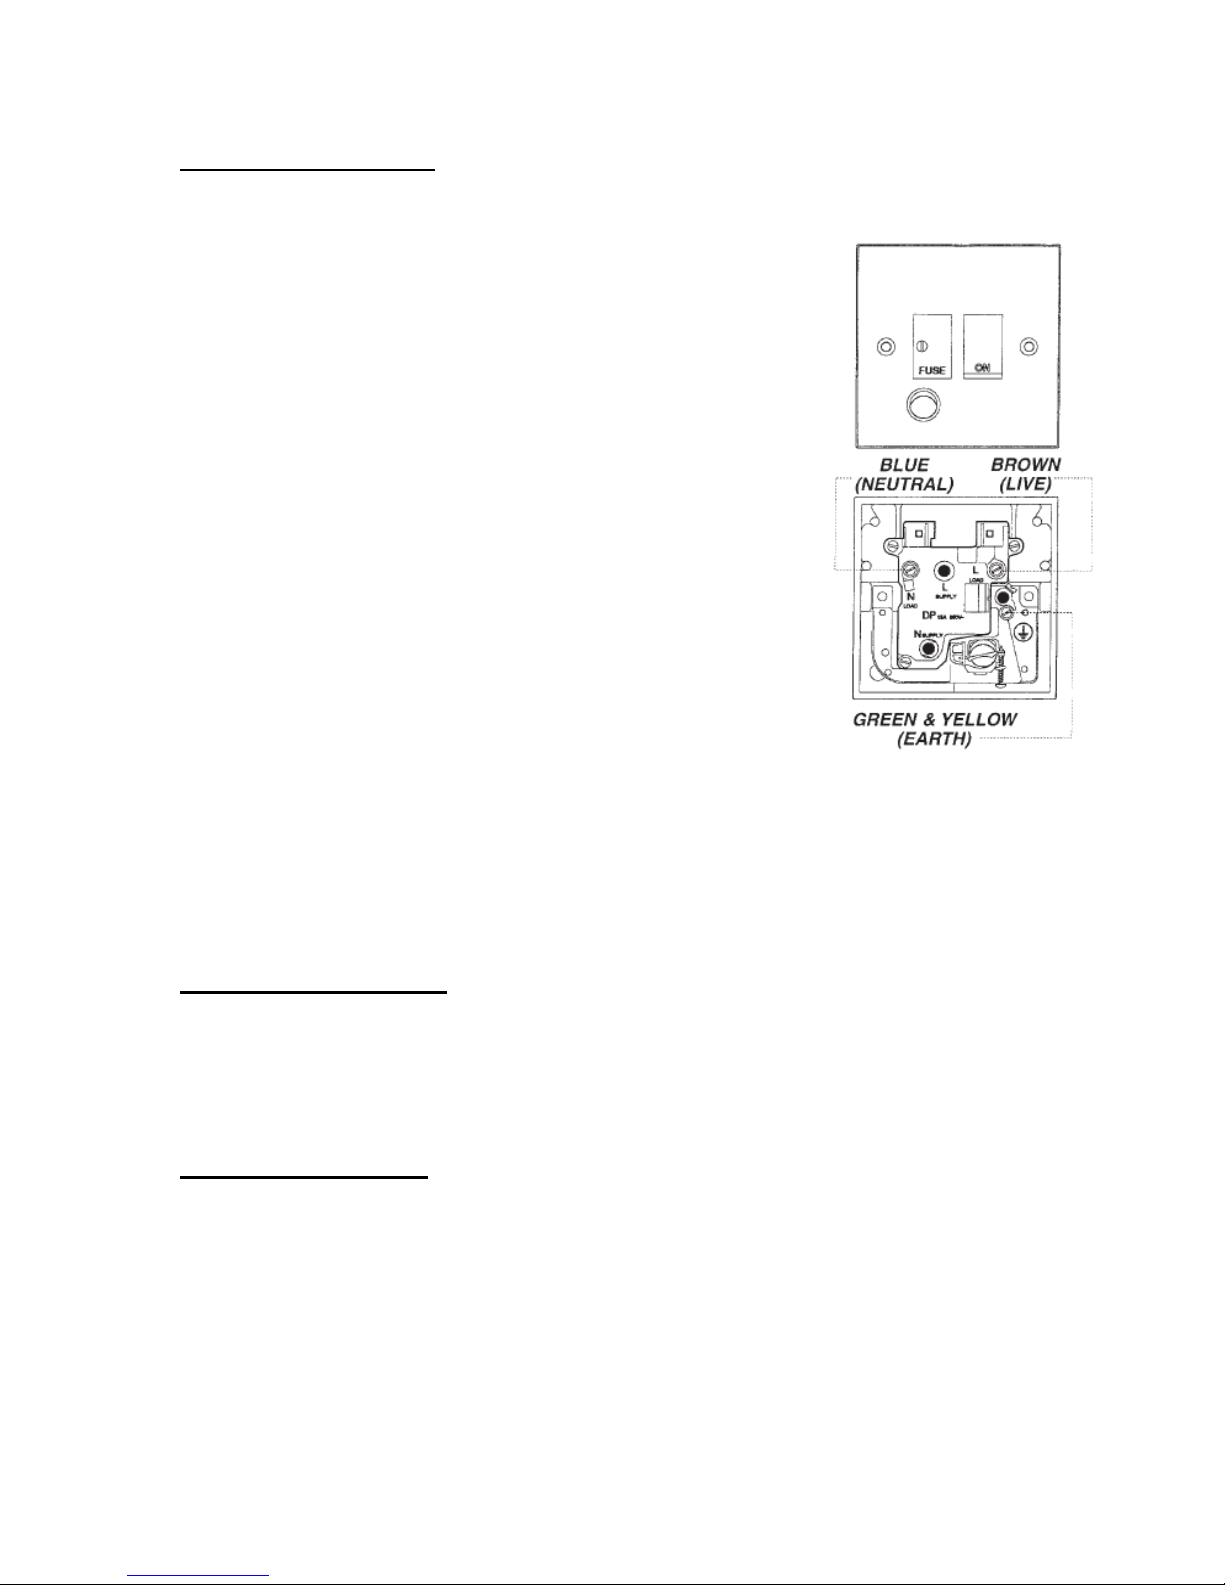
A qualified electrician or competent person must undertake any installation work.
This hood is suitable for installation above a gas, ceramic or induction hob. This hood is not
suitable above other appliances such as wood burning stoves.
If the cooker hood is installed for use above a gas appliance the provision for ventilation must be
in accordance with the latest edition of the Gas Safety Codes of Practice, and the Gas Safety
(Installation & Use) Regulations, the Building Regulations issued by the Department of the
Environment, the Building Standards (Scotland) (Consolidated) Regulations issued by the
Scottish Development Dept.
The fan motor of this cooker hood incorporates a thermal cut-out device, which will operate if the
cooker hood is installed below the minimum height, or if the motor becomes overheated. If the
cut-out device is activated, switch off the fan motor and allow the cooker hood to cool down. The
cut-out device will reset itself when the fan motor has cooled significantly.
It is dangerous to alter the specifications or modify the product in any way.
When installed between adjoining wall cabinets, the wall cabinets must not overhang the
hob/hotplate.
The following applies when ducting outThe following applies when ducting
out
The following is a requirement of UK and European legislation and is based on the interest of
your safety. If the room where a ducted cooker hood is to be installed also contains a fossil fuel
burning appliance such as a gas or oil central heating boiler, then its flue must be of the room
sealed or balanced flue type. A ducted hood is not suitable for use in a room where any open flue
is in use, as dangerous fumes of combustion can be sucked back into the room. (this would
include the following open flue appliances - central heating boilers, coal fires, log fires, gas fires,
wood burning stoves, etc.). Therefore, if you have an open flue fossil burning appliance in your
kichen, you are automatically compelled to use a hood in recycling mode.
Any local regulations concerning the discharge of exhaust air must be checked and fulfilled prior
to use of the hood. The ducting system for this appliance must not be connected to any existing
ventilation or flue system that is being used for any other purpose.

3 of 11
High level grills
Do not install this hood above a cooker with a high level grill.
Child safety
This appliance is designed to be operated by adults. Children should not be allowed to tamper
with the appliance.
During use
This product is for domestic use only.
Never leave frying pans unattended during use as overheated fats and oils may catch fire.
Do not flambé food under the cooker hood.
Always turn on your hood every time you use your cooker.
Always use pans with lids.
Do not leave naked flames under the cooker hood.
Do not pull or twist the cable coming out of the appliance.
Do not spray water directly on the appliance.
Do not use any sharp objects.
Always turn off the electricity supply before conducting any cleaning or maintenance.
Maintenance and service
This appliance can be a fire hazard if the grease filters and charcoal filters are not cleaned and
replaced in accordance with instructions.
Always insist on genuine spare parts.
Under no circumstances should you attempt to repair the appliance yourself. Repairs carried out
by inexperienced persons may cause injury or a more serious malfunction.
In the event of service being required for your cooker hood please contact the service helpline.

4 of 11
Technical
SPECIFICATION
SPEED 1 2 3 4
Air capacity cubic metres
per hour *
250 380 550 920
Pressure Pa 320 460 520 550
Input Watts 75 135 220 345
Power Noise level dB(A)re1pW ** 47 56 64 74
*Performance data according to Standard EN61591, Free air delivery.
** Noise level according to Standard IEC60704-2-13 method.
Finish: Stainless Steel, Hardened Black Glass
Size: 900mm or 1000mm wide
Controls: Touch screen
Air outlet: 150mm diameter
Illumination: 5 x LEDs of 1,5 watts each
Motor: 1 x 345 watts (4 speeds)
Total wattage: 353 watts
Mains supply: 230 volts 50 Hz
Connection: via a 13 amp fused spur outlet
fused at 5 amps

5 of 11
Electrical connections
Important: Ensure that the electricity supply is switched off before connecting.
FUSE RATING: 5 AMP
Your appliance must be connected to fixed wiring via the use of a
double pole switched fused spur outlet with at least 3mm contact
separation. We strongly recommend the appliance is connected by a
qualified electrician who is a member of the N.I.C.E.I.C. or Corgi who
will comply with the I.E.E. and any local regulations.
Note: The terminology “double pole” means that both the live and
neutral supplies are switched and disconnected at the same time.
The terminations labelled SUPPLY are for the internal house wiring
and the terminations labelled LOAD are for connection for the
appliance.
WARNING - THIS APPLIANCE MUST BE EARTHED
Important: The wires in this mains lead are coloured in accordance
with the following code:- Green/Yellow = Earth, Blue = Neutral, Brown
= Live
As the colours of the wires in the mains lead of this appliance may not correspond with the
coloured markings identifying the terminals in your spur box, proceed as follows:
The wire which is coloured green and yellow must be connected to the terminal which is marked
with the letter ‘E’ or by the earth symbol or coloured green or green and yellow. The wire which is
coloured blue must be connected to the terminal which is marked with the letter ‘N’ or coloured
black. The wire which is coloured brown must be connected to the terminal which is marked with
the letter ‘L’ or coloured red.
Height above Hotplates
For best performance we suggest that the hood is installed at a distance between 65cm to 75cm
from the hotplate surface. Under no circumstances should the hood be installed lower than 65cm
above the hotplate surface.
Ducting out / Filtering
The hood can be used as a filtering version or as a ducted version. It is always preferable to
install the hood as a ducted version i.e. duct to an outside wall. If this is not practical, charcoal
filters can be fitted. In the filtering mode the air drawn in is purified as it passes through the
charcoal filters, the air is then recycled back into the kitchen. It is realistic to assume that using a
hood in filtering mode will be less efficient than ducting out. Charcoal filters are an optional extra
and will require replacing after 120 hours of use or at least every 6 months. Charcoal filters are
not required if you duct out. If the hood is used as a filtering version, please note that the filters
will help reduce cooking odours but will not reduce steam or condensation. If you wish to reduce
steam, condensation and cooking odours then you must duct out.

6 of 11
We strongly recommend that the hood is only used as a filtering version if it is impossible to duct
out.
Ducting Information
To obtain the best possible extraction performance use 150mm diameter ducting. Wherever
possible utilise rigid circular pipe or “Mega duct” ducting. Both types are available via your
Britannia dealer. Do not use expanding concertina type ducting as this is not smooth on the
interior and can cause air flow restrictions. Do not use ducting that has a smaller diameter than
150mm as this will reduce extraction rates and can increase noise levels. Please note ducting kits
and ducting components are optional accessories and have to be ordered. They are not supplied
with the hood.
Maximum length of ducting run
4 metres with 1 x 90 degree bend
3 metres with 2 x 90 degree bends
2 metres with 3 x 90 degree bends
Note: the shorter the ducting run and the least number of bends gives the best extraction
performance.
Warning: Any ducting used must be fire retardant.

7 of 11
Unpacking the hood
On some models components are packed inside the polystyrene protection pieces. Do not throw away the
box and packaging until installation is fully completed.
Non-return flaps
On certain models only, there is a metal-hinged non-return flap in the outlet spigot of the hood where the
ducting attaches. The purpose of this flap is to prevent wind/weather from blowing back through the ducting
and hood and back into the kitchen. However, some ducting incorporates integral non-return flaps, often in
the form of hinged flap/s where the ducting terminates at the outside wall vent. You do not need two non-
return flaps in the system, so if this is the case remove the non-return flap sited in the hood outlet spigot - it
simply lifts out.
Installation
Attention:
The appliance should be installed by a qualified electrician or competent person.
The hood consists of three parts (picture 1):
1. Cooker hood body
2. Telescopic chimney
3. Black glass
If the hood is installed in filtering mode (rather than ducted out), the clean air will need to escape from the
hood through the holes (H) as indicated on picture 6. Make sure that these holes (H in picture 6) are free so
that the recycled air can escape.
The hood is supplied with all the necessary fastenings for its installation, which are suitable for most
surfaces. Please make sure the installation surface is strong enough.
4. Draw and drill the wall as in Picture 2.
5. Fix the screw anchors with the wall cupboard support on the wall (A).
6. Fix the support of the telescopic chimney (B) with screw anchors (C).
7. Put the screw anchors in the holes (D).
8. Fix the hood to the wall cupboard support (see point 2). You need two people for this operation.
9. Open the glass door and remove the filters. Block the equipment with two screws as in (E).
10. Place the telescopic chimney on the upper part of the hood and fix the support with screws as in (F).
Please note that there should be a 50mm gap between a hob and the Omaggio hood. This gap is not
required for installing the hood above a Britannia range cooker.

8 of 11
Operation
The hood is operated by touch control.
Operation of the hood:
1. Control TL turns the lights on/off.
2. Control T1 turns the hood on/off.
3. Controls T2, T3 and T4 should be pressed to increase the speed of the motor.
Using the timer:
To enable the timer, keep one of the buttons T1, T2, T3 or T4 pressed down for a few seconds until it starts
blinking. The motor will continue to run for a set time and then switch off:
T1 - The hood will switch off after 5 minutes.
T2 - The hood will switch off after 10 minutes.
T3 - The hood will switch off after 15 minutes.
T4 - The hood will switch off after 20 minutes.
Cleaning and maintenance
Always turn off the electricity supply before conducting any cleaning or maintenance. After installation,
remove the protective film and clean the hood following the instructions below.
Clean the glass with warm water and a small amount of washing up liquid in order to remove any grease.
Wipe the hood dry with a soft cloth to prevent water marks.
Use a reputable stainless steel cleaner for cleaning the stainless steel exterior of the hood and follow the
manufacturer's instructions.
The cooker hood must be cleaned frequently. Do not let dirt gather. Do not use acid or abrasive products.
Aluminium anti-grease filters
After 30 hours in operation, the leds of all speed buttons will switch on as a reminder to clean the anti-grease
filters. These can be cleaned by hand in hot soapy water or cleaned in a dishwasher. To reset the timer,
keep the the button T4 pressed for 2 seconds. If the timer is not reset, then all leds will switch on again after
the next time the hood is switched off.
Charcoal filters
After 120 hours in operations, the leds of all speed buttons will blink as a reminder to replace the charcoal
filters that are placed at the two ends of the motor. The charcoal filters can be replaced as follows:
1. Remove the metal anti-grease filters.
2. The charcoal filters can be taken off by turning the filters until they unfasten from the motor
(Picture 4 - G).
3. Place the new charcoal filters at the two ends of the motor and fasten them (by turning them around).
To reset the timer, keep button T4 pressed for 2 seconds. If the timer is not reset, then all leds will switch on
again after the next time the hood is switched off.
Please note that there is no need to replace charcoal filters if the hood is ducted out. When all speed buttons
blink, you only need to reset the timer by pressing button T4 for 2 seconds.
4.With the button T4, select the maximum speed of the extraction fan for 5 minutes (button blinking), after
which the extraction fan will automatically switch to the 3rd speed.
Note: if you select the maximum speed, after 5 minutes the extraction fan switches to the 3rd speed and will
automatically turn off at such speed.

9 of 11
Changing the LEDs
The LED lights can only be replaced by a qualified electrician. Britannia's service department will be happy to
assist (tel. 0870 863 8680 - Option 3).
Please note
The information contained in this booklet is given in good faith and has been written for the use of hoods
over Britannia domestic appliances. Some of the information may not be applicable for use with other makes
of appliances. We reserve the right to alter any design or specification without notice.

10 of 11
UK - Tel: 0870 863 8680 (Option 3)
Fax: 01253 471140
EIRE - Tel: 1850 302 560
EE
What the Guarantee covers
Our service division will repair or replace free of charge any defect or component that is due to
faulty material or workmanship, provided that such a defect occurs within 2 years of date of
purchase and that:
1 Our service division is notified promptly of any defects. Under the terms of the guarantee the appliance
must be made available for service during normal working hours, Monday to Friday.
2 The appliance is installed in accordance with these instructions and for normal domestic use.
3 The guarantee does not apply if the appliance is repaired or modified by any other person than a member
of our service division. The guarantee does not cover misuse, improper installation or any installation in
commercial premises. This product is for domestic use only.
Before calling for service, please check the following:
1 Is there a power failure? Turn on the appliance to check the mains supply.
2 Check that the fuse has not blown.
3 Please note that bulbs are not covered under the guarantee.
In the event of service being required, our service division will request the following information:
1 Your name, address and postcode.
2 Your telephone numbers for home and work.
3 The model number and colour of the appliance.
4 Precise details of the fault.
5 Date of purchase.
Please note that when the service engineer visits he will require seeing your proof of purchase date
so please retain your receipt.

11 of 11
1
3
2
4
Table of contents
Other Britannia Ventilation Hood manuals