Briteq bt-575w User manual

Version: 1.0
WWW.BEGLEC.COM
Copyright © 2007 by BEGLEC cva.
Reproduction or publication of the content in any manner, without express permission of the publisher, is prohibited.
BT-575W
Operation Manual
Mode d'emploi
Gebruiksaanwijzing
Bedienungsanleitung
Manual de instrucciones
EN
FR
NL
DU
ES

EN - DISPOSAL OF THE DEVICE
Dispose of the unit and used batteries in an environment friendly manner
according to your country regulations.
FR - DÉCLASSER L’APPAREIL
Débarrassez-vous de l’appareil et des piles usagées de manière écologique
Conformément aux dispositions légales de votre pays.
NL - VERWIJDEREN VAN HET APPARAAT
Verwijder het toestel en de gebruikte batterijen op een milieuvriendelijke
manier conform de in uw land geldende voorschriften.
DU - ENTSORGUNG DES GERÄTS
Entsorgen Sie das Gerät und die Batterien auf umweltfreundliche Art und
Weise gemäß den Vorschriften Ihres Landes.
ES - DESHACERSE DEL APARATO
Reciclar el aparato y pilas usadas de forma ecologica conforme a las
disposiciones legales de su pais.
PT - COMO DESFAZER-SE DA UNIDADE
Tente reciclar a unidade e as pilhas usadas respeitando o ambiente e em
conformidade com as normas vigentes no seu país.

ENGLISH OPERATION MANUAL
BRITEQ®1/68 BT-575W
OPERATION MANUAL
Thank you for buying this BriteQ®product. To take full advantage of all possibilities and for your own safety,
pleaseread theseoperating instructions very carefully before you start using this unit.
FEATURES
This unit is radio-interference suppressed. This product meets the requirements of the current European and
national guidelines. Conformity has been established and therelevant statements and documents havebeen
deposited by the manufacturer.
Powerful intelligent moving wash for use in discotheques,theater, studio and hiring companies
16 DMX channels: (Pan * tilt * speed * dimmer * shutter/strobe * color * Cyan * Magenta * Yellow * CMY
preset colors * CMY-speed * diagonal lens rotation + frost * zoom * pan 16bit * tilt 16bit * reset + remote
lamp on/off)
Can beused in Master/slave mode with built-in programsand optional CA-8 controller
Built-in menus with 4digitblue LEDdisplay
Smooth 540° panning and 270° tilt movements
CMY Colormixing: Cyan 0-100% * Magenta 0-100% * Yellow 0-100%
Extra color wheel with 9 dichroic colors
Selectable Frost filter and diagonal lens + DMX zoom 11° to 28°
Dimmer 0-100% + variablespeed strobe
Easily controlled by our Scanmaster 1612, iLEAD controller or any other DMX controller
BEFORE USE
Before you start using this unit, please check if there’s no transportation damage. Should there be any, do
not use the device and consult your dealer first.
Important: This device left our factory in perfect condition and well packaged. It is absolutely necessary
for the user to strictly follow the safety instructions and warnings in this user manual. Any damage caused
by mishandling is not subject to warranty. The dealer will not accept responsibility for any resulting defects
orproblems caused bydisregarding this user manual.
Keep this booklet in a safe place for future consultation. If you sell the fixture, be sure to add this user
manual.
Check the contents:
Check that the carton contains the following items:
BT-575W unit
Operatinginstructions
SAFETY INSTRUCTIONS:
CAUTION: To reduce the risk of electric shock, do not remove the top cover.
No user-serviceable parts inside. Refer servicing to qualified service
personnel only.
The lightning flash with arrowhead symbol within the equilateral triangle is intended to alert the use
or the presence of un-insulated “dangerous voltage” within the product’s enclosure that may be of
sufficient magnitude to constitute a risk of electric shock.
The exclamation point within the equilateral triangle is intended to alert the user to the presence of
important operation and maintenance (servicing) instructions in the literature accompanying this
appliance.
This symbol means: indoor use only.
Thissymbol means:Readinstructions.
CAUTION
ENGLISH OPERATION MANUAL
BRITEQ®2/68 BT-575W
This symbol determines: the minimum distance from lighted objects. The minimum distance between
light-output and the illuminated surface must be more than 1 meters.
To protect theenvironment, please try to recyclethe packing material as much as possible.
A new light effect sometimes causes some unwanted smoke and/or smell. This is normal and disappears
after some minutes.
To prevent fire or shock hazard, do not expose this appliance to rain ormoisture.
To avoid condensation to be formed inside, allow the unit to adapt to the surrounding temperatures when
bringing it into a warm room after transport. Condense sometimes prevents the unit from working at full
performance or may even cause damages.
This unit is for indoor use only.
Don’t placemetal objects or spill liquid inside the unit. Electric shock or malfunction may result. If a foreign
object enters the unit, immediately disconnect themains power.
Locate the fixture in a well ventilated spot, away from any flammable materials and/or liquids. The fixture
must be fixed at least 50cm fromsurrounding walls.
Don’t cover any ventilation openings as this mayresult in overheating.
Prevent use in dusty environments and clean the unit regularly.
Keep the unit away from children.
Inexperienced persons should not operatethis device.
Maximum save ambient temperature is 40°C. Don’t use this unit at higher ambient temperatures.
The units’ surface temperature may reach up to 85°C. Don’t touch the housing with bare hands during its
operation.
Make sure the area below the installation place is free from unwanted persons during rigging, de-rigging
andservicing.
Allow thedevice about 10 minutes to cool down before replacing the bulb or start servicing.
Always unplug the unit when it is notused for a longer time orbefore replacing thebulb or start servicing.
The electrical installation should be carried out by qualified personal only, according to the regulations for
electrical and mechanical safety in your country.
Check that the available voltage is not higher than the one stated on the rear panel of the unit.
The power cord should always be in perfect condition. Switch the unit immediately off when the power cord
is squashed or damaged. It must be replaced by the manufacturer, its service agent or similarly qualified
persons in order toavoid a hazard.
Never let the power-cord come into contact with other cables!
This fixture must be earthed toin order comply with safety regulations.
Don’t connect the unit to any dimmer pack.
Always use an appropriate and certified safety cable when installing the unit.
In order to prevent electric shock, do not open the cover. Apart from the lamp and mains fuse there are no
user serviceable parts inside.
Never repair a fuse or bypass the fuse holder. Always replace a damaged fuse with a fuse of the same
type and electrical specifications!
In the event of serious operating problems, stop using the fixture and contact your dealer immediately.
The housing and thelenses must be replaced if theyare visibly damaged.
Please usethe original packing when the device is to be transported.
Due to safety reasons it is prohibited to make unauthorized modifications to the unit.
Important: Never look directly into the light source! Don’t use the effect in the presence of persons suffering
from epilepsy.

ENGLISH OPERATION MANUAL
BRITEQ®3/68 BT-575W
LAMP (RE)PLACEMENT
In case of replacement of the lamp or maintenance, do not open the fixture within 10
minutes until the unit cools down after switching off. Always unplug the unit before
servicing! Always use the same type of spare parts (bulbs, fuses, etc.) When replacing
parts, please only genuine spare parts.
Switch off the main supply and unplug the unit.
Wait for about 15 minutes until the unit has been cooled down.
Open the lamp compartment on the back of the fixture by unscrewing screws X, Y and Z ( A and B on the
picture below)
Remove the old lamp (never handle the lamp when it is hot)
Attention! Check the label on thebackside of the device or see the technical specifications in this manual
to knowwhich lamp should be used. Never install lampswith a higher wattage!
Don’t touch the bulb with bare hands! This drastically shortens the lifespan of the lamp.If you touched the
lamp, clean it with a cloth and a little denatured alcohol. Wipe the lamp off before installing.
Put the new lampback inside the unit.Be sure that the wiresdon’t touch the lamp.
Close the lamp compartment with the 3 screws X, Y and Z
Make sure the lamp is located in the center of the reflector for the best spot. Switch the unit on and adjust
lamp position by screws A, B and C, located on the back of the head. ( B on thepicture below)
Done!
OVERHEAD RIGGING
Important: The installation must be carried
out by qualified service personal only.
Improper installation can result in serious
injuries and/or damage to property.
Overhead rigging requires extensive
experience! Working load limits should be
respected, certified installation materials
should be used, the installed device
should be inspected regularly for safety.
Make sure the area below the installation
place is free from unwanted persons during
rigging,de-rigging andservicing.
Locate the fixture in a well ventilated spot, far
ENGLISH OPERATION MANUAL
BRITEQ®4/68 BT-575W
away from any flammable materials and/or liquids. The fixture must be fixed at least 50cm from
surroundingwalls.
The deviceshould be installed out of reach of people and outside areas where persons may walk by or be
seated.
Before rigging make sure that the installation area can hold a minimum point load of 10times the device’s
weight.
Always use a certified safety cable that can hold 12times the weight of the device when installing the unit.
This secondary safety attachment should be installed in a way that no part of the installation can drop
more than 20cm if the main attachment fails.
The device should bewell fixed; a free-swinging mountingisdangerous and maynot be considered!
Don’t cover any ventilation openings as this mayresult in overheating.
The operator has to make sure that the safety-relating and machine-technical installations are approved by
an expert before using them for the first time. The installations should be inspected every year by a skilled
person to be sure that safety is still optimal.
HOW TO SET UP THE UNIT
CONTROL PANEL:
1. DISPLAY shows the various menus and the selected functions.
2. LEDS DMX On DMXinput present
MASTER On Master mode
SLAVE On Slavemode
SOUND Flashing Soundactivation
3. BUTTONSMENU To selectthe programmingfunctions
DOWN To go backward in the selected functions
UP To go forward in the selected functions
ENTER To confirm the selected functions

ENGLISH OPERATION MANUAL
BRITEQ®5/68 BT-575W
4. REMOTE CONTROL INPUT: Used to connect a simple CA-8 hand controller whilethe unit is used in
standalone or master/slave mode.
5. SENSITIVITY: Used to adjust the sensitivityof the micro when the unit is used in standaloneor
master/slave mode.
6. DMX INPUT/OUTPUT: used for DMX512 linking. Use good quality 3pin XLR M/F balanced cable tolink
the units together.
MAINMENU:
To select any of the pre-set functions, press the MENU button up to when the required one is shown on
thedisplay.
Select the function with the ENTER button. The display will blink.
Use DOWN and UP button to change the mode.
Once the required mode has been selected, press the ENTER button to select. After8 seconds the display
will automatically return to the main functions without any change. To go back to the functions without any
change pressthe MENU button. The main functions areshown on the right.
DMX512AddressSetting
Used to set the starting address in a DMXsetup.
Press the MENU button until is shown on the
display.
Press theENTER button, thedisplay starts blinking.
Use DOWN and UP buttons to change the DMX512
address.
Once the correct address shows on the display,
press the ENTER button to save it.
(or automatically return to the main functions without
any change after 8 seconds)
To go back to the functions without any change
press theMENU button again.
ChannelMode
Press the MENU button until is shown on the
display.
Press the ENTER button so the display starts
blinking.
Use DOWN and UP button to select the (16
Channel ) or (8Channel) mode.
Once the mode is selected, press the ENTER button
tosetup
( or automatically return to the main functions
without any change after 8 seconds. )
To go back to the functions without any change
press the MENU button again.
Show Mode
Used to choose the Show mode when used in
standalone or master/slave mode.
Press the MENU button until is showing on
thedisplay.
Press theENTER button, thedisplay starts blinking.
Use DOWN and UP buttons to select (show 1), (show 2), (show 3) or (show
4) mode.
Once the right mode shows on the display, press the ENTER button tosave it.
(or automatically return tothe main functions without any change after 8 seconds)
To go back to the functions without any change press the MENU button again.
ENGLISH OPERATION MANUAL
BRITEQ®6/68 BT-575W
Show 1 mode- Fixture is placed on the floor. Tiltmovement angle210°.
Show 2mode-Fixture is fixed under ceiling. Tilt movement angle 90°.
Show 3 mode - Fixture is placed on a podium, in front of the audience
The spotis always projecting tothe audience’s direction;i.e in front of the stage. Pan movement
angle (left to right to left ): 160°. Tilt movement angle: 90° ( 60° above horizon; 30° belowhorizon.)
Show 4mode - Fixture is fixed under ceiling.
The spot is mainly projecting in front of the stage. Pan movement angle ( left to right to left ) :160°.
Tilt movement angle: 90° ( vertically, front 75°; back 15° )
SlaveMode
Used to make the slave unit work in opposite to the master or to work in complete sync.
Press the MENU button until is shown on the display.
Press theENTER button, thedisplay starts blinking.
UseDOWN and UP button to select (normal) or (2 lightshow)mode.
Once the mode has been selected, press the ENTER button save it.
(or automatically return tothe main functions without any change after 8 seconds)
To go back to the functions without any change press the MENU button again.
Blackout Mode
Blackout mode: when no DMX-signal is detected, the unit goes in blackout and waits for the DMX-
signal.
No blackout mode: when no DMX-signal is detected, the unit automatically switches to standalone
mode.
Press the MENU button until is shown on the display.
Press theENTER button, thedisplay starts blinking.
Use DOWN and UP button to select (yes blackout) or (no blackout) mode.
Once the mode has been selected, press the ENTER button to save it.
(or automatically return to themain functions without any change after 8 seconds)
To go back to the functions without any change press the MENU button again.
PanInversion
Normal: Panning movement is notinversed.
Pan inversion: Panning movementis inversed
Press the MENU button until is shown on the display.
Press theENTER button, thedisplay starts blinking.
Use DOWN and UP button to select (normal) or (pan inversion) mode.
Once the mode has been selected, pressthe ENTER button to save it.
(or automatically return to themain functions without any change after 8 seconds)
To go back to the functions without any change press the MENU button again.
Tilt Inversion
Normal: Tilt movement isnot inversed.
Tilt inversion: tilt movementis inversed
Press the MENU button until is shown on the display.
Press theENTER button, thedisplay starts blinking.
Use DOWN and UP buttons to select (normal) or (tilt inversion) mode.
Once the mode has been selected, pressthe ENTER button to save it.
(or automatically return to themain functions without any change after 8 seconds)
To go back to the functions without any change press the MENU button again.

ENGLISH OPERATION MANUAL
BRITEQ®7/68 BT-575W
Led Display
Display on: display is always on.
Display off:display is off when not used.
Press theMENU button until the display shows .
Press theENTER button, thedisplay starts blinking.
Use DOWN and UP buttons to select (display always on) or (display off when not used).
Once the mode has been selected, press the ENTER button to save it.
(or automatically return to themain functions without any change after 8 seconds)
To go back to the functions without any change press the MENU button again.
Display Inversion
Display normal: display is readable when the unit is on the floor.
Display inversion: display is readable when the unitis mounted upside down.
Press the MENUbutton until is blinking on the display. (normal display)
Use the ENTER button to change to the mode (display inversion), the option will be automatically
stored after8 seconds.Or press theENTER button again return to the mode (normal display).
To go back to the functions press the MENU button.
Focus Adjust
Used to help you adjusting the focus of the light beam .
Press theMENU button until the display shows .
Press theENTER button, thedisplay starts blinking.
Use DOWN and UP button toselecta value between 0 and 255.
Once the value has been selected, press the ENTER button tosetup
(or automatically return to themain functions without any change after 8 seconds. )
To go back to the functions without any change press the MENU button again.
Self-Test
Used to activate the internal “self-test” program which shows all possibilities of the unit.
Press theMENU button until is blinking on the display.
Press the ENTER button to start theinternal self-test program.
To go back to the functions press the MENU button.
Ambient temperature of lamp
Used toshow the temperature inside the lampcompartment
Press theMENU button until the sign is blinking on the display.
Press the ENTER buttonand the ambient temperature of lamp will show on the display.
To go back to the functions press theMENU button again.
Fixture Hours
Used to show the number of working hours of the unit.
Press theMENU button until is blinking on the display.
Pressthe ENTER button to showthe number of working hours in thedisplay.
To go back to the functions press the MENU button.
ENGLISH OPERATION MANUAL
BRITEQ®8/68 BT-575W
Lamp Display
Used to switch the lamp ON/OFF so you can cool the lamp with the internal fans before
transportation
Press theMENU button until is blinking on thedisplay.
Press ENTER button so the display starts blinking.
Use DOWN and UP button to selectthe (Lamp on) or (Lamp off) mode.
Once the mode is selected, pressthe ENTER button tosetup
(or automatically return to the main functions without any change after 8 seconds)
To go back to the functions without any change press the MENU button again.
Lamp Mode
Press the MENU button until the is showing on thedisplay.
Press ENTER button so the display starts blinking.
Use DOWN and UP button to select the ( Lamp modeon ) or ( Lamp mode off ) mode.
Once the mode has been selected, press the ENTER button tosetup
(or automatically return to themain functions without any change after 8 seconds.)
To go back to the functions without any change press the MENU button again.
Reset
Used to force a reset of the unit.
Press theMENU button until isblinking on the display.
Press the ENTER to reset all channels to theirstandard position.
To go back to the functions press the MENU button.
Pleasealso check the chapter about the DMX-channel configuration of the unit to find out how you can force
a reset by DMX.
HOME POSITION ADJUST
Press MENU button for at least 5
seconds to go into offset mode
Now you can adjust the home position
( this is thezero position )
When you want to adjust gobo and
color home position, you should run
mode first
The functions are shown below:
Panoffset
Press the MENU button for at least 5
seconds to activate offset mode
Use DOWNand UP buttons until is shown on the display.
Press the ENTER button so the display starts blinking.
Use DOWN and UP button to adjust the pan homeposition.
Once the position has is selected, press the ENTER button to setup OR Automatically return to the offset
functions withoutany changes by pressing the MENU button
To go back to themain functions without anychange wait 8seconds.
Tilt offset
Press theMENU button for at least 5 seconds to activate offset mode
Use DOWNand UP button until is shown on the display.
Press theENTER button so the display starts blinking.
Use DOWN and UP button to adjust the tilt home position.

ENGLISH OPERATION MANUAL
BRITEQ®9/68 BT-575W
Once the position has is selected, press the ENTER button tosetup OR Automatically return to the offset
functions without anychanges by pressing the MENU button
To go back to the main functions without any change wait 8 seconds.
Color offset
PresstheMENU button forat least 5 seconds to activate offset mode
Use DOWNand UP button until is shown on the display.
Press the ENTER button sothe display starts blinking.
Use DOWN and UP button to adjust the color homeposition.
Once the color is selected, press the ENTER button to setup OR automatically return to the offset
functions without anychanges by pressing the MENU button
To go back to the main functions without any change wait 8 seconds.
Dimmer offset
PresstheMENU button forat least 5 seconds to activate offset mode
use DOWN and UP button until the is shown on thedisplay.
Press the ENTER button sothe display starts blinking.
Use DOWN and UP button to adjust the dimmer home position(0~255).
Once the mode has been selected, press the ENTER button to setup or automatically return to the offset
functions without any change press the MENU button again.
To go back tothe main functions without any change after 8 seconds.
HOW TO CONNECT THE UNIT BY DMX
The DMX-protocol is a widely used high speed signal to control intelligent light equipment.
You need to “daisy chain” your DMX controller and all the connected light effects with a
goodquality XLR M/F balanced cable. To prevent strange behavior of the light effects, due
to interferences, you must use a 90Ωto 120Ωterminator at the end of the chain. Never
use Y-splitter cables, this simply won’t work!
Each light effect in thechain needs tohave its proper starting address so it knows which commands from the
controller it has to decode.
ENGLISH OPERATION MANUAL
BRITEQ®10/68 BT-575W
HOW TO SET THE THE RIGHT STARTING ADDRESS:
Refer to theprevious chapter (DMX-512 address setting) to learn how toset the starting address on this unit.
The starting address of each unit is very important. Unfortunately it is impossible to tell you in this user
manual which starting addresses you haveto set because this completely depends on the controller you will
use… So please refer to the user manual of your DMX-controller to find out which starting addresses you
must set.
DMX-CONFIGURATION OF BT-575W:
16 channel modus

ENGLISH OPERATION MANUAL
BRITEQ®11/68 BT-575W
The values below will beeffective after about five seconds:
For DMX reset, put DMX value of CH-16 to200-209
For DMX lamp on, put DMX value of CH-16 to 130-139.
For DMX lamp off, put DMX value of CH-16 to 230-239.
8 channel modus
HOW TO OPERATE THE UNIT
Every time you turn the unit on, it will show575U on the display and move all the motors to their ‘home’
position and you may hear some noises for about 20 seconds. After that the unit will be ready to receive
DMX signal or run the built-in programs.
YOU CAN OPERATE THE UNIT IN FOUR WAYS:
oBy master/slave built-in preprogram function
oBy CA-8 easy controller
oBy universalDMX controller ( 8 & 16 channel DMX mode )
oBy iLead controller ( The BT-575W must beswitched to8 channel DMX
mode )
BY MASTER/SLAVE BUILT-IN PREPROGRAM FUNCTION:
Select this function when you want an instant show. By linking the units in master/slave
connection, the first unit will control the other units to give an automatic, sound activated,
synchronized light show. Its DMX input will have nothing plugged into it, and its master-
LED will be constantly on and sound-LED will flash tothe music.
Important! This function only works when the blackout mode in the menu of the
master is set to OFF, otherwise nothing will happen! Read more about this option in
the “MainMenu” paragraph.
ENGLISH OPERATION MANUAL
BRITEQ®12/68 BT-575W
MASTER has 4 built-in shows: You can select (show1), (show2), (show3) or
(show4) directly in the menu of the master.
SLAVES have 2 workingoptions: The other units are set to slave mode (slave-LED is constantly on).
In order to create a great light show you can introduce contrast movements (pan/tilt of slave is
inversed) In the menu of theslave units you can go to option and select:
oNormalslave: slave works in sync with themaster.
o2 lightshow: slave works in oppositewith themaster.
BY EASY CONTROLLER:
When used in Master/slave mode we strongly advice you to use the CA-8 “Easy controller” Just connect
this small controller to the 1/4” jack of the master unit, and you will be able to control the following
FUNCTIONS:
Stand by Blackout the unit
Function
Strobe
1.Gobo/Color sync. strobe
2.Sync. strobe
3.Two-lightstrobe
X/Y moving show
modeselection
( Show 1 ~Show 4 )
Color selection X/Y moving setting
1.Pan position
2.Tilt position
3.Dimmer
First set Masterunit, then set
Slaveunits’ position.
Mode Sound 1
(LED off ) Sound2
(LED normal
blinking)
Slow/Sound 3
(LED on) Position/ Latch
(LED fastblinking)
MAINTENANCE
Make surethe area below the installation place is free from unwanted persons during servicing.
Switch off the unit,unplug the mains cable and waituntil theunit has been cooled down.
During inspection the following points should be checked:
All screws used for installing the device and any of its parts should be tightly fastened and may not be
corroded.
Housings, fixations and installations spots (ceiling, truss, suspensions) should be totally free from any
deformation.
When an optical lens is visibly damaged due to cracks or deep scratches, it must be replaced.
The mains cables must be in impeccable condition and should be replaced immediately when even a
small problem is detected.
In order to protect the device from overheat the cooling fans (if any) and ventilation openings should be
cleaned monthly.
The interiorof the device should be cleaned annually using a vacuum cleaner or air-jet.
The cleaning of internal and external optical lenses and/or mirrors must be carried out periodically to
optimize light output. Cleaning frequency depends on the environment in which the fixture operates: damp,
smoky or particularly dirty surroundings can cause greater accumulation of dirt on the unit’s optics.
Clean with a softcloth using normal glass cleaning products.
Always dry the parts carefully.
Clean the externaloptics at least onceevery 30 days.
Clean the internaloptics at least every 90 days.
Attention: Westrongly recommend internal cleaning to be carried out by qualified personnel!

ENGLISH OPERATION MANUAL
BRITEQ®13/68 BT-575W
SPECIFICATIONS
Mains Input: AC 230V, 50Hz
Fuse: 10 A/250V
Sound Control: Internal microphone
Pan/Tilt: 540° / 270° withautomatic correction
Beam angle: 11-28°
DMX connections: 3pin XLR male / female
Lamp: MSR575/2
Size: 428 x 387 x491mm
Weight: 30,5 kg
Every informationis subject to change without prior notice
You can download the latest version of this user manual on our website: www.beglec.com
FRANCAIS MODE D’EMPLOI
BRITEQ® 14/68 BT-575W
Merci d’avoir choisi ce produit BriteQ®. Pour votre sécurité et pour une utilisation optimale de toutes les
possibilités de l’appareil, lisez attentivement cette notice avant utilisation.
EN VOUS INSCRIVANT POUR LA LETTRE D’INFORMATION VOUS SEREZ TOUJOURS
TENU AU COURANT DES DERNIERES NOUVELLES CONCERNANT NOS PRODUITS:
NOUVEAUTES, ACTIONS SPECIALES,JOURNEES PORTES OUVERTES, ETC.
SURFEZ SUR: WWW.BEGLEC.COM ET INSCRIVEZ-VOUS
CARACTERISTIQUES
Cet appareil ne produit pas d’interférences radio. Il répond aux exigences nationales et européennes. La
conformité aété établieet les déclarations et documents correspondants ont été déposés parle fabricant.
Lyre wash puissante et intelligente pour une utilisation dans les discothèques, théâtres, studios et pour les
sociétés de location.
16 canaux DMX: (pan * tilt * vitesse * dimmer * shutter/strobo * roue couleurs * Cyan * Magenta * Jaune *
couleurs CMJ préréglées * vitesse CMJ * rotation de la lentille en diagonale + Frost * zoom * pan 16 bit *
tilt 16 bit * remise à zéro +mise en et hors service de la lampe à distance)
Peut être utilisé en modeMaître/Esclave grâce à ses programmes et son micro intégrés
Menus intégrés avec écran LEDbleu à 4 caractères
Mouvements pan de 540° ettilt de 270° sans saccades
Mixage de couleurs CMY (CMJ): Cyan 0-100% * Magenta0-100% * Jaune0-100%
Roue decouleurs supplémentaireà 9couleurs dichroïques
Sélection du filtre Frost et lentille diagonale
Gradation 0-100% + stroboscope à vitessevariable
Angle du faisceau ajustable (zoom) par DMX 11°- 28°
Solide boîtier stylé en matière composite
Un contrôleur CA-8 est disponible en option pour différents modesd'exploitation etfonctions
Facilement pilotableavec le “Scanmaster 1216”, la iLEAD ou autresconsoles DMX.
AVANT UTILISATION
Avant d’utiliser cet appareil, assurez-vous de l’absence de dommages liés au transport. En cas
d’endommagement, n’utilisez pas l’appareil et contactez le vendeur.
Important: Cet appareil a quitté notre usine en parfaite condition et bien emballé. Il est primordial que
l’utilisateur suive les instructions de sécurité et avertissements inclus dans ce manuel. La garantie ne
s’applique pas en cas de dommage lié à une utilisation incorrecte. Le vendeur ne prend pas la
responsabilité des défauts ou de tout problème résultant du fait de n’avoir pas tenu compte des mises en
garde de ce manuel.
Conservez ce manuel dans un endroit sûr pour toute consultation future. Si vous vendez l’appareil,
assurez-vous d’y joindre ce manuel également.
Vérifiez le contenu:
Vérifiez si l’emballage contient les articles suivants:
Moded'emploi
Appareil BT-575W

FRANCAIS MODE D’EMPLOI
BRITEQ® 15/68 BT-575W
CAUTION
INSTRUCTIONS DE SECURITE:
ATTENTION: afin de réduire le risque d’électrocution, n’enlevez jamais le
couvercle de l’appareil. Il n’y a aucune pièce à l’intérieur de l’appareil que
vous pouvez remplacer vous-même. Confiez l’entretien uniquement à des
techniciensqualifiés.
La flèche dans un triangle met l'utilisateur en garde contre la présence de haute tension sans
isolation dans l'appareil qui peut causer un risqued'électrocution.
Un point d'exclamation dans un triangle prévient de la présence d'instructions de fonctionnement et
de maintenance se trouvant dans le manuel, fourniavec l'appareil.
Ce symbole signifie:uniquement pourusage àl'intérieur
Ce symbole signifie: Lire lemode d’emploi.
Ce symbole détermine: la distance minimum des objets allumés. La distance minimum entre le
projecteur et la surface à éclairerdoit être plus de 1 mètre.
Afin de protéger l’environnement, merci de recycler les emballages autant que possible.
Un nouvel effet lumière peut provoquer de la fumée et/ou une odeur non souhaitée, disparaissant après
quelquesminutes.
Afin d’éviter tout risque d’incendie ou de choc électrique, ne pas exposer cet appareil à la pluie ou l’humidité.
Pour éviter la formation de condensation à l’intérieur de l’appareil, patientez quelques minutes pour laisser
l’appareil s’adapter à la température ambiante lorsqu’il arrive dans une pièce chauffée après le transport. La
condensation empêchel’unité de fonctionner en performance optimale et peut même causer des dommages.
Cette unité est destinée à une utilisation à l’intérieur uniquement.
Ne pas insérer d’objet métallique ou verser un liquide dans l’appareil. Aucun objet rempli de liquides, tels que
des vases, ne peut être placé sur cet appareil. Risque de choc électrique ou de dysfonctionnement. Si un corps
étranger est introduit dans l’unité, déconnectez immédiatement de la source d’alimentation.
Aucune source de flamme nue, telle que les bougies allumées, ne peut être placée sur l'appareil.
Placez l’appareil dans un endroit bien ventilé, éloigné de tout matériau ou liquide inflammable. L’appareil doit
être fixé à 50cm minimum desmurs.
Ne pas couvrir les ouvertures de ventilation, un risque de surchauffe en résulterait.
Ne pas utiliser dans un environnement poussiéreux et nettoyez l’unité régulièrement.
Ne pas laisser l’unité à portée des enfants.
Les personnes non expérimentées ne doivent pas utiliser cet appareil.
La température ambiante maximum d’utilisation de l’appareil est de 40°C. Ne pas l’utiliser au-delà de cette
température.
La température des parois de l’unité peut atteindre 85°C. Ne pas toucher la coque à mains nues en cours de
fonctionnement.
Assurez-vous que la zone au-dessous du lieu d’installation ne comporte pas de personnes indésirables pendant
le montage, le démontage et les opérations de maintenance.
Laissez l’appareil refroidir environ 10 minutes avant de remplacer l’ampoule ou d’effectuer des réparations.
Débranchez toujours l’appareil si vous ne l’utilisez pas de manière prolongée avant de changer une ampoule ou
d’entreprendre des réparations.
Les installations électriques ne peuvent être faites que par du personnel qualifié et conformément aux
régulations de sécurité électrique et mécanique en vigueur dans votre pays.
Assurez-vous que la tension d’alimentation de la source d’alimentation de la zone dans laquelle vous vous
trouvez ne dépasse pas celui indiqué à l’arrière de l’appareil.
Le cordon d’alimentation doit toujours être en parfait état. Mettez immédiatement l’unité hors tension si le cordon
devait être écrasé ou endommagé. Pour éviter tout risque de choc électrique, le cordon doit être remplacé par
le constructeur, son agent ou un technicien qualifié.
Ne laissez jamais le cordon d’alimentation entrer en contact avec d’autres câbles !
L’appareil doit être à la masse selon les règles de sécurités.
Ne pas connecter l’unité à un variateur de lumière.
Utilisez toujours les câbles appropriés et certifiés lorsque vous installez l’unité.
Pour éviter tout choc électrique, ne pas ouvrir l’appareil. En dehors des ampoules et du fusible principal, il n’y a
pas de pièces pouvant êtrechangées par l’utilisateur à l’intérieur.
Ne jamais réparer ou court-circuiter un fusible. Remplacez systématiquement un fusible endommagé par un
fusible de même type et ayant les mêmes spécifications électriques !
En cas de problèmes de fonctionnement sérieux, arrêtez toute utilisation de l’appareil et contactez votre
revendeur immédiatement.
FRANCAIS MODE D’EMPLOI
BRITEQ® 16/68 BT-575W
La coque et les lentilles doivent être remplacées si visiblement endommagées.
Utilisez l’emballage d’origine si l’appareil doit être transporté.
Pour des raisons de sécurité, il est interdit d’apporter toute modification à l’unité non spécifiquement autorisée
par les parties responsables.
Important: Ne jamais fixer directement la source de lumière ! Ne pas utiliser d’effets en présence de personnes
souffrant d’épilepsie.
MISE EN PLACE / REMPLACEMENT DES AMPOULES
En cas d’opération de maintenance ou de remplacement des ampoules, ne pas ouvrir
l’installation dans les 10 minutes suivant la fin de l’utilisation jusqu’à ce que l’appareil
ait refroidi. Débranchez systématiquement l’appareil avant toute opération de
maintenance. Utilisez toujours le même type de pièces (ampoules, fusibles, etc.) Lors
du remplacement, n’utilisez que des pièces d'origine.
Coupez l’alimentation et débranchez l’appareil.
Attendez environ 15 minutes jusqu’à ce que l’appareil aitrefroidi.
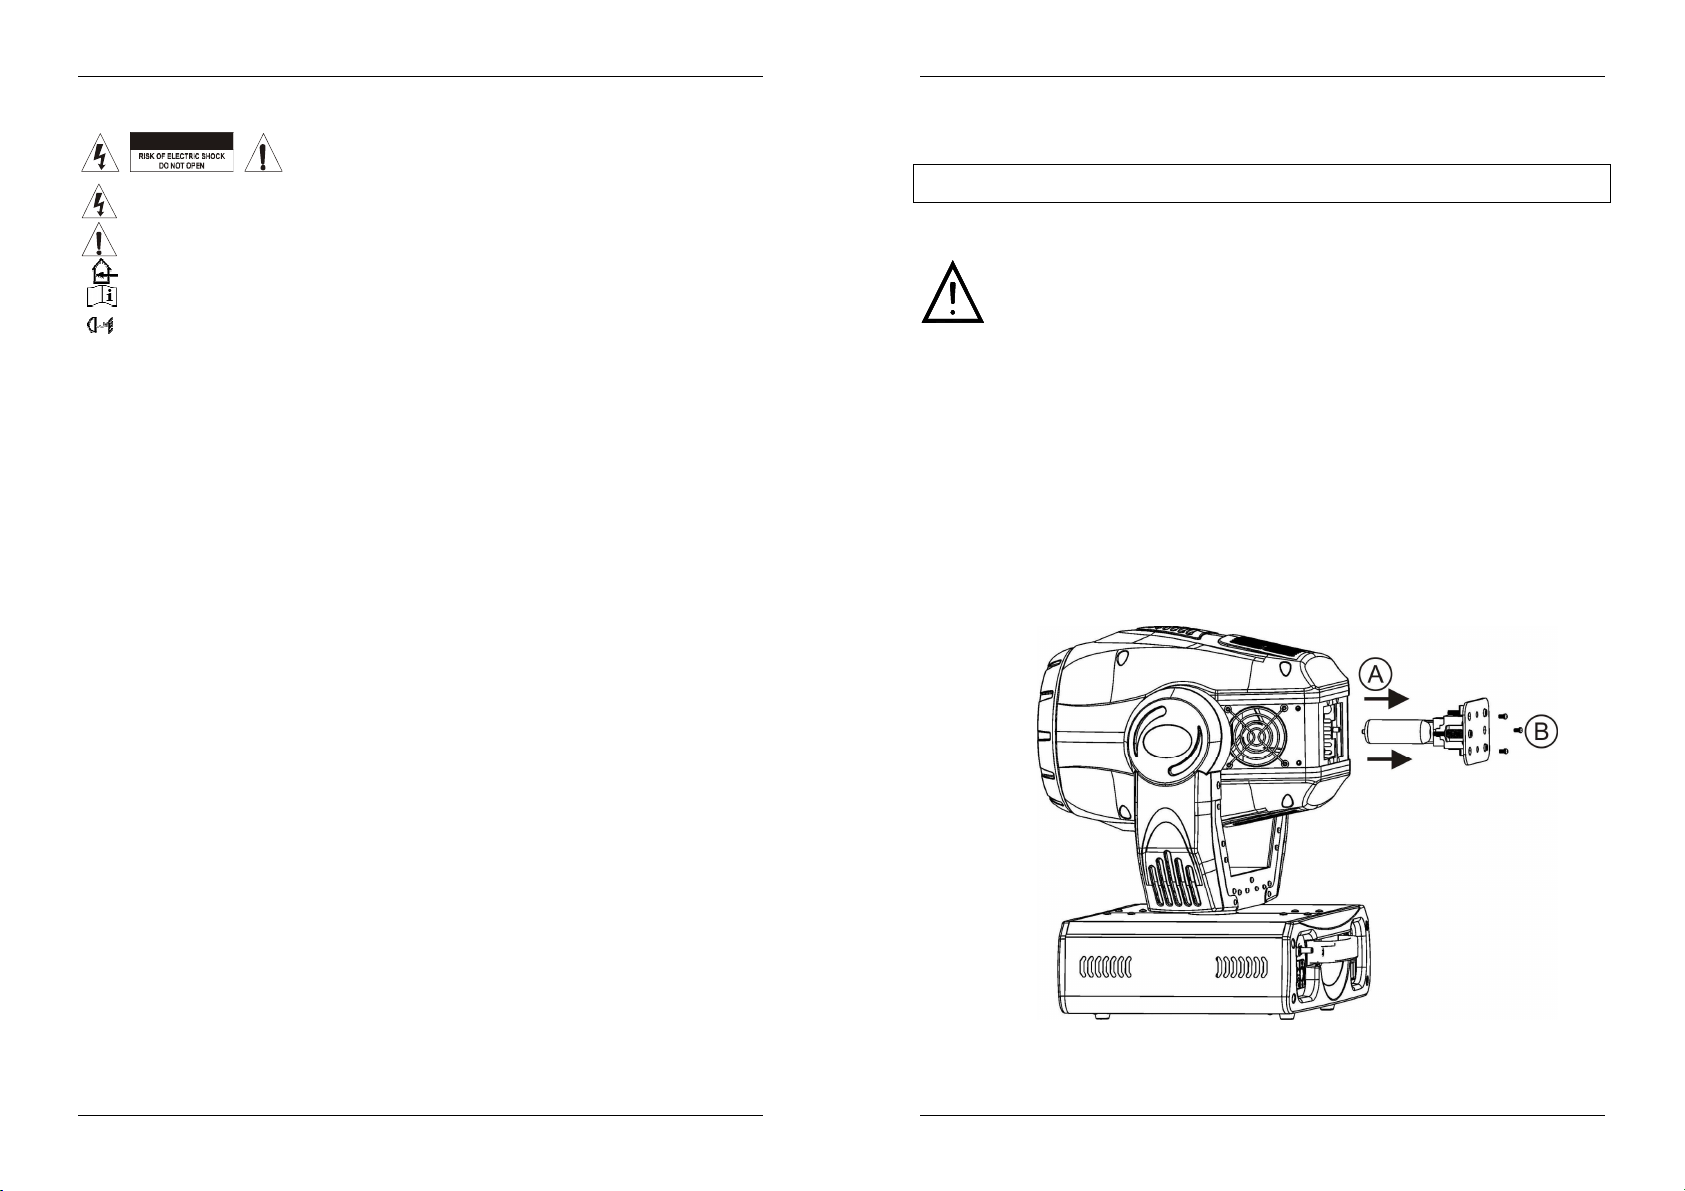
Ouvrez le compartiment de la lampe situé à l'arrière de l'appareil en dévissant lesvis X, Y et Z (A et B sur
la figure ci-dessous.
Retirez la lampe usagée (ne manipulezjamais la lampe tantqu’elle est chaude)
Attention! Reportez-vous à l’étiquette à l’arrière de l’appareil ou aux spécifications techniques de ce
manuel pour savoir quelle ampoule utiliser. Ne jamais installerd’ampoules à puissanceplus élevée!
Ne touchez pas l’ampoule à mains nues ! Cela réduit considérablement la durée de vie de l’ampoule. Si
vous avez touché l’ampoule, nettoyez-la à l’aide d’un chiffon et un peu d’alcool dénaturé. Frottez
l’ampoule avant del’installer.
Remettez la nouvelleampoule dans l’appareil. Assurez-vous que les fils ne touchent pas l’ampoule.
Refermez le compartiment de la lampe au moyen des 3 vis X, Y et Z.
Assurez vous que la lampe soit bien placée au centre du réflecteur afin de lui garantir un rendement
optimal. Allumez l'appareil et ajustez la position de la lampe. Utilisez à cet effet les vis A, B et C situées à
l'arrière de l'appareil. (B sur lafigure ci-dessous)
Voilà, tout est prêt !

FRANCAIS MODE D’EMPLOI
BRITEQ® 17/68 BT-575W
INSTALLATION EN HAUTEUR
Important: L’installation doit être faite par du
personnel qualifié uniquement. Une
installation incorrecte peut causer des
blessures sévères et/ou endommager
l’appareil. L’installation en hauteur exige de
l’expérience ! Les limites de charge doivent
être respectées, du matériel d’installation
certifié doit être utilisé, et l’appareil installé
doit subir des inspections de sécurité
régulièrement.
Assurez-vous que la zone au-dessous du lieu
d’installation ne comporte pas de personnes
indésirables lors de l’installation, la désinstallation
ou lamaintenance.
Placez l’appareil dans un endroit bien ventilé, éloigné de tout matériau ou liquide inflammable. L’appareil
doit être fixé à 50cm minimum des murs à l’entour.
L’appareil doit être hors de portée du public et en dehors des zones de passage de personnes ou des
zones où le publicest installé.
Avant l’installation assurez-vous que la zone d’installation supporteun point localisé minimum de 10 fois le
poids de l’appareil.
Utilisez systématiquement un câble de sécurité qui peut supporter 12 fois le poids de l’appareil lors de
l’installation. Ce câble de sécurité secondaire doit être installé de manière à ce qu’aucune partie de
l’appareil ne puisse descendre de plus de 20 cm si le support principal tombe.
L’appareil doitêtre bien fixé, un montageà balancement est dangereux et nedevrait pasêtre considéré !
Ne pas couvrir les ouvertures de ventilation pour éviter tout risque de surchauffe.
L’utilisateur doit s’assurer que les installations techniques et de sécurité sont bien approuvées par un
expert avant la première utilisation. Les installations doivent être inspectées chaque année par du
personnel qualifiépour assurer une sécurité optimale.
COMMENT REGLER L’APPAREIL
PANNEAU DE CONTRÔLE:
1. ECRAN affiche les différents menus et les fonctions sélectionnées.
2. LEDS
FRANCAIS MODE D’EMPLOI
BRITEQ® 18/68 BT-575W
DMX Allumé Présenced’unsignalDMX
MASTER Allumé Mode maître
SLAVE Allumé Mode esclave
SOUND Clignote Activationmusicale
3. TOUCHESMENU Pour sélectionner les fonctions de programmation
DOWN Pour reculer dansles fonctions sélectionnées
UP Pouravancer dansles fonctions sélectionnées
ENTER Pour confirmerla fonction sélectionnée
4. ENTREE POUR LE CONTROLEUR A DISTANCE : connectez le contrôleur à distance optionnel (CA-8)
via l'entrée jack¼" afin decontrôler l'appareil au niveau du stand by, de la fonction et du mode.
5. SENSITIVITY: vous pouvez régler la sensibilité du micro si vous utilisez cet appareil de façon autonome
ou en mode maître/esclave.
6. DMX IN/OUT: est utilisé pour les configurations en DMX512. Utilisez des câbles symétriques XLR M/F
à 3 broches de bonne qualité pour relier les appareils entre eux.
MENU PRINCIPAL:
Pour sélectionner une des fonctions pre-set, appuyez
sur la touche MENU jusqu’à ce que la fonction que
vous désirezapparaisse àl’écran.
Sélectionnez la fonction à l’aide de la touche ENTER.
L’écranclignotera.
Utilisez les touches DOWN et UP pour changer de
mode.
Dès que vous avez sélectionné le mode requis,
appuyez sur la touche ENTER pour confirmer. Après
8 secondes l’écran retournera automatiquement aux
fonctions principales sans avoir modifié quoi que ce
soit. Pour retourner aux fonctions sans effectuer de
changements, appuyez sur la touche MENU. Les
fonctions principales sont affichées à droite.
Reglagedel’adresse DMX512
Est utilisé pour régler l’adresse de départ dans une
configuration DMX.
Appuyez sur la touche MENU jusqu’à ce que
soit affiché à l’écran.
Appuyez sur la touche ENTER, l’écran commence à
clignoter.
Utilisez les touches DOWN et UP pour changer
l’adresseDMX512.
Quand l’adresse désirée est affiché à l’écran,
appuyez sur la touche ENTER pour confirmer votre
choix.
(Où il retournera automatiquement aux fonctions
principales sans aucune modification après 8
secondes)
Pour retourner aux fonctions sans effectuer de
changements, appuyez à nouveau sur la touche
MENU.

FRANCAIS MODE D’EMPLOI
BRITEQ® 19/68 BT-575W
Channel Mode (Mode canal)
Appuyez sur le bouton MENUjusqu'à ce que les lettres soient affichées par l'écran.
Appuyez sur le bouton ENTER, ce qui apour conséquenceque l'écran commence à clignoter.
Utilisez les boutons DOWN et UP pour sélectionner l'un des deux modes : (16 canaux) ou
(8 canaux).
Une fois que le mode est sélectionné, appuyez sur le bouton ENTER pour confirmer (ou vous retournerez
vers les fonctions principales si aucune activité n'est détectée par l'appareil pendant 8 secondes ).
Pour retourner vers les fonctions sans effectuer de changements, appuyez de nouveau sur le bouton
MENU.
Show Mode
Est utilisé pourchoisir le Show quand l’appareil fonctionne de façon autonome ou en maître/esclave.
Appuyez sur latoucheMENU jusqu’à ce que est affiché à l’écran.
Appuyez sur latoucheENTER, l’écran commence à clignoter.
Utilisez les touches DOWN et UP pour sélectionner (show 1) ou (show 2) ou (show
3) ou ( show4 ).
Dès que le mode de fonctionnement est affiché à l’écran, appuyez sur la touche ENTER pour confirmer
votre choix.
(Où il retournera automatiquement aux fonctions principales sans aucune modification après 8 secondes)
Pour retourner aux fonctions sans effectuer de changements, appuyez à nouveau sur la touche MENU.
Show 1 mode- l’appareil est placé parterre. Angle du mouvement tilt : 210°.
Show 2mode- l’appareil est fixé au plafond. Angle du mouvement tilt : 90°.
Mode show 3 : l'appareil est placé sur le haut-parleur.
Le projecteur reste continuellement dirigé vers le public, donc, devant la scène. Angledu
mouvement pan (de gauche à droite à gauche) : 160°. Angle du mouvement tilt : 90°(60° audessus
de l'horizontale ; 30° en dessous de l'horizontale).
Mode show4 : l'appareil est fixé au plafond.
La plupart du temps, le spot projette son faisceau devant la scène. Angle du mouvement pan (de
gauche à droiteà gauche) : 160°. Angle du mouvement tilt : 90° (verticalement, devant 75°; derrière
15 °).
SlaveMode
Est utilisé pour que l’appareil esclave fonctionne de façon opposée au maître ou pour fonctionner de
façon complètement synchronisé.
Appuyez sur latoucheMENU jusqu’à ce que est affiché à l’écran.
Appuyez sur la touche ENTER, l’écran commence à clignoter.
Utilisez les touches DOWN et UP pour sélectionner (normal) ou (2 light show).
Dès que le mode de fonctionnement est affiché à l’écran, appuyez sur la touche ENTER pour confirmer
votre choix.
(Où il retourneraautomatiquement aux fonctions principales sans aucune modificationaprès 8 secondes)
Pour retourner aux fonctions sans effectuer de changements, appuyez à nouveau sur la touche MENU.
Mode Black-out
Black-out mode: quand aucun signal DMX est détecté, l’appareil se met en black-out et attends un
signal DMX.
Mode « pas de black-out »: quand aucun signal DMX est détecté, l’appareil se met automatiquement
à fonctionner de façon autonome.
Appuyez sur latoucheMENU jusqu’à ce que est affiché à l’écran.
Appuyez sur la touche ENTER, l’écran commence à clignoter.
Utilisez les touches DOWN et UP pour sélectionner (yes black-out) ou (no black-out).
Dès que le mode de fonctionnement est affiché à l’écran, appuyez sur la touche ENTER pour confirmer
votre choix.
(Où il retournera automatiquement aux fonctions principales sans aucune modification après 8 secondes)
FRANCAIS MODE D’EMPLOI
BRITEQ® 20/68 BT-575W
Pour retourner aux fonctions sans effectuer de changements, appuyez à nouveau sur la touche MENU.
InversionPan
Normal: le mouvement pan n’est pas inversé.
Pan inversion: le mouvement pan est inversé
Appuyez sur latoucheMENU jusqu’à ce que est affiché à l’écran.
Appuyez sur la touche ENTER, l’écran commence à clignoter.
Utilisez les touches DOWN et UP pour sélectionner (normal) ou (paninversion).
Dès que le mode de fonctionnement est affiché à l’écran, appuyez sur la touche ENTER pour confirmer
votre choix.
(Où il retournera automatiquement aux fonctions principales sans aucune modification après 8 secondes)
Pour retourner auxfonctions sans effectuer de changements, appuyez à nouveau sur la touche MENU.
InversionTilt
Normal: lemouvement tilt n’est pas inversé.
Tilt inversion: le mouvement tilt est inversé
Appuyez sur latoucheMENU jusqu’à ce que est affiché à l’écran.
Appuyez sur la touche ENTER, l’écran commence à clignoter.
Utilisez les touches DOWN et UP pour sélectionner (normal) ou (tilt inversion).
Dès que le mode de fonctionnement est affiché à l’écran, appuyez sur la touche ENTER pour confirmer
votre choix.
(Où il retourneraautomatiquement aux fonctions principales sans aucune modification après 8 secondes)
Pour retourner aux fonctions sans effectuer de changements, appuyez à nouveau sur la touche MENU.
Led Display
Display on: l’écran est toujours allumé.
Display off: l’écran est éteint quand il n’est pas utilisé.
Appuyez sur latoucheMENU jusqu’à ce quel’écran affiche .
Appuyez sur la touche ENTER, l’écran commence à clignoter.
Utilisez les touches DOWN et UP pour sélectionner (écran toujours allumé) ou (écran éteint
si pas utilisé).
Dès que le mode de fonctionnement est affiché à l’écran, appuyez sur la touche ENTER pour confirmer
votre choix.
(Où il retournera automatiquement aux fonctions principales sans aucune modification après 8 secondes)
Pour retourner aux fonctions sans effectuer de changements, appuyez à nouveau sur la touche MENU.
InversionDisplay
Display normal: possibilité de lire ce qui est affiché à l’écran quand l’appareil est posé par terre.
Displayinversion: possibilité de lire ce qui est affiché à l’écran quand l’appareil est suspendu.
Appuyez sur latoucheMENU jusqu’à ce que clignotesurl’écran. (affichage normal)
Utilisez la touche ENTER pour changer l’affichage (affichage inversé), l’option sera
automatiquement enregistrée après 8 secondes. Ou appuyez à nouveau sur la touche ENTER pour
retourner à l’affichage normal
Pour retourner vers les fonctions, appuyez sur la touche MENU.
Focus Adjust
Est utilisé pour vous aider à ajuster le foyer durayon lumineux.
Appuyez sur le bouton MENU jusqu'à ce que l'écran affiche .
Appuyez sur le bouton ENTER, ce qui apour conséquenceque l'écran commence à clignoter.
Utilisez les boutons DOWN etUP pour sélectionner une valeur comprise entre0 et255.
Une fois que lavaleur est sélectionnée, appuyez sur le bouton ENTER pour confirmer.
(ou vous retournerez vers les fonctions principales si aucune activité n'est détectée par l'appareil pendant
8 secondes )

FRANCAIS MODE D’EMPLOI
BRITEQ® 21/68 BT-575W
Pour retourner vers les fonctions sans effectuer de changements, appuyez de nouveau sur le bouton
MENU.
Self-Test
Est utilisé pour activer le programme interne “self-test” quipassera enrevue toutes les possibilités
de l’appareil.
Appuyez sur latoucheMENU jusqu’à ce que clignoteà l’écran.
Appuyez sur la touche ENTER pourdémarrer leprogramme intégré « self-test ».
Pour retourner auxfonctions, appuyez sur la touche MENU.
Ambient temperature of lamp
Utilisé pour afficher la température à l'intérieur du compartiment de lalampe.
Appuyez sur le bouton MENUjusqu'à ce que les lettres se mettent à clignoter sur l'écran.
Appuyez sur le bouton ENTER et la températurede service de lalampe seraaffichée sur l'écran.
Pour retourner vers les fonctions, appuyez de nouveausur le bouton MENU.
Fixture Hours
Vouscommunique le nombre d’heures de service de l’appareil.
Appuyez sur latoucheMENU jusqu’à ce que clignoteà l’écran.
Appuyez sur la touche ENTER pour que l’appareil affiche le nombre d’heures de service à l’écran.
Pour retourner auxfonctions, appuyez sur la touche MENU.
Lamp Display
Utilisé pour allumer et éteindre la lampe de manière à pouvoir refroidir la lampe grâce aux
ventilateurs internes avantde la transporter.
Appuyez sur le bouton MENUjusqu'à ce que les lettres se mettent à clignoter sur l'écran.
Appuyez sur le bouton ENTER, ce qui a pour conséquence que l'écran commenceà clignoter.
Utilisez les boutons DOWN et UP pour sélectionner l'un des deux modes : (la lampe sera allumée)
ou (la lampe sera éteinte).
Une fois que le mode est sélectionné, appuyez sur le bouton ENTER pour confirmer (ou vous retournerez
vers les fonctions principales si aucune activité n'est détectée par l'appareil pendant 8 secondes).
Pour retourner vers les fonctions sans effectuer de changements, appuyez de nouveau sur le bouton
MENU.
Lamp Mode
Appuyez sur le bouton MENUjusqu'à ce que les lettres soient affichées par l'écran.
Appuyez sur le bouton ENTER, ce qui apour conséquenceque l'écran commence à clignoter.
Utilisez les boutons DOWN et UP pour sélectionner l'un des deux modes : (la lampe sera allumée)
ou (la lampe seraéteinte). Une fois que lemode est sélectionné, appuyez sur le bouton ENTER
pour confirmer.
(ou vous retournerez vers les fonctions principales si aucune activité n'estdétectéepar l'appareil pendant
8secondes).
Pour retourner vers les fonctions sans effectuer de changements, appuyez de nouveau sur le bouton
MENU.
Reset
Poureffectuer une mise à zéro del’appareil.
Appuyez sur latoucheMENU jusqu’à ce que clignoteà l’écran.
Appuyez sur ENTER pourrenvoyer tous les canaux à leur position d’origine.
Pour retourner auxfonctions, appuyez sur la touche MENU.
Veuillez également consulter le chapitre concernant la configuration des canaux DMX pour découvrir
comment effectuer une mise à zéro (reset) par commande DMX.
FRANCAIS MODE D’EMPLOI
BRITEQ® 22/68 BT-575W
HOME POSITION ADJUST
Appuyez sur lebouton MENU pendant
au moins 5 secondes pour aller vers
le mode Offset.
Vous êtes maintenant en mesure
d'ajuster la position de référence
('home position', qui est donc la
position"zéro").
Quand vous désirez ajuster la position
de référence ('home position') des
gobos et des couleurs, vous devez
d'abord choisir le mode .
Les fonctions sont décrites ci-
dessous.
Panoffset
Appuyez sur le bouton MENUpendant au moins 5 secondes pour activer lemode Offset.
Utilisez les boutons DOWN et UP jusqu'à ce que les lettres soient affichées par l'écran.
Appuyez sur le bouton ENTER, ce qui apour conséquenceque l'écran commence à clignoter.
Utilisez les boutons DOWN et UP pour ajuster la position de référence du mouvement pan (pan home
position).
Un fois que la position a été déterminée, appuyez sur le bouton ENTER pour confirmer, ou retournez
automatiquement aux fonctions offset sans effectuer le moindre changement en appuyant sur le bouton
MENU.
Pour retourner vers les fonctions principales sans effectuer le moindre changement, attendez pendant 8
secondes.
Tilt offset
Appuyez sur le bouton MENUpendant au moins 5 secondes pour activer lemode Offset.
Utilisez les boutons DOWN et UP jusqu'à ce que les lettres soient affichées par l'écran.
Appuyez sur le bouton ENTER, ce qui apour conséquenceque l'écran commence à clignoter.
Utilisez les boutons DOWN et UP pour ajuster la position de référence du mouvement tilt (tilt home
position).
Un fois que la position a été déterminée, appuyez sur le bouton ENTER pour confirmer, ou retournez
automatiquement aux fonctions offset sans effectuer le moindre changement en appuyant sur le bouton
MENU.
Pour retourner vers les fonctions principales sans effectuer le moindre changement, attendez pendant8
secondes.
Color offset
Appuyez sur le bouton MENUpendant au moins 5 secondes pour activer lemode Offset.
Utilisez les boutons DOWN et UP jusqu'à ce que les lettres soient affichées par l'écran.
Appuyez sur le bouton ENTER, ce qui a pour conséquenceque l'écran commence à clignoter.
Utilisez les boutons DOWN et UP pour ajuster la position de référence de la couleur (color home
position).
Un fois que la couleur a été sélectionnée, appuyez sur le bouton ENTER pour confirmer, ou retournez
automatiquement aux fonctions offset sans effectuer le moindre changement en appuyant sur le bouton
MENU.
Pour retourner vers les fonctions principales sans effectuer lemoindre changement, attendez pendant 8
secondes.

FRANCAIS MODE D’EMPLOI
BRITEQ® 23/68 BT-575W
Dimmer offset
Appuyez sur le bouton MENUpendant au moins 5 secondes pour activer le mode Offset.
Utilisez les boutons DOWN et UP jusqu'à ce que les lettres soient affichées par l'écran.
Appuyez sur le bouton ENTER, ce qui apour conséquenceque l'écran commence à clignoter.
Utilisez les boutons DOWN et UP pour ajuster la position de référence du gradateur ('dimmer home
position').
Un fois que le mode a été déterminé, appuyez sur le bouton ENTER pour confirmer ou pour retourner
automatiquement aux fonctions offset sans effectuer le moindre changement, appuyez sur le bouton
MENU.
Pour retourner vers les fonctions principales sans effectuer lemoindre changement, attendez pendant 8
secondes
COMMENT BRANCHER LES APPAREILS EN DMX
Le protocole DMX est un signal à haute vitesse qui sert à contrôler les projecteurs dits « intelligents ». Vous
devez relier le contrôleur DMX et tous les appareils “en chaîne” à l’aide d’un câble symétrique
XLR M/F de très bonne qualité. Pour éviter un comportement étrange des appareils, suite aux
interférences, vous devez utiliser un « terminal» de 90Ù à 120Ù à la fin de la chaîne. N’utilisez
jamais descâbles répartiteurs-Y, ceci ne fonctionnera tout simplement pas!
Chaque appareil dans la chaîne doit avoir sa propre adresse de départ afin de savoir quelles commandes,
venant du contrôleur, il doit décoder.
COMMENT REGLER L’ADRESSE DE DEMARRAGE EXACTE:
Référez-vous au chapitre précédent (réglage de l’adresse DMX-512) pour apprendre à régler l’adresse de
départ sur cet appareil. L’adressededépart de chaque appareil est très importante. Malheureusement il est
impossible de vous expliquer dans ce mode d’emploi quel adresse de démarrage vous devez introduire car
cela dépends entièrement du contrôleur que vous utiliserez … veuillez donc vous référer au mode d’emploi
de votre contrôleur DMX pour savoir quelle adressevous devez utiliser.
FRANCAIS MODE D’EMPLOI
BRITEQ® 24/68 BT-575W
CONFIGURATIONDMXDU BT-575W:
Modeà 16 canaux
Les valeurs ci-dessous prendronteffectivement cours après environ cinqsecondes :
Pour la commande DMX'reset', réglezla valeur DMXdeCH-16 entre 200 et 209 ;
Pour la commande DMX 'lampon', réglez la valeur DMXde CH-16 entre 130 et 139 ;
Pour la commande DMX 'lamp off', réglez la valeur DMX de CH-16 entre 230 et239.

FRANCAIS MODE D’EMPLOI
BRITEQ® 25/68 BT-575W
Mode à 8 canaux
COMMENT UTILISER L’APPAREIL
Chaque fois que vous allumerez l’appareil, l’écran affichera 575U et tous les moteurs retourneront à leur
position ‘initiale’ ce qui fait que vous entendrez des bruits pendant environ 20 secondes. Après cela,
l’appareilsera prêt à recevoir des signaux DMXou à parcourirses programmes.
Vous pouvez utiliser l’appareil selon 3 façons:
oEn utilisant les programmes intégrés maître/esclave
oEn utilisant le petit contrôleur
oEn utilisant un contrôleur DMX universel
oEn utilisant le contrôleur iLead (dans ce cas, le BT-575W doit être configuré en mode DMXà
8 canaux).
EN UTILISANT LES PROGRAMMES INTÉGRÉS MAÎTRE/ESCLAVE:
Sélectionnez cette fonction si vous voulez un show instantané. En reliant tous les
appareils selon le principe maître/esclave, le premier appareil contrôlera tous les autres
appareils en effectuant un show automatique et synchronisé au rythme de la musique.
Rien ne sera branché à son entrée DMX et son Led « master » sera constamment
allumé, le Led « sound » clignotera au rythmede la musique.
L’appareil Maître possède 2 shows préprogrammés: vous pouvez sélectionner
(show 1), (show 2), (show 3) ou (show 4)
immédiatement dans le menu du master (maître).
Les appareils Esclaves possèdent 2 options: les autres appareils sont réglés en
mode esclave (le Led « slave » est constamment allumé). Afin de créer un
magnifique show vous pouvez introduire des mouvements contrastés (pan/tilt de
l’appareil esclave est inversé) dans le menu des appareils esclaves vous pouvez
aller à l’option et sélectionner:
FRANCAIS MODE D’EMPLOI
BRITEQ® 26/68 BT-575W
oNormal slave: l’appareil esclave fonctionne de façon synchronisé par rapport à
l’appareil maître.
o2 light show: l’appareil esclave fonctionne à l’opposé del’appareil maître.
EN UTILISANT LE CONTRÔLEURCA-8:
Si vous utilisez l’appareil en mode maître/esclave nous vous recommandons d’utiliser le contrôleur CA-8.
Connectez ce petit contrôleur à l’entrée jack 1/4” de l’appareil maître. Ceci vous permettra decontrôler les
fonctions suivantes:
MAINTENANCE
Assurez-vous que la zone au-dessous du lieu d’installation ne comporte pas de personnes indésirables
lors de la maintenance
Mettez l’unité hors tension,débranchez le cordon d’alimentation et attendez que l’appareil ait refroidi.
Pendant l’inspection, les points suivants doivent être vérifiés :
Toutes les vis utilisées pour l’installation de l’appareil ou de chacune de ses pièces doivent être bien
fixées et non corrodées.
Les niches, fixations et structures de support (plafond, poutres, suspensions) doivent être totalement
intactes, sans aucune déformation.
Lorsqu’une lentille optique est visiblement endommagée (fissure ou éraflures profondes), elle doit être
remplacée.
Les câbles doivent être en parfaite condition et doivent être remplacés immédiatementen cas de détection
d’un problème,mêmebénin.
Pour protéger l’appareil de toute surchauffe, les ventilateurs (si applicable) et les ouvertures de ventilation
doivent être nettoyées mensuellement.
L’intérieur de l’appareil doit être nettoyé annuellement à l’aide d’un aspirateur ou jet d’air.
Le nettoyage des lentilles optiques internes et externes et/ou des miroirs doit être effectué périodiquement
pour optimiser la production de lumière. La fréquence de nettoyage dépend de l’environnement dans
lequel l’appareil fonctionne: des environnements humides, enfumés ou particulièrement sales peuvent
entraîner une accumulation de saleté plus importantes sur les optiques de l’appareil.
Nettoyez à l’aide d’un chiffon doux avec des produits de nettoyagepour verres normaux.
Séchez toujours les parties soigneusement.
Nettoyez les optiques externes ou moins une fois tous les 30 jours.
Nettoyez les optiques internes ou moins une fois tous les 90 jours.
Attention: Nous vous recommandons fortement de faire exécuter le nettoyage interne par du
personnel qualifié !
Stand by L'appareil est totalement éteint.
Fonction
Strobe
1.Gobo / Color sync.
strobe
2.Sync. strobe
3.Two-lightstrobe
Sélectiondu mode
moving showX/Y
(Show 1 - Show4)
Sélection dela
couleur Réglage du mouvement X/Y.
1. Position pan.
2. Position tilt.
D'abord régler l'appareil Master,
ensuite régler lesappareils Slave.
Mode Son 1
(la LED est éteinte) Son 2
(la LED clignote
normalement)
Lent/son 3
(la LED est
allumée)
Position/ Latch
(la LED clignote rapidement)

FRANCAIS MODE D’EMPLOI
BRITEQ® 27/68 BT-575W
SPECIFICATIONS
Alimentation: AC 230V, 50Hz
Fusible: 10 A/250V
Contrôle de son: Microphoneinterne
Mouvements Pan/Tilt: 540° / 270° aveccorrection automatique
Angle du faisceau : 11-28°
ConnexionsDMX : connecteur XLR mâle / femelle à 3 broches
Ampoule: MSR575/2
Taille: 428 x 387 x 491mm
Poids: 30,5 kg
Chacune de ces informations peut être modifiée sans avertissement préalable. Vous pouvez
télécharger la dernière version dece mode d’emploi de notre siteWeb: www.beglec.com
NEDERLANDS HANDLEIDING
BRITEQ® 28/68 BT-575W
Hartelijk dank voor de aankoop van dit BriteQ®product. Om ten volle te kunnen profiteren van alle
mogelijkheden en voor uw eigen veiligheid, gelieve de aanwijzingen zeer zorgvuldig te lezen voor U begint
het apparaat te gebruiken.
DOOR U OP ONZE MAILINGLIJST IN TE SCHRIJVEN ONTVANGT U STEEDS DE
LAATSTE INFORMATIE OVER ONZE PRODUKTEN: NIEUWIGHEDEN, SPECIALE
ACTIES, OPENDEURDAGEN, ENZ.
SURF NAAR: WWW.BEGLEC.COM EN SCHRIJF U IN
KARAKTERISTIEKEN
In dit apparaat is radio-interferentie onderdrukt. Dit product voldoet aan de gangbare Europese en nationale
voorschriften. Het is vastgesteld dat het apparaat er zich aan houdt en de desbetreffende verklaringen en
documenten zijn door de fabrikant afgegeven.
Krachtige,intelligente moving wash voor gebruik in discotheken, theaters, studio’s en verhuurbedrijven.
16 DMX kanalen: (Pan * tilt * snelheid * dimmer * shutter/strobe * kleuren * Cyaan * Magenta * Geel * CMY
preset kleuren * CMY-snelheid * diagonale lens rotatie + frost * zoom * pan 16bit * tilt 16bit * reset +
remote lamp aan/uit)
Ingebouwde programma's en microfoon voor een eenvoudige autonome werking in “Master/slave” mode!
Kleine optionele CA-8 controllervoor een eenvoudige bediening
Blauwe digitale display voor talrijke opties!
Soepele 540° panning en 270°tilt bewegingen
CMY kleurenmixing: Cyaan 0-100% * Magenta 0-100% * Geel 0-100%
Extra kleurenwiel met 9 dichroide kleuren
Instelbare frost filter en diagonale lens rotatie + DMX zoom van 11° tot 28°
Dimmer 0-100% + strobe met variabele snelheid
Kan ook bestuurd worden met onze “Scanmaster 1612”, de iLEAD controller of met om heteven welke
andere DMX controller
VOOR DE IN GEBRUIKNAME
Controleer voor het eerste gebruik van het apparaat of het tijdens het transport beschadigd werd. Mocht er
schade zijn, gebruik het dan niet, maar raadpleeg eerst uw dealer.
Belangrijk: Dit apparaat verliet de fabriek in uitstekende staat en goed verpakt. Het is erg belangrijk dat de
gebruiker de veiligheidsaanwijzingen en raadgevingen in deze gebruiksaanwijzing uiterst nauwkeurig volgt.
Elke schade veroorzaakt door verkeerd gebruik van het apparaat valt niet onder de garantie. De dealer
aanvaardt geen verantwoordelijkheid voor mankementen en problemen die komen doorhet veronachtzamen
van dezegebruiksaanwijzing.
Bewaar deze brochure op een veilige plaats om hem inde toekomst nogmaals te kunnen raadplegen. Indien
U het apparaat verkoopt, denkt Uer wel aan om de gebruiksaanwijzing bij te voegen.
Controleer de inhoud:
Controleer of de doos volgende onderdelen bevat:
Handleiding
BT-575W toestel

NEDERLANDS HANDLEIDING
BRITEQ® 29/68 BT-575W
VEILIGHEIDSVOORSCHRIFTEN:
WAARSCHUWING: Om het risico op elektrocutie zoveel mogelijk te
vermijden mag u nooit de behuizing verwijderen. Er bevinden zich geen
onderdelen in het toestel die u zelf kan herstellen. Laat de herstellingen
enkel uitvoeren door een bevoegde technicus.
De bliksempijl die zich in een gelijkbenige driehoek bevindt is bedoeld om u te wijzen op het gebruik
of de aanwezigheid van niet-geïsoleerde onderdelen met een “gevaarlijke spanning” in het toestel
die voldoende kracht heeft om een risico van elektrocutie in te houden.
Het uitroepteken binnen de gelijkbenige driehoek is bedoeld om de gebruiker erop te wijzen dat er in
de meegeleverde literatuur belangrijke gebruik en onderhoudsinstructies vermeld staan betreffende
dit onderdeel.
Dit symbool betekent: het apparaat mag enkel binnenhuis worden gebruikt.
Dit symbool betekent: Lees de handleiding!
Dit symbool bepaalt: de minimumafstand van te belichten voorwerpen. De minimumafstand tussen
projector en het verlichte voorwerp moet meer dan 1 meters zijn.
Om het milieu te beschermen, probeer zoveel mogelijk het verpakkingsmateriaal te recycleren.
Een nieuw lichteffect kan soms ongewenste rook en/of reuk veroorzaken. Dit is normaal en verdwijnt na een
paarminuten.
Stel dit apparaat niet bloot aan regen ofvocht, dit om het risico op brand en elektrische schokken te voorkomen.
Om de vorming van condensatie binnenin te voorkomen, laat het apparaat aan de omgevingstemperatuur
wennen wanneer het, na het transport, naar een warm vertrek is overgebracht. Condensatie kan het toestel
soms verhinderen perfect te functioneren. Het kan soms zelfs schade aan het apparaat toebrengen.
Gebruik dit apparaat uitsluitendbinnenshuis.
Plaats geen stukken metaal en mors geen vocht binnen in het toestel om elektrische schokken of storing te
vermijden. Indien een vreemd voorwerp in het apparaat geraakt, moet U het direct van het lichtnet afkoppelen.
Plaats de installatie op een plaats met goede ventilatie, ver van brandbare materialen en/of vloeistoffen. De
installatie moet op minstens 50 cm van de muren rondom geplaatst worden.
Bedek geen enkele ventilatieopening om oververhitting te vermijden.
Zorg dat het toestel niet in een stoffige omgeving wordt gebruikt en maak het regelmatig schoon.
Houd het apparaat uit de buurt van kinderen.
Dit apparaat mag niet door onervaren personen bediend worden.
De maximum veilige omgevingstemperatuur is 40°C. Gebruik het apparaat dus niet bij hogere temperaturen.
De temperatuur van het oppervlak van het apparaat kan 85°C bereiken. Raak de metalen ombouw tijdens het
gebruik niet met blote handen aan.
Verzeker er U van dat er zich onder de plaats waar het toestel wordt geïnstalleerd geen ongewenste personen
bevinden tijdens het bevestigen en losmaken alsook bij het onderhoud.
Laat het toestel ongeveer 10 minuten afkoelen alvorens de lamp te vervangen of alvorens te starten met de
onderhoudsbeurt.
Trek altijd de stekker uit wanneer het apparaat gedurende langere tijd niet wordt gebruikt of alvorens de lamp te
vervangen of alvorens te beginnen met de onderhoudsbeurt.
De elektrische installatie behoort uitsluitend uitgevoerd te worden door bevoegd personeel, volgens de in uw
land geldende regels betreffende elektrische en mechanische veiligheid.
Controleer dat de beschikbarespanning niet hoger is dan die aangegeven op de achterzijde van het toestel.
De elektrische kabel behoort altijd in uitstekende staat te zijn. Zet het apparaat onmiddellijk afals de elektrische
kabel gekneusd of beschadigd is. De kabel moet vervangen worden door de fabrikant zelf, zijn dealer of
vergelijkbare bekwame personen om een brand te voorkomen.
Laat de elektrische draad nooit in contact komen met andere draden.
Volgens de veiligheidsvoorschriften moet deze installatie geaard worden.
Sluit het apparaat niet aan op een elektronische dimmer.
Gebruik altijd een geschikte en gekeurde veiligheidskabel bij het installeren van het toestel.
Om elektrische schokken te voorkomen, moet U de behuizing niet openen. Afgezien van de lamp en de zekering
zitten er geen onderdelen in die door de gebruikermoeten worden onderhouden.
Repareer nooit een zekering en overbrug de zekeringhouder nooit. Vervang een beschadigde zekering steeds
door een zekering van hetzelfde type en met dezelfde elektrische kenmerken.
Ingeval van ernstige problemen met het bedienen van het toestel, stopt U onmiddellijk het gebruik ervan.
Contacteer uw dealer voor een eventuele reparatie.
CAUTION
NEDERLANDS HANDLEIDING
BRITEQ® 30/68 BT-575W
De behuizing en de lenzen moeten vervangen worden als ze zichtbaarbeschadigd zijn.
Gebruik best de originele verpakking als het toestel vervoerd moet worden.
Om veiligheidsredenen is het verboden om ongeautoriseerde modificaties aan het toestel aan te brengen.
Belangrijk: Kijk nooit rechtstreeks in de lichtbron. Gebruik het lichteffect niet in de tegenwoordigheid van
personen die lijden aan epilepsie.
PLAATSEN OF VERVANGEN VAN DE LAMP
Wacht, in het geval van het vervangen van een lamp of van het geven van een
onderhoudsbeurt, 15 minuten na het uitzetten van de installatie met het openen ervan
totdat het apparaat is afgekoeld. Trek altijd de stekker uit het stopcontact voor U begint
aan het onderhoud. Gebruik altijd hetzelfde type reserveonderdelen (lampen,
zekeringen, e.d.) Gebruik bij het vervangen van onderdelen uitsluitend authentieke
reserveonderdelen.
Schakel het toestel uit en trek de stekker uit het stopcontact.
Wacht gedurende ongeveer 15 minutentot het toestel afgekoeld is.
Open het lampcompartiment aan de achterzijde van het toestel door schroeven X, Y en Z los te maken
( A en B op de foto hieronder)
Verwijder de oude lamp (raak de lamp nooit aan terwijl zij warm is)
Opgelet! Controleer het label op de achterkant van het toestel of raadpleeg de technische kenmerken in
deze handleiding om te weten welke lamp u moet gebruiken.
Raak de lamp nooit aan met blote handen! Dit verkort drastisch de levensduur van de lamp. Indien u de
lamp heeft aangeraakt, reinig deze dan met een doek en een beetje schoonmaakalcohol. Veeg de lamp
droog alvorens hem te installeren.
Plaats de lamp in het toestel. Let er op dat de draden de lamp niet raken.
Sluit het lampcompartiment met de 3 schroeven X, Y en Z
Wees er zeker van dat de lamp in het centrum van de reflector geïnstalleerd wordt. Schakel het toestel
aan en pas delamp positie aan met behulp van deschroeven A, Ben C (B op de foto hieronder)
Klaar!

NEDERLANDS HANDLEIDING
BRITEQ® 31/68 BT-575W
OPHANGEN VAN HET APPARAAT
Belangrijk: De installatie van het toestel mag
uitsluitend door bekwaam
onderhoudspersoneel uitgevoerd worden.
Onjuiste plaatsing kan ernstige letsels en/of
schade aan eigendommen tot gevolg hebben.
Het ophangen vergt veel ervaring. U behoort
de grenzen te respecteren aan de werklast;
erkende installeringmaterialen moeten
worden gebruikt; de veiligheid van het
geïnstalleerde toestel moet regelmatig
wordengecontroleerd.
Overtuig U ervan dat het gebied onder
installatieplaats vrij is van ongewenste personen
tijdens het plaatsen, het weghalen en het
onderhoud.
Installeer het toestel op een goed geventileerde plaats, ver van brandbare stoffen en/of vloeistoffen. Het
toestel moet worden bevestigd op minstens 50 cm van deomringende muren.
Het toestel moet worden geïnstalleerd buiten het bereik van iedereen en weg van plaatsen waar men mag
lopen en zitten.
Alvorens tot plaatsen over te gaan, moet men controleren dat de minimum puntbelasting van de
installatieplaats 10 keer het gewicht van het toestel bedraagt.
Gebruik bij het installeren van het toestel altijd een gewaarmerkteveiligheidskabel die 12 keer het gewicht
van het toestel kan dragen. Deze bijkomende veiligheidsbevestiging moet zo worden aangebracht dat
geen deel van het toestel meer dan 20 cm vallen kan als de hoofdbeveiliging faalt.
Het apparaat moet goed worden vastgezet; aan een vrij zwaaiende montage mag zelfs niet gedacht
worden.
Bedekgeen ventilatieopeningen, anderszou ditoververhitting totgevolg kunnen hebben.
De gebruiker moet er zich van verzekeren dat de installaties met betrekking tot de veiligheid en de
technische mechaniek door een expert zijn goedgekeurd alvorens ze voor de eerste keer te gebruiken. Elk
jaar moeten deinstallaties worden gekeurd door een vakman om tecontroleren of de veiligheid nog steeds
perfect is.
INSTELLEN VAN HET TOESTEL
Bedieningspaneel:
NEDERLANDS HANDLEIDING
BRITEQ® 32/68 BT-575W
1. DISPLAY geeftde verschillende menu’s en de gekozen functies weer.
2. LEDS DMX Aan DMXsignaalaanwezig
MASTER Aan Master mode
SLAVE Aan Slavemode
SOUND Knippert Geluidsactivering
3. TOETSENMENU Om programmeringfuncties te selecteren
DOWN Om terug te gaan in de geselecteerde functies
UP Om verderte gaan in degeselecteerde functies
ENTER Om de geselecteerde functies te bevestigen
4. REMOTE CONTROL INGANG: sluit de optionele CA-8 afstandsbediening aan op de ¼” microfoon jack
om zo het toestel te controleren voor stand by, functie en modus
5. SENSITIVITY: wordt gebruikt om de gevoeligheid van de microfoon in te stellen wanneer het toestel
gebruikt wordt in standalone of master/slave mode.
6. DMX INPUT/OUTPUT: wordt gebruikt voor DMX512 verbinding. Gebruik symmetrische 3pins XLR M/V
kabels van goede kwaliteit om de toestellen met elkaar te verbinden.
HOOFDMENU:
Druk op de MENU toets om een van de pre-set
functies te kiezen. Druk op de toets tot de gewenste
functieop dedisplayverschijnt.
Selecteer de functie met de ENTER toets. De
display zal knipperen.
Gebruik de DOWN en UP toetsen om de modus te
wijzigen.
Eens u de gewenste modus geselecteerd hebt moet
u op de ENTER toets drukken om uw keuze te
bevestigen. Na 8 seconden zal de display
automatisch naar de hoofdfuncties terugkeren
zonder iets veranderd te hebben. Om naar de
functies terug te keren zonder iets te wijzigen moet
u weer op de MENU toets drukken. De
hoofdfuncties worden hier rechts weergegeven.
DMX512Adresinstelling
Wordt gebruikt omhet startadres van het toestel
in te stellen in een DMX configuratie.
Druk op de MENU toets tot op de display
weergegeven wordt.
Druk op de ENTER toets, de display begint te
knipperen.
Gebruik de DOWN en UP toetsen om het DMX512
adres te wijzigen.
Wanneer het juiste adres op de display wordt
weergegeven, druk dan op de ENTER toets om uw
keuze tebevestigen.
(anders keert hij na 8 seconden automatisch weer
naar de hoofdfuncties zonder iets gewijzigd te
hebben)
Om naar de functies terug te keren zonder iets te
wijzigen moet u weer op de MENU toets drukken.

NEDERLANDS HANDLEIDING
BRITEQ® 33/68 BT-575W
ChannelMode
Druk op de MENU toets tot op dedisplay weergegeven wordt.
Druk op de ENTER toets, de display begint te knipperen.
Gebruik de DOWN en UP toetsen om de (16 kanalen ) of de (8 kanalen) modus te
selecteren.
Wanneer de juiste modus op de display wordt weergegeven, druk dan op de ENTER toets om uw keuze te
bevestigen.
(anders keert hij na 8 seconden automatisch weer naar de hoofdfuncties zonder ietsgewijzigd te hebben)
Om naar de functies terug te keren zonder iets te wijzigen moet u weer op de MENU toets drukken.
Show Mode
Wordt gebruikt om de Show werkmodus te kiezen wanneer het toestel standalone of in master/slave
configuratie gebruiktwordt.
Druk op de MENU toets tot op de display weergegeven wordt.
Druk op de ENTER toets, de display begint te knipperen.
Gebruik de DOWN en UP toetsen om (show 1), (show2), (show 3) of (show
4) te selecteren.
Wanneer de gewenste modus op de display wordt weergegeven, druk dan op de ENTER toets om uw
keuze tebevestigen.
(anders keert hij na 8 seconden automatisch weer naar de hoofdfuncties zonder ietsgewijzigd te hebben)
Om naar de functies terug te keren zonder iets te wijzigen moet u weer op de MENU toets drukken.
Show 1mode- Het toestel staat op de grond. Tilt bewegingshoek 210°.
Show 2 mode- Het toestel hangt onder het plafond. Tilt bewegingshoek 90°.
Show 3mode – Het toestel staat op een podium, tegenover het publiek
De spot projecteert steeds in de richting van het publiek en staat dus aan de voorkant van het
podium. Panbewegingshoek ( links naar rechts naar rechts ): 160°. Tilt bewegingshoek: 90° ( 60°
boven de horizon; 30° onder dehorizon.)
Show 4 mode – Het toestel hangt onder het plafond.
De spot projecteert vooral aan de voorzijde van het podium. Pan bewegingshoek ( links naar rechts
naar links): 160°. Tiltbewegingshoek: 90° ( verticaal, voorzijde 75°; achterzijde 15° )
SlaveMode
Wordt gebruikt om het slave toestel synchroon of tegenovergesteld telaten werken ten opzichte van
de master.
Druk op de MENU toets tot op dedisplay weergegeven wordt.
Druk opde ENTER toets, dedisplay begint te knipperen.
Gebruik de DOWN en UP toetsen om (normal) of (2 light show) te selecteren.
Wanneer de gewenste modus op de display wordt weergegeven, druk dan op de ENTER toets om uw
keuze tebevestigen.
(anders keert hij na 8 seconden automatisch weer naar de hoofdfuncties zonder ietsgewijzigd te hebben)
Om naar de functies terug te keren zonder iets te wijzigen moet u weer op de MENU toets drukken.
Blackout Mode
Black-out mode: wanneer geen enkel DMX signaal gedetecteerd wordt, dan gaat het toestel over naar
de black-out modus en wacht op het volgende DMXsignaal.
No blackout mode: wanneer geen enkel DMX signaal gedetecteerd wordt, dan schakelt het toestel
automatisch over naarstandalone werking.
Druk op de MENU toets tot op de display weergegeven wordt.
Druk op de ENTER toets, de display begint te knipperen.
Gebruik de DOWN en UP toetsen om (yes blackout)of (no blackout) te selecteren.
Wanneer de gewenste modus op de display wordt weergegeven, druk dan op de ENTER toets om uw
keuze tebevestigen.
NEDERLANDS HANDLEIDING
BRITEQ® 34/68 BT-575W
(anders keert hij na 8 seconden automatisch weer naar de hoofdfuncties zonder ietsgewijzigd te hebben)
Om naar de functies terug te keren zonder iets te wijzigen moet u weer op de MENU toets drukken.
PanInversion
Normal: Panbewegingwordt nietomgekeerd.
Pan inversion: Panbewegingwerkt tegenovergesteld
Druk op de MENU toets tot op dedisplay weergegeven wordt.
Druk op de ENTER toets, de display begintte knipperen.
Gebruik de DOWN en UP toetsen om (normal) of (pan inversion)te selecteren.
Wanneer de gewenste modus op de display wordt weergegeven, druk dan op de ENTER toets om uw
keuze tebevestigen.
(anders keert hij na 8 seconden automatisch weer naar de hoofdfuncties zonder iets gewijzigd tehebben)
Om naar de functies terug te keren zonder iets te wijzigen moet u weer op de MENU toets drukken.
Tilt Inversion
Normal: Tilt bewegingwordt niet omgekeerd.
Tilt inversion: tilt bewegingwerkttegenovergesteld
Druk op de MENU toets tot op dedisplay weergegeven wordt.
Druk op de ENTER toets, de display begint te knipperen.
Gebruik de DOWN en UP toetsen om (normal) of (tilt inversion) te selecteren.
Wanneer de gewenste modus op de display wordt weergegeven, druk dan op de ENTER toets om uw
keuze tebevestigen.
(anders keert hij na 8 seconden automatisch weer naar de hoofdfuncties zonder ietsgewijzigd te hebben)
Om naar de functies terug te keren zonder iets te wijzigen moet u weer op de MENU toets drukken.
Led Display
Display on: display is steeds aan.
Display off:display is uit wanneer deze niet gebruikt wordt.
Druk op de MENU toets tot op de display weergegeven wordt.
Druk op de ENTER toets, de display begint te knipperen.
Gebruik de DOWN en UP toetsen om (display steeds aan) of (display uit wanneer niet in
gebruik).
Wanneer de gewenste modus op de display wordt weergegeven, druk dan op de ENTER toets om uw
keuze tebevestigen.
(anders keert hij na 8 seconden automatisch weer naar de hoofdfuncties zonder iets gewijzigd tehebben)
Om naar de functies terug te keren zonder iets te wijzigen moet u weer op de MENU toets drukken.
DisplayInversie
Display normal: display kan afgelezen worden wanneer het toestel op de grond staat.
Display inversion:display kan afgelezen worden wanneer het toestel ondersteboven opgehangen is.
Druk op de MENU toets tot knippert op de display. (gewone weergave)
Gebruik de ENTER toets om over te gaan naar (omgekeerde weergave), deze optie zal
automatisch behouden worden na 8 seconden. Of druk weer op de ENTER om terug te gaan naar
(gewone weergave).
Druk op de MENU toets om naar de functies weer te keren.

NEDERLANDS HANDLEIDING
BRITEQ® 35/68 BT-575W
Focus Adjust
Wordt gebruikt om de focus van de lichtstraal aan te passen
Druk op de MENU toets tot knippertop dedisplay
Druk op de ENTER toets, de display begint te knipperen.
Druk op deDOWN en UP toetsen om een waarde tussen 0 en 255 te selecteren.
Wanneer de gewenste waarde hebt geselecteerd, druk dan op de ENTER toets om uw keuze te
bevestigen.
(anders keert hij na 8 seconden automatisch weer naar de hoofdfuncties zonder ietsgewijzigd te hebben)
Om naar de functies terug te keren zonder iets te wijzigen moet u weer op de MENU toets drukken.
Self-Test
Wordt gebruikt om het interne “zelftest” programma in te schakelen. Alle mogelijkheden van het
toestel zullen dan automatisch overlopen worden.
Druk op de MENU toets tot knippertop de display.
Druk op de ENTER toetsom het interne self-test programma te starten.
Druk op de MENU toets om naar de functies weer te keren.
Ambient temperature of lamp
Wordt gebruikt om de temperatuur in het lampcompartiment aan te duiden .
Druk op de MENU toets tot knippert op de display.
Druk op de ENTER toets en de omgevingstemperatuur van de lamp zal getoond worden op de display .
Druk op de MENU toets om naar de functies weer te keren.
Fixture Hours
Wordt gebruikt om het aantal werkuren van het toestel weer te geven.
Druk op de MENU toets tot knippertop de display.
Druk op de ENTER toets om het aantal werkurenvan het toestel weer te geven op de display.
Druk op de MENU toets om naar de functies weer te keren.
Lamp Display
Wordt gebruikt om de lamp AAN/UIT te zetten zodat u de lamp kan afkoelen met de interne
koelvinnen vooraleer te transporteren .
Druk op de MENU toets tot knippertop de display.
Druk op de ENTER toets, de display begint te knipperen.
Gebruik de DOWN en UP toetsen om (lamp AAN) of (lamp UIT) modus te selecteren.
Wanneer de gewenste modus op de display wordt weergegeven, druk dan op de ENTER toets om uw
keuze tebevestigen.
(anders keert hij na 8 seconden automatisch weer naar de hoofdfuncties zonder ietsgewijzigd te hebben)
Om naar de functies terug te keren zonder iets te wijzigen moet u weer op de MENU toets drukken.
Lamp Modus
Druk op de MENU toets tot knippert op de display.
Druk op de ENTER toets, de display begint te knipperen.
Gebruik de DOWN en UP toetsen om (lamp modus AAN) of (lamp modus UIT) modus te
selecteren.
Wanneer de gewenste modus op de display wordt weergegeven, druk dan op de ENTER toets om uw
keuze tebevestigen.
(anders keert hij na 8 seconden automatisch weer naar de hoofdfuncties zonder ietsgewijzigd te hebben)
Om naar de functies terug te keren zonder iets te wijzigen moet u weer op de MENU toets drukken.
NEDERLANDS HANDLEIDING
BRITEQ® 36/68 BT-575W
Reset
Wordt gebruikt omeen algemene reset van het toesteluit tevoeren.
Druk op de MENU toets tot knippertop de display.
Druk op de ENTER toets om alle kanalen terug in te stellen volgenshunstandaardwaarde.
Druk op de MENU toets om naar de functies weer te keren.
Gelieve ook het hoofdstuk over de DMX kanaalconfiguratie van het toestel om een reset via DMX uit te
voeren.
HOME POSITION ADJUST:
Druk op de MENU voor tenminste 5
seconden om de offset modus te
activeren.
Nu kan u de home position ( dit is de
zero positie) aanpassen.
Wanneer u de gobo en kleur home
position wilt aanpassen dient u eerst
de modus te gebruiken.
De mogelijke functies worden
hieronder weergegeven:
Pan offset
Druk op de MENU voor tenminste 5 seconden om de offset modus te activeren.
Gebruik de DOWN en UP toetsen tot tot op de display weergegeven wordt.
Druk op de ENTER toets, de display begint te knipperen.
Gebruik DOWN en UP om de pan homeposition aan te passen.
Wanneer de positie is geselecteerd, druk dan op de ENTER toets OF ga automatisch terug naar de
offset functies zonder veranderingen door te voeren door op de MENU toets te drukken
Om terug te gaan naar de hoofdfuncties zonderenige veranderingen door tevoeren wacht 8 seconden.
Tilt offset
Druk op de MENU voor tenminste 5 seconden om de offset modus te activeren.
Gebruik de DOWN en UP toetsen tot tot op de display weergegeven wordt.
Druk op de ENTER toets, de display begint te knipperen.
Gebruik DOWN en UP om de tilthome position aan te passen.
Wanneer de positie is geselecteerd, druk dan op de ENTER toets OF ga automatisch terug naar de
offset functies zonder veranderingen door te voeren door op de MENU toets te drukken
Om terug te gaan naar de hoofdfuncties zonder enige veranderingen door tevoeren wacht 8 seconden.
Color offset
Druk op de MENU voor tenminste 5 seconden om de offset modus te activeren.
Gebruik de DOWN en UP toetsen tot tot op de display weergegeven wordt.
Druk op de ENTER toets, de display begint te knipperen.
Gebruik DOWN en UP om de color home position aan te passen.
Wanneer de kleur is geselecteerd, druk dan op de ENTER toets OF ga automatisch terug naar de offset
functies zonder veranderingen doorte voeren door op de MENU toets te drukken
Om terug te gaan naar de hoofdfuncties zonder enige veranderingen door tevoeren wacht 8 seconden.
Table of contents
Languages:
Other Briteq Speakers manuals