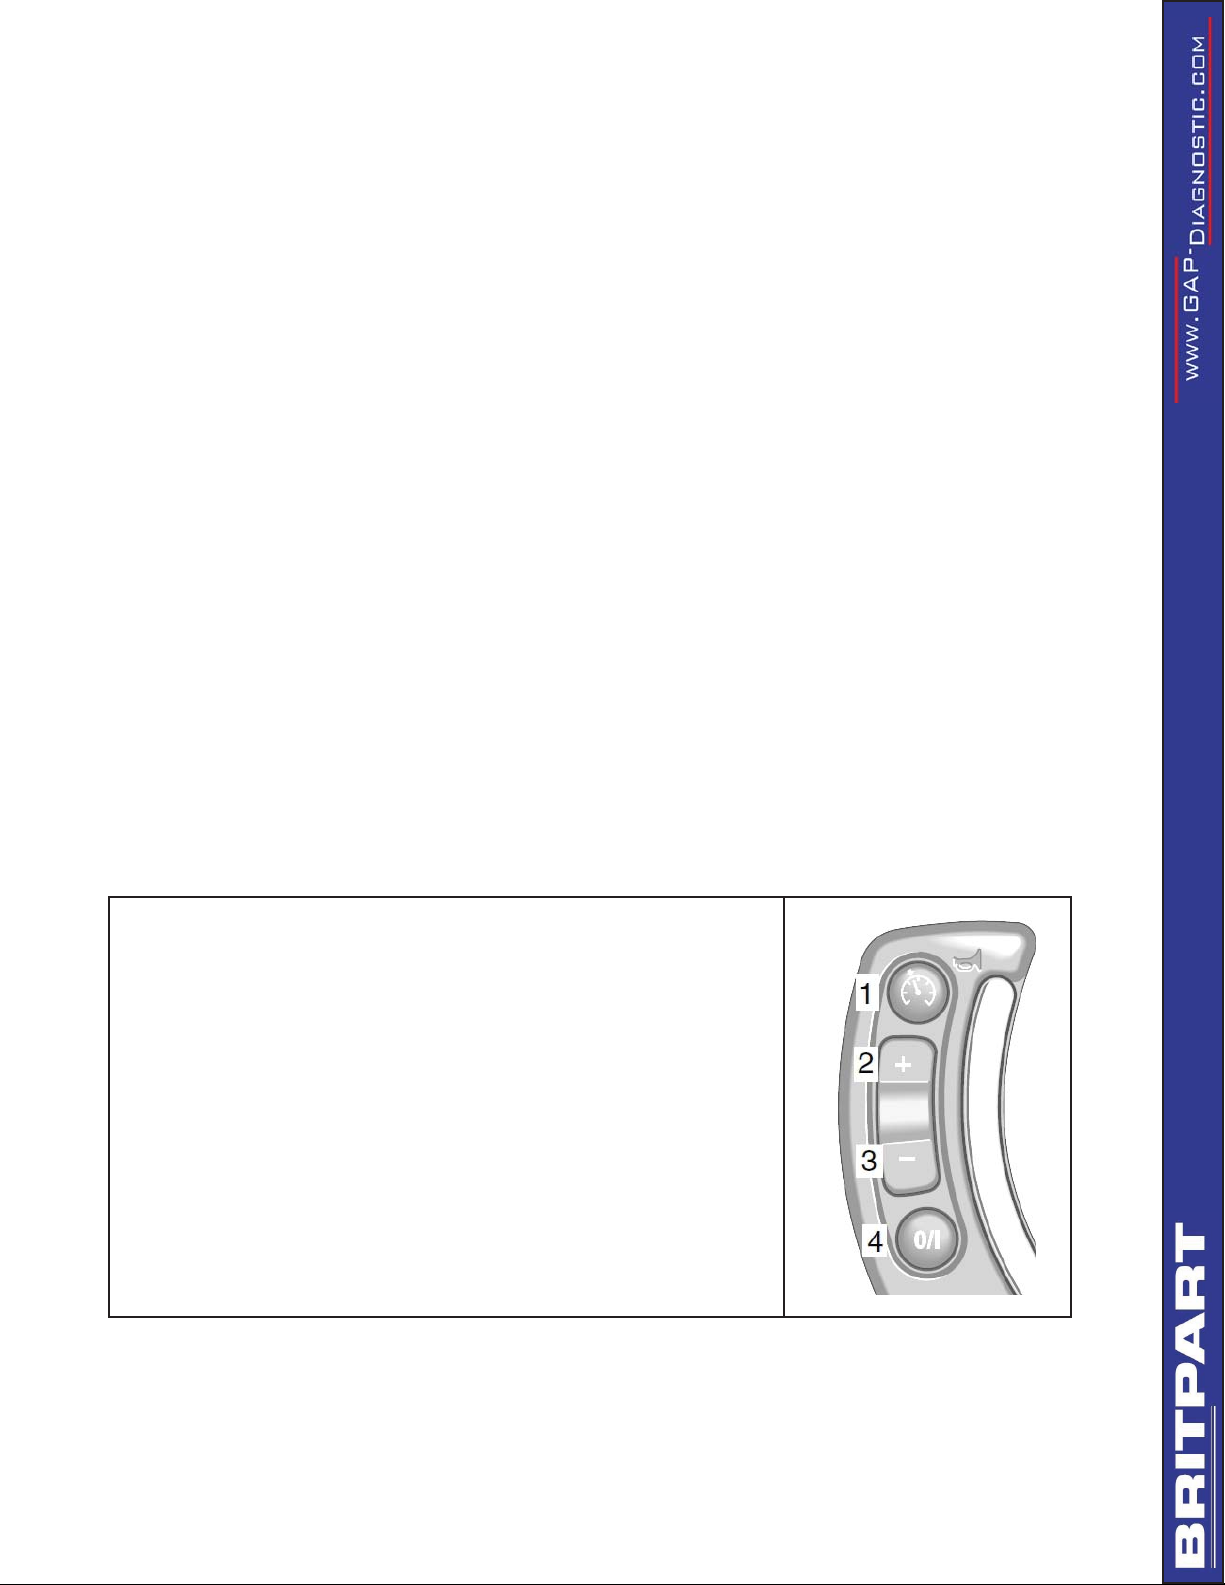
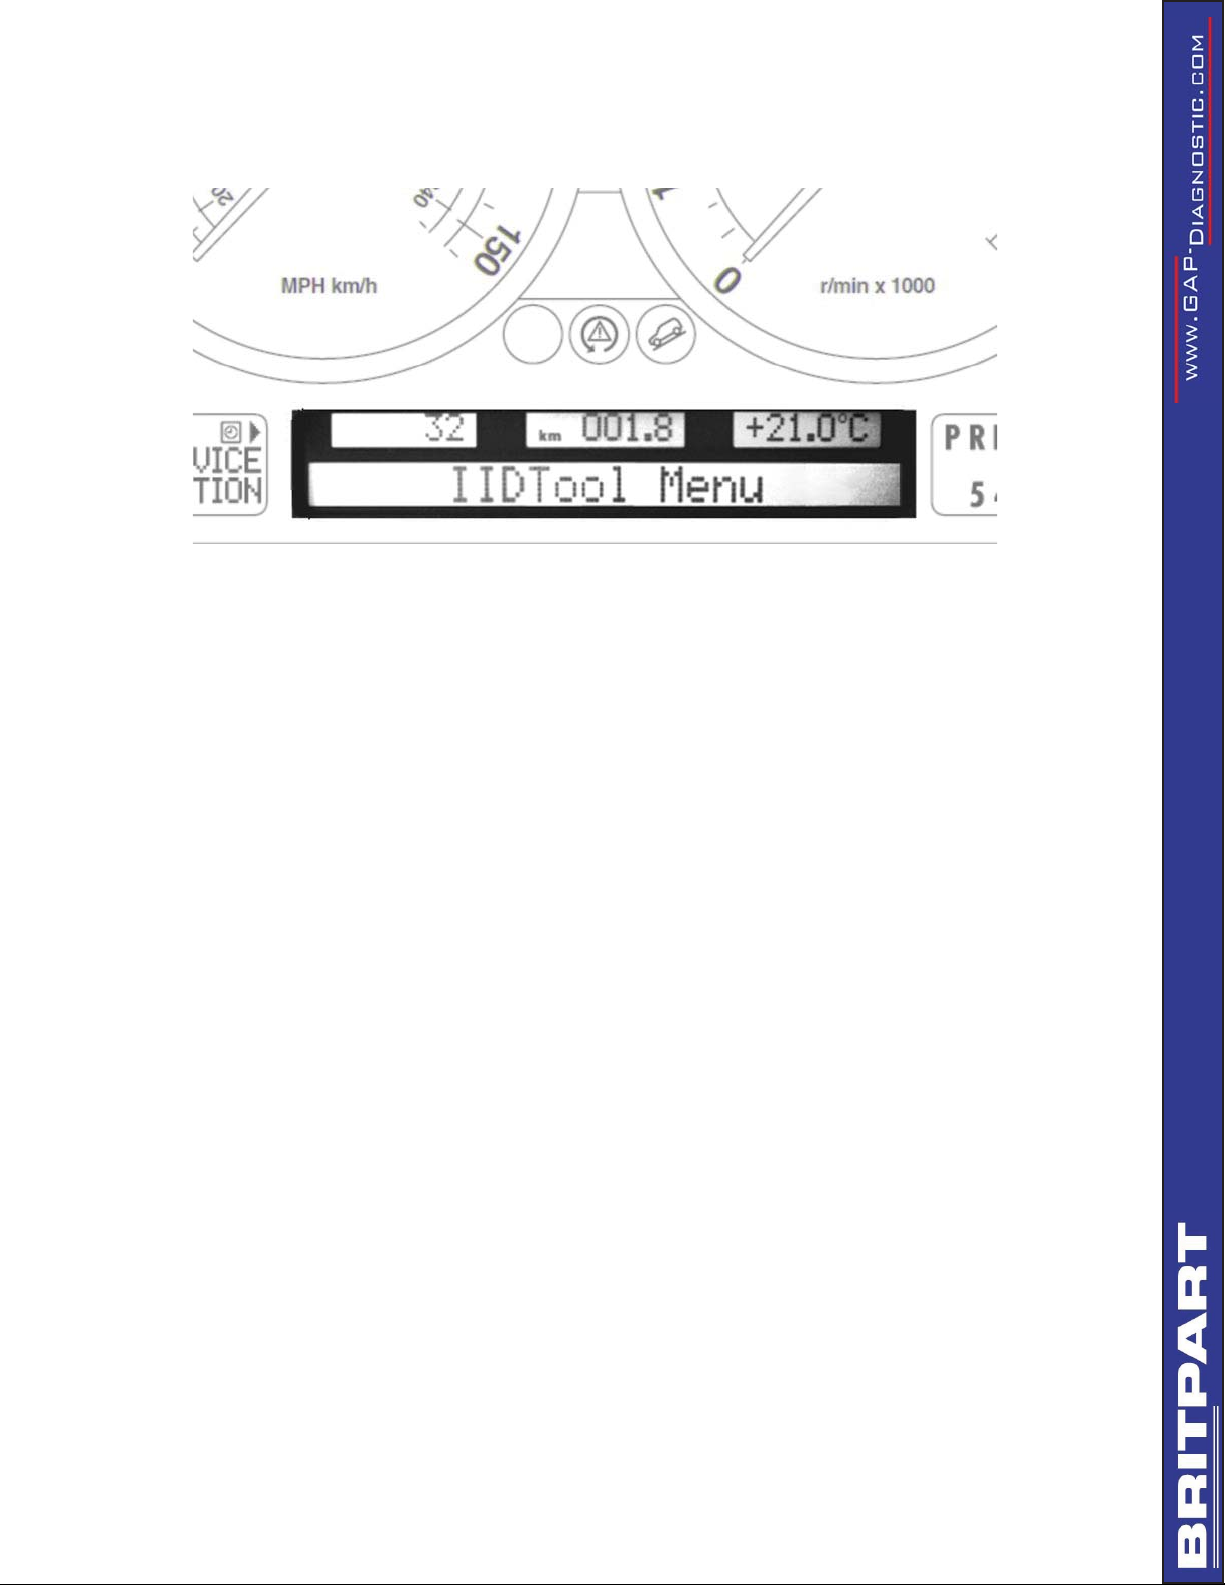
Britpart IIDTOOL User manual

IIDTool
for
Range Rover L322
2002-2005
By
1
User manual
Document version: 2.17.12
For Firmware: V2.17.03

2
IIDTool
Warning
The IIDTool allows changes to vehicle settings to a state outside of
the original manufacturer specification. It is the sole responsibility
of the user to choose secure settings for the applicable use of the
vehicle.
The IIDTool is not designed to be left in place for long periods. Please
unplug after use!
Disclaimers
Neither the distributor (Britpart-Border Holdings (UK) Ltd- and its resellers) nor the manufacturer (GAP
Diagnostic, Inc.) accept any responsibility or liability for damages incurred through use of the IIDTool.
This includes all damages to the vehicle itself, vehicle systems or property. This also includes injuries
to the user or other persons. The warranty is limited to the functionality of the IIDTool itself (for further
warranty details, please consult the last page of this document). This includes especially:
• Damages incurred through improper use of the IIDTool
• Damages incurred through the use of the IIDTool to change vehicle configuration and / or settings
• Damages incurred by changing the height settings of the electronic air suspension. Changing
the height settings either up or down can make the vehicle less stable. Do not drive vehicles in
an unstable condition!
• Damages incurred through clearing faults without effecting proper repairs
The IIDTool is a powerful diagnostic device that allows the reading and clearing of logged faults as well
as changing vehicle configuration and / or settings. It is designed for use by very well-informed indivi-
duals or professional automotive technicians. It is the sole responsibility of the user to make sure
that he has the necessary skills and training required to use the IIDTool.
Read this instruction manual carefully!
GAP Diagnostic 29/01/2013 All right reserved
User manual: V2.17.12, Firmware V2.17.03
Range Rover L322 2002-2005

3
IIDTool
Terms and conditions
Do not copy or reverse engineer
While considerable effort has been made to make the information provided in this section as complete
and accurate as possible, it does not and cannot cover all possible situations. The authors cannot
accept any responsibility for any damages which may occur from the use or misuse of these proce-
dures, nor can the authors accept any responsibility for any damages which may result from personal
injury or property damage which allegedly may be caused by the use or misuse of these procedures.
No responsibility is accepted for missing or incorrect information. Those who use these procedures
shall accept all responsibility for performing the work which may be described below.
GAP Diagnostic 29/01/2013 All right reserved
User manual: V2.17.12, Firmware V2.17.03
Range Rover L322 2002-2005

4
IIDTool
GAP Diagnostic 29/01/2013 All right reserved
User manual: V2.17.12, Firmware V2.17.03
Range Rover L322 2002-2005
Table of content
I. Getting Started 6
II. Using the IIDTool 11
III. Menu tree 12
IV. Top Level Menu Options 13
V. Limited Warranty 32

5
IIDTool
Glossary
ECU : Electronic Control Unit. An ECU is an embedded system that controls one or more systems or
subsystems present in a motor vehicle.
EAS : Electronic Air Suspension. This defines all the components of the air suspension system.
CAN : For ControllerArea Network, is a communication protocol which connects ECUs via a two wires
interface.
GAP Diagnostic 29/01/2013 All right reserved
User manual: V2.17.12, Firmware V2.17.03
Range Rover L322 2002-2005

6
IIDTool
I. Getting Started
1. Introduction
IIDTool stands for Integrated Interface Diagnostic Tool. In using this diagnostic system, the vehicle’s
controls and display are used to interface with the tool.
When the firmware is completed* the IIDTool will allow complete diagnostic functionality (aside from
flashing ECUs): fault reading and clearing, viewing live data and manually activating components, and
programming / new component initialization.
* Full functionality on all vehicle systems should be available by autumn 2012. Firmware upgrades are
done via the internet and USB. Full functionality in the end version may not include all functions of the
OEM T4/IDS unit; re-flashing firmware to ECU’s will not be supported.
With the firmware version 2.17 the IIDTool has full diagnostic functionality for the EAS as well as the
ability to read fault codes of all other diagnosable modules connected on the communications busses.
Live values viewing and car configuration (personalization) capabilities are included.
2. Controls
Your IIDTool needs no additional cables or power supply. The USB connector is only used when upda-
ting the tool’s firmware.
GAP Diagnostic 29/01/2013 All right reserved
User manual: V2.17.12, Firmware V2.17.03
Range Rover L322 2002-2005
The IIDTool is controlled with the vehicle’s cruise control
switchgear.
The functions are:
1. Resume = Enter*
2. Speed + = Menu up / increase value
3. Speed - = Menu down / decrease value
4. On/Off = Back one level / Exit
*When viewing a configuration in the car configuration menu,
pressing the resume button will show the next available option
for this configuration.

7
IIDTool
Information is displayed in the instrument cluster message center. Due to limited space, longer mes-
sages such as error codes are scrolled through automatically.
GAP Diagnostic 29/01/2013 All right reserved
User manual: V2.17.12, Firmware V2.17.03
Range Rover L322 2002-2005

8
IIDTool
3. Activating the IIDTool
The IIDTool is VIN locked and must be activated for each vehicle it is used on. To activate the IIDTool,
you will need access to the exact vehicle it will be used on. Once your activation code is noted, you will
need an internet connection to get your unlock code.
1. Ensure that the vehicle is in Park and in a safe environment.
• If the vehicle is outside, start the engine.
• If in a garage, turn the key to the ON position.
• If you plan to use the device for more than 10 minutes with the engine not running, connect
a power supply (Midtronic’s PSC-550 or equivalent) to the vehicle battery.
Note: Battery chargers are not suitable due to poor line regulation.
The OBD connector is located at the top of
the cubby box in the lower dash finisher on
the driver’s side of the vehicle. Hinged co-
ver must be opened for access.
GAP Diagnostic 29/01/2013 All right reserved
User manual: V2.17.12, Firmware V2.17.03
Range Rover L322 2002-2005

9
IIDTool
2. Connect the IIDTool and wait until the message «IIDTool Ready» appears on your instrument
display. You can now call up the IIDTool by pressing the resume button for 2 seconds.
3. Amessage indicating that the tool is not activated will appear. Press resume again for the acti-
vation code.
4. Take note of the 10 characters code, go to our website and follow the instructions to retrieve
your unlock code.
http://www.GAP-diagnostic.com/support/unlock.html
5. Go back to the vehicle and follow steps 1. to 4. Press resume once more and enter the unlock
code using the + and – buttons to change characters and resume to go to the next character.
If you make a mistake, exit the IIDTool menu with the cruise control on/off button and re-enter
the menu with a 2 sec. press/hold of the resume button.
Once the unlock code is entered correctly, the IIDTool will backup the original suspension calibra-
tion and the CCF content (2005 only). Confirmation messages will appear and the unit will enter the
menu.
GAP Diagnostic 29/01/2013 All right reserved
User manual: V2.17.12, Firmware V2.17.03
Range Rover L322 2002-2005

10
IIDTool
• You can use your IIDTool on more than one up to 10 vehicles by purchasing additional VIN
licenses from a Britpart dealer. Once you have your new license(s), connect the IIDTool to a
new vehicle and follow the procedure above to activate the IIDTool for the new VIN. When you
access the GAP Diagnostic website to receive your unlock code you will be asked to enter
your new VIN license as well.
• The IIDTool does an automatic backup of the vehicle’s height settings when first used. For
details about the backup procedure, please consult the Save/Restore section of this manual.
• You can also unlock your IIDTool for future vehicles before connecting the unit to these parti-
cular vehicles. Please consult the Save/Restore section of this manual.
• When adding other vehicles, please refer to the Re-Scan procedure in this manual before
reading or clearing faults.
GAP Diagnostic 29/01/2013 All right reserved
User manual: V2.17.12, Firmware V2.17.03
Range Rover L322 2002-2005

11
IIDTool
II. Using the IIDTool
Use
1. Ensure that the vehicle is in Park and in a safe environment.
• If the vehicle is outside, start the engine.
• If in a garage, turn the key to the ON position.
• If you plan to use the device for more than 10 minutes with the engine not running, connect
a power supply (Midtronic’s PSC-550 or equivalent) to the vehicle battery.
Note: Battery chargers are not suitable due to poor line regulation.
2. Connect the IIDTool and wait until the message «IIDTool Ready» appears on your instrument
display. You can now call up the IIDTool by pressing the resume button for 2 seconds.
3. Navigate the menu by using the resume button to enter, the cruise control On/Off button to exit
or go back, and the + and – buttons to navigate up or down or change values.
4. To exit the IIDTool menu use the On/Off button to navigate to the top level menu and press
On/Off again or move the vehicle*. The message “Exiting Menu” confirms that the session is
terminated.
*Except while viewing a live value. Please read Section 6 Live Values for more details.
If the transmission is engaged with the tool connected, it will need to be disconnected before
re-using.
Remove the IIDTool from the OBD connector when done!
Additional Information’s
WARNING
Upon first use, some functions will display warning messages. The
first time these functions are used, the warnings messages will be
displayed 3 times and cannot be skipped. When these functions are
used again later, a press of the resume button cancels the warning
message.
By pressing the resume button, the user confirms that he has read
and understood the warnings.
GAP Diagnostic 29/01/2013 All right reserved
User manual: V2.17.12, Firmware V2.17.03
Range Rover L322 2002-2005

12
IIDTool
III. Menu tree Range Rover L322 2002-2005
GAP Diagnostic 29/01/2013 All right reserved
User manual: V2.17.12, Firmware V2.17.03
Range Rover L322 2002-2005

13
IIDTool
IV. Top Level Menu Options
1. Read fault
To view faults currently stored in any ECU, select the Read Fault option in the top level menu and
press the resume button to enter.
First use ECU scan
Upon first use (read or clear fault), the IIDTool will scan the vehicle and note the presence of all ECU’s
on the communications busses. When the scan is complete it will display the number of ECUs found,
for example, 12 in the following screenshot.
Checking for faults
The ECU list will now be displayed. The menu is navigated up and down with the + / - buttons.
Note: the IIDTool does not enter the ECU list at the bottom – you can scroll both up AND down from
the starting point. The list is not in alphabetical order.
Choose the ECU to be checked and press resume to enter. If there are no faults, the message ‘No
Fault Stored’ will appear and the IIDTool will automatically go back to the ECU selection menu.
GAP Diagnostic 29/01/2013 All right reserved
User manual: V2.17.12, Firmware V2.17.03
Range Rover L322 2002-2005

14
IIDTool
Faults (DTC – Diagnostic Trouble Codes) will be displayed in the standard format if available. If not
available, it will be displayed in hexadecimal format. Fault code descriptors are in plain English.
Should a fault be displayed without the plain English descriptor, please contact us at:
We will provide the corresponding descriptor.
Reading the fault output
Displayed fault in the example above: 2/5 A Compressor relay fault
As the display does not have enough characters, the message is scrolled through.
2/5: Faults are displayed with the prefix showing the fault number of the total number of faults stored in
the ECU. In the example the display is showing fault number two of five total faults stored in the EAS
ECU. If the third character is a +, there are more than 10 faults stored. Scroll through the fault list using
the +/- buttons.
A: Numeric DTC diagnostic trouble code designation.
Compressor relay fault: Plain English fault descriptor. This particular fault indicates a possible defect
in the electric circuit supplying the EAS compressor.
GAP Diagnostic 29/01/2013 All right reserved
User manual: V2.17.12, Firmware V2.17.03
Range Rover L322 2002-2005

15
IIDTool
2. Version
The IIDTool enters the top level menu at ‘Read Fault’ and displays the firmware version of the IIDTool
when the minus button is pressed.
3. Clear Fault
Specific ECU
Displays the ECU list and allows the clearing faults in one specific ECU. Scroll to the desired ECU and
press ‘Resume’to enter.All faults stored in this specific ECU will be cleared. The IIDTool automatically
exits the menu afterwards.
Clear All
Clears all faults stored in all ECU’s and exits the IIDTool. The number displayed when clearing all is not
related to the number of fault cleared but to the number of ECUs on which the faults where cleared.
4. Calibration
WARNING
The IIDTool allows changes to vehicle settings to a state outside of
the original manufacturer specification. It is the sole responsibility
of the user to choose secure settings for the applicable use of the
vehicle.
Notes:
• Different calibration values for each corner are normal – they do NOT need to be set to
the same value! These values represent arbitrary electrical values provided by the height sen-
sors. Correlating these values to the measured height of each corner is part of the calibration
procedure.
• If the values for the standard height are set too low (without raising the values for access and
motorway heights) the vehicle may reach the bump stops in access mode. If the height indi-
cator light continues blinking after the vehicle has been switched off, this can cause a battery
drain.
• The height values are given in millimeters . This does NOT correspond exactly to changes in
height at the wheel, though. Measure all values to be sure.
GAP Diagnostic 29/01/2013 All right reserved
User manual: V2.17.12, Firmware V2.17.03
Range Rover L322 2002-2005

16
IIDTool
• If the values for standard height are set too high (without lowering the offroad height or with
increased offroad heights) the suspension can reach a fully extended condition in off road
mode. In this condition, there is no suspension travel. There is severe risk of damage and
the vehicle can become uncontrollable in this state! GAP Diagnostic assumes no liability
for damages occurred in using the IIDTool.
• Changes in height are instantaneous in the EAS ECU but the ECU won’t apply these changes
immediately. The EAS ECU will adjust a corner when it’s +/- 10 mm or higher than the desired
height. For example if the corner is at +9 mm, it will not correct the height.
The calibration menu provides access to the height settings of the 4 suspension modes: standard,
access, motorway, and off-road.
For baseline calibration, the standard function allows height changes to each corner individually; for
height changes it allows changes to either front, rear, or all.
The access and motorway functions allow height changes for all corners simultaneously. The offroad
function allows separate height changes to front and rear.
Adjust All
This allows changes to the height of the whole vehicle from its current calibration - all four corners
simultaneously - at standard height. It also affects the other modes as the standard mode is the refe-
rence point. For example, if standard mode is lowered by 10mm, access mode, motorway, and off-
road height will also be 10mm lower.
GAP Diagnostic 29/01/2013 All right reserved
User manual: V2.17.12, Firmware V2.17.03
Range Rover L322 2002-2005
Values are changed up or down with the + / - buttons.
If two subsequent changes of -10mm are made, the vehicle will be -20mm (20mm lower) than the ori-
ginal height.

17
IIDTool
Front
Changes height of only the front axle in all modes. +10mm means the front will be 10mm higher in all
modes.
Rear
Changes height of only the rear axle in all modes. -10mm means the rear will be 10mm lower in all
modes.
Limits
The EAS ECU has internal absolute limits that limit the extent of possible height changes.
For example, if the current calibration is
Sensor Calibration height value (mm)
Front Left 157
Front Right 138
Rear Left 180
Rear Right 166
And the limits of the EAS ECU are
Sensor Limit Value (mm)
Upper Front 200
Upper Rear 200
Lower No Limits
The front can be raised by a maximum of 200 - 157 = 43 mm. The front can be lowered without a
maximum limit.
The rear can be raised by a maximum of 200 - 180 = 20 mm. The rear can be lowered without a maxi-
mum limit.
The IIDTool automatically calculates these values and allows only changes within these parameters.
Note: The maximum values for lowering and raising are found by trial and error. They will not be
the same on every vehicle.
GAP Diagnostic 29/01/2013 All right reserved
User manual: V2.17.12, Firmware V2.17.03
Range Rover L322 2002-2005

18
IIDTool
Front Left, Front Right, Rear Left and Rear Right.
WARNING
Calibration of individual sensors should only be attempted by expe-
rienced users. Read this section very carefully and only undertake a
calibration when the procedure is fully understood.
Serious damage can result if the procedure is performed improperly!
GAP Diagnostic assumes no liability for damages incurred through
use of the IIDTool.
Note: The values entered into the ECU vary according to sensor tolerances and settings. It is highly
unlikely that all 4 corner values will be the same. This is normal!
The settings and changes are given in millimeters but this does not correspond exactly to changes at
the wheel. Each change in height must be measured from the bottom of the wheel arch to the center
of the wheel. (as explained on the next page).
These menu items allow the calibration of the absolute value (in mm) of each height sensor. This is
necessary when height sensors or linkages are replaced or reinstalled. At a minimum, calibration can
be done on either axle, front or rear, but it is recommended that all four corners be calibrated simulta-
neously.
Steps:
1. Preparation: go to http://gap-diagnostic.com/support/downloads.html, download and print the
EAS Calibration Aid and Sample EAS Calibration Calculation. Place the vehicle on a flat,
level surface in standard mode. While small surface irregularities may not reduce the accuracy
of a calibration significantly, large irregularities can make the calibration harder to verify. The
calibration must be done outside with the engine running as the air suspension will not rise
when the engine is not running. Study these instructions and the Sample EAS Calibration
Calculation.
2. Use the IIDTool to take note of the actual calibration. Go to menu item ‘Live Value > Suepension
ECU > View Calibration’. Note down the values in the EAS Calibration Aid.
GAP Diagnostic 29/01/2013 All right reserved
User manual: V2.17.12, Firmware V2.17.03
Range Rover L322 2002-2005

19
IIDTool
3. To prepare the vehicle for height measurements, the vehicle must first be brought to a steady
state in standard height mode. To do this, change the height to off-road using the switch on the
console. Once at off-road height (off-road LED has stopped flashing), return to standard height
and again wait for the LED to stop flashing. Move the vehicle forward 5 meters and back to its
original position.
4. Navigate the IIDTool to ‘Live Values > Suspention ECU > View Current Height’.As the driver’s
weight affects the current height, the current height must be noted from outside the vehicle.
Open the driver’s window, exit the vehicle and leave the the door open slightly. This will prevent
the EAS ECU from making adjustments while measuring. Leave the IIDTool in ‘Live Values >
Suspention ECU > View Current Height’ mode for the following steps.
5. Measure the height in millimeters of each
corner from the bottom of the wheel arch
tothe centerof thewheel.Foreachcorner
take note of the current height displayed
on the cluster LCD (from outside) just be-
fore or after taking the measurement.
Make sure the measurement of each cor-
ner is noted at the corresponding spot.
•
GAP Diagnostic 29/01/2013 All right reserved
User manual: V2.17.12, Firmware V2.17.03
Range Rover L322 2002-2005

20
IIDTool
Option 1 : Calibrating the left sensor and using the right sensor as reference.
6. The correct calibration is achieved by adjusting only the left side of the vehicle to match the
right. Calculate the new calibration value for the left side using the formula below. To do the
calculation, fill in the table below or on the EAS Calibration Aid with the values noted for front
corners and repeat for rear corners.
All values are in millimeters
Front
Current Calibration Values Current Height Values Measured Heights
Front Left X= A= C=
Front Right B= D=
Rear
Rear Left X= A= C=
Rear Right B= D=
Calibration Formula
for left hand adjustment
All values are in millimeters
New Calibration
Value Left Front =Old Calibration
Value Left +Current
Height A -Current
Height B -Measured
height C +Measured
height D
=+--+
New Calibration
Value Left Rear =Old Calibration
Value Left +Current
Height A -Current
Height B -Measured
height C +Measured
height D
=+--+
*Please remember: when a value minus a negative value, the minus in the equation becomes a plus
(subtracting a negative number = adding a positive number). For example, 3 - -3 = 6
GAP Diagnostic 29/01/2013 All right reserved
User manual: V2.17.12, Firmware V2.17.03
Range Rover L322 2002-2005
Table of contents