Autophix 7910 User manual

7910
7910
OBDII For bmw Oil reset
BMS resetBATEPB reset
Tool SetupETCS reset

SAFETY PRECAUTIONS
ABOUT 7910
To prevent personal injury or damage to vehicles and/or the
scan tool, Read this instruction manual first and observe the
following safety precautions at a minimum whenever working on
a vehicle:
Always perform automotive testing in a safe environment Do
not attempt to operate or observe the tool while driving a
vehicle. Operating or observing the tool will cause driver
distraction and could cause a fatal accident.
Wear safety eye protection that meets ANSI standards.
Operate the vehicle in a well ventilated work area: Exhaust
gases are Poisonous.
Put the transmission in PARK (for automatic transmission) or
NEUTRAL (for manual transmission) and make sure the parking
brake is engaged.
Keep the scan tool dry, clean, free from oil/water or grease. Use
a mild detergent on a clean cloth to clean the outside of the
scan tool, when Necessary.
1) 7910 supports for BMW, Mini and Rolls-Royce brand cars. It
works on all the systems such as engine, transmission, ABS
and airbag etc.
2) Supports OBDII/EOBD Modes of operation
1. Coverage
• 2.8’LCD,320 X 240 pixels color screen
• Operating Voltage: 8V-18V.
• Operating Temperature: 0°C-60°C(32-140°F).
• Storage Temperature: -20°C-70°C(4-158°F).
2. Product specification
1

7910
3. Appearance and buttons description
1. LCD DISPLAY – Indicates test results. Backlit, 320 x 240
pixels display
2. [OK] BUTTON – Confirms a selection (or action) from a
menu.
3. ESC BUTTON – Cancels a selection (or action) from a menu
or returns to the menu.
OBDII For bmw Oil reset
BMS resetBATEPB reset
Tool SetupETCS reset
2
1
3 6
5
7
2
4
10
9
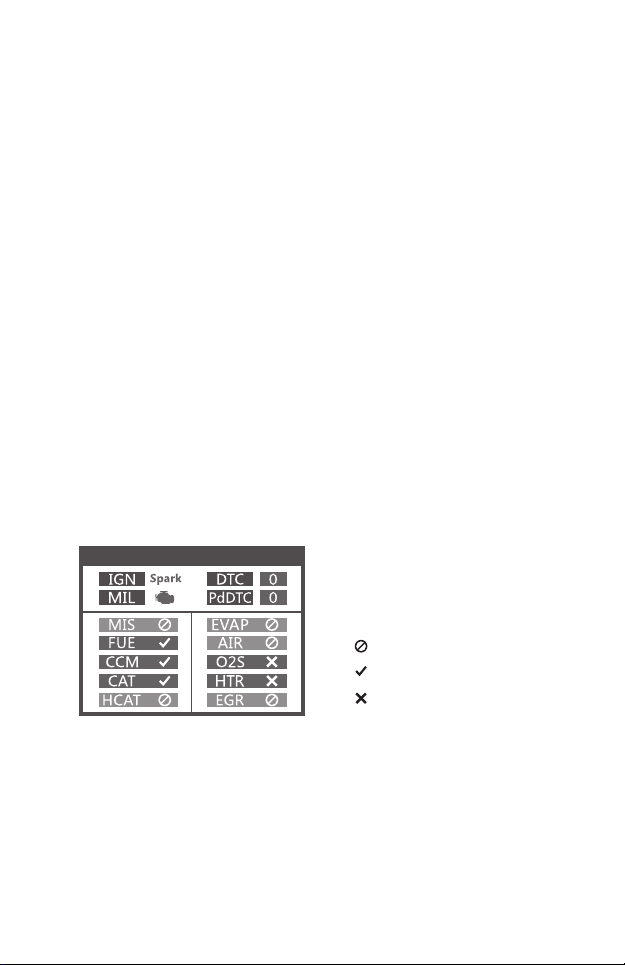
I/M Readiness
10. [READ DTC] BUTTON-Quick read the vehicle’s fault codes.
4. [LEFT ]SCROLL BUTTON –in the menu mode through the
menu and sub menu move to the left, when rolling in a data
interface, use the left button can be moved to the last screen.
5. [RIGHT] SCROLL BUTTON –In the menu mode through the
menu and sub menu item move to the right, when rolling in the
data interface, use the right button can be moved to the next
screen.
6. [UP] SCROLL BUTTON –in the menu mode through the
menu and sub menu item moving up. When retrieving data for
more than a screen by moving up the screen to the previous
screen for more data.
7. [DOWN] SCROLL BUTTON –In the menu mode through the
menu and sub menu item moves down. When retrieving data
more than one screen, by moving down the screen to the next
screen for more data.
8. OBD-16PIN CONNECTOR – Connects the scan tool to the
vehicle’s Data Link Connector (DLC).
9. [I/M] BUTTON - Quick State Emissions readiness check and
drive cycle verification.
3
Remarks:
MIL Yellow- Dashboard MIL ON
MIL Gray-Dashboard MIL OFF
-not support
-complete
-not complete
OPERATION INSTRUCTIONS
For example: Choose [For 5 Series] and select
[G38(2017-Present)] ,it displays as follow:
1.1 Turn the ignition on.
1.2 Locate the vehicle's 16-pin Data Link Connector (DLC).
2.1 For bmw
1. Connect 7910
2. 7910 Features
Choose [For bmw] and then select [For BMW Series Diagnose].
The screen will show all car series. As follows:
Select Brand
Last Test Shortcut
For BMW Series Diagnose
For MINI Series Diagnose
For Rolls-Royce Series Diagnose
Select System Diagnose
2/5
Select Chassis
F90(2017-Present)
G30/G31(2017-Present)
G38(2017-Present)
10/10
Select Series
For 1 Series
For 2 Series
For 3 Series
For 4 Series
For 5 Series
For 6 Series
For 7 Series
5/11
OBDII For bmw Oil reset
BMS resetBATEPB reset
Tool SetupETCS reset
4

Choose [Basic Functions] and it displays as follow:
2.2 Basic Functions
Select System Diagnose
CAS Car Access System
ECM Engine Control Module
ECM2 Engone Control Module 2
EGS Transmission
ABS/ACS/DSC Dynamic Stabilit...
SRS Air Bag
FPB Electronic Parking Brake
1/86
Select Menu
System Scan
Manual Select
2/2
Select Function
Basic Functions
Special Functions
Erase All Systems Fault Codes
1/3
System scan is to scan all vehicle systems.
Manual Select is to display all possible systems, select one of
the systems to diagnosis.
Choose [Manual Select] and it displays as follows:
For example: Choose [ECM Engine Control Module] and it
displays as follows:
Select System Diagnose
CAS Car Access System
ECM Engine Control Module
ECM2 Engone Control Module 2
EGS Transmission
ABS/ACS/DSC Dynamic Stabilit...
SRS Air Bag
FPB Electronic Parking Brake
1/86
Select Function
Version Information
Read Fault Codes
Erase Fault Codes
Read Datastream
1/4
5

2.2.1 Version Information
Select Function
Version Information
Read Fault Codes
Erase Fault Codes
Read Datastream
1/4
Select Function
Version Information
Read Fault Codes
Erase Fault Codes
Read Datastream
2/4
Select Function
Version Information
Read Fault Codes
Erase Fault Codes
Read Datastream
3/4
Choose [Version Information] and it displays as follows:
Version Information
Diagnosis Index: 0F2426
2.2.2 Read Fault Codes
Choose [Read Fault Codes]. Press up or down button to check
each fault code as follows:
Read Fault Codes
29CF Combustion misfires
Cylinder 3
1/20
2.2.3 Erase Fault Codes
Choose [Erase Fault Codes] then press [OK] button as follows:
Information
Erase fault codes!
Are you sure?
6

Select Function
Version Information
Read Fault Codes
Erase Fault Codes
Read Datastream
4/4
Select Function
View All Items
Select Items
2/2
Select Datastream
All Datastream Of Page[v]
[v]
[v]
[v]
[v]
Engine speed[rpm]
DISA potentiometer voltage[v]
Throttle opening[%]
Throttle opening[%]
1~4/6
Choose [Read Datastream] then press [OK] button as follow:
Choose [Select Items] and press [OK] button as follows:
Press [LEFT] and [RIGHT] buttons to page
Press [UP] and [DOWN] buttons to select one by one
Press [OK] button to select the Datastream
Press [ESC] button to read Datastream
You need to press [OK] again to clear the fault codes. Or you
can press [ESC] button to give up clearing fault codes, as
follows:
Version Information
Erase fault codes had success.
Please wait 10 seconds, Turn ignition
off and Switch on again.
Read fault codes to verify.
2.2.4 Read Datastream
7

Select Function
Basic Functions
Special Functions
Erase All Systems Fault Codes
2/3
Select Function
CBS Function(Service Function)
Reset Control Unit
ECM Engine Control Module
Electric fuel pump
Battery Management
EPB Electronic Parking Brake
Steering-angle Sensor
1/9
CBS Function(Service Function)
Oil reset
CBS Reset
CBS Correction
1/3
Oil reset
This function will perform’
engine oil reset’ and ‘vehicle check
reset’.
Note!
The vehicle check is related to
the engine oil. After the oil is
Choose [Special Functions] and it displays as follows:
2.3 Special Functions
Choose [CBS Function (Service Function)] and it displays as
follows:
[CBS reset 1]: Engine oil, Spark plugs, Front brakes, Rear
brakes, Coolant, Diesel particle filter, Brake fluid, Micro filter,
Vehicle inspection, Exhaust emission inspection, Vehicle check.
[CBS reset 2]: Oil service, Inspection, Time interval, Correct
follow-on service, Display service interval status.
[CBS correction]: Engine oil, Spark plugs, Front brakes, Rear
brakes, Coolant, Diesel particle filter, Brake fluid, Micro filter,
Vehicle inspection, Exhaust emission inspection, Vehicle check.
2.3.1 CBS Functions
8
Select Function
CBS Function(Service Function)
Reset Control Unit
ECM Engine Control Module
Electric fuel pump
Battery Management
EPB Electronic Parking Brake
Steering-angle Sensor
3/9
ECM Engine Control Module
Reset adaptation values
Idle speed
Learning Valvtronic limit positi...
1/3
Choose [ECM Engine Control Module] and it displays as follows:
2.3.2 ECM Engine Control Module
Select Function
CBS Function(Service Function)
Reset Control Unit
ECM Engine Control Module
Electric fuel pump
Battery Management
EPB Electronic Parking Brake
Steering-angle Sensor
5/9
Choose [Battery Management] and it displays as follows:
Step 1: Use the up or down button to select the (2) option and
press the [OK] button to achieve register battery replacement
and display the following menu:
2.3.3 Battery Management
Special Functions
(2)
(3)
1/3
The battery
replacement is eneredin
the DME/DDE in the next
test step!
The engine does not
have to be running and
(1)
9
Special Functions
1/2
Selection
(1). Diasplay Kilometrr
reading of last battery
change and last but
one
(2). Register battery
(2)
(1)
Special Functions
2/2
Selection
(1). Diasplay Kilometrr
reading of last battery
change and last but
one
(2). Register battery
(2)
(1)

Step 2: Use the up or down button to select the (1) option and
press the [OK] button to display the following menu:
Special Functions
The battery replacement is
entered in the engine
electronics(DME or DDE)
Please wait!
10
Choose [EPB Electronic Parking brake] and it displays as
follows:
2.3.4 EPB Electronic Parking Brake
Select Function
CBS Function(Service Function)
Reset Control Unit
ECM Engine Control Module
Electric fuel pump
Battery Management
EPB Electronic Parking Brake
Steering-angle Sensor
6/9
EPB Parking brake
Workshop mode,Automatic Hol...
Startup-up,Automatic Hold br ake
1/2
Choose [Steering-angle sensor] and it displays as follows:
2.3.5 Steering-angle sensor
Select Function
CBS Function(Service Function)
Reset Control Unit
ECM Engine Control Module
Electric fuel pump
Battery Management
EPB Electronic Parking Brake
Steering-angle Sensor
7/9
Information
Exactly set front wheels to
staright - ahead position. The
steering wheel must be positioned
horizontally.(Approximate setting
suffient).
Preconditon for initialization of
Special Functions
The battery replacement was
registered successfully in the
DME/DDE)
The folloeing is now entered
in the DME/DDE:
Last battery replacement:
Select Function
Basic Functions
Special Functions
Erase All Systems Fault Codes
3/3
Note: The special features of each model are different,
please according to the actual operation.
Note: For BMW car after 2003.
Choose [Erase All Systems Fault Codes] and it displays as
follows:
You need to press [OK] again to clear the fault codes. Or you
can press [ESC] button to give up clearing fault codes. It shows
as the follow after clearing the fault codes.
2.4 Erase All Systems Fault Codes
Information
Erase fault codes!
Are you sure?
Information
Erase fault codes had
success.
Please wait 10 seconds, Turn
ignition off and Switch on again.
Read fault codes to verify.
11

Diagnostic Menu
Read Codes
Erase Codes
I/M Readiness
Data Stream
Evap System Test
Vehicle Information
1/6
1) Use the UP/DOWN scroll button to select Read Codes from
the Diagnostic Menu and press [OK].
If there are no Diagnostic Trouble Codes, the display indicates
"No (pending) codes are stored in the module!" Wait a few
seconds or press any key to return to the Diagnostic Menu.
Pending Codes will not turn on the malfunction indicator light,
and codes will be cleared from memory if there is no failure
during the following warm-up period.
3.1 Read Codes
3. OBDII System
Stored codes are also known as "hard codes" or "permanent
codes". These codes cause the control module to illuminate
the malfunction indicator lamp (MIL) when an emission-related
fault occurs.
Pending Codes are also referred to as "maturing codes" or
"continuous monitor codes".
It indicates the problem that control module has detected
during the current or last driving cycle, but they are not
considered seriously.
12

2) View DTCs and their definitions on screen.
The control module number, sequence of the DTCs, total
number of codes detected and type of codes (Generic of
Manufacturer specific) will be observed on the upper right hand
corner of the display.
Notes:
This function is performed with key on engine off. Do not
start the engine. Before performing this function, make
sure to retrieve and record the trouble codes. After clear-
ing, you should retrieve trouble codes once more or turn
ignition on and retrieve codes again. If there is still some
trouble codes for hard troubles, please find the reason
caused the trouble code firstly, and then solve the problem.
Now, the trouble codes can be erased.
3.2 Erase Codes
DTC
P0143
Generic
1/8
Current
O2 Sensor Circuit Low Voltage
Bank 1 Sensor 3
13

Diagnostic Menu
Read Codes
Erase Codes
I/M Readiness
Data Stream
Evap System Test
Vehicle Information
2/6
1) Use the UP/DOWN scroll buttons to select Erase Codes from
the Diagnostic Menu and press [OK].
2) A warning message comes up asking for your confirmation.
3) Press [OK] to confirm.
Erase Codes
Clear/Reset Emission-Related
Diagnostic Information, AreYou
sure?
Erase Codes
Please Turn Ignition ON with
Engine Off, Press OK key to
continue!
Erase Codes
Emission-Related Diagnostic
Information has been cleared!
14

Diagnostic Menu
Read Codes
Erase Codes
I/M Readiness
Data Stream
Evap System Test
Vehicle Information
3/6
I/M Readiness
Since DTCs Were Cleared
This Drive Cycle
1/2
Diagnostic Menu
Read Codes
Erase Codes
I/M Readiness
Data Stream
Evap System Test
Vehicle Information
4/6
Datastream
View All Items
Select Items
1/2
I/M refers to Inspection and Maintenance, that is legislated by
the Government to meet federal clean-air standards. I/M
Readiness indicates whether or not the various emissions-relat-
ed systems on the vehicle are operating properly and are ready
for Inspection and Maintenance testing.
The I/M readiness Monitor Status function also can be used
(after repair of a fault has been performed) to confirm that the
repair has been performed correctly, and/ or to check for
Monitor Run Status.
3.3 I/M Readiness
The OBDII Scan Tool is a special diagnostic tool that communi-
cates with the vehicle’s computer. The Scan Tool lets you view
“real-time” Live Data. This information includes value(volts, rpm,
temperature, speed etc.) and system status information (open
loop, closed loop, fuel system status, etc.) generated by the
various vehicle sensors, switches and actuators.
Press ENTER
3.4 Data Stream
15

Evap System Test
Evaportive system leak test
not supported
Diagnostic Menu
Read Codes
Erase Codes
I/M Readiness
Data Stream
Evap System Test
Vehicle Information
5/6
Vehice InformationDiagnostic Menu
Read Codes
Erase Codes
I/M Readiness
Data Stream
Evap System Test
Vehicle Information
6/6
This function enables the conditions required to conduct an
evaporative system leak test, but does not actually run the test.
The vehicle manufacturer is responsible to determine the
criteria to automatically stop the test.
Before performing this function, please check the vehicle's
service repair manual to determine the necessary procedures.
Select [Vehicle Information] and press [ENTER],the screen will
display the information such as VIN (Vehicle identification
Number),CID(Calibration ID)and CVN (Calibration verify
number).
3.5 Evap Leak Test
3.6 Vehicle Information
Vehicle Identification Number(VIN):
LVSFBFAC94F020950
Calibration Identifications(CID):
000007550753
Calibration Verification Numbers(CVN):
B5073064
16

Tool Setup
Language
Beeper
Instructions(Display at startup)
Unit of Measure
Skin Style
Feedback
Device Information
1/7
Language
English
Svenska
Suomalainen
Norsk språk
Dansk
Deutsch
Français
1/10
Choose [Language] and it displays as follows:
4. Tool Setup
4.1 Language
Tool Setup
Language
Beeper
Instructions(Display at startup)
Unit of Measure
Skin Style
Feedback
Device Information
2/7
Beeper
OFF
ON
1/2
Choose [Beeper] and it displays as follows:
4.2 Beeper
Choose [Instructions(Display at startup)] and it displays as
follows:
4.3 Instructions(Display at startup)
17

Tool Setup
Language
Beeper
Instructions(Display at startup)
Unit of Measure
Skin Style
Feedback
Device Information
3/7
Instructions(Display at startup)
OFF
ON
1/2
Tool Setup
Language
Beeper
Instructions(Display at startup)
Unit of Measure
Skin Style
Feedback
Device Information
4/7
Unit of measure
Mertic
Imperial
1/2
Choose Unit of measure and it displays as follows:
4.4 Unit of measure
18
Tool Setup
Language
Beeper
Instructions(Display at startup)
Unit of Measure
Skin Style
Feedback
Device Information
5/7
Skin Style
Sky Gray
Gem Blue
1/2
Choose Unit of measure and it displays as follows:
4.5 Skin Style

19
Tool Setup
Language
Beeper
Instructions(Display at startup)
Unit of Measure
Skin Style
Feedback
Device Information
6/7
1. If it shows connected error with vehicle or other problem
during using, please using the feedback function. Choose
[Feedback] and it displays as follows:
Next : Press EXIT Button several times and return to the main
menu.
2. For example: Register battery change fail Enter [Register
battery change] option, and do Register battery change again
(This step is very important)
Note : Keep tool connect with car in above steps.
3. After doing register battery change, disconnect with car.
4.6 Feedback
Feedback
Automatic recording is ready,
perform the related functions
that require feedback.
After the execution,
disconnect the car, connect to
the computer via USB use the
Table of contents
Languages:
Other Autophix Diagnostic Equipment manuals


