Brookstone iConvert User manual

Instant Scan Digital Frame
iConvert®

1
Warnings and Cautions2
Location of Parts and Controls 7
Remote Control Battery Installation11
Remote Control Operation11
Scanning11
Select a Storage Device14
Photo 15
Scanned Image22
Music 25
Audio Mode Menu 26
Video27
Video Mode Menu28
Calendar/Clock28
Calendar Mode Menu 29
System Setup31
Setup Mode Menu 31
Printing Photos32
Frequently Asked Questions33
Specications35
Warranty 37

2
TO REDUCE THE RISK OF ELECTRIC SHOCK, DO NOT REMOVE COVER
THERE ARE NO SERVICEABLE PARTS INSIDE
TO REDUCE THE RISK OF FIRE OR ELECTRIC SHOCK, DO NOT EXPOSE
THIS UNIT TO RAIN OR MOISTURE
The lightning flash with arrow-head symbol within an equilateral triangle
is intended to alert the user to the presence of uninsulated “dangerous
voltage” within the unit’s enclosure that may be of sufficient magnitude
to constitute a risk of electric shock
The exclamation point within an equilateral triangle is intended to alert
the user to the presence of important operating and maintenance
(servicing) instructions in the literature accompanying the unit
All the safety and operating instructions should be read, adhered to and followed
before the unit is operated
•
•

To reduce the risk of electric shock, burns, fire or injury:
Always unplug the unit from the electrical outlet immediately after using
Do not use while bathing or in a shower
Do not place or store unit where it can fall or be pulled into a tub or sink
Do not place in or drop into water or other liquid
Do not reach for unit that has fallen into water Unplug it immediately
Care should be taken so that objects do not fall and liquids are not
spilled, splashed or dripped onto the unit
Do not place objects filled with liquid, such as vases, on the unit
Turning off the main switch does not completely disconnect power
Unplug unit directly from power outlet when not in use
1
2
3
4
5
6
7
8
3

Keep away from children This is not a toy
Use this unit only for its intended use as described in this manual
Unplug this unit during lightning storms or when unused for long
periods of time
Never drop or insert an object into any opening
Protect the power cord from being walked on or pinched, particularly
at plug outlets, convenience receptacles and the point where it exits the unit
Do not allow cord to touch hot surfaces Wrap cord loosely around
the unit when storing
The unit should be situated away from direct sunlight or heat sources such as
radiators, electric heaters, heat registers, stoves or other units (including amplifiers)
that produce heat Avoid placing on top of stereo equipment that radiates heat
Never block the air openings of the unit with materials such as clothing,
plastic bags or papers, or place it on a soft surface such as a bed or couch,
where the air openings may be blocked
Do not overload electrical outlet Use only the power source as indicated
Do not carry this unit by cord or use cord as handle
Never operate this unit if it has a damaged cord or plug, if it is not working
properly, or if it has been dropped or damaged, or dropped into water If the
unit’s power supply cord or plug is damaged, do not attempt to fix it yourself
To avoid the risk of electric shock, do not disassemble or attempt to repair
the unit Incorrect repair can cause risk of electric shock or injury to persons
when unit is used
Do not operate in the presence of explosive and/or flammable fumes
Never remove the plug from the socket by pulling the power cord
1
2
3
4
5
6
7
8
9
10
11
12
13
14
4

5
This equipment has been tested and found to comply with the limits for a Class B
Digital Device, pursuant to Part 15 of the FCC Rules These limits are designed to
provide reasonable protection against harmful interference in a residential installation
This equipment generates, uses, and can radiate radio frequency energy and,
if not installed and used in accordance with the instructions, may cause harmful
interference to radio communications However, there is no guarantee that
interference will not occur in a particular installation
If this equipment does cause harmful interference to radio or television
reception, which can be determined by turning the equipment off and on,
the user is encouraged to try to correct the interference by one or more
of the following measures:
Reorient or relocate the receiving antenna
Increase the distance between the equipment and receiver
Connect the equipment to an outlet on a circuit different from that
to which the receiver is connected
Consult the dealer or an experienced radio/TV technician for help
This equipment complies with part 15 of the FCC Rules Operation is subject
to the following two conditions:
•
•
•
•

6
1 This equipment may not cause harmful interference
2 This equipment must accept any interference received, including interference
that may cause undesired operation
Modifications not authorized by the manufacturer may void the user’s authority
to operate this device

7

8
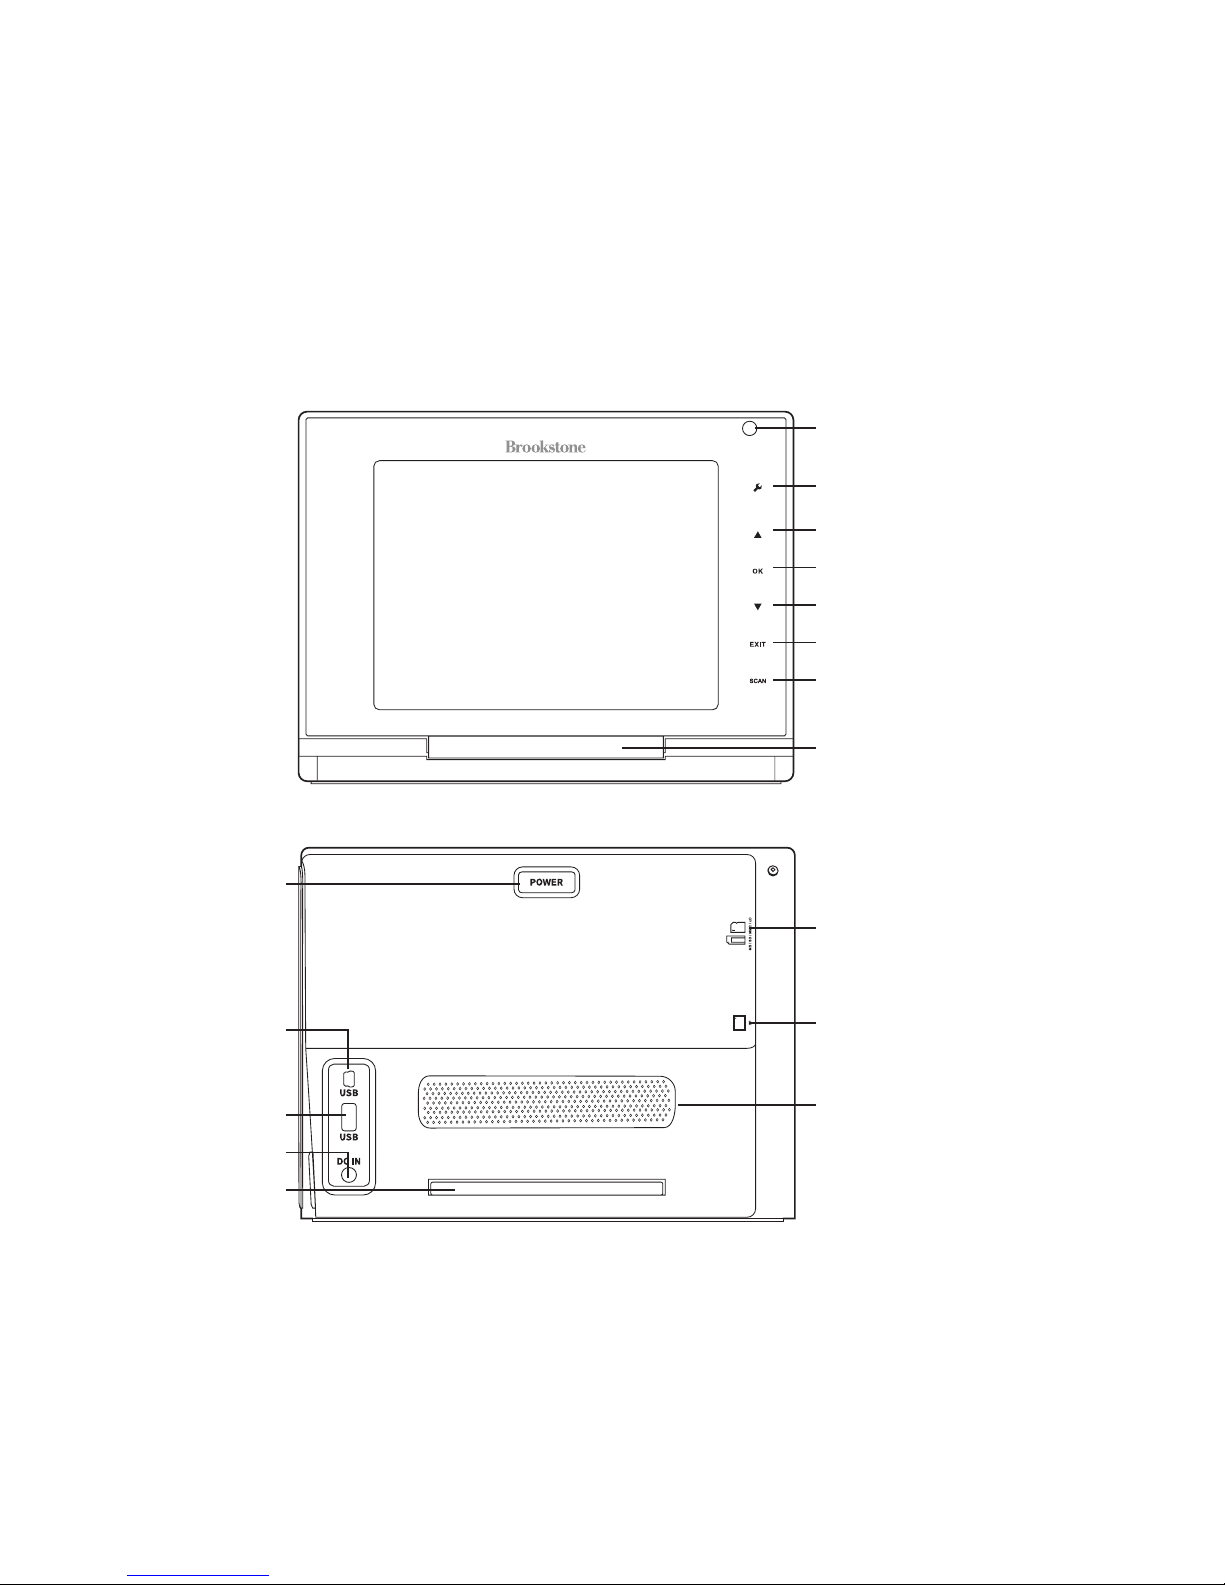
Remote Control Sensor: Receive the signals from remote control
Setup: Press to access the setup menu*
Up: Moves up in the menus*
OK: Press to make selections in the menus or setting modes*
Down: Moves down in the menus*
EXIT: Return to the previous menu or stop the playback under the Music mode*
SCAN Press to scan a photo*
Photo feed slot: Where you insert your photo for scanning
POWER/Standby button: Press to power on the unit Press and hold for
3-4 seconds to turn off Red light: Standby mode, Green light: power is on
Mini USB connector: Connects to a PC or a PictBridgeTM Printer
USB A-type connector: Connects to a USB flash drive
DC-IN: Connects to the supplied AC power adapter (12V, 083A)
Scanner output slot: Releases the photo after scanning
SD/MMC/MS/xD card slot: Accommodates an SD, MMC, MS or xD card
CF card slot: Accommodates a CF type I card
Speaker: Plays sound files
*Buttons may be used directly on the Digital Frame with Scanner itself,
or the remote
1
2
3
4
5
6
7
8
9
10
11
12
13
14
15
16

9

Press to access the Setup Menu
Press to return to the Main Menu
/ Moves left/right in the menus in all modes except Video mode
In Video mode, these buttons control fast backward/fast forward
during video playback
Press to playback the selected file
Press to pause the current playback file
Press to make the selection in the menu or setting modes
Press to rotate the photo by 90º clockwise in Browse mode
Press to enlarge photo in Photo mode Each press will enlarge the
photo in the sequence of 2x, 3x, 4x, 5x, and then revert to its original size
/ Press the button to increase and the button to
decrease sound Volume levels
Press to view photos in a Slideshow
/ Moves up/down in the menus
Returns to the previous menu or stop the playback under the
Music mode
Press to the Mute the volume
1
2
3
4
5
6
7
8
9
10
11
10

If the remote control is being used for the rst time, remove the insulating
mylar strip from the battery compartment to allow contact
To replace the battery, press and hold the battery release tab in
the direction of arrow as shown in the diagram on the back of the
remote control
Pull out the battery holder completely
Remove the old battery
Place a new CR2025 battery in the battery tray, positive side up
Slide the battery holder back into the remote securely
Point the remote control at the unit from no more than 10 feet and within 60° of
the front of the unit The operating distance may vary according to the brightness
of the room
Place smaller or damaged photos in the protective sleeve (included) to prevent damage
Protective sleeve should also be used if photos are not feeding into the scanner straight
Remove white cleaning cloth from inside the sleeve before use
1
2
3
4
5
6
11

Power on the unit
Press the button to enable the scan function
Adjust the Paper Feed Guide on the scanner to the size of your photo
Insert the picture in the Protective Sleeve (if needed) face up and push it
forward into the Photo Feed Slot until the picture is automatically pulled in
and scanned
Do not press any buttons or touch photo while the scanning is in progress Wait
until the process is complete
Once the scan process is completed, a
scanner menu will appear on the screen
(see below) Press or to select your
desired choice
To rotate the scanned photo, press or to highlight , then press
The scanned photo will be rotated Each time the is pressed, the photo will
rotate by 90° clockwise
1
2
3
4
5
12

Press or to highlight , then press to save A status
message will appear on the screen to indicate when the photo is saved
To erase the image you just scanned and scan a new photo, press or to
highlight , then press The previously scanned photo
will be erased, and the unit will be ready to scan the next photo
Image showing the
photo being saved
is in progress
13

Press or to highlight mode, then press to exit and return
to the Scanned Image mode The last scanned photo will not be saved in the
internal memory
14
This photo frame can play back content from internal and external memory devices
such as USB flash drives, and memory cards (MMC, SD, MS/MS pro, CF type I, and
xD cards) typically used with digital cameras More than one external memory device
can be inserted at the same time However, the photo frame can only select one
memory device at a time for playback of its content
Power on the unit The Device Select
menu will appear on the screen
When a memory device is inserted,
its corresponding icon will light up
(see below) Use the / / /
buttons to highlight the desired
storage device, then press /
to enter
After selecting a memory device, the
Main Menu will appear on the screen
(see to the right)
1
2
3

THUMBNAIL MODE
1 From the MAIN MENU, select Photo and
press to enter All photos stored
in the selected storage device will be
displayed via thumbnail mode first
2 Use the / / / buttons to
navigate thumbnails Highlight the photo
you would like to view and press to
view it full screen
PHOTO THUMBNAIL MODE SETTINGS
During the thumbnail mode, you may
select a photo then press to access
the Settings menu
2 Use the / / / buttons to
browse through available options,
and press to select desired option
(see chart below)
1
15

16
Press to access the Settings menu When finished, press to exit
MENU OPTIONS DESCRIPTIONS
Copy to This option allows you to copy the selected photo and/or
scanned image from the current memory device to other
available memory device(s) Available memory devices will be
displayed when this option is selected
Delete To delete the selected photo, select Yes
Otherwise choose No to cancel
Mark This function allows you to select multiple photos
to copy or delete* (page 19)
System Setup Bring up the System Setup menu

17
Allows you to select multiple photos to copy or delete
if you want to select multiple photos It will bring you back to the
thumbnail screen for photo selection Use the / / / buttons and press OK to
make your selection (see below) A check mark will appear on all selected photos Press
to return to Settings menu to continue Copy to, or Delete function
: Select to choose all the photos in the folder
Selects to clear your selection(s)
: From the Thumbnail mode, select a photo then
press to enter the Browse mode (see below)

18
: Photos can be manually rotated by pressing the button (on the remote)
in full screen mode Each press of this button will rotate the photo by 90º clockwise
: Landscape or portrait display of a photo will be automatically switched
according to the unit orientation If the horizontally placed photo frame is rotated
right by 90˚, the displayed photo will automatically rotate counter-clockwise by 90˚
If the vertically placed photo frame is rotated left by 90˚, the displayed photo will
automatically rotate clockwise by 90˚ You must advance to the next or previous
picture for the orientation to change
: Press to zoom in on a photo Each time the button is pressed, the photo
will be enlarged in the sequence of X2, X3, X4, and X5 Use the / / /
buttons to navigate around the magnified area At X5 zoom press the button again
to return it to its original size
(see below and on the following page)
During the Browse mode, press to bring up the Settings menu
Use the / / / buttons to browse through available options,
and press to select your choice when highlighted
Note: To return to the Browse mode, press
1
2
3

19
Press to access the Settings menu When finished, press to exit
Copy to This option allows you to copy the selected photo
from the current memory device to other available
memory device(s)
Delete To delete the selected photo, select Yes Otherwise
choose No to cancel
Print Select Yes to print the current photo Otherwise
choose No to cancel To print, the frame needs
to be connected to a PictBridgeTM compatible printer
See page 34 for printer setup instructions
Adjust LCD color This option lets you adjust the brightness, contrast,
tint and color of the LCD screen
Use and to highlight the desired option, then
use and to increase or decrease the level
Press to exit
System Setup Bring up the System Setup menu
Other manuals for iConvert
6
Table of contents
Other Brookstone Scanner manuals

Brookstone
Brookstone iConvert Scanner V2 User manual

Brookstone
Brookstone iConvert User manual

Brookstone
Brookstone Wi-Fi Scanner Wand User manual

Brookstone
Brookstone Photo Scanner User manual

Brookstone
Brookstone Scanner Mouse User manual

Brookstone
Brookstone Instant Slide & Negative User manual

Brookstone
Brookstone iConvert User manual

Brookstone
Brookstone iConvert User manual

Brookstone
Brookstone iConvert User manual

Brookstone
Brookstone iConvert User manual