www.brothermax.com www.brothermax.com
14 15
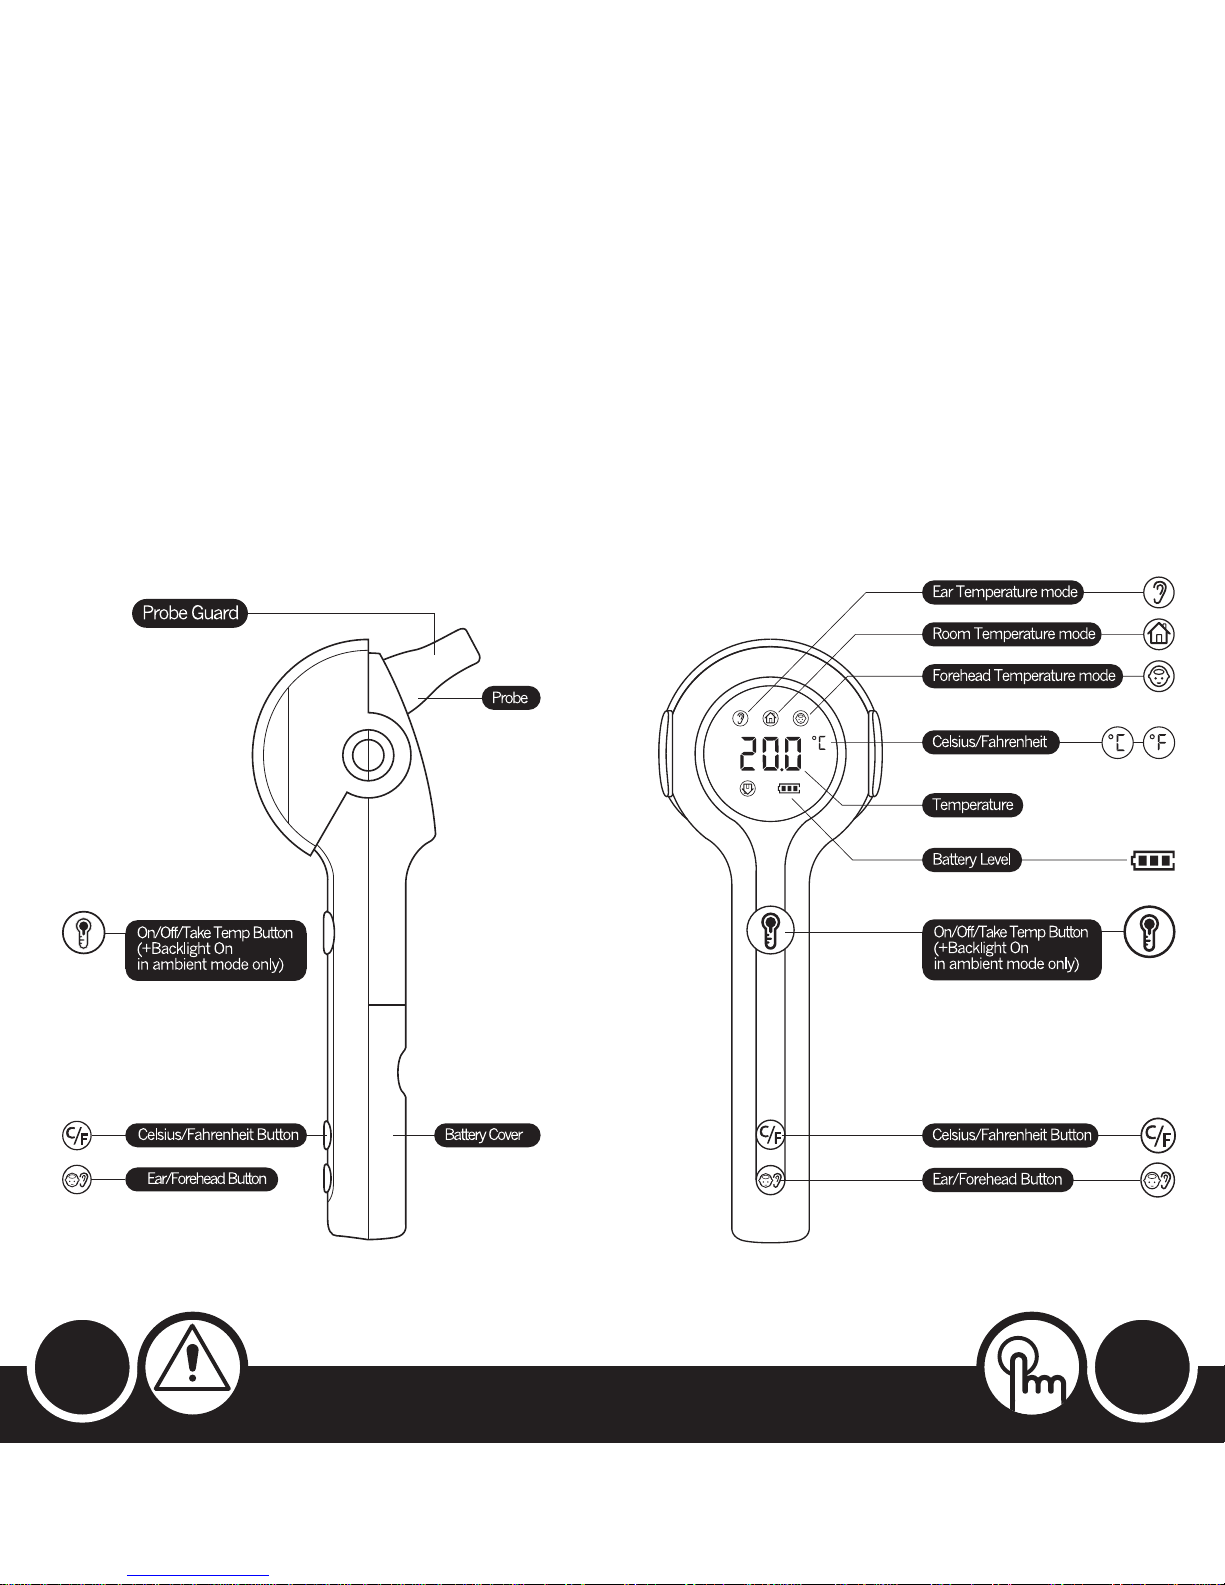
5 Measuring Ear or Forehead Temperature:
•If ONwiththeprobeOUT(Fig.6),thethermometerisinEar
orForeheadtemperaturemode.Thescreenwilldisplayeither
anEarorForeheadicontoindicatewhichtemperaturemodeit
iscurrentlyin,anditwillalsodisplaythelastearorforehead
temperaturetaken.
•If itisinEarmodebutyouwantForeheadorviceversa,see7
forswitchingbetweenEarandForeheadmodes.
Measuring Ear Temperature:
•Placetheprobegentlyintotheear,brieflypressthe‘On/Off/
TakeTemp’buttonandleavetheprobeincontactwiththe
earuntilabeepsounds.Thenremovetheprobeandreadthe
temperatureonthescreen.
Measuring Forehead Temperature:
•Placetheprobegentlyonyourlefttemple,pressandKEEPpressed
the‘On/Off/TakeTemp’button,movetheprobeacrossyour
foreheadtotherighttemple-alwayskeepingtheprobein
contactwithyourforehead-andthenletgoof the‘On/Off/Take
Temp’button.Onceabeepsounds,removetheprobefromyour
foreheadtoreadthetemperatureonthescreen.
•Thebacklightwillautomaticallyturnitself off after10seconds.
Note: Make sure you are in the correct mode before taking the temperature
by checking if the screen is displaying an Ear or Forehead icon.
It takes 1 second to read forehead temperature and 1 - 2 seconds to read
ear temperature.
6 Switching Between Ambient and Body (Ear or Forehead)
Temperature Modes:
•If ONwiththeprobeIN(Fig.5seepage13),switchtoBody
(EarorForehead)temperaturemodebyopeningtheprobe
guardandthenfoldingtheprobeOUT.Ashortbeepwill
soundtoconfirmthatithasnowchangedtoEarorForehead
temperaturemode.
•If ONwiththeprobeOUT(Fig.6seepage13),switchto
AmbienttemperaturemodebyfoldingtheprobeINandthen
closingtheprobeguard.Ashortbeepwillsoundtoconfirmthat
ithasnowchangedtoAmbienttemperaturemode.
7 Switching Between Ear or Forehead Temperature Modes:
•Brieflypress‘Ear/Forehead’buttontochangebetweenEar
andForeheadmodes.Ashortbeepwillsoundtoconfirmthis
changeandthescreenwilldisplayanEarorForeheadiconto
indicatewhichtemperaturemodeitisin.Itwillalsoshowthe
lasttemperaturetakeninthatmode.
Note: Pressing the ‘Ear/Forehead’ button when in Ambient mode will
produce no response.
8 Switching Between Celsius and Fahrenheit:
•Brieflypress‘Celsius/Fahrenheit’buttontoconvertbetweenCelsius
andFahrenheit.Ashortbeepwillsoundtoconfirmthischange.
9 Backlight:
•ToturnthebacklightONagainafterithasautomaticallyturnedOFF:
•InAmbienttemperaturemode,brieflypressthe‘On/Off/Take
Temp’button.
•InEarorForeheadtemperaturemodes,re-takethe
temperature,orswitchbetweenCelsiusandFahrenheit,or
switchbetweenEarandForeheadtemperaturemodes.
•AshortbeepwillsoundtoconfirmthatthebacklightisnowON.
Note: The backlight will always automatically
switch itself off after 10 seconds.
10 Probe Guard:
•Youcanopenorclosetheprobeguardbyflippingitupordown.
•AlwayskeeptheprobeguardclosedinAmbienttemperature
modeoraftermeasuringearorforeheadtemperatureto
preventabuildupof dirtanddustontheprobe,whichmay
giveaninaccuratetemperaturereading.
11 Switching Display Direction on Screen:
•InAmbienttemperaturemode,thescreenautomaticallyflips
upordown-dependingonwhichwaythethermometerisbeing
held(byhandoronthestand)-soitcanalwaysbereadinthe
correctorientation.Ashortbeepwillsoundaftereachtimethe
screendisplayflipsupordown.
•Youwillalsohearasoft‘ticking’soundwhenyouturnthe
thermometerupsidedown.Thisisnotafault!Itisthe‘tilt
switch’thatenablesthescreentoalwaysknowwhichwayupit
shouldbe,doingsowithouttheneedformercury.
How To Use the Accessories
1 Stand:
•TheStandisprovidedsothethermometercanbeconveniently
andsafelypositionedwhilstmeasuringAmbienttemperature
and/orsoyoualwaysknowwhereitis.
•OnceontheStand,thethermometerisfreetorotatethrough
180°,allowingittobepositionedonhorizontalorvertical
surfaces,suchas:
•onatable(Fig.7) •underashelf (Fig.8)
•onashelf (Fig.7) •onawall(Fig.9)
•Thescreenwillautomaticallydisplaytherightwayinallpositions.
•ToplacethethermometerontotheStand,gentlypullthetwo
armsontheStandapartandinsertthethermometerin-between
thearms.
•Toremoveit,useonehandtogentlypullthetwoarmsopen
and,atthesametime,holdandliftoutthethermometerwith
yourotherhand.
•Anadhesivepadissuppliedalreadyaffixedtothebaseof the
Standtoeasilymountittoawallorunderashelf.Todoso,first
removethepaperfromtheadhesivepadplacedunderneath
theStand,thenpositiontheStandintherequiredlocationand
finallyaddthethermometer(asabove).
Note: When affixing the Stand to a wall, be careful to ensure that it is
straight to ensure that the thermometer does not appear wonky when
placed in the Stand.
You do not need to remove the paper from the adhesive pad if simply
freestanding the Stand on a shelf or table.
2 Carry Case:
•TheCarryCase(Fig.10seepage16)isprovidedtoconveniently
protectthethermometerwhennotbeingusedoristaken
outside.
•TheProbeGuardshouldbeclosedandthermometerswitched
OFFbeforeplacingthethermometer
insidetheCarryCase.
Fig. 7 Fig. 8 Fig. 9