BROWIN 330020 User manual

1
- INSTRUKCJA OBSŁUGI -
WĘDZARNIA ELEKTRYCZNA –
PRZENOŚNA
No 330020

2
JĘZYKI
Instrukcja obsługi –
WĘDZARNIA ELEKTRYCZNA –
PRZENOŚNA
PL - 3
Operation manual -
ELECTRIC SMOKER –PORTABLE
GB - 8
Bedienungsanleitung –
ELEKTRISCHER RÄUCHEROFEN –
MOBIL
DE - 9
Руководство по эксплуатации –
КОПТИЛЬНЯ ЭЛЕКТРИЧЕСКАЯ -
ПЕРЕНОСНАЯ
RU - 14
Naudojimo instrukcija -
KILNOJAMOJI ELEKTRINĖ RŪKYKLA
LT - 20
Apkalpošanas rokasgrāmata -
ELEKTRISKA PĀRVIETOJAMĀ
KŪPINĀTAVA
LV - 25
Kasutusjuhend -
TEISALDATAV ELEKTRILINE
SUITSUAHI
EE - 30
Instrucțiuni de utilizare -
DISPOZITIV ELECTRIC DE AFUMARE –
PORTABIL
RO - 35
Návod k obsluze -
ELEKTRICKÁ PŘENOSNÁ
UDÍRNA
CZ - 41
Návod na použitie -
ELEKTRICKÁ UDIAREŇ –
MOBILNÁ
SK - 46
Notice d’utilisation -
FUMOIR ÉLECTRIQUE –
PORTABLE
FR - 51
ІНСТРУКЦІЯ З ЕКСПЛУАТАЦІЇ -
ЕЛЕКТРИЧНА КОПТИЛЬНЯ –
ПЕРЕНОСНА
UA - 57
HASZNÁLATI ÚTMUTATÓ
ELEKTROMOS FÜSTÖLŐ –
HORDOZHATÓ
HU - 63

3
Instrukcja obsługi
WĘDZARNIA ELEKTRYCZNA – PRZENOŚNA
Uniwersalna wędzarnia elektryczna wykonana ze stali nierdzewnej pozwala na jednoczesne pieczenie z
możliwością nadania potrawom aromatu wędzarniczego. Szybko i bez trudu uwędzisz drób i inne ulubione
rodzaje mięs czy ryb.
Urządzenie zasilane jest wbudowaną grzałką o mocy 1100W z termostatem umożliwiającym regulację
temperatury. W korpusie wędzarni znajduje się termometr, który pozwala na kontrolę temperatury podczas
całego procesu wędzenia lub podpiekania. Drewniane uchwyty w wędzarni pozwalają na przeniesienie
urządzenia lub otwarcie w każdej chwili podczas procesu.
Dołączony metalowy uchwyt pozwoli na wygodne i bezpieczne wyjęcie gorącej tacki ze zrębkami lub tacki
z przygotowywanymi produktami. Natomiast tacka ociekowa zbierze ociekający z potraw tłuszcz,
zapobiegając zanieczyszczeniu zrębków i grzałek co ułatwi proces czyszczenia wędzarni.
UWAGA!
W trakcie używania zrębków wędzarniczych, ze względu na generowany podczas wyżarzania dym,
produkt służy jedynie do użytku zewnętrznego.
Użytkowanie w pomieszczeniach dopuszczalne jest tylko, jeśli urządzenie jest wykorzystywane jako
piekarnik bez użycia zrębków wędzarniczych.
UWAGA! Przy obsłudze wędzarni korzystaj najlepiej z rękawic ochronnych/kuchennych, gdyż elementy
metalowe będą bardzo gorące.
Z niniejszą instrukcją należy się dokładnie zapoznać przed użyciem urządzenia i zachować
ją do wglądu na przyszłość.
Zestaw zawiera:
1. Skład zestawu
Nazwa
Ilość
Zdjęcie
Obudowa wędzarni
wraz z grzałką
elektryczną
1 komplet

4
Pokrywa wędzarni
1 sztuka
Drewniana rączka
2 sztuki
Stalowe nóżki
4 sztuki
Przewód zasilający
z termostatem
1 sztuka
Osłona grzałki
1 szt
Ruszt
1 sztuki
Tacka ociekowa
1 sztuka
Tacka na zrębki
1 sztuka
Uchwyt
1 sztuka

5
Termometr
1 sztuka
Śruby M5x9
15 sztuk
Nakrętki M5
15 sztuk
Instrukcja
1szt
Dane techniczne:
Moc: 1100 W
Napięcie: 220V-240V
Częstotliwość: 50 Hz
Przewód zasilający: 170 cm
Termometr w pokrywie o zakresie temp. 0-250 oC
Termoregulator
Materiał: stal nierdzewna
Średnica korpusu: 25 cm
Długość korpusu: 45 cm
Długość całkowita z rączką: 65 cm
Waga: 5,2 kg
Wysokość między rusztem a górną ścianką: 13,5 cm
2. Montaż
Zmontuj urządzenie na czystej, płaskiej powierzchni.
Potrzebne narzędzia: śrubokręt krzyżakowy i klucz nr 8.
1. Do korpusu wędzarni przykręć nóżki przy pomocy ośmiu śrub (każdą nogę dwoma śrubami). Od
zewnątrz włóż śrubę w odpowiedni otwór, natomiast od wewnątrz nakręć nakrętkę na gwint.
2. Grzałkę wsuń do komory wędzarni i przykręcić przy pomocy dwóch śrub i dwóch nakrętek do
korpusu w bocznej części pomiędzy nóżkami. Następnie osłonę nałóż na grzałkę i przykręć śrubą
z nakrętką do spodniej krawędzi korpusu.
3. Przykręć drewniane uchwyty (jeden w górnej części korpusu, drugi do pokrywy wędzarni) przy
pomocy śrub. Włóż je od zewnątrz korpusu i pokrywy, a od wewnątrz komory i pokrywy nakręć
na nie nakrętkę.
4. Termometr zamontuj w górnej części korpusu, w dedykowanym otworze przykręcając go od
wewnętrznej części komory.

6
5. Tackę na zrębki umieść na osłonie grzałki, bezpośrednio nad nią.
6. Tackę ociekową wraz z rusztem umieść na prowadnicach przymocowanych na stałe do
wewnętrznych ścianek wędzarni.
SPOSÓB UŻYTKOWANIA
Dokładne zapoznanie się z poniższymi zaleceniami umożliwi właściwe korzystanie z wędzarni
i pozwoli cieszyć się jej bezawaryjnym działaniem przez długi czas.

7
By jednak uzyskać w pełni satysfakcjonujące efekty, przy każdym użyciu należy przestrzegać kilku
podstawowych zaleceń.
1. Przystępując do procesu wędzenia umieść wędzarnię na zewnątrz, na stabilnej, odpornej
na ciepło powierzchni. Wybierz miejsce chronione przed deszczem, ale gwarantujące
dobrą cyrkulację powietrza.
2. Po skręceniu wędzarni przed pierwszym wędzeniem należy dokonać „wypalenia” wędzarni.
Proces ten powinien potrwać około 20 minut, w celu spalenia wszelkich pozostałości z
produkcji. „Wypalenia” należy dokonać zgodnie z następującą procedurą:
a. NIE wykonuj procesu „wypalania” w pomieszczeniu. Proces ten MUSI być wykonywany na zewnątrz.
b. Podczas procesu „wypalania” NIE używaj zrębków drewnianych.
c. Podłącz przewód zasilający i przekręć pokrętło na termostacie z ruchem wskazówek zegara do
maksimum
d. Odczekaj 20 minut na rozgrzanie urządzenia, a następnie wyłącz zasilanie
3. Pamiętaj, by przed rozpoczęciem wędzenia bardzo dokładnie osuszyć mięso. Źle osuszone
produkty mogą spowodować gromadzenie się wilgoci wewnątrz komory podczas wędzenia oraz
nieprawidłowy proces obróbki wędzonek. Produkty można również dosuszyć w komorze wędzarni
przy ustawionym termostacie na minimum, bez zamykania wędzarni.
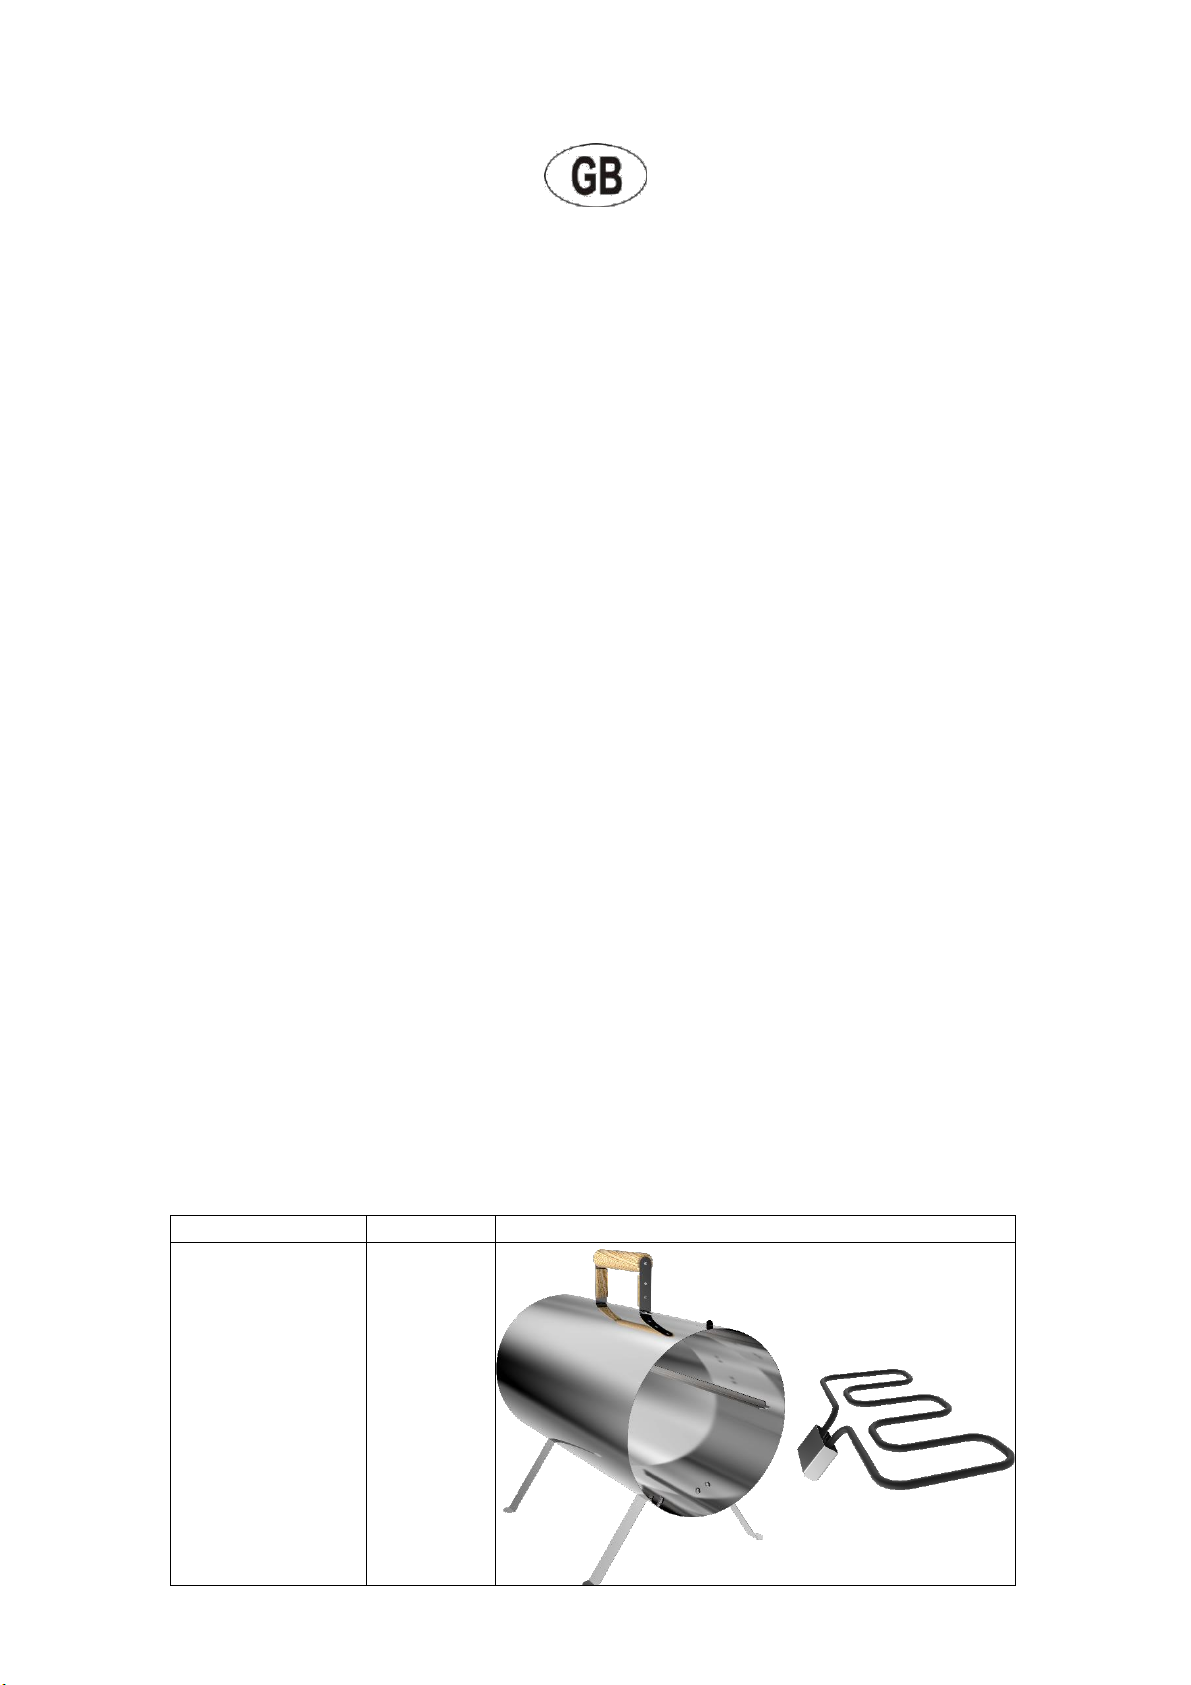
4. Zrębki umieść na tacce bezpośrednio nad grzałką, w ilości (ok. 60 g - trzy garstki) - należy
jednak uważać, by nie przesadzić, bowiem zbyt duża ilość zrębków może mieć niekorzystny wpływ
na smak wędzonych potraw (mięso nabierze kwaśnego posmaku). Podana ilość zrębków powinna
wystarczyć na ok. 1 godzinę wędzenia. Pamiętaj, że zawsze możesz dosypać zrębków w czasie
procesu wędzenia.
5. Ruszt umieść na tacce okapowej i ułóż na nim produkty do podpiekania lub wędzenia.
6. Pozostaw wolną przestrzeń między wędzonymi na rusztach produktami i bokami wędzarni, aby
zapewnić prawidłową cyrkulację ciepła oraz dymu wędzarniczego.
7. Zrębki zaczynają się wyżarzać po osiągnieciu odpowiedniej temperatury po ok. 10-15
minutach od włączenia urządzenia. Temperatura oraz czas rozpoczęcia jak i ciągłości
wyżarzania się zrębków zależy od temperatury otoczenia.
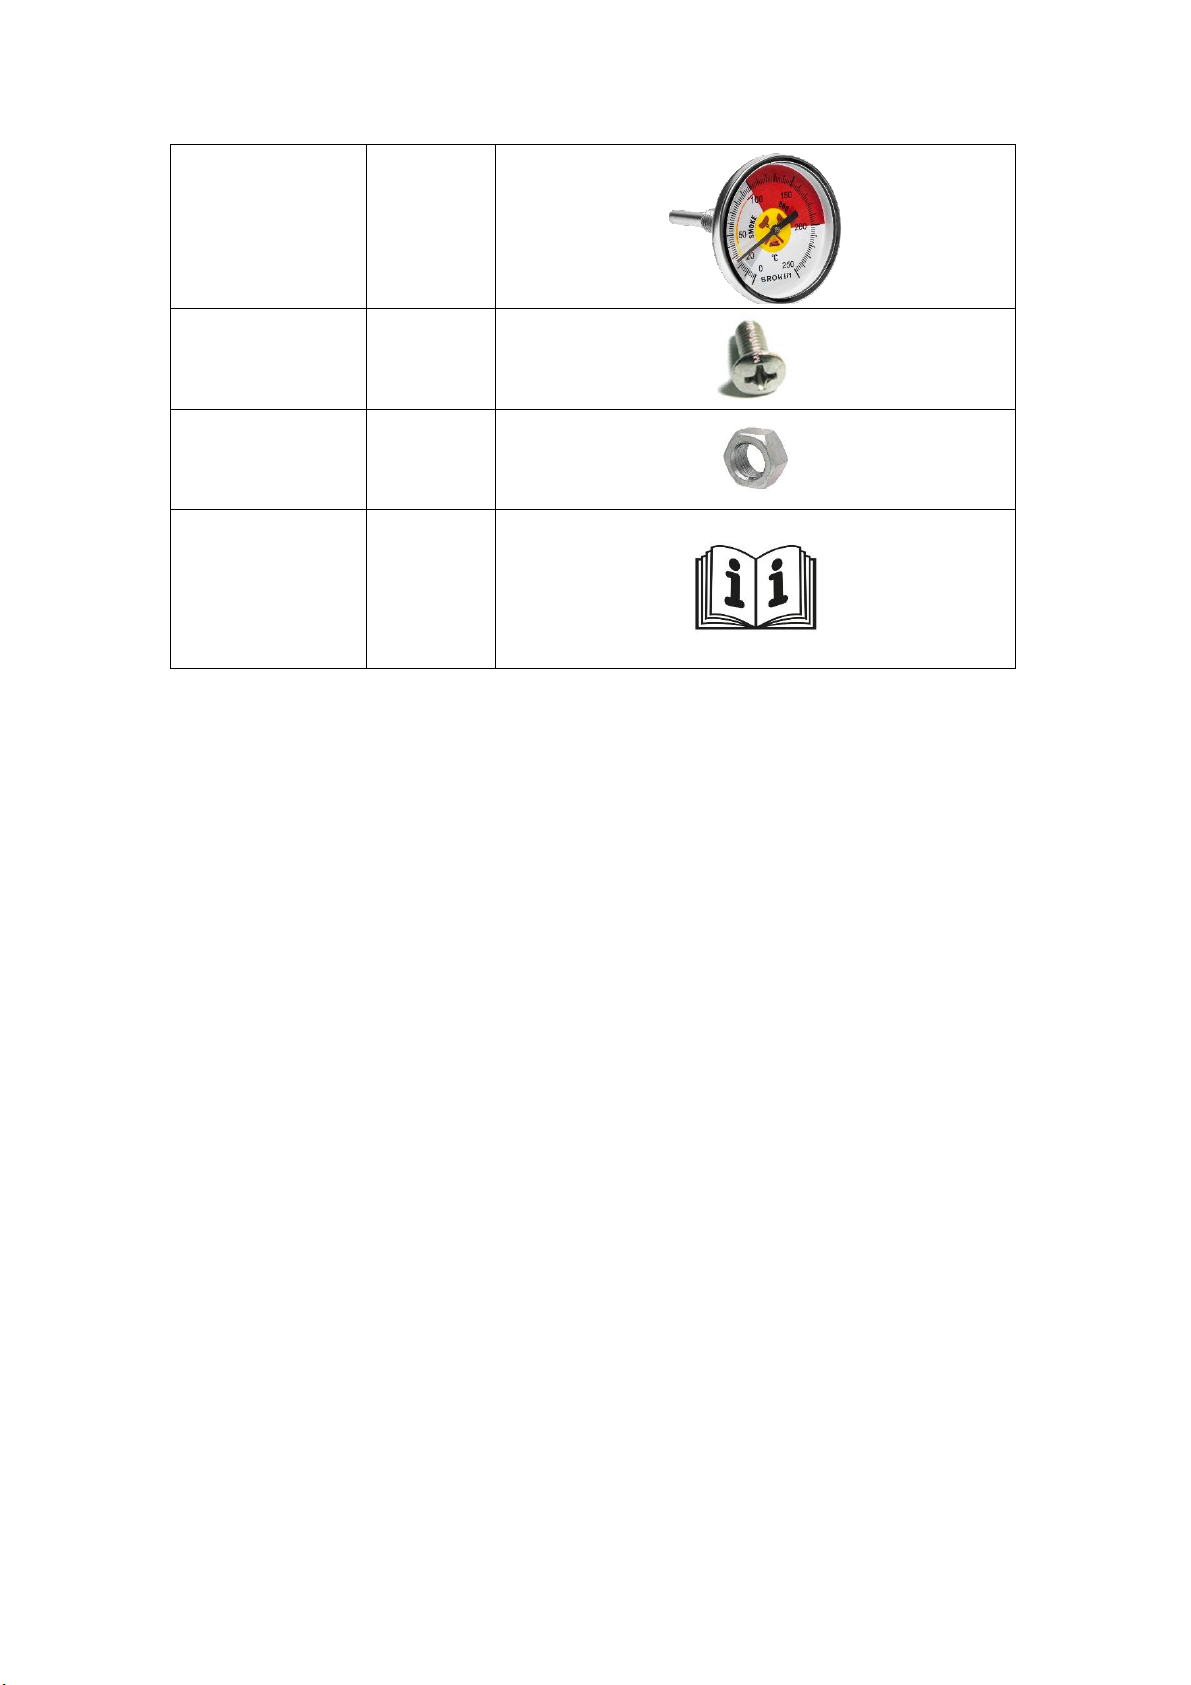
8. Podczas całego procesu wędzenia należy kontrolować temperaturę w wędzarni –
wykorzystując termometr wędzarniczy zamontowany w korpusie urządzenia. Regulację
temperatury dokonuje się za pomocą pokrętła w termostacie. W razie zbyt wysokich temperatur
w komorze można uchylić pokrywę wędzarni.
9. Jeśli barwa produktów wędzarniczych jest już satysfakcjonująca, natomiast produkt wymaga
jeszcze obróbki termicznej prowadź proces bez podsypywania zrębków.
10. Do wyjmowania rusztu jak i tacek należy używać przystosowanego do tego uchwytu.
11. Po zakończeniu procesu odłącz przewód zasilający. W celu usunięcia zużytych zrębków i
powstałych zabrudzeń poczekaj, aż urządzenie wystygnie.

8
Operation manual
ELECTRIC SMOKER –PORTABLE
This versatile electric smoker made of stainless steel allows roasting combined with the option to give
dishes the smoked aroma. It allows quick and easy smoking of poultry and any other favourite types of
meat or fish.
The device is powered by a built-in heater with power of 1100 W, featuring a thermostat that enables
temperature adjustment. The smoker body features a thermometer that enables monitoring temperature
during the whole smoking or roasting process.
The wooden handle of the smoker enables moving it around or opening it at any moment during the
process.
The oak holder included enables convenient and safe removal of the hot wood chip tray or product tray.
Meanwhile, the drip tray will collect the fat dripping from the food prepared, preventing soiling of wood
chips and heaters, which will make it easier to keep the smoker clean.
NOTE!
When the wood chips for smoking are used, the product can be only used outdoors in view of the smoke
generated from burning chips.Indoor use is allowed only if the device is used as an oven, without burning
wood chips.
NOTE! When handling the smoker, it is best to use protective gloves or kitchen gloves, as the metal parts
will be very hot.
Please familiarise yourself thoroughly with this manual prior to using the device and keep it for
future reference.
The set includes:
1. The set includes:
Name
Quantity
Picture
Smoker housing
with the electric
heater
1 complete
set

9
Smoker cover
1 pc.
Wooden handle
2 pcs
Steel feet
4 pcs
Power supply cable
with thermostat
1 pc.
Heater shield
1 pc.
Grill
1 pc.
Drip tray
1 pc.
Wood chip tray
1 pc.
Holder
1 pc.

10
Thermometer
1 pc.
M5x9 bolts
15 pieces
M5 nuts
15 pieces
Manual
1 pc.
Technical data:
Power: 1100 W
Voltage: 220V-240V
Frequency: 50 Hz
Power supply cable 170 cm
Thermometer in the cover, with temperature range of 0-250 oC
Temperature control unit
Material: stainless steel
Body diameter: 25 cm
Body length: 45 cm
Total length with handle: 65 cm
Weight: 5.2 kg
Height between the grill and the upper wall: 13.5 cm
2. Assembly
Assemble the device on a clean and flat surface.
Tools needed: cross head screwdriver and wrench No. 8.
1. Screw the feet to the smoker body using 8 bolts (used two bolts for each foot). Put the
bolt into the right hole from the outside and twist a nut onto the thread from the inside.
2. Slide the heater into the smoker chamber and screw it to the body in the side part
between the feet using two bolts and two nuts. Next, installed the shield on the heater and
screw it to the bottom edge of the body using a bolt and a nut.
3. Screw the wooden holders in place (one in the upper part of the body, the other to the
smoker cover) using bolts. Insert them from the outside of the body and the cover and
twist a nut onto each of them from the inside of the chamber and the cover.
4. Install the thermometer in the upper part of the body, in a dedicated opening, by screwing
it in place from the inside of the chamber.

11
5. Place the wood chip tray on the heater shield, directly over it.
6. Place the drip tray and the grill on the guides attached permanently to the internal walls of
the smoker.

12
HOW TO USE
Familiarising yourself thoroughly with the recommendations below will enable using the smoker properly
and enjoy its faultless functioning for a long time.
However, in order to achieve fully satisfying effects it is necessary to always adhere to several fundamental
recommendations when using it.
1. Start the preparations for the smoking process by placing the smoker outdoors, on a
stable, heat-resistant surface. Choose a place sheltered against rain but ensuring good
air circulation.
2. After assembling the smoker, it is necessary to “fire” it prior to first smoking. This
process should take about 20 minutes and it is carried out in order to burn any remains
from production stage. “Firing” should be carried out according to the procedure below:
a. DO NOT carry out the “firing” process indoors. This process HAS TO be carried out outdoors.
b. During the “firing” process use only temperature - DO NOT use any wood chips.
c. Connect the power supply cable and turn the knob on the thermostat clockwise, to the limit.
d. Wait 20 minutes for the device to warm up and then turn the power supply off.
3. Remember to dry the meat very carefully prior to commencing smoking. Poorly dried products
may cause humidity to accumulate inside the chamber during smoking and lead to faulty
processing of smoked meat. The product drying can also be finished in the smoker chamber
with the thermostat set to the minimum, without closing the smoker.
4. Place the wood chips on the tray directly over the heat, in the amount of about 60 g - three
handfuls. However, it is necessary to take not to use an excessive amount as it may have
adverse impact on the flavour of food smoked (the meat may acquire a sour aftertaste). The
amount of wood chips used should be sufficient for about an hour of smoking. Remember that
you can always add wood chips during the smoking process.
5. Place the grill on the drip tray and arrange on it the products intended for roasting or smoking.
6. Leave some free space between the products roasted on the grills and the sides of the smoker
in order to ensure proper circulation of heat and smoke.
7. The wood chips start burning after achieving the right temperature, which takes place about
10-15 minutes after turning the device on. The temperature, starting time, and continuity of
wood chip burning depends on the ambient temperature.
8. During the whole smoking process it is necessary to monitor the temperature inside the smoker
using the smoking thermometer installed in the body of the device. The adjustment of
temperature is carried out by means of a thermostat knob. In the event of the temperature in
the chamber being too high it is possible to open the smoker cover slightly.
9. If the colour of the products smoked is already satisfactory, but the product requires further
thermal processing, continue the process without adding wood chips.
10. For removing the grill and the trays, use the holder intended for that purpose.
11. After completing the process, disconnect the power supply cable. Wait for the device to cool
before removing spent wood chips and any staining that appeared.

9
Bedienungsanleitung
ELEKTRISCHER RÄUCHEROFEN – MOBIL
Dieser universelle elektrische Räucherofen aus nicht rostendem Stahl erlaubt es, den Gerichten beim
Anbraten ein Räucheraroma zu verleihen. Sie werden schnell und problemlos Geflügel und andere Fleisch-
und Fischsorten räuchern können.
Das Gerät wird von einem eingebauten Heizstab mit einer Leistung von 1100 W, mit einem Thermostat, der
eine Regelung der Temperatur erlaubt, gespeist. Im Gehäuse des Räucherofens befindet sich ein
Thermometer, das die Kontrolle der Temperatur während des gesamten Räucher- oder Bratvorgangs erlaubt.
Die Holzgriffe des Räucherofens erlauben das Tragen des Geräts oder seine Öffnung in jedem Augenblick
des Vorgangs.
Der hinzugefügte Metallgriff erlaubt es, das heiße Tablett mit den Spänen oder den vorbereiteten Produkten
bequem und sicher herauszunehmen. Die Tropfschale sammelt das von den Gerichten tropfende Fett sowie
verhindert die Verunreinigung der Späne und Heizstäbe, was die Reinigung des Räucherofens erleichtert.
ACHTUNG!
Im Fall der Verwendung von Räucherspänen darf das Produkt aufgrund der Rauchentwicklung während des
Ausglühens, nur in Außenbereichen benutzt werden.
Eine Inbetriebnahme in Innenräumen ist nur dann zulässig, wenn das Gerät als Backofen, ohne die
Verwendung von Räucherspänen, genutzt wird.
ACHTUNG! Während der Bedienung des Räucherofens Schutz-/Küchenhandschuhe benutzen, da die
Metallbauteile sehr heiß werden.
Vor dem Gebrauch dieses Geräts genau mit der Gebrauchsanleitung bekannt machen und sie zum
Einsehen aufbewahren.
Das Set enthält:
1. Im Set enthalten
Bezeichnung
Menge
Foto
Gehäuse des
Räucherofens mit
elektrischen
Heizstab
1 Set

10
Deckel des
Räucherofens
1 Stück
Holzgriff
2 Stück
Stahlfüße
4 Stück
Stromversorgungsk
abel mit
Thermostat
1 Stück
Hülle des
Heizstabs
1 St.
Rost
1 Stück
Tropfschale
1 Stück
Tablett für
Räucherspäne
1 Stück

11
Griff
1 Stück
Thermometer
1 Stück
Schrauben M5x9
15 Stück
Muttern M5
15 Stück
Gebrauchsanweisu
ng
1 Stück
Technische Daten:
Leistung: 1100W
Spannung: 220 V- 240 V
Frequenz: 50 Hz
Stromversorgungskabel: 170 cm
Thermometer im Deckel mit einem Temperaturbereich von 0-250oC
Thermostat
Material: rostfreier Stahl
Durchmesser des Gehäuses: 25 cm
Länge des Gehäuses: 45 cm
Gesamtlänge mit Griff: 65 cm
Gewicht: 5,2 kg
Höhe zwischen Rost und oberer Wand: 13,5 cm
2. Montage
Das Gerät auf einer sauberen, ebenen Oberfläche montieren.
Benötigtes Werkzeug: Kreuzschraubendreher und Schlüssel Nr. 8.
1. An das Gehäuse des Räucherofens die Füße mittels acht Schrauben anschrauben (jeden Fuß mit zwei
Schrauben). Von außen die Schraube in die entsprechende Öffnung hineinstecken, von innen die
Mutter auf das Gewinde schrauben.
2. Den Heizstab in die Kammer des Räucherofens schieben und mithilfe von zwei Schrauben und zwei
Muttern an den seitlichen Teil des Gehäuses zwischen den Füßen befestigen. Anschließend die Hülle

12
auf den Heizstab stülpen und mit einer Schraube mit Mutter an der unteren Kante des Gehäuses
befestigen.
3. Die hölzernen Griffe (der eine im oberen Teil des Gehäuses, der andere an den Deckel des
Räucherofens) anschrauben. Die Schrauben von außen, von der Außenseite des Gehäuses und
Deckels hineinlegen und von der Innenseite der Kammer und des Deckels eine Mutter auf sie
aufschrauben.
4. Das Thermometer im oberen Teil des Gehäuses, in der dafür vorgesehen Öffnung platzieren und an
den inneren Teil der Kammer anschrauben.
5. Das Tablett für Räucherspäne auf der Hülle des Heizstabs, direkt über dem Heizstab, platzieren.
6. Die Tropfschale mit dem Rost auf den Führungsleisten an den Innenwänden des Räucherofens
platzieren.

13
BENUTZUNGSWEISE:
Das Bekanntmachen mit den unten stehenden Empfehlungen wird es ermöglichen, den Räucherofen korrekt,
störungsfrei und lange nutzen zu können.
Um jedoch vollkommen befriedigende Ergebnisse zu erhalten, müssen bei jedem Gebrauch einige Empfehlungen
beachtet werden.
1. Für das Räuchern den Räucherofen nach draußen, auf eine stabile, wärmebeständige Fläche stellen. Eine
Stelle wählen, die vor Regen geschützt ist und eine gute Luftzirkulation garantiert.
2. Nach dem Zusammenschrauben des Räucherofens, vor dem ersten Räuchern, sollte der Räucherofen
„ausgebrannt“ werden. Das „Ausbrennen“ sollte ca. 20 Minuten dauern, um alle Überreste aus den
Produktionsprozessen zu verbrennen. Das Ausbrennen sollte folgendermaßen ausgeführt werden:
a. Der Prozess des „Ausbrennens“ darf NICHT in Innenräumen vorgenommen werden. Dieser Prozess MUSS
außerhalb von Innenräumen stattfinden.
b. Während des Prozesses des „Ausbrennens“ KEINE Holzspäne verwenden.
c. Das Stromversorgungskabel anschließen und den Drehknopf am Thermostat im Uhrzeigersinn bis zum Maximum
drehen.
d. 20 Minuten bis zum Erhitzen des Gerätes warten und anschließend die Spannungsversorgung ausschalten.
3. Achten Sie darauf, das Fleisch vor dem Räuchern sehr genau zu trocknen. Schlecht getrocknete Produkte können
bewirken, dass sich während des Räucherns Feuchtigkeit im Inneren der Kammer sammelt und der Räuchervorgang
nicht korrekt verläuft.
Die Produkte können auch in der Kammer des Räucherofens bei einem auf einen Minimalwert eingestellten Thermostat,
ohne Schließen des Räucherofens, getrocknet werden.
4.Die Räucherspäne (ca. 60 g – drei Handvoll) auf dem Tablett direkt über dem Heizstab platzieren – es dürfen aber
nicht zu viele Räucherspäne verwendet werden, da dies einen ungünstigen Einfluss auf den Geschmack der
geräucherten Gerichte haben kann (das Fleisch bekommt einen sauren Nachgeschmack). Die angegebene Menge der
Späne sollte für ca. 1 Stunde des Räucherns reichen. Sie können während des Räucherns jederzeit Späne dazugeben.
5. Den Rost auf der Tropfschale platzieren und auf ihn die Produkte für das Anbraten und Räuchern legen.
6. Zwischen den auf den Rosten geräucherten Produkten und den Wänden des Räucherofens Freiräume lassen, um
eine ordnungsgemäße Wärme- und Rauchzirkulation zu gewährleisten.
7. Die Räucherspäne beginnen bei entsprechender Temperatur nach ca. 10-15 Minuten nach Einschalten des Geräts
auszuglühen. Die Temperatur sowie die Anfangszeit und Dauer des Ausglühens hängen von der Umgebungstemperatur
ab.
8. Während des gesamten Räuchervorgangs die Temperatur im Räucherofen kontrollieren – unter Verwendung des
Thermometers, das im Gehäuse des Geräts montiert ist. Die Temperatur wird mittels eines Drehknopfs im Thermostat
reguliert. Im Fall von zu hohen Temperaturen in der Kammer kann der Deckel des Räucherofens verschoben werden.
9. Wenn die Farbe der Räucherprodukte bereits befriedigend ist, aber das Produkt noch der Wärmebehandlung bedarf,
den Vorgang ohne Dazuschütten von Räucherspänen fortführen.
10. Zum Herausnehmen des Rosts und der Tablette einen dazu bestimmten Griff verwenden.

14
11. Nach dem Beenden des Vorgangs das Gerät von der Stromversorgung trennen. Um die verbrauchten Späne und
die entstandenen Verschmutzungen zu entfernen, warten bis das Gerät abgekühlt ist.
Руководство по эксплуатации
КОПТИЛЬНЯ ЭЛЕКТРИЧЕСКАЯ – ПЕРЕНОСНАЯ
Универсальная электрическая коптильня из нержавеющей стали позволяет производить
одновременно выпечку с возможностью придания блюдам аромата копчености. Позволяет быстро и
легко коптить птицу и другие любимые виды мяса и рыбы.
Устройство питается от встроенного нагревателя мощностью 1100 Вт с термостатом, позволяющим
регулировать температуру. В корпусе коптильни находится градусник, позволяющий контролировать
температуру в течение всего процесса копчения или запекания.
Деревянные ручки в коптильне позволяют перемещать или открывать устройство в любой момент во
время процесса.
Прилагаемый металлический держатель позволит с удобством и безопасно снимать горячий поддон
с древесной щепой или поддон с подготовленными продуктами. В свою очередь, поддон для сбора
капель будет собирать жир, капающий с блюд, предотвращая загрязнение щепы и нагревателей, что
облегчит процесс чистки коптильни.
ВНИМАНИЕ!
В процессе сгорания коптильной щепы образуется дым, поэтому данное изделие предназначено для
использования только снаружи помещений.
Использование в помещениях допускается в случае, если устройство работает как духовка, без
использования коптильной щепы.
ВНИМАНИЕ! При обслуживании коптильни необходимо пользоваться средствами защиты рук, лучше
всего кухонными защитными перчатками/прихватками, так как металлические элементы будут очень
горячими.
Перед использованием устройства внимательно прочтите это руководство и сохраните его
для использования в будущем.

15
В набор входят:
1. Состав комплекта
Название
Количество
Фото
Корпус коптильни
с электрическим
нагревателем
1 комплект
Крышка коптильни
1 штука
Деревянная ручка
2 штуки
Стальные ножки
4 штуки
Кабель питания с
термостатом
1 штука

16
Кожух
нагревателя
1 штука
Решетка
1 штука
Поддон для
стекания
1 штука
Поддон для
древесной щепы
1 штука
Держатель
1 штука
Термометр
1 штука
Болты M5x9
15 штук
Гайки M5
15 штук
Руководство по
эксплуатации
1 штука
Технические характеристики:
Мощность: 1100 Вт
Напряжение: 220В-240В
Частота: 50 Гц
Table of contents
Languages:
Other BROWIN Smoker manuals
Popular Smoker manuals by other brands

Bradley Smoker
Bradley Smoker BS611 owner's manual

Breville
Breville Commercial Smoking Gun Pro Instruction book

Smoke Daddy
Smoke Daddy Pellet Pro 2300 Operation manual

Mayer Barbecue
Mayer Barbecue RAUCHA MS-400 MASTER Assembly instructions

Weber
Weber Smokey Mountain Cooker series manual

Blaze
Blaze BLZ-26-ELSMK manual