BRU BRU100 User manual

BRU MAKER ONE
tea maker
User manual
Bedienungsanleitung
Manuel de l’utilisateur
Manuale di istruzioni
Model no. BRU100

DeutschFrançaisItaliano
READ THIS MANUAL CAREFULLY BEFORE USE.
PAY SPECIAL ATTENTION TO THE SAFETY INSTRUCTIONS.
KEEP THIS MANUAL FOR LATER CONSULTATION.
read this manual to get the best performance out of your Bru maker one.
LESEN SIE DIESE ANLEITUNG VOR DEM GEBRAUCH SORGFÄLTIG DURCH.
ACHTEN SIE BESONDERS AUF DIE SICHERHEITSHINWEISE.
BEWAHREN SIE DIESE ANLEITUNG ZUM SPÄTEREN NACHSCHLAGEN AUF.
LESEN SIE DIESES HANDBUCH, UM DIE BESTE LEISTUNG AUS IHREM BRU MAKER ONE
HERAUSZUHOLEN.
LISEZ CE MANUEL ATTENTIVEMENT AVANT LA PREMIÈRE UTILISATION.
PRÊTEZ UNE ATTENTION SPÉCIALE AUX CONSIGNES DE SÉCURITÉ.
CONSERVER CE MODE D'EMPLOI POUR CONSULTATION ULTÉRIEURE.
LISEZ CE MANUEL POUR OBTENIR UNE MEILLEURE PERFORMANCE DE VOTRE
BRU MAKER ONE.
SI PREGA DI LEGGERE ATTENTAMENTE IL PRESENTE MANUALE PRIMA DELL'USO.
PRESTARE PARTICOLARE ATTENZIONE ALLE AVVERTENZE DI SICUREZZA.
CONSERVARE QUESTO MANUALE PER UNA SUCCESSIVA CONSULTAZIONE.
LEGGERE QUESTO MANUALE PER OTTENERE LE MASSIME PRESTAZIONI DAL TUO
APPARECCHIO BRU MAKER ONE.
English

3
English
intended use
This tea brewing machine – BRU Maker One - is the first automated tea machine with patented technology that
allows you to make the perfect tea at the push of a button by using any type of loose leaf tea or tea bags.
BRU is all about the perfect cup of tea. We develop and sell automated, smart, user - friendly tea making machines
for brewing fresh, full -taste tea, providing a high quality, quick, and convenient solution for tea drinkers.
The innovative BRU Maker One solves the problems involved with the time-consuming, messy, and often wasteful
business of tea-making, and replaces it with a seamless, more sustainable and effortlessly repeatable process.
Table of contents
INTENDED USE ......................................................................................................................................................................................................................... p. 3
SAFETY INSTRUCTIONS ...................................................................................................................................................................................................... p. 4
OVERVIEW ................................................................................................................................................................................................................................... p. 8
HOW TO USE .............................................................................................................................................................................................................................. p. 10
USER INTERFACE ....................................................................................................................................................................................................................
• MENUS .................................................................................................................................................................................................................................
• MACHINE SETTINGS ...................................................................................................................................................................................................
p. 14
p. 15
p. 18
CLEANING .................................................................................................................................................................................................................................... p. 23
TROUBLESHOOTING ............................................................................................................................................................................................................. p. 25
WARRANTY & AFTER SERVICES .................................................................................................................................................................................... p. 30
DISPOSAL ..................................................................................................................................................................................................................................... p. 31
EXPLANATION OF SYMBOLS ........................................................................................................................................................................................... p. 31
FCC ................................................................................................................................................................................................................................................... p. 32

4
DANGER! IMPORTANT SAFEGUARDS:DANGER! IMPORTANT SAFEGUARDS:
• Read all instructions before using. Save these
instructions for future reference.
•• Failure to observe the warnings, failure to follow these instructions and/or misuse of the applianceFailure to observe the warnings, failure to follow these instructions and/or misuse of the appliance
could cause personal injury and/or damage to the appliance.could cause personal injury and/or damage to the appliance.
•• This appliance incorporates a heating element surface which is subject to residual heat aer use.This appliance incorporates a heating element surface which is subject to residual heat aer use.
•• Failure to follow these instructions may result in life threatening injuries caused by electric shock.Failure to follow these instructions may result in life threatening injuries caused by electric shock.
• The appliance must not be immersed!
• Avoid spillage on the connector.
• After removing the packaging, make sure the product is complete and undamaged, and that all the accessories
are present. Do not use the appliance if it is visibly damaged. Contact BRU customer services (see p. 30).
• Do not leave pieces of packaging (plastic bags, polystyrene foam, nails etc.) within reach of animals, children or
people with reduced mental capabilities, since these are potential sources of danger.
• The appliance is intended to brew tea or infusion only. Any other use is considered improper and thus
dangerous. The manufacturer is not liable for damage deriving from improper use of the appliance.
• This appliance can be used by children aged from 8 years and above if they have been given supervision or
instruction concerning the use of the appliance in a safe way and understand the hazard involved. Cleaning
and user maintenance shall not be done by children unless they are older than 8 and supervised. Keep the
appliance and power cord away from children under 8 years of age (Not valid for Canada and USA).
• This appliance is not intended for use by people (including children) with reduced physical, sensory or mental
capabilities, or lack of experience and knowledge, unless they have been given supervision or instruction con-
cerning the use of the appliance by a person responsible for their safety (Only for Canada and USA).
• The appliance can be used by people with reduced physical, sensory or mental capabilities or lack of experi-
ence and knowledge if they are supervised or have been given instruction concerning use of the appliance in a
safe way and if they understand the hazards involved (Not valid for Canada and the USA;)
safety instructions
English

5
• For Canada and the USA this appliance is not intended for use by people (including children) with reduced
physical, sensory or mental capabilities, or lack of experience and knowledge, unless they have been given su-
pervision or instruction concerning use of the appliance by a person responsible for their safety).
• Children should be supervised to ensure that they do not play with the appliance.
• Cleaning and user maintenance shall not be done by children without supervision.
• Close supervision is necessary when any aplliance is used by or near children.
• This appliance is intended to be used in household and similar applications such as: staff kitchen areas in
shops, offices and other working environments; farm houses; by clients in hotels, motels and other residential
type environments; bed and breakfast type environments.
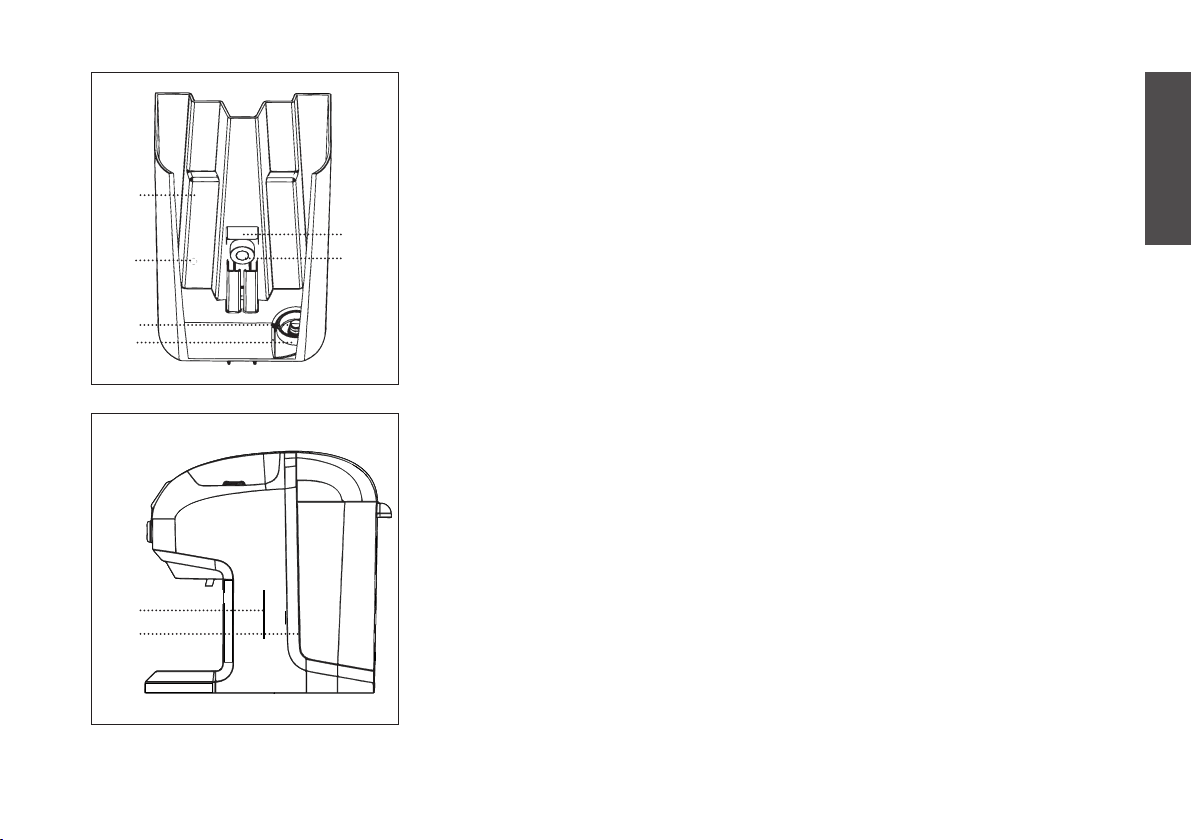
• Handle the glass brewing chamber (A11) with care to avoid breaking. If any crack or damages are observed,
replace the brewing chamber immediately. To do so, visit the help page on our website or contact customer
support (see p. 30).
• This is an electrical appliance and may cause electrical shocks. You should therefore follow these safety warn-
ings:
• Never touch the appliance with damp hands or feet.
• Never touch the plug with damp hands.
• Do not leave the appliance exposed to atmospheric agents (sun, rain, etc.).
• Make sure the socket used is freely accessible at all times, enabling the appliance to be unplugged
when necessary.
• Unplug directly from the plug only. Never pull the cord as you could damage it.
• To disconnect the appliance completely you must unplug it from the main socket.
• If the appliance is faulty, do not attempt to repair. Turn it off, unplug from the main socket and
contact customer services (see p. 30).
• Before cleaning the appliance, turn it off, unplug from the mains socket and allow to cool.
• Before connecting the plug to the socket outlet check that the working voltage of the appliance corresponds to
the one in your house. If in doubt, contact a professionally qualified technician.
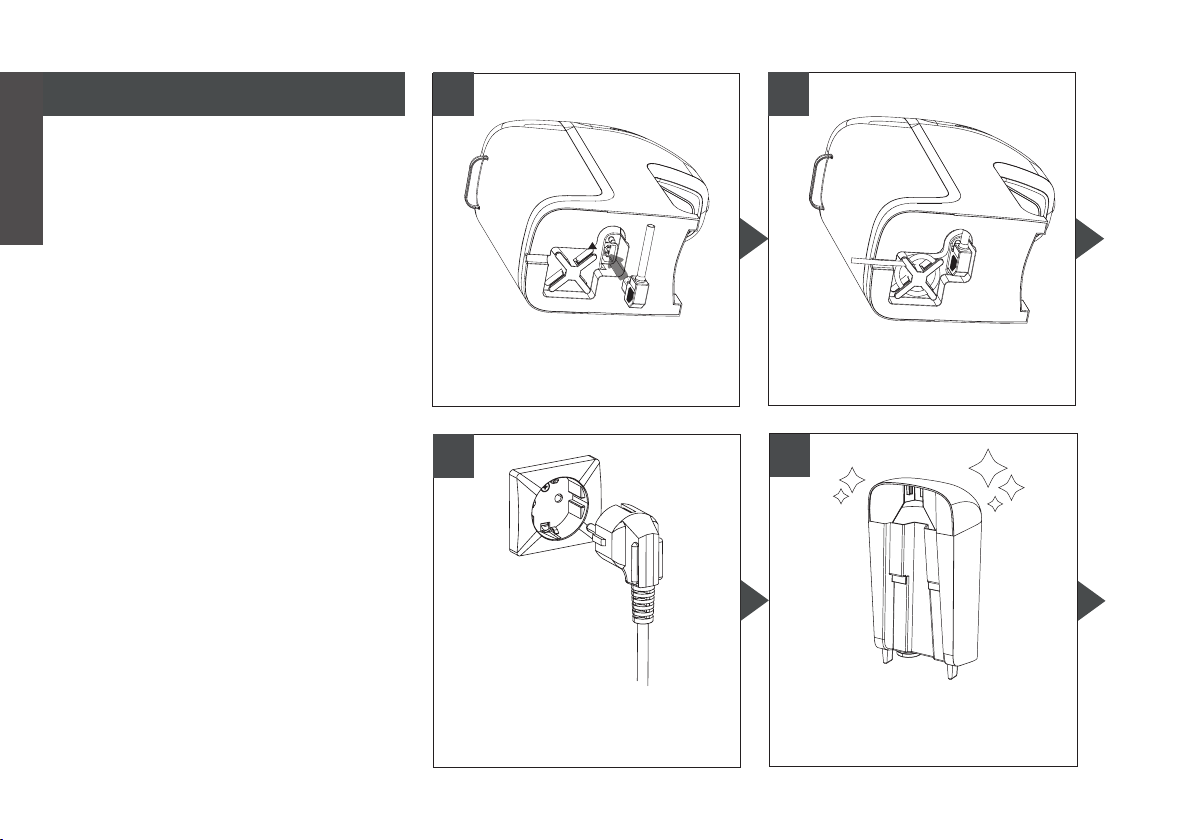
• Connect the product only to a socket provided with ground connection. The electrical safety of this appliance
is ensured only if it is correctly connected to an effective earthing system in compliance with the existing elec-
trical safety standards. BRU AG can not be held responsible for any damage caused by the lack of an earthing
system.
• If the use of an extension cords is necessary, be sure that extension cord is certified, suitable for the product
ratings and provided of ground wire connection. While in use, unwind the cord completely.
English

6
• Always unplug the appliance when left unattended and before moving, assembly, taking apart or cleaning.
• Always attach the plug to the appliance first, then plug the cord into the wall outlet. To disconnect, turn any
control to off, then remove the plug from the wall outlet.
• Unplug from outlet when not in use and before cleaning. Allow the appliance to cool down before handling any
parts, putting on or taking off parts, and before cleaning the appliance.
• Do not let the power cord hang over the edge of a table or counter and do not let it get in contact with hot
surfaces or water.
• If the supply cord is damaged, it must be replaced by the manufacturer, its service agent or similarly qualified
persons in order to avoid a hazard.
• A short power-supply cord (or detachable power-supply cord) is provided to reduce risks resulting from beco-
ming entangled in or tripping over a longer cord.
• longer detacable power-supply cords or extension cords are available and may be used if care is exercised in
their use.
• If a long detachable power-supply cord or extension cord is used:
• The marked electrical rating of the of the detachable power-supply cord or extension cord should be
at least as great as the electrical rating of the appliance;
• If the appliance is of the grounded type, the extension cord should be a grounding-type 3-wire cord;
• The longer cord should be arranged so that it will not drape over the counter top or table top where it
can be pulled on by children or tripped over.
• Use and place the product on a flat, stable and heat resistant surface.
• Do not place on or near a hot gas or electric burner, or in a heated oven.
• Do not place the appliance or power cord close to or on top of hot electric or gas cookers.
• In case of failure and/or malfunctioning of the appliance, turn it off and do not tamper with it. Do not disas-
semble the appliance due to any reason.
• Do not operate any appliance with a damaged cord or plug or after the aplliance malfunctions, or has been
damaged in any manner. Return appliance to the nearest authorized service facility for examination, repair or
adjustment.
• Do not use the appliance if it has fallen down or if it shows signs of damage, water leakage or defects that
alter its operation.
• If the brewing chamber is damaged, it must be replaced by customer service (see p. 30) to avoid any risk.
• The use of accessories which were not provided or recommended by the manufacturer may lead to fire,
electric shock, or serious personal injury.
English

7
• Only fill the water tank with mineral water. Do not insert any other liquid in the tank.
• Clean all the components before use. Follow the cleaning instructions (see p. 23) and never clean by immersing
the appliance or any electrical part of it in water.
• To protect against fire, electric shock and injury to persons do not immerse cord, plugs or any electrical part in
water or other liquid.
• Never place the appliance under running water.
• Never place the appliance in the dishwasher for cleaning.
• Do not use abrasive cleaners or scouring pads on the appliance.
• Do not use the appliance when the water tank (A3) is empty, it may cause malfunction.
• The glass brewing chamber (A11) should be cleaned once a week.
• The glass brewing chamber can be washed in the dish washer.
• The tea sieve (A10) should be cleaned after the tea is removed from the tea sieve.
• The tea sieve can be washed in the dishwasher.
• This appliance doesn’t require any lubrication. Other than the maintenance procedures described in this ma-
nual, any other servicing should be performed by an authorized service representative.
• This is a household appliance. It is also intended to be used in: staff kitchen areas in shops, offices and any
other working environment, bed and breakfast type environments, hotels, etc. Do not use the aplliance for
other than the intended use.
• Do not use outdoors.
• This appliance complies with applicable European directives and regulations to which the product must con-
form (not valid for Canada and the USA).
DANGER OF BURNS
• Surfaces marked with this symbol become hot during use.
• Do not touch hot surfaces. Use handles or knobs.
• The glass brewing chamber (A11) and tea sieve (A10) can be hot during and after use, manage with attention.
• Do not move the appliance while in use. Before carrying, transporting or storing the appliance, ensure that it
has sufficiently cooled down.
• Scalding may occur if the machine opening lid (A8) is removed during the brewing cycles.
• Failure to observe the warning could result in scalds or burns. This appliance produces hot water and steam
may form while in it is operation. Avoid contact with splashes of water, hot steam or the hot brewing glass
chamber (A11).
English

8
overview
A7
A13
A15
A5
A8
A4
A3
A14
A1
A2
A6
A11
A9
A17
A10
A12
A16
A6
English

9
DESCRIPTION OF THE PARTS
A1
A2
A3
A4
A5
A6
A7
A8
A9
A10
A11
Power cord
Power cord storage
Water tank
Water tank lid
Magnetic drip tray
Silicone nozzle
Lid opening button
Machine lid
Tea sieve lid
Tea sieve
Glass brewing chamber
A12
A13
A14
A15
A16
A17
A18
A19
A20
A21
A22
Tea sieve handle
Main button
Floating magnet
Cup sensor
Drip tray plate
Tea (loose leaf or tea bag)
Tank valve
Tank receiver
Metal cover
Reset hole
Reset pin
NOTE: a CA6702 water filter is not included with the BRU maker one,
however it is possible to add one. Consult our website help page (see p. 30)
to find out how.
TECHNICAL INFORMATION
Supply data
Power input
Water tank capacity
Size LxHxD
Weight
Europe
210-230 V AC; 50 Hz
2200 W
3 liter
40x40x25 cm
3,2 kg
USA - Canada
120 V AC; 60 Hz
1600 W
80 Oz
5.9’x8’x11’
6.6 lb
A3
A18
A19
A14
A20
A21
English
A22
A21

10
How to use
BEFORE FIRST USE
• Read all the instructions and
warnings.
• Remove all packaging materials
and make sure all items are in
good condition. If there are any
defaults, contact customer ser-
vice (see p. 30).
• Remove the glass brewing
chamber (A11) and rise with wa-
ter, then dry thoroughly before
returning to appliance.
• Download the BRU tea app for
your smartphone (see backside).
* NOTE - Steps indicated with an as-
terisk* concerning the glass brewing
chamber (A11) are optional AFTER
first use, if you decide to use the
self-cleaning function (see p. 18 - S2.
Rinse)
** NOTE - When using loose leaf
tea always close the tea sieve lid
(A9), when using a tea bag the lid is
optional.
*** NOTE - To avoid limescale we
highly recommend using a CA6702
water filter (not included).
Plug the power cord (A1) in the
machine.
1 2
34
Adjust the length of the cord
as needed in the power cord
storage (A2).
Plug the power cord plug into a
socket.
Rinse the water tank (A3) with
clean water.
English

11
9 10
5 7
8
Fill the water tank (A3) with drin-
kable water (WARNING: don’t use
other liquids)
Slide the water tank (A3) on the
machine, making sure that it is
aligned.
6
Close the water tank lid (A4),
making sure that it is aligned.
Assemble and attach the magne-
tic drip tray (A5).
Gently pull the silicone nozzle (A6)
to check if it’s installed properly
(If you’re unsure, check p. 24).
Push the lid opening button (A7)
to open the machine lid (A8).
English

12
14 15
11
Now completely open the lid by
hand until it’s horizontal.
12
Remove the tea sieve (A10) and
the glass brewing chamber* (A11)
from the machine.
13
Rinse the tea sieve (A10), tea
sieve lid (A9) and glass brewing
chamber* (A11) with clean water.
Put the glass brewing chamber
(A11) back and slightly push it
down until you hear a click*.
Put either loose leaf tea or a tea
bag into the tea sieve (A10) and
close the tea sieve lid (A9) **.
15b
When using a tea bag, make sure
the string hangs over the tea
sieve handle (A12) **.
English

13
16
Install the tea sieve (A10) into the
machine.
Make sure the tea sieve (A10) is
well installed. The tea handles
(A12) should be in the grooves.
17
When using a tea bag, make sure
the string and label are hanging
outside of the machine.
17b
18
Close the machine lid (A8), and
place a cup on the drip tray (A5).
19
Adjust the settings (see p.15)
and/or press the main button
(A13) to start.
20
The machine will make a sound
when your tea is ready. Enjoy!
English

14
Display with
information
Left button-
Press to choose
the option on
the bottom left
of the display
Main button
Turn left or right to switch
between menus or options
Press to choose the current menu
or option
(highlighted in grey)
With the user interface you can adjust the settings to control temperature, steeping time, water and tea amount,
and much more.
Right button-
Press to choose
the option on the
bottom right of
the display
user interface
STARTsetup
04:30
95˚C
300ml
English

15
STARTsetup
04:30
95
˚
C
300ml
HELLO
BRU
WELCOME SCREEN
After plugging in the machine,
you will get this welcome screen,
and after a few seconds the main
menu will appear.
M1. MAIN MENU
Indicated by the white outline.
Here you find the current settings.
BUTTON ACTION
MAIN press to start the brewing
process
RIGHT
LEFT press to set up your brewing
preferences in following
order: steeping time, water
temperature (NOTE: cold
= room temperature, not
cooled), water amount by
turning the main button,
then pressing ‘next’
MAIN turn to go to other menus
MAIN press and hold for 3 sec to
perform a rinse (see p. 18 -
S2. rinse)
STARTsetup
02:00
80
˚
C
250ml
green tea
M2./M3./M4. GREEN/BLACK/
HERBAL TEA PRESET
Adjustable presets used for quic-
kly brewing green, black or herbal
tea. Our recommended settings:
green 2min, 80°C/180F, 250ml/8oz
black 5min, 95°C/205F, 250ml/8oz
herbal 5min, 90°C/200F, 250ml/8oz
But you can adjust them to your
preference.
BUTTON ACTION
MAIN press to start the brewing
process
RIGHT
LEFT press to edit preset settings
(analog to setup M1. main
menu)
MAIN turn to go to other menus
MENUS
English

16
STARTsetup
multi
steeping
3
M5. MULTI STEEPING
In multi steeping mode you make
multiple infusions without taking
out the used tea. The main menu
settings will be used (e.g. 3 = 3x
the amount of tea selected in the
main settings). NOTE: Make sure
to place a big enough container
underneath and put enough tea in
the tea sieve (A10)!
BUTTON ACTION
MAIN press to start brewing
multi-steep
RIGHT
LEFT press to set up the mul-
ti-steeping amount (2,3 or
4 cups) by turning the main
button and then pressing
‘save’
MAIN turn to go to other menus
STARTsetup
dispenser
95˚C
250ml
M6. DISPENSER
Dispense water (not tea) in your
cup, at the temperature and
amount you desire. NOTE: when
using the dispenser mode, empty
or take out the tea sieve (A10).
BUTTON ACTION
MAIN press to start the dispenser
with displayed settings
RIGHT
LEFT press to set up the
dispenser settings in
following order: water
temperature, water amount
(NOTE: when using infinity
∞ mode, press ‘stop’ to stop
dipensing) by turning the
main button and then pres-
sing ‘next’
MAIN turn to go to other menus
STARTsetup
TIMER
07:30
M 7. TIMER
Brew your tea at a specific time.
The main menu settings will be
used. Put your tea in the machi-
ne, and it will start brewing at the
time indicated on the display (e.g.
you set the timer in the evening
before to brew your tea at 7:30 in
the morning when you wake up.)
(timer button explanation
continues on the next page)
English

17
(timer button explanation)
BUTTON ACTION
MAIN press to put the machine in
timer mode. you will see two
indicated times:
top: the time at which your
tea starts brewing.
bottom: the current time.
If this is not correct, adjust
your settings at S1 - current
time (see p. 18)
RIGHT
LEFT press to set up the timer
in following order: hours,
minutes
by turning the main button
and then pressing ‘next’
MAIN turn to go to other menus
enterback
machine
setup
M9. MACHINE SETUP
If you enter the machine setup
menu, you can edit the different
settings of the machine
(settings will be explained on the
next pages)
BUTTON ACTION
MAIN press to enter the machine
setup to edit settings
RIGHT
LEFT press to go back to M1.
main menu
MAIN turn to go to other menus
STARTsetup
cool down
50%
water
50%
tea
M8. COOL DOWN
Prepare tea at a more ready-to-
drink temperature, by brewing
part of the tea, and topping up
the rest with unheated water from
the water tank. The main menu
settings will be used. Tip: Increase
the steeping time to not loose on
taste.
BUTTON ACTION
MAIN press to start brewing cool
down
RIGHT
LEFT press to choose the dillu-
tion proportion (e.g. 40%
water, 60% tea) by turning
the main button and then
pressing ‘next’
MAIN turn to go to other menus
English

18
editback
current
time
12:39
S1. CURRENT TIME
Here you can adjust the time in
the machine which is used for
the timer mode (M7.) and also the
digital clock that can be used as
a screen saver (see S9.) You can
switch the time format from 12H
to 24H (see S14.)
BUTTON ACTION
MAIN press to set up the current
time in following order:
hours, minutes by turning
the main button, then pres-
sing ‘next’, then ‘save’
RIGHT
LEFT press to go back to M9.
machine setup
MAIN turn to go to other settings
editback
rinse
cup
S2. RINSE
The rinse function automatically
rinses the glass brewing chamber
(A11) with a little bit of fresh water
from the tank after each cycle. The
rinse can be set as:
cup: the rinse water (fresh water
from the tank) goes into your cup.
tray: the rinse water dispenses to
the magnetic drip tray (A5) after
you remove the cup.
off: rinse function is deactivated.
NOTE: A manual rinse can be star-
ted by pressing the main button
in the main menu (M1.) for longer
than 2 seconds.
BUTTON ACTION
MAIN press to set up the rinse to
your preference (cup, tray,
off) by turning the main but-
ton, then pressing ‘save’
RIGHT
LEFT press to go back to M9. ma-
chine setup
MAIN turn to go to other settings
MACHINE SETTINGS
English

19
editback
mult
i
steeping
activated
S5./S6./S7./S8 MULTI STEEPING/
DISPENSER/TIMER/COOL DOWN
You can decide to show or hide
these functions in your main
menu: multi steeping (M5.), the
dispenser (M6.), the timer mode
(M7.), the cool down mode (M8.)
activated: visible/shown
deactivated: invisible/hidden
BUTTON ACTION
MAIN press to set up the chosen
menu to be activated or
deactivated by turning the
main button, then pressing
‘save’
RIGHT
LEFT press to go back to M9.
machine setup
MAIN turn to go to other settings
editback
rinse
delay time
off
S4. RINSE DELAY TIME
Enables you to delay the rinse
to up to 60 sec after dispensing
the tea. This is a more advanced
setting, typically set to 0 (no de-
lay). Only use it after reading the
troubleshooting guide (see p. 27 -
problem 11)
BUTTON ACTION
MAIN press to set up the delay
time to your desired
amount of seconds by
turning the main button,
then pressing ‘save’
RIGHT
LEFT press to go back to M9.
machine setup
MAIN turn to go to other settings
editback
rinse
intensity
normal
S3. RINSE INTENSITY
Adjust the amount of water used
with the rinse function:
normal: suitable for most teas
intense: more water, longer rinse
short: less water, shorter rinse
BUTTON ACTION
MAIN press to set up the rinse
intensity to your preference
(normal, intense, short) by
turning the main button,
then pressing ‘save’
RIGHT
LEFT press to go back to M9. ma-
chine setup
MAIN turn to go to other settings
English

20
editback
screen
saver
logo
S9. SCREEN SAVER
Adjust the screen saver (machine
goes into screen saver mode after
90 sec. of no use). Can be set to:
logo: display the BRU logo
clock: display the time
dark: display nothing
off: the machine won’t go into
screen saver mode
BUTTON ACTION
MAIN press to choose the screen
saver by turning the main
button, then pressing ‘save’
RIGHT
LEFT press to go back to M9.
machine setup
MAIN turn to go to other settings
editback
led
on
S10. LED
Turn the background LED lights
on or off . The background light
indicates different stages of the
steeping cycle: red = filling up,
orange = steeping, green = ready
to enjoy
BUTTON ACTION
MAIN press to turn the LED lights
on or off by turning the main
button, then pressing ‘save’
RIGHT
LEFT press to go back to M9.
machine setup
MAIN turn to go to other settings
editback
buzzer
on
S11. BUZZER
Turn the buzzer on or off. The
buzzer indicates when the tea is
ready, or when there is an error or
warning.
BUTTON ACTION
MAIN press to turn the buzzer on
or off by turning the main
button, then pressing ‘save’
RIGHT
LEFT press to go back to M9.
machine setup
MAIN turn to go to other settings
English
Table of contents
Languages:
Popular Kitchen Appliance manuals by other brands

LA VAGUE
LA VAGUE SOUS-CHEF user manual

GENERAL MACHINES
GENERAL MACHINES 350 GXL Automatic Instructions for use and maintenance

UBERHAUS DESIGN
UBERHAUS DESIGN JC-115B2E manual

ARIETE
ARIETE B-DRY manual

Tupperware
Tupperware Universal Pickling Jar 3L quick start guide

Cuisinart
Cuisinart DHR-20 INSTRUCTION AND RECIPE BOOKLET