Brunner Anliker GSM 5 User manual

Operating Manual for
the Vegetable Slicer
GSM 5
GSM 5 Star
Translation of the original instructions (German)

Issued:
Tested:
Revised:
Status: 300 Approved
Page 2 of 33
Ralph Moretti
Michel Benkovics
Ralph Moretti
Document number:
Index
10.07.2015
17.07.2015
20.01.2022
235.01518
CA
SAFETY GUIDELINES
This operating manual contains notices which you must observe to ensure your
personal safety and to
prevent damage to property. These notices are highlighted
by a warning triangle and displayed as follows, depending on the level of risk:
DANGER!
signifies that death, severe bodily injury or considerable damage to
property will occur if the respective precautions are not taken.
WARNING!
signifies that death, severe bodily injury or considerable damage to
property may occur if the respective precautions are not taken.
CAUTION!
signifies that minor bodily injury or damage to property may occur
if the respective precautions are not taken.
NOTE!
signifies important information on the product, its handling or the
respective part of the documentation to which you should pay par-
ticular attention.
Qualified per-
sonnel
The GSM 5 vegetable slicer may only be commissioned and oper-
ated by
qualified personnel. Within the context of this operating
manual and the safety information it contains, qualified personnel
constitutes persons trained or instructed in the use of this system.
This unit can be used by children aged 8 years and older and b
y
persons with reduced physical, sensory, or mental capabilities, or
lack of experience and knowledge, if they are supervised or have
been instructed in the safe use of the unit and understand the
hazards involved. Children must not play with the unit.
Cle
aning and user maintenance must not be undertaken by chil-
dren without supervision.
Please note
that:
The manufacturer cannot be held liable for accidents or damages
caused by the non-observance of the safety instructions, by im-
proper procedures or by inappropriate use.

Issued:
Tested:
Revised:
Status: 300 Approved
Page 3 of 33
Ralph Moretti
Michel Benkovics
Ralph Moretti
Document number:
Index
10.07.2015
17.07.2015
20.01.2022
235.01518
CA
WARNING!
The GSM 5 vegetable slicer may only be used for the applications
described in the specifications and technical description and only
in conjunction with spare parts recommended by Brunner-
Anliker
AG.
The product’s
faultless and safe operation assumes proper
transport, storage, set up and assembly as well as careful opera-
tion and maintenance.
Copyright © Brunner-Anliker AG 2015 All rights reserved
The reproduction, transmission or use of this document or its
contents is not permitted without explicit written authority.
Any violations will require payment of damages. All rights
reserved.
Brunner-Anliker AG
8302 Kloten
Switzerland
Disclaimer
We have reviewed the contents of this publication to ensure consisten-
cy with the described GSM Vegetable Slicer. Since variance cannot be
entirely precluded, we cannot guarantee full consistency. The infor-
mation in this publication is checked regularly and any necessary
corrections are then made in the next release issued.
We would appreciate any recommendations for improvement.
© Brunner-Anliker AG 2015

Issued:
Tested:
Revised:
Status: 300 Approved
Page 4 of 33
Ralph Moretti
Michel Benkovics
Ralph Moretti
Document number:
Index
10.07.2015
17.07.2015
20.01.2022
235.01518
CA
PREAMBLE / IMPORTANT INFORMATION
Purpose of this
operating man-
ual
This operating manual serves to
support the specialist in handling the GSM 5
Vegetable Slicer.
Readership
This operating manual is intended for the GSM 5 Vegetable Slicer, users and
the maintenance personnel of Brunner-Anliker.
Information ob-
ligation
The operating manual and
applicable regulations must be stored in a place
accessible to operating and maintenance personnel.
NOTE!
In addition to the operating manual, the generally applicable and other man-
datory regulations relevant to accident prevention must be observed and di-
rected!
Scope of this
operating man-
ual
This operating manual applies for the GSM 5 and GSM 5 Star Vegetable Slicer.
NOTE!
Functional modifications to the GSM 5 Vegetable Slicer will invalidate any en-
titlement to warranty.
Obligations of
the operating
company
The operator is obligated to operate the GSM 5 Vegetable Slicer in faultless
condition only. Potential hazards that arise between the GSM 5 Vegetable
Slicer and customer equipment must be secured by the operator.
Please read this operating manual carefully and completely. If there are any
uncertainties, please contact us immediately. Do not operate the equipment
as long as there are uncertainties. By commissioning the equipment you con-
firm that you have read and understood the operating manual.
DANGER!
Accidents may occur if the GSM 5 Vegetable Slicer is improperly used or used
in faulty condition.

Issued:
Tested:
Revised:
Status: 300 Approved
Page 5 of 33
Ralph Moretti
Michel Benkovics
Ralph Moretti
Document number:
Index
10.07.2015
17.07.2015
20.01.2022
235.01518
CA
Table of contents
1. Introduction ............................................................................................................................8
2. Intended use ...........................................................................................................................8
2.1 Limitation of liability ............................................................................................................8
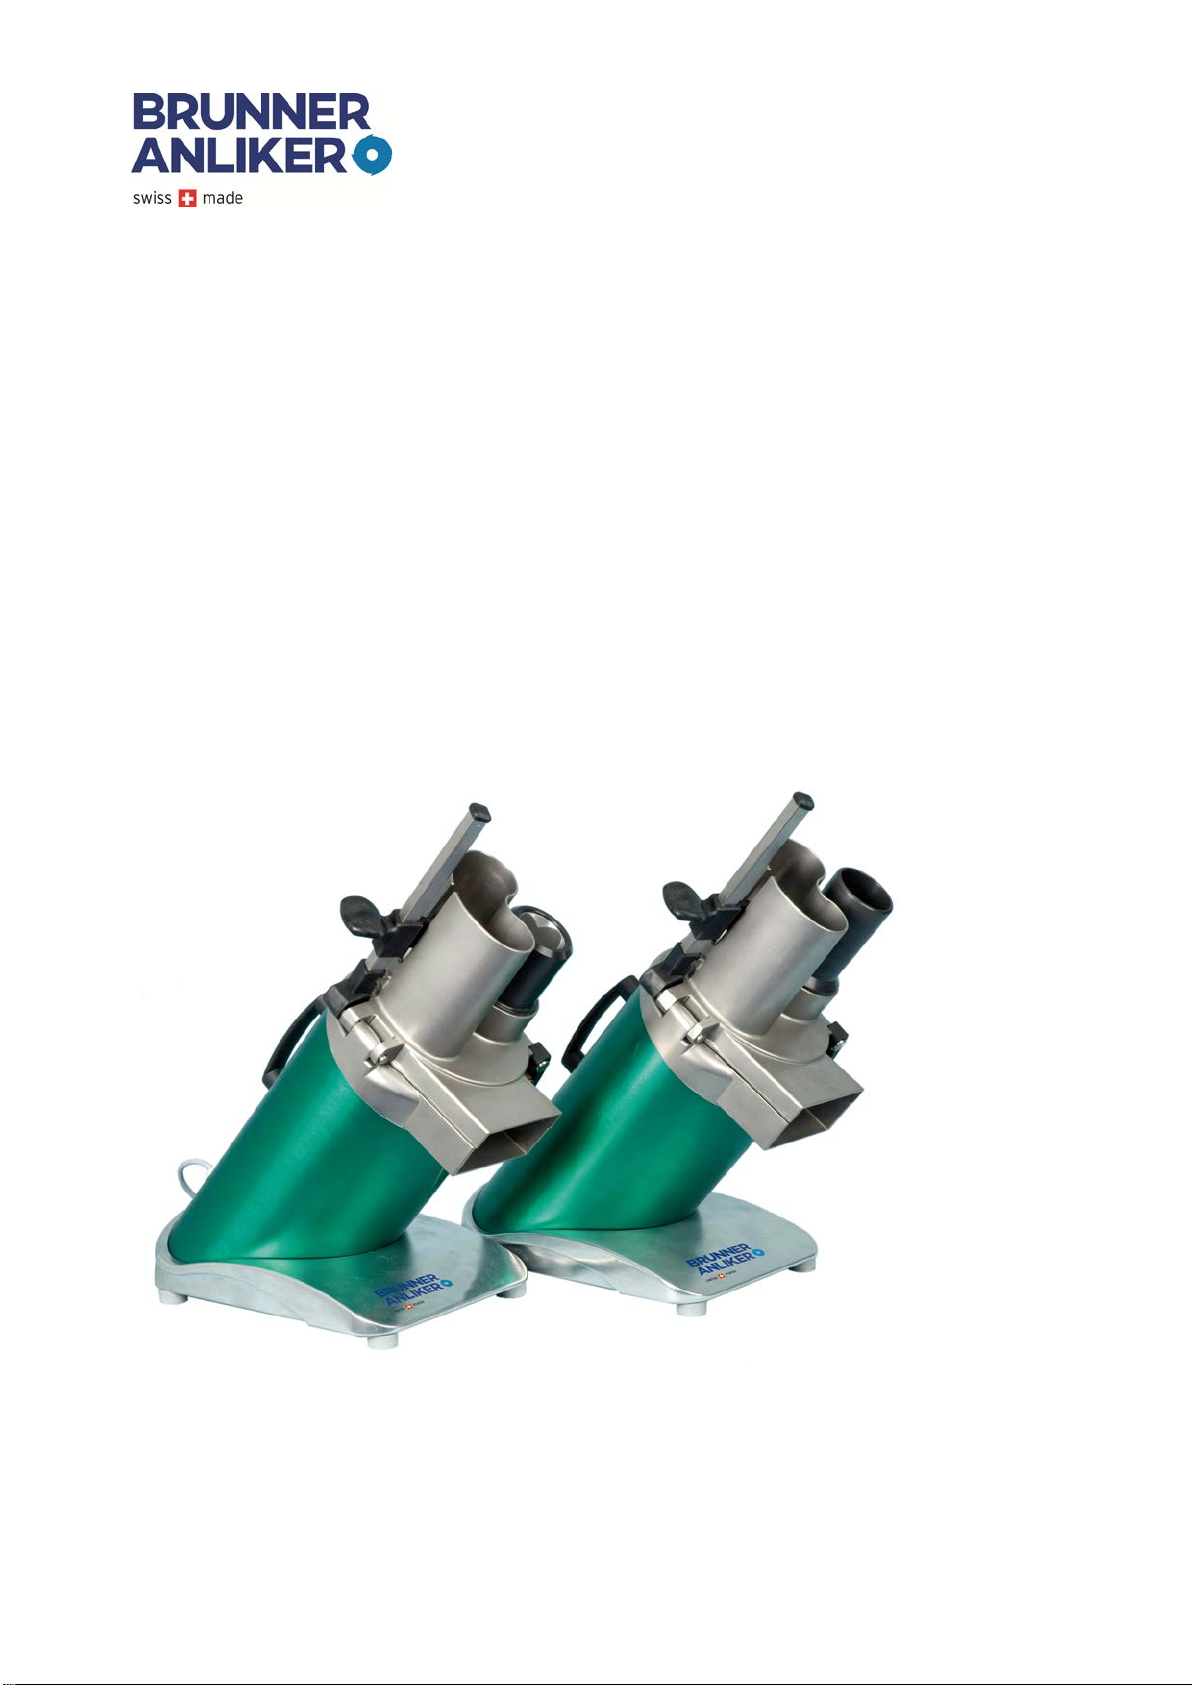
3. Designation of the system parts ................................................................................................9
4. Delivery scope .......................................................................................................................10
4.1 Delivery scope...................................................................................................................10
4.2 Accessories .......................................................................................................................10
5. Transport and installation instructions.....................................................................................11
5.1 Delivery condition..............................................................................................................11
5.2 Reporting damages ............................................................................................................11
5.3 Weight of the GSM 5 Vegetable Slicer ..................................................................................11
5.4 Delivery ............................................................................................................................11
5.5 Unpacking.........................................................................................................................12
5.6 Transporting the machine...................................................................................................12
5.7 Assembly & Installation ......................................................................................................12
5.8 Electrical / Electronic setup.................................................................................................13
5.9 Commissioning..................................................................................................................14
5.10 Storage.............................................................................................................................14
6. Operation..............................................................................................................................15
6.1 Correct insertion of cutting or grating discs...........................................................................15
6.2.1 Preparing the GSM 5 Vegetable Slicer...................................................................................15
6.2.2 Insert the ejector................................................................................................................15
6.2.3 Insert the cutting or grating disc...........................................................................................15
6.2.4 Close the hopper head ........................................................................................................16
6.2 Cutting inserts W (cubes), cutting disc Brunoises BR, Gaufrettes PG and Spaghetti Cutter.......... 17
6.2.1 cubes “W” .........................................................................................................................17
6.2.2 Brunoises “BR” and Gaufrettes “PG”.....................................................................................18
6.2.1 Spaghetti cutter .................................................................................................................18
6.3 Cutting of vegetables .........................................................................................................19
7. System maintenance “Cleaning concept” .................................................................................20
7.1 Cleaning the GSM 5 Vegetable Slicer....................................................................................20
7.2 Cleaning the blades and inserts ...........................................................................................20
7.2.1 Cleaning the cubing-grid......................................................................................................21
7.2.2 Soft matter in the cubing-grid ..............................................................................................21
7.2.3 Hard matter in the cubing-grid.............................................................................................21
7.2.4 Cleaning the cubing-grid manually........................................................................................21
8. Troubleshooting.....................................................................................................................21
8.1 Fault removal ....................................................................................................................22
8.2.1 Unit is not working: ............................................................................................................22
8.2.2 Clogging ............................................................................................................................22
8.2.3 Hopper head refuses to close...............................................................................................22
8.2.4 Cutting insert W cannot be removed. ...................................................................................22
8.2.5 BR cutting blade - only results in strips..................................................................................23
8.2.6 Cutting quality (surface structure) is deteriorating .................................................................23

Issued:
Tested:
Revised:
Status: 300 Approved
Page 6 of 33
Ralph Moretti
Michel Benkovics
Ralph Moretti
Document number:
Index
10.07.2015
17.07.2015
20.01.2022
235.01518
CA
8.2.7 Cube blade is jammed.........................................................................................................23
8.2.8 The blade strikes the head...................................................................................................23
8.2.9 The cutter bar has broken off...............................................................................................23
8.2.10 The machine cannot be deactivated....................................................................................23
8.2.11 The machine hums and operates irregularly. .......................................................................23
8.2.12 The pusher plate jams .......................................................................................................23
8.3 Service and information address..........................................................................................24
9. Spare parts ............................................................................................................................25
9.1 Disposal............................................................................................................................25
10. Transfer to Third Parties .........................................................................................................25
11. Technical data .......................................................................................................................26
11.1 GSM 5 ..............................................................................................................................26
11.2 GSM 5 Star........................................................................................................................26
11.3 Dimensional drawing GSM 5 ...............................................................................................27
11.4 Dimensional drawing GSM5 Star..........................................................................................28
11.5 EC Declaration of conformity ..............................................................................................29
11.6 Additions ..........................................................................................................................30
12. Warranty...............................................................................................................................33

Issued:
Tested:
Revised:
Status: 300 Approved
Page 7 of 33
Ralph Moretti
Michel Benkovics
Ralph Moretti
Document number:
Index
10.07.2015
17.07.2015
20.01.2022
235.01518
CA
List of illustrations
Figure 1: System designation
Figure 2: System designation 2 ..................................................................................................................9
Figure 3: Type plate .........................................................................................................................................9
Figure 4: GSM 5 Star or GSM 5
Figure 5:Standard pusher and rotating pusher............................................................................................. 10
Figure 6: Ejection plate and ejector
Figure 7: Cutting discs
Figure 8: Cubeing gridwith cube blade ..................................................................................................... 10
Figure 9: Cardboard box for the GSM
Figure 10: GSM with polystyrene padding ................................................................................................. 11
Figure 11: Hopper head folded back............................................................................................................. 15
Figure 12: Assembling the ejector ................................................................................................................ 15
Figure 13: Inserted disc................................................................................................................................. 15
Figure 14: Cubing-grid................................................................................................................................... 17
Figure 15: Cubeknifes.................................................................................................................................... 17
Figure 16: Underside of the machine ........................................................................................................... 22
Figure 17: Dimensional drawing GSM 5........................................................................................................ 27
Figure 18: Dimensional drawing GSM5 Star ................................................................................................. 28
Figure 19: Declaration of Conformity ........................................................................................................... 29
Figure 20: Directive 1935/2004 .................................................................................................................... 30
Figure 21: Directive 10/2011 ........................................................................................................................ 31
Figure 22: WEEE 2012/19 ............................................................................................................................. 32
List of tables
Table 1: System parts 9
Table 2: Type plate 9
Table 3: Underside of the machine 22
Table 4: Technological Data GSM 5 26
Table 5: Technological Data GSM 5 Star 26

Issued:
Tested:
Revised:
Status: 300 Approved
Page 8 of 33
Ralph Moretti
Michel Benkovics
Ralph Moretti
Document number:
Index
10.07.2015
17.07.2015
20.01.2022
235.01518
CA
1. Introduction
Thank you for your trust.
We hope you enjoy using the Brunner-Anliker device!
Brunner-Anliker AG machinery is of high quality. With its internal quality insurance measures, Brunner-
Anliker AG ensures that the equipment leaves the plant in perfect condition. By purchasing the GSM 5 or
GSM 5 Star Vegetable Slicer from Brunner-Anliker AG, you have decided on a sophisticated, technically
superior product.
2. Intended use
The GSM 5 Vegetable Slicer is the ideal vegetable slicer. Slicing or grating your vegetables, chopping your
fruit or grating your cheese in your kitchen, canteen or catering business is longer a difficult feat.
Frozen vegetables or fruit may not be processed!
NOTE!
•The device may only be used for the products approved by the manufacturer.
•Any other use is contrary to those specified.
•This unit can be used by
children aged 8 years and older and by persons with re-
duced physical, sensory, or mental capabilities, or lack of experience and
knowledge, if they are supervised or have been instructed in the safe use of the
unit and understand the hazards involved. Children must not play with the unit.
Cleaning and user maintenance must not be undertaken by children without su-
pervision.
DANGER!
•
The manufacturer cannot be held liable for accidents or damages caused by the
non-observance of the safety instructions, by improper procedures or by inap-
propriate use and excludes liability regarding operational safety and personal
damages.
2.1 Limitation of liability
NOTE!
The operator of the machine is responsible for the conformity of the entire
system to locally
valid regulations regarding the installation and operation of these systems.
The machine operators shall verify installation safety following its completion. Exposed sys-
tem parts, which could denote a hazard for the operating personnel, m
ust be protected by
the operator or must be safeguarded with appropriate safety equipment.

Issued:
Tested:
Revised:
Status: 300 Approved
Page 9 of 33
Ralph Moretti
Michel Benkovics
Ralph Moretti
Document number:
Index
10.07.2015
17.07.2015
20.01.2022
235.01518
CA
3. Designation of the system parts
Figure 1 displays the system parts of the vegetable slicer.
These images serve general illustrative purposes.
Detailed information on the dimensions is contained in the dimensional images 17 and 18
of the device.
Figure 1: System designation Figure 2: System designation 2
Table 1: System parts
Item
Item
1 Star feeding tube “GSM 5 Star”
9 Cutting compartment
2 Power cable with plug
10 Drive shaft
3 Vegetable slicer (basic unit)
11 Drive pin
4 Latch
12 Hopper head swivelled backwards
5 Pusher rod
6 Pusher plate
7 Hopper (kidney-shaped)
8 Outlet
Type plate
Figure 3: Type plate
Item
Item
1 Manufacturer
5 Contact details
2 Serial number
6 Motor capacity details
3 Machine name
7 S+
Safety symbol of the Federal Inspectorate for Heavy Current Installa-
tions (ESTI)
4 CE mark
Table 2: Type plate

Issued:
Tested:
Revised:
Status: 300 Approved
Page 10 of 33
Ralph Moretti
Michel Benkovics
Ralph Moretti
Document number:
Index
10.07.2015
17.07.2015
20.01.2022
235.01518
CA
4. Delivery scope
4.1 Delivery scope
Apart from the machine itself, the delivery scope of the Vegetable Slicer includes the operating manual
and accessories, depending on the individual order.
Figure 4: GSM 5 Star or GSM 5 Figure 5:Standard pusher and rotating pusher
Figure 6: Ejection plate and ejector Figure 7: Cutting discs Figure 8: Cubeing gridwith cube blade
4.2 Accessories
A large range of accessories, from various cutting and grating discs to disc holders areavailable for the
Vegetable Slicer. For further information, please contact our sales department or have a look on the In-
ternet.
Contact address:
Brunner-Anliker AG
Brunnergässli 1-3 T: +41 44 804 21 00
8302 Kloten F: +41 44 804 21 90
Switzerland
brunner-anliker.com E-Mail: mail@brunner-anliker.com

Issued:
Tested:
Revised:
Status: 300 Approved
Page 11 of 33
Ralph Moretti
Michel Benkovics
Ralph Moretti
Document number:
Index
10.07.2015
17.07.2015
20.01.2022
235.01518
CA
5. Transport and installation instructions
5.1 Delivery condition
The machine is delivered in a cardboard box padded with polystyrene as shown in Image 9 and 10.
Figure 9: Cardboard box for the GSM Figure 10:GSM with polystyrene padding
WARNING!
•During assembly, ensure that foreign bodies do not enter the machine. Cleaning is im-
perative if the machine is soiled during installation. On how to clea
n the unit, refer to
Page 18.
The GSM 5 Vegetable Slicer was cleaned by the manufacturer before delivery.
We do however recommend cleaning the machine again before its initial use (with a food-
grade cleaning product!).
5.2 Reporting damages
If any damage to the GSM 5 Vegetable Slicer is noted as a result of deficient packaging or transportation,
the haulage company, the insurance company and the dispatching factory must be notified immediately.
For contact details, refer to page 23.
5.3 Weight of the GSM 5 Vegetable Slicer
GSM 5 Vegetable Slicer 23 kg Bist Du Dir sicher
GSM 5 Star Vegetable Slicer 23 kg
5.4 Delivery
Normal transport

Issued:
Tested:
Revised:
Status: 300 Approved
Page 12 of 33
Ralph Moretti
Michel Benkovics
Ralph Moretti
Document number:
Index
10.07.2015
17.07.2015
20.01.2022
235.01518
CA
5.5 Unpacking
Before using the Vegetable Slicer, please remove the polystyrene padding and any other packaging mate-
rial (i.e. cable binders) for transport!
NOTE!
•Check the completeness of the
delivery based on the enclosed delivery note (if the
delivery is incomplete, please contact our customer service).
•Report any visible damages caused by inferior packaging or transport to our cus-
tomer service, the shipping company and the insurance company immediately.
CAUTION!
•Heavy load! May damage the musculoskeletal system.
•Use suitable lifting gear when transporting the device!
5.6 Transporting the machine
For transport by the operator, use certified and suitable lifting gear.
5.7 Assembly & Installation
Only place the machine on a level, stable surface with minimum dimensions of 300 mm x 400 mm at suit-
able working height to ensure ergonomic working conditions.
Also ensure sufficient space in front of the machine to accommodate a suitable GN-containerunder the
machine’s outlet. Gastronorm containers with a height of 150 mm at 2/3 or 1/2 sizes are ideally suited to
fit underneath the machine.
Also ensure sufficient space on the left side of the machine to swivel the hopper head away for replacing
the cutting discs or cutting inserts!
Connect the machine to a power socket in as close proximity as possible! Do not place the cables in the
path of a thoroughfare to prevent a tripping hazard!
If you are unsure about the installation site and/or the installation itself, please contact Brunner-Anliker
AG (refer to Page 23 for the contact address).

Issued:
Tested:
Revised:
Status: 300 Approved
Page 13 of 33
Ralph Moretti
Michel Benkovics
Ralph Moretti
Document number:
Index
10.07.2015
17.07.2015
20.01.2022
235.01518
CA
5.8 Electrical / Electronic setup
Depending on the version, the machine is designed for the 115V 60Hz / 230V 50Hz / 230V 60Hz network.
The machine can be connected to a normal, appropriately secured plug!
It is imperative that you observe the following instructions for the electrical installation of the GSM 5
Vegetable Slicer:
DANGER!
•Defective electrical components may be live and pose a life-threatening haz-
ard.
•Do not drive over, crush or pull on the cable(s).
•
Before working on electrical equipment, disconnect the device from the
mains supply.
•
Established defects on electrical components / assemblies must be repaired
immediately. In the event of acute danger, the equipment may never be op-
erated in defective condition.
CAUTION!
•When connecting the device, please observe: For electrical data -
refer to
Type Plate on page 8.
NOTE!
•Brunner-
Anliker AG does not accept any liability for events and damages, the
origins of which can be attributed to the electrical installation.
•Protection from unexpected activation: Observe national provisions!

Issued:
Tested:
Revised:
Status: 300 Approved
Page 14 of 33
Ralph Moretti
Michel Benkovics
Ralph Moretti
Document number:
Index
10.07.2015
17.07.2015
20.01.2022
235.01518
CA
5.9 Commissioning
Observe the following points when starting the machine for the first time. Ensure that there are no for-
eign objects in the Vegetable Sliver’s hopper!
DANGER!
•Do not change or modify the system or add any
equipment which could impair
the safety or function of the GSM 5 Vegetable Slicer, as otherwise its CE-
conformity will be invalidated.
•
Not appropriately checking the safety equipment on the GSM 5 Vegetable Slicer
may massively impair its function and may r
esult in severe injury to personnel
and/or damage to the machine!
CAUTION!
•Comply with local accident prevention regulations.
NOTE!
•
Before starting any work, you must have read and understood the content and
valid provisions regarding “Safety Measures” in the operating manual.
5.10 Storage
In order to maintain the functionality of an unused GSM 5 Vegetable Slicer over a longer period of time,
you need to observe several points:
•The storage location must be dry and clean.
•The GSM 5 Vegetable Slicer must not be exposed to extreme cold or heat.
•The entire machine must be kept clean.
•The storage location must not be exposed to condensation.
•The GSM 5 Vegetable Slicer must be packaged or covered to prevent penetration of dirt and dust.
NOTE!
•Brunner-Anliker AG is not liable for corrosion damage caused by incorrect stor-
age, e.g. storage in a moist room or similar.
Before returning the machine into service after a longer period of time, we recommend that you contact
our customer service.
All mechanical parts must be inspected. In particular:
•Check all components for corrosion damage (and storage deterioration).
•Check the cutting discs for damage or cutting quality.

Issued:
Tested:
Revised:
Status: 300 Approved
Page 15 of 33
Ralph Moretti
Michel Benkovics
Ralph Moretti
Document number:
Index
10.07.2015
17.07.2015
20.01.2022
235.01518
CA
6. Operation
The possible uses of Brunner-Anliker’s GSM 5 Vegetable Slicer, the standard model, are already very diverse. With
Brunner-Anliker’s GSM 5 Star however, you can expand the cutting types by Brunoises “BR”, Gaufrettes “PG” and
the “Spaghetti cutter”. Observe the following points when inserting the cutting or grating discs:
6.1 Correct insertion of cutting or grating discs
How you can insert cutting or grating discs is described below.
6.2.1 Preparing the GSM 5 Vegetable Slicer
In order to insert a cutting disc, open the Latch first and swivel the hop-
per head to the left.
Figure 11:Hopper head folded back
6.2.2 Insert the ejector
Before inserting a disc, the ejector or ejection plate must be mounted. If
inserted correctly, this almost touches the base of the cutting compart-
ment. Without the ejector/ejection plate, the cutting material will accu-
mulate underneath the cutting disc, while the discs are pressed upward,
scratching the cutter head and damaging the blades.
Figure 12:Assembling the ejector
6.2.3 Insert the cutting or grating disc
Now place the disc onto the drive shaft. A short rotation will engage the
disc in the drive pin at the drive shaft, seating the top of the disc correct-
ly, i.e. “flush with the drive shaft”.
To enable the correct placement of the blade disc, the hub and drive pin
have to be clean.
Figure 13:Inserted disc
WARNING!
•The blades and grater perforations are very sharp and are now exposed.
•Risk of cuts and skin abrasions!

Issued:
Tested:
Revised:
Status: 300 Approved
Page 16 of 33
Ralph Moretti
Michel Benkovics
Ralph Moretti
Document number:
Index
10.07.2015
17.07.2015
20.01.2022
235.01518
CA
ATTENTION!
•The discs fit snugly onto the
drive shaft. Never press them onto the drive shaft
using force or any amount of exertion!
6.2.4 Close the hopper head
Swivel the hopper head back into position and follow the additional steps on Page 18 for vegetable slicing.

Issued:
Tested:
Revised:
Status: 300 Approved
Page 17 of 33
Ralph Moretti
Michel Benkovics
Ralph Moretti
Document number:
Index
10.07.2015
17.07.2015
20.01.2022
235.01518
CA
6.2 Cutting inserts W (cubes), cutting disc Brunoises BR, Gaufrettes PG and Spaghetti Cutter
The so-called cutting inserts consist of at least 2 parts, while the
6.2.1 cubes “W”
consist of a cubing-grid and cube blade
The cube blades are marked on the upper surface. The cubing-grids con-
sisting of black glass-fibre compound are marked underneath on the rim.
First insert the cubing-grid with the sharp side facing up.
Figure 14:Cubing-grid
Once the cubing-grid is inserted, place the appropriate blade onto the drive shaft. Ensure that the cube
blade correctly engages in the drive pin on the drive shaft. Rotating the blade carefully and gently in anti-
clockwise direction will make it engage in the drive pins on the drive shaft and seat it correctly, its “top
flush” with the drive shaft.
Now swivel the hopper head backwards and follows the next stops, “Slic-
ing vegetables correctly”
To remove a cutting insert W ( = cube) you first have to rotate and hold
the cube knife in anti-clockwise direction to release the bayonet catch.
You can then carefully lift out both parts together from below.
Figure 15:Cubeknifes
WARNING!
•The cube knifes and cubing-grids are very sharp and are now exposed.
•Risk of cuts and skin abrasions!
ATTENTION!
•Every cubing-grid has a matching cube knifes
. Ensure that the matching parts
are inserted.
•Mixing differently sized cubing-grids and knifes
can lead to immediate damage
and possibly to required repairs.

Issued:
Tested:
Revised:
Status: 300 Approved
Page 18 of 33
Ralph Moretti
Michel Benkovics
Ralph Moretti
Document number:
Index
10.07.2015
17.07.2015
20.01.2022
235.01518
CA
6.2.2 Brunoises “BR” and Gaufrettes “PG”
Cutting of Brunoises “BR” and Gaufrettes “PG” is only possible with the GSM 5 Star model. The BR and PG
blades are specially equipped with a tappet / pin, thus allowing the flower-shaped filling neck to rotate,
which in turn leads to the respective vegetable cutting form. It is imperative that the cutting material is
inserted in the rotating filling neck, not higher than the swivel support and pushed down with the help of
the rotating pusher.
When inserting the 2 disc types BR and PG, always ensure that the drive pin (on the upper side of the disc)
is engaged and that the hopper head is easily closed.
If the hopper head cannot be easily closed, the tappet / pin will be positioned directly on the driver. Ro-
tate the disc slightly to engage the tappet / pin and to easily close the hopper head.
6.2.1 Spaghetti cutter
Cutting vegetable spaghetti is only possible with the GSM 5 Star model.
The spaghetti cutter consists of 5 parts
•Base plate
•Driver
•2 mm cutting insert
•3 mm cutting insert
•Garland cutting insert
Application: Open the hopper head and insert the driver with the tappet facing upwards. Press the re-
quired cutting insert onto the upper side of the base plate. Place both parts onto the basic unit and rotate
in anti-clockwise direction until they engage. Close the hopper head and push the vegetables snugly into
the flower-shaped filling neck. The vegetables must be fully inserted into the rotating filling neck. Start
the machine with the Latch and use the rotating pusher to push down the vegetables. Important: Do not
use the ejector, as this will destroy the vegetable spaghetti.
Tip: The following vegetables are particularly suitable
•Large carrots
•Large “Pfälzer” yellow carrots
•Parsnips
•Zucchini
•Red onions (garlands)
•Kohlrabi
The tighter the vegetables in the rotating filling neck, the better the cut.

Issued:
Tested:
Revised:
Status: 300 Approved
Page 19 of 33
Ralph Moretti
Michel Benkovics
Ralph Moretti
Document number:
Index
10.07.2015
17.07.2015
20.01.2022
235.01518
CA
6.3 Cutting of vegetables
Place a suitable container under the outlet of the machine. Gastronorm containers with a height of 150
mm at 2/3 or 1/2 sizes are ideally suited to fit underneath the machine.
1. Remove the pusher plate from the kidney-shaped feed opening and swivel away to the left.
2. Fill the feed opening with the vegetables.
3. Return the pusher plate to the stop (i.e. the pusher plate is on top of the vegetables above the
kidney-shaped feed opening)
4. Close the Latch or push it downwards and start the machine.
5. Guide the pusher (by lightly pressing onto the vegetables) so that it is always on the disc body to
maintain an optimal cut.
6. As soon as the feed opening is empty - repeat the process 1-5 times ?????.
7. When all the vegetables have been processed, unlock the Latch to stop the machine. (Switched
off)
If you want to cut the vegetables in “oriented” manner - such as onions or tomatoes - you also have to fill
the feed opening in “oriented” manner.
Tip: If you stand long vegetables upright into the feed opening, you will receive small, diagonally cut piec-
es. If you place long vegetables on their side, you will receive long pieces.
You can also use the feed opening on the right to continuously fill long vegetables such as leeks, celery
sticks, spring onions, cucumbers, radishes, etc.
It is imperative that you use the right (rotating) feed opening for Brunoises and Gaufrettes.
ATTENTION:
•The pusher plate only serves to guide the vegetables. Strong pressure is un-
necessary and lessens the cutting quality.
•
Strong pressure will also not increase the output quantity / performance in
any way.

Issued:
Tested:
Revised:
Status: 300 Approved
Page 20 of 33
Ralph Moretti
Michel Benkovics
Ralph Moretti
Document number:
Index
10.07.2015
17.07.2015
20.01.2022
235.01518
CA
7. System maintenance “Cleaning concept”
7.1 Cleaning the GSM 5 Vegetable Slicer
The GSM 5 Vegetable Slicer is manufactured from low-maintenance stainless steel and is therefore easy
to clean. The hopper head can be removed completely for cleaning purposes.
Hopper head, pusher and ejector can be cleaned and disinfected in the dishwasher. The cutting compart-
ment of the basic unit can be cleaned with a damp cloth or with the brush provided.
However, the vegetable slicer (basic unit) may not be cleaned in the dishwasher!
WARNING!
•The basic machines may not be cleaned in the dishwasher.
7.2 Cleaning the blades and inserts
You can use the nylon brush included in the delivery scope to easily clean the blades and grater discs, as
well as the inserts, under running water.
Due to the use of a high-performance, glass-fibre compound, these parts can also be cleaned in the dish-
washer or in the combi-steamer at 90°C! You can then easily remove the vegetables (under running wa-
ter) using the brush provided.
WARNING!
•Please note that the use of the dishwasher to clean the blades may negatively influ-
ence the service life of the blades.
Other manuals for GSM 5
1
This manual suits for next models
1
Table of contents