BT FREELANCE XH 2100 User manual

BT Freelance XH 2100 user guide ~ 2nd Edition ~ 18th March ’04 ~ 6012
User uide
BT FREELANCE XH 2100
This equipment is not designed for making
emergency telephone calls when the power fails.
Alternative arrangements should be made for
access to emergency services.
This product is intended for connection to analogue
public switched telephone networks and private
switchboards in the UK.
YOU MUST
SUBSCRIBE TO YOUR
NETWORK PROVIDER’S
CALLER DISPLAY AND CALL WAITING
SERVICES BEFORE THESE FEATURES WILL
WORK. A QUARTERLY FEE IS PAYABLE

BT Freelance XH 2100 user guide ~ 2nd Edition ~ 18th March ’04 ~ 6012
Please open this page for an ‘at a glance’
guide to your BT Freelance XH 2100

BT Freelance XH 2100 user guide ~ 2nd Edition ~ 18th March ’04 ~ 6012
12
5
8
0
3
6
9
Int
4
7
E
F
W
X
Y
Z
T
U
V
P
Q
R
S
M
N
O
J
K
L
G
H
I
A
B
C
R
f
n
o
C
P
a
u
s
e
S
e
c
r
e
c
y
Vol
C
a
l
l
s
䊲
䊲
u
M
e
n
HANDSET 1
i
g
i
t
a
l
C
l
a
r
i
t
y
Redial
1
At a glance
Menu button
Use to access and
select the options in
the menu, see pages 4-5.
Handset
Internal button
To make internal calls
between handsets
registered to the base.
Phonebook button
Use to access the 50
names and numbers
stored in the phonebook,
see page 17.
Recall/Po er button
For use with a
switchboard/PBX and BT
Calling Features, see page 35.
Also used to switch
off the handset, see page 14.
Keypad
Talk button
Use to make, receive
and end calls, see pages
14-15.
Secrecy button
During a call press to
mute the call so your
caller cannot hear
you talk to someone
close by, see page 16.
Also used as a delete,
edit and exit button.
Volume buttons
Use to adjust the
handset earpiece speech
volume (see page 15)
and handset and base
ringer volume, see pages
20 and 23.
Also used to access the
redial and calls list and
scroll through the
phonebook, menu options,
redial and calls list.
Red light
To indicate that
the phone is ringing or
in use.
Pause/Redial
Press to redial one of
the last five numbers
dialled. Also, press to
dial or store a pause in
the stored number,
see page 16.
Liquid Crystal
Display
Display shows you
incoming caller’s
details, the name
and/or number you
have dialled, and the
status of the handset.

BT Freelance XH 2100 user guide ~ 2nd Edition ~ 18th March ’04 ~ 6012
Power/
In Use
Charging
BT Freelan e XH 2100
Digital Clarity
DECT
Page
2
Explanation of the display icons
Icon Steady Flashing
EXT External line in use Incoming call
INT Internal call Internal call from another handset
In calls list New call received in calls list
3 way conversation in progress
Battery exhausted
Battery weak
Battery half-full
Battery full
Phonebook
Menu in use
Handset linked to base station Out of range or searching for base station
EXT
INT
JOHN HS1
EXT
INT
HS1
Displays the number of
the handset at all times.
Charging light
Lights up red to indicate
charging when the
handset is on the base.
Power/In use light
Green light remains lit
when there is power to the
base and flashes when the
line is in use.
Page button
Lets you page the handset.
Also used to register the
handset.
To personalise the
name of your handset,
see page 21.
Standby s reen
Base

BT Freelance XH 2100 user guide ~ 2nd Edition ~ 18th March ’04 ~ 6012
Key ombination
*
enter the name enter
the telephone number
During a call, press the during a
call until the required level is reached.
During a call, press to switch on and again
to switch off.
enter handset number
– Press and release continuously to
scroll through.
– Press and release continuously to
scroll through.
HANDSET
RING VOL to select volume
SETUP BASE VOL
to select volume
Quick Guide
Information for the handset settings
Fun tion
Answer a all/End a all
Make a all
Redial a number
Store a number in the
memory
Dial a number in the memory
Adjust the earpie e volume
Se re y on/off
Transfer all to another handset
Three way onversation
A ess to redial list
A ess to alls list
Set handset ringer volume
Set base unit ringer volume
3
u
M
e
n
u
M
e
n
u
M
e
n
u
M
e
n
u
M
e
n
u
M
e
n
u
M
e
n
u
M
e
n
u
M
e
n
u
M
e
n
u
M
e
n
u
M
e
n
S
e
c
r
e
c
y
Int
Int
C
a
l
l
s
Vol
Vol
Vol
Vol
Vol
Vol
Vol
C
a
l
l
s
C
a
l
l
s
C
a
l
l
s
C
a
l
l
s
C
a
l
l
s
C
a
l
l
s
C
a
l
l
s
C
a
l
l
s
Vol
C
a
l
l
s
f
n
o
C
Int
u
M
e
n

BT Freelance XH 2100 user guide ~ 2nd Edition ~ 18th March ’04 ~ 6012
4
Menu Structure
Cont......
Phonebook
Setup
Add
Delete
Modifiy
Base Vol
Base Mel
Sel Base
Del H/S
PIN Code
Priority
Dial Mode
PABX
Default
Handset 1.....5
Vol Off
Melody 1.....5
Base 1.....4
Auto
PIN?
PIN?
Off
On
Sele t
Pulse
Tone
Re all Re all 1
Re all 2
PBX1
PBX2
Pause
PIN?
Handset 1.....5
New PIN
Retype
Base
Handset 1.....5
PIN?
PIN?
3 Se
5 Se
MENU STRUCTURE

BT Freelance XH 2100 user guide ~ 2nd Edition ~ 18th March ’04 ~ 6012
5
Important. If you make a mistake you can return to the previous menu heading by pressing the ✘button. If you press
and hold the ✘button at any time you will return to the standby screen. After 15 seconds if no buttons are pressed
the handset will automatically return to the standby screen.
Handset
Register
Beep
Ring Vol
Ear Vol
Int Mel
Ext Mel
Auto Ans
Name
Language
BS 1234
Keytone
Low Batt
Outrange
Volume 1.....5
Vol Off
Ear Vol 1.....5
Melody 1.....5
Melody 1.....5
Off
On
English
Fran ais
Deuts h
Nederl
Italiano
Espanol
Portuges
Norsk
Dansk
Svenska
Suomi
PIN?
On or Off
On or Off
On or Off
MENU STRUCTURE

BT Freelance XH 2100 user guide ~ 2nd Edition ~ 18th March ’04 ~ 6012
6
In this guide
At a glance
Handset 1
Display icons 2
Quick Guide 3
Menu structure 4
Introduction 7
Unpacking your
BT reelance XH 2100 8
or your records 8
Safety information 9
Setting up 10
Plan the location 10
Using the telephone 1
Making and receiving calls 14
Call timer 14
Redial 16
Secrecy 16
Name and number
Phonebook 16
Paging handsets 19
Handset settings 20
Base settings 23
Caller Display
and Call Waiting 26
Using Caller Display 26
Calls list 27
Call Waiting 28
Using BT Freelance
XH 2100 additional
handsets and bases 30
Help 32
General information 3
Guarantee 34
Technical information 35
Switchboard compatibility 35
Switchboard external line
access code 35
Recall 35
Index 37
Note
In this user guide, we’ve included
helpful tips and useful notes. They
are shown in a white box like this.
Note
There is a detailed INDEX at the end of this guide, see page 37.
IN THIS GUIDE

BT Freelance XH 2100 user guide ~ 2nd Edition ~ 18th March ’04 ~ 6012
7
Introduction
Your BT Freelan e XH 2100 has been designed for ease of use
and made to the high standards set by BT
Please read the instructions carefully
before use and keep this user guide for
future reference.
DECT
By purchasing the BT Freelance
XH 2100 you now own a product which
combines the advantages of cordless
operation with the performance of a
high quality corded telephone. It
complies with the Digitally Enhanced
Cordless Telecommunications (DECT)
standard and offers unparalleled quality
and features.
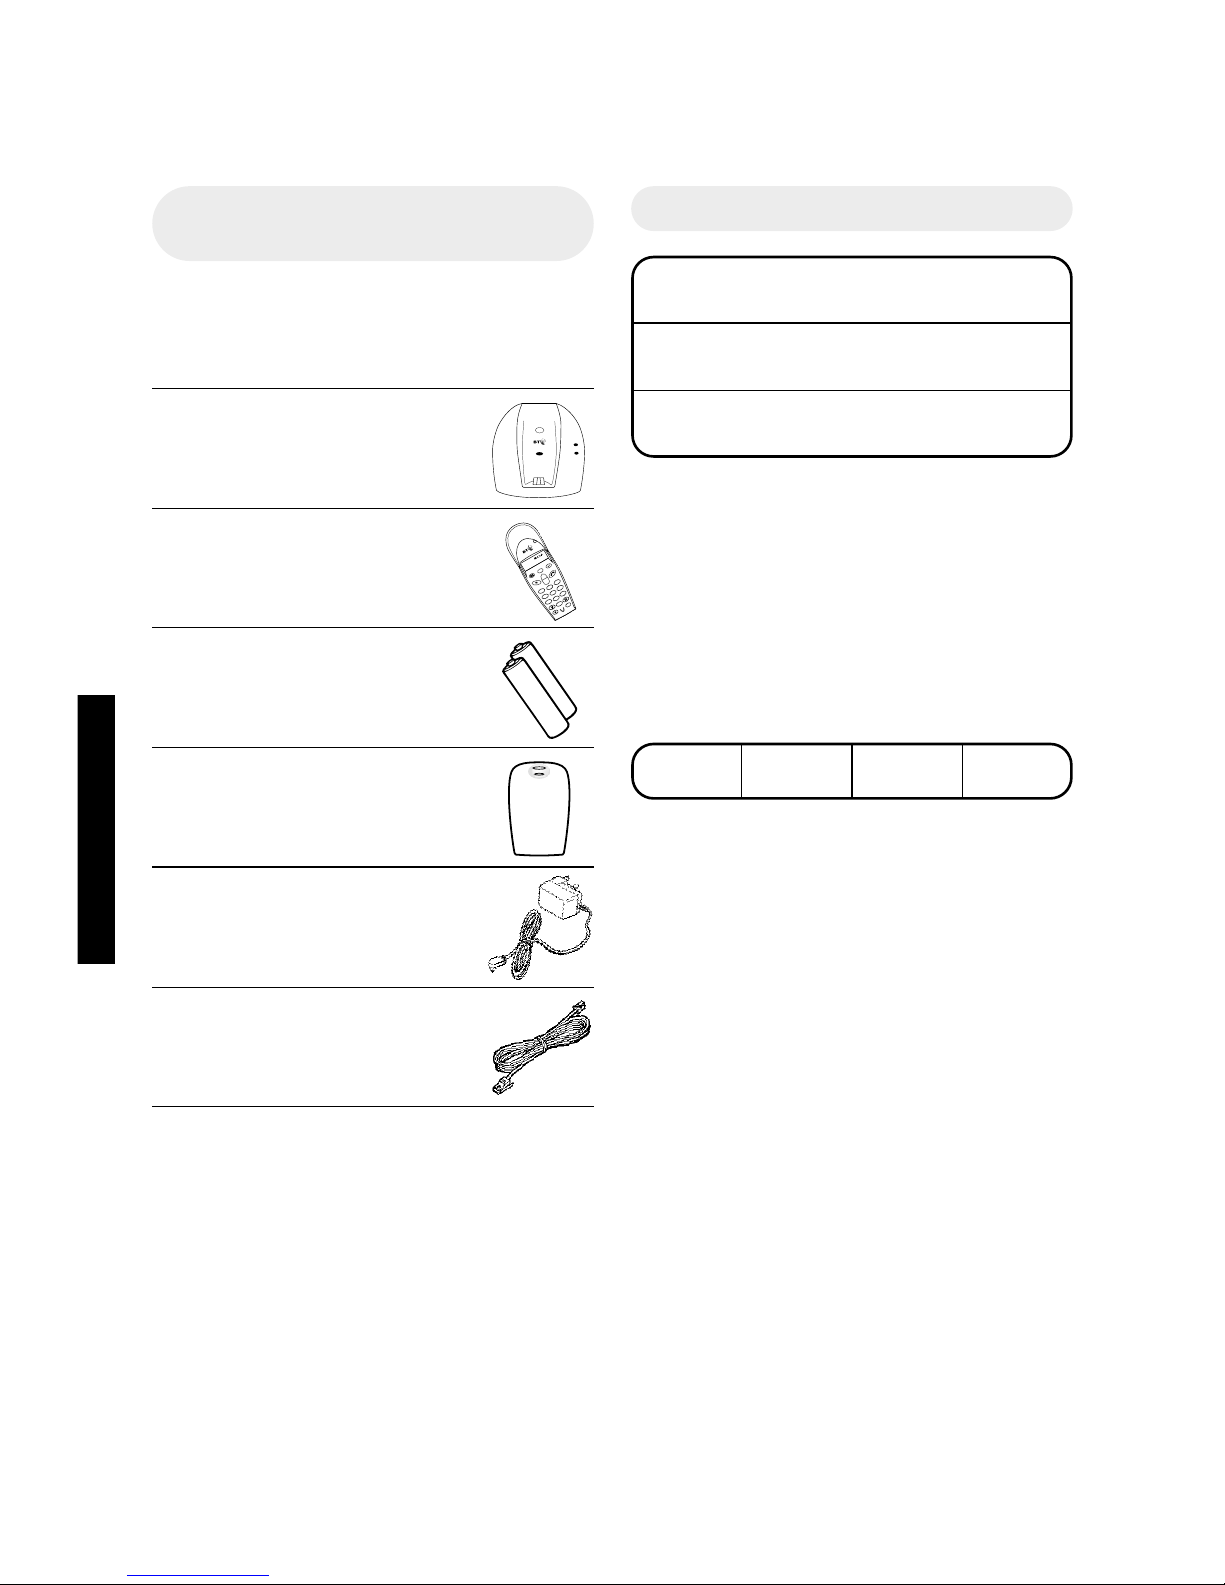
You can use up to 5 handsets with your
BT Freelance XH 2100 base station
without the need for additional wiring.
This user guide applies to both single
and multiple handset packs. The
internal call functions described in this
guide apply only to BT Freelance
XH 2100 base stations with more than
one handset connected.
Important
If you wear a hearing aid, please
note that the BT Freelance XH 2100
works by sending radio signals
between the base station and the
handset. These signals may interfere
with some hearing aids, causing a
humming noise.
Power/
In Use
Charging
BT Freelan e XH 2100
Digital Clarity
DECT
Page
12
5
8
0
3
6
9
Int
4
7
D
E
F
W
X
Y
Z
T
U
V
P
Q
R
S
M
N
O
J
K
L
H
I
A
B
C
R
f
n
o
C
P
a
u
s
e
S
e
c
r
e
c
y
Vol
u
M
e
n
HANDSET 1
D
i
g
i
t
a
l
C
l
a
r
i
t
y
Redial
C
a
l
l
s
12
5
8
0
3
6
9
Int
4
7
D
E
F
W
X
Y
Z
T
U
V
P
Q
R
S
M
N
O
J
K
L
H
I
A
B
C
R
f
n
o
C
P
a
u
s
e
S
e
c
r
e
c
y
Vol
u
M
e
n
HANDSET 1
D
i
g
i
t
a
l
C
l
a
r
i
t
y
Redial
C
a
l
l
s
12
5
8
0
3
6
9
Int
4
7
D
E
F
W
X
Y
Z
T
U
V
P
Q
R
S
M
N
O
J
K
L
H
I
A
B
C
R
f
n
o
C
P
a
u
s
e
S
e
c
r
e
c
y
Vol
u
M
e
n
HANDSET 1
D
i
g
i
t
a
l
C
l
a
r
i
t
y
Redial
C
a
l
l
s
12
5
8
0
3
6
9
Int
4
7
D
E
F
W
X
Y
Z
T
U
V
P
Q
R
S
M
N
O
J
K
L
H
I
A
B
C
R
f
n
o
C
P
a
u
s
e
S
e
c
r
e
c
y
Vol
u
M
e
n
HANDSET 1
D
i
g
i
t
a
l
C
l
a
r
i
t
y
Redial
C
a
l
l
s
12
5
8
0
3
6
9
Int
4
7
D
E
F
W
X
Y
Z
T
U
V
P
Q
R
S
M
N
O
J
K
L
H
I
A
B
C
R
f
n
o
C
P
a
u
s
e
S
e
c
r
e
c
y
Vol
u
M
e
n
HANDSET 1
D
i
g
i
t
a
l
C
l
a
r
i
t
y
Redial
C
a
l
l
s
INTRODUCTION

BT Freelance XH 2100 user guide ~ 2nd Edition ~ 18th March ’04 ~ 6012
8
Unpa king your
BT Freelan e XH 2100
For your re ords
Date of purchase:
Place of purchase:
Serial number:
For guarantee purposes proof of
purchase is required so please keep
your receipt.
If you change your PIN, keep a record
of the new number here:
(original setting 0000)
See page 24 for more information.
INTRODUCTION
If anything is missing, please contact
your place of purchase immediately.
One BT Freelance XH 2100
base station
One BT Freelance XH 2100
handset
2 x AAA rechargeable
batteries (Ni-MH)
One battery cover
One power supply
for base station
(Item code: 872260)
One telephone line cord
In addition, if you have purchased
a BT Freelance XH 2100 with
multiple handsets you will receive
the following for each handset:
BT Freelance XH 2100 handset.
BT Freelance XH 2100 charger.
2 x AAA rechargeable batteries (NiMH).
One power supply for the charger
(item code 003313)
Power/
In Use
Charging
BT Freelan e XH 2100
Digital Clarity
DECT
Page
12
5
8
0
3
6
9
Int
4
7
D
E
F
W
X
Y
Z
T
U
V
P
Q
R
S
M
N
O
J
K
L
H
I
A
B
C
R
f
n
o
C
P
a
u
s
e
S
e
c
r
e
c
y
Vol
u
M
e
n
HANDSET 1
D
i
g
i
t
a
l
C
l
a
r
i
t
y
Redial
C
a
l
l
s

BT Freelance XH 2100 user guide ~ 2nd Edition ~ 18th March ’04 ~ 6012
9
INTRODUCTION
General
Only use the power supply included
with the product. Using an unauthorised
power supply will invalidate your
guarantee and may damage the telephone.
The item number for the power supply
used with the base station is 872260.
If you have purchased a multiple pack,
the item number for the power supply
used with the charger is 003313.
Only use the approved rechargeable
batteries supplied. Spare rechargeable
batteries are available from the Freelance
Helpline 0870 605 8047.
Do not open the handset or base station.
This could expose you to high voltages
or other risks. Contact the Helpline for
all repairs.
Radio signals transmitted between the
handset and base may cause interference
to hearing aids.
It is recommended that advice from a
qualified expert be sought before using
this product in the vicinity of emergency/
intensive care medical equipment.
It is recommended that if you have
a pacemaker fitted you check with a
medical expert before using this product.
Your product may interfere with other
electrical equipment, e.g. TV and radio
sets, clock/alarms and computers if placed
too close. It is recommended that you
place your product at least one metre
away from such appliances to minimise
any risk of interference.
Never dispose of the batteries in a fire.
There is a serious risk of explosion and/or
the release of highly toxic chemicals.
Cleaning
Simply clean the handset and base station
with a damp (not wet) cloth, or an anti-
static wipe. Never use household polish
as this will damage the product. Never
use a dry cloth as this may cause a
static shock.
Environmental
Do not expose to direct sunlight.
The product may heat up when the
batteries are being recharged. This is
normal. However, we recommend
that you do not place the product on
antique/veneered wood to avoid damage.
Do not stand your product on carpets
or other surfaces which generate fibres,
or place it in locations preventing the
free flow of air over its surfaces.
Do not submerge any part of your
product in water and do not use it in
damp conditions, such as bathrooms.
Do not expose your product to fire,
explosive or other hazardous conditions.
There is a slight chance that your phone
could be damaged by an electrical storm.
We recommend that you unplug the
power and telephone line cord for the
duration of the storm.
Safety information

BT Freelance XH 2100 user guide ~ 2nd Edition ~ 18th March ’04 ~ 6012
10
1Conne t the power supply to
the base
Plan the lo ation
Position your BT Freelance XH 2100
within 2 metres of a power socket and
phone socket otherwise extension
cables will be required.
Make sure it is at least 2-3 metres
away from other electrical products to
avoid interference.
Do not place your BT Freelance
XH 2100 product in the bathroom or
other humid areas.
Setting up
Follow these steps to set up your BT Freelan e XH 2100 ready
for use
Plug the power adaptor into the mains
power socket and switch on. The green
Power/In Use light comes on.
Note
The base station must be plugged into
the mains power socket at all times.
Note
The BT Freelance XH 2100 has a
range of 300m outdoors when there
is a clear line of sight between the
base and the handset. When there is
no clear line of sight between the
handset and the base, e.g. the base is
indoors and the handset is either
indoors or outdoors, the range could
be reduced to 50m. Thick stone walls
will severely affect the range.
SETTING UP

BT Freelance XH 2100 user guide ~ 2nd Edition ~ 18th March ’04 ~ 6012
11
Before you use your BT Freelance
XH 2100 for the first time, it is important
to have the handset batteries fully
charged. The batteries need to charge
continuously for at least 16 hours
to rea h full harge.
Place the handset on the base. The
red charging light will come on. The
handset comes pre-registered to the
base station as HANDSET HS1. This
is shown on the display. The icon
and the battery icon are shown on
the display. Once the handset is fully
charged, the display shows a full
battery symbol.
3Charge the handset batteries
for at least 16 hours
2Install the re hargeable
batteries in the handset
Battery low warning
If the handset battery symbol is empty
and flashing, and you hear a warning
beep every minute, you will need
to recharge your handset before you
can use it.
The handset uses two rechargeable
Nickel Metal Hydride (Ni-MH) AAA
batteries which are supplied. Take
care to insert the batteries as shown
and then fit the battery cover (the
battery cover may be found in the
packaging with the batteries).
SETTING UP
Please note that the red charging light
will remain on even when the batteries
are fully charged.
BATTERY LEVELS
WEAK HALF-FULL FULL
Note
The symbol on your handset display
indicates when you are in range of
the base station. If the symbol flashes
and you hear a warning beep, you
are out of range and will need to move
closer to the base station.

BT Freelance XH 2100 user guide ~ 2nd Edition ~ 18th March ’04 ~ 6012
12
Battery performan e
Under no circumstances should
non-rechargeable batteries be used.
Only use the approved batteries, type:
rechargeable Nickel Metal Hydride
(Ni-MH); size AAA; capacity
550mAh 1.2v. Using unapproved
batteries will invalidate your guarantee
and may damage the telephone.
To keep your batteries in the best
condition, leave the handset off the
base station for a few hours at a time.
(after the intial 16 hour charge).
Please note, however, that new Nickel
Metal Hydride (Ni-MH) batteries
do not reach their full capacity until
they have been in normal use for
several days.
Fully discharging the batteries at
least once a week will help them last
as long as possible. However, the charge
capacity of rechargeable batteries will
reduce with time as they wear out, so
reducing the talk/standby time of the
handset. Eventually they will need
to be replaced. New batteries can be
obtained from the BT Freelance
Helpline 0870 605 8047.
Note: Under ideal conditions, the
handset batteries should give about
14 hours talktime or 350 hours
standby on a single charge. Optimum
times for talk and standby are only
achieved when the handset batteries
are fully charged.
SETTING UP
For BT Freelance XH 2100
multiple pack owners only:
Plug the mains power adaptor into the
power socket on the underside of the
charger(s) and connect the other end
to the mains power.
Insert the 2 x AAA rechargeable
batteries supplied. Take care to insert
the batteries as shown on page 11 and
then fit the battery cover.
The display will show the handset
number, e.g. HANDSET HS2, to show
it is registered to the base.
Place the handset(s) on the charger(s).
The red charging light will come on.
Leave the handset to charge
continuously for at least 16 hours.

BT Freelance XH 2100 user guide ~ 2nd Edition ~ 18th March ’04 ~ 6012
13
SETTING UP
5Conne t the telephone line ord
Note
It is recommended that you do not
connect the telephone line cord to the
phone socket until your handset is
fully charged. This will prevent the
risk of the batteries discharging
during a conversation, which could
cause you to lose a call.
4Conne t the telephone line
ord to the BT Freelan e
XH 2100 base station
Your BT Freelance XH 2100
is now ready for use.

BT Freelance XH 2100 user guide ~ 2nd Edition ~ 18th March ’04 ~ 6012
14
USING YOUR PHONE
Using the telephone
Call timer
Making and re eiving alls
To make an external all
Press the TALK button.
You will hear the dial tone and
the display will show the EXT
symbol.
Enter the number you want.
The number is dialled
automatically.
To swit h the handset on and off
Press and hold the POWER
button to switch the handset off
or on.
Preparatory dialling
Preparatory dialling allows
you to enter the number
before pressing the TALK
button. This enables you to
correct any mistakes before
you actually make the call.
Enter the number to be
dialled.
The number is shown in the
display.
(If you make a mistake, press
the ✘button to delete the
incorrect digit).
When you have entered the
number correctly, press the
TALK button to dial the number.
Your handset will automatically time
the duration of all external calls.
The handset display shows the call
duration both during your call and for
a few seconds after it is complete.
S
e
c
r
e
c
y
R
Note
To exit and return to the previous
menu at any time, press the
button. If you press and hold the
button you will return to the
standby screen.
S
e
c
r
e
c
y
S
e
c
r
e
c
y
EXT

BT Freelance XH 2100 user guide ~ 2nd Edition ~ 18th March ’04 ~ 6012
15
USING YOUR PHONE
During a call:
You can adjust the earpiece
volume. There are 5 levels to
choose from.
Press the UP or DOWN
button until you reach the
required level. This will be
shown on the display.
eg: EAR VOL 3.
In standby mode:
Press the button.
Press the DOWN button until
HANDSET is displayed.
Press the button.
Press the DOWN button until
EAR VOL is displayed.
Press the button.
Press the UP or DOWN
button until you reach the
required level.
Press the button to confirm
the selected level.
Press and hold the ✘ button to
return to the standby screen.
To re eive a all
When the phone rings the
display will show CALL and
the EXT symbol will flash.
If you have subscribed to a
Caller Display Service, the
number (and name if stored
in the phonebook) will be
displayed.
Press the TALK button.
Or
If the handset is on the base,
simply lift it up and speak.
u
M
e
n
u
M
e
n
S
e
c
r
e
c
y
C
a
l
l
s
To adjust the spee h volume
during a all
To end a all
Press the TALK button.
Or
Place the handset back on
the base.
Vol
C
a
l
l
s
Vol
C
a
l
l
s
u
M
e
n
u
M
e
n
C
a
l
l
s
Note
You can switch the Auto-Talk feature
on or off. Please see page 21

BT Freelance XH 2100 user guide ~ 2nd Edition ~ 18th March ’04 ~ 6012
16
USING YOUR PHONE
You can redial up to 5 of the last
numbers called. They are stored in the
redial list. If you have stored a name
to go with a number in the phonebook,
the name will be displayed instead. See
“Name and number Phonebook”, opposite.
Redial
When on a call you can talk to
someone in the same room, without
your caller hearing.
Se re y
To swit h se re y on / off
During a call, press the ✘
button. The display will show
MUTE. Your caller cannot hear
you.
Press the ✘button again to
resume your call.
S
e
c
r
e
c
y
S
e
c
r
e
c
y
Dial from the redial list
Press the REDIAL button to
enter the redial list.
Press the UP or DOWN button
to scroll through the list.
Press the TALK button when
the number (or name) you
want to call is displayed. The
number is dialled automatically.
P
a
u
s
e
Redial
Vol
C
a
l
l
s
Press the button to enter
the menu.
The display will show
PHONEBK, press the button.
The display will show ADD,
press the button.
The display shows NAME?
Enter the name using the
letters on the keypad. Names
can be no longer than 8
characters.
Entering names:
Use the keypad letters to
enter names, e.g. if you wish
to store the name TOM:
To enter the letter T, press the
8button once.
To enter O, press the 6button
three times and wait for the
cursor to move across.
You can store up to 50 of your most
frequently used names and numbers
in the Phonebook. Stored numbers
can be no longer than 20 digits and
a maximum of 8 characters can be
stored.
To store a name and number in
the Phonebook
u
M
e
n
u
M
e
n
u
M
e
n
8
T
U
V
6
M
N
O
6
M
N
O
6
M
N
O
Name and number Phonebook

BT Freelance XH 2100 user guide ~ 2nd Edition ~ 18th March ’04 ~ 6012
17
USING YOUR PHONE
To enter a pause in a stored
number
You may want to enter a pause
when storing international
numbers, charge card numbers
or if you connect your
telephone to a switchboard.
(For more information on
switchboard use see page 35.)
When storing the number,
press and hold the UP button,
until a Pis displayed, at the
point where you want to enter
the pause.
You may enter as many pauses
as required.
Vol
To enter M, press the 6button
once.
If you enter a digit incorrectly,
press the ✘button to delete it.
Press to confirm the name.
You will hear a confirmation
beep.
The display shows NUMBER?
Enter the telephone number
you want to store.
Press the button. You will
hear a confirmation beep.
Alternatively, press the
button to continue storing
entries in the phonebook.
Press and hold the ✘button to
return to the standby screen.
Note
Press the 1button once to insert a
space, press twice for a - (hyphen),
press 3 times for the number
1
.
Note
If you subscribe to a Caller Display
Service (see page 26) and want
directory names to be displayed when
a call is received from one of your
directory numbers, you must ensure
that you always enter the full
telephone number, including the
national code.
6
M
N
O
S
e
c
r
e
c
y
u
M
e
n
To dial a name and number
from the Phonebook
Press the PHONEBOOK
button to enter the phonebook.
Use the UP or DOWN button
to scroll through.
Or
Enter the first letter of the
name you want, e.g. for Tom,
press the 8button to search
for names beginning with T.
Press the TALK button to
dial the number of the name
displayed. The number is
dialled automatically.
u
M
e
n
u
M
e
n
S
e
c
r
e
c
y
Vol
C
a
l
l
s
8
T
U
V

BT Freelance XH 2100 user guide ~ 2nd Edition ~ 18th March ’04 ~ 6012
18
USING YOUR PHONE
To delete a Phonebook entry
Press the button to enter
the menu.
The display will show
PHONEBK, press the button.
Use the DOWN button to
scroll to DELETE and press
the button.
Use the UP and DOWN
buttons to scroll through to
the entry you want to delete.
When you have found the name
to delete, press the button.
The number will be displayed,
press the button.
The display will show
CONFIRM?, press the button.
You will hear a confirmation
beep. The number is now
deleted.
Press and hold the ✘button to
return to the standby screen.
u
M
e
n
u
M
e
n
u
M
e
n
u
M
e
n
u
M
e
n
u
M
e
n
S
e
c
r
e
c
y
C
a
l
l
s
To edit an entry in the
Phonebook
Press the button to enter
the menu.
The display will show
PHONEBK, press the button.
Use the DOWN button to
scroll to MODIFY and press
the button.
Use the UP or DOWN button to
find the name you want to edit.
Press the button.
Use the UP or DOWN button to
move through the name and
press ✘button to delete
unwanted letters. You can
enter new letters as shown in
‘Entering names’ on page 16.
Press to store the new
name. You will hear a
confirmation beep.
The number will be displayed.
Use the ✘button to delete
unwanted digits and re-enter
the correct ones.
u
M
e
n
u
M
e
n
u
M
e
n
u
M
e
n
u
M
e
n
S
e
c
r
e
c
y
Press the button to store
the new number. You will hear
a confirmation beep.
Press and hold the ✘button to
return to the standby screen.
u
M
e
n
S
e
c
r
e
c
y
Note
You can scroll in either direction to
search through the list.
C
a
l
l
s
S
e
c
r
e
c
y
Vol
C
a
l
l
s
Vol
C
a
l
l
s
Vol
C
a
l
l
s
Table of contents
Other BT Cordless Telephone manuals