BT BWS-5b User manual

1
Thank You
Thank you for using BT Model .This R/C car is designed to be fun to drive and uses top quality parts for BWS-5b
d u r a b i l i t y a n d p e r f o r m a n c e . T h i s i n s t r u c t i o n m a n u a l y o u a r e r e a d i n g w a s d e s i g n e d t o b e e a s y
to follow yet thorough in its explanations.We want you to enjoy driving your BWS-5b of BT Model.
Caution
and cause serious bodily injury or death.
Failure to follow these instructions can
damage your R/C car or its accessories,
Attention
Failure to follow these instructions
can cause injury to yourself or others.
Caution
To prevent any se rious personal injury or dam age to prope rt y,please be ca reful when ope rating all
These R/C car max. speed can reach 80km/h and use highly poisonous and flammable fuels.
Children are forbidden to play below the age of 14.
remote controlled models.Extra attention is called for when operating any fuel powered model.
Safety Gui d e l i n es When Oper a t i n g G asoline En g i n e s
wh en ha n din g gas oli n e.
This product uses a mixture of gasoline and two cycle oil for fuel.Please take extreme caution
Do not run near open flames or smoke while running your model or while handling fuel.
Always store fuel in well ventilated place,away from heating devices,open flames,direct
sunlight,or batteries.
Gasoline is flammable and poisonous.Gasoline powered model engines emit poisonous vapors.
These vapors irritate eyes and can be highly dangerous to your health.
You must only use a mixture of gasoline and two cycle oil as fuel for this engine.Never use
glow fuels intended for R/C cars.
Be aware that some parts will be hot after operation.Do not touch the exhaust or the engine
until they have cooled.
After running,please empty the fuel tank before storing the car.
Keep fuel away from children.
Store in a well ventilated area.
Components
R/C CAR
Battery charger
Transmitter
All manuals and user guides at all-guides.com

4
3
+-
2
x 4
In c l u d e d Co mp on e n t s
Allen wrench Multi tool
Spark plug wrench
Mi x ed f u el r a ti o c an
Wheel wrench
Eq u i p m e nt N ee de d
Screwdriver AA Batteries
Gasoline
Ve h i c l e P re pa ra t i o n
Remove the body
Remove the 6 body pins
All manuals and user guides at all-guides.com

Bat te ry Charging W ar nings and P re cautions
could result in product malfunction, electrical issues, excessive heat, FIRE, and ultimately injury
Warning: Failure to exercise caution while using this product and comply with the following warnings
and property damage.
Read all safety precautions and literature prior to use of this product.
Never leave the battery and charger unattended during use.
Never allow minors to charge battery packs.
Always inspect the battery for damage before charging.
Never charge a battery if the cable has been pinched or shorted.
Never allow batteries or charger to come into contact with moisture at any time.
Never attempt to charge dead or damaged batteries.
Never charge batteries in extremely hot or cold places (recommended between 50-80 degrees Fahrenheit
/10-27 Celsius) or place in direct sunlight.
Always use only MiMH rechargeable batteries. This charger cannot charge batteries such as “heavy duty,”
“alkaline battery,” or “mercury battery.”
Alw a y s co n n e ct t h e po s i tiv e r e d l e a d (+ ) an d ne g ati v e b lac k l e a d ( - ) te r m inal s o f th e b a t t e ry t o th e
charger terminal correctly.
Always disconnect the battery and charger after charging, and let them cool between chargers.
Always terminate all processes if the product malfunctions.
A l w a y s ma k e su r e y o u kn o w th e sp e c i f icat i o n s of t he b a t t e r y t o b e ch a rged o r di s c h arge d t o en s u re i t
meets the requirements of this charger.
Always constantly monitor the temperature of the battery pack while charging.
Always end the charging process if the charger or battery becomes hot to the touch or starts to change
form during the charge process.
Cha rg ing the Recei ve r Battery
7. P lac e the r e cei ver b atte ry ba ck in t h e bat ter y box. The b att e ry wi re mu st be ne atl y fol ded in f ron t of
1. Remove the body pin and battery box lid.
2. Remove the receiver battery from the battery box.
3. Connect the receiver battery plug to the battery charger.
4. Plug the battery charger into an AC wall outlet. Charge the battery for 4 hours. DO NOT exceed 6 hour
5. Monitor battery while charging.
6. When the battery is fu lly cha rged: (a) di sconnect the battery and (b) re move the bat tery charger from
8. Reinstall battery box lid and body pin.
charge time.
the wall outlet.
the battery and the foam block must be placed on top of the wires.
All manuals and user guides at all-guides.com

+ -
4
Tr a n s m i tt er P re p a r at io n
Push
Left turn Right turn
Forward Stop
Brake
Tr a n s m i tt er B at t e r y In st al l a t i o n
Open battery cover at the bottom of the
transmitter.Install batteries.Follow
the direction of batteries designated
in the inside of battery box.
AA Batteries
Se t u p B e f or e St ar t i n g
Turn on transmitter first,
then turn on receiver.
push
O p e r a t e t h e c o n t r o l s t o m a k e s u r e t h e m o d e l r e s p o n d s
M a k e s u r e no o n e el s e i s u s i n g th e s a m e ra d i o fr e q u e n c y
as you are using.Check the radio system and range before
eve ry d ri v in g se s si on .T o pro pe rl y che ck th e ran ge ,h av e a
fr ie n d ho ld t h e bu gg y w it h th e en g in e o f f a nd w al k t o th e
fart hest dis tanc e th at you plan to oper ate your mod el.
correctly.Do not operate the model if there is any problem
with the radio system.
TH.TRIM
ST.TRIM
EX IT
EN T
+
-
ST.D/R
POWER
Multi Function
O N
All manuals and user guides at all-guides.com

5
Adj us ting Steeri ng a nd Thrott le T rims
Steering Tri m
1. Make sure transmitter steering wheel and steering trim are set to “0” or neutral.
3. Trim the steering adjust the steering wheel to the neutral position as described above.
steering trim
Adjust the direction wheel to center the tires. Use sub-trim (see your remote control’s instruction
wheel cannot be centered using sub-trim, please take the following steps:
manual) if needed. If direction wheel is not close to its desired neutral position,and direction
2. Remove the servo output rocker arm using a 2.0mm hexagon wrench,exchange angle to install
the rocker arm in correct orientation.
TH.TRIM
ST
.TRIM
EXI T
EN T
+
-
ST.D/R
POWER
Multi Function
All manuals and user guides at all-guides.com

6
Thr ot tle Trim
throttle trim
Tur ni ng R/C Off
Turn off the receiver first,then turn off the transmitter.
push
Adjust the throttle trim so the carburetor is completely closed at neutral and there is a little gap
be t w e en the serv o r o c k e r a rm and coll a r ( F i g . A : g ap shoul d b e l e s s t h a n1mm) . I f t h rottl e r o c k er arm
is not close to its desired neutr al po sition, and throt tle cannot be centered usin g tri m, pl ease take
the following steps:
1.Make sure transmitter throttle trim are set to “0” or neutral.
2.Remove the servo output rocker arm using a 2.0mm hexagon wrench,exchange angle to install the
3.Trim the throttle adjust the throttle rocker arm to the neutral position as described above.
rocker arm in correct orientation.
TH.TRIM
ST
.TRIM
EXIT
ENT
+
-
ST.D/R
POWER
Multi Function
1mm
A
OFF
POWER
All manuals and user guides at all-guides.com

7
Fue l Pr eparation
Fuel Warning s a n d G uidelines
Always observe all warnings and precautionary statements on fuel.
Fuel is a fire accelerant. Never operate your vehicle near open flames. Never smoke while operating
your vehicle or while handling fuel.
Always only use a mixture of gasoline and two-cycle oil for fuel. Do not use glow (nitro) fuel.
Always use caution when handling gasoline,
A l w a y s r u n yo u r mo d e l en g i n e in a w e l l - v e n t i l a t e d a r e a . Mo d e l e n g i n e s p r o d u c e h a r m f u l c a r b o n
monoxide fumes.
Fuel Require m e n t
The fuel is a mixture of gasoline and 2-cycle oil. Use a 25:1 ratio gasoline to oil.
Mixing the fuel
Gasoline 2-Cycle Enging Oil
Always observe all warnings, precautionary statements and instructions supplied by the fuel
manufacturer/provider.
Only use pre-mix two-cycle engine oil. Do not use any other kind of oil.
Always mix fuel in a sealable, water-resistant container(mixed fuel ratio can) specifically
made for gasoline.
Always blend gasoline with two-cycle engine oil at a 25:1 ratio.
Never use glow (nitro) fuel.
Fuel Storage Precautions
Al w a y s d r a i n yo u r e n g i n e af t e r yo u h a v e f i n i s h ed r u n n i n g y o ur v e h i c l e. D o n o t s t o r e t h e v eh i c l e
with fuel in the gas tank.
Don’t touch engine and exhaust pipe until they are cooling.
Always store your fuel in a safe place well away from sparks, heat or anything that can ignite.
Always e n s u r e th a t ga s o l i n e a n d f u e l a r e s t o r ed i n a cl e a r l y ma r k e d co n t a i ner w e l l aw a y f rom t h e
reach of children.
Always store your fuel safely in a sealed, water-resistant container specifically made for gasoline.
Always store fuel in a cool, dry location.
Always responsible discard fuel if there is condensation inside the fuel container.
Never allow fuel to come into contact with eyes or mouth.
Never return unused fuel from the fuel tank back into the fuel container.
All manuals and user guides at all-guides.com

8
Tr a n s m i tt er O pe r a t io n
St e e r i n g Wh ee l
lef t tur n rig ht tu rn
straight(neutral)
lef t tur n rig ht tu rn
straight(neutral)
steering trim
Steering Trim Setup
Throttle Trigger
forward stop(neutral)
brake
forward
brake
Brake Bias
r i g h t w i l l m a k e t h e f r o n t t i r e s o f t h e
turn,Turning the wheel a large amount will
make the model perform a sharp turn.
ca r do the s am e. Tu rni ng t he wh ee l a sma ll
amo unt wi ll ma ke the mo de l perf orm a wi de
T u r n i n g t h e t r a n s m i t t e r w h e e l l e f t a n d
Standard brake bias is 60% rear and 40% front,
If you need more chassis rotation under braking
adjust the linka ge for less fr ont brak e. If the
t r u c k i s l o o s e e n t e r i n g t u r n s u n d e r b r a k i n g ,
adjust the linkage for less rear brake or more
front brake.
Tu r n st e e ri n g tr i m wh i l e dr i vi n g ,
that can set the car in the straight
line driving.
TH.TRIM
ST
.TRIM
EXI T
EN T
+
-
ST.D/R
POWER
Multi Function
less
brake
more
brake
rear
brake
front
brake
All manuals and user guides at all-guides.com

9
Vehicle star t i n g and Running
If there is a problem with the engine,press engine OFF
After running you must check the car and perform routine
Make sure linkage setup is correct before running.
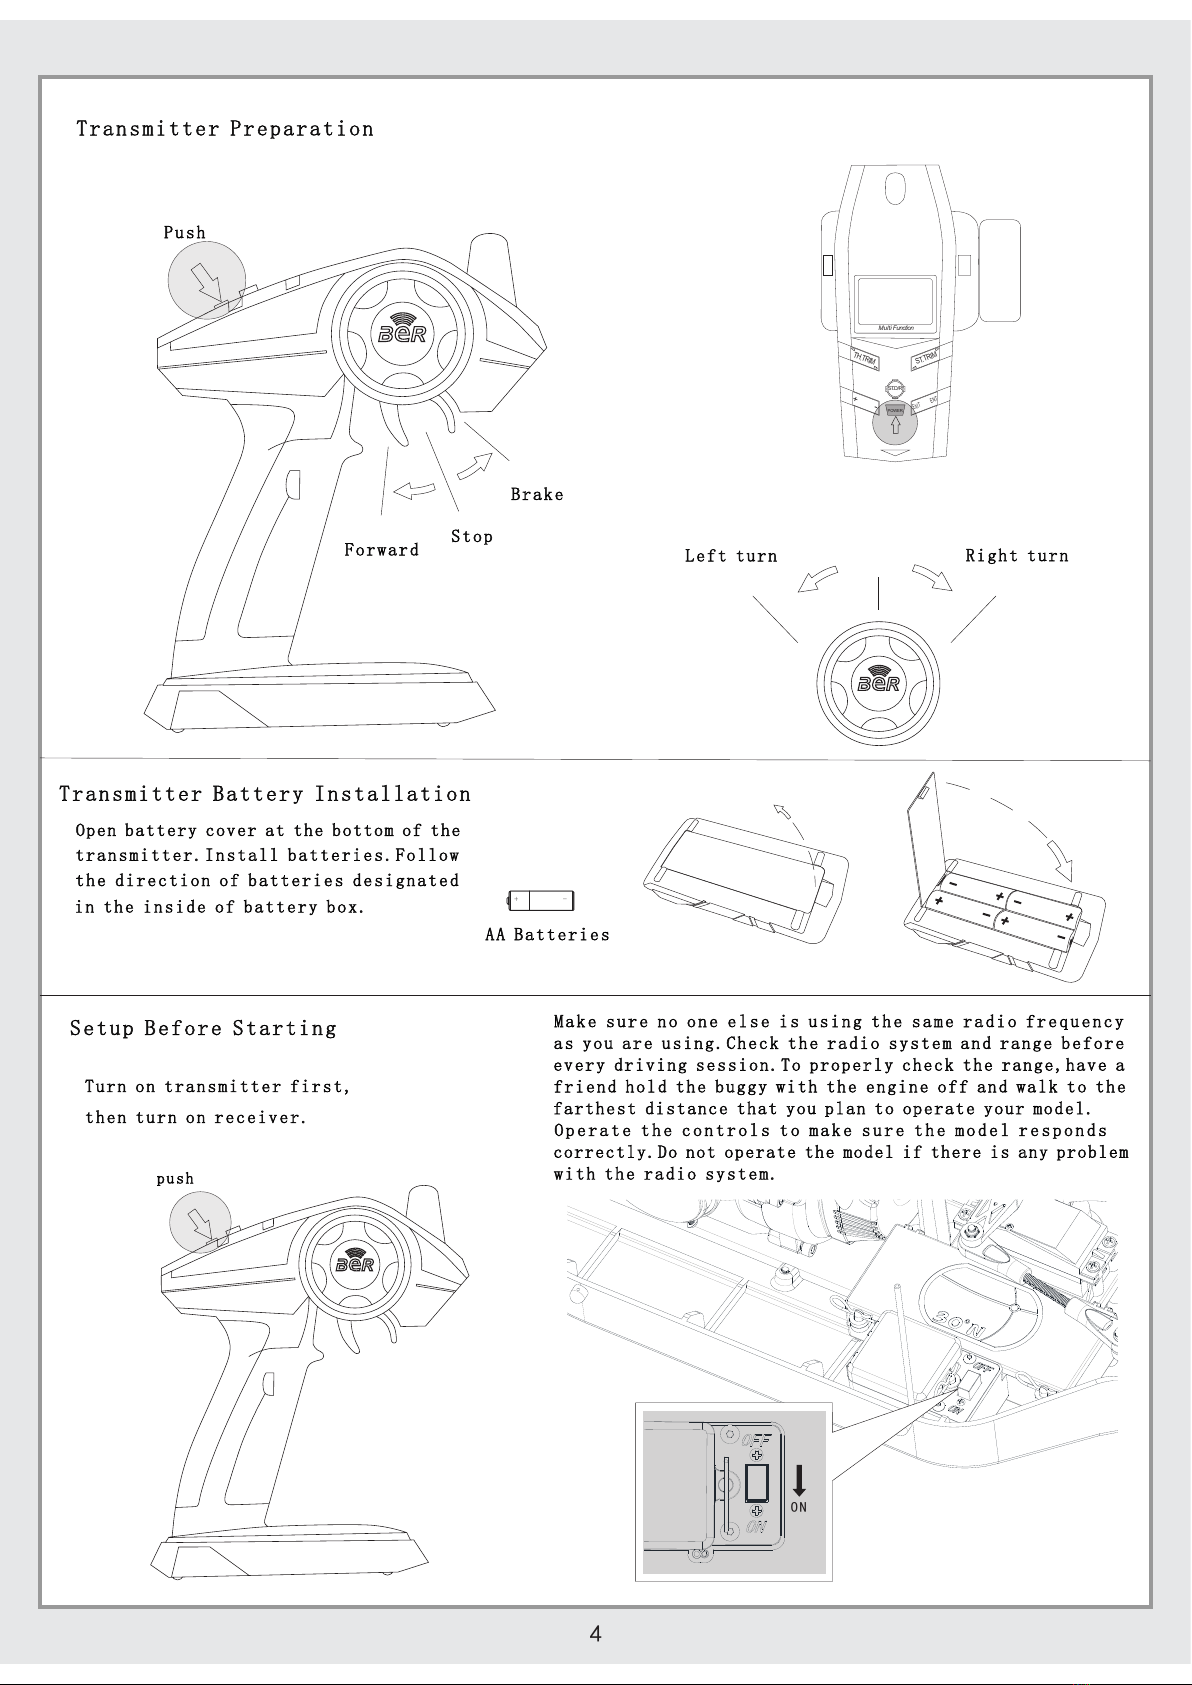
Turn on transmitter first then the receiver.If you turn on
Make sure you understand all engine instructions before
attempting to start the engine. Failure to follow all
instructions can lead to damage to your vehicle, property
damage and bodily injury.
receiver first,it can cau se you to los e control the car.
maintenance.
switch to shut down the engine.
Caution
the engine.
If there is a problem with the engine,
pres s en gine off swit ch to shut down
Preparatio n f o r E ngine Start
keep the wheels off the ground
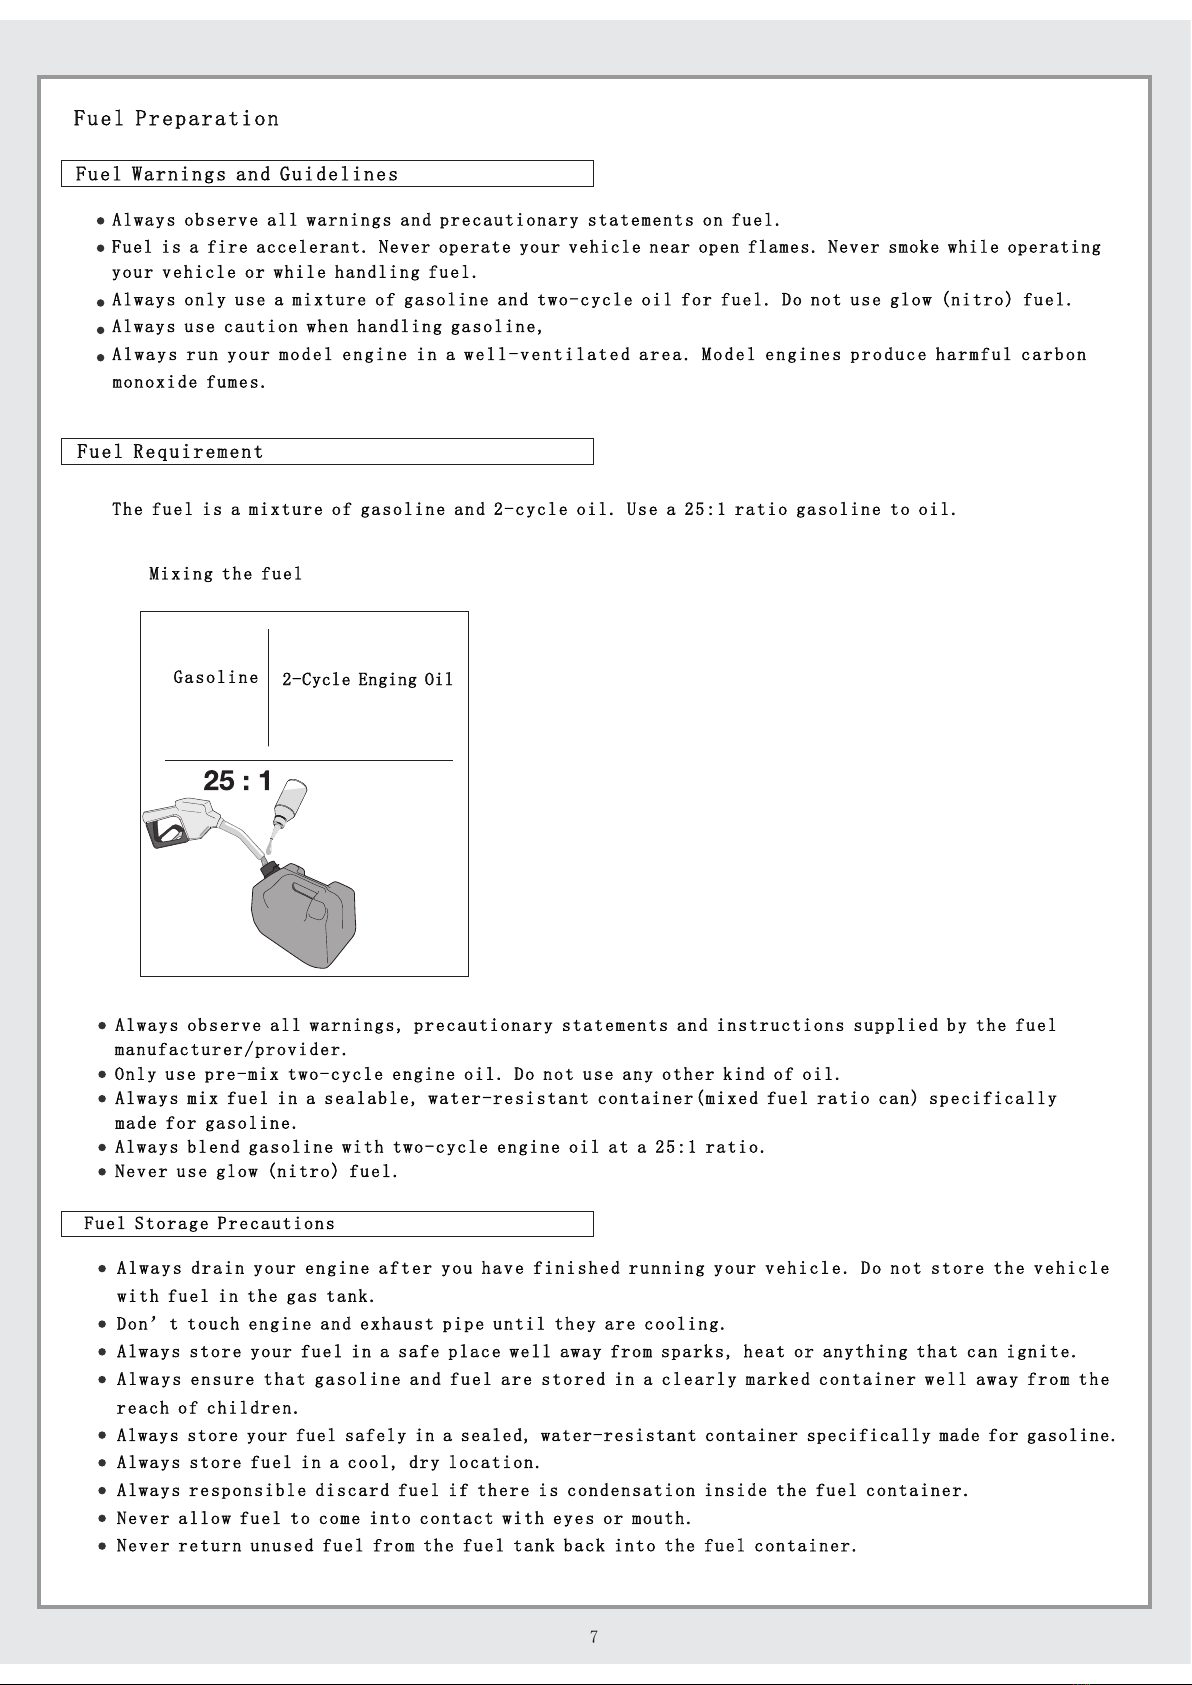
Fill Fuel Tank
Clean the dirt from ga s cap before removing .Dirt and debris
sho uld nev er get into the fue l tank. Fill the tank with fuel.
Make sur e th e ga s ca p is scr ewed on tightly b ef ore start in g
the engine.
You must use mixture of gasoline and two stroke oil as fuel
for this engine,Never use glow fuels intended for R/C cars.
C a u t i o n
Be careful not to tilt the car,gasoline may
leak from the vent hole.
Turn on the transmitter first,then turn on the receiver.
Ch e ck the thr o ttle a n d s t eeri n g f unct i on and che c k t he
rad io rang e before sta rting the engi ne,Make sure no one
is using the same frequency.
I f y o u s w i t c h o n t h e r e c e i v e r
you may lose control of the R/C
swit ch befo re the tran smitt er,
car.
Check Max.Range
push
Priming Engi n e
for the first time,if fuel appears in the yellow
To prime the engine,fill th e tank with fuel and
push t h e pr i m e r bu l b u n til f u e l a ppears i n t he
r e t u r n t u b e ( Y e l l o w ) . A f t e r t h e en g i n e r u n n i n g
return tube,you do not need to prime the engine.
Pri mer B ulb
PUSH Ret urn p ipe Out
In
Into the tubing
Turn on remote c o n t rol power
Eng ine O FF
Swi tch
PUSH
TH.TRIM
ST.TRIM
EXIT
ENT
+
-
ST.D/R
POWER
Multi Function
O N
All manuals and user guides at all-guides.com

1 0
Engine OFF Switch
PUSH
Eng in e Start
If there is a problem with the engine,press the engine
Make sure choke lever is in the horizontal position
before starting.
Start the engine by pulling the starter cord in short
(N o lon ger t h an 50 cm ma x.)
The engine should never be run without the air filter
in place.
OFF switch to shut down the engine.
Eng in e Start Tips
,you might flood
1.If you have trouble starting the engine,move the
choke lever to the vertical position
2. Pul l the starter cor d unt il yo u hea r the e ngi ne is
al m o s t s t a r ting.t h e n m o v e t h e c h o k e l e ver b ack to
t h e h o r i z o n t a l p o s i t i o n a n d t r y s t a r t i n g t h e
engine.
3.If you pull the starter cord too hard while the choke
lever is in the vertical position
the engine.
Caution
Engine OFF Switch
engine.
If there is a problem with
the engine,press enging
s w i t c h t o s h u t d o w n t h e
PUSH
Bre ak ing in the Engi ne
Break in the engine by driving slowly for the
first half tank of fuel (about 60 minutes).
Engine Stop
You can shut down the engine by
pushing the engine off switch.
Caut i o n
Be c a re f ul a f te r r un n in g ,
th e e ng i ng a n d mu f fl e r wi l l
be v e ry h o t.
Tur ni ng R/C Off
After the engine is shut off,turn off the receiver
first,then turn off the transmitter.
OFF
push
POWER
All manuals and user guides at all-guides.com

56045
56037
61004
61003
56038
56028
56029
51009
54004
55013
55003
51016
56003
56049
56041
56059
56062
51085
64002
61022
55033
56064
56072
61023
56058
51022
56072
56069
55024
56077
55021
64005
56038
54005
51010
56069
65004
55021
55020
56051
56030
51003
56058
56074
51005
55001
55001
56050 56073
56070
55015
56065
56049
55040
51007
55039
56011
56029
56033
56033
56062
56062
55002
55002
61001
55043
51008
65003
51008
55042
56062
56059
55034
56068
54015
56065
53023
55031
56036
56036
56075
55027
55027
56075
56075
53023
56065
56068
55034
54014
56063
55035
55036
55035
56063
54014
All manuals and user guides at all-guides.com

55034
56068
54015
56065
53023
56036
56036
56075
55027
55027
56075
56075
53023
56065
56068
55034
54014
56063
55035
55036
55035
56063
54014
55032
61015
56058
56058 56077
56069
65011
56072
56038
51043
54007
61028
56058
56058
56011
56072
56064
55033
55025
55026
61029
56041
55014
51016
56049
56003
54008
51044
56014
56059
56010
56062
56062
64002
56045
56059
56062
51085
66005
56028
56028
56045
55003
55009
56058
56006 61016
56058
56029
55039
51007
55040
56051
65004
55021
65003
55043
56029
55020
56069
51008
55042
56030
56074
51047
56073
55015
56070
56058
56058
51008
56051
61019
61019-1 66002
66004
66004
56057
56061
56061
56057
61020
61021
66008
66008
65016
65016
65017
61018
All manuals and user guides at all-guides.com

64001
56038
56037-1
56037-1
56037-1
55010
55010
65005
65019
65008
56077
56069
65006
64005
64007
64006
61027
56075
56010
55030
66006
66006
56075
61027
64005
64007
64006
65006
61025
58004
56016
56060
61036
65014
61037
56056
55052
59059
56048
66001
65015
56048
59059
51104
65021
56048
59059
56049
55012
65001
55011
65022
65022
56069
56069
65007
56027
66007
56077
56077
65012
65009
65013
66007
55024
56039
55041
65002
55005
56071
55008
55007
51021
51020
55041
51008
51008
55041
55041
65002-1
56039
56040
55004
54003 56046
56057 61005
51037
55038
55038
56020
65020
65020 51037
55038
56071
55006
61006
56028
56027 56027
61088
56058
56058
61030
61031
61032
61033
56019
61026
56027
All manuals and user guides at all-guides.com

56043
56042
56037-1 56035
56042
56035
64001
61013
61014
58004
56020
61035
5605756003
61024
61010
61009
61011
53007
56048
61012
56054
66003
56079
56079 71073
73002
71004
73001
71005
71006
56019
56061
56061
53004
53004
53004
62002
51027
61007
All manuals and user guides at all-guides.com

56004
51123
51074
53021
53027
51125
56004
67002
55066
73008
57041
67009
67008
67003
67006
67005
67004
66003
55044
53014
56057
56061
51048
55047 53018
55045
53016
51083
51082
53017
51081
51079-1
55038
53015
55051
51080
56009
56066
56009
56066
67001
All manuals and user guides at all-guides.com

59005
56010
56055
56066
57005
53024
57024
56006
57032 57019
51096
57022
56012
56011
56066
57018
56066
57056
57035
57008
57037
57029
57035
57057
57015
57017
57006
56066
57007
56043
56009
56066
56009
57033
57025
57034
56044
55037
56076
57020
56076 56062
56032
56032
56062
55029
56009
57016
57011
57014
57010
57013
57014
57009
57011
57012
57036-29
57058
57038
56058
51094
56010
57039
57021
61038
63002
66003
66003
57040
62003
63005
63001
63005
63001
56066
56066
56010-1
56010-1
51096
51095
57001
56005
56005
56005
All manuals and user guides at all-guides.com
Other manuals for BWS-5b
1
Table of contents
Other BT Motorized Toy Car manuals
Popular Motorized Toy Car manuals by other brands

LAEGENDARY
LAEGENDARY Triton owner's manual

rastar
rastar JAMARA Jeep Wrangler Rubicon Muddy instructions

Traxxas
Traxxas SLASH BRUSHLESS 58134-4 owner's manual

FrSky
FrSky Edge Warrior instruction manual

Kyosho
Kyosho MINI-Z Racer MR-02 RM Type instruction sheet

Carrera
Carrera go!!! Assembly and operating guide