burmeier ARMINIA III User manual

Istruzioni per l’uso
Letto di cura
ARMINIA III
Instruction Manual
Nursing Bed
ARMINIA III
Codice modello / Model Number
51.3431.33
Tipo / Type
195713
Ultimo aggiornamento / Last update
Dicembre / December 2008

2
ISTRUZIONI PER L’USO LETTO DI CURA ARMINIA III · INSTRUCTION MANUAL FOR NURSING BED ARMINIA
III
Nota:
Nel testo di queste istruzioni le parentesi quadre
e le cifre in grassetto = [00] si riferiscono a 3
componenti del letto di cura.
Please notice:
In the text of these instructions square brackets
and bold figures = [00] refer to the parts of the
nursing bed.
5 7 8
9 16 15 10
17
4
11 12 6 13 14
1 Maniglia triangolare (non visibile in
fig.)
2 Alza-malati (non visibile in fig.)
3 Pannello in legno pediera con
telaio in legno
4 Leve di sblocco per sponde laterali
(4 pz.)
5 Appoggia piedi
6 Alza ginocchia
7 Sponde laterali (4 pz.)
8 Pulsantiera
9 Schienale
10 Pannello in legno testiera con
telaio in legno
11 Rotelle con freno (4 pz.)
12 Piano-rete
13 Motori elettrici per schienale e
alza ginocchia
14 Box di comando
15 Staffe materasso (4 pz.)
16 Raccordi per alza-malati (2 pz.)
17 Guide per sponde (4 pz.)
1 Trapeze (without illustration)
2 Trapeze pole (without illustration)
3 Foot board with wooden encasement
4 Release levers for side rails (4)
5 Lower leg rest
6 Thigh rest
7 Side rail beams (4)
8 Hand switch
9 Backrest
10 Head board with wooden encasement
11 Castors with wheel locks (4)
12 Reclining surface frame
13 Motor drives for backrest and thigh rest
14 Control unit
15 Mattress brackets (4)
16 Trapeze pole sockets (2)
17 Guide bars (4)

3
ISTRUZIONI PER L’USO LETTO DI CURA ARMINIA III · INSTRUCTION MANUAL FOR NURSING BED ARMINIA
III
Capitolo
Chapter
1
2
3
4
5
Indice
Premessa
Informazioni generali
Gruppi di persone indicate in questo manuale
Avvertenze sulla sicurezza
Spiegazione dei simboli di sicurezza utilizzati
Avvertenza sulla sicurezza per il proprietario
Avvertenze sulla sicurezza per l’utilizzatore
Descrizione prodotto
Utilizzo corretto
Caratteristiche particolari
Struttura
Materiali utilizzati
Montaggio e messa in funzione
Montaggio
Testate del letto
Montaggio superficie degenza
Montaggio delle testate
Montaggio dei pannelli in legno
Montaggio delle sponde laterali
Collegamento elettrico
Schema collegamento dispositivo di comando
Dispositivo antitrazione
Requisiti del luogo di installazione
Operatività
Smontaggio
Dispositivi di trasporto
Funzionamento
Avvert. speciali di sicurezza sistema azionamento
Pulsantiera
Utilizzo della pulsantiera
Funzione blocco
Rotelle
Portacavo di alim.
Alza-malati
Maniglia
Alza ginocchia
Sponde
Discesa di emergenza dello schienale
Pulizia e disinfezione
Informazioni generali
Addestramento utilizzatori e personale specializz.
Programma di pulizia e disinfezione
Detergenti e disinfettanti
Come utilizzare i disinfettanti
Table of contents Seite
Page
Preface 4
General notes 5
Definitions of involved persons 5
Safety instructions 6
Meaning of the safety symbols 6
Safety Instructions for operators 7
Safety instructions for users 7
Product description 9
Normal operating procedure 9
Special Features 10
Structural Design 10
Description of materials 11
Assembly and start up procedure 11
Assembly 12
The End boards 12
Assembly of the reclining surface 12
Assembly of the end boards 13
Fit the wooden encasements 13
Assembly of the side rail beams 14
Electrical connection 16
Control unit plugs 16
Strain relief of the power cable 17
Location requirements 17
Reaching operational readiness 18
Disassembly 19
Storage aid 19
Operations 20
Special safety instructions for the drive unit 20
Hand switch 22
Operating the hand switch 22
Locking function 23
Castors 24
Power cable holder 24
Trapeze pole 24
Trapeze 25
Lower leg rest 26
Side rails 26
Emergency lowering of the back rest 28
Cleaning and disinfecting 29
General 29
Instructing the user and qualified personnel 30
Cleaning and disinfection plan 30
Cleaning supplies and disinfectants 31
Contact with disinfectants 32

4
ISTRUZIONI PER L’USO LETTO DI CURA ARMINIA III · INSTRUCTION MANUAL FOR NURSING BED ARMINIA
III
6
7
8
9
10
11
Manutenzione
Utilizzatore
Proprietario
Parti di ricambio
Indirizzo costruttore
Sostituzione componenti elettrici
Eliminazione difetti
Accessori
Requisiti del materasso
Datitecnici
Dimensioni e pesi
Dati elettrici
Condizioni ambientali
Norme / Direttive applicate
Informazioni sullo smaltimento
Dichiarazione di conformità CE
Maintenance 33
By the user 33
By the operator 36
Spare parts 41
Manufacturer's address 41
Replacement of electrial components 41
Troubleshooting 42
Accessories 44
Requirements of the mattress 44
Technical data 45
Measurements and dimensions 45
Electrical data 45
Ambient conditions 46
Applied standards and guidelines 47
Disposal instructions 47
EC-Declaration of Conformity 50
Capitolo 1 Chapter 1 PREMESSA
Gentile cliente,
la ditta BURMEIER ringrazia per la fiducia
accordata a noi e ai nostri prodotti.
La sicurezza elettrica e la funzionalità del letto di
cura ARMINIA III sono state testate
internamente e la ditta costruttrice garantisce
che questo prodotto non presenta difetti.
Vi preghiamo di leggere attentamente questo
manuale. Questo vale in particolar modo per la
fase di montaggio ma anche per l’utilizzo
quotidiano. Questo manuale fornisce un pratico
riferimento da tenere sempre a portata di mano
Il presente manuale fornisce all’acquirente e
all’utilizzatore informazioni su tutte le funzioni
che garantiscono quotidianamente un utilizzo
pratico e sicuro di questo letto.
Nella speranza che per voi e per gli utilizzatori di
questo letto la cura abbia esiti positivi, siamo
sicuri che il nostro prodotto darà un notevole
contributo al raggiungimento di questo scopo.
Burmeier GmbH & Co. KG
PREFACE
Dear customer,
Thank you for the confidence you have shown in
BURMEIER.
The nursing bed ARMINIA III is factory-checked
for electrical safety and function and has left our
factory in faultless condition.
Please take time to read this manual carefully.
This applies especially to the assembly phase
but also to daily use.
It is also a practical reference guide. Keep the
instructions in a handy place.
These instructions provide information for the
operator and user regarding the convenient
handling and safe operation.
We wish you and your users much success in
care-giving and we are convinced that our
product will make a positive contribution.
BURMEIER GmbH & Co. KG

5
ISTRUZIONI PER L’USO LETTO DI CURA ARMINIA III · INSTRUCTION MANUAL FOR NURSING BED ARMINIA
III
Capitolo 2 Chapter 2
INFORMAZIONI GENERALI
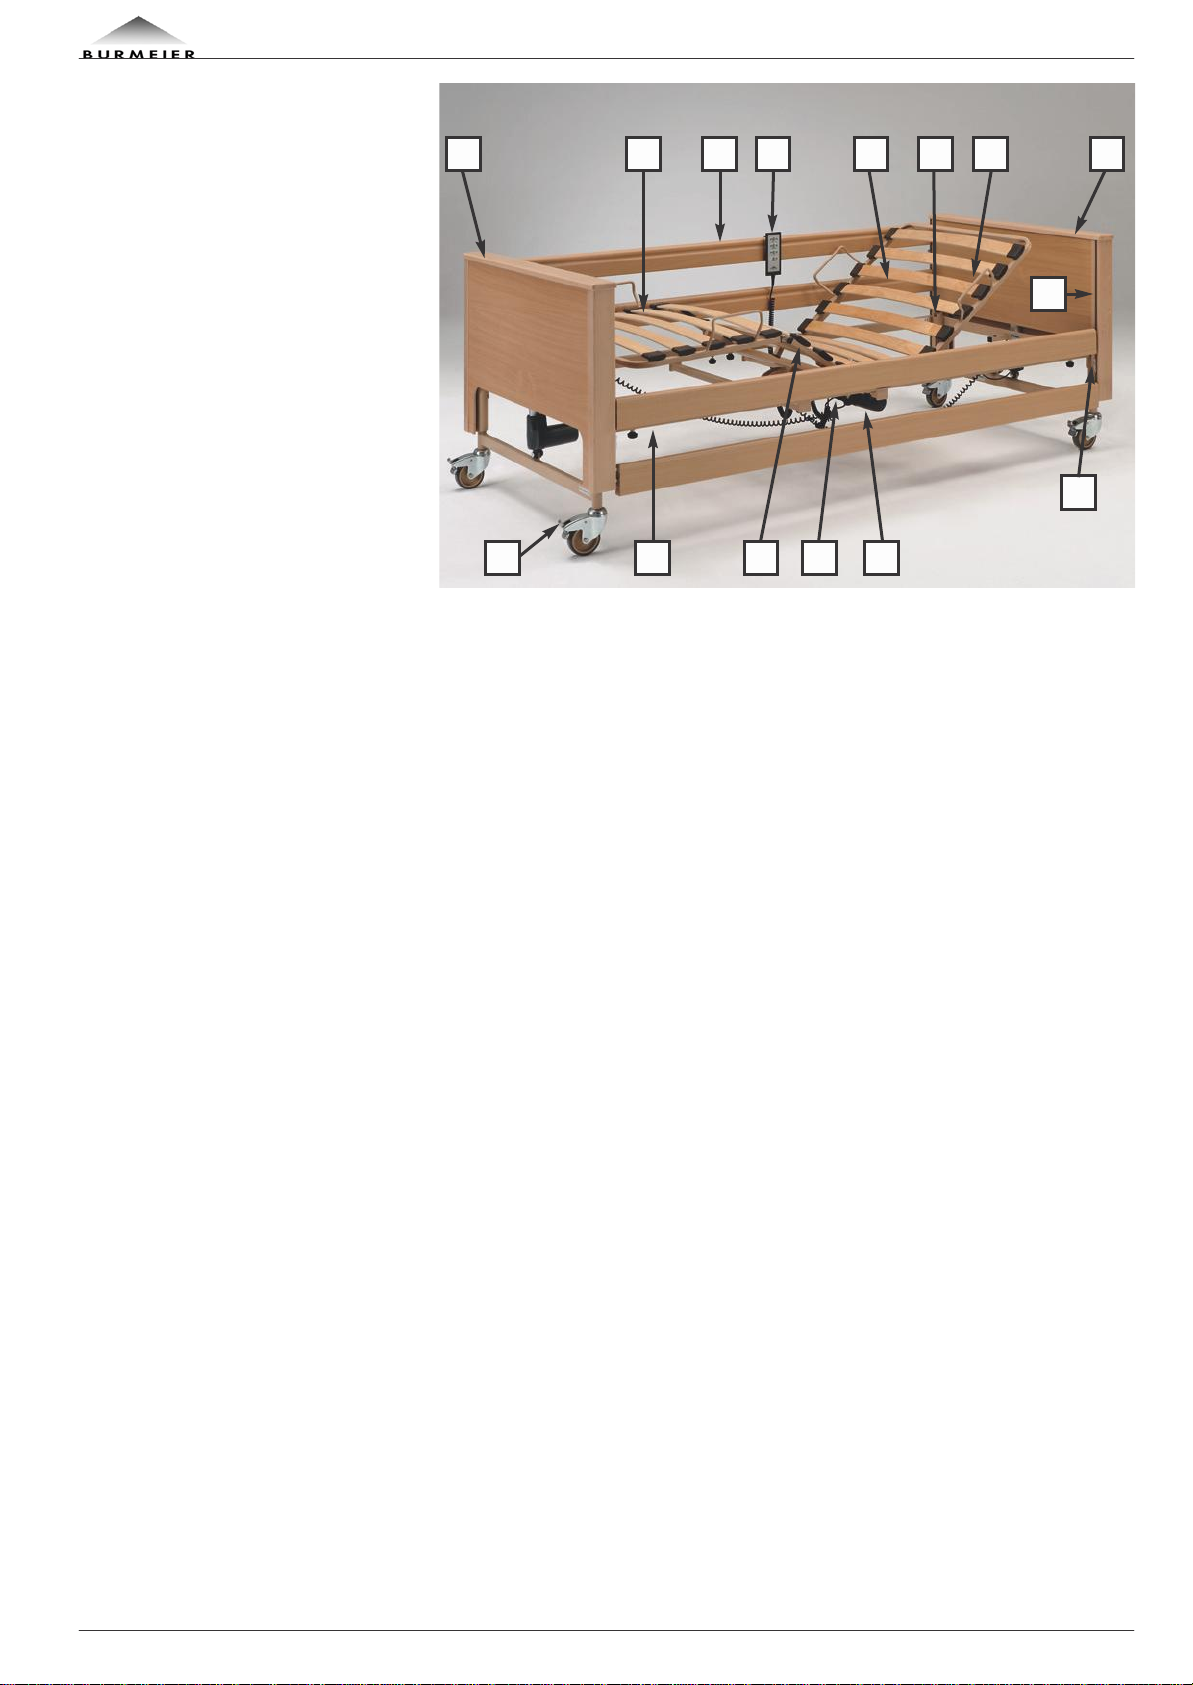
Il letto di cura ARMINIA III viene prodotto in
diversi modelli. E’ possibile che alcune funzioni
ed attrezzature descritte non siano presenti nel
modello in vostro possesso.
Modelli ARMINIA III:
Codice modello: 51.3431.33
Superficie di degenza, legno, in 4 sezioni
Sponde in legno, 2 elementi
Codice modello: 51.3431.33
Superficie di degenza, metallo, in 4 sezioni
Sponde in legno, 2 elementi
Prima del primo utilizzo del letto di cura:
Leggete fino in fondo il presente manuale, per
evitare danneggiamenti a causa di un errato
utilizzo.
Prima del primo utilizzo pulite e disinfettate il
letto di cura.
Prima dell’utilizzo, l’utilizzatore dovrà verificare
l’efficienza e il buono stato del letto, in
conformità con il § 2 dell’ordinanza tedesca in
materia di installazione, esercizio e utilizzo di
dispositivi medicali (MPBetreibV) e dovrà
rispettare quanto indicato nel manuale d’uso. Lo
stesso vale per gli accessori.
Il letto ortopedico ARMINIA III soddisfa tutti i
requisiti richiesti alla Direttiva 93/42/CEE per i
prodotti medicali. E’ classificato come
dispositivo medico attivo di classe I in
conformità alla legge tedesca sui prodotti
medicali (MPG §13).
Il letto di cura ARMINIA III dispone di
certificazione rilasciata da istituto indipendente.
Come ogni apparecchio tecnico elettrico può
causare pericoli in caso di utilizzo scorretto.
Anche il proprietario del letto dovrà rispettare i
suoi doveri in conformità all’ordinanza tedesca
in materia di installazione, esercizio e utilizzo di
dispositivi medicali (MPBetreibV), per garantire
un funzionamento duraturo e sicuro di questo
prodotto medicale senza causare danni a
pazienti, utilizzatori e terzi.
Il presente manuale d’uso contiene
avvertenze sulla sicurezza assolutamente da
rispettare. Tutti gli utilizzatori, che lavorano
con il letto di cura, devono conoscere il
contenuto di questo manuale e rispettare le
avvertenze sulla sicurezza.
GENERAL NOTES
The nursing bed ARMINIA III is available in
various models. These instructions may describe
functions and accessories which are not included
with your model.
Overview ARMINIA III Models:
Model Number: 51.3431.33
Wooden Reclining surface, 4 parts
Wooden side rails, 2 bars
Model Number: 51.3431.33
Iron reclining surface, 4 parts
Wooden side rails, 2 bars
Before putting the nursing bed into operation
for the first time:
Read these instructions carefully in order to
avoid damage or incorrect operation.
Clean and disinfect the nursing bed before
first use.
According to the "Medizinprodukte-Betreiberver-
ordnung (MPBetreibV) § 2, before using the
nursing bed, the user shall ensure that it is in
proper working order and free of defects, and be
aware of the instruction manual. This applies
also to accessories.
The nursing bed ARMINIA III complies with all
requirements of the guidelines 93/42/EWG for
medical products. It is classified as a dynamic
medical product of the class I in accordance
with "Medizinproduktegesetz (German abbrevia-
tion: MPG § 13, Medical Products Act)."
The nursing bed ARMINIA III is checked by an
independent examining institute. As with all
technical, electrical devices improper handling
can lead to damage and/or injury.
Observe your obligations as operator in accor-
dance with medical devices "Medizinprodukte-
Betreiberverordnung (German abbreviation:
MPBetreibV, Operators of Medical Products
Ordinance)" in order to ensure a dependable
and safe operation of this medical device without
endangering patients, users and third parties.
This manual contains safety guidelines,
which must be observed. All persons who
work with the nursing bed ARMINIA III must
familiarize themselves with these instructions
and follow the safety guidelines.
GRUPPI DI PERSONE INDICATE
IN QUESTO MANUALE
Nel presente manuale viene fatto riferimento
ai seguenti gruppi di persone:
Proprietario
Il proprietario (per es.: fornitori di prodotti
medicali, rivenditori, mutua) designa qualsiasi
persona fisica o giuridica che utilizza il letto di
cura ARMINIA III o a nome di cui viene
utilizzato il letto. Al proprietario spetta il
compito di fornire le informazioni necessarie
all’utilizzatore.
DEFINITIONS OF INVOLVED
PERSONS
In this manual the following persons are
involved:
Operator
Operators (e.g.: Medical Supply Houses,
Dealers and representatives, health insurance
companies) are natural persons or legal entities,
who utilize the nursing bed ARMINIA III or aut-
horize its use. The operator is responsible for in-
structing the user in the proper use of the unit.

6
ISTRUZIONI PER L’USO LETTO DI CURA ARMINIA III · INSTRUCTION MANUAL FOR NURSING BED ARMINIA
III
Utilizzatore
L’utilizzatore è colui che è autorizzato ad
utilizzare il letto di cura ARMINIA III e ad
eseguire interventi sul letto sulla base
della sua formazione, esperienza o
istruzione, e che è istruito sull’utilizzo del
letto. Inoltre l’utilizzatore deve essere in
grado di riconoscere ed evitare possibili
pericoli e di giudicare la condizione clinica
del paziente.
Paziente
In questo manuale il paziente designa la
persona bisognosa di cure, disabile o ammalata
che necessita di questo letto.
Personale specializzato
Il personale specializzato designa i collaboratori
del proprietario che sono autorizzati, sulla base
della loro formazione o istruzione, a
consegnare, montare e smontare e trasportare il
letto di cura. Questo personale è inoltre
informato sulle norme sulla pulizia e disinfezione
del letto.
User
Users are persons who as a result of training
and experience are authorized to assemble,
perform maintenance and/or operate the nursing
bed ARMINIA III. Furthermore, the user can rec-
ognize and avoid possible dangers, and judge
the clinical condition of the patient.
Patient
In this manual a patient is an infirm or handicap-
ped person who reclines on the nursing bed.
Specialist staff
Specialist staff are employees of the operator
who are authorized as a result of their education
and training to deliver, assemble, dismantle and
transport the nursing bed. Furthermore, they are
familiar with the regulations for cleaning and
disinfecting the unit.
AVVERTENZE SULLA SICUREZZA
Al momento della consegna il letto di cura
ARMINIA III è un prodotto di alto livello
tecnologico ed è certificato da un istituto di
certificazione indipendente.
Utilizzate il letto di cura ARMINIA III solo se in
buono stato.
SPIEGAZIONE DEI SIMBOLI DI SICUREZZA UTILITTATI
Nel presente manuale vengono utilizzati i
seguenti simboli:
Avvertenza contro danni alle persone
Indica la presenza di tensione elettrica
pericolosa, che può causare pericolo di vita.
Indica la presenza di pericoli generici, che
possono causare pericolo di vita e per la salute.
Avvertenza contro danni a cose
Indica la possibilità di danni a cose. E’
possibile che si verifichino danni
all’azionamento, al materiale o all’ambiente.
Altre avvertenze
Suggerimento generico. Seguendo questo
suggerimento, viene facilitato l’utilizzo del letto e
una migliore comprensione delle istruzioni.
Il simbolo di sicurezza utilizzato non
sostituisce il testo dell’avvertenza sulla
sicurezza. Leggete quindi l’avvertenza sulla
sicurezza e seguitela attentamente!
SAFETY INSTRUCTIONS
The nursing bed ARMINIA III represents the
latest technological development at the time of
delivery and is checked by an independent
examining institute.
Do not use the nursing bed ARMINIA III if it is
damaged.
MEANING OF THE SAFETY SYMBOLS
In these instructions the following safety
symbols are used:
Warning about injuries to persons
Dangerous voltage. Life Threatening.
General danger. Injury or life hazard.
Warning about property damages
Possibility of damage to drive, material or
environment.
Other symbols
Useful tip. For easier operation or better
understanding of the unit.
The safety symbol used does not replace the
text of the safety note. Therefore read the
safety instructions and follow them exactly!
Pericolo!
Attenzione
Prudenza
Importante

7
ISTRUZIONI PER L’USO LETTO DI CURA ARMINIA III · INSTRUCTION MANUAL FOR NURSING BED ARMINIA
III
AVVERTENZE SULLA SICUREZZA PER IL
PROPRIETARIO
Rispettate i vostri doveri in conformità
all’ordinanza tedesca in materia di installazione,
esercizio e utilizzo di dispositivi medicali
(MPBetreibV), per garantire un funzionamento
sicuro e duraturo di questo prodotto medicale
senza pericoli per pazienti, utilizzatori e terzi.
Prima del primo utilizzo informate
l’utilizzatore sull’utilizzo sicuro del letto sulla
base di questo manuale d’uso che deve
essere fornito insieme al letto.
Informate l’utilizzatore in base all’ordinanza
MPBetreibV § 9 sul luogo in cui viene
conservato questo manuale.
Informate ogni utilizzatore su eventuali
pericoli in caso di utilizzo scorretto. Fate
particolare attenzione all’utilizzo di azionamenti
elettrici e delle sponde.
Fate in modo che solo il personale
specializzato possa utilizzare questo letto.
Assicuratevi che anche gli eventuali sostituiti
del personale siano sufficientemente istruiti
sull’utilizzo del letto.
In caso di utilizzo prolungato del letto dopo
un certo periodo di tempo (raccomandazione:
ogni sei mesi) eseguite un controllo per
verificare la funzionalità e ed eventuali danni
visibili (vedi capitolo 6).
Collegate il letto direttamente alla presa di
corrente. Non utilizzate prolunghe e/o prese multiple.
Assicuratevi che anche in caso di
applicazione di accessori (per esempio
compressori per sistemi di deposito, ecc.) sia
garantito il corretto fissaggio e funzionamento
di tutti i dispositivi.
Non applicate prese di corrente multiple
sotto al letto (pericolo di incendio in caso di
contatto con liquidi).
In particolare, fate attenzione a quanto
segue:
Posa sicura di tutti i cavi di collegamento mobili,
tubi flessibili, ecc.
Vedi pag. 9 : Utilizzo corretto
Vedi pag. 20 : Avvertenze di sicurezza
sul sistema di azionamento
In caso di dubbi rivolgetevi al costruttore degli
accessori oppure a BURMEIER.
Assicuratevi che il vostro personale rispetti le
avvertenze sulla sicurezza.
SAFETY INSTRUCTIONS FOR OPERATORS
Remember your responsibilities in accor-
dance with the MPBetreibV in order to ensure
the safe operation of this unit without endange-
ring patients, users and third parties.
Before first use, instruct every user in the
safe operation of the nursing bed in accordance
with these safety instructions, which must be
supplied along with the unit.
According to MPBetreibV 9 the user shall be
notified of the location of this instruction manual.
Call attention to the dangers of improper use
of the unit, especially in regards to the electrical
drives and side rails.
The unit should only be operated by properly
trained personnel.
Make sure that representatives are also
familiar with the operation of the nursing bed.
During long term use it is recommended that
the nursing bed be inspected for function and
visible damage at regular intervals (Recommen-
dation: yearly) (see chapter 6).
Connect the bed directly to an electrical out-
let. Do not use extension cords and/or multiple
outlet extension cords.
When attaching other equipment (e.g. com-
pressors for positioning systems) make sure
that they are mounted and can function in a
secure and safe manner.
Do not put multiple outlet electrical extensi-
ons under the nursing bed. Leaking liquids can
cause a fire hazard.
Pay special attention to:
Securely locating of all wiring, cables, tubes,
etc.
See page 9 : Intended use
See page 20 : Safety note for the electric
drive system
For further information please contact the
manufacturer of the accessories or BURMEIER
directly.
Make sure that your personnel follow the
safety instructions.
AVVERTENZE SULLA SICUREZZA PER
L’UTILIZZATORE
Fatevi istruire dal proprietario sull’utilizzo
sicuro di questo letto.
Prima di ogni utilizzo verificate il buono
stato e l’assenza di difetti nel letto di cura.
Assicuratevi che in caso di regolazioni non
vi siano ostacoli come mobili o inclinazioni del
soffitto.
SAFETY INSTRUCTIONS FOR USERS
Let the operator instruct you in the safe use
of the nursing bed.
Before each use make sure that the nursing
bed is in proper and faultless condition.
Take care that no obstacles, such as furniture
or slanted ceilings interfere with the adjustment
functions.

8
ISTRUZIONI PER L’USO LETTO DI CURA ARMINIA III · INSTRUCTION MANUAL FOR NURSING BED ARMINIA
III
In caso di utilizzo di componenti elettrici
esterni, come per esempio alza-malati, luci di
lettura o compressori per sistemi di deposito,
assicuratevi che il cavo di alimentazione non si
impigli nelle parti mobili del letto o che non
venga danneggiato.
Le prese di corrente multiple non devono
essere utilizzate per il collegamento di
componenti elettrici esterni.
Assicuratevi che anche in caso di
applicazione di accessori (per esempio
compressori per sistemi di deposito, ecc.) sia
garantito il corretto fissaggio e funzionamento
di tutti i dispositivi.
Non applicate prese di corrente multiple
sotto al letto (pericolo di incendio in caso di
contatto con liquidi).
Assicuratevi che tutti i cavi di collegamento
mobili, tubi flessibili, ecc. siano stati posati
correttamente.
Pay attention that when using additional elec-
trical components, such as patient lifts, reading
lights or compressors for positioning systems
that their electrical cords do not get entangled or
damaged by the moving parts of the bed.
Connect the bed directly to an electrical out-
let. Do not use extension cords and/or multiple
outlet extension cords.
Make sure that when attaching other applian-
ces (e.g. compressors for positioning systems)
that a safe mounting and function is guaranteed.
Do not put multiple electrical outlets under
the nursing bed. Leaking liquids can be a fire
hazard.
Pay special attention to securely locating all
wiring, cables, tubes, etc.
In caso di dubbi rivolgetevi al costruttore
degli accessori oppure a BURMEIER.
Se sospettate la presenza di un
danneggiamento o malfunzionamento,
disattivate il letto:
togliete immediatamente la spina di
alimentazione dalla presa;
Contrassegnate il letto in modo chiaro con
„DIFETTOSO“;
Comunicate la situazione immediatamente al
proprietario del letto.
Nel capitolo 6 troverete una lista di controllo
per poter valutare il buono stato del letto.
For further information please contact the
manufacturer of the accessories or BURMEIER
directly.
Take the nursing bed out of operation if
damage or a malfunction is suspected:
Immediately unplug the electrical plug from
the wall outlet;
Clearly mark the nursing bed as
"DEFECTIVE";
Promptly notify the appropriate operator.
A checklist for assessing the proper condition is
located in Chapter 6.
Posate il cavo di alimentazione in modo
tale che durante il funzionamento del letto
non venga trascinato via, calpestato o
danneggiato da parti mobili.
Prima di ogni trasporto togliete la spina
dalla presa e inserite il cavo di alimentazione
nel portacavo in modo che il cavo non possa
cadere e toccare il pavimento.
Controllate il cavo di alimentazione
regolarmente verificando eventuali dannI
meccanici (abrasioni, fili scoperti, piegature,
ammaccature, ecc.) e in particolare:
Dopo ogni sovraccarico meccanico (per
es.: schiacciamento del cavo con il letto di
cura stesso, con carrello degli attrezzi, dopo
forti sforzi di trazione e di flessione come
rulli di scorrimento del letto di cura con cavo
di alimentazione inserito);
Dopo ogni cambio di posizione/
spostamento prima di inserire la spina;
Durante il funzionamento regolarmente
da parte dell’utilizzatore.
Controllate che il dispositivo
antitrazione del cavo di alimentazione sia
serrato correttamente.
Position the power cable in such a way
that during normal operation of the nursing
bed the cable will not be stretched, driven
over or interfere with moving parts of the bed.
Before any relocation of the nursing bed it
is imperative that the power cable is pulled
from the wall socket and be secured in the
power cable holder.
Check the power cable regularly for da-
mage (abrasions, exposed wires, kinks,
pressure marks, etc.) in particular:
after every larger mechanical strain (e.g.:
rolling over the power cable with the nursing
bed or with an equipment cart; after a strong
pulling or bending load caused by the bed
rolling away with the power cable still atta-
ched to the wall outlet);
after relocating and before plugging in the
power cable.
during prolonged operating by the user.
Regularly inspect the cord grip of the
power cable. It must be tightly screwed in.
Attenzione

9
ISTRUZIONI PER L’USO LETTO DI CURA ARMINIA III · INSTRUCTION MANUAL FOR NURSING BED ARMINIA
III
Non utilizzate lo spazio libero sotto al letto per
depositare eventuali utensili.
Posizionate la superficie di degenza nella
posizione più bassa, quando lasciate il letto
di cura incustodito al paziente. In questo
modo il pericolo di lesione del paziente a
causa di caduta durante la salita e la discesa
dal letto viene ridotto al minimo.
In caso di mancato utilizzo fate in modo
che la pulsantiera non possa cadere
inavvertitamente (deve rimanere attaccata
al gancio). Assicuratevi che il cavo non
possa essere danneggiato da parti mobili
del letto di cura.
Portate la pulsantiera al di fuori della
portata del paziente e in particolare dei
bambini per proteggerli da eventuali
movimenti motorizzati indesiderati (per es.
pediera), se:
Il paziente non è in grado di utilizzare in
modo sicuro il letto e di liberarsi da posizioni
pericolose;
Il paziente può essere messo in pericolo
a causa di un movimento involontario dei
motori elettrici;
Sono applicate le sponde (pericolo di
schiacciamento di arti in caso di
movimentazione dello schienale e
dell’appoggia gambe);
I bambini si trovano in una stanza
incustodita con il letto di cura.
Le regolazioni possono essere eseguite
solo da personale esperto o in presenza di
personale esperto!
Do not use the area under the nursing bed
as a "parking spot" for any utensils.
Lower the reclining surface to its lowest
position when leaving the patient unatten-
ded. This reduces the risk of injury to the pa-
tient getting in and out of the nursing bed.
Keep the hand switch safe from acciden-
tally falling during non-use (Hang it on the
hook). Take care that the the cable is not da-
maged by the moving parts of the nursing
bed.
To protect the patient and especially chil-
dren from unintentionally adjusting the hand
switch, place it beyond their reach (e.g. at
the foot end) or lock the hand switch when:
the patient is not able to control the bed
safely or is unable to get out of dangerous
positions without help;
the patient could be endangered, because
of unintentional adjustments to the drive
motor;
the side rails are up:
(There is a possible danger that limbs
could be squeezed when adjusting the
back and thigh rest);
unsupervised children are in the room with
the nursing bed.
Adjustment functions can only be
performed by a trained person!
DESCRIZIONE PRODOTTO
UTILIZZO CORRETTO
Il letto ortopedico ARMINIA III, di seguito
chiamato letto, è stato creato come soluzione
ideale per la degenza e per facilitare la cura
di persone bisognose di cure, ammalate in
ricoveri per anziani e case di cura. Inoltre è
una soluzione ideale per la cura a domicilio di
persone bisognose di cure, disabili o
ammalate.
Il letto ortopedico ARMINIA III è concepito
per l’utilizzo in ospedali solo per la camere del
gruppo di utilizzatori 0.
Questo letto può essere utilizzato per la
cura dietro disposizione di un medico e può
servire per la diagnosi, il trattamento o
l’osservazione del paziente. E’ quindi provvisto
di funzione di blocco dei dispositivi elettrici di
regolazione.
Questo letto non ha nessuna opzione
speciale per un collegamento equipotenziale.
Considerate questo elemento prima del
collegamento con altri apparecchi (medicali)
collegati alla rete.
PRODUCT DESCRIPTION
NORMAL OPERATING PROCEDURE
The nursing bed ARMINIA III, hereafter called
bed, serves as a comfortable solution for posi-
tioning and easing the care of infirm, frail people
in senior or nursing homes. Additionally it was
developed as a comfortable solution for in-home
care of infirm, handicapped or frail people. It will
support this care.
The ARMINIA III care bed is designed for use
in hospitals only in rooms of application group 0.
This bed can be used for care under the
instructions of a physician and can serve in
diagnosing, treatment and observation of a
patient. It is therefore equipped with a locking
mechanism for the electrical adjustment
functions.
This bed has no special connector possibili-
ties for a potential equalization. Consider this
before combining with additional electrically
operated (medical) devices.

10
ISTRUZIONI PER L’USO LETTO DI CURA ARMINIA III · INSTRUCTION MANUAL FOR NURSING BED ARMINIA
III
Ulteriori informazioni su altre eventuali misure
di sicurezza da prendere sono reperibili come
segue:
Nelle istruzioni d’uso di questi apparecchi
collegati a rete (per esempio sistemi di
immagazzinamento ad aria compressa,
pompe ad infusione, sonde di alimentazione,
ecc.)
Nella norma DIN EN 60601-1-1:2002
(Sicurezza dei sistemi elettrici medicali)
Nella norma VDE 0107:1994 (Impianti a
corrente forte in ospedali)
Il carico di lavoro in condizioni di sicurezza
è di 1820 N (~185 kg), considerando un peso
paziente di 145 kg. I restanti 40 kg vengono
distribuiti su materasso e accessori montati.
Questo letto non è adatto per pazienti di
altezza inferiore a 150 cm. In particolare per
pazienti con grave condizione clinica
rispettate le avvertenze sulla sicurezza nel
capitolo 4.
Questo letto può essere utilizzato solo da
persone adeguatamente istruite.
Questo letto è adatto per un riutilizzo
ripetuto. Considerate i presupposti necessari:
Vedi capitolo 5;
Vedi capitolo 6.
Anche mentre il paziente è sdraiato sul
letto, è possibile spostare il letto all’interno
dell’edificio.
Questo letto può essere utilizzato solo
nelle condizioni di utilizzo descritte in
questo manuale d’uso. Qualsiasi altro
utilizzo non è da considerasi a norma.
Further references about additionally applicable
precautions can be found:
In the instructions for the additional electri-
cally operated devices (e.g. compressors for
positioning systems, infusion pumps, nutrition
probe ...)
In the Standard DIN EN 60601-1-1:2002
(Safety of medical electrical systems)
In the Standard VDE 0107:1994 (High current
systems in hospitals)
The safe working load amounts to 1820 N
(~185 kg), whereas a patient weight of 145 kg
has been allowed. The remaining 40 kg are allo-
cated for the mattress and attached accessories.
This bed is not appropriate for patients less
than 150 cm tall. Observe, especially with
patients in poor health condition, the safety tips
in chapter 4.
This bed may only be operated by trained
personnel.
This bed is useful for multiple re-use. Bear in
mind the necessary requirements:
See chapter 5;
See chapter 6.
While the patient also is lying in bed, it is
allowed to drive the bed within the building.
This bed may only be operated under the
operating instructions laid out in this
instruction manual.
Any other use is deemed to be inappropriate.
La vendita di questo prodotto non è
autorizzata sul mercato nordamericano, in
particolar modo negli Stati Uniti d’America
(USA). La distribuzione e l’utilizzo del letto
ortopedico in questi mercati, anche tramite
terzi, sono vietati da parte del Produttore.
Sale of this product in North America,
especially in the United States of America, is
prohibited. Distribution and use of the nursing
bed, including distribution and use by third
parties in these markets is forbidden by the
Manufacturer.
CARATTERISTICHE SPECIALI
Regolazione in altezza elettrica della
superficie di degenza da circa 40 a 80 cm.
Regolazione elettrica dello schienale da 0° a
circa 70°.
Regolazione elettrica dell’appoggia gambe
da 0° a circa 35°.
Inclinazione elettrica della superficie di
degenza fino ad un abbassamento piedi di
circa 10°.
Scorrevole su quattro rotelle, tutte bloccabili
singolarmen.
Superficie di degenza 200 x 90 cm,
articolata in quattro sezioni; dimensioni di
ingombro ca. 218 x 101 cm.
Sponde abbassabili su entrambi i lati.
SPECIAL FEATURES
Electrical height adjustment of the reclining
surface from about 40 cm to 80 cm.
Electrical adjustment of the backrest from 0°
to about 70°.
Electrical adjustment of the leg rest from 0° to
about 35°.
Electrical inclination of the reclining surface to
the foot end from about 10°.
Driven with four individually-locking castors.
Reclining surface of 200 x 90 cm, divided into
four areas; Outside dimensions are about
218 x 101 cm.
Side rails on both sides can be lowered.
Importante

11
ISTRUZIONI PER L’USO LETTO DI CURA ARMINIA III · INSTRUCTION MANUAL FOR NURSING BED ARMINIA
III
STRUTTURA
Il letto viene fornito smontato, installato su un
dispositivo di trasporto. Può essere trasportato
anche in appartamenti. E’ composto da due
estremità (testata e pediera), da un piano rete
diviso al centro; quattro sponde laterali e un
alza-malati con maniglia triangolare. Il letto
poggia su quattro rotelle orientabili, tutte
provviste di freno di blocco.
Piano rete
Il piano rete è suddiviso in 4 sezioni: uno
schienale mobile, un elemento centrale fisso,
un appoggia-gambe e un alza-ginocchia mobili.
Lo schienale e l’appoggia-gambe sono
regolabili grazie a motori elettrici. Il piano rete
può essere regolato orizzontalmente in altezza
oppure regolato fino alla posizione più bassa.
Tutte le regolazioni vengono eseguite tramite
apposita pulsantiera.
Sponde
Per proteggere il paziente da eventuali cadute
accidentali dal letto, il letto dispone di sponde su
entrambi i lati, che possono fungere da barriera
o essere abbassate in caso di mancato utilizzo.
Sistema di regolazione elettrico
Il sistema di regolazione elettrico di questo letto
è sicuro, antincendio (V0) ed è composto da:
Dispositivo di comando elettronico. Viene
prodotta una tensione minima di protezione di
24 Volt non pericolosa per paziente ed
utilizzatore. Al dispositivo di comando centrale
sono collegati tutti i motori elettrici e la
pulsantiera tramite connettori, che funzionano
alla tensione minima di protezione di 24 Volt;
Una pulsantiera con gancio fisso.
L’utilizzatore può bloccare le regolazioni della
pulsantiera, se la gravità del paziente lo
richiede.
Due motori elettrici per comando integrato
della regolazione in altezza orizzontale.
Un motore elettrico con comando integrato
per alza-ginocchia.
Un motore elettrico con comando integrato
per schienale.
STRUCTURAL DESIGN
The bed is shipped disassembled on a storage
aid. It can be transported without problems even
in apartment homes. It consists of two end boards
(head- and foot section); a reclining surface
frame which is divided in the middle; four side
rail beams and a trapeze pole with trapeze
handle. The bed stands on four steerable,
individually-locking casters.
Reclining surface frame
The reclining surface frame has four sections:
a movable backrest, a firm middle section, a
moveable thigh rest and lower leg rest. The
back- and thigh rest can be adjusted with the aid
of electric motors. The horizontal height of the
reclining surface can be adjusted and inclined to
a low foot end position. All adjustment functions
are controlled by a hand switch.
Side Rails
The bed has side rail beams on both sides
which can be raised as a barrier or lowered
when not needed. This safeguards the patient
from accidentally falling out of the bed.
Electric adjustment system
The electrical adjustment system of this bed is
error protected, flame-retardant (V0) and
consists of:
the central control unit. For the safety of
patient and user, safety low-voltage of 24 volt is
produced in the control unit by means of a trans-
former. All drive motors and the hand switch are
hooked up to the central control unit by plug-in
connections and work with the 24 volt safety
low-voltage;
a hand switch with a sturdy hook.
The user can lock the adjustment functions of
the hand switch if the poor clinical condition
of the patient warrants is.
two drive motors with integrated control for
the horizontal height .
one drive motor with integrated control for the
thigh rest .
one drive motor with integrated control for the
backrest.
MATERIALI UTILIZZATI
Il letto è costituito in gran parte da profilati in
acciaio, la cui superficie è ricoperta da un
rivestimento di polvere di poliestere, oppure è
dotata di un rivestimento metallico in zinco o
cromo. Le testate del letto, le sponde laterali e
gli elementi molleggiati sono costruiti in legno
o in materiale simile, la cui superficie è stata
impermeabilizzata.
Le superfici non sono dannose in caso di
contatto con la pelle.
DESCRIPTION OF MATERIALS
The bed is mostly constructed out of steel secti-
ons, their surfaces have been polyester-powder-
coated, or with a metallic coating of zinc and
chrome. The end boards, the side rail beams
and the spring wood slats consist of wood and
derived timber products whose surface has
been sealed.
All surfaces are harmless to skin contact.

12
ISTRUZIONI PER L’USO LETTO DI CURA ARMINIA III · INSTRUCTION MANUAL FOR NURSING BED ARMINIA
III
Capitolo 3 Chapter 3 MONTAGGIO E
MESSA IN
FUNZIONE
Il letto viene fornito smontato, installato su un
dispositivo di trasporto.
Il montaggio avviene sul posto da parte del
personale specializzato del proprietario e può
essere eseguito da una o due persone.
Togliete il materiale d’imballo e fascette dai
cavi.
ASSEMBLY AND START
UP PROCEDURE
The bed ships dissasembled mounted on a
storage aid.
The assembly is taken care of at the destination
by qualified personnel supplied by the operator.
Remove all packaging material and cable ties.
MONTAGGIO ASSEMBLY
TESTATE DEL LETTO
Le due estremità del letto [3]+[10] non devono
essere invertite, per non spostare la posizione
dell’abbassamento piedi regolabile.
Fate attenzione alle due etichette di
identificazione delle testate. Esse si trovano al
centro dei tubolari trasversali, nella zona di
alloggiamento motori e al centro dei tubolari
trasversali del piano rete [12].
Etichetta estremità letto lato testa [10]
Etichetta estremità letto lato piedi [3]
THE END BOARDS
The two end boards [3]+[10] must not be inter-
changed! The adjustment to a lower foot position
can otherwise not be achieved.
Look for the decals marking the head and foot
sections. They are located in the middle on the
crosspipe, in the area of the drive motor mount
and in the middle of the the crosspipe on the
reclining surface frame [12].
Decal on end board, head section [10]
Decal on end board, foot section [3]
MONTAGGIO DELLA SUPERFICIE DI DEGENZA
Togliete le sponde [7] e l’alza-malati [2] dal
dispositivo di trasporto e metteteli da parte.
Togliete entrambe le parti della superficie
di degenza [12] dal dispositivo di trasporto.
Posizionate verticalmente la testiera della
superficie di degenza sul pavimento;
posizionate gli elementi di fissaggio per l’alza-
malati [16] verso il basso, mentre i due pomelli
sono rivolti verso l’alto.
Allentale i 4 pomelli dalla testiera della
superficie di degenza. Non svitate
completamente i pomelli ma lasciateli inseriti di
ca. 2 giri.
Prendete la pediera della superficie di
degenza e sollevatela oltre alla testiera. Ora
inserite le due parti l'una dentro l'altra .
ASSEMBLY OF THE RECLINING SURFACE
Remove the side rail beams [7] and the tra-
peze pole [2] from the storage aid and put them
aside for now.
Remove the two halves of the reclining
surface frame [12] from the storage aid.
Put the head side half of the reclining surface
frame vertically on the floor. The two trapeze
pole sockets [16] point downward while the
2 pairs of knurled screws are pointing upward.
Loosen the 4 knurled screws in the head
side half of the reclining surface frame. Do not
unscrew the knurled screws completely, but
leave them in the thread for about 2 revolutions.
Now take the foot side half of the reclining
surface frame and lift it over the head side half
of the reclining surface frame. Now insert the
halves of the reclining surface frame into each
other.
Prudenza

13
ISTRUZIONI PER L’USO LETTO DI CURA ARMINIA III · INSTRUCTION MANUAL FOR NURSING BED ARMINIA
III
Stringete i 4 pomelli. Evitate di utilizzare
pinze per questa operazione!
Tighten the 4 knurled screws. Do not use
pliers to tighten the screws.
Copiglia di sic.
con staffa Cotter
pins with
clamping yoke
Collegate la barra di sollevamento dei
motori con gli elementi di fissaggio della
testiera. Inserite le copiglie di sicurezza
nell’elemento di fissaggio e nella barra di
sollevamento e fissatele piegando le staffe di
bloccaggio.
Posizionate il piano rete orizzontalmente sul
pavimento.
Connect the lift rod of the drive motors with
the entry of the head side of the reclining surface
frame. For that, insert the cotter pins through the
receiver and the lift rod and secure it by turning
over the clamping yoke.
Place the combined reclining surface frame
flat on the floor.
Raccordi di presa
Support bracket
Testata
End board
MONTAGGIO DELLE TESTATE
Allentate i due pomelli che si trovano in
basso nel piano rete, vicino ai raccordi per
alza-malati [16]. Non svitateli completamente.
Inserite la testata [10] nel piano rete [12].
ASSEMBLY OF THE END BOARDS
Loosen both of the knurled screws, which
are below the reclining surface frame next to the
trapeze pole socket [16]. Do not loosen the
screws completely.
Join the end board, head section [10] with
the reclining surface frame [12] together. Ensure
Piano rete
Reclining surface frame
Assicuratevi che gli adesivi coincidano! that the decals correspond!
Sollevate il piano rete dalla testata e inserite i
due raccordi di presa della testata [10] nei
tubolari del piano rete [12] fino a fine corsa.
Lift the reclining surface frame at the head end
and push the two support brackets from the end
board, head section [10] into the tubes of the
reclining surface frame [12] to the limit.
Tra il piano rete e i rinforzi angolari della
testata deve esserci una distanza massima di
5 mm.
Stringete i 4 pomelli. Evitate di utilizzare
pinze per questa operazione!
Ripetete la stessa operazione anche per
la pediera [3].
There should only be a 5 mm gap between the
reclining surface frame and the corner post of
the end board.
Tighten the 4 knurled screws tight. Do not
use pliers to tighten the screws.
Repeat the process with the end board, foot
section [3].
Pistone
Hubstange
Lift rod
Telaio rete
Telaio pannello

14
ISTRUZIONI PER L’USO LETTO DI CURA ARMINIA III · INSTRUCTION MANUAL FOR NURSING BED ARMINIA
III
MONTAGGIO DEI PANNELLI IN LEGNO
Se i pannelli in legno non sono ancora stati
montati, devono essere fissati come segue.
Inserite il pannello di legno al di sopra del
telaio carrellato.
FIT THE WOODEN ENCASEMENTS
If the wooden encasements have not yet been
fitted, they must be attached as follows.
Fit the wooden encasement over the under-
carriage.
Avvitate ipannelli in legno con il telaio carrellato
per evitare il sollevamento dei pannelli.
Screw the wooden encasement to the under-
carriage to prevent the encasement from being
lifted off.
MONTAGGIO DELLE SPONDE LATERALI
Nelle estremità del letto [3]+[10] si trova una
guida [17], una a sinistra e una a destra, per le
sponde laterali [7]. All’interno di ogni guida si
trova un cursore in plastica con 4 perni in
metallo. I perni in metallo sono inseriti in fori
longitudinali, sui lati frontali, delle 4 spone
laterali. Le sponde possono essere sollevate o
abbassate, se necessario.
Per il montaggio delle sponde laterali, il piano
rete deve essere portato a metà altezza (vedi
Collegamento elettrico a pag. 16).
Al momento della consegna vi sono due
cursori in plastica in una guida.
ASSEMBLY OF THE SIDE RAIL BEAMS
At the end boards [3]+[10] you will find on the
left side and right side a guide bar [17] for the
side rail beams [7]. In them runs a plastic slide
with 4 metal pins. The metal pins hook into the
oblong holes on the face of the 4 side rail
beams. The side rail beams can be raised or
lowered, as needed.
To mount the side rail beams the reclining
surface frame has to be raised to mid-level.
(Electrical Connections see page 16)
When first delivered there are two plastic
slides in a guide bar.
Guida
Guide bar
Cursore in plastica
Plastic slide
Iniziate dalla testata:
Togliete un cursore dalla guida. Questa
estrazione avviene facendo leva sul perno di
sicurezza [a]. Per estrarre il cursore in plastica
deve essere premuta la leva di sblocco [4].
L’altro cursore rimane all’interno della guida.
Start with the end board, head section:
Remove one plastic slide at a time from the
guide bar. This is done by pressing the fastening
bolt [a]. To take out the plastic slide the unlocking
lever [4] must be depressed. Leave the other
plastic slide in the guide bar.

15
ISTRUZIONI PER L’USO LETTO DI CURA ARMINIA III · INSTRUCTION MANUAL FOR NURSING BED ARMINIA
III
Il cursore in plastica estratto deve ora essere
inserito nella seconda guida della stessa
testata del letto:
Premete il perno di sicurezza [a]
nell’estremità inferiore della guida [17] e inserite
il cursore, con la parte arrotondata verso l’alto,
nella guida.
a
Sollevate i due cursori nella testata finchè non
scattano in posizione.
The plastic slide you have just removed must
now be inserted into the second guide bar of the
end board, head section.
Press the fastening bolt [a] at the lower end
of the guide bar [17] and insert the plastic slide
into the guide bar with the rounded end facing
upwards.
Pull both plastic slides on the head section
upward until they click into place.
Sponde in metallo
Inserite ora la sponda sottile [7] sulla coppia
superiore di perni in metallo della testata e
depositate l’altra estremità della sponda a terra.
Le sponde laterali sono arrotondate sul lato
sottile superiore. Il lato arrotondato di
entrambe le sponde deve essere rivolto
verso l’alto.
Inserite la sponda larga sulla coppia
inferiore dei perni in metallo e depositate l'altra
estremità della sponda a terra.
Verificate lo stato di montaggio in base alla foto.
Ripetete la stessa operazione anche
sull’altro lato della testata.
Metal side rail
Now place the thin side rail bar [7] onto the
top pair of metal plugs on the head board, and
let the other end of the side rail bar rest on the
floor.
The side rail beams are rounded on the top.
The rounded side must always be uppermost.
Now place the thick side rail bar onto the
bottom pair of metal plugs and let the other end
of the side rail bar rest on the floor.
Please refer to the photograph.
Repeat the same procedure on the other
side of the end board, head section.
Sponde in legno
Inserite ora la sponda laterale [7] sui perni in
metallo della testata e depositate l’altra
estremità della sponda a terra.
Le sponde laterali sono arrotondate sul lato
sottile superiore. Il lato arrotondato di
entrambe le sponde deve essere rivolto
verso l’alto.
Inserite la seconda sponda sulla coppia
inferiore dei perni in metallo e depositate l'altra
estremità della sponda a terra.
Ripetete la stessa operazione anche
sull’altro lato della testata.
Wooden side rail
Now place the side rail beam [7] onto the top
pair of metal plugs on the head board, and let
the other end of the side rail beam rest on the
floor.
The side rail beams are rounded on the top.
The rounded side must always be uppermost.
Now place the second side rail beam onto
the top pair of metal plugs and let the other end
of the side rail beam rest on the floor.
Repeat the same procedure on the other
side of the end board, head section.

16
ISTRUZIONI PER L’USO LETTO DI CURA ARMINIA III · INSTRUCTION MANUAL FOR NURSING BED ARMINIA
III
Parte arrotondata
Rounded end
Passate ora alla pediera:
Estraete i due cursori in plastica dalla
guida verso il basso.
Il lato arrotondato del cursore in plastica
deve sempre essere rivolto verso l'alto.
Inserite ora il cursore attraverso il perno di
sicurezza nella guida della pediera e fatelo
scorrere verso l’alto finchè non scatta in
posizione.
Ripetete la stessa operazione anche
sull’altro lato della pediera.
Now move to the end board, foot section:
Remove both plastic slides toward the
bottom out of the guide bar.
The rounded end of the plastic slide must
face upward.
Now insert the plastic slide over the faste-
ning bolt into the guide bar at the foot end and
push it upwards until it clicks into place.
Repeat this process on the other side of the
foot section.
Controllate la distanza rimanente tra
l’estremità del pannello e la guida: deve
essere max. 10 mm.
Se la distanza fosse maggiore, premere ancora il
piano rete fino a fine corsa sui raccordi di presa
delle testate.
Check the distance between the beam and
the guide bar. It should not be greater than
10 mm.
In case the distance is larger the reclining
surface frame must again be pushed into place
against the end boards.
COLLEGAMENTO ELETTRICO
La centralina di comando fornisce la tensione
necessaria ai motori elettrici tramite cavi a
spirale. I connettori, alle estremità dei cavi a
spirale, devono essere inseriti nella centralina di
comando. I cavi a spirale dei motori elettrici
devono essere inseriti nella centralina di
comando. Prima di connettere i cavi, togliete il
materiale di confezionamento da tutti i cavi.
ELECTRICAL CONNECTION
The central control unit supplies the drive
motors, through a spiral cable, with the needed
voltage. The plugs, at the end of the spiral ca-
bles, must be plugged into the appropriate drive
motors. The spiral cables from the drive motors
must be plugged into the central control unit.
Before connecting the cables all packaging
materials must be removed.
SCHEMA DI COLLEGAMENTO DEL
DISPOSITIVO DI COMANDO
I cavi a spirale, che portano ai diversi motori
elettrici, sono contrassegnati come segue sulla
centralina:
1 Motore schienale
2 Motore appoggia gambe
3 Motore testiera
4 Motore pediera
HB Pulsantiera
Fate particolare attenzione ad assegnare
correttamente i motori elettrici per la
regolazione in altezza, evitando che
vengano scambiati. Il cavo a spirale No. 3
porta al motore elettrico della testiera. Il
cavo a spirale No. 4 porta al motore elettrico
della pediera. E’ ammessa solo una
posizione bassa dei piedi.
CONTROL UNIT PLUGS
The spiral cables leading to each drive motor
are marked in the following way at the central
control unit:
1 Backrest motor
2 Thigh rest motor
3 End board / Head motor
4 End board / Foot motor
HB Hand switch
Take special care in assigning the drive mo-
tors for the height adjustments. These must
not be interchanged. Spiral cable number 3
leads to the drive motor for the end board
(head section). Spiral cable number 4 leads
to the drive motor for the end board (foot
section). Only one lower foot position should
be possible.
Prudenza
Attenzione
Telaio
pannello
Sponda

17
ISTRUZIONI PER L’USO LETTO DI CURA ARMINIA III · INSTRUCTION MANUAL FOR NURSING BED ARMINIA
III
Spostate i cavi dei motori e della pulsantiera
sotto il piano rete.
Inserite il connettore angolare per il
motore elettrico nella testiera e collegate il
dispositivo antitrazione.
Inserite il connettore angolare per il
motore elettrico nella pediera e collegate il
dispositivo antitrazione.
Place the drive motor cables and the hand
switch cable under the reclining surface frame.
Plug in the right angle plug from the drive
motor on the head section and clip in the strain
relief.
Plug in the right angle plug from the drive
motor on the foot section and clip in the strain
relief.
Assicuratevi che nessun cavo venga
danneggiato, che non si formino nodi e che i
cavi non si impiglino nelle parti mobili.
Make sure that no cable is damaged, that
there is no loop in the cables and that the
cables are not crushed by moving parts.
In caso di sostituzione di singoli componenti
elettrici assicuratevi sempre che le relative spine
siano inserite nel dispositivo di comando fino a
fine corsa e che la protezione connettori venga
nuovamente inserita. Solo in questo modo viene
garantita l’assoluta tenuta e un funzionamento
corretto.
DISPOSITIVO ANTITRAZIONE DEL CAVO DI
ALIMENTAZIONE
Sotto al piano rete si trova al centro il
dispositivo antitrazione del cavo di
alimentazione.
Controllate la stabilità e l’efficienza del
dispositivo antitrazione.
Fate particolare attenzione durante la posa
del cavo di alimentazione. Assicuratevi che
questo cavo non venga danneggiato, che
non si formino nodi e che il cavo non si
impigli nelle parti mobili. Durante la
movimentazione del letto questo cavo non
deve andare a finire sotto le rotelle o tra
elementi mobili!
When exchanging single electrical components,
always make sure that their plugs have been
plugged back into the central control unit until
they lock and the plug covering strips have been
re-affixed. This will ensure a tight fit and a pro-
per operation.
STRAIN RELIEF OF THE POWER CABLE
Underneath the reclining surface frame is the
strain relief for the power cable.
Make sure that the power cable is hooked
tightly into the strain relief.
Special care is to be taken when positioning
the power cable. Make sure that the cable is
not damaged and there is no loop in it! When
moving the bed around, take care that the
castors do not run over the power cable!
When adjusting the bed the power cable
should not get caught between moving parts!
REQUISITI DEL LUOGO DI
INSTALLAZIONE
Nell’intero campo di regolazione del letto
deve essere presente spazio sufficiente. In
questo campo non devono trovarsi mobili o altri
elementi.
Lo spazio sotto al letto deve rimanere libero.
Prima dell’utilizzo su parquet assicuratevi che
l’impermeabilizzazione del pavimento non causi
alterazioni di colore tramite le rotelle. L’utilizzo
su piastrelle, tappeti, laminato e linoleum non è
pericoloso.
BURMEIER non risponde per eventuali danni
causati ai pavimenti in seguito all’utilizzo
quotidiano.
LOCATION REQUIREMENTS
There must be enough space available to be
able to adjust the bed. No furniture, window sills
and the like should be in the way.
The space under the bed must remain clear.
Check before use on parquet flooring, that
the castors do not cause discoloration of the
varnish. Use on ceramic tiles, carpet, laminate
and linoleum is harmless.
BURMEIER is not liable for any damage to
floors due to daily operation.
A properly installed 230 volt power outlet
must be available, near the bed.
Guida cavo
Motore pediera
Prudenza
Prudenza
Importante

18
ISTRUZIONI PER L’USO LETTO DI CURA ARMINIA III · INSTRUCTION MANUAL FOR NURSING BED ARMINIA
III
Una presa di alimentazione da 230 Volt
installata correttamente deve trovarsi (il più
possibile) vicino al letto.
Assicuratevi che anche in caso di
applicazione di accessori (per esempio
compressori per sistemi di deposito, ecc.) sia
garantito il corretto fissaggio e funzionamento di
tutti gli apparecchi. In particolare assicuratevi
che sia stata effettuata una posa sicura di tutti i
cavi di collegamento mobili, tubi flessibili, ecc.
In caso di domande o dubbi rivolgetevi al
costruttore degli accessori oppure a
BURMEIER.
Durante l’installazione del letto fate
attenzione ai seguenti punti per ridurre al
minimo possibili pericoli di incendio a
causa di influssi esterni. Informate
l’utilizzatore e il personale specializzato su
questi punti!
Utilizzate il più possibile solo materassi e
biancheria non infiammabili.
Utilizzate solo materassi adatti, non troppo
soffici, in conformità a DIN 13014. Inoltre i
materassi non devono essere infiammabili in
base a DIN 597 Parte 1 e 2.
Non fumate nel letto, in quanto non è
garantita nessuna resistenza contro utensili
da fumatore a seconda dei materassi e della
biancheria utilizzata.
Utilizzate solo accessori (per es.
termocoperte) e altri apparecchi elettrici (per
es. luci, radio) in buone condizioni.
Assicuratevi che questi apparecchi vengano
utilizzati solo per lo scopo a cui sono destinati e
che non possano finire inavvertitamente sulla e
sotto la biancheria (pericolo di
surriscaldamento).
Evitate assolutamente l’utilizzo di connessioni
a prolunghe di cavi o prese multiple sotto al letto
(pericolo di incendio a causa della penetrazione
di liquido).
Collegate il letto direttamente alla presa di
corrente. Prolunghe di cavi e/o prese
multiple non dovrebbero essere
assolutamente utilizzate.
Take care when attaching further accessory
equipment (e.g. compressors for positioning
systems, etc.) that their attachment is safe and
their functionality is not impaired. Especially
important is hereby also the safe placement of
all movable connecting cables, tubes, etc. If you
have any further questions or need clarification
contact the manufacturer of the accessory
equipment or BURMEIER.
Observe the following points when setting
up the bed to minimize possible fire hazard.
Instruct the user and the authorized person-
nel in these points!
If possible use only fire-retardant mattresses
and bed sheets.
Only use appropriate firm mattresses
according to DIN 13014. This mattress should
be inflammable according to DIN 597 Section 1
and 2.
Avoid smoking in bed because of the danger
of fire.
Use only technically faultless appliances (e.g.
heating blankets) and other electronic devices
(e.g. lamps, radios).
Take care that these devices are only used
for the purpose intended and that they cannot
accidentally get on top of or underneath the bed
sheets (Fire hazard because of overheating).
Absolutely avoid the use of extension cords
or multi outlet extension cords under the bed
(Leaking liquids can cause a fire hazard).
Connect the bed directly to an electrical
outlet. Do not use extension cords and/or
multiple outlet extension cords.
OPERATIVITÀ
Dopo aver eseguito il montaggio del letto,
eseguite un controllo in conformità al capitolo
6.
Pulite e disinfettate il letto prima del primo
utilizzo e prima di ogni riutilizzo in conformità al
capitolo 5.
Dopo avere eseguito tutte le istruzioni
descritte nelle pagine da 12 a 18 il letto si
trova in condizioni di operatività.
REACHING OPERATIONAL READINESS
After successful assembly, complete an
inspection according to chapter 6.
Clean and disinfect the bed before first time
use and before every further use according to
chapter 5.
After successfully completing and heeding
all steps on page 12 through 18 the bed is
now operationally ready.

19
ISTRUZIONI PER L’USO LETTO DI CURA ARMINIA III · INSTRUCTION MANUAL FOR NURSING BED ARMINIA
III
SMONTAGGIO
Togliete l’alza-malati.
Portate il letto nella posizione orizzontale
centrale.
Bloccate le quattro rotelle.
Togliete tutte le sponde una dopo l’altra.
Reinserite i cursori in plastica nelle guide.
Stringete di nuovo i pomelli nelle guide.
Portate il letto nella posizione orizzontale più
bassa.
Estraete la spina di alimentazione dalla
presa.
Estraete la spina del connettore dalla
presa di collegamento.
Estraete le spine e i dispositivi antitrazione
dai motori di regolazione testiera e pediera.
Allentate i pomelli che si trovano sulla
pediera del piano rete per rimuovere il telaio
tubolare. Allentate poi i pomelli che si trovano
sulla testiera del piano rete per rimuovere il
telaio tubolare. Riavvitare i pomelli allentati sul
piano rete in modo che non vadano persi.
Per smontare il piano rete, procedete
come segue:
Posizionate il piano rete verticalmente
appoggiato ad una parete; la testiera deve
essere rivolta verso il basso.
Togliete le copiglie di sicurezza che si
trovano sulle barre di sollevamento del motore
dello schienale e dell’appoggia gambe.
Allentate i pomelli in entrambi i punti di
collegamento del piano rete.
Smontate le varie parti del telaio.
Avvitate tutti i pomelli allentati che si trovano
sul piano rete per il trasporto e inserite le
copiglie di sicurezza (attenzione a non perderli).
DISPOSITIVO DI TRASPORTO
Il dispositivo di trasporto unisce le due estremità
del letto e sostiene le due metà del piano rete.
Inoltre il dispositivo di trasporto garantisce
supporto alle sponde laterali e all'alza-malati.
Avvitate le due parti del dispositivo di
trasporto sui raccordi di presa di un’estremità del
letto.
Tutti i pomelli del dispositivo devono
essere rivolti nella stessa direzione.
I raccordi del piano rete devono essere
rivolati verso l’alto, il cestello delle sponde
verso l’intreno e il raccordo dell’alza-malati
verso l’esterno.
Utilizzate i pomelli della superficie di degenza.
DISASSEMBLY
Remove the trapeze pole.
Lower the bed into the middle horizontal
position.
Lock all four castors.
Remove all side rail beams consecutively.
Insert the plastic slide back into the guide
bar. Screw the knurled screws tightly back into
the guide bars.
Lower the bed into the lowest horizontal
position.
Pull the power plug out of the socket.
Unplug the transformer cable from the
connecting socket.
Remove the plugs and strain relief from the
drive motors at the head and foot ends.
Loosen the knurled screws from the reclining
surface frame on the foot section, to remove the
tubular frame from the foot section; next loosen
the knurled screws from the reclining surface
frame on the head section, to remove the tubular
frame from the head section. Screw the loosened
knurled screws back into the reclining surface
frame so they do not get lost.
To disassemble the reclining surface frame
proceed as follows:
Lean the reclining surface frame upright on a
wall. Head section downward.
Remove the cotter pins from the lifting rod of
the drive motors for the back- and the thigh rest.
Loosen the knurled screws on both joints of
the reclining surface frame.
Pull the frame apart.
Screw the loosened knurled screws back into
the reclining surface frame so they do not get
lost.
STORAGE AID
The storage aid joins both headboards and
takes in both halves of the reclining surface
frame. Additionally there are holders for the side
rail beams and the trapeze.
Screw both pieces of the storage aid onto
the receiver pin of one of the end boards.
At the same time all knurled screws in the
storage aid must face in one direction.
The receptacle for the reclining surface
frame must point upward; the basket for the
side rail beams go inward and the recepta-
cles for the trapeze point toward the outside.
Use the knurled screws from the reclining
surface.

20
ISTRUZIONI PER L’USO LETTO DI CURA ARMINIA III · INSTRUCTION MANUAL FOR NURSING BED ARMINIA
III
Raccordi corti
Receptacles short
Raccordi lunghi
Receptacles long
Raccordo alza-malati
Socket for trapeze pole
Avvitate la seconda estremità del letto.
Inserite prima di tutto una metà del piano rete
(schienale) nei raccordi corti, in modo che la
testiera (raccordi per alza-malati) sia rivolta
verso il basso. Le staffe del materasso sono
rivolte verso l'interno.
Inserite poi l’altra metà del piano rete
(pediera) nei raccordi più lunghi, in modo che la
pediera sia rivolta verso il basso. Le staffe del
materasso [15] sono rivolte verso l'interno.
Fissate le barre di sollevamento dei motori
elettrici con fascette per il cablaggio o simili
per evitare che si rovescino.
Avvitate tutti i pomelli.
Inserite le barre nel cestello.
Inserite l’alza-malati nel dispositivo di
trasporto.
Ora il letto è pronto per essere trasportato
e/o immagazzinato.
Screw on the second headboard.
Put the first half of the reclining surface
frame (back rest) onto the receptacle, so that
the head section points downward. The
mattress brackets point inward.
Now put the second half of the reclining
surface frame (foot section) on the longer
receptacle so that the foot section points down-
ward. The mattress brackets [15] point outward.
Safely secure the lifting rods of the drive motors
with cable ties or something similar.
Tighten the knurled screws.
Put the side rail beams into the basket.
Place the trapeze pole in the appropriate
socket.
The bed is now ready for transport or
storage.
Capitolo 4 Chapter 4 FUNZIONAMENTO OPERATIONS
AVVERTENZE SPECIALI DI
SICUREZZA PER IL SISTEMA DI
AZIONAMENTO
Durante le regolazioni fate attenzione che
nessun arto di pazienti, utilizzatori e altre
persone, specialmente di bambini, si trovi
sotto gli elementi regolabili o sotto al telaio
del letto per evitare che venga impigliato e
ferito.
Bloccate sempre i dispositivi di
regolazione elettrici di schienale e appoggia
gambe quando le sponde sono posizionate,
per proteggere il paziente da regolazioni
motorizzate indesiderate (Pericolo di
schiacciamento di arti durante la
regolazione di schienale e appoggia
gambe).
SPECIAL SAFETY INSTRUCTIONS
FOR THE DRIVE UNIT
Take care when adjusting the bed that no
limbs of patients, users or any other persons,
especially children, can be jammed or injured
by getting under the movable parts or the
bed frame.
For the safety of the patient, lock the hand
switch operation of adjustments to the back
and thigh rests to avoid unwanted adjust-
ments when the side rail beams are up.
(Danger of getting limbs trapped when
adjusting the back- and thigh rests).
Attenzione
Other manuals for ARMINIA III
1
Table of contents
Other burmeier Indoor Furnishing manuals

burmeier
burmeier ALLURA II User manual

burmeier
burmeier Inovia User manual

burmeier
burmeier ARMINIA III 24 Volt User manual

burmeier
burmeier ARMINIA III User manual

burmeier
burmeier ECONOMIC III User manual

burmeier
burmeier INOVIA II User manual

burmeier
burmeier FORTUNA II 15.0524.11 User manual

burmeier
burmeier Regia Care Bed User manual

burmeier
burmeier ALLURA II 100 User manual

burmeier
burmeier WESTFALIA-KLASSIK User manual