BUSH COMPANY DX27 User manual

DX27 Instructions

DX27 Clamshell Tent
The Bush Company www.thebushcompany.com
DX27 Instructions v2.0.docx Last Updated: 11/09/2023 11:49:00 AM
2
TABLE OF CONTENTS
1GETTING STARTED 3
1.1 Product Contents 3
1.2 What You Need for The Install 4
1.2.1 Tools Required 4
2INSTALL THE GAS STRUTS TO YOUR TENT 5
3TENT ELECTRICAL PACKAGE 7
4MOUNTING YOUR TENT 8
4.1 Posioning Your Tent 8
4.2 Installaon Opons 9
4.2.1 Opon 1 – Fitment Bracket Outside Extrusion 10
4.2.2 Opon 2 – Fitment Bracket Inside Extrusion 10
4.2.3 Opon 3 – Fitment Bracket Inside Extrusion 10
5CARE & MAINTENANCE 11
5.1 Canvas Care 11
5.1.1 Cleaning Canvas 11
5.1.2 Cleaning Mould 11
5.2 Condensaon Management 11
5.3 Maress Care 11
6WARRANTY 12

DX27 Clamshell Tent
The Bush Company www.thebushcompany.com
DX27 Instructions v2.0.docx Last Updated: 11/09/2023 11:49:00 AM
3
1Getting Started
Firstly, thank you for purchasing this DX27 Clamshell tent. The Bush Company have invested
significant resources in terms of time and effort to ensure that your DX27 Clamshell Tent
reaches the standards of quality, practicality and reliability that The Bush Company is renowned
for.
Before getting started with installation of your DX27 Clamshell tent please make sure that the
items listed below are present:
1.1 Product Contents
1 x DX27 Clamshell Tent
1 x Carpet Underlay
1 x Mattress with canvas cover
1 x Ladder with Canvas Bag
1 x Ladder Mounting Bracket mounted to rear of tent.
1 x Ladder Mounting Bracket inside ladder bag.
2 x Roof Organizers each with 3 pockets on inside roof of tent
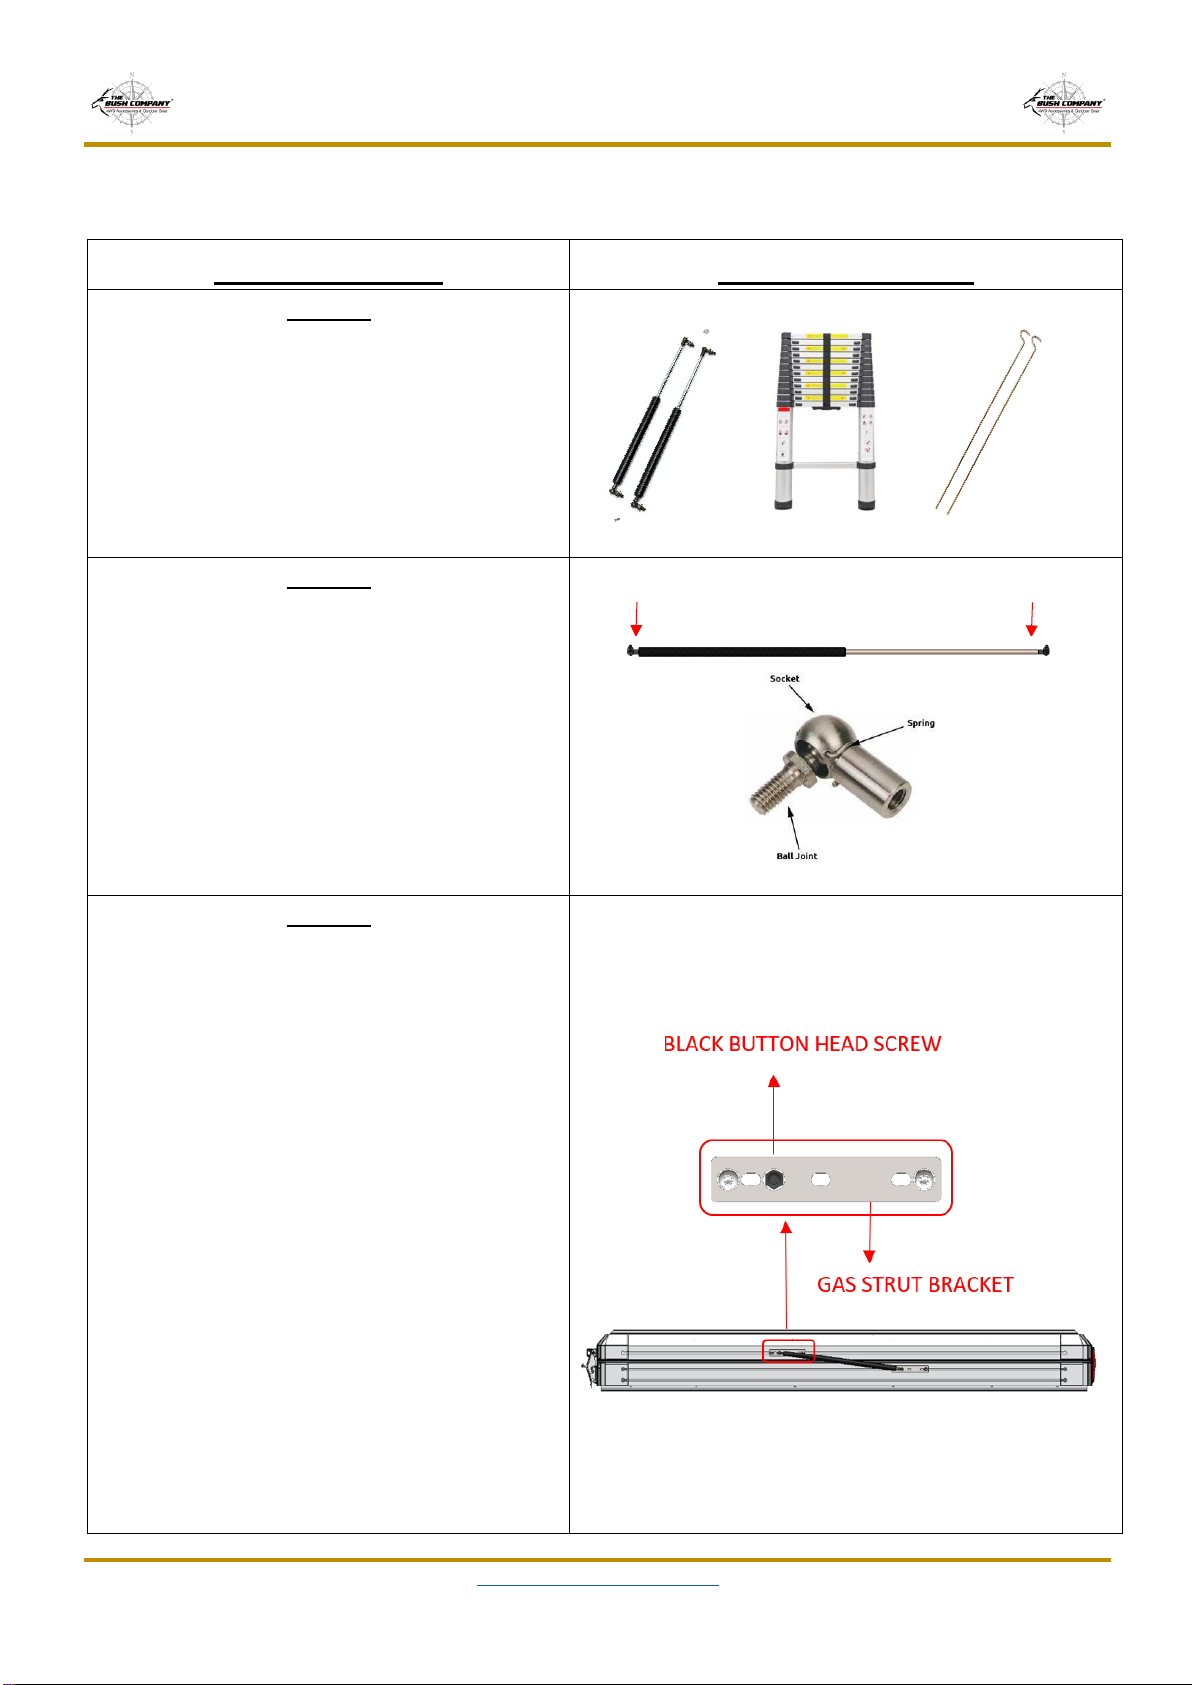
2 x Large Spring Rods
2 x Small Spring Rods
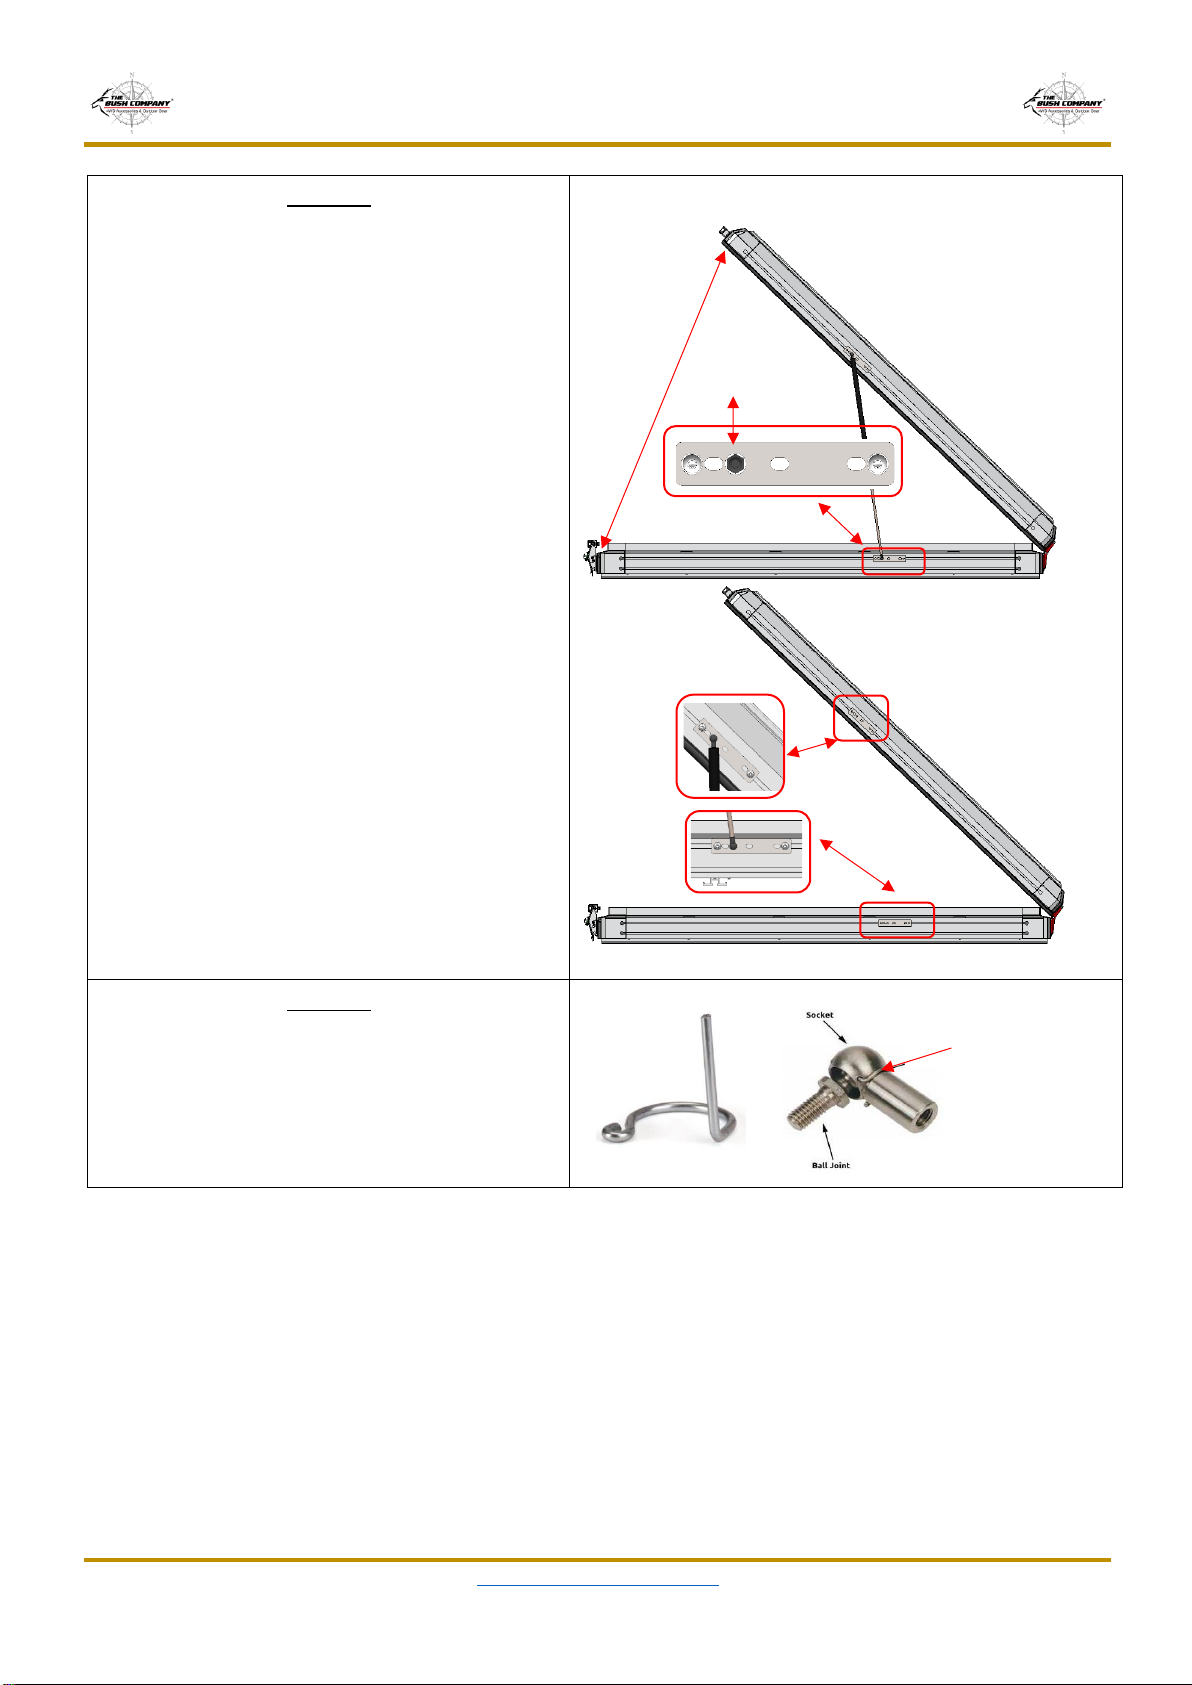
2 x K4149 Gas Lifting Struts, including:
4 x Male Ball with thread
4 x Female ball receivers
4 x Locking Pins
1 x LED Rechargeable Tri-Colour Light (Velcro’s to roof)
1 x Telescopic Pole – normally located at end of mattress.
1 x Universal Fitment Bracket Set - inside ladder bag
If any of these items are not present, please contact the Bush Company immediately by email
and we will send out the missing component. Please provide the serial number of your DX27
Clamshell Tent when communicating with The Bush Company, it is stamped to the gusset at the
front section of the roof of the tent.

DX27 Clamshell Tent
The Bush Company www.thebushcompany.com
DX27 Instructions v2.0.docx Last Updated: 11/09/2023 11:49:00 AM
4
1.2 What You Need for The Install
The Bush Company or one of our stockists can assemble and install your tent, but if you choose
to install the rooftop tent yourself, please make sure that you have done the due-diligence on
your intended install to ensure that it does not create any safety issues and ensure that you
follow standard safety precautions when undertaking the install.
You may find it useful to watch this Rooftop Tent Install Assembly video
(https://youtu.be/PxvEPyyEGd4) which provides detailed advice on unpacking and assembly of
our tents.
1.2.1 Tools Required
The following tools are recommended for the install.
•13mm & 14mm ratchet spanners
•Ratchet with 13mm socket
•Ratchet extension
•5mm Allen Key
•Anti-seize grease (e.g.: Lanotec Type A-Grease or Nickel Anti-Seize)
•Ratchet strap – to assist with compressing gas struts for fitment
Please be aware that the tent is a heavy item and cannot be moved by 1 person. When it
comes to raising the tent in the air for installation please ensure that you are using a rated lifting
device and that all relevant safety procedures are adhered to.

DX27 Clamshell Tent
The Bush Company www.thebushcompany.com
DX27 Instructions v2.0.docx Last Updated: 11/09/2023 11:49:00 AM
5
2Install the Gas Struts To Your Tent
INSTRUCTION
PRESENTATION
STEP 1:
•
OPEN THE TENT AND REMOVE THE GAS
STRUTS, LADDER AND SPRING RODS.
•
CLOSE THE TENT
.
STEP 2:
•
IDENTIFY THE TOP OF THE GAS STRUT.
•
REMOVE THE SPRING FROM THE BALL AND
SOCKET END POINTS
•
REMOVE THE BALL JOINTS FROM BOTH ENDS
OF THE GAS STRUTS
.
STEP 3:
•
APPLY THE FOLLOWING TO BOTH SIDES OF THE
TENT.
•
REMOVE THE BLACK BUTTON HEAD SCREW
FROM THE GAS STRUT BRACKET ON THE TOP
SHELL.
•
REMOVE THE EXISTING WASHER & PLACE IT
OVER THE TOP PART OF THE GAS STRUTS’
THREAD.
•
SCREW THE TOP PART OF THE GAS STRUT INTO
THE NUT, HELD IN PLACE BY THE BLACK
BUTTON HEAD SCREW. ENSURE TO PROPERLY
FASTEN THE BALL JOINT.
•
TOP
BOTTOM

DX27 Clamshell Tent
The Bush Company www.thebushcompany.com
DX27 Instructions v2.0.docx Last Updated: 11/09/2023 11:49:00 AM
6
STEP 4:
•
OPEN THE TOP SHELL UNTIL THE CANVAS HAS
REACHED ITS MAXIMUM TENSION.
•
USE THE PROVIDED TELESCOPIC POLE TO
MAINTAIN THE OPEN POSITION.
•
WITH THE GAS STRUT HANGING FROM THE TOP
SHELL, USE A RATCHET STRAP TO COMPRESS
THE GAS STRUT. THIS WILL ENABLE YOU TO
ALIGN THE THREAD ON THE BOTTOM OF THE
STRUT, WITH THE RELEVANT NUT POSSITION ON
THE BOTTOM SHELL.
•
REPEAT THE GAS STRUT FASTENING PROCESS
FOR THE BOTTOM SHELL.
STEP 5:
•
ENSURE TO SECURE ALL 4 BALL JOINTS ON THE
GAS STRUTS VIA THE SPRING LOCKING PIN.
B
L
A
C
K
S
C
R
E
W
PIN

DX27 Clamshell Tent
The Bush Company www.thebushcompany.com
DX27 Instructions v2.0.docx Last Updated: 11/09/2023 11:49:00 AM
7
3Tent Electrical Package
Your rooftop tent is supplied with:
•An internal rechargeable Tri-Colour LED light with USB charging cable.
•Electrical outlets on the inside of the tent which includes two sets of 12V CIG and USB
outlets connected in the circuit.
•A 20amp resettable fuse is connected to the electrical outlet system, the switch for this is
located on the rear of one of the power outlets.
•Anderson plug power connection point located under the front left-hand side of the tent.
Note: When running a permanent connection to this point a 20amp in-line fuse must be
used and the correct thickness electrical cable must be used to safely handle 25amp
over the distance as needed.
REAR
FRONT
ELECTRICAL
OUTLETS
INSIDE TENT
EXTERNAL
ANDERSON
PLUG

DX27 Clamshell Tent
The Bush Company www.thebushcompany.com
DX27 Instructions v2.0.docx Last Updated: 11/09/2023 11:49:00 AM
8
4Mounting Your Tent
Before installing your tent, you must ensure that your chosen mounting solution (load bar, roof
rack etc.) can support the weight of the tent in dynamic load conditions.
The Bush Company do not recommend mounting the tent without full support running
horizontally across the full width of the tent. If this is not done it will void the warranty on your
tent.
4.1 Positioning Your Tent
When deciding on the position of your rooftop tent there are some specifications which must be
considered:
•Unsupported Overhang – 500mm at the front and rear of the tent. IMPORTANT:
exceeding these limits will void the warranty on your tent.
•If only two load bars are used to support your tent (we recommend 3), they can be no
more that 125omm apart centre to centre.
•If the maximum distance between the front and rear support underneath the tent exceeds
1250mm then a third support MUST be used, with a minimum distance from the front and
rear supports of 500mm.
On a ute/pickup, due to the difference in flex between the cab and the tray/canopy, you must not
fix the tent across the two, as this will result in damage to the tent and also your vehicle.
Max Distance Apart 1250mm
Max Overhang 500mm
Max Overhang 500mm
Min. Distance Apart 500mm

DX27 Clamshell Tent
The Bush Company www.thebushcompany.com
DX27 Instructions v2.0.docx Last Updated: 11/09/2023 11:49:00 AM
9
4.2 Installation Options
On the underside of your tent there are two full length foot extrusion rails that are used to secure
your tent to your chosen platform or load bars. The Universal Fitment Bracket Set that comes
with your tent includes 6 L-Brackets that can be mounted (3 per side) to either the inside (Option
1) or outside (Option 2) edges of the mounting rails along with long bolts and 6 heavy-duty
plates that can be used to clamp around the bars on your mounting platform.
Depending on your intended mounting solution may only need to use the L-Brackets in the
mounting kit and not the heavy-duty plates to clamp around your bars/platform.
In some cases, you may not need to use the Universal Fitment Brackets and will be able to slide
your mounting bolts into the central channel of the mounting rail (Option 3) and then insert the
bolts through your load bars.
IMPORTANT: the supplied nuts and bolts are stainless steel, so it is essential to use an anti-
seize product on the treads of the bolts (e.g.: Lanotec Type A grease, Nickel Anti-Seize Grease).
We also recommend NOT to use power tools when tightening the bolts to reduce the risk of
seizing an over tightening.
Option 1
FITMENT BRACKETS
ON THE INSIDE OF
THE TENT FOOT
EXTRUSIONS
Option 2
FITMENT BRACKETS
ON THE OUTSIDE OF
THE TENT FOOT
EXTRUSIONS
Option 3
MOUNTING BOLTS
INSERT INTO CENTRAL
CHANNEL OF
THE TENT
FOOT EXTRUSIONS
TENT FOOT EXTRUSION

DX27 Clamshell Tent
The Bush Company www.thebushcompany.com
DX27 Instructions v2.0.docx Last Updated: 11/09/2023 11:49:00 AM
10
4.2.1 Option 1 – Fitment Bracket Outside Extrusion
4.2.2 Option 2 – Fitment Bracket Inside Extrusion
4.2.3 Option 3 – Fitment Bracket Inside Extrusion
FITMENT BRACKETS ON THE
OUTSIDE OF THE TENT
FOOT EXTRUSIONS
FITMENT BRACKETS ON THE
INSIDE OF THE TENT FOOT
EXTRUSIONS
MOUNTING BOLTS INSERT INTO
CENTRAL CHANNEL OF
THE TENT
FOOT EXTRUSIONS

DX27 Clamshell Tent
The Bush Company www.thebushcompany.com
DX27 Instructions v2.0.docx Last Updated: 11/09/2023 11:49:00 AM
11
5Care & Maintenance
Your rooftop tent has been manufactured to the highest standards and with only quality
components/materials. There are some basic care and maintenance procedures that we
recommend you follow to ensure that your tent provides you with the performance intended for
many years to come.
5.1 Canvas Care
We recommend that new tents are thoroughly wet down on the outside before first use.
This will ensure that your tent performs well in wet weather by allowing the poly/cotton
corespun thread and canvas to swell ensuring the take up of any potential leaks in the
stitching.
5.1.1 Cleaning Canvas
Should your canvas become excessively dirty or marked please follow these guidelines:
•Do not use soap or detergents on the canvas.
•Do not store the product if wet, allow drying first.
•To clean use a soft brush and cold water.
•Do not expose to petrol, oils or harsh chemicals.
5.1.2 Cleaning Mould
The canvas of your tent has been infused with anti mould and mildew elements during
manufacture, but in exceptional circumstances or if the tent is stored incorrectly and you are
unfortunate enough to find some mould inside your tent, please follow these guidelines:
•Allow mould to dry
•Remove surface mould off with stiff bristle brush
•Vacuum the area
•Treat area with Oil of Clove spray (diluted spray can be purchased or can be mixed using
a few drops of oil into a spray bottle of water)
5.2 Condensation Management
Condensation is a natural occurrence in cold weather. In confined areas like swags or tents the
body releases more moisture than the canvas can dispose of, especially if there are two or more
people in the tent.
To help to reduce condensation build up, we recommend keeping some of the windows open on
the tent to enable airflow on cold nights. If your tent has a vent above the rear entrance, then
we recommend that this is always kept open.
It is also possible to use moisture absorbing silica gel pouches inside your tent when travelling
and when storing your tent. These pouches are widely available, each pouch can absorb
approximately 40% of its own weight in moisture, and they can be reused by drying them out in
the sun or in an oven.
5.3 Mattress Care
Your mattress absorbs moisture through body sweat. When travelling for extended periods it is
a good idea to move your bedding back from the mattress during the day to allow the mattress
to breathe.

DX27 Clamshell Tent
The Bush Company www.thebushcompany.com
DX27 Instructions v2.0.docx Last Updated: 11/09/2023 11:49:00 AM
12
If you are not using your tent for an extended period (more than 10 days) we recommend
opening the tent regularly to allow it to air out, and possibly even remove the mattress and store
it separately until your next trip.
6Warranty
The Bush Company prides itself on the quality of manufacture of all its products.
In the unlikely event that you experience an issue with your rooftop tent please contact the
stockist or Bush Company outlet that you purchased your tent from to initiate the warranty
process.
If you are in Australia, please go to The Bush Company Australia website and visit the My
Account section to raise a warranty support ticket. Full details of how to do this can be found
here https://www.thebushcompany.com.au/support-warranty/
The full details of the warranty policy that applies to your tent is available on the product page of
The Bush Company website.
Table of contents
Popular Tent manuals by other brands

Clarke
Clarke CIG 1220 Assembly instructions

Kiwi Camping
Kiwi Camping Takahe 15 Pitching instructions

E-Z UP
E-Z UP Instant Shelter Endeavor owner's manual

Flying tent
Flying tent 000011 instruction manual

Anchor
Anchor Economy Tent International XP Series Assembly instructions

Inventini
Inventini STARTENT user manual