Bush Palace Eagle User manual

THE BUSH PALACE EAGLE
SETUP GUIDE
February 2017

Bush Palace !"#$% Setup Guide © 2017 Bush Palace Camper Hire
2
&'()*+,-(&*'.
Thanks for hiring the Bush Palace Eagle. It is supplied with everything you need to take it away and
enjoy your holiday. The setup varies slightly depending on whether or not you have access to mains
power and water, and whether or not you require the bed end privacy screens and awning.
These instructions assume that you have never used a wind up style camper before; if you have there
may still be some steps that are unique to this RV. Please follow the instructions carefully to minimise
the setup time and to ensure that the camper remains in excellent condition.
The instructions may appear daunting, but in practice they are easy to follow and you will have the
camper set up in no time!
/%.012%.30"3.30%.4560.7"$"8%.!"#$%.0"6.%9%:;30<=#.30"3.;15.=%%>?.<@.30%:%.<6."=;30<=#.30"3.;15.
":%.=13.0"22;.A<30.A%.A15$>."6B.30"3.;15.81=3"83.56."=>.#<9%.56.30%.1221:35=<3;.31.@<C.<3.@1:.
;15D..&@.;15.0"9%."=;.<665%6.;15.8"=.81=3"83.56.1=E.
F"30:;=.G.HIJK.LMNIHK.
+"9<>.G.HIHO.ONHPNM.
!Q"<$.0%$2RS5602"$"8%D81QD"5.
/%.A15$>.$19%.31.0%":.;15:.@%%>S"8BD..7$%"6%.3"B%.".Q1Q%=3.31.$%"9%.".81QQ%=3.1=.-"Q2$<@;T.
"=>.6%=>.56.".20131.1@.A0%:%.;15:.">9%=35:%6.0"9%.3"B%=.;15U.
.
V"22;.8"Q2<=#T.
.
F"30:;=.W.+"9<>.

Bush Palace !"#$% Setup Guide © 2017 Bush Palace Camper Hire
3
(X4Y!.*Z.-*'(!'([.
&'()*+,-(&*'.DDDDDDDDDDDDDDDDDDDDDDDDDDDDDDDDDDDDDDDDDDDDDDDDDDDDDDDDDDDDDDDDDDDDDDDDDDDDDDDDDDDDDDDDDDDDDDDDDDDDDDDDDDDDDDDDDDDDDDDDDDDDDDDDDDDDDDDDDDDDDDDDDDDD.P
(X4Y!.*Z.-*'(!'([.DDDDDDDDDDDDDDDDDDDDDDDDDDDDDDDDDDDDDDDDDDDDDDDDDDDDDDDDDDDDDDDDDDDDDDDDDDDDDDDDDDDDDDDDDDDDDDDDDDDDDDDDDDDDDDDDDDDDDDDDDDDDDDDDDDDDDDDDD.J
4!Z*)!.\*,.[!(.*ZZ.DDDDDDDDDDDDDDDDDDDDDDDDDDDDDDDDDDDDDDDDDDDDDDDDDDDDDDDDDDDDDDDDDDDDDDDDDDDDDDDDDDDDDDDDDDDDDDDDDDDDDDDDDDDDDDDDDDDDDDDDDDDDDDDDDDDDDDDD.I
[!((&'].,7.DDDDDDDDDDDDDDDDDDDDDDDDDDDDDDDDDDDDDDDDDDDDDDDDDDDDDDDDDDDDDDDDDDDDDDDDDDDDDDDDDDDDDDDDDDDDDDDDDDDDDDDDDDDDDDDDDDDDDDDDDDDDDDDDDDDDDDDDDDDDDDDDDDDDDDDDDD.K
ARRIVAL AT SITE ................................................................................................................................................... 5
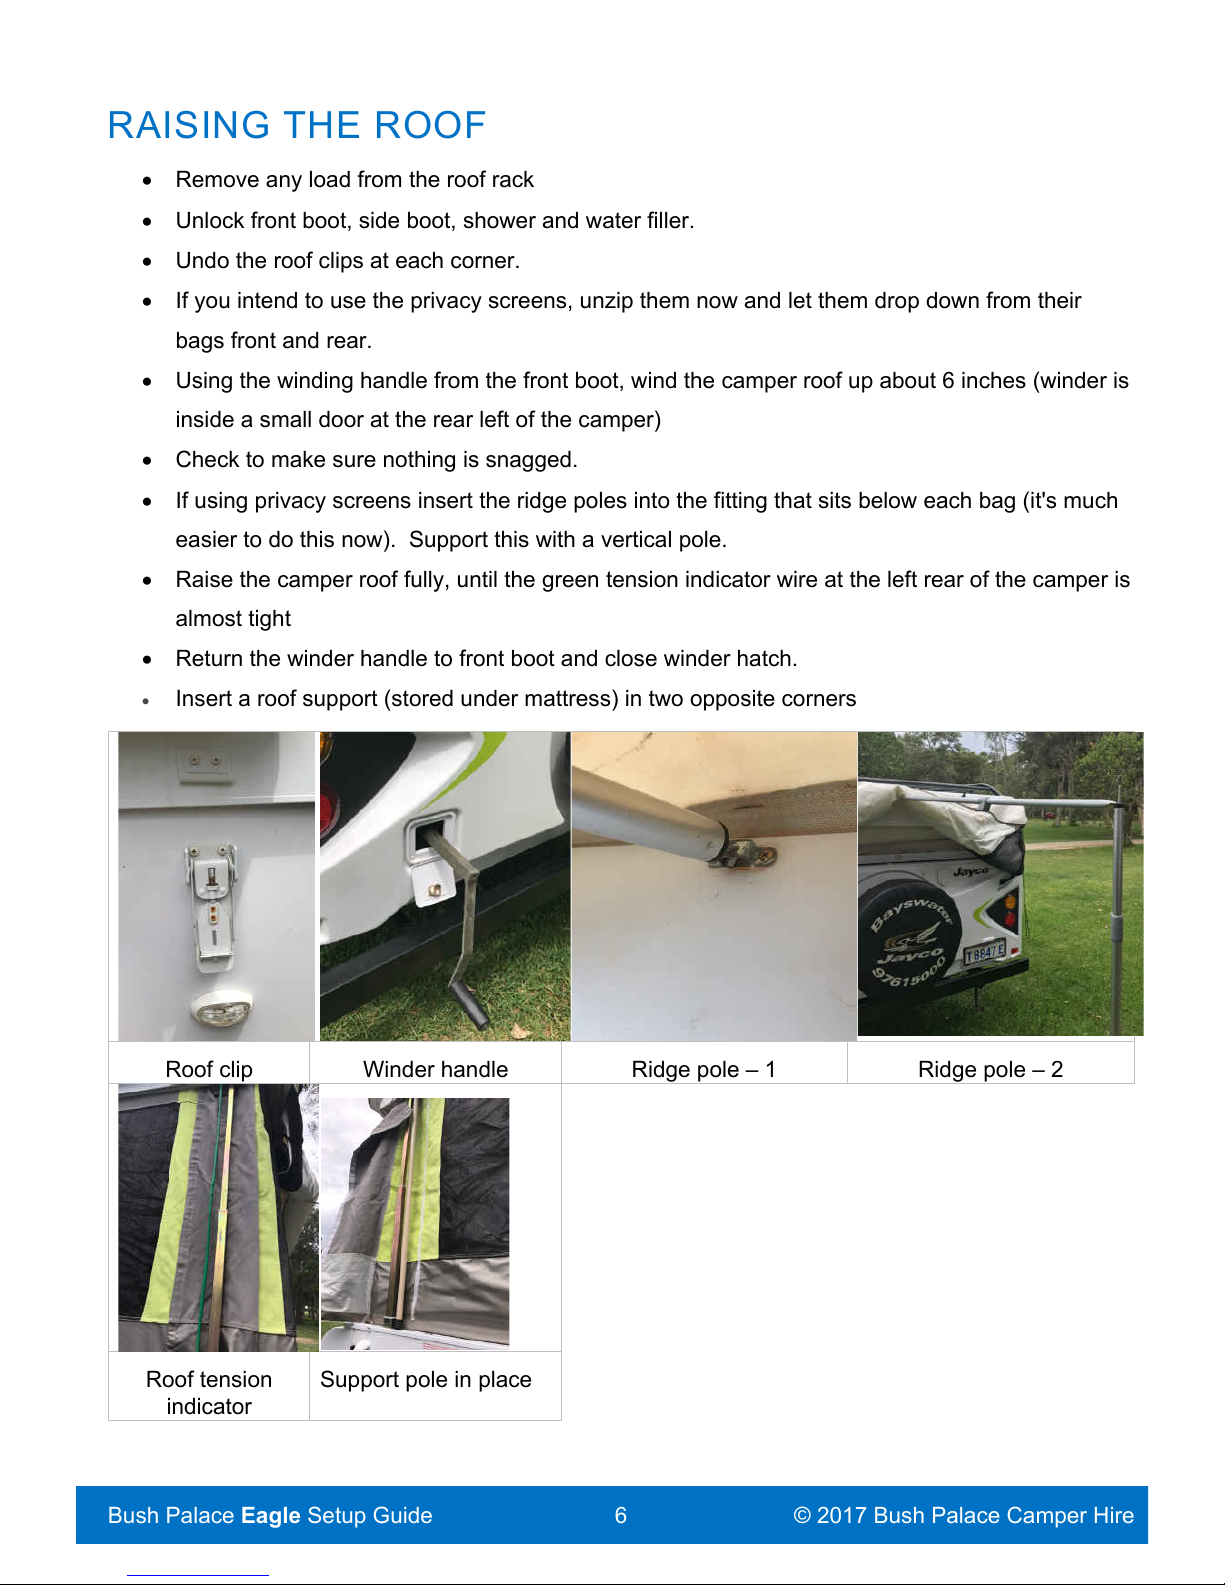
RAISING THE ROOF ............................................................................................................................................... 6
SETTING UP THE BEDS .......................................................................................................................................... 7
FITTING THE DOOR ............................................................................................................................................... 8
MISCELLANEOUS SETUP ....................................................................................................................................... 8
IF MAINS WATER AND POWER ARE AVAILABLE…. .................................................................................................... 9
Hot Water (240v Electric) ............................................................................................................................... 9
IF YOU ARE FREE CAMPING…. ............................................................................................................................. 10
Hot Water (Gas) ........................................................................................................................................... 10
TV/DVD ............................................................................................................................................................ 11
AWNING ............................................................................................................................................................. 12
MISCELLANEOUS ................................................................................................................................................ 13
Barbecue ...................................................................................................................................................... 13
SIT DOWN & ENJOY! ............................................................................................................................................ 13
7X-F&'].,7.DDDDDDDDDDDDDDDDDDDDDDDDDDDDDDDDDDDDDDDDDDDDDDDDDDDDDDDDDDDDDDDDDDDDDDDDDDDDDDDDDDDDDDDDDDDDDDDDDDDDDDDDDDDDDDDDDDDDDDDDDDDDDDDDDDDDDDDDDDDDDDDDDDDDDDD.MI
INITIAL STEPS ..................................................................................................................................................... 14
AWNING ............................................................................................................................................................. 14
POLES & GUY ROPES .......................................................................................................................................... 15
TV ANTENNA ...................................................................................................................................................... 15
DOOR ................................................................................................................................................................ 15
INTERIOR ........................................................................................................................................................... 15
BEDS ................................................................................................................................................................. 16
ROOF ................................................................................................................................................................. 16
HOOKING UP ...................................................................................................................................................... 17
Z&'XY.-V!-F.DDDDDDDDDDDDDDDDDDDDDDDDDDDDDDDDDDDDDDDDDDDDDDDDDDDDDDDDDDDDDDDDDDDDDDDDDDDDDDDDDDDDDDDDDDDDDDDDDDDDDDDDDDDDDDDDDDDDDDDDDDDDDDDDDDDDDDDDDDDDDDDDDDDDD.MN
&'^!'(*)\.DDDDDDDDDDDDDDDDDDDDDDDDDDDDDDDDDDDDDDDDDDDDDDDDDDDDDDDDDDDDDDDDDDDDDDDDDDDDDDDDDDDDDDDDDDDDDDDDDDDDDDDDDDDDDDDDDDDDDDDDDDDDDDDDDDDDDDDDDDDDDDDDDDDDDDDDD.ML
&+!'(&Z&-X(&*'.7V*(*[.DDDDDDDDDDDDDDDDDDDDDDDDDDDDDDDDDDDDDDDDDDDDDDDDDDDDDDDDDDDDDDDDDDDDDDDDDDDDDDDDDDDDDDDDDDDDDDDDDDDDDDDDDDDDDDDDDDDDDDDDDDDDDDDDD.PJ
*7(&*'XY.&(!_[.DDDDDDDDDDDDDDDDDDDDDDDDDDDDDDDDDDDDDDDDDDDDDDDDDDDDDDDDDDDDDDDDDDDDDDDDDDDDDDDDDDDDDDDDDDDDDDDDDDDDDDDDDDDDDDDDDDDDDDDDDDDDDDDDDDDDDDDDDDDDDDD.PN
SATELLITE DISH ................................................................................................................................................. 28

Bush Palace !"#$% Setup Guide © 2017 Bush Palace Camper Hire
4
Unpack ......................................................................................................................................................... 28
Pack away .................................................................................................................................................... 29
INFLATABLE KAYAKS ........................................................................................................................................... 30
Setup ............................................................................................................................................................ 30
Packing away ............................................................................................................................................... 30
GAZEBO ............................................................................................................................................................. 31
TOILET .............................................................................................................. !))*)U.4**F_X)F.'*(.+!Z&'!+D
SOLAR PANELS ................................................................................................................................................... 31
4!Z*)!.\*,.[!(.*ZZ.
• Make sure that all 4 corner jacks are raised.
• Make sure that the hitch is connected properly and the latch is closed on the ball.
• Check chains and make sure that the shackles are done up. It is usually best to cross the
chains underneath the drawbar.
• Connect the 12 pin socket to car, using the portable brake controller if required.
• Connect Anderson plug to vehicle if available
The camper can not be towed unless the electric brakes are connected to your vehicle
• Make sure that the trailer handbrake is off
• check all lights for proper operation
WATER
If you intend to free camp, please note that the camper is supplied with the water tanks empty to keep
the towing weight down. Remember to fill the tanks with potable water when you are close to your
destination, using the drinking water quality hose provided.
.

Bush Palace !"#$% Setup Guide © 2017 Bush Palace Camper Hire
5
[!((&'].,7.
ARRIVAL AT SITE
• Park the camper on a level area, making sure to leave enough room (~2m) at rear for the bed.
• If required use a levelling ramp to level the camper left to right (a bubble level is in the side boot;
place this on the A-frame))
• Once level left to right, engage the handbrake, undo the chains and electrical connection.
• Place a chock against each wheel
• Put the jockey wheel into its bracket and tighten
• Disengage the hitch
• Raise the camper with the jockey wheel
• Move the vehicle away from the towball
• Level the camper front to back using the jockey wheel to adjust the height, again using the
bubble level.
• Drop each corner jack by pulling the red handle
• wind them down using the long winder handle in the front boot.
• Replace bubble level to side boot
The corner jacks should not take the weight of the camper and so just need to be down enough to be
stable.
The fridge will not work well if the camper is not level
Corner Jack

Bush Palace !"#$% Setup Guide © 2017 Bush Palace Camper Hire
6
RAISING THE ROOF
• Remove any load from the roof rack
• Unlock front boot, side boot, shower and water filler.
• Undo the roof clips at each corner.
• If you intend to use the privacy screens, unzip them now and let them drop down from their
bags front and rear.
• Using the winding handle from the front boot, wind the camper roof up about 6 inches (winder is
inside a small door at the rear left of the camper)
• Check to make sure nothing is snagged.
• If using privacy screens insert the ridge poles into the fitting that sits below each bag (it's much
easier to do this now). Support this with a vertical pole.
• Raise the camper roof fully, until the green tension indicator wire at the left rear of the camper is
almost tight
• Return the winder handle to front boot and close winder hatch.
• Insert a roof support (stored under mattress) in two opposite corners
Roof clip
Winder handle
Ridge pole – 1
Ridge pole – 2
Roof tension
indicator
Support pole in place

Bush Palace !"#$% Setup Guide © 2017 Bush Palace Camper Hire
7
SETTING UP THE BEDS
• Pull the rear bed out fully
• Using the support poles stored under mattress, support the bed end by placing one end of each
pole into the bracket on the bumper and the other into the bracket under the bed. You may
need to lift the bed slightly as you do this
• Close front boot and repeat for front bed
• At each corner cover the riser arms with canvas flap and Velcro closed
• Pull step out from under door
• Unlock the door and enter the camper
• Remove BBQ and stand (they are only stored here for travel)
• Turn battery switch on
• Plug in roof light connector (behind sink)
• Raise the wardrobe and lock into place using the bolt inside
• Using the crook shaped pole (under the mattress), insert into plastic fitting in the rear bed hoop
and raise the roof of the bed. Insert the other end into the bracket on roof and close Velcro flap.
• Do the same for front bed
• Pull the corners of the canvas down over the bed ends and secure with velcro
Velcro to bed base
Front Supports
Rear Supports
Roof light connector
Wardrobe in place
Bed roof in place
Battery switch

Bush Palace !"#$% Setup Guide © 2017 Bush Palace Camper Hire
8
FITTING THE DOOR
• With the door closed, lower the door top section from the roof and place it onto the locating pins
on next to the lower door.
• Lock the top of the door in place using the two wing nuts at the hinge, then clip the two door
sections together using the latch at the top of the lower section.
• Unclip the door from the door frame.
• Secure the camper walls to door frame using Velcro inside & out
MISCELLANEOUS SETUP
• Using the poles and guy ropes from the side boot set up the privacy screens if used, securing
the bottom of the screen to the clips on the poles and on the camper. The centre pole connects
to the ridge pole.
• Connect the black 25mm silage hose to the barbed connector under the camper in front of the
r/h wheel (if you can't find it run the tap and look for the water coming out!)
• Fit the 12v light/fans to the bed roof support pole and plug into socket on main light
• Remove microwave from cupboard and place on bench. Note that microwave is 240v only.
Door stored in roof
Upper door frame connected to lugs on
camper body
Butterfly clips at top of door
Lower & upper door clip
Butterfly clip on door frame
Lower & upper door clip

Bush Palace !"#$% Setup Guide © 2017 Bush Palace Camper Hire
9
IF MAINS WATER AND POWER ARE AVAILABLE….
For example at a caravan park:
• connect the power to the socket at the rear of the camper using the 15a cable provided (do not
use any other cable).
• Unlock the small black door at the rear of the right side of the camper and connect the water
hose.
• Set the fridge to run on 240v (plug symbol)
Hot Water (240v Electric)
• Inside camper, flick tap to hot and ensure water is flowing
• Outside camper, open the hot water cover and turn switch to ON (do not use the switch inside
the camper).
• Close hot water door
• HWS takes ~20 minutes to heat water
If you are setting up at someone’s house or property you will need to use the 10amp to 15amp
connector supplied to allow you to plug into 240v power.
240v connection
Mains water connection
240v hot water
switch
Fridge 240V setting

Bush Palace !"#$% Setup Guide © 2017 Bush Palace Camper Hire
10
IF YOU ARE FREE CAMPING….
I.e. there is no mains water/240v power available. In this case you are reliant on the 2 x 82l water
tanks, the 2 x 100a/h batteries, and the 2 x 9Kg gas cylinders.
• Make sure water tanks are full. They are filled via the fillers inside the small black door at the
rear of the right side of the camper.
• Switch on the water pump using the switch on the control panel (located in the club lounge
area). The control panel also shows how much water is remaining and battery status.
• Turn on the gas bottles in the front boot, making sure to push down on the gas fuse.
• Set the fridge to gas (gas symbol) and ignite by holding down button a pressing igniter until
lit. The red needle on the small green and white gauge will move to the green area once the
fridge is lit.
Hot Water (Gas)
• Outside camper, open the hot water cover and make sure switch is set to OFF
• Inside camper, ensure battery switch and water pump are on
• flick tap to hot and ensure water is flowing
• Turn on the white ‘Water Heater’ switch inside the camper. A red light will ignite and remain lit
until the hot water burner has ignited. Turn switch off when not in use.
• Do not light the hot water with no water in the tanks.
• HWS takes ~20 minutes to heat water
Water pump switch (r/h
button on control panel)
Gas hot water switch &
battery switch
Fridge gas setting
Lighting the fridge
Fridge indicator when
gas is lit

Bush Palace !"#$% Setup Guide © 2017 Bush Palace Camper Hire
11
TV/DVD
The TV is stored in the void created by folding the wardrobe down. Remove before raising wardrobe,
then place on top of wardrobe once locked in place.
The antenna is stored in a tube in the side boot. To erect:
• join the sections securely together
• Raise the top arms to be at the ‘4’ and ‘8’ o’clock positions
• Insert the bottom of the antenna into the mount on the right front of the camper
• Clip the top of the antenna into the roof lip
• Plug the coax cable into the socket.
You may need to turn the antenna or adjust the angle of the horizontal arms to get the best picture.
Please see the leaflet in the folder for more details
Antenna base
Antenna setup
If you are at a caravan park that provides reticulated TV signals simply plug their cable into the
external aerial socket.

Bush Palace !"#$% Setup Guide © 2017 Bush Palace Camper Hire
12
AWNING
The awning provides shade and somewhere comfortable to sit outside, but you don’t have to set it
up. The awning legs can either be pegged into the ground or secured in the brackets on the side of
the camper. Pegging them to the ground is the most secure method as it puts less strain on the
awning legs. Connecting to the wall is fine for a short stay.
Note that the awning is not made to withstand moderate or high wind, and should be wound in
when you are away from the camper.
If you require the awning, simply:
• Insert the winder handle into the loop at the rear end of the awning and wind out.
• Pull the legs from the awning barrel and extend them.
• To secure them into the brackets on the camper wall lift the top of the bracket, place the awning
foot in, then close the bracket.
• Otherwise simply 2%#.30%Q.<=31.30%.#:15=> using the pins provided (30<6.<6.30%.2:%@%::%>.
123<1=)
• Adjust the awning arms to appropriate height and tighten the awning arm nuts
Awning winder
Awning leg extended
The awning is not designed for use in moderate or high wind. An awning tie down kit is included,
however if in doubt retract the awning.

Bush Palace !"#$% Setup Guide © 2017 Bush Palace Camper Hire
13
MISCELLANEOUS
Barbecue
• Fit the barbecue into its stand (instructions are in the folder)
• Turn on gas, making sure to push gas fuse (instruction for the gas fuse are in the folder also)
• Connect barbecue to the camper using the bayonet fitting under the front LHS (push bayonet
into fitting and turn to secure)
It is advisable to place aluminium foil around the bowl of the barbecue to ensure that it is returned
clean
Gas bayonet with BBQ
hose connected
SIT DOWN & ENJOY!
That’s it! All that’s left to do is put out the awning mat, set up the table and chairs, and relax. Enjoy
your holiday!
.

Bush Palace !"#$% Setup Guide © 2017 Bush Palace Camper Hire
14
7X-F&'].,7.
Packing up is almost a reverse of the setting up process but there are a few differences - the sequence
is often important.
Whilst the instructions may say to return something to the front or side boot, it may be easier to lay
everything neatly on the ground as you take things down and then return them to their appropriate
storage in one go.
INITIAL STEPS
• Turn off water pump
• Turn off battery switch
• Turn off hot water (inside camper if using gas, or from the hot water unit outside if using 240v)
• Turn fridge off
• Return all cutlery, plates, utensils etc
• Remove bed end light/fans
• Fold wardrobe down and place TV in void (with a cushion)
• Close roof hatch, but make sure that internal blinds are open
• Zip all windows closed
• Unplug roof light connector behind sink
• Place microwave in cupboard
• Remove bed roof hoops and place under mattress (front & rear)
• Turn off gas bottles in front boot.
• Disconnect all cables & hoses (including the sullage hose), place in storage bags and return to
front boot
AWNING
• Remove awning legs from wall or unpeg from ground and insert into awning barrel, making sure
that they are completely in and sit flush within the barrel.
• Wind the awning in until it is fully closed.

Bush Palace !"#$% Setup Guide © 2017 Bush Palace Camper Hire
15
POLES & GUY ROPES
• Remove guy ropes and poles from privacy screens and put in side boot
TV ANTENNA
• Dismount and dismantle the TV antenna, put it back into its tube and return to side boot
DOOR
• Close door from inside
• Undo Velcro securing camper walls to door frame, inside & out
• Unclip connector securing door sections together
• Clip upper door section to door frame using butterfly clips
• Unclip butterfly clips at top of door
• Lift upper door section and secure to roof, making sure it is flat against ceiling
INTERIOR
• Now is a great time to sweep the camper!
• Place BBQ and stand inside camper at rear (use the blue rubber mats to protect floor)
• Close door
• Fold steps away
BBQ & stand storage position

Bush Palace !"#$% Setup Guide © 2017 Bush Palace Camper Hire
16
BEDS
• Undo Velcro securing bed walls to bed base
• Fold walls onto bed as flat as possible, making sure that no canvas hangs over the end of the
bed
• Remove support poles from underneath and place alongside mattress
• Undo Velcro flaps covering riser arms
• Push bed in until it is inside the frame of the camper
• Repeat for rear bed
ROOF
• Remove roof supports and place under mattress
• Using the winder handle, Wind the camper down until it is about 30cm from being down
• Walk around the camper and make sure that no canvas is sticking out, push it back in if needed.
• Lower until 10cm and repeat canvas check
• Lower completely, making sure that the top edge of the door sits inside the edge of the camper
roof.
• Return winder handle to front boot
• Clip down each corner of the roof
• Remove ridge poles from privacy screens if used
• Roll privacy screen back into bag, secure by tying them with the attached tape and then zip the
bags closed.
• Secure the clips on the bag awnings.
• Replace shower and close & lock door
• Close & lock water filler door
Correct position of door when roof
closed

Bush Palace !"#$% Setup Guide © 2017 Bush Palace Camper Hire
17
HOOKING UP
• Raise front & rear legs with winder and fold backwards
• Hook vehicle up to tow hitch
• Raise jockey wheel, remove and place in front boot (or vehicle boot).
• Connect chains and electrical connection to vehicle
• Release camper handbrake
• Remove chocks
• Move camper to release levelling ramps if used
• Return all chocks, ramps, winders & handles to front/side boot
That's it packed away!
.

Bush Palace !"#$% Setup Guide © 2017 Bush Palace Camper Hire
18
Z&'XY.-V!-F.
• Camper, fridge, stove, BBQ, cutlery, plates etc cleaned & put away
• All winders and handles returned to front boot
• All cables and hoses have been neatly put in storage bags and returned to front boot
• All poles, pegs and guy ropes have been put in their bags and returned to side boot
• Support poles have been put in side boot
• Chocks & Ramps removed and put away
• Roof secured with no canvas trapped
• Gas off
• All chairs, table, annex mat etc cleaned & put away
• All doors and hatches closed and locked
It should look something like this -
.

Bush Palace !"#$% Setup Guide © 2017 Bush Palace Camper Hire
19
&'^!'(*)\.
This is a comprehensive listing of the items supplied with the camper. The location will help you to find
things, and may also be useful when packing away – everything has a home!
&3%Q.
`3;.
[31:"#%.Y18"3<1=.
-"=.12%=%:.
1
2nd drawer
-53$%:;.6%36.
6
2nd drawer
!##.@$<2.
1
2nd drawer
Y">$%.
1
2nd drawer
Y":#%.B=<9%6.
3
2nd drawer
7"63:;.S:560.
1
2nd drawer
713"31.Q"60%:.
1
2nd drawer
713"31.2%%$%:.
1
2nd drawer
[8<661:6.
1
2nd drawer
(1=#6.
1
2nd drawer
/11>%=.6211=.
1
2nd drawer
[31=%.>%@$%831:.
1
A-frame
`5%%=.6<a%.Q"33:%66.2:13%831:.
1
Bed
`5%%=.6<a%.60%%3.
1
Bed
`5%%=.6<a%.Q"33:%66.3122%:.
1
Bed
+15S$%.Q"33:%66.2:13%831:.
1
Bed
+15S$%.60%%3.
1
Bed
44`.63"=>.
1
Camper floor
44`.A<30.PQ.63"<=$%66.S";1=%3.016%.
1
Camper floor
-$%"=<=#.2:1>5836.
~
Cupboard under drawers
Z$;.62:";.
1
Cupboard under drawers
_16b5<31.:%2%$$%=3.
1
Cupboard under drawers
*$<9%.1<$.62:";.
1
Cupboard under drawers
7"2%:.31A%$6.
1
Cupboard under drawers
["$3.W.2%22%:.
1
Cupboard under drawers
[5=S$18B.
1
Cupboard under drawers

Bush Palace !"#$% Setup Guide © 2017 Bush Palace Camper Hire
20
&3%Q.
`3;.
[31:"#%.Y18"3<1=.
+^+c6.
~20
Dinette drawer
]"Q%6.
2
Dinette drawer
V"=>.31A%$.
1
Dinette drawer
_16b5<31.81<$6.
1
Dinette drawer
71A%:.S1":>.
1
Dinette drawer
(%".(1A%$6.
2
Dinette drawer
MP9.$<#03d@"=.
2
Dinette void
4"33%:;.$"=3%:=.
1
Dinette void
LB#.#"6.8;$<=>%:6.
2
Front boot
XA=<=#.@$11:.Q"3.
1
Front boot
-"Q2<=#.80"<:6.
4
Front boot
+:<=B<=#.b5"$<3;.A"3%:.016%.<=.S"#T.Ad.@<33<=#6.
1
Front boot
]"6.@56%.
2
Front boot
e"8B.
1
Front boot
e"8B.0"=>$%.
1
Front boot
e18B%;.A0%%$.
1
Front boot
Y%#.0"=>$%.
1
Front boot
71A%:.$%">.<=.S"#.
1
Front boot
[01A%:.3%=3.
1
Front boot
[5$$"#%.016%.<=.S"#.
1
Front boot
("S$%.
1
Front boot
/0%%$.S:"8%.
1
Front boot
/<=><=#.0"=>$%.
1
Front boot
PP.$<3:%.2$"63<8.A"3%:.f%::;.
1
Front jerry holder
44`.53%=6<$6.
3
In BBQ
V132$"3%.g@1:.56%.<=.44`h.
1
In BBQ
!$%83:<8.B%33$%.
1
Large cupboard
]"6.B%33$%.g81$$"26<S$%h.
1
Large cupboard
713.
1
Large cupboard
["=>A<80.Q"B%:.
1
Large cupboard
[<$<81=%.Q"3.
1
Large cupboard
Table of contents
Other Bush Palace Utility Vehicle manuals