ONE YEAR LIMITED WARRANTY
Your Bushnell® product is warranted to be free of defects in materials and workmanship for one year after the date of
purchase. In the event of a defect under this warranty, we will, at our option, repair or replace the product, provided
that you return the product postage prepaid. This warranty does not cover damages caused by misuse, improper
handling, installation, or maintenance provided by someone other than a Bushnell Authorized Service Department.
Any return made under this warranty must be accompanied by the items listed below:
1. A check/money order in the amount of $10.00 to cover the cost of postage and handling
2. Name and address for product return
3. An explanation of the defect
4. Proof of Date Purchased
5. Product should be well packed in a sturdy outside shipping carton, to prevent damage in transit, with return
postage prepaid to the address listed below:
IN U.S.A. Send To: IN CANADA Send To:
Bushnell Outdoor Products Bushnell Outdoor Products
Attn.: Repairs Attn.: Repairs
9200 Cody 140 Great Gulf Drive, Unit B
Overland Park, Kansas 66214 Vaughan, Ontario L4K 5W1
For products purchased outside the United States or Canada please contact your local dealer for applicable warranty
information. In Europe you may also contact Bushnell at:
Bushnell Germany GmbH
European Service Centre
Mathias-Brüggen-Str. 80
D-50827 Köln
GERMANY
Tel: +49 221 995568-0
Fax: +49 221 995568-20
This warranty gives you specic legal rights.
You may have other rights which vary from country to country.
©2014 Bushnell Outdoor Products
GARANTIE LIMITEE D’UN AN
Votre produit Bushnell® est garanti exempt de défauts de matériaux et de fabrication pendant une année après
la date d’achat. En cas de défaut durant la période de garantie, nous nous réservons la possibilité de réparer, ou
d’échanger le produit, sous condition que vous retourniez le produit en port payé. Cette garantie ne couvre pas
les dommages causés par une mauvaise utilisation, une mauvaise manipulation, une mauvaise installation, ou un
entretien incorrect eectué par une personne autre que le Centre de Réparation agréé par Bushnell.
Tout retour eectué dans le cadre de la présente garantie doit être accompagné des éléments ci-dessous :
1. Un chèque / mandat de 10,00 $ pour couvrir les frais de port et de manutention
2. Nom et adresse à laquelle le produit devra être renvoyé
3. Une explication de la défaillance constatée
4. Preuve de la date d’achat
5. Le produit devra être emballé soigneusement dans un carton d’expédition solide pour éviter d’être
endommagé pendant le transport et avec port payé à l’adresse indiquée ci-dessous :
Aux USA Envoyer à : AU CANADA Envoyer à :
Bushnell Outdoor Products Bushnell Outdoor Products
Attn.: Repairs Attn.: Repairs
9200 Cody 140 Great Gulf Drive, Unit B
Overland Park, Kansas 66214 Vaughan, Ontario L4K 5W1
Pour les produits achetés hors des États-Unis ou du Canada veuillez contacter votre revendeur local pour les
informations applicables de la garantie. En Europe vous pouvez également contacter Bushnell à :
BUSHNELL Outdoor Products Gmbh
European Service Centre
Mathias-Brüggen-Straße 80
D-50827 Köln
GERMANY
Tél : +49 (0) 221 995 568 0
Fax : +49 (0) 221 995 568 20
Cette garantie vous ouvre des droits spéciques.
Vos droits peuvent varier d’un pays à l’autre.
©2014 Bushnell Outdoor Products
GARANTÍA LIMITADA DE UN AñO
Su producto Bushnell® está garantizado contra defectos de materiales y fabricación durante un año después de
la fecha de compra. En caso de un defecto bajo la garantía, nosotros, según nuestra elección, repararemos o
reemplazaremos el producto, dando por sentado que usted devuelve el producto a portes pagados. Esta garantía no
cubre daños causados por el mal uso, el manejo inapropiado, la instalación, o el mantenimiento llevado a cabo por
alguien diferente de un Servicio Autorizado de Bushnell.
Cualquier devolución hecha bajo esta garantía debe acompañarse con los siguientes artículos:
1. Un cheque u orden de pago por valor de 10 dólares para cubrir el coste del envío y manipulación
2. Nombre y dirección para la devolución del producto
3. Una explicación del defecto
4. Prueba de Fecha de Compra
5. El producto debe estar bien empaquetado en una caja de cartón resistente para evitar que se dañe en el
tránsito, a portes pagados a la dirección siguiente:
EN U.S.A. Envíelo a: EN CANADÁ Envíelo a:
Bushnell Outdoor Products Bushnell Outdoor Products
Attn.: Repairs Attn.: Repairs
9200 Cody 140 Great Gulf Drive, Unit B
Overland Park, Kansas 66214 Vaughan, Ontario L4K 5W1
Para los productos comprados fuera de los Estados Unidos o Canadá por favor, contacte con su vendedor habitual
para información sobre la garantía válida. En Europa puede contactar también con:
BUSHNELL Outdoor Products Gmbh
European Service Centre
Mathias-Brüggen-Straße 80
D-50827 Köln
GERMANY
Tel: +49 (0) 221 995 568 0
Fax: +49 (0) 221 995 568 20
Esta garantía le da derechos legales especícos.
Usted podría tener otros derechos que varían de país a país.
©2014 Bushnell Outdoor Products
GEWÄHRLEISTUNGSFRIST EIN JAHR
Auf das von Ihnen erworbene Produkt der Firma Bushnell® gewähren wir 1 Jahr Garantie auf Materialmängel und
Verarbeitung, gültig ab dem Kaufdatum. Bei allen Schäden unter dieser Garantie behalten wir uns nach eigenem
Ermessen vor, das Produkt entweder zu reparieren oder zu ersetzen, vorausgesetzt, dass Sie das Produkt frei Haus an
uns senden. Diese Garantie deckt keine Schäden ab, die durch Zweckentfremdung, falsche Behandlung, Installation
oder Instandhaltung durch andere Personen als die des von Bushnell autorisiertem Kundenservice durchgeführt
wurden. Jede Rücksendung innerhalb der Garantiezeit muss die nachfolgend aufgeführten Punkte beinhalten:
1. Scheck/Zahlungsanweisung in Höhe von $10.00 US-Dollar zur Deckung von Porto und Bearbeitungskosten
2. Name und Adresse zur Produktrücksendung
3. Eine Erläuterung des Defekts
4. Beleg des Erwerbsdatums
5. Das Produkt sollte in einem robusten Versandpaket verpackt sein, um Beschädigungen während des
Transports zu vermeiden, und sollte mit Rückporto versehen sein, vorausbezahlt an die folgende
Adresse:
Versandadresse in den USA: Versandadresse in KANADA:
Bushnell Outdoor Products Bushnell Outdoor Products
Attn.: Repairs Attn.: Repairs
9200 Cody 140 Great Gulf Drive, Unit B
Overland Park, Kansas 66214 Vaughan, Ontario L4K 5W1
Für Produkte, die außerhalb der USA oder Kanada gekauft wurden, wenden Sie sich bitte wegen der geltenden
Garantieinformationen an Ihren Händler vor Ort. In Europa können Sie Bushnell ebenfalls unter folgender Anschrift
kontaktieren:
BUSHNELL Outdoor Products GmbH
European Service Centre
Mathias-Brüggen-Straße 80
D-50827 Köln
GERMANY
Tel.: +49 (0) 221 995 568 0
Fax: +49 (0) 221 995 568 20
Diese Garantie gewährt Ihnen besondere gesetzliche Rechte.
Diese Rechte können von Land zu Land abweichen.
©2014 Bushnell Outdoor Products
GARANZIA LIMITATA PER UNO ANNO
Si garantisce che questo prodotto Bushnell® sarà esente da difetti di materiale e fabbricazione per uno anno a
decorrere dalla data di acquisto. In caso di difetto durante il periodo di garanzia, a nostra discrezione ripareremo o
sostituiremo il prodotto purché sia restituito franco destinatario. Sono esclusi dalla garanzia eventuali danni causati
da abuso, maneggiamento improprio, installazione o manutenzione eseguiti da persone non autorizzate dal servizio
di assistenza Bushnell.
A un prodotto restituito e coperto da questa garanzia occorre allegare quanto segue:
1. Assegno/ordine di pagamento per l’importo di 10,00 $ per coprire i costi di spedizione
2. Nome e indirizzo da utilizzare per la restituzione del prodotto
3. Una spiegazione del difetto
4. Scontrino riportante la data di acquisto
5. Il prodotto deve essere imballato in una scatola robusta, per prevenire danni durante il trasporto, e va spedito
franco destinatario a uno dei seguenti indirizzi:
Recapito negli STATI UNITI: Recapito in CANADA:
Bushnell Outdoor Products Bushnell Outdoor Products
Attn.: Repairs Attn.: Repairs
9200 Cody 140 Great Gulf Drive, Unit B
Overland Park, Kansas 66214 Vaughan, Ontario L4K 5W1
Per prodotti acquistati fuori dagli Stati Uniti o dal Canada, rivolgersi al rivenditore per le clausole pertinenti della
garanzia. In Europa si può anche contattare la Bushnell al seguente recapito:
BUSHNELL Outdoor Products Gmbh
European Service Centre
Mathias-Brüggen-Straße 80
D-50827 Köln
GERMANY
Tel.: +49 (0) 221 995 568 0
Fax: +49 (0) 221 995 568 20
Questa garanzia dà specici diritti legali.
Eventuali altri diritti variano da una nazione all’altra.
©2014 Bushnell Outdoor Products
Entsorgung von elektrischen und elektronischen Ausrüstungen
(Gültig in der EU und anderen europäischen Ländern mit getrennten Sammelsystemen)
Diese Ausrüstung enthält elektrische und/oder elektronische Bauteile und darf deshalb nicht im
normalen Haushaltmüll entsorgt werden. Stattdessen sollte sie an den entsprechenden Sammelstellen
für Recycling der jeweiligen Gemeinden abgegeben werden. Ihnen entstehen hierdurch keine Kosten.
Wenn die Ausrüstung austauschbare (wiederauadbare) Batterien enthält, müssen diese zuvor auch
herausgenommen werden und, falls nötig, entsprechend der geltenden Vorschriften entsorgt werden
(siehe auch die jeweiligen Anmerkungen in der Anleitung dieses Instruments).
Weitere Informationen zu diesem Thema sind in Ihrer Gemeinde-/Stadtverwaltung, Ihrem regionalen
Abfallentsorgungsunternehmen oder in dem Geschäft, in dem Sie Ihr Equipment gekauft haben, erhältlich.
BEDIENUNGSANLEITUNG ZUR WIEDERAUFLADBAREN LEUCHTE
Modell # 10R2000 DEUTSCH 01-15
Lesen Sie alle Anweisungen vor der Benutzung sorgfältig durch
und bewahren Sie sie für die Zukunft auf.
AUFLADEN DER LEUCHTE
Die wiederauadbare Bushnell RUBICON™-Leuchte wird mit einer eingebauten Lithium-Ionen-Batterie
betrieben, die vor dem ersten Gebrauch und nach jeder gebrauchsbedingten Entladung aufgeladen
werden muss.
Auaden der Batterie:
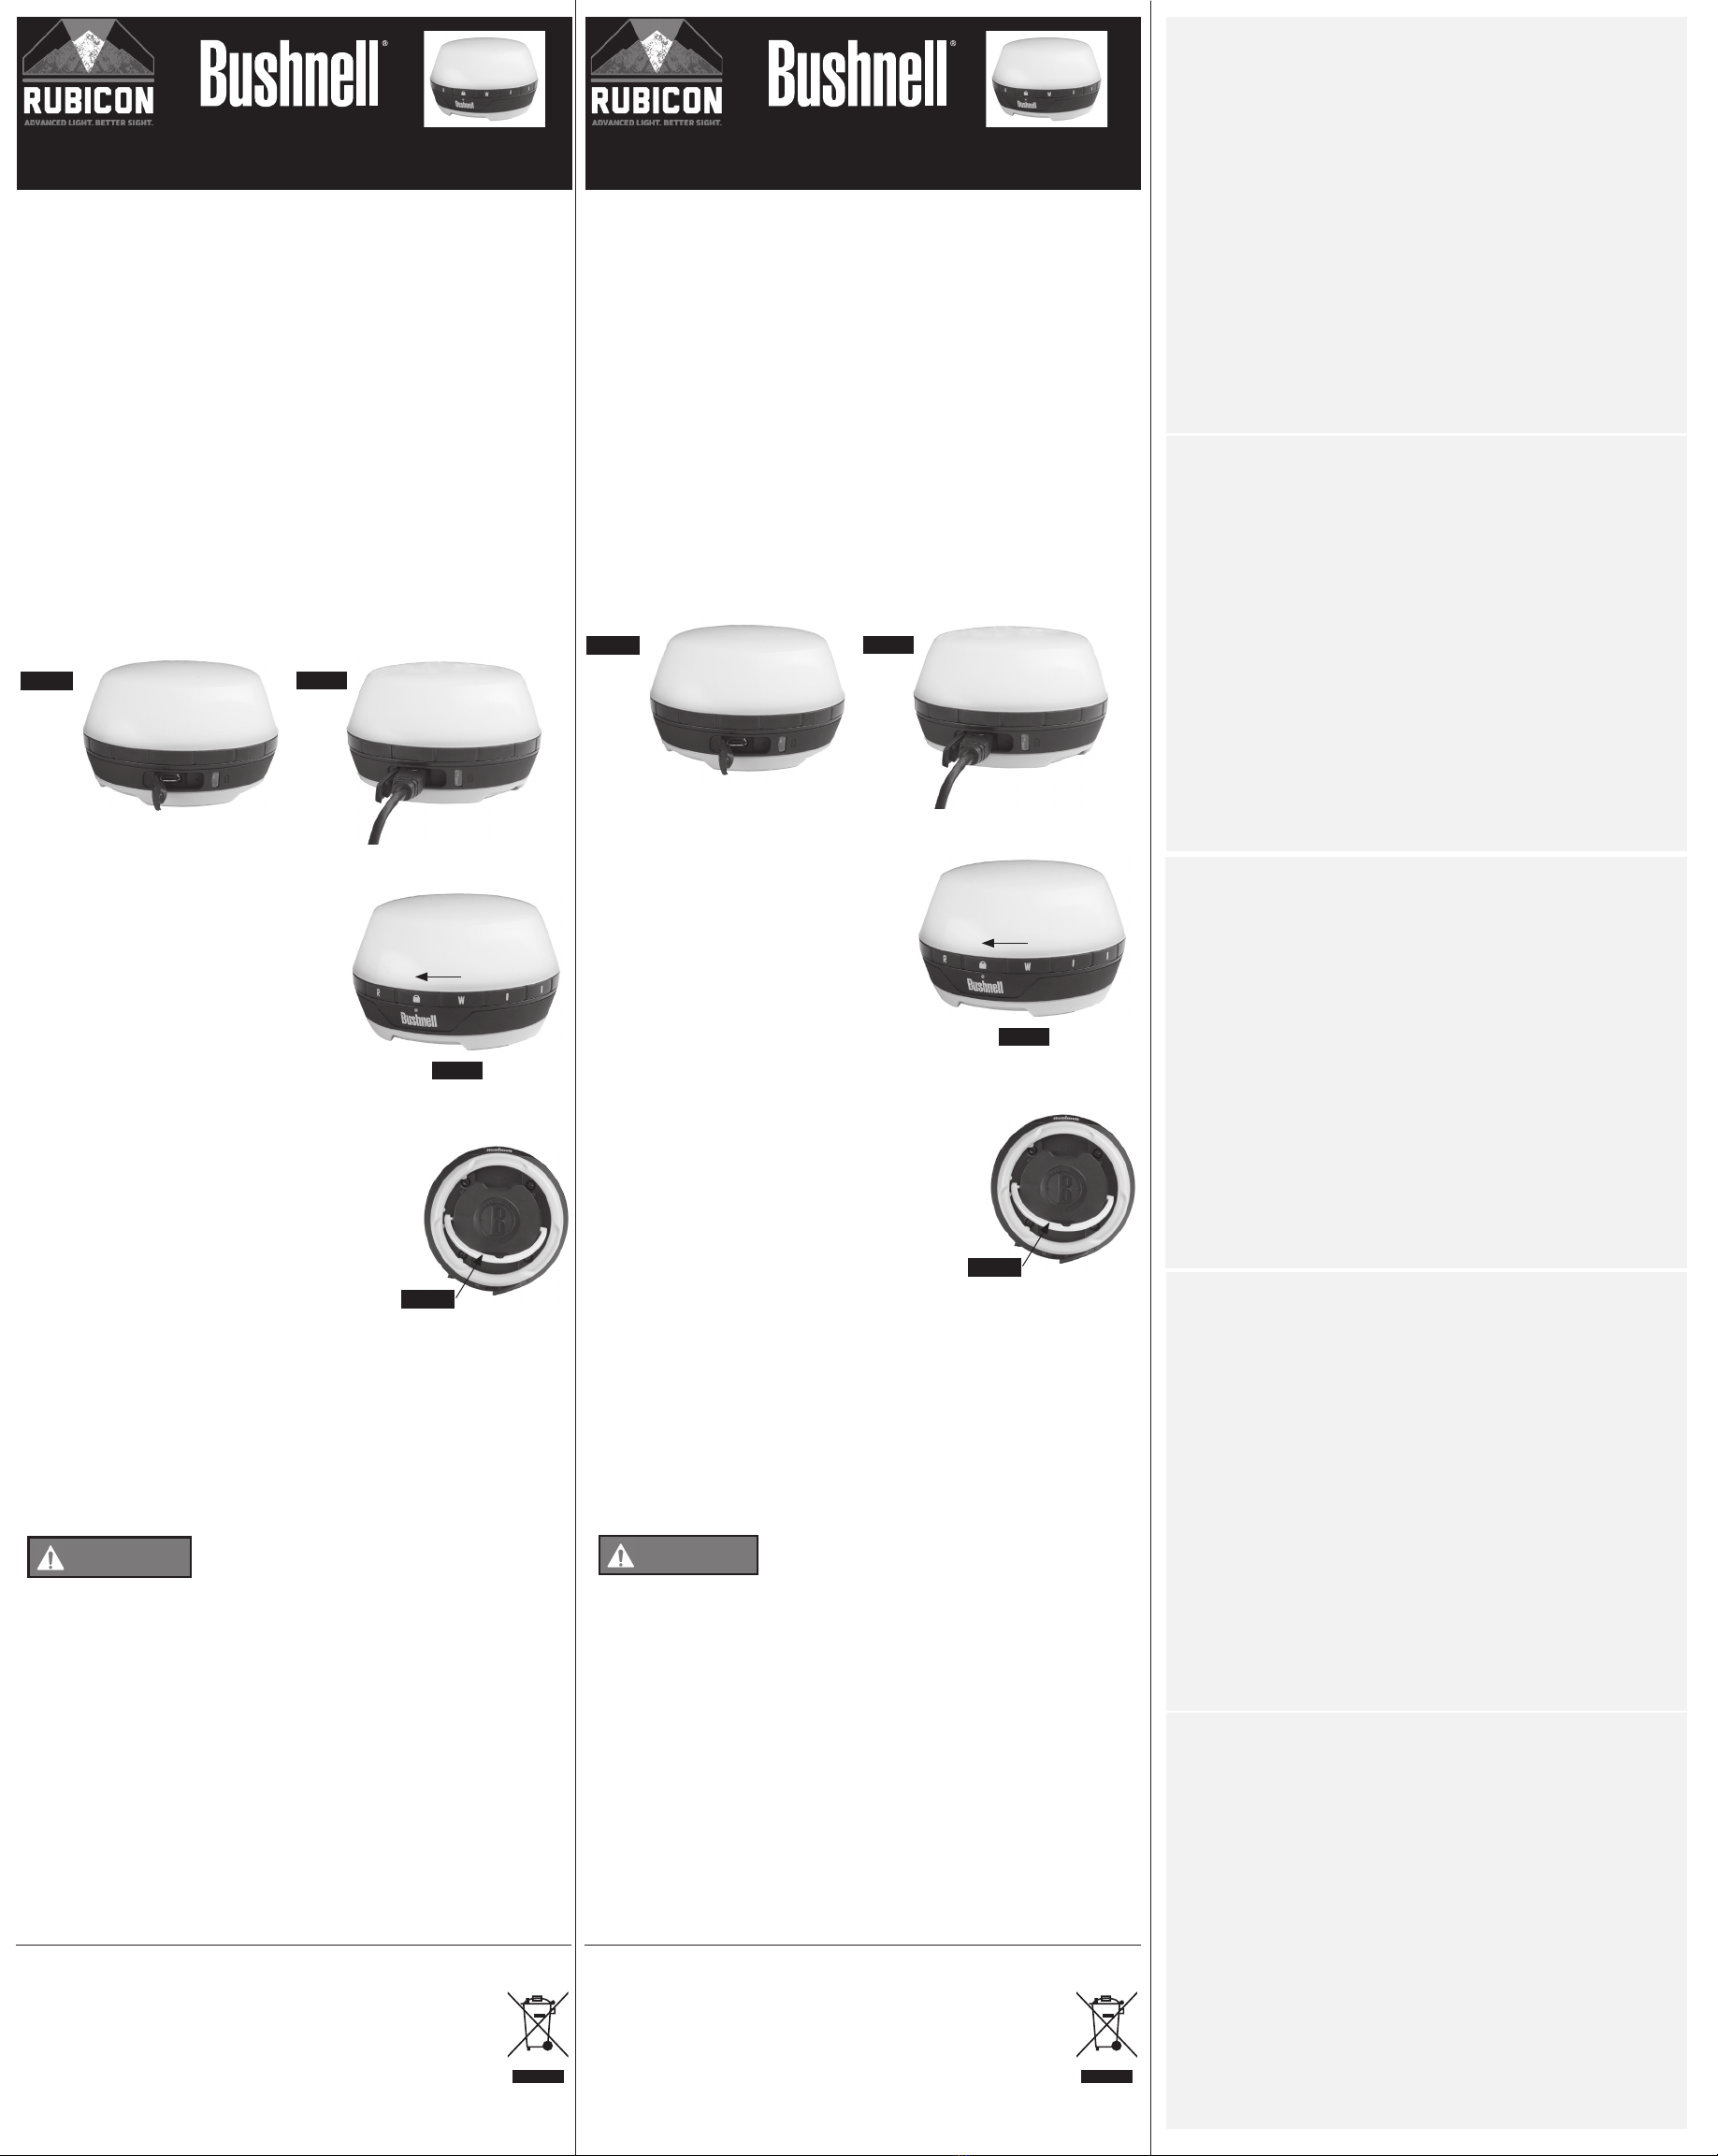
1. Die Gummikappe auf der Rückseite der Leuchte (oberhalb des grünen Unterteils) önen, indem
Sie an der kleinen Lasche mit dem USB-Symbol ziehen (Abb. 1).
2. Den Micro-USB-Stecker des mitgelieferten Kabels in den Micro-USB-Anschluss der Leuchte
stecken (Abb. 2).
3. Den Standard-USB-Stecker des Kabels entweder mit dem USB-Anschluss eines Computers, einem
Handy-Ladegerät oder einem anderen AC-Ladegerät mit Standard-USB-Anschluss verbinden.
Bei Verwendung eines Computers erhalten Sie (je nach Betriebssystem) möglicherweise eine
Meldung über eine nicht ausreichende Stromversorgung oder eine zu hohe Stromaufnahme des
angeschlossenen Geräts, wenn Sie die Leuchte mit dem USB-Anschluss einer Tastatur oder eines
anderen Peripheriegeräts (z. B. USB-Hub ohne eigene Stromversorgung) verbinden. Versuchen
Sie in diesem Fall, die Leuchte mit einem primären USB-Anschluss des Computers (z. B. auf der
Rückseite eines Desktop-Computers) zu verbinden. Die zum Auaden der Leuchtenbatterie
benötigte Zeit variiert je nach verwendeter Ladequelle und Entladezustand der Batterie.
4. Die Ladelampe rechts neben dem USB-Anschluss leuchtet rot, wenn die Leuchte geladen wird.
Wenn die Farbe der Lampe zu grün wechselt, ist die Leuchte vollständig geladen und kann von
der USB-Stromquelle getrennt werden. Auf der Ladeanzeige wird zudem der Batteriezustand im
Normalbetrieb angezeigt (grün=aufgeladen, rot=Auaden erforderlich).
5. Verstauen Sie das Kabel für den zukünftigen Gebrauch, und schließen Sie die USB-Anschluss-
Abdeckung der Leuchte.
BEDIENUNG DER LEUCHTE
Nach dem Auaden die obere Hälfte der Leuchte
im Uhrzeigersinn drehen, bis sich das „W“ auf dem
schwarzen Ring über dem Markierungsstrich (über dem
„h“) bendet, um das weiße Licht einzuschalten (Abb. 3).
Wenn das Licht in der Stellung „W“ zu hell ist, die obere
Hälfte der Leuchte weiter im Uhrzeigersinn drehen, um
eine der beiden Einstellungen zum Dimmen des weißen
Lichts auszuwählen. Zum Ausschalten die Oberseite
der Leuchte gegen den Uhrzeigersinn drehen, bis sich
das Verriegelungssymbol über dem Markierungsstrich
bendet. Zum Einschalten des roten Lichts die Oberseite
der Leuchte über das Verriegelungssymbol hinaus gegen
den Uhrzeigersinn drehen, bis sich das „R“ über dem
Markierungsstrich bendet.
AUFHÄNGBÜGEL
Mit dem silbernen Bügel an der Unterseite können Sie die Leuchte
in einem Zelt oder an einem anderen Ort über Kopf aufhängen, um
den gesamten Bereich zu beleuchten, ohne dass die Leuchte im Weg
ist. Zum Aufhängen der Leuchte den Bügel nach oben ziehen (Abb.
4). Die Einkerbung in der Mitte des Rings kann dabei behilich sein,
die Leuchte gerade zu halten, wenn sie an einer waagerechten Schnur
aufgehängt wird. Wenn Sie den Bügel nicht verwenden, klappen Sie
ihn wieder ein und drücken Sie ihn fest, bis er einrastet.
WICHTIGE INFORMATION
1. Die Betriebsdauer Ihrer RUBICON-Leuchte hängt von der Art des Gebrauchs ab (kontinuierlich oder unterbrochen). Durch den Betrieb
mit Unterbrechungen wird die Laufzeit der wiederauadbaren Stromquelle verlängert.
2. Die LED ist eine lebenslange Lichtquelle. Sie muss niemals ausgetauscht werden.
3. Es ist normal, dass sich die Leuchte bei kontinuierlichem Gebrauch erwärmt.
FABB. 1 FABB. 2
FABB. 4
FABB. 3
Smaltimento di apparecchiature elettriche ed elettroniche
(Vigente presso i Paesi UE e altri Paesi europei con sistemi di raccolta dierenziata dei riuti)
Il presente apparecchio componenti elettriche e/o elettroniche e non può pertanto essere smaltito come
riuto domestico ordinario. Al contrario, dovrebbe essere smaltito presso punti di raccolta destinati al
riciclaggio, in base alle istruzioni delle amministrazioni locali. Tale operazione non prevede alcun costo
per l’utente.
Qualora l’apparecchio dovesse contenere batterie (ricaricabili) sostituibili, anche queste devono essere
prima rimosse e, laddove previsto, smaltite in conformità alle normative specche (cfr. altresì i commenti
specici nelle presenti istruzioni sull’unità).
Per ulteriori informazioni su questa tematica, rivolgersi all’amministrazione locale, all’azienda incaricata della raccolta dei
riuti o alla rivendita presso cui è stato acquistato l’apparecchio.
MANUALE PER L’UTENTE DELLA LANTERNA RICARICABILE
Modello # 10R200 ITALIANO 01-15
Leggere attentamente tutte le istruzioni prima dell’utilizzo
e conservarle per riferimento futuro.
CARICA DELLA LANTERNA
La lanterna ricaricabile Bushnell RUBICON™ funziona con una batteria interna agli ioni di litio, che deve
essere caricata prima del primo utilizzo e tutte le volte che la carica si esaurisce dopo l’utilizzo.
Per caricare la batteria:
1. Aprire il tappo in gomma sul retro della lanterna (sopra alla sezione inferiore verde), sollevando la
linguetta con il simbolo USB (Fig. 1).
2. Inserire l’estremità per micro USB del cavo in dotazione nella porta per micro USB sulla lanterna
(Fig. 2).
3. Inserire l’estremità per USB standard del cavo nella porta USB di un computer oppure nel
caricatore di un telefono cellulare o di un dispositivo di carica CA simile, che ore connessione
USB standard. Se si utilizza un computer, potrebbe comparire un messaggio “insucient
power” (alimentazione insuciente) oppure “device draws excessive power” (il dispositivo riceve
alimentazione eccessiva) (in base al sistema operativo) se si collega la lanterna alla porta USB su
una tastiera o un’altra unità periferica, un hub USB non alimentato ecc. In questo caso provare a
collegare la lanterna a una porta USB principale sul computer (potrebbero essere ubicate sul retro
del computer desktop). Il tempo necessario per caricare la batteria della lanterna varia in base
alla fonte di ricarica che si utilizza e anche a quanto è scarica la batteria.
4. Quando la lanterna è in carica, si accende la spia rossa di carica a destra della porta USB. Quando
la spia diventa verde signica che la lanterna è completamente carica e può essere scollegata
dalla fonte di alimentazione USB. L’indicatore di carica visualizza inoltre la condizione della
batteria durante il funzionamento normale (verde=carica, rosso=necessaria carica).
5. Conservare il cavo per l’utilizzo futuro e chiudere la linguetta della porta USB.
FUNZIONAMENTO DELLA LANTERNA
Dopo averla caricata, per attivare la luce bianca ruotare
la metà superiore della lanterna in senso orario, nché
la “W” sull’anello nero non si trova sopra il marcatore di
riferimento (sopra la “h”) (Fig. 3). Se la posizione principale
“W” è troppo luminosa, continuare a ruotare la parte
superiore della lanterna in senso orario per selezionare
una delle due impostazioni di riduzione dell’emissione
luminosa della luce bianca. Per spegnere la lanterna,
ruotare la parte superiore della lanterna in senso antiorario
nché l’icona del blocco non si trova sul marcatore di
riferimento. Per attivare la luce rossa, ruotare la parte
superiore della lanterna in senso antiorario oltre l’icona
del blocco nché la “R” non si trova sul marcatore di
riferimento.
ANELLO PER APPENDERLA
Un mezzo anello ubicato sulla parte inferiore della lanterna ore la
possibilità di appenderla sottosopra all’interno di una tenda o in un
altro luogo per fornire una fonte di luce all’intera area senza ostacoli.
Sollevare l’anello per utilizzarlo (Fig. 4). Una tacca vicino al centro
dell’anello può aiutare a mantenere il livello della lanterna se è appesa
su una corda orizzontale. Quando l’anello per appenderla non viene
utilizzato, ripiegarlo in basso nché non scatta in posizione di blocco.
INFORMAZIONI IMPORTANTI
1. La durata del funzionamento della lanterna RUBICON varia a seconda dell’utilizzo continuo o intermittente. Il funzionamento
intermittente prolunga la durata della fonte di alimentazione ricaricabile.
2. Il LED è una fonte luminosa a lunga durata. Non dovrà mai essere sostituito.
3. Durante l’utilizzo continuo è normale che la cupola illuminata della lanterna diventi calda.
FFIG. 1 FFIG. 2
FFIG. 4
FFIG. 3
Pericolo di incendio e di ustione chimica Per evitare possibili lesioni gravi o morte, danni a cose, danni al proprio dispositivo o una
riduzione della durata del prodotto, attenersi a queste precauzioni.
• Non posizionare il dispositivo vicino a fonti di calore né lasciare il dispositivo in un ambiente con temperatura elevata, ad
esempio un veicolo incustodito.
• Non disassemblare né modicare il dispositivo. La batteria non può essere sostituita dall’utente.
• Non forare né incenerire il dispositivo o la batteria.
• Non immergere il dispositivo né esporre la batteria all’acqua.
• Non caricare il dispositivo al di fuori dell’intervallo di temperatura indicato di seguito: da 0 a 45 °C (da 32 a 113 °F).
• Non azionare il dispositivo al di fuori dell’intervallo di temperatura indicato di seguito: da -20 a 50 °C (da -4 a 122 °F).
• Non conservare il dispositivo per un periodo prolungato in un ambiente con temperatura non compresa nell’intervallo indicato
di seguito: da -10 a 45 °C (da 14 a 113 °F).
Non caricare mai l’unita lasciandola incustodita. Durante la ricarica di batterie al polimero di litio o agli ioni di litio, restare sempre in
costante osservazione per monitorare la ricarica e intervenire in caso di potenziali problemi. Ricaricare l’unità esclusivamente su una
supercie asciutta e rigida.
Se il dispositivo presenta rigonamenti, emette fumo o diventa rovente interrompere immediatamente la ricarica. Scollegare la bat-
teria e osservarlo in un’area sicura, all’esterno di edici o veicoli e lontano da materiali combustibili, per circa 30 minuti. Interrompere
l’utilizzo del prodotto in tale eventualità.
Verbrennungsgefahr durch Feuer oder Chemikalien. ZurVermeidung von schweren Körperschäden bis hin zumTod, Eigentumsverlus-
ten, Sachschäden oder verkürzter Lebensdauer des Produkts, sollten die hier aufgeführten Vorsichtsmaßnahmen beachtet werden.
• Halten Sie das Gerät von Hitzequellen oder Umgebungen mit hohenTemperaturen fern, wie der direkten Sonneneinstrahlung
in einem nicht beaufsichtigten Fahrzeug.
• Zerlegen oder modizieren Sie das Gerät nicht. Der Akku kann nicht durch den Benutzer ausgetauscht werden.
• Das Gerät oder der Akku darf weder gewaltsam geönet noch verbrannt werden.
• Tauchen Sie das Gerät nicht insWasser, und setzen Sie den Akku keiner Feuchtigkeit aus.
• Laden Sie das Gerät nur innerhalb des folgendenTemperaturbereichs: 0 °C bis 45 °C (32 °F - 113 °F).
• Betreiben Sie das Gerät nur innerhalb des folgendenTemperaturbereichs: -20 °C bis 50 °C (- 4 °F - 122 °F).
• Wird das Gerät längere Zeit nicht verwendet, bewahren Sie es nur innerhalb des folgendenTemperaturbereichs auf: -10 °C bis
45 °C (142 °F - 113 °F).
Überwachen Sie stets den Ladevorgang. Beim Laden von Lithium-Polymer- oder Lithium-Ionen-Akkus sollten Sie den Ladevorgang
stets überwachen, um bei eventuell auftretenden Problemen eingreifen zu können. Stellen Sie das Gerät während des Ladens auf eine
trockene, harte Fläche.
Unterbrechen Sie den Ladevorgang sofort, sollte das Gerät während des Ladens aufquellen, rauchen, heiß werden oder sich aufblähen.
Trennen Sie den Akku, und beobachten Sie ihn ca. eine halbe Stunde an einem sicheren Platz außerhalb von Gebäuden oder Fahrzeu-
gen in sicherer Entfernung von brennbaren Materialien. Verwenden Sie das Produkt in einem solchen Fall nicht mehr.
GEFAHR PERICOLO


