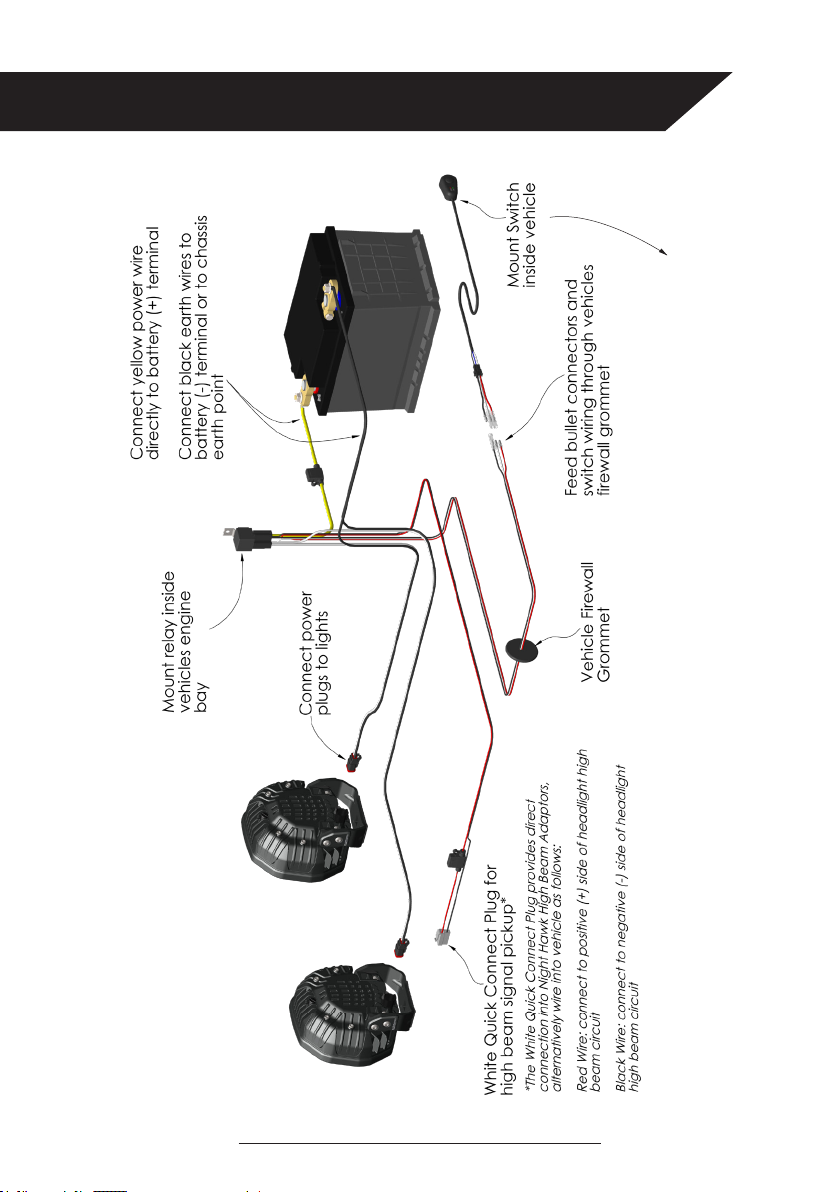
Night Hawk Wiring Loom
7
1. Our Warranty
We warrant to you that the Kingsley product is free from defects in workmanship
and materials for the warranty period.
2. Fitting and use
Please ensure you:
a. t the Kingsley product in accordance with the product information and all
relevant vehicle safety and compliance laws
b. use the Kingsley product for the purpose for which it was originally designed and
in accordance with the product information and all relevant vehicle safety and
compliance laws
3. Exclusions
Our warranty doesn’t cover:
a. normal wear and tear
b. tting the Kingsley product other than in accordance with the product
information and any relevant vehicle safety and compliance laws, including
incorrect tting
c. using the Kingsley product other than for the purpose for which it was originally
designed or other than in accordance with the product information and any
relevant vehicle safety and compliance laws, including unusual, improper or
negligent use or misuse or overloading
d. misuse or neglect of the Kingsley product, including improper repair or
maintenance or failing to repair or maintain
e. alteration, abuse, acts of nature, terrorism, vandalism, collision, road hazards or
adverse conditions
4. Making a claim
Please immediately contact us as soon as you become aware of a possible defect
in the Kingsley product. We’ll arrange for you to either attend a Kingsley outlet (at
your cost) for a Kingsley representative to inspect the Kingsley product (as tted to
your vehicle) or for you to return the Kingsley product to us. We’ll also request you
to provide the purchase receipt and complete a warranty claim form. In order to
ensure our warranty is not voided, please keep the purchase receipt as proof of
purchase and don’t remove the tted Kingsley product from your vehicle before
contacting us. Note: Non-transferable warranty. The original purchaser can only
claim warranty. If your claim’s in order, we’ll notify you and (at our sole discretion)
either repair or replace the defective workmanship or materials (at our cost) or
refund to you the purchase price you paid for the defective Kingsley product. If
further information or investigation is required or if the claim does not meet the
requirements under our warranty, we’ll let you know.
5. Australian Consumer Law
The Kingsley product comes with guarantees that can’t be excluded under the
Australian Customer Law. You’re entitled to a replacement or refund if there’s
a major failure and compensation for any other reasonably foreseeable loss or
damage. You’re also entitled to have the Kingsley product repaired or replaced
if it fails to be of acceptable quality and the failure doesn’t amount to a major
failure.
Warranty Policy
WARRANTY POLICY