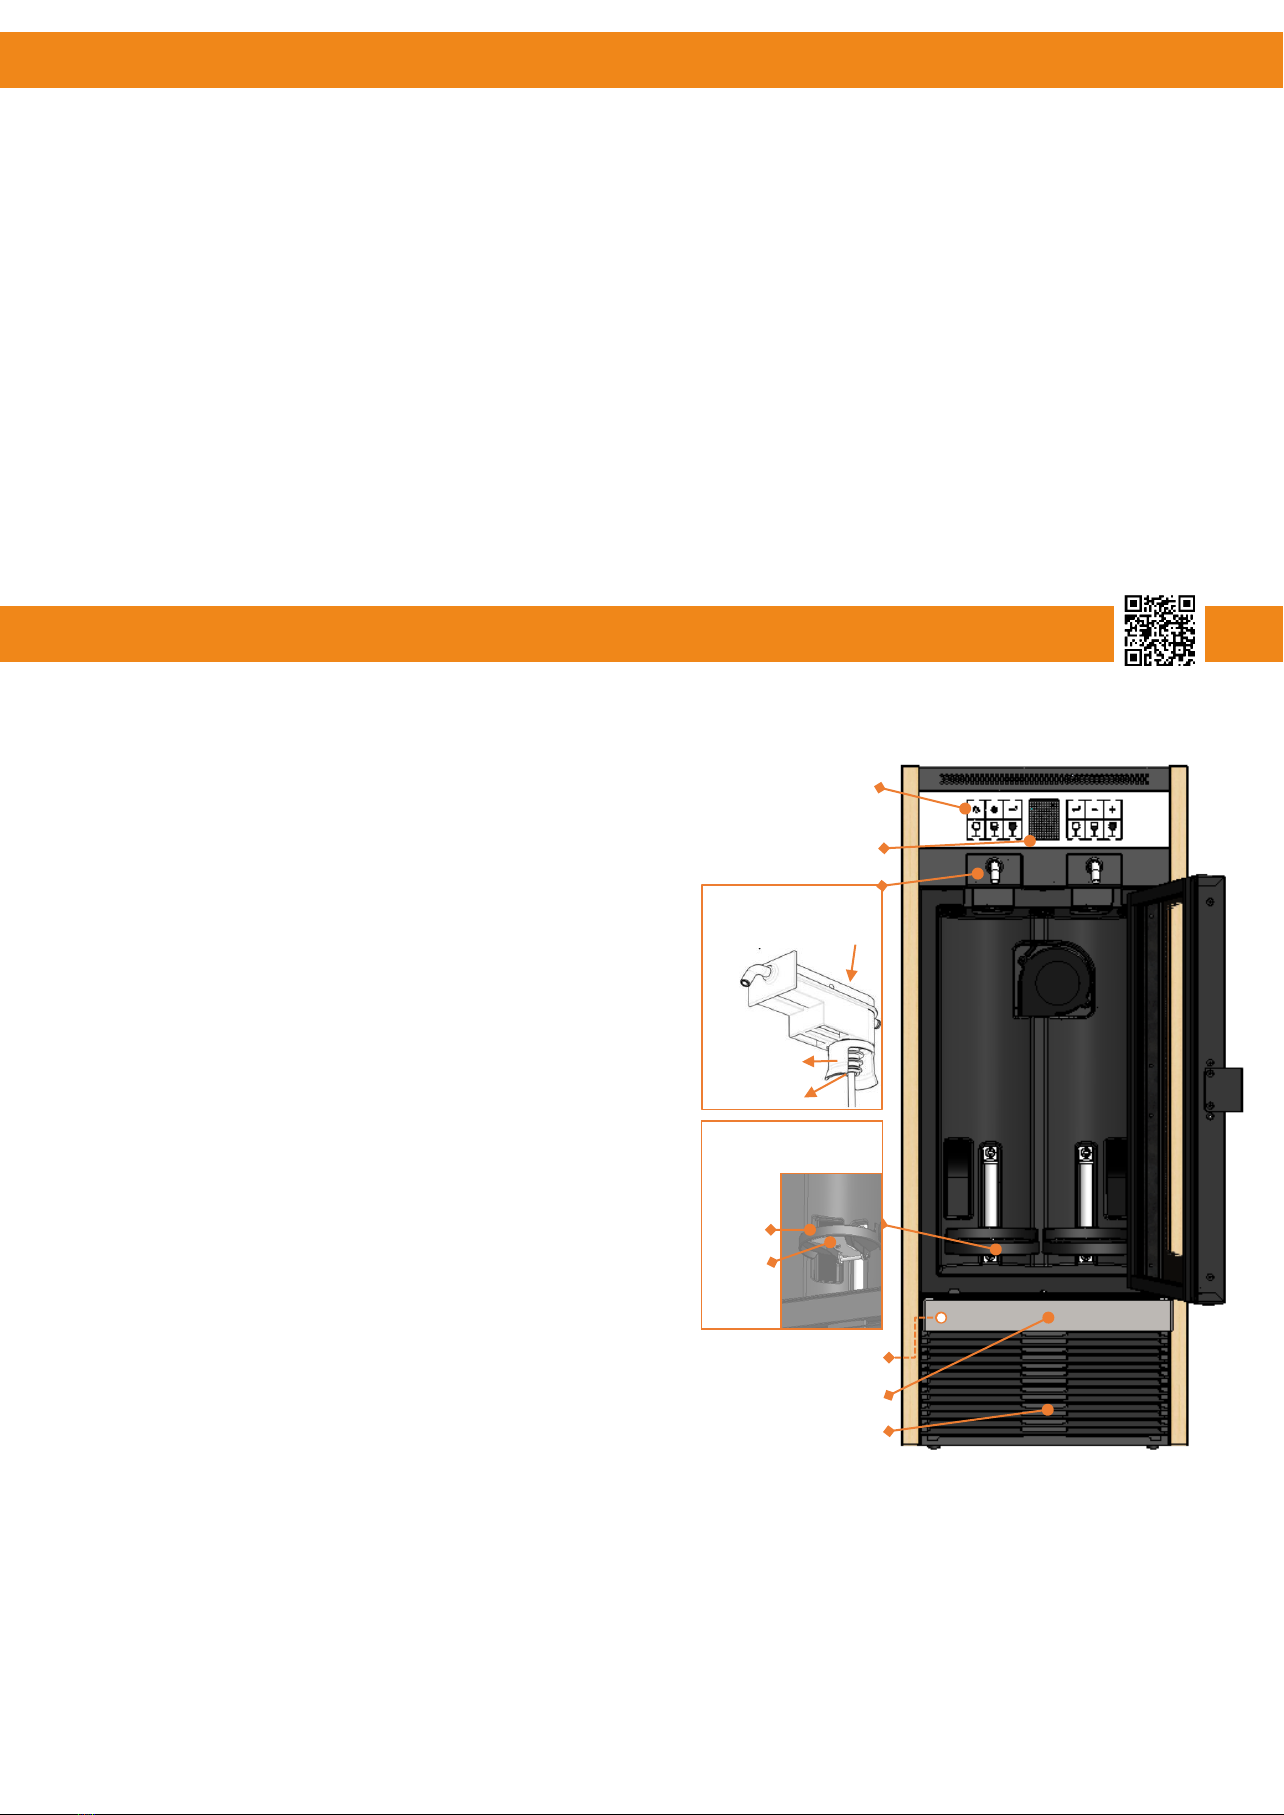
By The Glass Modular User manual

The World’s Best Wine Entertainment
By the Glass® Modular
Operating Instructions
Wine Dispensing System | VS 15.2021

Inhaltsverzeichnis
Before use –Important safety informaton
1. What you need to consider before use................................ 3
2. Intended use ................................………………………........3
3. Information on handling packaging materials...................... 3
4. Technical guidelines and standards..................................... 3
5. Information on installation location....................................... 4
6. Electrical connections...........................................................4
7. Information on handling argon in pressurised containers.... 5
8. Unpacking and checking on delivery…................................ 5
Set-up and operation
9. Connection and set-up of the argon gas supply................... 6
10. Changing the gas bottle....................................................... 7
11. Connecting wine bottles..........…………............................... 7
12. System settings and functions..............................................8
12.1 Overview of button functions
12.2 Setting the temperature
12.3 Setting the dispensing quantity
13. Cleaning and care................................................................ 9
14. Extension / connection of additional “modules“….…......... 10
Service and technical details
15. Trouble Shooting (questions and answers- contact)……… 10
16. Guarantee conditions……………………………………….... 11
17. Disposal……………………............................................. 11
18. Technical data….…………………………....................... 11
Contents
2
Explanation of symbols:
Warns of injury risks or
possible risks of damage.
QR codes refer to
video content
(with English sub-titles)

1. What you must consider before use
BEFORE USE
IMPORTANT SAFETY INFORMATION!
Read these operating instructions carefully before using the wine
dispensing system. They contain important information about
installation, operation and care and servicing.
Keep these operating instructions in a place where they can be located
easily. The manufacturer will not accept responsibility for damage
arising from ignoring instructions or information given in these
operating instructions.
The wine dispensing system is suitable for cooling, keeping and
dispensing of still wines in measured quantities from standard wine
bottles.
Caution!
The wine dispensing system may only be operated by adults.
In addition to these instructions, also note particularly the manufacturer‘s
printed instructions for handling the gases in pressurised bottles used to
conserve the wine (see section 7).
Repairs may only be carried out by a specialist fitter decided by the
manufacturer. Repairs not carried out correctly may lead to lapse of the
guarantee.
The packaging protects the wine dispensing system and its accessories for
transport purpose. It is made of re-useable materials. Contribute to
environmental protection be ensuring it is correctly disposed of.
Caution!
Packaging material is not a toy. Incorrect use of the packging material,
especially the wrapping, can lead to injuries and suffocation.
The By the Glass® modular wine dispensing system complies with the
following Guidelines:
●2014 /35 /EU (Low voltage guideline)
●2014 /30 /EU (Electromagnetic Compatability guideline)
●2009 /125 /EG (Eco-design Guideline)
●2011 /65 /EU (RoHS Guideline)
3. Instruction on handling packaging material
4. Technical guidelines and standards
3
2. Intended use

If the appliance is not to be installed immediately, it must be stored in a
dry, protected place.
The wine dispensing system is only suited to installation and use inside
at room temperatures between 16 °C and 26 °C and up to 60% rel.
humidity.
Do not set up the appliance near heat sources, sources of steam or in
direct sunlight.
Consider the weight specifications when choosing the installation
location. Ensure that the surface on which it is to be installed is level. If
necessary, secure the appliance against tipping or sliding.
Ensure that the ventilation slits on the front are not covered. The
minimum clearance to anything that might limit the ventilation space is
25 cm. Insufficient ventilation can lead to loss of performance or even
to damage to the appliance.
Caution:
●Do not install the appliance near inflammablesubstances.
The appliance may only be connected to an earthed power socket using
the earthed cooling appliance connection cable supplied. The intended
mains voltage is
100-240 VAC (50-60Hz)
Only use the cooling appliance connection cable supplied to connect
the cooling dispensing appliance to a power socket and do not use an
extension cable.
Caution:
●Beware of possible damage. If the power cable is damaged, it must
be replaced by the manufacturer before it is used again.
●Ensure that the appliance is not standing on the power cable.
●Keep the power cable away from heat sources and liquids, out of
the reach of children and inaccesssible to pets.
●Never pull on the cable to remove the plug from the socket. Ensure
that the socket is accessible.
●Check the appliance and the power cable regularly for signs of wear.
If any damage is identified, the appliance must no longer be used.
●Remove the power plug immediately and contact the manufacturer
in the event of damage.
6. Electrical connections
4
5. Instruction on installation location

Your wine dispensing system keeps the opened bottles under a protective
atmosphere of nitrogen or argon gas, thus preventing oxidation. The un-
reactive (inert) gas drives the air out of the bottle with every tap operation,
thereby also transferring the desired quantity into the glass.
To operate your wine dispenser, use only inert gases suitable for use with
foodstuffs –in the EU and EFTA, you can recognise them by their E-numbers:
Food-gradeArgon (E938)or Nitrogen (E941)
These gases are non-toxic, odourless and tasteless and not flammable, but
larger quantities of the gases can drive breatheable air from small, poorly
ventilated spaces, and the containers are under high pressure. Therefore,
respect the safety notices on the gas containers when handling them:
Caution:
●Contains pressurised gas
●Could explode if heated
●Keep in a well-ventilated place
●Protect against direct sunlight. Do not expose to temperatures above 50°C.
Check the argongas cylinder and the valve for dents or other damage before use.
If you identify any defects, do not use the cylinder.
You can serve up to 30 bottles of wine(75cl) with one 950mlgas cylinder –do not
store more inert gas in your rooms than you need.
Check the delivery on receipt for damage and completeness. If a defect is
identified, do not start to use the appliance, contact either the merchant or By
the Glass directly.
Note: when you open the box, you will immediately find a hexagonal allen key
on top of the polystyrene insert. You can use this to access the accessories
inside your wine dispensing system.
Remove the appliance from the packaging and set it down safely. You will find
a small keyhole for the allen key on the left below the door to open it (see
illustration, page 7).
Inside the dispensing system you will find: You will receive these separate accessories:
2 Dispense heads 1 pair of wooden side panels
1 Stainless steel drip tray 1 refrigeration appliance power cable
and as further accessories:
4 Connection bolts
1 short 8mm-gas connection hose
1 Y-splitter adapter cable
To connect the appliance to other modules
(see page10).
5
7. Instructions for handling argon in pressurised containers
8. Unpacking and checking on delivery
UN 1006
1 long 8mm gas tube with elbow
1 pressure regulator
1 argon gas cylinder to start.
for your By the Glass® Modular wine
dispenser (one pressure regulator can
supply up to 6 modules).
Video 1
Video 2
UN 1066
Compressed Gas (Nitrogen/Argon)

6
To operate the dispensing appliance you need a pressure regulator to reduce the input
pressure of the gas bottle –up to 110 bar depending on filling pressure and fill level–to
the desired, stable operaating pressure (0.2 to max. 0.4 bar).
A quality pressure regulator is included with your wine dispensing systems. Fit the pressure
regulator securely and easily accessibly to a wall.
Both the pressure regulator and the dispensing system have Push-Fit plug connections:
✓To connect the gas supplies, you just have to push them together firmly and securely into
the push fit connection.
9. Connecting the gas supply
SETTING UP AND OPERATION
✓To release the connection again, you must push
the ring of the push-fit connection against the pull
direction and hold it (!).
If needed, push the taps in the push-fit connector on
the rear side of the appliance to connect the gas
supply by choice from the right or left. Abb. 1 Steckverbindungen an der Geräterückseite
Display for output
pressure
Display of input
pressure
Setting screw for
the output
pressure
Argon gas bottle
Fig. 2 Example of a pressure regulator with 950ml disposable gas cylinder
Bottle bracket
Gas tube
Connect the gas supply with the pressure regulator.
To give an example the following information refers to a commercially available pressure reducer for
disposable gas cylinders. The pressure regulator and gas bottle format employed by you may differ –
please check for separate instructions from your supplier!
Setting the operating pressure
The dials (manometers) on the pressure regulator show
the input pressure of the gas bottle (right) and the
output pressure to the dispensing system, according to
the operating pressure (left manometer).
Turn the setting screw for the output pressure
initially completely to the left (anti-clockwise).
Place a new gas bottle in the pressure regulator (see
also Sect. 10) and turn the setting screw clockwise
until the display shows the desired operating
pressure.
The operating pressure determines the flow speed of the wine. We recommmend a low
operating pressure of 0.2-0.25 bar for a gentle flow, or serving speed.
Check that you are happy with the flow speed. If you have set the pressure too high, turn
the setting screw anti-clockwise again. Please note that the display only shows the
reduced pressure setting if you remove the previously set higher pressure from the
system. To do this, remove the wine bottle and push one of the discharge buttons.

Keyboard
(see page 8 for details)
Display
Dispense head
Moveable
bottle plate
Keyhole
(behind the drip tray)
Ventilation slits
Seal
Tensioning
spring
Spring
Plate
Plug
Drip tray
7
10. Change the gas bottle
A full disposable gas cylinder has a pressure of approx. 100 bar. The pressure displayed on
the manometer of the pressure regulator falls to „0“when the gas cylinder is empty.
Disposable gas cylinders seal by themselves when you unwind them. You can disconnect
the gas supply at any time by unscrewing the cylinder from the pressure regulator.
1. Unscrew the empty gas bottle anti-clockwise out of the pressure regulator.
2. Remove the black rubber sealing cap from the valve of the new gas bottle and feed it
into the holder from below.
3. Screw it clockwise into the thread in the pressure regulator. Do not worry if a little gas
escapes when you do this, just continue to screw the bottle firmly into the thread until
the connection is audibly sealed.
Refillable gas containers come with higher pressures of up to 300 bar. They come with their
own stopcock. Close the stopcock before exchanging the bottle even when the bottle is
empty, and make sure there is no remaining pressure on the regulator.
The removable dispense heads of the By the Glass® Modular wine dispensers make
changing a bottle as well as cleaning and maintenance, very easy.
1. Take hold of the wine bottle neck and the
dispense head at the seal and pull them
together straight out of the appliance.
2. Pull the dispense head and the plug and
tube out of the bottle. To allow residual
wine to flow from the tube back into the
bottle, you can press the tensioning spring
when the tube is hanging freely in the
bottle.
3. Feed the tube into the new bottle and push
the dispense head firmly onto the bottle so
that the plug seals the bottle well.
Caution: for bottles with a high fill level and
especially for screw-thread bottles, you may
have to first pour out a small amount so the
bottle does not overflow.
4. Place the new bottle with the dispense head
into the appliance. To do this, take hold of
the seal and bottleneck again and place the
bottle and dispense head into position
straight until it engages.
11. Connecting wine bottles
5. Move the sliding bottle plate from below firmly onto the bottle so that the wine
bottle sits firmly on the dispense head at the top and level on the plate. Push the
spring below the bottle plate from the front to slide it up or down.
6. Then dispense a small quantity of the wine by pressing the Enter button or repeatedly
pressing a Dispense button (Start/Stop). The wine now reaches the top of the tap and
the bottle is protected against spoiling by the noble gas.
Fig. 3 By the Glass® Modular overview and details
Video 3

8
12. System settings and functions
12.1 Overview of button functions
1. Light: Options “Off“, “Intensity 1“, “Intensity 2“
The modular wine dispensing system has a soft white LED
light dimmable in two-stages
2. Standby: Deactivates the cooling e.g. for cleaning with open
doors (light can be separately activated)
3. Enter left/right –to confirm program inputs and for
continuous dispensing if the button is held pressed for
example to rinse the system with water.
4. The dispense buttons for three programmable quantities
per tap also have a start/stop function: press it again at any
time to stop the dispensing.
5. Button lock: press and hold the “Light“ and “Standby“ simultaneously for 2 seconds to activate and
deactivate the button lock.
12.2 Setting the temperature
You can keep the wines in your wine dispensing system in the temperature range from 6° to 20° C.
Select a temperature for white wines ideally between 8° bis 10° C and for red wines a temperature
from 16°-18° C.
1. Press the “Plus“ und “Minus“ buttons simultaneously until the temperature display flashes.
2. Set the temperature with the “Plus“ or “Minus“ buttons while the display is flashing.
3. After a few seconds of inactivity, the display stops flashing by itself. The new temperature is set.
12.3 Programming the doses (sizes dispensed)
1. To set the doses, use a bottle filled with water. Connect the bottle to a tap. Hold a measuring cup
or a calibrated glass under the tap.
2. Press the buttons for „Taster“ and “medium size“at the
corresponding tap until „L Program“ for the left tap or
“Program R“ for the right tap appears in the display.
Large glass
Medium size/ dose programming 2
Small glass (Taster)
/ dose programming 1
Enter left / continuous flow Enter right / continuous flow
Standby / key lock 1
Light / key lock 2
Temperature setting 1 / Minus
Temp. setting 2 / Plus
Large glass
Medium size / dose programm. 2
Small Glass / dose programming 1
L Program R
3. Then press the dispense button that you wish to program for as long and as often as it takes until
the desired quantity is in the measuring cup, i.e., you can measure the required quantity in one
draft or press the button several times.
4. To confirm, press the according „Enter“ button. The new dose size has been saved. Repeat the
procedure for the other glass sizes.
Output buttons
Display
Video 4 Video 5 Video 6

13. Cleaning and care
9
Conscientious care ensures many years of trouble-free and hygienic operation of your wine
dispensing system. This requires a few easily manageable steps:
Cleaning the dispense heads
1. The short outlets of the dispense heads are the part of your dispensing system that
come into contact with the air. Wine and its sediments can dry out here, leading to
blockages, especially if use is intermittent or rare.
Clean the taps or their outlets every few days from the outside with a small brush or,
e.g., a damp pipe cleaner. You do not need to remove the bottles and dispense heads
from the appliance to do this.
2. Rinse the dispense heads at least every few weeks with hot water, especially if you are
changing the type of wine (not the bottle) and before and after longer periods of
inactivity to prevent any depositions. Choose a suitable interval between one and a
maximum of four weeks, according to the frequency of use:
▪To rinse the tubes and dispense heads, proceed as with changing the bottle, and place a bottle
of warm tap water (max. 65°C) instead of wine in the appliance.
▪Hold a second empty bottle under the tap and press the “Enter“ button at the appropriate
position for a few seconds until you have drawn about 350ml water through the pipe.
▪Then remove the bottle from the appliance, pull the dispense head out of the bottle and allow
any water remaining in the tube to run out by pressing the tensioning spring on the dispense
head as described above.
▪Then wipe the short outlets with a damp cloth. You can also rinse the entire dispense head
including the hose at the sink under running water at any time.
3. Rinse the dispense heads as needed every few months with a solution of pure citric
acid in water to remove deposits and discolorations.
4. The dispense heads will last many years if they are well looked after. However, they
can be exchanged if necessary at any time. We recommend annual change in the case
of frequent use, comparable to professional use.
Cleaning the surfaces
1. Wipe the outside of the appliance and the drip tray regularly with a damp cloth.
2. You can also wipe out the interior of the appliance with a damp cloth at regular
intervals. Do not use any harsh or scented cleaning agents to avoid affecting the wine
aroma.
3. Ensure that the ventilation slits are clear and not blocked with dust as this can lead to
reductions in performance or even damage to the appliance. You can clean the
ventilation slits as needed from the front with a vacuum cleaner.
Switch the cooling off if the appliance is left open for longer periods for cleaning or if
no dispense heads are inserted.

10
14. Extend your modular wine dispensing system
Place the dispensing systems you wish to link next to
each other on a level surface.
Start with the left dispensing system
1. Screw the connecting bolt with a little slack into
the thread provided on the right-hand side of the
left-hand dispensing system.
2. Lift the right-hand dispensing system slightly and
connect it from the right into the connecting bolt.
Ensure that the plugs on the rear side do not
come between them.
3. Connect the power supply to both dispensing systems using the Y-shaped power cable. You can
hide the plug connections in the cable duct.
4. Remove the end stopper from the push-fit connector on the rear of the appliances to connect
the gas supply from appliance to appliance–put and end stopper back in at the end of the
connected sequence of appliances.
5. Connect the gas supply from appliance to appliance with the short connecting hose–it is best
to connect these with a loop so that the ends plug straight into the push-in connectors and are
not under tension.
6. Check that all hose ends are fully and firmly pushed into the connectors as there could
otherwise be leaks meaning the gas bottles will empty faster.
Finish off your free-standing By the Glass® Modular wine dispensing system consisting of one or
more modules with optional wooden side panels.
The wine is flowing slowly or not at all: Is the gas empty? Check the display on the input pressure
manometer.
A tap is dripping, the wine is flowing slowly or not at all: Is the outlet or tube blocked? Rinse the
dispense head with water. Pay particular attention to the area below the clamp as you look at the
dispense head from above. Massage the tube part under the clamp if necessary.
Despite the correct setting, the wine appears too warm: Is the room very warm? The appliance can
achieve satisfactory levels of cooling in a room temperature up to 26°C. Another cause for the drop
in performance could be excessive ice build-up. This is caused, for example, by very high air humidity
or if the door of the appliance has been open for a long time. If this happens, close the appliance
down completely for 24 hours to de-frost and then start it up again.
The gas bottle is empty after a very short time: Check whether you can feel or hear a leak. Push all
connections in firmly and straight into the push-fit connectors. Look for any buckling and straight cut
ends of hoses.
The display shows an error code, e.g. “E02 Overheat“:Have you identified and rectified the fault,
e.g. Insufficient ventilation? Remove the power supply for 10 seconds to then re-start the appliance.
If the problem persists, call us.
15. Trouble shooting (questions and answers)
The By the Glass® Modular wine dispensing system for two bottles can be extended at
any time with additional modules that can be seamlessly linked to the existing.
You can contact us on working days between 09:00-17:00 CET under the following number
+31 23 52 52 289 or by e-mail at any time: inf[email protected]
Video 7

The By the Glass® Modular wine dispensing system was created for professional use
and should operate reliably for decades with appropriate care. Even if repairs one day
become due on the appliance, we guarantee that in most cases it will be worth it, or
that an interested purchaser can be found even years later. If in doubt, please contact
us.
17. Disposal
If you should nonetheless one day decide to dispose of the appliance, then please protect our
environment: Electrical devices should not go in the household refuse! Use the collection points
provided to dispose of electrical apliances that you will no longer use. You will be helping to prevent
potential impacts on the environment and human health through incorrect disposal, and
contributingto recycling and other forms of re-using old electrical devices. Information about where
devices can be disposed of can be obtained from your local council or district authorities.
16. Guarantee conditions
1. We grant a warranty of 12 months from the purchase to commercial users and businesses. We
grant a warranty of 24 months to private customers who use the appliance only in a private
domestic context. The warranty period for private customers reduces to 12 months if they use
the appliance–even partially–commercially.
2. The warranty is provisional on purchase of the appliance from one of our contracted dealers
and sending a copy of the proof of purchase to us.
3. If the appliance is abroad at the time of the warranty claim, it must be made available to us at
the cost of the purchaser for provision of services under warranty.
4. Defects must be reported to us in writing within 14 days of identification. If the warranty claim
is valid, we will decide how the damage/defect will be rectified, whether by repair or
replacement of an equivalent appliance.
5. Services under warranty are not provided for defects caused by non-observance of the
operating instructions, incorrect handling or for normal wear and tear of the appliance. No
warranty claims will be considered for easily breakable parts such as glass or plastic. Claims
under warranty are also excluded if work has been undertaken on the appliance by parties
other than those authorised by us.
6. The warranty period is not extended by services provided under guarantee. There is no
entitlement to new warranty. This declaration of a guarantee is a voluntary service provided by
us as the manufacturer of the appliance. Your dealer may offer a different declaration of
warranty which does not obligate us as the manufacturer. Legal guarantee rights (rectification,
withdrawal, damages and reduction) are not affected by this guarantee.
Model:.................................................................. By the Glass® Modular (3V)
Electrical supply :..................................................100-240 VAC, 50-60 Hz (autom. switching)
Power (protection rating)....................... 120 W (II)
Net weight / Dimensions mm (WxHxD):...............22.1 kg / 250x685x231
Cooling performance (Temperature range):.........6 - 20 °C
Climate class (suitable operating conditions):.....SN, N (16-26°C, 60% rel. humidity max.)
Bottle height / content (cooling compartment):…270-335mm / 7.85l
Operating agent………………………..…………………..……Compressed argon or nitrogen
Operating pressure…………………………………………….....0.2-0.4 bar
Technical and design changes possible revised on 01.04.2021
18. Technical data
11

By The Glass International B.V.
Energieplein 17 ◦2031TC Haarlem ◦The Netherlands
Technical Service Region DACH
Tel. +49 421 276 566 58 | service@bytheglass.de | www.bytheglass.de
Other manuals for Modular
2
Table of contents
Other By The Glass Beverage Dispenser manuals
Popular Beverage Dispenser manuals by other brands

Schroeder America
Schroeder America 959 Installation instruction, parts list and configuration guide

VEVOR
VEVOR XRJF-11 Product instruction manual

oneConcept
oneConcept Braufreund manual

CombiSteel
CombiSteel 7065.0025 user manual

Marvel
Marvel 61WCM Installation, operating and maintenance instructions

MARMON
MARMON Cornelius IDC Pro manual

Primo Water
Primo Water hTRIO owner's manual

Hamilton Beach
Hamilton Beach Coffee Urn instructions

Bunn
Bunn IMIX-5 Illustrated parts catalog

Gastrorag
Gastrorag DK50 instruction manual

Siemens
Siemens GA 3000 OPERATING & SERVICE MANUAL

Cornelius
Cornelius 2 Flavor Post-Mix Cold Coffee Dispenser Quest... Technical specifications