BYECOLD BKD-G0606-WLH/D User guide

Smart Mirror
INSTALLATION AND OPERATING INSTRUCTION

READ BEFORE USE
SCOPE OF DELIVERY
A: Smart Mirror ×1
B: Screw×4
C: Dowel×4
D: Drill template×1
E: Manual×1
Thank you for purchasing this product.
Please read the instructions carefully before attempting to install,
operate or service the product.
Please retain this booklet for future reference.
Pictures for reference only, subject to our available products
Ⅰ

CONTENTS
Product Introduction…………………………………………………………1
Safety Introduction…………………………………………………………1
Product Information…………………………………………………………4
Installation……………………………………………………………………5
Operation……………………………………………………………………6
Maintenance………………………………………………………………10
Troubleshooting……………………………………………………………11
Warranty……………………………………………………………………12
Ⅱ

PRODUCT INTRODUCTION
Smart mirror is a device which with that functions as a bathroom mirror with additional
functions, such as displaying weather forecast, date and time, temperature and humidity,
LED lighting, defogging etc. Users can select the product with different functions
according to self-requirement. Please ignore the related operating instructions in this
booklet if you didn't subscribe some functions when ordering.
SAFETY INTRODUCTION
Read this manual carefully before starting or using the device. Always store the manual in
the immediate vicinity of the device or its site of use!
Warning
Do not ceiling mount those devices designed for wall only!
Or else it may cause burning, fire and falling off risk!
Warning
This appliance can be used by children aged from 8 years and above and persons with
reduced physical, sensory or mental capabilities or lack of experience and knowledge if
they have been given supervision or instruction concerning use of the appliance in a safe
way and understand the hazards involved.
Children shall not play with the appliance. Cleaning and user maintenance shall not be
made by children without supervision.
Warning
Children of less than 3 years should be kept away unless continuously supervised.
Children aged from 3 years and less than 8 years shall only switch on/off the appliance
provided that it has been placed or installed in its intended normal operating position and
they have been given supervision or instruction concerning use of the appliance in a safe
way and understand the hazards involved.
Children aged from 3 years and less than 8 years shall not plug in, regulate and clean the
appliance or perform user maintenance.
Warning
Do not use the device in small rooms if persons are present who cannot leave the room
independently and who are not under constant supervision.
Warning
Some parts of this product can become very hot and cause burns. Particular attention has to
be given where children and vulnerable people are present. Its dangerous of installation
1

close to curtains and other combustible materials. To avoid the possibility of burns, the
following people should be much more careful when using the heaters: infants and kids,
people with sensitive skin, the old, the sick, people who is drunk, people who takes
sleeping pills.
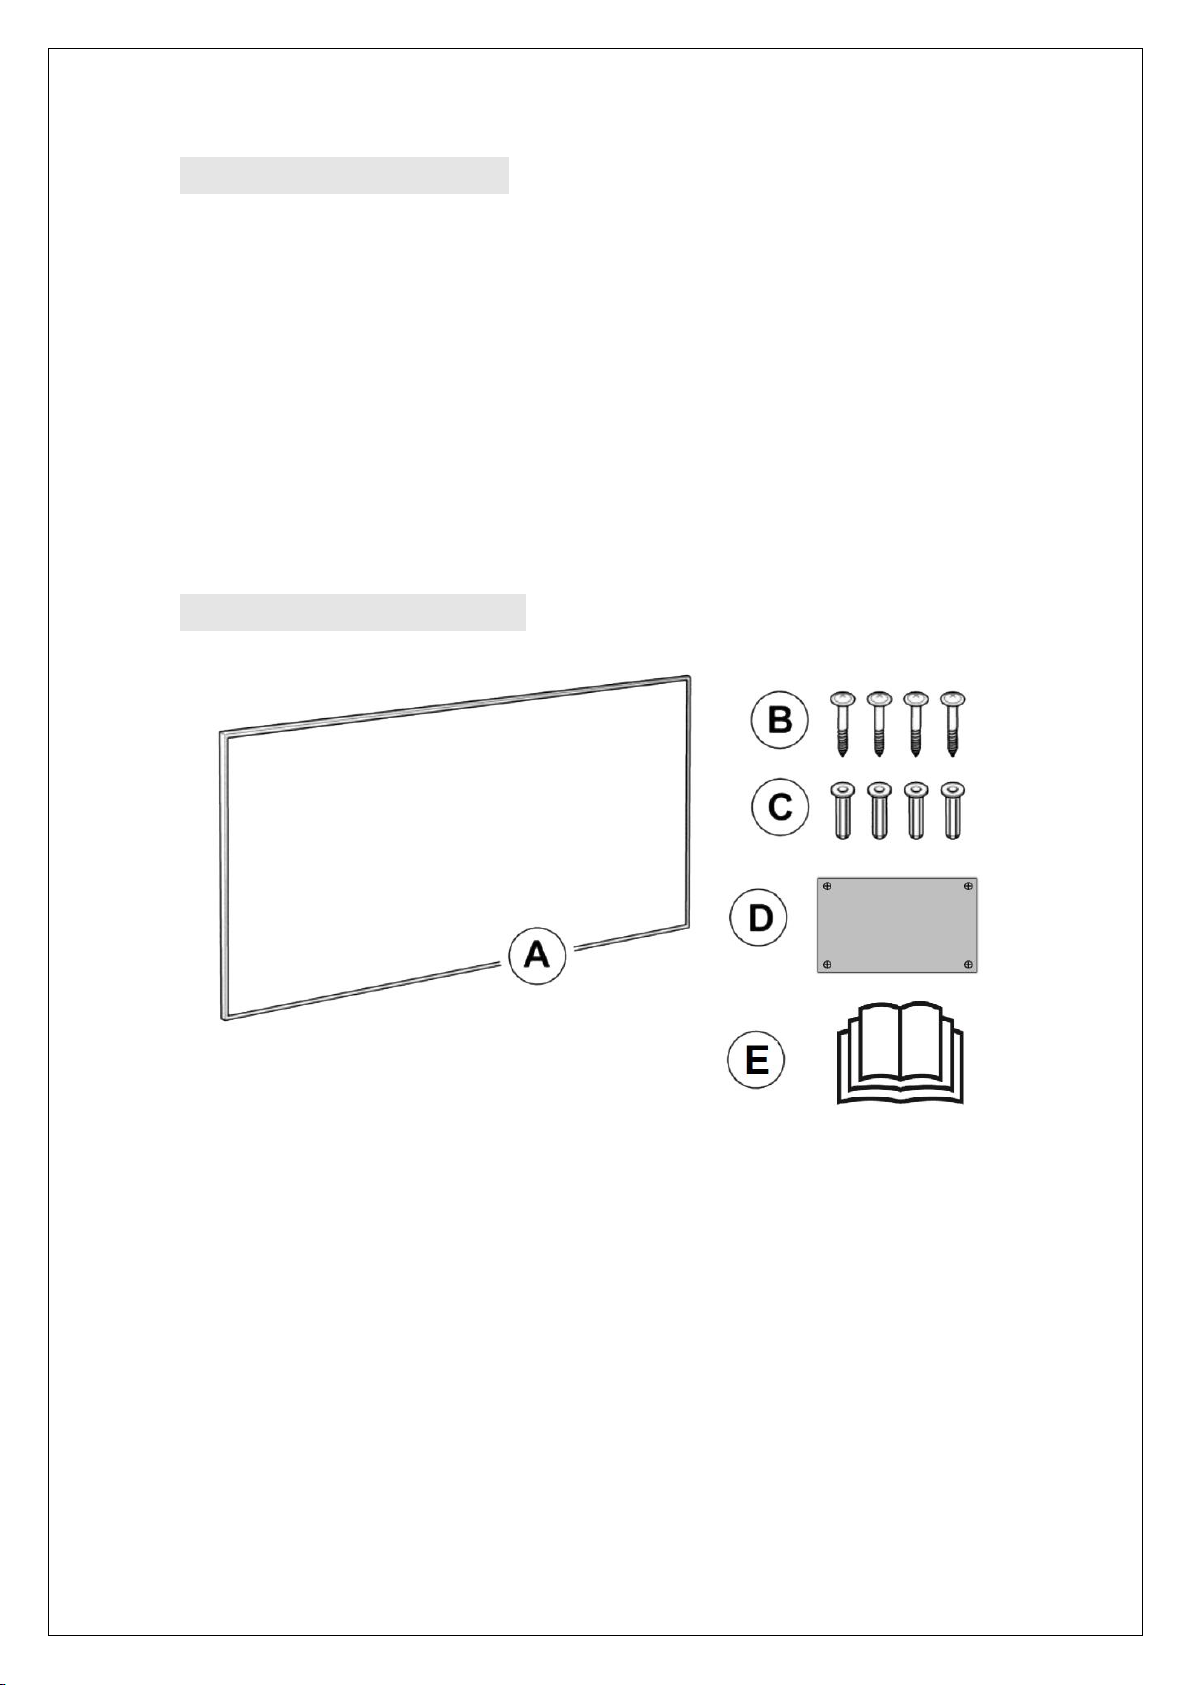
Remove all the blue protective films(both on the front and on the back) before using.
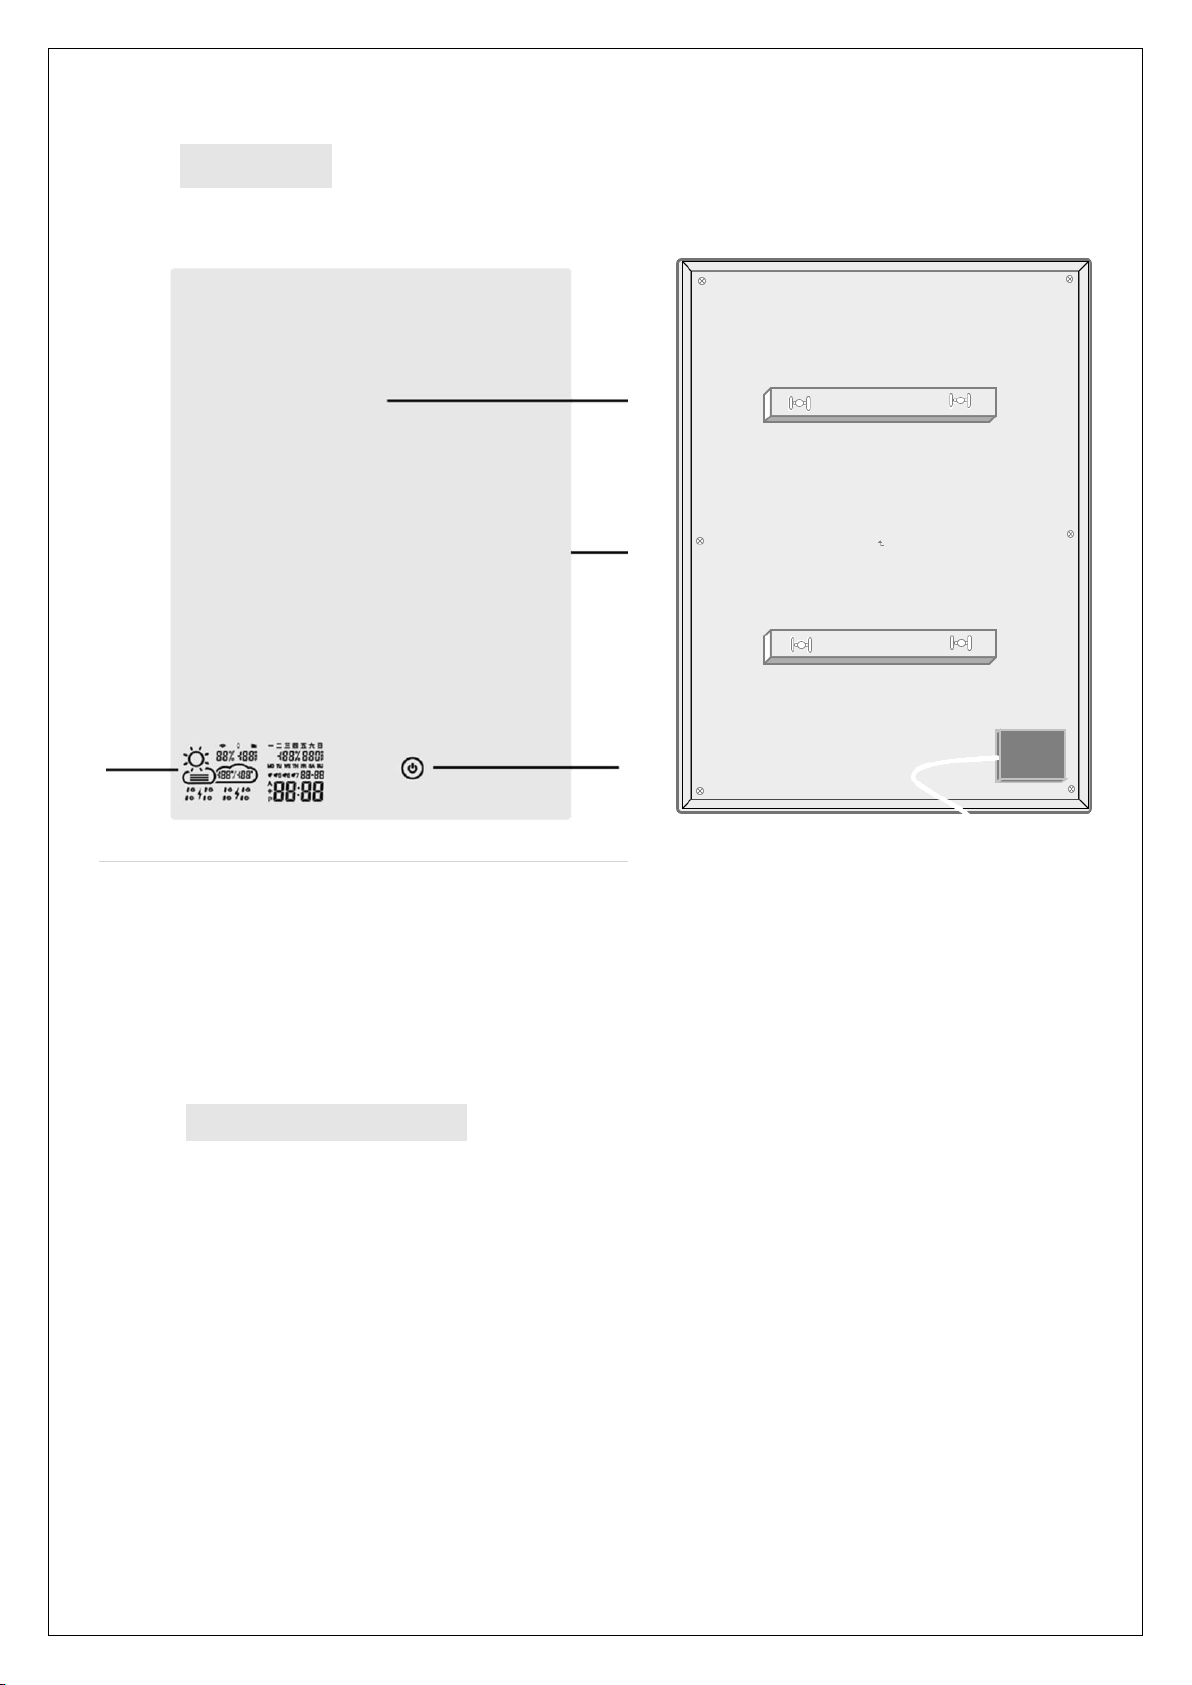
Be sure the usage voltage is between 110-240V, 50Hz, and power supply has been strictly in
accordance with IEC, left is null wire and right is live wire, and also well grounded.
The devices will draw more current than small appliances, so a separate 5A socket is required.
Do not use the device in potentially explosive rooms.
Do not use the device in aggressive atmosphere.
Set the device up in an upright and stable position.
Let the device dry out after a wet clean. Do not operate it
when wet.
Do not use the device with wet or damp hands.
Do not expose the device to directly squirting water.
Never insert any objects or limbs into the device.
Do not cover or transport the device during operation.
Do not sit on the device.
This appliance is not a toy! Keep away from children and animals. Do not leave the device
unattended during operation.
Check accessories and connection parts for possible damage prior to every use of the device. Do not
use any defective devices or device parts.
Ensure that all electric cables outside of the device are protected from damage (e.g. caused by
animals). Never use the device if electric cables or the power connection are damaged!
The electrical connection must be according to the specifications in chapter Technical data.
Insert the mains plug into a properly secured mains socket.
Do not use the device when the socket or wire overloaded.
Observe the device's power input, cable length and intended use when selecting extensions to the
power cable. Completely unroll extension cables. Avoid electrical overload.
Before carrying out maintenance, care or repair work on the device, remove the mains plug from the
2

mains socket. Hold onto the mains plug while doing so.
Switch the device off and disconnect the power cable from the mains socket when the device is not
in use.
Do not under any circumstances use the device if you detect damages on the mains plug or power
cable. If the supply cord is damaged, it must be replaced by the manufacturer, its service agent or
similarly qualified
persons in order to avoid a hazard. Defective power cables pose a serious health risk.
During the installation of the device observe the minimum distances from walls and other objects as
well as the storage and operating conditions specified in the Technical data chapter.
Never drill into the heating device.
Do not use the device once any damage found on the glass or mirror surface.
Do not use the device in immediate proximity to curtains.
Do not place the device on combustible ground.
Do not transport the device during operation.
Do not touch the surface during the device working to avoid burns.
Allow the device to cool down before transport and / or maintenance work.
Do not use this device near bathtubs, shower trays, swimming pools or other water containers. Risk
of electric shock!
The device must be placed where the switches and controllers cannot be touched by a person in a
bathtub or shower.
Do not use this device in a child-care centre and bathroom.(Only for Sweden)
Do not place any objects, e.g. clothing, on the device.
Do not use the device outdoors. Do not place the device on wet or flooded ground.
Do not unplug by pulling on the cable. To unplug, grasp the plug, not the cable.
Do not stretch the cable or place the cable under strain.
Keep cable away from heated surfaces.
Do not run the cable under carpeting. Do not cover the cable with throw rugs, runners, or similar
coverings. Do not route the cable under furniture or appliances. To avoid a tripping hazard arrange the
cable away from traffic areas so that it will not be tripped over.
3

Do not use on soft surfaces, such as a bed, where openings may become blocked.
Keep combustible materials, such as furniture, pillows, bedding, papers, clothes and curtains, at
least 0.9m (3 feet) from the front of the appliance and keep them away from the sides and rear when
the appliance is plugged in.
If there is a loose fit between the plug and the socket or the plug becomes very hot, the socket may
need to be replaced. Check with a qualified electrician to replace the socket.
Turn off all controls before unplugging. Unplug before connecting any tool or accessory.
Allow the device to cool down before transport or maintenance work.
Do not privately disassemble the device or replace parts, otherwise it may cause mechanical failure,
electric shock, fire or body injury.
The warranty is not applicable for the product fault caused by private disassembly.
Warning:
Do not cover.
Insert the mains plug into an outlet that is properly installed and grounded.
Do not locate directly below a mains electricity supply socket.
PRODUCT INFORMATION
TECHNICAL DATA
Model
BKD-G0606-WLH/D
BKD-G0806-WLH/D
BKD-G1006-WLH/D
BKD-G1206-WLH/D
Size
600*600mm
600*800mm
600*1000mm
600*1200mm
Thickness(after install)
44mm
44mm
44mm
44mm
Net Weight
7.2KG
9.8KG
12.2KG
14.9KG
Rated Voltage
110-240V/50HZ
Heating/Defogging Power
200W/26W
250W/35W
350W/50W
500W/66W
LED Power
10W
12W
13W
15W
Weather Display Module Power
Around 2W
Material
Mirror + Aluminum
Weather server
Internet Weather
Note: Heating and Defogging functions should be mutually exclusive.
4

STRUCTURE
(Front)(Back)
①Mirror Surface ②LED Strip Light
③Touch Switch ④Display Screen(Visible when double-click)
⑤Mounting Brackets ⑥Temperature Humidity Sensor
INSTALLATION
(1)Choose the mounting position, keep the required minimum distances;
(2)Mark the positions for the bore holes onto the drilling template (D) if there are no
existing marks. Stick the drilling template on the wall;
○,5
○,6
Fout!
○,2
Fout!
Fout!
5

(3)Drill the holes. Insert the screws into the dowels and fasten the screws. The screws
should protrude approx.1.5 cm from the dowels;
(4)Tear off the back protective film, Hang the mirror (A) on the screws and move it to
one direction.
Note: please tear off the front and back protective film once you start to use.
OPERATION
START-UP:
1. Check if the power cord is intact.
2. Check if the power supply voltage is consistent, the power socket is required to have a
grounding terminal and good grounding performance.
3. Whether the power cord plug and socket are matched, the socket can withstand
110-240V/50HZ, 10A. If it is lower than this value, it cannot be used to avoid accidents.
FUNCTIONAL OPERATING INSTRUCTIONS:
6

1. After the power is turned on, the backlight of the touch button is always on;
Click the touch button once, the surrounding LED lights up, touch again, the light goes
out. If the LED lighting is not selected when ordering, click the touch button is invalid;
2. Double click the touch button once, the weather display screen is turned on, and double
click again to close;
3. Long press the touch button to turn on the heating or defogging function, the blue
heating indicator next to the touch button lights up, long press again to turn off
heating/Defogging. If the function of heating or fogging is not selected when ordering,
Long press the touch button is invalid.
WEATHER DISPLAY OPERATING INSTRUCTIONS:
1. Ensure that the installation location has a good WIFI signal, and make the operating of
mobile phone and smart mirror APP connected to the same WIFI hotspot;
2. Double click the touch switch to start the screen and wait for the screen to display the
SCAN status;
3. Scan the QR code of the following figure (1) and install the APP according to the
prompts;
Note: This App only supports Android phone operation for the time being. The weather
display WIFI needs to use the Android phone only for the first time and when you
occasionally changes its settings later.
For IOS operating system, please search and install the APP named“WifiClock" in App
Store
Figure (1) Figure (2)
4. After the installation is successful, find the WifiClock application icon on the mobile
phone desktop and open it, as shown in the figure above (2);
7

5. After opening the app, the following interface is displayed, click to add a WIFI clock;
6. Next select the WIFI hotspot and enter the wireless password. The screen will display
the configuration, waiting for about 60 seconds, at the same time, the mirror screen
displays JOIN, then PAIR is set successfully.
7. After the pairing is successful, the following interface is displayed. A mobile phone
can add several WIFI clock terminals.
8. For each WIFI clock device, you can make the following settings.
8

1) Basic setting: You can set the switch button sound. This button sound refers to
whether the buzzer inside the mirror is buzzing when the phone is operated. 24 hours/12
hours display selection; day and month mode selection; temperature unit selection; digital
tube display brightness adjustment on the mirror.
2) Alarm setting: Users can set several groups of alarms through the mobile phone. Until
the time, the buzzer alarm inside the mirror will sound.
3) Weather setting: After the weather scroll screen is turned on, the screen will scroll the
weather of the day and tomorrow (d2);the area setting is used to select the area where the
weather is to be displayed. The default is automatically set to the local area where the
network IP belongs. If the automatic positioning is not successful, you need to manually
set the area; server selection means that if the user finds that the displayed weather is
quite different from the actual weather, you can replace another server to get a more
accurate weather display; today's weather selection refers to whether the screen display is
real-time weather or the total forecast of the day.
Note: The weather information source of this APP application is from internet, and there
may be that the weather update is not timely.
4) Sleep mode: Refers to setting the digital light screen display timing, the screen system
will automatically reduce the brightness during sleep, to achieve the purpose that energy
saving or not affect the user's sleep;
5) Firmware version: Refers to the current software version, the system will
automatically update the version if necessary;
6)Delete device: Refers to the mobile phone is no longer connected to the device, after
deleting, you need to restart the connection.
7) When the WIFI hotspot is replaced, you need to restart the device to reconnect. The
specific operation is to cut off the total power supply three times or more. Each
power-on needs to hear the “Patter” inside the mirror before the next power-off.
After three or more power-offs, double click the touch switch to turn on the screen.
The SCAN status is displayed and set up by the mobile phone.
9

8)The device displays 11 different icons, including sunny, overcast, cloudy, light rain,
heavy rain, thunderstorm, shower, light snow, heavy snow, sleet and haze / fog. The icons
is shown in the following table:
MAINTENANCE
The appliance must be switched off and unplugged before taking regular cleaning
and care. Otherwise, it may cause electric shock..
The appliance needed only external cleaning and care regularly.
Please use some medicinal alcohol clean the surface with damped soft cloth. Never
10

clean it under running water. Do not use thinner, toluene,benzene, acidic/alcoholic
cleaning agents, or any chemical clothes on the appliance.
After regular care and cleaning, well pack it into the original packing box, then put it to
dry and cool environment for storage.
Wind and keep dry the cable when not in use.
TROUBLESHOOTING
The device has been checked for proper functioning several times during production. If
malfunction occur nonetheless, check the device according to the following list.
Problem
Reason
Measure
The touch button does not light
The device does not start
Check the power connection
The device makes noises after
switch-on
Some parts are loose
caused by transportation
It’s a normal process. No measure are
required.
The surface bulges slightly
The material expands due
to heating
It’s a normal process. No measure are
required.
Indoor Temperature / humidity
are displayed inaccurately
The sensor maybe covered
Make sure that the senor is placed at a
right position,should not be covered
or touched by other materials.
The device is unable to connect
WIFI
Wifi signal is poor or
network failures
Restart the router and device.
The real-time weather is
displayed inaccurately
weather data is not updated
Connect another sever in your APP.
Display code Err
The device failed to
connect to configured
network, and the previous
data already expired.
Restart your router, make sure that the
wifi signal strength as good as enough
Display code 05
The configured router is
connected to too many
devices
Replace another router or reduce
connected devices.
Display code 201
The configured network is
unreachable or . WIFI
hotspot is replaced
Make sure the device, Wi-Fi router
and the smartphone closer together.
Refer to Step 8-(7).
11

Warranty Card
NAME TEL
ADD
MODEL ORDER NO.
Date
Failure Description
THANK YOU FOR CHOOSING TO BUY THIS APPLIANCE.
Customers can contact us for repairing or replacement of this appliance if it is found to be
defective due to faulty materials, workmanship or function within 1 years of purchase or
delivery.
We do not guarantee the repair or replacement of a product where a defect is the result of:
•Damage caused by not carrying out the recommended appliance maintenance.
•Accidental damage, faults caused by negligent use or care, misuse, neglect,careless
operation or handling of the appliance which is not in accordance with our Operating
Manual.
•Use of the appliance for anything other than normal domestic household purposes.
•Faulty installation .
•Repairs or alterations carried out by parties other than the manufacturer or its
authorised agents.
If you are in any doubt as to what is covered by your guarantee, please contact us.
12
This manual suits for next models
3
Table of contents
Other BYECOLD Personal Care Product manuals