C Luce Avantgarde S User manual

F - Français
Assurez-vous que vous avez supprimé la tension avant l'installation ou
l'entretien. Suivez les procédures d'installation pour assurer le bon
fonctionnement de cette unité. Le produit ne doit pas être modifié, tout
changement entraînera l'annulation de l'agrément de sécurité et le
produit sera rendu dangereux. Le fabricant décline toute responsabilité
sur les produits en cours de modification ou incorrectement installé.
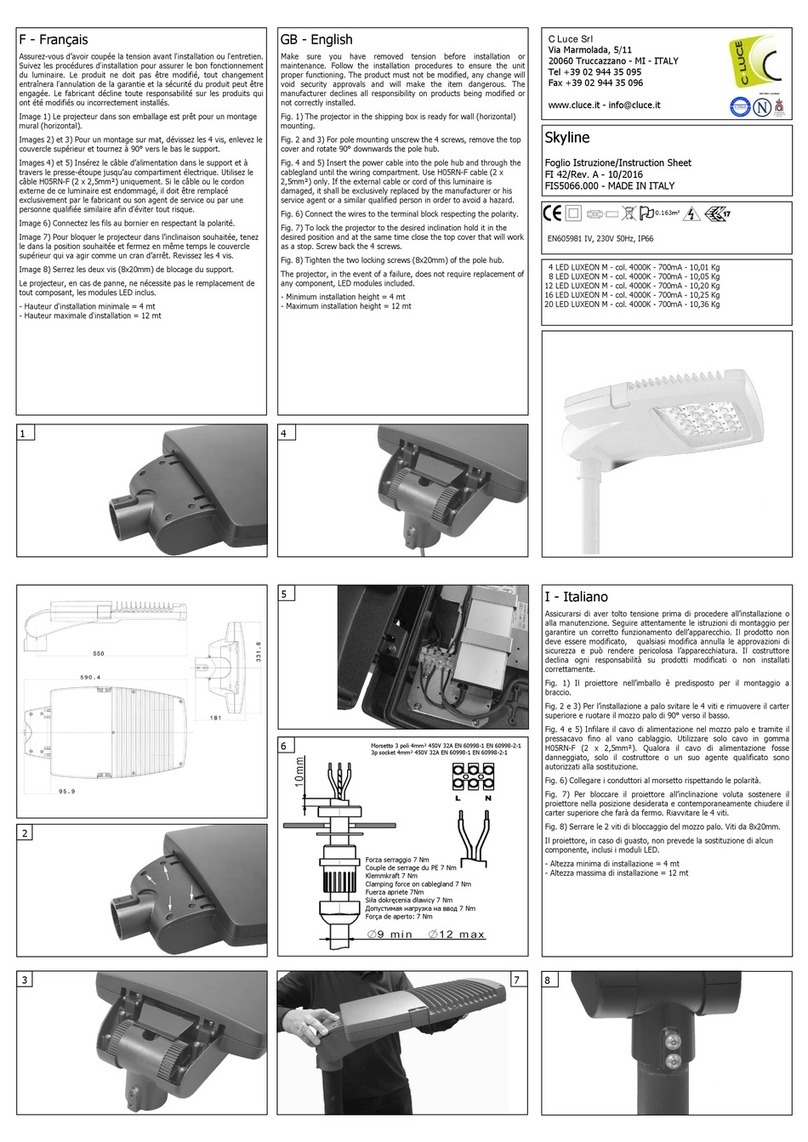
Fig. 1a) Insérer le manchon réversible sur le poteau ou sur la console
murale, et serrer les deux vis de côté le maintenir.
Fig. 1b) Insérer le corps de l’appareil sur le manchon, s'assurer d’un
bon serrage avec les deux vis latérlaes.
Fig. 2) Ajuster l’inclinaison (positions 0, 5, 10 et 15 degrés) au moyen
de la vis supérieure.
Fig. 3) Insérer le câble d'alimentation à l'intérieur de l’appareil au
travers du presse étoupe et serrer avec le couple comme indiqué.
Fig. 4) Connectez les fils au bornier en respectant les polarités.
Fig. 5) Pour accéder au compartiment de câblage:
5a) Dévisser la vis de sécurité, désengager et soulever le couvercle.
5b) Dévissez la vis de sécurité et de soulever le couvercle.
Fig. 6) Pour accéder au compartiment appareillage, pivoter le crochet
de fermeture.
Fig. 7) Pour le remplacement des lampes, désengager le crochet de
fermeture extérieur , et basculer le verre. Pour fermer l'unité suivre la
même procédure dans l'ordre inverse.
Avantgarde
Foglio Istruzione/Instruction Sheet
FI 10/Rev. E - 01/2012
FIS5000.000 - MADE IN ITALY
SHP-T 1x70W E27 1x100/150/250W E40
MH-T/S 1x70/100/150W E27
GB - English
Make sure you have removed tension before installation or
maintenance. Follow the installation procedures to ensure the unit
proper functioning. The product must not be modified, any change will
void security approvals and will make the item dangerous. The
manufacturer declines all responsibility on products being modified or
not correctly installed.
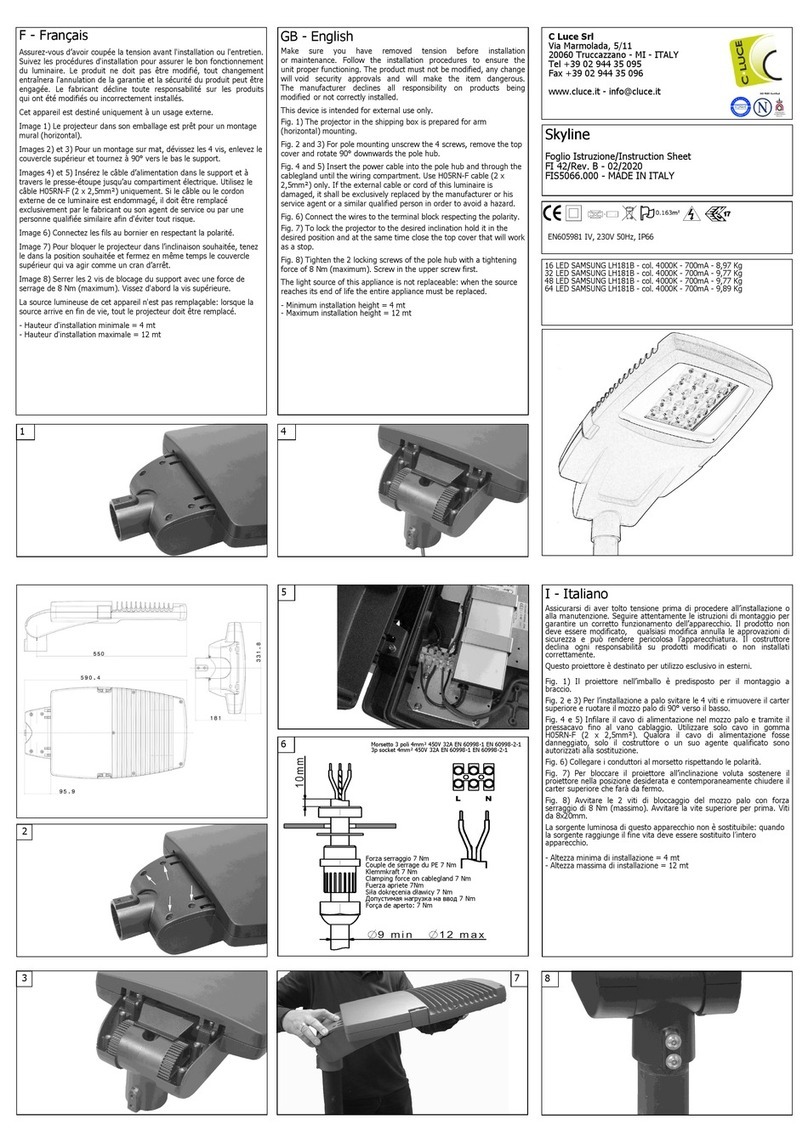
Pic. 1a) Insert the hub on pole or on the arm and tighten the two side
screws maintaining it.
Pic. 1b) Insert the main body on the hub and assure it by tightening
the two side screws.
Pic. 2) Choose the desired angle between 0, 5, 10 and 15 degrees
insert the supplied pin in one of the four slots.
Pic. 3) Insert the power cable inside the unit through the cablegland
and hold as shown.
Pic. 4) Connect wires to the terminal block respecting polarities.
Pic. 5) To access the wiring compartment:
5a) Unscrew the security screw, press the retention tab and raise the
lid.
5b) Unscrew the security screw and raise the lid.
Pic. 6) To access the wiring and lamp compartments pull out the
closure hook.
Pic. 7) For lamp replacement pull to the outside the closure hook and
lower the glass. To close the unit follow the same procedure in
viceversa order.
7
3
Morsetto 3 poli 4mm² 450V 32A
EN 60998-1 EN 60998-2-1
3p socket 4mm² 450V 32A
EN 60998-1 EN 60998-2-1
1a
Avantgarde C/S
Avantgarde Pro
Sezionatore 2 poli 4mm² 400V 16A
EN 60598
2p socket insulator block 4mm² 400V 16A
EN 60598
Avantgarde C/S Avantgarde Pro
1b
4a 4b
5a 5b
Posizioni lampada/Lamp positions
MH-T, SHP-T, MH-T PH, MV 250W Pos. 2
SHP-E 150W Pos. 3
MH-T, SHP-T 100/150W, MH-T Pos. 4
SHP-E 100W Pos. 5
MH-E, MH-T, SHP-T, SHP-E 70W, MH-E 100/150W, MV 80/125W Pos. 6
1
2
I - Italiano
Assicurarsi di aver tolto tensione prima di procedere all’installazione o
alla manutenzione. Seguire attentamente le istruzioni di montaggio per
garantire un corretto funzionamento dell’apparecchio. Il prodotto non
deve essere modificato, qualsiasi modifica annulla le approvazioni di
sicurezza e può rendere pericolosa l’apparecchiatura. Il costruttore
declina ogni responsabilità su prodotti modificati o non installati
correttamente.
Fig. 1a) Inserire il mozzo sul palo o al braccio e stringere le due viti
laterali per assicurarlo.
Fig. 1b) Inserire il corpo principale sul mozzo e assicurarlo stringendo
le due viti laterali.
Fig. 2) Scegliere l’inclinazione desiderata tra 0, 5, 10 e 15 gradi
inserendo il perno fornito in dotazione in una delle quattro cave.
Fig. 3) Inserire il cavo di alimentazione all’interno del prodotto
attraverso il pressacavo e stringerlo come indicato in figura.
Fig. 4) Collegare i conduttori al morsetto rispettando le polarità.
Fig. 5) Per accedere al vano cablaggio:
5a) Svitare la vite di sicurezza, premere sulla linguetta di ritenzione e
sollevare il coperchio.
5b) Svitare la vite di sicurezza e sollevare il coperchio.
Fig. 6) Per accedere al vano cablaggio e al vano lampada tirare verso
l’esterno il gancio di chiusura.
Fig. 7) Per il ricambio lampada tirare verso l’esterno il gancio di
chiusura e abbassare il vetro. Per la chiusura eseguire la stessa
procedura in ordine inverso.
Forza serraggio 7 Nm
Clamping force on cablegland 7 Nm
Couple de serrage du PE 7 Nm
Klemmkraft 7 Nm
Fuerza apriete 7Nm
Siła dokręcenia dławicy 7 Nm
Допустимая нагрузка на ввод 7 Nm
Força de aperto: 7 Nm
C Luce Srl
Via Marmolada, 5/11
20060 Truccazzano - MI - ITALY
Tel +39 02 944 35 095
Fax +39 02 944 35 096
www.cluce.it - [email protected]
2 Avantgarde Plus 6
266
153.9
Avantgarde Plus
574.5
198.9
Avantgarde S - IP23
Avantgarde C & Pro- IP65
Avantgarde Plus - IP66
EN605981 IV, 230V 50Hz

Fig. 1b) Insertar el cuerpo principal al soporte y asegurarlo apretando
los dos tornillos laterales.
Fig. 2) Escoger la inclinación deseada entre 0, 5, 10 o 15 grados
simplemento enroscando a fondo el tornillo que se suministra, dentro
de uno de los cuatro casquillos roscados.
Fig. 3) Insertar el cable de alimentación en el interior del producto, a
través del prensacables y sujetarlo como se indica en la figura.
Fig. 4) Unir los conductores a los bornes respetando las polaridades.
Fig. 5) Para acceder al cableado :
5a) Destornillar el tornillo de seguridad, presionar sobre la lengüeta de
retención y levantar la tapa.
5b) Destornillar el tornillo de seguridad y levantar la tapa.
Fig. 6) Para acceder al compartimento del cableado tirar hacia el
exterior el gancho de cierre.
Fig. 7) Para cambiar la lámpara, estirar hacia fuera el gancho de cierre
y bajar el cristal. Para cerrar, seguir el mismo procedimiento en sentido
contrario.
PL - Polski
Upewnić się czy naświetlacz nie jest podłączony do napięcia sieciowego
w czasie instalacji lub konserwacji oprawy. Przestrzegać bezwzględnie
instrukcji montażu. Nie należy wprowadzać żadnych zmian
technicznych. Produkt po modyfikacjach technicznych traci wszelkie
gwarancje bezpiecznego użytkowania i jego funkcjonowanie może
stwarzać zagrożenie. Producent nie ponosi odpowiedzialności za
ewentualne konsekwencje powstałe na skutek niewłaściwego montażu
oprawy lub wprowadzania zmian w jej strukturze technicznej.
Rys. 1a) Umieścić podstawę mocującą na słupie lub wysięgniku i
przykręcić 2 śruby boczne.
Rys. 1b) Umieścić korpus oprawy na podstawie mocującej i przykręcić 2
śruby po bokach.
Rys. 2) Wybrać odpowiednie nachylenie oprawy ( 0°, 5°, 10°, 15°) i
dokręcić śrubę do oporu w odpowiednim otworze.
Rys. 3) Wprowadzić przewód zasilający przez wejście kablowe i
zacisnąć dławicę jak na rysunku.
Rys. 4) Podłączyć przewody do zacisków według biegunów.
Rys.5) Aby otworzyć oprawę:
5a) Odkręcić śrubę zabezpieczającą, przycisnąć zacisk i podnieść
pokrywę oprawy.
5b) Odkręcić śrubę zabezpieczającą i podnieść pokrywę.
Rys. 6) W celu dostępu do korpusu z komponentami elektrycznymi
należy odciągnąć klips zabezpieczający.
Rys.7) W celu wymiany źródła odciągnąć klips blokujący i uchylić szybę.
Zamknąć oprawę powtarzając czynności w odwrotnej kolejności.
PT - Português
Certifique-se que desligou a tensão de alimentação do aparelho antes
da instalação ou manutenção. Seguir as instruções de montagem para
garantir um correcto funcionamento do aparelho. O produto não deve
ser modificado, uma vez que qualquer modificação anula as aprovações
de segurança e pode tornar a luminária perigosa. O fabricante declina
toda a responsabilidade de produtos modificados ou instalados
incorrectamente.
Fig. 1a) Insira o suporte no poste ou no braço e apertar com os dois
parafusos laterais para o fixar.
Fig. 1b) Inserir o corpo principal no poste e fixeo apertando os dois
parafusos laterais.
Fig. 2) Escolher a inclinação desejada entre 0, 5, 10 ou 15 graus
simplesmente enroscando a fundo o parafuso fornecido dentro de um
dos quatro orifícios roscados.
Fig. 3) Insira o cabo de alimentação no interior do produto, através do
bucim e prende-lo como indicado na figura.
Fig. 4) Conectar os condutores ao ligador, respeitando as polaridades.
Fig. 5) Para aceder ao compartimento das ligações:
5a) Desaperte o parafuso de segurança, pressionar sobre a patilha de
retenção e levantar a tampa.
5b) Desapertar o parafuso de segurança e levantar a tampa.
Fig. 6) Para aceder ao compartimento de ligações puxe o gancho de
encaixe.
Fig. 7) Para trocar a lâmpada, puxar para fora o gancho de fecho e
baixar o vidro. Para fechar, seguir o mesmo procedimento no sentido
contrário.
RUS - Русский
Перед началом установки и обслуживания оборудования
убедитесь, что питание отключено. Для корректной работы
осветительного оборудования следуйте инструкции по установке. В
конструкцию светильника нельзя вносить изменения, любое
отклонение от данного правила может привести к нарушению
безопасности работы светильника. Производитель снимает с себя
всю ответственность за работу оборудования в случае его
изменения или некорректной установки.
Рис.1а) Установите блок крепления на столбе или консоли и
затяните боковые крепежные винты.
Рис. 1b) Оденьте корпус светильника на блок крепления и затяните
боковые крепежные винты.
Рис. 2) Выберите желаемый установочный угол 0-5-10-15 град.,
установив прилагаемый винт в отверстие с соответствующей
маркировкой.
Рис. 3) Введите кабель питания через муфту, как показано на
рисунке.
Рис. 4) Подсоедините кабели к распаечной коробке, соблюдая
полярность.
Рис. 5) Для доступа к отсеку подключения питания на светильнике
необходимо:
5a) Открутить предохранительный винт, нажать на язычок и
поднять крышку.
5b) Открутить предохранительный винт и поднять крышку.
Рис. 6) Для замены лампы потяните ручку крепления стекла и
опустите стекло. После замены лампы, выполните те же действия в
обратном порядке.
I Conformità ai requisiti essenziali di sicurezza previsti da una o più Direttive Comunitarie
GB Compliance with essential security requirements provided by one or more Community Directives
F Appareil en conformité avec l’essentiel des exigences de sécurité des directives communautaires
DE Das Produkt entspricht den geltenden europäischen Sicherheits-Richtlinien
E Conformidad a los requisitos esenciales de seguridad previstos por una o varias Directivas Comunitarias
PL Zgodność z podstawowymi wymogami bezpieczeństwa, przewidzianymi przez jedną lub więcej Dyrektyw UE
RUS Изделие соответствует требованиям директив ЕЭС
PT Conforme os requisitos essenciais de segurança e outros, previstos por uma ou mais Directivas Comunitárias aplicáveis
./.
I Superficie esposta al vento
GB Surface exposed to the wind
F Surface exposée eu vent
DE Windangriffsfläche
E Superficie expuesta al viento
PL Powierzchnia płaszczyzny czołowej oprawy
RUS Поверхность располагать по ветру
PT Superfície exposta ao vento
I Prodotto dotato di accenditore esterno
GB Fitting equipped with external ignitor
F Appareil équipé d'un amorceur
DE Produkt ist mit einem externen Versorgungsteil ausgestattet
E Producto dotado de encendedor externo
PL Oprawa posiada zewnętrzny zapłonnik
RUS Оборудование поставляется с внешним стартером
PT Produto equipado com ignitor externo
DE - Deutsch
Vor Beginn der Installation oder Wartung ist sicher zu stellen, dass die
Leuchte vom Strom getrennt ist. Die einzelnen Montageschritte müs-
sen, damit die Leuchte richtig funktioniert, sorgfältig durchgeführt
werden. Das Produkt darf nicht modifiziert werden, jede Veränderung
am Produkt führt zum Erlöschen der Garantie und kann gefährliche
Auswirkungen haben. Bei modifizierten oder nicht richtig installierten
Produkten erlischt die Haftung des Konstrukteurs.
Fig. 1a) Die Befestigungsnabe über den Pfahl stülpen oder am Auslege-
arm befestigen. Die zwei seitlichen Schrauben festziehen.
Fig. 1b) Den Leuchtenkörper an der Nabe befestigen und die seitlichen
Schrauben anziehen.
Fig. 2) Gewünschten Neigungswinkel, zwischen 0, 5, 10 und 15 Grad,
einstellen und die zusätzlich mitgelieferte Schraube mit einer der vier
Nieten verschrauben.
Fig. 3) Das Kabel durch die Zugentlastung ins Innere des Strahlers
führen und, wie auf der Zeichnung beschrieben, befestigen.
Fig. 4) Die Leitung an den entsprechenden Polen der Kabelklemme
anschließen.
Fig. 5) Vorgehensweise für den Anschluss:
5a) Sicherheitsschraube abschrauben und Befestigungslasche eindrü-
cken. Deckel abnehmen.
5b) Sicherheitsschraube abschrauben und Deckel abnehmen.
Fig. 6) Um ins Innere der Leuchte zu gelangen, den Verschlussbügel
nach außen wegziehen.
Fig. 7) Zum Wechseln des Leuchtmittels den Verschlusshaken nach
außen ziehen und das Glas nach unten wegkippen. Zum Schließen
werden dieselben Schritte wie beim Öffnen, jedoch in umgekehrter
Reihenfolge, durchgeführt.
E - Español
Asegurarse de haber quitado la corriente antes de proceder a la
instalación o manutención. Seguir atentamente las instrucciones de
montaje para garantizar un correcto funcionamiento del aparato. El
producto no debe ser modificado, ya que cualquier modificación anula
las aprobaciones de seguridad y puede convertir la luminaria en
peligrosa. El fabricante declina cualquier responsabilidad de los
productos modificados o instalados incorrectamente.
Fig. 1a) Insertar el soporte al palo o brazo y sujetar con los dos
tornillos laterales para asegurarlo.
I Prodotto in classe II
GB Product in class II
F Appareil de classe électrique II
DE Schutzklasse II
E Producto de clase II
PL Oprawa w Klasie II
RUS Светильник класса II
PT Produto de classe II
I Distanza minima dagli oggetti illuminati
GB Minimum distance from enlighted objects
F Distance minimal de sécurité
DE Mindestabstand zu den beleuchtenden Objekten
E Distancia mínima de los objetos iluminados
PL Minimalna odległość od oświetlanych obiektów
RUS Минимальное расстояние до освещаемого объекта
PT Distancia mínima aos objectos iluminados
I Sostituire gli schermi di protezione danneggiati
GB Replace any cracked protective shield
F Remplacer tout verre abimé
DE Defekte Sicherheitsgläser austauschen
E Sostituir las protecciones dañadas o estropeadas
PL Wymienić uszkodzone klosze
RUS Замените любой поврежденный элемент
PT Substituir as protecções partidas ou danificadas
I Conforme alla direttiva WEEE
GB Comply with the WEEE directive
F En conformité avec les directives de la DEEE
DE WEEE-Konform
E Conforme a la directiva WEEE
PL Zgodność z dyrektywą WEEE
RUS Утилизировать в соответствие со стандартом WEEE
PT Conforme com a Directiva REEE
I Totalmente protetto contro la polvere e i getti d’acqua
GB Dust-tight and protected against water jets
F Étanche à la poussière et protégés contre les jets d'eau
DE Staubdicht und geschützt gegen Strahlwasser
E Totalmente protegido contra el polvo i los chorros de agua
PL Oprawa szczelna
RUS Защищен от пыли и струй воды
PT Totalmente protegido contra pó e jactos de água
I Protetto contro i corpi solidi maggiori di 12 mm e contro la pioggia
GB Protected against solid objects greater than 12 mm and spraying water
F Protégé contre les objets solides de plus de 12 mm et de projection d'eau
DE Geschützt gegen Fremdkörper > 12 mm und Sprühwasser
E Protegido contra los cuerpos sólidos mayores de 12 mm y contra la lluvia
PL Ochrona przed dostaniem się obcych ciał stałych o średnicy do 12mm i przed wnikaniem wody natryskiwanej
RUS Защищено от проникновения твердых частиц, размер которых превышает 12 мм и струй воды
PT Protegido contra objectos sólidos maiores do que 12 mm e projecção de água
I Totalmente protetto contro la polvere e contro le onde
GB Dust-tight and protected against heavy seas
F Protégé contre les poussières et les influences marines
DE Staubdicht und geschützt gegen schwere See
E Totalmente protegido contra el polvo y las olas
PL Oprawa szczelna
RUS Защищен от пыли и больших потоков воды (волн)
PT Totalmente protegido contra entrada de pó e projecções
de água semelhantes às ondas do mar
IP65
IP23
IP66
I Marchio di conformità agli Standard Europei per componenti ed apparati di illuminazione
GB Mark of compliance with European standards for lighting equipments and components
F Marque de conformité avec les normes européennes pour les équipements d’éclairage et composants
DE Konformitätszeichen des Europäischen Standards für Beleuchtungsapparate und Zubehör
E Marco de conformidad a los estandards europeos para componentes y aparatos de iluminación
PL Znak zgodności ze Standardem Europejskim, co do komponentów i sprzętu oświetleniowego
RUS Знак ENEC (Европейские Нормы по Электрической Сертификации) свидетельствует о соответствии продукции всем европейским нормам
PT Marca de conformidade com as normas Europeias para componentes e aparelhos de iluminação
This manual suits for next models
3
Other C Luce Outdoor Light manuals
Popular Outdoor Light manuals by other brands
silversun
silversun VIAL STHP50CWS installation guide
Larson Electronics
Larson Electronics SPLED-STL-600W-12V-M1 instruction manual
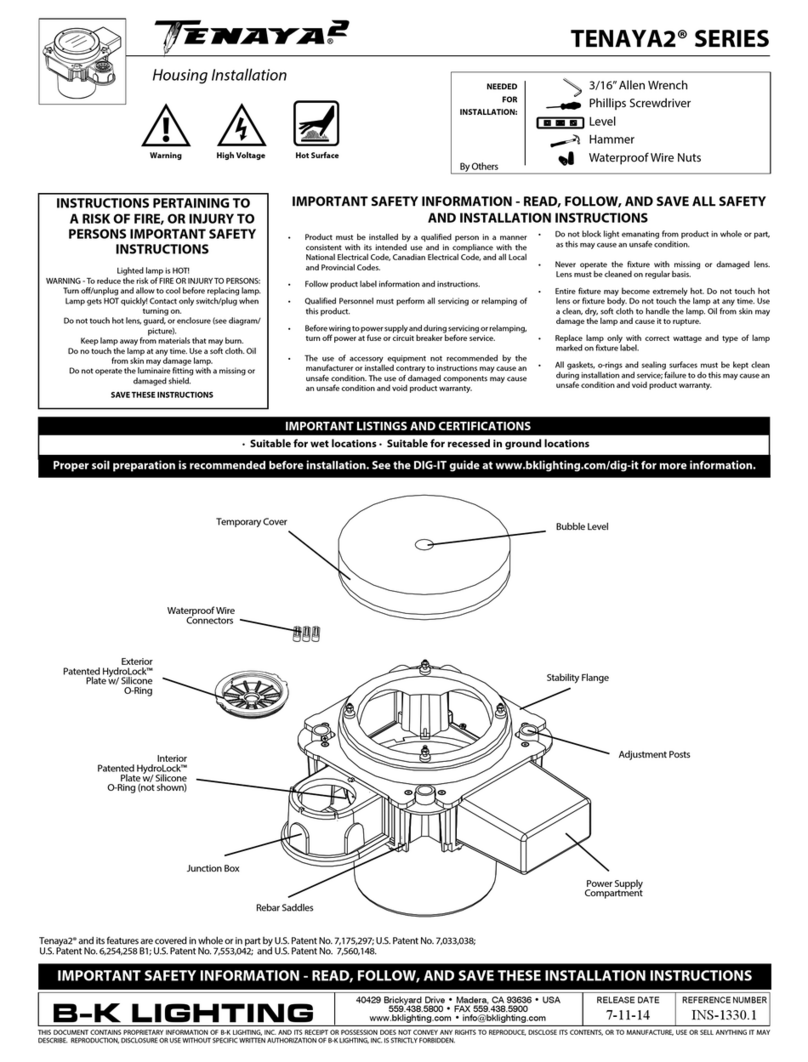
B-K lighting
B-K lighting TENAYA2 Series Housing Installation
GE
GE FPH-100/2F quick start guide
Conrad
Conrad Prebent operating instructions

Lithonia Lighting
Lithonia Lighting DLSD1 installation instructions
elvita
elvita E115692 user manual

Sea gull lighting
Sea gull lighting Crittenden 8538501 installation instructions
Heath
Heath DualBrite manual
Glashutte Limburg
Glashutte Limburg 56 343.3 Instructions for use
Hubbardton Forge
Hubbardton Forge Erlenmeyer Dark Sky Assembly/installation instructions
DÖRR
DÖRR CL-1285 SOFT LIGHT instruction manual
