C Luce LUXEON M User manual
Morsetto 3 poli 4mm² 450V 32A EN 60998-1 EN 60998-2-1
3p socket 4mm² 450V 32A EN 60998-1 EN 60998-2-1
Forza serraggio 7 Nm
Couple de serrage du PE 7 Nm
Klemmkraft 7 Nm
Clamping force on cablegland 7 Nm
Fuerza apriete 7Nm
Siła dokręcenia dławicy 7 Nm
Допустимая нагрузка на ввод 7 Nm
Força de aperto: 7 Nm
04 LED LUXEON M - col. 4000K - 700mA - 10,01 Kg
08 LED LUXEON M - col. 4000K - 700mA - 10,05 Kg
12 LED LUXEON M - col. 4000K - 700mA - 10,20 Kg
16 LED LUXEON M - col. 4000K - 700mA - 10,25 Kg
20 LED LUXEON M - col. 4000K - 700mA - 10,36 Kg
F - Français
Assurez-vous d’avoir coupée la tension avant l'installation ou l'entretien.
Suivez les procédures d'installation pour assurer le bon fonctionnement
du luminaire. Le produit ne doit pas être modifié, tout changement
entraînera l'annulation de la garantie et la sécurité du produit peut être
engagée. Le fabricant décline toute responsabilité sur les produits qui
ont été modifiés ou incorrectement installés.
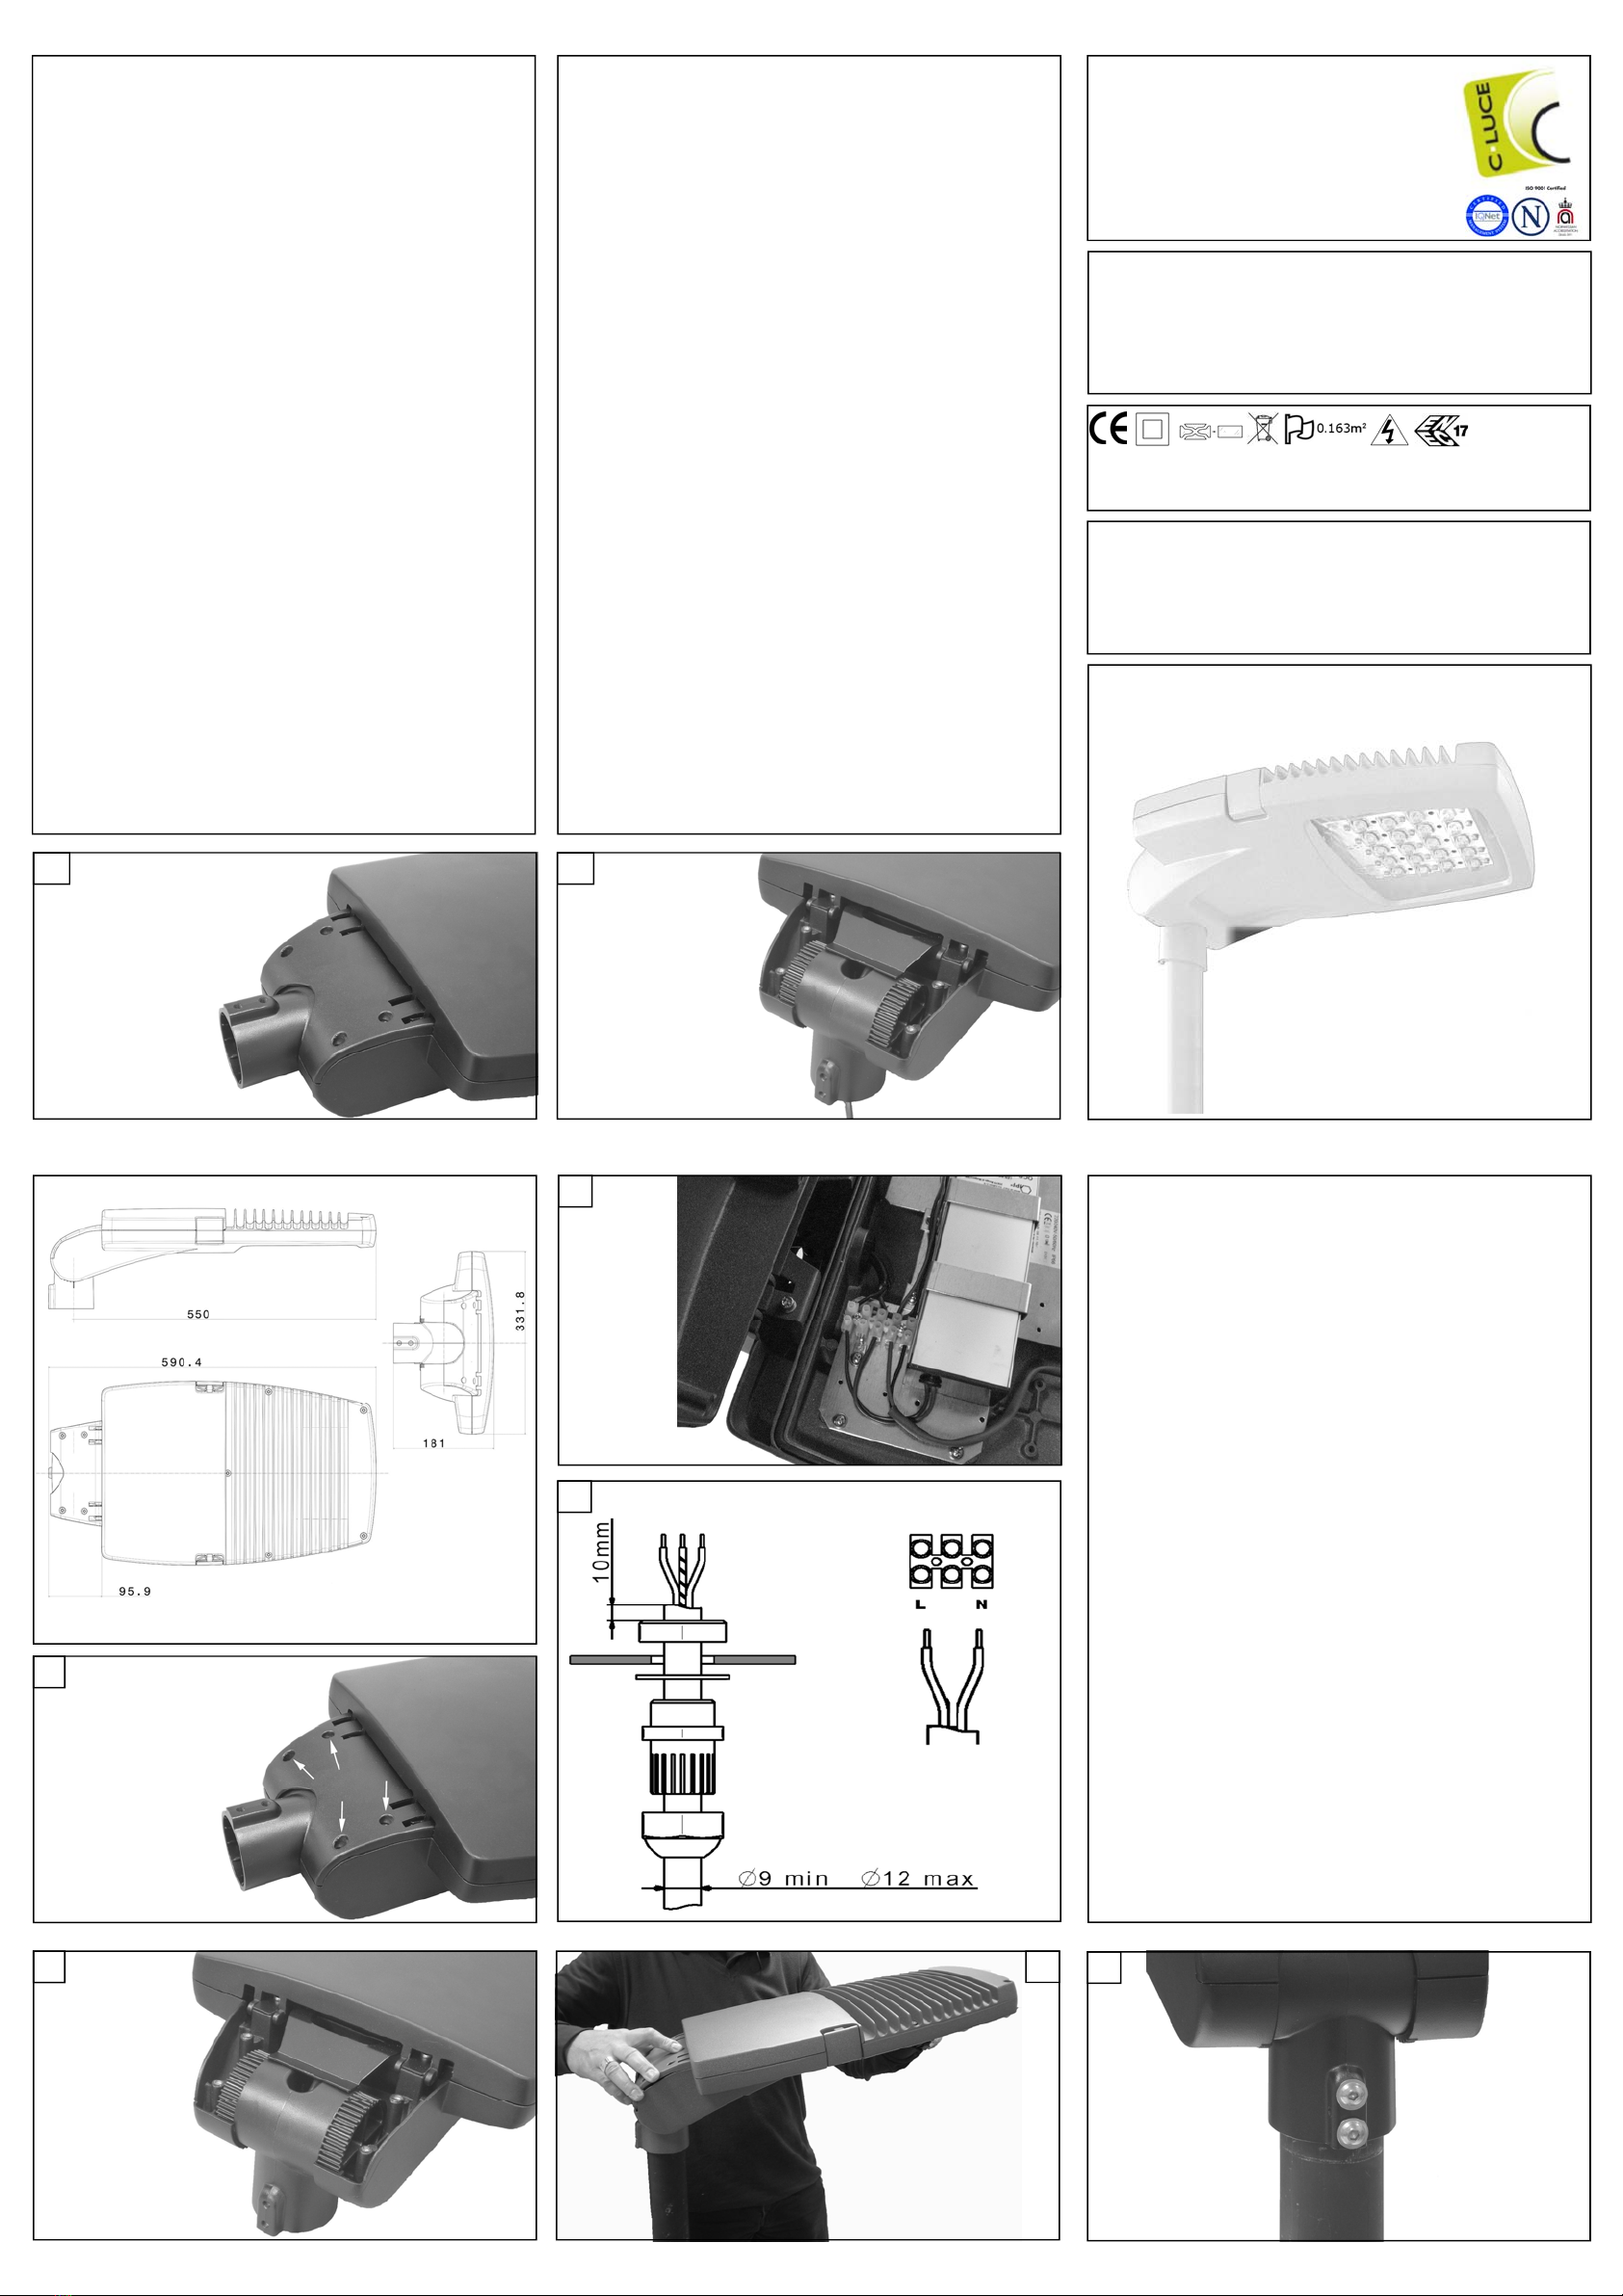
Image 1) Le projecteur dans son emballage est prêt pour un montage
mural (horizontal).
Images 2) et 3) Pour un montage sur mat, dévissez les 4 vis, enlevez le
couvercle supérieur et tournez à 90° vers le bas le support.
Images 4) et 5) Insérez le câble d’alimentation dans le support et à
travers le presse-étoupe jusqu’au compartiment électrique. Utilisez le
câble H05RN-F (2 x 2,5mm²) uniquement. Si le câble ou le cordon
externe de ce luminaire est endommagé, il doit être remplacé
exclusivement par le fabricant ou son agent de service ou par une
personne qualifiée similaire afin d'éviter tout risque.
Image 6) Connectez les fils au bornier en respectant la polarité.
Image 7) Pour bloquer le projecteur dans l’inclinaison souhaitée, tenez
le dans la position souhaitée et fermez en même temps le couvercle
supérieur qui va agir comme un cran d’arrêt. Revissez les 4 vis.
Image 8) Serrez les deux vis (8x20mm) de blocage du support.
Le projecteur, en cas de panne, ne nécessite pas le remplacement de
tout composant, les modules LED inclus.
- Hauteur d'installation minimale = 4 mt
- Hauteur maximale d'installation = 12 mt
Skyline
Foglio Istruzione/Instruction Sheet
FI 42/Rev. A - 10/2016
FIS5066.000 - MADE IN ITALY
GB - English
Make sure you have removed tension before installation or
maintenance. Follow the installation procedures to ensure the unit
proper functioning. The product must not be modified, any change will
void security approvals and will make the item dangerous. The
manufacturer declines all responsibility on products being modified or
not correctly installed.
Fig. 1) The projector in the shipping box is ready for wall (horizontal)
mounting.
Fig. 2 and 3) For pole mounting unscrew the 4 screws, remove the top
cover and rotate 90° downwards the pole hub.
Fig. 4 and 5) Insert the power cable into the pole hub and through the
cablegland until the wiring compartment. Use H05RN-F cable (2 x
2,5mm²) only. If the external cable or cord of this luminaire is
damaged, it shall be exclusively replaced by the manufacturer or his
service agent or a similar qualified person in order to avoid a hazard.
Fig. 6) Connect the wires to the terminal block respecting the polarity.
Fig. 7) To lock the projector to the desired inclination hold it in the
desired position and at the same time close the top cover that will work
as a stop. Screw back the 4 screws.
Fig. 8) Tighten the two locking screws (8x20mm) of the pole hub.
The projector, in the event of a failure, does not require replacement of
any component, LED modules included.
- Minimum installation height = 4 mt
- Maximum installation height = 12 mt
EN605981 IV, 230V 50Hz, IP66
6
I - Italiano
Assicurarsi di aver tolto tensione prima di procedere all’installazione o
alla manutenzione. Seguire attentamente le istruzioni di montaggio per
garantire un corretto funzionamento dell’apparecchio. Il prodotto non
deve essere modificato, qualsiasi modifica annulla le approvazioni di
sicurezza e può rendere pericolosa l’apparecchiatura. Il costruttore
declina ogni responsabilità su prodotti modificati o non installati
correttamente.
Fig. 1) Il proiettore nell’imballo è predisposto per il montaggio a
braccio.
Fig. 2 e 3) Per l’installazione a palo svitare le 4 viti e rimuovere il carter
superiore e ruotare il mozzo palo di 90° verso il basso.
Fig. 4 e 5) Infilare il cavo di alimentazione nel mozzo palo e tramite il
pressacavo fino al vano cablaggio. Utilizzare solo cavo in gomma
H05RN-F (2 x 2,5mm²). Qualora il cavo di alimentazione fosse
danneggiato, solo il costruttore o un suo agente qualificato sono
autorizzati alla sostituzione.
Fig. 6) Collegare i conduttori al morsetto rispettando le polarità.
Fig. 7) Per bloccare il proiettore all’inclinazione voluta sostenere il
proiettore nella posizione desiderata e contemporaneamente chiudere il
carter superiore che farà da fermo. Riavvitare le 4 viti.
Fig. 8) Serrare le 2 viti di bloccaggio del mozzo palo. Viti da 8x20mm.
Il proiettore, in caso di guasto, non prevede la sostituzione di alcun
componente, inclusi i moduli LED.
- Altezza minima di installazione = 4 mt
- Altezza massima di installazione = 12 mt
C Luce Srl
Via Marmolada, 5/11
20060 Truccazzano - MI - ITALY
Tel +39 02 944 35 095
Fax +39 02 944 35 096
4
2
3
5
78
1
PT - Português
Certifique-se que desligou a tensão de alimentação do aparelho antes
da instalação ou manutenção. Seguir as instruções de montagem para
garantir um correcto funcionamento do aparelho. O produto não deve
ser modificado, uma vez que qualquer modificação anula as aprovações
de segurança e pode tornar a luminária perigosa. O fabricante declina
toda a responsabilidade de produtos modificados ou instalados
incorrectamente.
Fig. 1) O projector é fornecido pronto para a montagem (parede hori-
zontal).
Fig. 2 e 3) para montagem em poste soltar os 4 parafusos, remova a
parte superior e gire o acoplamento de 90° para baixo.
A Fig. 4 e 5) Insira o cabo de alimentação através do correio usando as
braçadeiras de cabos no compartimento de conexões. Use apenas o
cabo H05RN-F (2 x 2,5mm²). Se o cabo ou fio externo desta luminária
estiver danificado, ele será substituído exclusivamente pelo fabricante
ou seu agente de serviço ou por uma pessoa qualificada similar, a fim
de evitar um perigo.
Fig. 6) Ligue os fios ao bloco de terminais respeitando a polaridade.
A Fig. 7) Para travar o projetor para o ângulo desejado, mantê-lo na
posição desejada e, ao mesmo tempo perto a tampa superior irá agir
como um freio. Parafuso de volta os 4 parafusos.
A Fig. 8) Aperte os dois parafusos de fixação do acoplamento.
O projetor, no caso de uma falha, não requer substituição de nenhum
componente, módulos LED incluídos.
- Altura de instalação mínima = 4 mt
- Altura máxima de instalação = 12 mt
RUS - Русский
Перед началом установки иобслуживания оборудования
убедитесь, что питание отключено. Для корректной работы
осветительного оборудования следуйте инструкции по установке. В
конструкцию светильника нельзя вносить изменения, любое
отклонение от данного правила может привести кнарушению
безопасности работы светильника. Производитель снимает ссебя
всю ответственность за работу оборудования вслучае его
изменения или некорректной установки.
1) Прожектор готов кнастенному (горизонтальному) монтажу.
2) и3) Для установки на опору открутите 4 болта, снимите
верхнюю крышку иповерните разъём для опоры вниз на 90°.
4) и5) Подведите питающий кабель внутрь отверстия разъёма для
опоры через кабельный ввод до клеммника вотсеке
распределителя питания. Используйте только кабель H05RN-F
(2 x 2,5 мм²). Если внешний кабель или шнур этого светильника
поврежден, он должен быть заменен только изготовителем или его
сервисным агентом или аналогичным квалифицированным
персоналом во избежание опасности.
6) Подсоедините провода кклеммной колодке , учитывая
полярность.
7) Чтобы зафиксировать прожектор снужным наклоном,
удерживайте его втребуемой позиции иодновременно закрывайте
крышку, которая будет служить ограничителем. Закрутите обратно
4 болта.
8) Затяните 2 крепежных болта вразъёме для установки на опору.
Проектор вслучае сбоя не требует замены какого-либо
компонента, включая светодиодные модули.
- Минимальная высота установки = 4 м
- Максимальная высота установки = 12 м
I Conformità ai requisiti essenziali di sicurezza previsti da una o più Direttive Comunitarie
GB Compliance with essential security requirements provided by one or more Community Directives
F Appareil en conformité avec l’essentiel des exigences de sécurité des directives communautaires
DE Das Produkt entspricht den geltenden europäischen Sicherheits-Richtlinien
E Conformidad a los requisitos esenciales de seguridad previstos por una o varias Directivas Comunitarias
PL Zgodność z podstawowymi wymogami bezpieczeństwa, przewidzianymi przez jednąlub więcej Dyrektyw UE
RUS Изделие соответствует требованиям директив ЕЭС
PT Conforme os requisitos essenciais de segurança e outros, previstos por uma ou mais Directivas Comunitárias aplicáveis
I Prodotto in classe II
GB Product in class II
F Appareil de classe électrique II
DE Schutzklasse II
E Producto de clase II
PL Oprawa w Klasie II
RUS Светильник класса II
PT Produto de classe II
I Sostituire gli schermi di protezione danneggiati
GB Replace any cracked protective shield
F Remplacer tout verre abimé
DE Defekte Sicherheitsgläser austauschen
E Sostituir las protecciones dañadas o estropeadas
PL Wymienićuszkodzone klosze
RUS Замените любой поврежденный элемент
PT Substituir as protecções partidas ou danificadas
I Conforme alla direttiva WEEE
GB Comply with the WEEE directive
F En conformité avec les directives de la DEEE
DE WEEE-Konform
E Conforme a la directiva WEEE
PL Zgodność z dyrektywąWEEE
RUS Утилизировать всоответствие со стандартом WEEE
PT Conforme com a Directiva REEE
./.
I Superficie esposta al vento
GB Surface exposed to the wind
F Surface exposée eu vent
DE Windangriffsfläche
E Superficie expuesta al viento
PL Powierzchnia płaszczyzny czołowej oprawy
RUS Поверхность располагать по ветру
PT Superfície exposta ao vento
DE - Deutsch
Vor Beginn der Installation oder Wartung ist sicher zu stellen, dass die
Leuchte vom Strom getrennt ist. Die einzelnen Montageschritte müs-
sen, damit die Leuchte richtig funktioniert, sorgfältig durchgeführt
werden. Das Produkt darf nicht modifiziert werden, jede Veränderung
am Produkt führt zum Erlöschen der Garantie und kann gefährliche
Auswirkungen haben. Bei modifizierten oder nicht richtig installierten
Produkten erlischt die Haftung des Konstrukteurs.
Abb. 1) Der Projektor wird fertig geliefert für eine Wandmontage
(horizontal).
Abb. 2 und 3) für Mastmontage die 4 Befestigungsschrauben lösen, den
obere Abdeckung entfernen und das Maststück 90° nach unten drehen.
Abb. 4 und 5) Stecken Sie das Netzkabel durch die Mast und befestigen
Sie sie mit Kabelschellen bis zum den Anschlussraum. Verwenden Sie
nur H05RN-F Kabel (2 x 2,5mm²). Wenn das externe Kabel oder das
Kabel dieser Leuchte beschädigt ist, wird es ausschließlich durch den
Hersteller oder seinen Kundendienst oder eine ähnliche qualifizierte
Person ersetzt, um eine Gefährdung zu vermeiden.
Abb. 6) Schließen Sie die Drähte an den Klemmenblock unter Beach-
tung der Polaritäten an.
Abb. 7) Sie fixieren den Projektor auf den gewünschten Winkel, indem
Sie ihn in der die gewünschte Position halten und gleichzeitig die
obere Abdeckung schließen, was einen STOP verursacht. Befestigen Sie
die vier Schrauben wieder.
Abb. 8) Ziehen Sie die beiden Befestigungsschrauben des Maststückes an.
Der Projektor, im Falle eines Ausfalls, erfordert keinen Austausch von
Komponenten, LED-Module enthalten.
- Minimale Installationshöhe = 4 mt
- Maximale Installationshöhe = 12 mt
E - Español
Asegurarse de haber quitado la corriente antes de proceder a la
instalación o manutención. Seguir atentamente las instrucciones de
montaje para garantizar un correcto funcionamiento del aparato. El
producto no debe ser modificado, ya que cualquier modificación anula
las aprobaciones de seguridad y puede convertir la luminaria en
peligrosa. El fabricante declina cualquier responsabilidad de los
productos modificados o instalados incorrectamente.
Fig. 1) El proyector suministrado está listo para el montaje a la pared
(horizontal).
Fig. 2 y 3) para montaje en poste aflojar los 4 tornillos, quite la parte
superior y gíre el acople 90° hacia abajo.
Fig. 4 y 5) Inserte el cable de alimentación a través del poste utilizando el
prensacables hasta el compartimiento de cableado. Utilice sólo cable
H05RN-F (2 x 2,5mm²). Si el cable o cable externo de esta luminaria está
dañado, deberá ser reemplazado exclusivamente por el fabricante o su
agente de servicio o una persona cualificada similar para evitar un peligro. ./.
Fig. 6) Conectar los cables al bloque de terminales respetando la polari-
dad.
Fig. 7) Para bloquear el proyector con la inclinación deseada, mante-
nerlo en la posición deseada y al mismo tiempo cerrar la cubierta supe-
rior que actuará como freno . Atornille de nuevo los 4 tornillos.
Fig. 8) Apriete los dos tornillos de fijación del acople.
El proyector, en caso de un fallo, no requiere el reemplazo de ningún
componente, módulos de LED incluidos.
- Altura mìnima de instalación = 4 mt
- Altura máxima de instalación = 12 mt
PL - Polski
Upewnićsięczy naświetlacz nie jest podłączony do napięcia sieciowego
w czasie instalacji lub konserwacji oprawy. Przestrzegaćbezwzględnie
instrukcji montażu. Nie należy wprowadzaćżadnych zmian
technicznych. Produkt po modyfikacjach technicznych traci wszelkie
gwarancje bezpiecznego użytkowania i jego funkcjonowanie może
stwarzaćzagrożenie. Producent nie ponosi odpowiedzialności za
ewentualne konsekwencje powstałe na skutek niewłaściwego montażu
oprawy lub wprowadzania zmian w jej strukturze technicznej.
Rys. 1) Zapakowany projektor jest gotowy do montażu na wysięgniku/
uchwycie ściennym.
Rys. 2 i 3) Żeby zainstalowaćoprawęna słupie, należy odkręcić4
śruby, odchylićpokrywęi przekręcićuchwyt do słupa o 90° otworem w
dół.
Rys. 4 i 5) Przeciągnąć przewód zasilający przez otwór w uchwycie
słupa, przez dławnicęażdo układu zapłonowego. Używaj kabla H05RN-F
(2 x 2,5 mm²). Jeśli kabel lub przewód zewnętrzny oprawy jest uszko-
dzony, to wyłącznie producent, jego serwis lub inny wykwalifikowany
personel, w celu uniknięcia zagrożenia.
Rys. 6) Podłączyćprzewody do kostki zasilającej biorąc pod uwagę
odpowiednie bieguny.
Rys. 7) Żeby zablokowaćoprawępod pożądanym kątem należy ustawić
oprawęw pożądanej pozycji i jednocześnie zamknąć pokrywę, która
posłuży jako blokada. Dokręcić4 śruby.
Rys. 8) Dokręcić2 śruby w blokadzie uchwytu słupa.
Projektor w przypadku awarii nie wymaga wymiany dowolnego elemen-
tu, dołączone moduły LED.
- Minimalna wysokość instalacji – 4 m
- Maksymalna wysokość instalacji – 12 m
IP66 I Totalmente protetto contro la polvere e i getti d’acqua
GB Dust-tight and protected against water jets
F Étanche à la poussière et protégés contre les jets d'eau
DE Staubdicht und geschützt gegen Strahlwasser
E Totalmente protegido contra el polvo i los chorros de agua
PL Oprawa szczelna
RUS Защищен от пыли иструй воды
PT Totalmente protegido contra pó e jactos de água
I Pericolo per la presenza di tensione elettrica
GB Presence of dangerous electrical voltage
F Présence de tension électrique dangereuse
DE Vorhandensein gefährlicher elektrischer Spannung
E Presencia de tensión eléctrica peligrosa
PL Obecność niebezpiecznego napięcia elektrycznego
RUS Наличие опасного электрического напряжения
PT Presença de tensão elétrica perigosa
I Marchio di conformità agli Standard Europei per componenti ed apparati di illuminazione
GB Mark of compliance with European standards for lighting equipments and components
F Marque de conformité avec les normes européennes pour les équipements d’éclairage et composants
DE Konformitätszeichen des Europäischen Standards für Beleuchtungsapparate und Zubehör
E Marco de conformidad a los estandards europeos para componentes y aparatos de iluminación
PL Znak zgodności ze Standardem Europejskim, co do komponentów i sprzętu oświetleniowego
RUS Знак ENEC (Европейские Нормы по Электрической Сертификации) свидетельствует осоответствии продукции всем европейским нормам
PT Marca de conformidade com as normas Europeias para componentes e aparelhos de iluminação
Other C Luce Outdoor Light manuals


Popular Outdoor Light manuals by other brands

LIGMAN
LIGMAN TU-10136-1 installation manual

Panlux
Panlux PARK S Series instructions

SUN AMEX
SUN AMEX LAMPA1000 Instructions for use

Glashutte Limburg
Glashutte Limburg 56 343.3 Instructions for use

Safavieh Lighting
Safavieh Lighting TBL4098A quick start guide

Inspire
Inspire COROGNE G21319 instruction manual


