C Luce Skyline User manual

Morsetto 3 poli 4mm² 450V 32A EN 60998-1 EN 60998-2-1
3p socket 4mm² 450V 32A EN 60998-1 EN 60998-2-1
Forza serraggio 7 Nm
Couple de serrage du PE 7 Nm
Klemmkraft 7 Nm
Clamping force on cablegland 7 Nm
Fuerza apriete 7Nm
Siła dokręcenia dławicy 7 Nm
Допустимая нагрузка на ввод 7 Nm
Força de aperto: 7 Nm
16 LED SAMSUNG LH181B - col. 4000K - 700mA - 8,97 Kg
32 LED SAMSUNG LH181B - col. 4000K - 700mA - 9,77 Kg
48 LED SAMSUNG LH181B - col. 4000K - 700mA - 9,77 Kg
64 LED SAMSUNG LH181B - col. 4000K - 700mA - 9,89 Kg
Skyline
Foglio Istruzione/Instruction Sheet
FI 42/Rev. B - 02/2020
FIS5066.000 - MADE IN ITALY
GB - English
Make sure you have removed tension before installation
or maintenance. Follow the installation procedures to ensure the
unit proper functioning. The product must not be modified, any change
will void security approvals and will make the item dangerous.
The manufacturer declines all responsibility on products being
modified or not correctly installed.
This device is intended for external use only.
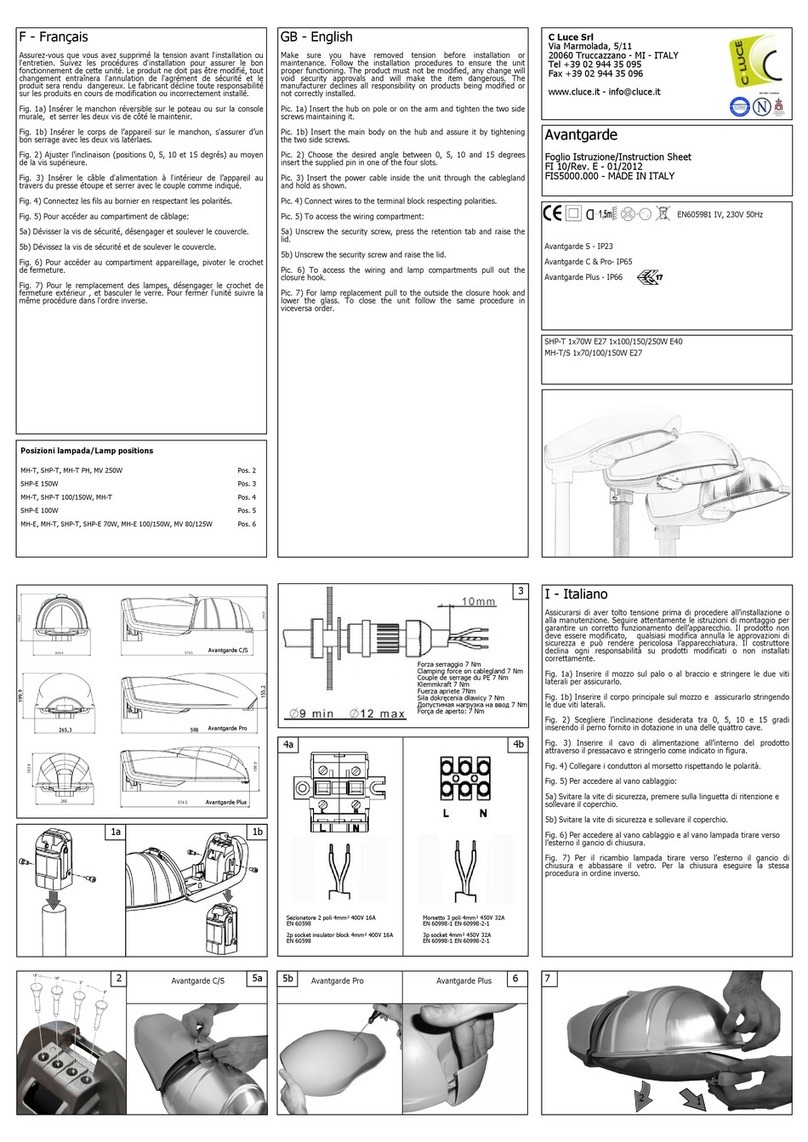
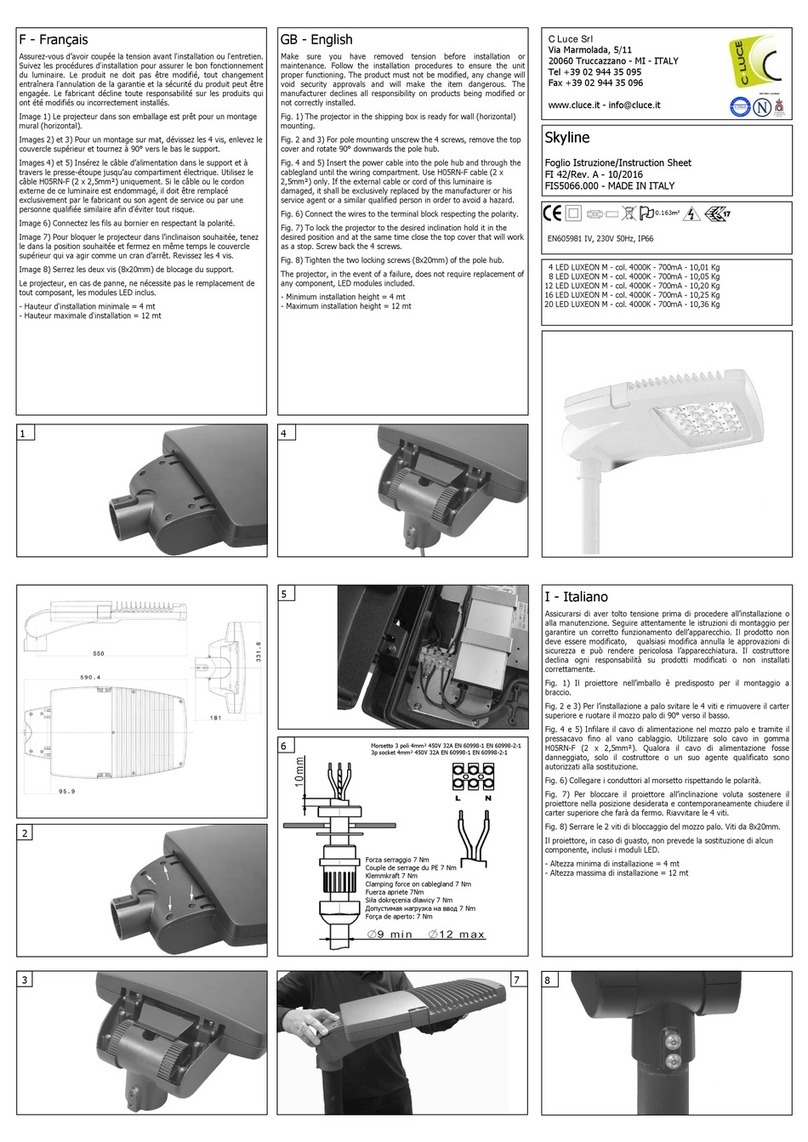
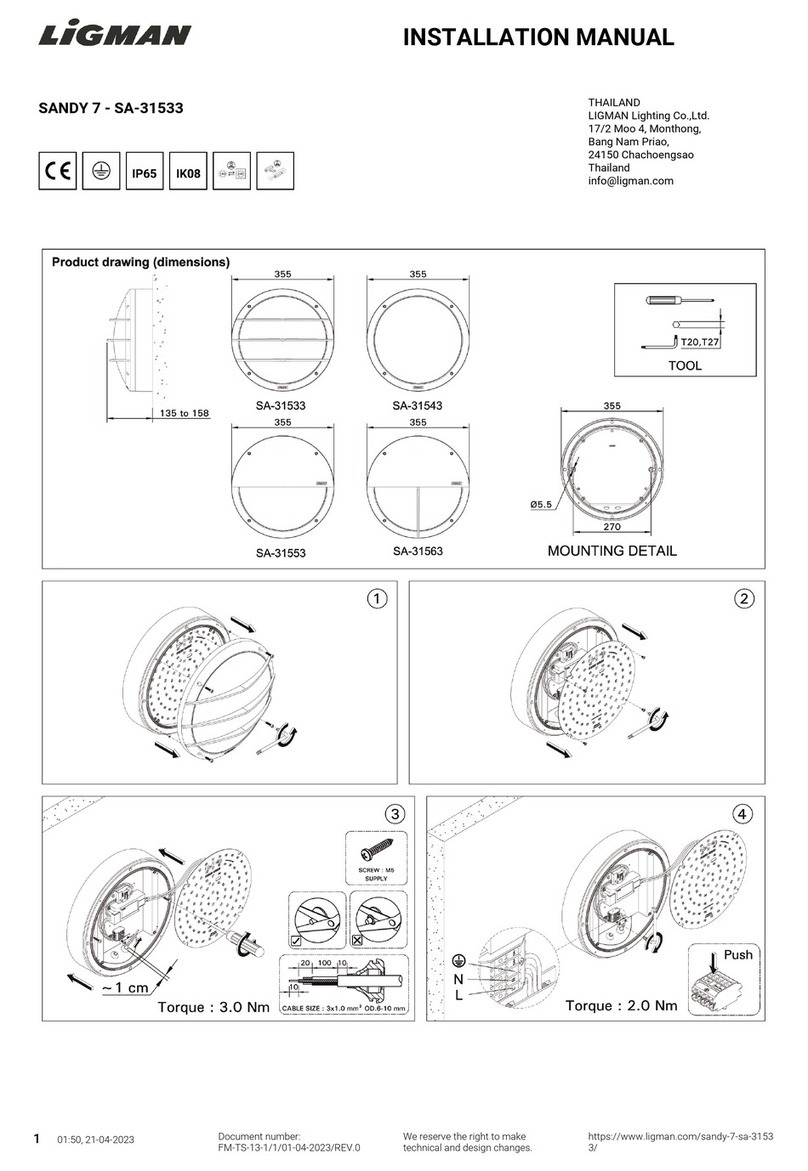
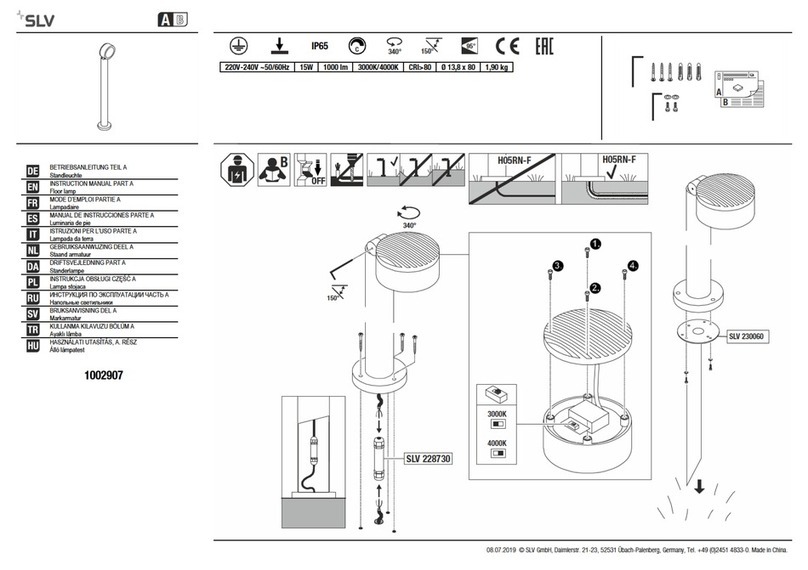
Fig. 1) The projector in the shipping box is prepared for arm
(horizontal) mounting.
Fig. 2 and 3) For pole mounting unscrew the 4 screws, remove the top
cover and rotate 90° downwards the pole hub.
Fig. 4 and 5) Insert the power cable into the pole hub and through the
cablegland until the wiring compartment. Use H05RN-F cable (2 x
2,5mm²) only. If the external cable or cord of this luminaire is
damaged, it shall be exclusively replaced by the manufacturer or his
service agent or a similar qualified person in order to avoid a hazard.
Fig. 6) Connect the wires to the terminal block respecting the polarity.
Fig. 7) To lock the projector to the desired inclination hold it in the
desired position and at the same time close the top cover that will work
as a stop.
Fig. 8) Tighten the 2 locking screws of the pole hub with a tightening
force of 8 Nm (maximum). Screw in the upper screw first.
The light source of this appliance is not replaceable: when the source
reaches its end of life the entire appliance must be replaced.
- Minimum installation height = 4 mt
- Maximum installation height = 12 mt
EN605981 IV, 230V 50Hz, IP66
6
I - Italiano
Assicurarsi di aver tolto tensione prima di procedere all’installazione o
alla manutenzione. Seguire attentamente le istruzioni di montaggio per
garantire un corretto funzionamento dell’apparecchio. Il prodotto non
deve essere modificato, qualsiasi modifica annulla le approvazioni di
sicurezza e può rendere pericolosa l’apparecchiatura. Il costruttore
declina ogni responsabilità su prodotti modificati o non installati
correttamente.
Questo proiettore è destinato per utilizzo esclusivo in esterni.
Fig. 1) Il proiettore nell’imballo è predisposto per il montaggio a
braccio.
Fig. 2 e 3) Per l’installazione a palo svitare le 4 viti e rimuovere il carter
superiore e ruotare il mozzo palo di 90° verso il basso.
Fig. 4 e 5) Infilare il cavo di alimentazione nel mozzo palo e tramite il
pressacavo fino al vano cablaggio. Utilizzare solo cavo in gomma
H05RN-F (2 x 2,5mm²). Qualora il cavo di alimentazione fosse
danneggiato, solo il costruttore o un suo agente qualificato sono
autorizzati alla sostituzione.
Fig. 6) Collegare i conduttori al morsetto rispettando le polarità.
Fig. 7) Per bloccare il proiettore all’inclinazione voluta sostenere il
proiettore nella posizione desiderata e contemporaneamente chiudere il
carter superiore che farà da fermo.
Fig. 8) Avvitare le 2 viti di bloccaggio del mozzo palo con forza
serraggio di 8 Nm (massimo). Avvitare la vite superiore per prima. Viti
da 8x20mm.
La sorgente luminosa di questo apparecchio non è sostituibile: quando
la sorgente raggiunge il fine vita deve essere sostituito l’intero
apparecchio.
- Altezza minima di installazione = 4 mt
- Altezza massima di installazione = 12 mt
C Luce Srl
Via Marmolada, 5/11
20060 Truccazzano - MI - ITALY
Tel +39 02 944 35 095
Fax +39 02 944 35 096
www.cluce.it - [email protected]
4
2
3
5
78
1
F - Français
Assurez-vous d’avoir coupée la tension avant l'installation ou l'entretien.
Suivez les procédures d'installation pour assurer le bon fonctionnement
du luminaire. Le produit ne doit pas être modifié, tout changement
entraînera l'annulation de la garantie et la sécurité du produit peut être
engagée. Le fabricant décline toute responsabilité sur les produits
qui ont été modifiés ou incorrectement installés.
Cet appareil est destiné uniquement à un usage externe.
Image 1) Le projecteur dans son emballage est prêt pour un montage
mural (horizontal).
Images 2) et 3) Pour un montage sur mat, dévissez les 4 vis, enlevez le
couvercle supérieur et tournez à 90° vers le bas le support.
Images 4) et 5) Insérez le câble d’alimentation dans le support et à
travers le presse-étoupe jusqu’au compartiment électrique. Utilisez le
câble H05RN-F (2 x 2,5mm²) uniquement. Si le câble ou le cordon
externe de ce luminaire est endommagé, il doit être remplacé
exclusivement par le fabricant ou son agent de service ou par une
personne qualifiée similaire afin d'éviter tout risque.
Image 6) Connectez les fils au bornier en respectant la polarité.
Image 7) Pour bloquer le projecteur dans l’inclinaison souhaitée, tenez
le dans la position souhaitée et fermez en même temps le couvercle
supérieur qui va agir comme un cran d’arrêt.
Image 8) Serrer les 2 vis de blocage du support avec une force de
serrage de 8 Nm (maximum). Vissez d'abord la vis supérieure.
La source lumineuse de cet appareil n'est pas remplaçable: lorsque la
source arrive en fin de vie, tout le projecteur doit être remplacé.
- Hauteur d'installation minimale = 4 mt
-Hauteur d'installation maximale = 12 mt

PT - Português
Certifique-se que desligou a tensão de alimentação do aparelho antes
da instalação ou manutenção. Seguir as instruções de montagem para
garantir um correcto funcionamento do aparelho. O produto não deve
ser modificado, uma vez que qualquer modificação anula as aprovações
de segurança e pode tornar a luminária perigosa. O fabricante declina
toda a responsabilidade de produtos modificados ou instalados incor-
rectamente.
Este dispositivo destina-se apenas a uso externo.
Fig. 1) O projetor na caixa de remessa está preparado para o braço
montagem (horizontal).
Fig. 2 e 3) Para montagem em poste, desaparafuse os 4 parafusos,
remova a tampa superior e gire 90 ° para baixo no cubo da haste.
Fig. 4 e 5) Insira o cabo de alimentação no cubo do pólo e no cabo até
o compartimento da fiação. Use apenas o cabo H05RN-F (2 x 2,5
mm²). Se o cabo ou cabo externo desta luminária estiver danificado,
deve ser substituído exclusivamente pelo fabricante ou pelo seu agente
de serviço ou por uma pessoa qualificada semelhante, a fim de evitar
riscos.
Fig. 6) Conecte os fios ao bloco de terminais respeitando a polaridade.
Fig. 7) Para travar o projetor na inclinação desejada, mantenha-o na
posição desejada e, ao mesmo tempo, feche a tampa superior que
funcionará como uma parada.
Fig. 8) Aperte os 2 parafusos de trava do cubo do pólo com uma força
de aperto de 8 Nm (máximo). Aperte o parafuso superior primeiro.
A fonte de luz deste aparelho não é substituível: quando a fonte chega
ao fim de sua vida útil, todo o aparelho deve ser substituído.
-Altura mínima de instalação = 4 mt
-Altura máxima de instalação = 12 mt
RUS - Русский
Перед началом установки и обслуживания оборудования
убедитесь, что питание отключено. Для корректной работы
осветительного оборудования следуйте инструкции по установке. В
конструкцию светильника нельзя вносить изменения, любое
отклонение от данного правила может привести к нарушению
безопасности работы светильника. Производитель снимает с себя
всю ответственность за работу оборудования в случае его
изменения или некорректной установки.
Это устройство предназначено только для внешнего
использования.
Рис. 1) Проектор в транспортной коробке подготовлен к работе
(горизонтальный) монтаж.
Рис. 2 и 3) Для монтажа на столбе открутите 4 винта, снимите
верхнюю крышку и поверните на 90 ° вниз полюсный наконечник.
Рис. 4 и 5) Вставьте кабель питания в втулку полюсов и через
кабельный ввод до отсека электропроводки. Используйте только
кабель H05RN-F (2 x 2,5 мм²). Если внешний кабель или шнур этого
светильника поврежден, он должен быть заменен исключительно
производителем, его агентом по обслуживанию или аналогичным
квалифицированным лицом, чтобы избежать опасности.
Рис. 6) Подключите провода к клеммной колодке, соблюдая
полярность.
Рис. 7) Чтобы зафиксировать проектор на желаемом наклоне,
удерживайте его в нужном положении и одновременно закройте
верхнюю крышку, которая будет работать как ограничитель.
Рис. 8) Затяните 2 стопорных винта полюсной втулки с усилием
затяжки 8 Нм (максимум). Вкрутите верхний винт первым.
Источник света этого прибора не подлежит замене: по истечении
срока службы источника весь прибор должен быть заменен.
-Минимальная высота установки = 4 м
-Максимальная высота установки = 12 м
I Conformità ai requisiti essenziali di sicurezza previsti da una o più Direttive Comunitarie
GB Compliance with essential security requirements provided by one or more Community Directives
FAppareil en conformité avec l’essentiel des exigences de sécurité des directives communautaires
DE Das Produkt entspricht den geltenden europäischen Sicherheits-Richtlinien
EConformidad a los requisitos esenciales de seguridad previstos por una o varias Directivas Comunitarias
PL Zgodność z podstawowymi wymogami bezpieczeństwa, przewidzianymi przez jedną lub więcej Dyrektyw UE
RUS Изделие соответствует требованиям директив ЕЭС
PT Conforme os requisitos essenciais de segurança e outros, previstos por uma ou mais Directivas Comunitárias aplicáveis
I Prodotto in classe II
GB Product in class II
FAppareil de classe électrique II
DE Schutzklasse II
EProducto de clase II
PL Oprawa w Klasie II
RUS Светильник класса II
PT Produto de classe II
I Sostituire gli schermi di protezione danneggiati
GB Replace any cracked protective shield
FRemplacer tout verre abimé
DE Defekte Sicherheitsgläser austauschen
ESostituir las protecciones dañadas o estropeadas
PL Wymienić uszkodzone klosze
RUS Замените любой поврежденный элемент
PT Substituir as protecções partidas ou danificadas
I Conforme alla direttiva WEEE
GB Comply with the WEEE directive
FEn conformité avec les directives de la DEEE
DE WEEE-Konform
EConforme a la directiva WEEE
PL Zgodność z dyrektywą WEEE
RUS Утилизировать в соответствие со стандартом WEEE
PT Conforme com a Directiva REEE
./.
I Superficie esposta al vento
GB Surface exposed to the wind
FSurface exposée eu vent
DE Windangriffsfläche
ESuperficie expuesta al viento
PL Powierzchnia płaszczyzny czołowej oprawy
RUS Поверхность располагать по ветру
PT Superfície exposta ao vento
DE - Deutsch
Vor Beginn der Installation oder Wartung ist sicher zu stellen, dass die
Leuchte vom Strom getrennt ist. Die einzelnen Montageschritte müs-
sen, damit die Leuchte richtig funktioniert, sorgfältig durchgeführt
werden. Das Produkt darf nicht modifiziert werden, jede Veränderung
am Produkt führt zum Erlöschen der Garantie und kann gefährliche
Auswirkungen haben. Bei modifizierten oder nicht richtig installierten
Produkten erlischt die Haftung des Konstrukteurs.
Dieses Gerät ist nur zur äußerlichen Anwendung bestimmt.
Abb. 1) Der Projektor in der Versandschachtel ist für den Arm vorberei-
tet (horizontale) Montage.
Abb. 2 und 3) Lösen Sie für die Mastmontage die 4 Schrauben, entfer-
nen Sie die obere Abdeckung und drehen Sie die Polnabe um 90° nach
unten.
Abb. 4 und 5) Führen Sie das Netzkabel in die Polnabe und durch das
Kabelband bis zum Kabelfach. Verwenden Sie nur das H05RN-F-Kabel
(2 x 2,5 mm²). Wenn das externe Kabel dieser Leuchte beschädigt ist,
darf es ausschließlich vom Hersteller oder seinem Servicemitarbeiter
oder einer ähnlich qualifizierten Person ausgetauscht werden, um eine
Gefahr zu vermeiden.
Abb. 6) Schließen Sie die Drähte unter Berücksichtigung der Polarität
an den Klemmenblock an.
Abb. 7) Um den Projektor in der gewünschten Neigung zu verriegeln,
halten Sie ihn in der gewünschten Position und schließen Sie gleichzei-
tig die obere Abdeckung, die als Anschlag fungiert.
Abb. 8) Ziehen Sie die 2 Feststellschrauben der Polnabe mit einer Anzu-
gskraft von maximal 8 Nm an. Schrauben Sie zuerst die obere Schraube
ein.
Die Lichtquelle dieses Geräts kann nicht ausgetauscht werden: Wenn
die Quelle das Ende ihrer Lebensdauer erreicht hat, muss das gesamte
Gerät ausgetauscht werden.
-Mindestinstallationshöhe = 4 mt
-Maximale Einbauhöhe = 12 mt
E - Español
Asegurarse de haber quitado la corriente antes de proceder a la instala-
ción o manutención. Seguir atentamente las instrucciones de montaje
para garantizar un correcto funcionamiento del aparato. El producto no
debe ser modificado, ya que cualquier modificación anula las aprobacio-
nes de seguridad y puede convertir la luminaria en peligrosa. El fabri-
cante declina cualquier responsabilidad de los productos modificados o
instalados incorrectamente.
Este dispositivo está destinado solo para uso externo.
Fig. 1) El proyector en la caja de envío está preparado para armar
(horizontal) de montaje.
Fig. 2 y 3) Para el montaje en poste, desatornille los 4 tornillos, retire la
cubierta superior y gire 90° hacia abajo el cubo del poste.
Fig. 4 y 5) Inserte el cable de alimentación en el cubo del poste y a
través del prensaestopas hasta el compartimiento del cableado. Utilice
solo cable H05RN-F (2 x 2,5 mm²). Si el cable o el cable externo de
esta luminaria está dañado, el fabricante o su agente de servicio o una
persona calificada similar lo reemplazará exclusivamente para evitar
riesgos.
./.
Fig. 6) Conecte los cables al bloque de terminales respetando la
polaridad.
Fig. 7) Para bloquear el proyector a la inclinación deseada, sosténgalo
en la posición deseada y al mismo tiempo cierre la cubierta superior
que funcionará como tope.
Fig. 8) Apriete los 2 tornillos de bloqueo del cubo del poste con una
fuerza de apriete de 8 Nm (máximo). Atornille el tornillo superior
primero.
La fuente de luz de este aparato no es reemplazable: cuando la fuente
llega al final de su vida útil, se debe reemplazar todo el aparato.
-Altura mínima de instalación = 4 mt
-Altura máxima de instalación = 12 mt
PL - Polski
Upewnić się czy naświetlacz nie jest podłączony do napięcia sieciowego
w czasie instalacji lub konserwacji oprawy. Przestrzegać bezwzględnie
instrukcji montażu. Nie należy wprowadzać żadnych zmian tech-
nicznych. Produkt po modyfikacjach technicznych traci wszelkie
gwarancje bezpiecznego użytkowania i jego funkcjonowanie może
stwarzać zagrożenie. Producent nie ponosi odpowiedzialności za ewen-
tualne konsekwencje powstałe na skutek niewłaściwego montażu
oprawy lub wprowadzania zmian w jej strukturze technicznej.
To urządzenie jest przeznaczone wyłącznie do użytku zewnętrznego.
Ryc. 1) Projektor w pudełku transportowym jest przygotowany na ra-
mię (poziomy) montaż.
Rys. 2 i 3) W celu montażu na słupie odkręcić 4 śruby, zdjąć górną
pokrywę i obrócić o 90° w dół piasty słupa.
Ryc. 4 i 5) Włóż kabel zasilający do piasty słupa i przez kabinę, aż do
przedziału okablowania. Używaj tylko kabla H05RN-F (2 x 2,5 mm²).
Jeżeli zewnętrzny kabel lub przewód tej oprawy jest uszkodzony, po-
winien zostać wymieniony wyłącznie przez producenta lub jego przed-
stawiciela serwisowego lub inną wykwalifikowaną osobę w celu unik-
nięcia zagrożenia.
Ryc. 6) Podłącz przewody do listwy zaciskowej, przestrzegając bieguno-
wości.
Ryc. 7) Aby zablokować projektor do pożądanego nachylenia, przytrzy-
maj go w żądanej pozycji i jednocześnie zamknij górną pokrywę, która
będzie działać jako ogranicznik.
Ryc. 8) Dokręcić 2 śruby blokujące piasty drążka siłą dokręcania 8 Nm
(maksymalnie). Najpierw wkręć górną śrubę.
Źródła światła tego urządzenia nie można wymienić: gdy źródło
osiągnie koniec okresu eksploatacji, należy wymienić całe urządzenie.
-Minimalna wysokość montażu = 4 m
-Maksymalna wysokość montażu = 12 m
IP66 ITotalmente protetto contro la polvere e i getti d’acqua
GB Dust-tight and protected against water jets
FÉtanche à la poussière et protégés contre les jets d'eau
DE Staubdicht und geschützt gegen Strahlwasser
ETotalmente protegido contra el polvo i los chorros de agua
PL Oprawa szczelna
RUS Защищен от пыли и струй воды
PT Totalmente protegido contra pó e jactos de água
I Pericolo per la presenza di tensione elettrica
GB Presence of dangerous electrical voltage
FPrésence de tension électrique dangereuse
DE Vorhandensein gefährlicher elektrischer Spannung
EPresencia de tensión eléctrica peligrosa
PL Obecność niebezpiecznego napięcia elektrycznego
RUS Наличие опасного электрического напряжения
PT Presença de tensão elétrica perigosa
I Marchio di conformità agli Standard Europei per componenti ed apparati di illuminazione
GB Mark of compliance with European standards for lighting equipments and components
FMarque de conformité avec les normes européennes pour les équipements d’éclairage et composants
DE Konformitätszeichen des Europäischen Standards für Beleuchtungsapparate und Zubehör
EMarco de conformidad a los estandards europeos para componentes y aparatos de iluminación
PL Znak zgodności ze Standardem Europejskim, co do komponentów i sprzętu oświetleniowego
RUS Знак ENEC (Европейские Нормы по Электрической Сертификации) свидетельствует о соответствии продукции всем европейским нормам
PT Marca de conformidade com as normas Europeias para componentes e aparelhos de iluminação
Other C Luce Outdoor Light manuals
