Cadac 942 User manual

503-0471 LEV7
MODEL No: 942 & 943
USER INSTRUCTIONS
LIVE THE BRAAI LIFE
ROLL ABOUT HEATER
MODEL No: 942
MODEL No: 943


11
CAUTION
Provide ample ventilation. This gas appliance consumes air (oxygen). Do not use this appliance in an unventilated space to
avoid endangering your life. If still more gas appliances and/or occupants using gas are added to the space, additional ventilation
must be provided.
IMPORTANT
Read these instructions carefully so as to familiarise yourself with the appliance before fiting the appliance to a gas cylinder.
Retain these instructions for future reference.
GB
1. Introduction
• This appliance complies with SANS 1539:2017.
• This appliance was designed to use 9kg gas cylinders (Not Supplied) with SANS certified hose and bull-nose regulator (Supplied).
• Appliance category: LPG 2.8kPa. 1.5/2.8/4.1kw 110/200/290g/h
• Heat Input: Minimum: 1.5kW, Medium: 2.8kW, Maximum: 4.1kW
• Gas Consumption: Minimum: 110g/hr, Medium: 200g/hr, Maximum: 290g/hr
• This appliance uses the following jets:
• 3 x 0.58mm main burner Jets
• 1 x 0.18mm pilot Jet
• Read these instructions carefully before using the appliance.
2. Safety information
• Always keep the cylinder and the appliance in an upright position.
• It is important that all gas connections have been correctly made to
prevent any gas leaks.
• Do not use your heater while sleeping.
• Do not use your heater in high-rise flats.
• Do not use your heater in basements, bathrooms or bedrooms
• Do not use a leaking, damaged or malfunctioning appliances.
• This appliance requires a hose and regulator to operate. (Supplied)
• Ensure that the appliance is used in a well-ventilated area.
• Always keep the appliance level during use. Handle the appliance with care,
do not drop it.
• Do not move the heater from room to room while lit.
• Do not use in leisure vehicles such as caravans and autocaravans
• Ensure the appliance is used away from flammable materials. Minimum safe
distances are: Above the appliance 1.2 m, at the rear and sides 600mm. (See
Fig. 1)
• Fit appliance to gas cylinder in a well ventilated area, preferably outside and away from any source of ignition such as naked flames
and away from people.
• If there is a leak on your appliance (smell of gas), immediately close the cylinder valve and take it outside into a well-ventilated flame
free location where the leak may be detected and stopped. Do not try to detect leaks using a flame. Soapy water should be used.
• The correct way to check for leaks is to smear the joints with soapy water over the joints. If bubbles form then there is a gas leak.
Immediately close the cylinder valve, remove the appliance and check the condition of the seal and the sealing face of the gas
cylinder. Replace the seal if in doubt.
• Never leave appliance unattended when lit. Keep young children away from the appliance at all times.
• In the event of light-back (where the flame burns back and ignites inside the burner) immediately turn off the gas supply by closing
the cylinder valve using the control lever. Inspect seal for possible leaks, re-light the appliance as described in section 5 below.
Should the flame persistently light back, return the product to your authorised CADAC repair agent.
• Do not modify the appliance. Do not use it for anything other than which it has been designed for.
• During use, parts of the appliance will become hot. Avoid touching hot parts with bare hands.
• Always ensure that your CADAC cylinder is not overfilled. Ask your dealer to check this by weighing the cylinder.
• Keep your CADAC cylinders off all stoves and at least one metre away from any source of direct heat.
• Cylinder valves should only be repaired by an authorised CADAC dealer.
Fig. 1
3. Ventilation
• Your heater consumes oxygen while it is in function. For that reason, adequate ventilation should be provided in rooms in which the
heater is used. This ensures the removal of products of combustion and allows the entry of replacement air.
• Adequate ventilation should considerably reduce the possibility of condensation occurring. The following table shows the smallest size
of room suitable for each heat setting and the ventilation which should be provided.
Number of radients
continuously in use Room Size
Ventilation
Low Level High Level
1 40 Cubic Meters (4m x 4m x 2.5m) 40 cm240 cm2
2 70 Cubic Meters (7m x 4m x 2.5m) 70 cm270 cm2
3 105 Cubic Meters (8.5m x 7m x 2.5m) 105 cm2105 cm2

22
PARTS LIST
1 Gas Control Knob
2 Piezo Igniter
3 Guard
4 Atmospheric Analyzer, Pilot, and Ignition System
5 Rear Cover (Found inside the body of the heater)
6Wheels (to be screwed on)
7Pilot burner
Fig. 2
6
7

33
6. Operating the Appliance
• Always operate the appliance on a firm level surface.
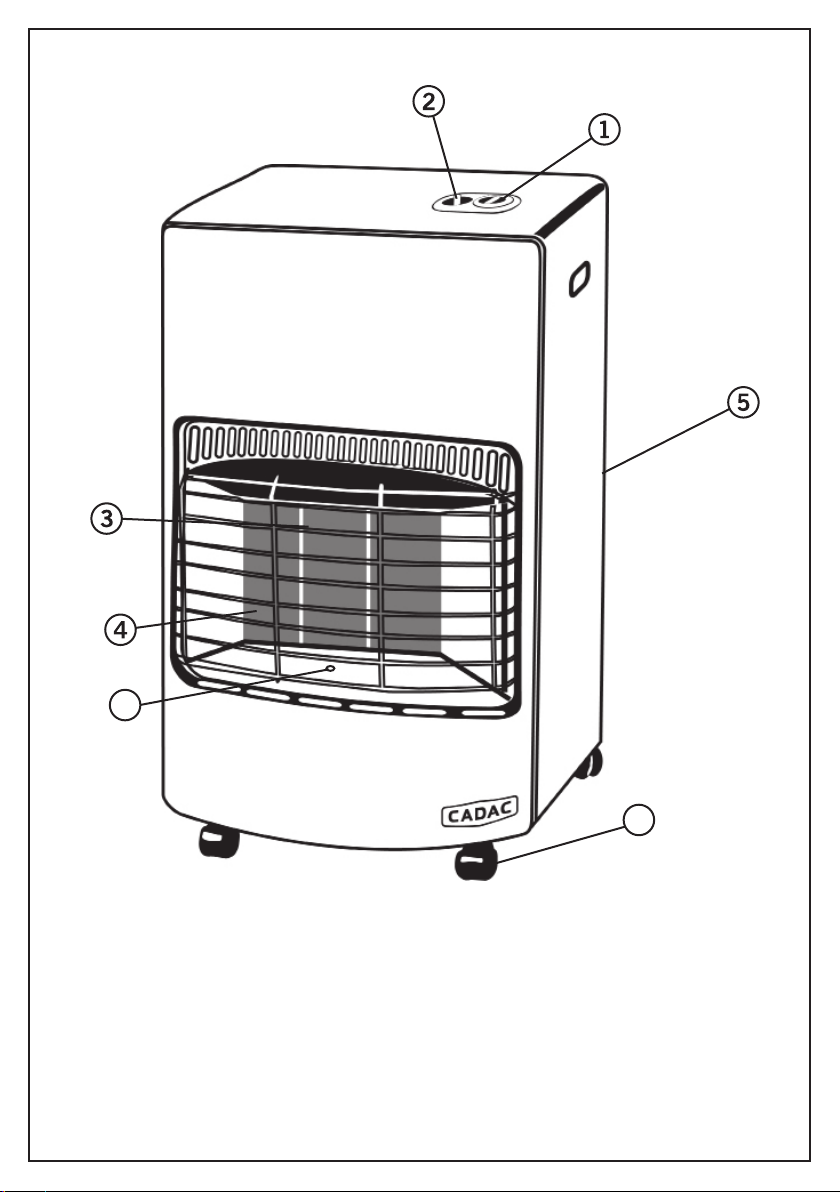
• The heater has three settings. Low, Medium, and High (Fig.3).
Lighting the appliance
• Do not attempt to light the appliance if you suspect any leaks.
• Turn the control knob of the gas cylinder to open the gas cylinder.
• NB! The pipe system needs to be purged of air before igniting will take place. Note
that if you have just refilled your cylinder, that purging may take a little longer due to
access air in the cylinder. To purge press in the control knob on the OFF setting, while
holding down the control knob turn to the Low setting for about 15 seconds to allow
the gas to fill the pipe system and then press the piezo ignitor in with your thumb
while still holding in the control knob, until the pilot burner ignites. Note to hold the
control knob in for a further 2-5 seconds after the pilot burner is alite in order for the
flame failure device to heat. Then press the ignitor button to ignite the Low panel.
• If you press the ignitor before purging the pipe system, it will not light.
• Once the pilot burner is alight, it means that the heater is at minimum position. If pilot flame goes out please repeat this procedure.
Heat settings
• To change from low to minimum, gently press in the control knob about 3/4 inwards and turn the control knob anti-clockwise to
position 2. If you press the control knob in too far, it will not turn.
• To change from medium to maximum, gently press in the control knob and turn it anti-clockwise to position 3.
• Turn off the heater at the cylinder first, and then the heater control knob.
Attention!
• Please ensure you have locked the control knob while changing position. Try to turn the control knob without forcing and pushing
downward to be sure that control knob is locked. The control knob should not turn without pushing downward.
• After lighting, operate the appliance upright and do not move it around. Flaring may occur if the appliance has not fully warmed up or
if it is moved around carelessly.
• After use, ensure that the cylinder valve is closed (turn control knob fully clockwise).
• After use, allow the appliance to cool down sufficiently before touching any parts.
5. Fitting and Changing the Gas Cylinder
• Ensure that the gas cylinder is fitted or changed in a well-ventilated location, preferably outdoors, away from any source of ignition,
such as naked flames and away from other people.
• Do not smoke while changing the cylinder.
• When you need to replace your empty cylinder, turn the gas off at the valve or regulator of the cylinder and take the empty cylinder out
of the heater. Make sure that the heater is extinguished completely.
• Remove the regulator from the empty cylinder.
• Use an approved regulator and hose. This hose must be a mimimum of 500mm in length. Avoid twisting the hose whilst connecting
the regulator to the cylinder. Please seek advice from your gas and regulator supplier so as to use correct hose and regulator.
• Blow out any dust from the cylinder opening to prevent possible blockage of the jet.
• Place the full cylinder in its allocated space and attach the rear cover.
• Ensure that a complete gas seal has been made (check for the smell of gas around the connection joint). If you have to check for a gas
leak, do this outdoors. Do not check for leaks with a naked flame. Use warm soapy water only, applied to the joints and connections of
the appliance. Any leakage will show up as bubbles around the leakage area. If you are in doubt, contact your nearest stockist.
• After use, always ensure that the control knob is turned to the “off” position (turn fully clockwise).
• After use, turn off the appliance at the gas container valve.
• When changing the gas cylinder be aware that the appliance will be very hot, allow to cool or make use of oven gloves
Fig. 3
4. Assembly
• Fit the wheels to the bottom by simply screwing them on in a clockwise direction using the spanner provided.
7. Warning
•Use an appropriate regulator which is adjusted to 2.8kPa.
•Do not keep pressing the gas inlet valve button for more than 40 seconds.
•Never disconnect the regulator while cylinder valve or regulator is open.
•Do not change cylinders within areas in which open fire exists.

44
9. Maintenance
• Check flexible tubing between regulator and heater regularly and replace if perished, worn or damaged. In any case replace tubing
taking into consideration the expiration date
• Refer any major maintenance to the agent named on last page of this manual.
• It is recommended that the heater is serviced every two years by authorized personnel.
SYMPTOMS FAULT REMEDY
Pilot will not light automatically. No spark across electrode gap.
a) Ensure that piezo-electric switch is
functioning correctly
b) Check electrical lead connections
c) Check that electrical lead is not dam
aged
d) Check that the spark plug is satisfactory
e) Check that spark is passing to the
earth electrode or thermocouple but not
to the grid
Pilot will not light automatically but
points (a) to (e) are satisfactory and
the pilot will light with a match.
Incorrect position of spark in relation to pilot
gas flow
Re-position spark plug so that spark jumps
across gas flow.
Heater will not remain alight when
pressure is released from ignition
button.
Electro-magnetic valve closes whilst heater
is alight
a) Ensure that thermocouple probe is
located in pilot flame
b) Ensure good connection between
thermocouple and valve
c) Check thermocouple
d) Check electromagnetic valve
After changing to maximum position
with all three plaques alight, one or
more plaques appear below normal
intensively.
a) Blocked jets
b) Partially blocked supply tube
a) Remove and clean blocked jet
b) Remove supply tube, remove jet and
blow through the tube
Difficulty in crosslighting from
position 1 to position 2 or 3.
a) Air draught directed away from 1st plaque
b) Position of the pilot flame
a) Change the location of the appliance
so that it is not adversely affected by
air draught.
b) Position pilot so that flame impinges
across bottom corner of 2nd plaque as
well as 1st plaque
Smell of combustion Missing piece of ceramic fireclay
Inspect perimeter of each plaque and
locate place where some fireclay has been
displaced. Repair with PYRUMA and leave
to set for approximately 24 hours.
8. Cleaning
• Use a damp cloth wrung out in a solution of soapy water to clean the exterior and cylinder storage area of your heater.
• Make sure that no water gets onto the burners or pilot/light area. Wipe the heater completely dry before use.
• Do not use abrasive cleaners as they may damage the quality of paint finish.
•Do not expose your cylinder to extreme heat.
•Do not locate any other cylinders within the space/room in which your heater is used.
•Do not insert your finger or any other material through the front panel of the heater.
•Leave at least 1 meter distance between your heater and the other heat source.
•Do not let unauthorized persons to interfere with your heater.
•Do not place appliance under socket outlet.
•Do not use the heater in surroundings of a bath, shower of swimming pool.
•This heater must not be used without a gas cylinder fitted for stability purposes.
•Do not cover your heater.
•Fabrics, clothing or other flammable materials may ignite if placed against the outlets of your heater.
•The guard on this appliance is to prevent risk of fire or injury from burns and no part of it should be permanently removed. IT DOES
NOT GIVE FULL PROTECTION FOR YOUNG CHILDREN OR THE INFIRM.

55
10. Storage
•Disconnect cylinder.
• Store cylinder in a well-ventilated area away from combustible material. Storage should preferably be in an outhouse but must NOT be
in a basement or high-rise flat.
• The heater should be covered in a dry, dust-free medium in its original package.
11. Returning the appliance for Repair or Service
• Do not modify the appliance. This may cause the appliance to become unsafe. Any modifications will render the CADAC warranty null
and void.
If you cannot rectify any fault by following these instructions, contact your local CADAC distributor for inspection / repair.
12. Spares and Accessories
Description Part Number
Hose and Regulator 942-SP001
Jet: 0.18mm (Pilot Burner) 942-SP002
Jet: 0.58mm (Main Burners) 942-SP003
Ignition button 942-SP005
Wire grid 942-SP006
Ignition holder 942-SP007
Valve 942-SP008
Electromagnetic valve 942-SP009
Wheel 942-SP010
Control knob 942-SP013
Rear guard 942-SP014

66
LIVE THE BRAAI LIFE
CADAC SOUTH AFRICA
P.O. Box 43196,
Industria, 2042 South Africa
Tel: +27 11 470 6600
Email: [email protected]
www.cadacsa.co.za
CADAC EUROPE
Ratio 26, 6921 RW Duiven
The Netherlands
Tel: +31 26 319 7740
Email: [email protected]
www.cadacinternational.com
CADAC GERMANY
Ratio 26, 6921 RW Duiven
The Netherlands
Tel: +31 26 319 7740
Email: [email protected]
www.cadacinternational.com
CADAC FRANCE
Le Viallon, 42520 Veranne
France
Tel: +33 4 74 78 13 65
www.cadacinternational.com
CADAC SOUTH EAST EUROPE
Bulevar oslobodjenja 285
Tel: +381 11 339 2700
Email: [email protected]
www.cadac.rs
CADAC SCANDINAVIA
Millarco International A/S
Rokhøj 26
8520 Lystrup, Denmark
Phone: +45 87 43 42 00
www.millarco.com
CADAC ITALY
Brunner SRL/GMBH
via Buozzi, 8
39100 Bolzano (Italy)
Tel: +39 0471 542900
Email: info@brunner.it
www.brunnerinternational.com
CADAC AUSTRALIA
CADAC-BBQ Pty Ltd, Australia
Tel: +61 420 503 967
Customer Care: 1300 135 011
Email: [email protected]
www.cadacbbq.com.au
CADAC CHINA
Room 807, Huayue International
Building, No.255 Tiangao Road,
South
Yinzhou business district,
Ningbo, China
Tel:+86 574 87723937
Email: [email protected]
CADAC DENMARK
Camper Fritid
Industrivej 11
6640 Lunderskov, Denmark
Tel.: +45 7558 5255
Email: info@camper.dk
www.camper.dk
CADAC FINLAND
OY KAMA
00358 207920 310
info@kamafritid.fi
CADAC HONG KONG
Everything Under The Sun
902 Horizon Plaza, 2 Lee Wing Street,
Ap Lei Chau, HK
Tel :+852 2554 9088
Email: [email protected]
www. everythingunderthesun.com.hk
CADAC ISRAEL
Chagim
PO.box 8122819
Hayarden 13, Yavne, Israel
Tel: +972-73-2595666
Email: [email protected]
CADAC IRAN
Robin Bazarganan Carin Co.
Unit D, 6th Floor, Negin Zafar
Building, No.1327,
Shariati Street, Tehran, Iran
Tel: +98 21 276 00 781
Mail: [email protected]
CADAC KOREA
Suite 502 Pika Bldg.
Hogye-Dong, Anyang-Si,
Gyeonggi-Do, South Korea
Tel: +82 31 427 5466
CADAC MALAYSIA
Katrin BJ SDN BHD (90816-M)
No 12, Jalan TP2, Taman
Perindustrian SIME UEP,
47600 Subang Jaya, Selangor
Darul, Ehsan, Malaysia.
Tel (603) 8023 3939
CADAC MOZAMBIQUE
Exclusive Brands Africa
492 Avenida Namaacha
Maputo, Mozambique
Tel: +258 21 406254
www.cadac.co.mz
CADAC NEW ZEALAND
Riverlea Group (Pty) Ltd
2A Maui Street, Pukete,
Hamilton 3200, New Zealand
Tel: +64 7 847 0204
Email: [email protected]
www.riverleagroup.co.nz
CADAC SAUDI ARABIA
Noble Ventures
34 Ibn Saad Al Kathib Street,
Khalidiya,
Jeddah, 21435,
Kingdom of Saudi Arabia
CADAC SWEDEN & NORWAY
KAMA FRITID AB
0046 36 353700
CADAC U.A.E.
Supreme Impex General Trading
LLC Office No. 1801-7 Latifa
Tower Sheikh Zayed Road
Dubai, UAE
CADAC USA
50 Mountain View Road
Warren, NJ, 07059
Tel: 908 604 0677
Email: [email protected]
CADAC ZAMBIA
Exclusive Brands Africa Limited
7225A Kachidza Road
Light Industrial Area
Lusaka, Zambia
Tel: +260 211 842015
Tel: +260977 345034
Email: [email protected]
CADAC ZIMBABWE
Exclusive Brands Africa
Unit 8 Birkenhead Park
43 Josiah Chinamano Street
Belmont, Bulawayo
Tel: +263 971 740 (Bul)
Tel: +263 479 2564 (Har)
www.cadac.co.zw
CADAC MONTENEGRO
Cetinjski put bb,novi City
kvart,zg.1,lokal 6
81101 Podgorica,Monte Negro
Tel.+38269020063
Email: [email protected]
CADAC POLAND
Kamai
Wola Batorska 461
32-007 Wola Batorska Poland
Tel: +48 12 635 1373
Email: [email protected]
www.kamai.pl
CADAC Czech Rep.
RÖSLER Praha spol. s r.o.
K Horkám 19/21
102 00 Praha 10 Česká republika
Tel: +420 267 188 011
Email: info@rosler.cz
www.rosler.cz
CADAC UK
14 Deanfield Court,
Link59 Business Park,
Clitheroe, Lancashire,
BB7 1QS
United Kingdom.
Tel: +44 (0) 333 2000363
E:mail: [email protected]
www.cadacinternational.com
This manual suits for next models
1
Table of contents
Popular Heater manuals by other brands

Frico
Frico Thermocassette HP300 Assembly and operating instructions

Toyotomi
Toyotomi 4963505710927 operating manual

Dometic
Dometic TwinBoost4000 Installation and service manual

Claudgen
Claudgen HE7010 Additional Installation, Operation and Maintenance Instructions

Webber
Webber WEBBER SRE 701 TC datasheet

Prem-I-Air
Prem-I-Air HT2007 instruction manual