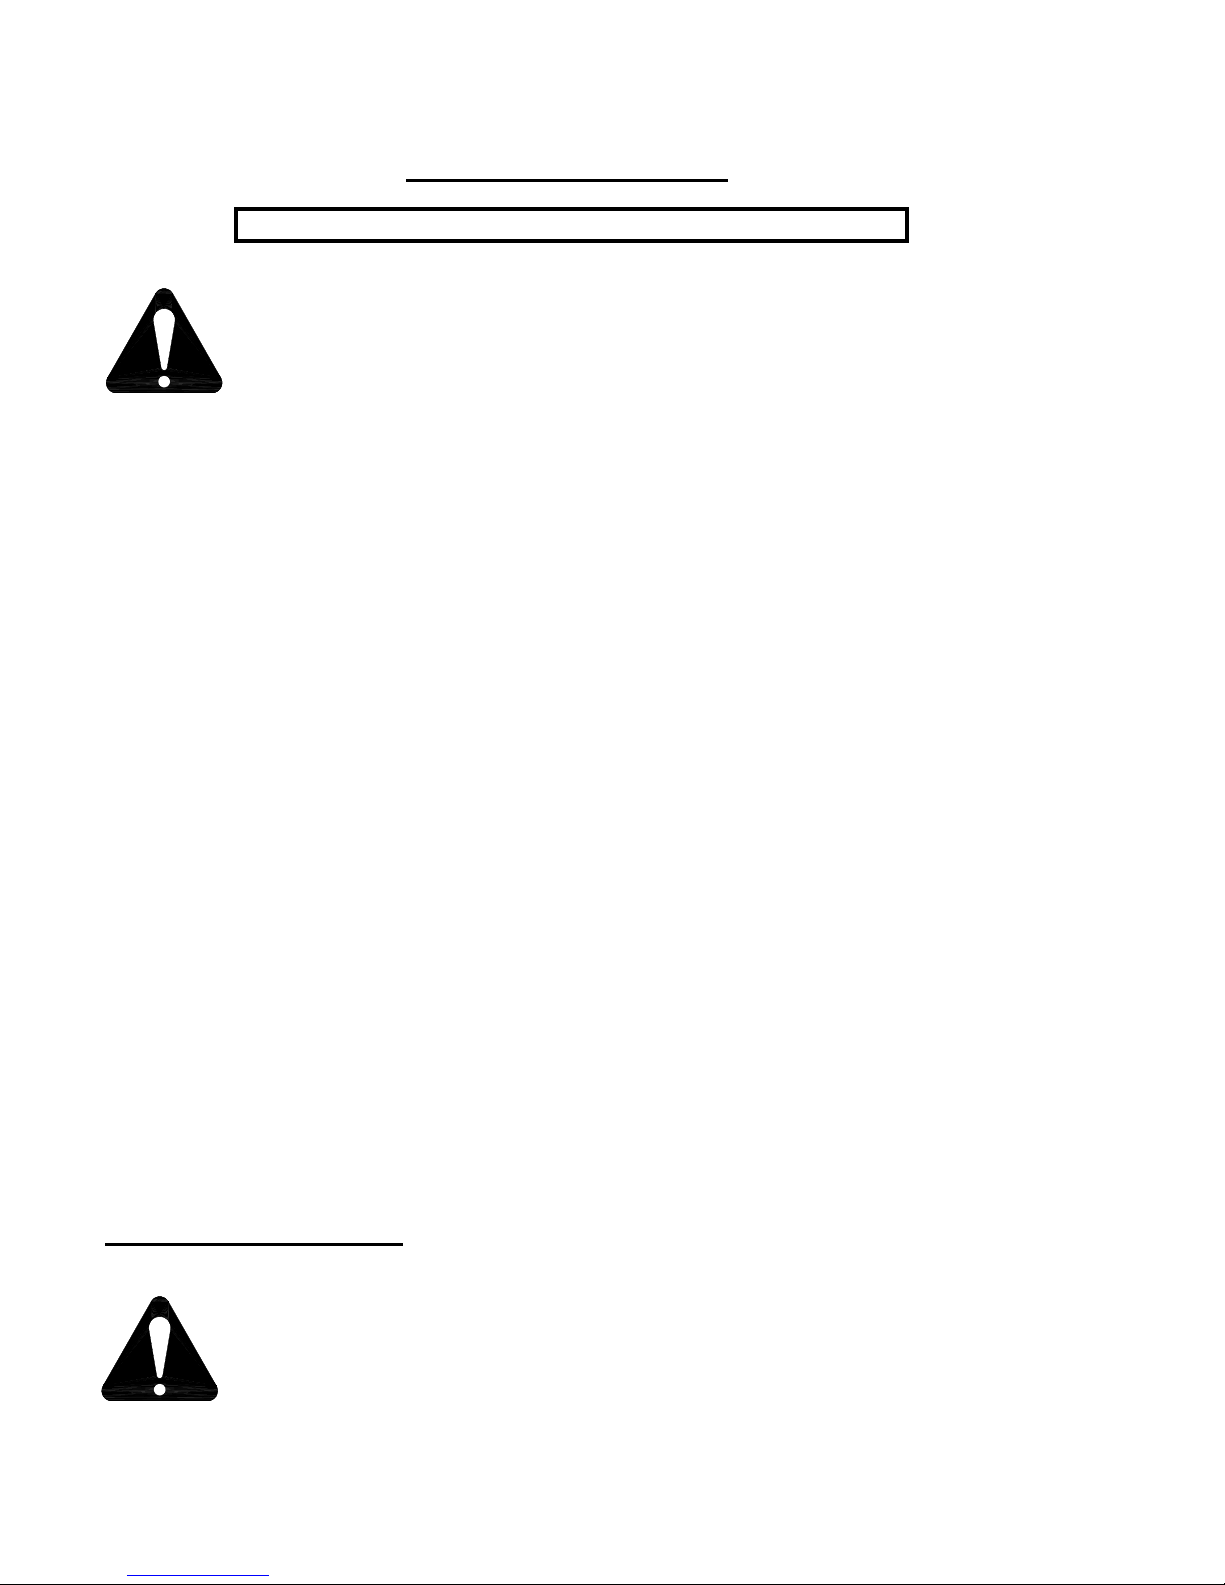
Cadman TRAVELLER 2250 Product manual

2250 / 2625 / 3000S
CADMAN TRAVELLER
OPERATOR’S and PARTS MANUAL
2001 EDITION


06/29/09
INDEX
Introduction ...................................................................................................................1
• Owner’s Responsibilities
• Features
Safety Precautions.......................................................................................................2
• General Precautions
• Safety Decals ..................................................................................................3
• Safety Shields
• Stabilizer Legs
• Gun Cart ..........................................................................................................
4
• Applicators and Accessories
Required Maintenance ................................................................................................5
•EachUse
• Daily
• After First 25 Hours
•Every 50 Hours
• Every 100 Hours
• Every 250 Hours..............................................................................................
6
• Before Storing
•Before Start-Up
•Lubricants
Field Preparation and Operating Tips .....................................................................7
When Applying Liquid Manure..................................................................................8
Field Set-Up and Operation........................................................................................9
Indexing Adjustment .................................................................................................10
Start Up of the Retrieve Cycle .................................................................................13
Retrieve Rate Selection.............................................................................................15
•Example.......................................................................................................16
Nelson SR-100 Big Gun®Performance Chart ......................................................17
Application Charts .....................................................................................................18
Parts Section Index .......................................................................................... 19

2
SAFETY PRECAUTIONS
As the owner and / or operator it is ultimately your responsibility to insure personal
safety and to operate this machine in a safe manner. Your good judgment and the following
precautions will help you to avoid costly accidents and minimize personal risk.
• DO NOT move or operate this machine until you have read and understand the instruc-
tions in this manual.
• NEVER allow untrained persons to operate this machine.
• DO NOT attempt to service this machine while it is in operation.
• MAKE CERTAIN all mechanical and hydraulic tension has been released before attempt-
ing to service the machine.
• CHECK all nuts and bolts regularly for tightness.
• PERFORM REQUIRED MAINTENANCE as prescribed or as necessary to keep this ma-
chine in safe operating condition.
• KEEP ALL SPECTATORS at a safe distance.
• STAY CLEAR of high pressure supply lines, especially when first pressurizing the system.
• DO NOT remove or alter any of the shielding from this machine.
• BE CERTAIN that the machine is securely anchored (using the stabilizer legs) before un-
spooling the hose.
• KEEP WELL CLEAR of all moving parts.
• NEVER tow this machine at speeds greater than 10 MPH / 15 KPH and be certain the tow
vehicle has adequate braking capacity to maintain safe control at all times.
GENERAL PRECAUTIONS
“SAFETY IS JUST A WORD UNTIL PUT INTO PRACTICE”
This symbol, the safety-alert symbol, indicates a hazard and conforms to ANSI
/ ASAE S350. When you come across the safety-alert symbol in this manual,
make certain you fully understand and abide by the given instructions.
Keep the chassis of the machine on firm and level ground. A Cadman Traveller
has a high center of gravity. It is essential that it be operated from a stable posi-
tion to prevent roll over.

3
SAFETY DECALS
The safety decals on this machine are intended to warn the operator of potentially haz-
ardous areas. These decals must be properly maintained. This includes;
• keeping all safety decals legible
• replacing any decal that becomes illegible
• replacing any decal that is missing
• if applicable, include the current safety decal specified by Cadman Power Equipment Ltd.
on any component installed during repair
Contact Cadman Power Equipment Limited to obtain replacement safety decals.
When replacing safety decals reinstall them onto there proper locations.
SAFETY SHIELDS
The shielding installed on your Cadman Traveller is designed to help guard against
accidental entanglement in the moving parts of the machine. These shields must be removed
ONLY for the purpose of repair or periodic maintenance as described in the “Required Main-
tenance” section of this manual. The shielding MUST be immediately re-installed BEFORE
putting the machine back in service.
STABILIZER LEGS
All Cadman Travellers are equipped with two (2) stabilizer legs. The stabilizer legs
MUST be lowered each time the machine is used, no matter how little hose is pulled out!
Regular inspection of your pipe couplings, tubing and gaskets should be part of
your regular set-up routine. Any defective parts should be replaced or taken out
of service.
Pressurizing your Cadman Traveller must be done slowly and cautiously to
purge all the air from the system before bringing the system up to full operating
pressure. (see “Field Set Up And Operation” #16 on pg. 13 for further explana-
tion)
WARNING
Operation of a Cadman Traveller without the shielding in place could re-
sult in serious personal injury or death!
WARNING
Failure to properly use the stabilizer legs may result in unwanted frame
movement or machine upset with the potential to cause serious injury or

4
APPLICATORS AND ACCESSORIES
There are a variety of applicators available to be used with your Cadman Traveller.
Ask a Cadman Power Equipment Limited representative about your options.
Cadman Power Pak Caprari Water Sprinkler Kit
Many accessories are also available for use with a Cadman Traveller (i.e. Cadman
Power Pak) Refer to there respective manuals before using any piece of equipment with your
Cadman Traveller.
GUN CART
The gun cart assembly of the Cadman Traveller has adjustable rear track widths. The
gun cart should be adjusted to the widest track width that row spacing will allow. This will pro-
vide greater stability for the gun cart.
2625 GUN CART SHOWN
CAUTIO
N
If the gun is set so that it rotates forward of
the rear wheels of the cart (toward the reel),
stop the retrieve cycle NO LESS than 10
FEET out from the machine in order to pre-
vent gun damage caused by the gun hitting
the cart lift assembly.

5
REQUIRED MAINTENANCE
Prevention of mechanical failure is the goal of any good maintenance schedule. Severe
service uses such as liquid manure application, municipal and industrial uses, custom slurry ap-
plications, etc. require timely, trouble free operation of your equipment. The secret to preventing
unwanted down time is to adhere to a maintenance schedule suited to the way you use the
equipment. Your maintenance schedule should include the following minimum requirements;
EACH USE
1 Check to be sure BOTH shut off switches and the safety shut off switch are working. Repair
or replace a defective switch BEFORE operating the machine. (see top of pg.14)
2 Check to be sure the compensator safety switch is properly adjusted and working. The en-
gine must shut down before the shut off bar contacts the frame. (see top of pg. 14)
DAILY
1 Check the engine oil level and air filter condi-
tion.
2 Check to be sure that the indexer drive button
and connecting link are in good condition. In-
sure that the slide rails are well greased. (see
illustration)
3 Check the alignment and tension of the main
drive chain. Adjust as necessary.
AFTER THE FIRST 25 HOURS
1 Change the oil in the Honda engine. Refer to
the Honda engine manual for detailed mainte-
nance instructions.
2 Change the oil in the transmission gearbox. See “LUBRICANTS” section for oil type and fill
level.
EVERY 50 HOURS OF USE
• Check ALL wheel bolts (using a lug wrench) to insure tightness.
EVERY 100 HOURS OF USE
1 Change the engine oil. Consult the Honda engine manual for further information on oil re-
quirements and change intervals as well as other required engine maintenance.
2 Lubricate the following;
3 Lubricate all chains.
4 Check the oil level in the transmission gearbox. Replenish as necessary.
• Turntable bearing ring
• Indexer slide rails
• Indexer idler block
• Main drive chain idler arm pivot
• Drive pulley lead screw
SLIDE RAIL
DRIVE BUTTON

6
5 Check for oil level in the indexer gearbox.
6 Check the tire pressure and maintain from 36-40 PSI.
EVERY 250 HOURS OF USE
Disassemble, clean, inspect and re-pack the gun cart
wheel bearings. Replace any defective components as
required.
BEFORE STORING
1 Drain the hose. This is easily done by pulling out all
but one (1) coil of hose along a level path. Remove the drain plug from the gun cart. Use the
Honda engine or a tractor PTO shaft to wind in the hose.
2 Disassemble and clean the variable speed pulley mounted on the engine. Remove the
“moving face” of the pulley. Clean the bronze bushing and shaft of gum and belt dust and lu-
bricate with a thin coat of light oil.
3 Disassemble, clean, inspect and re-pack the main chassis wheel bearings.
4 Lubricate all chains.
5 Prepare the Honda engine for storage. See the storage instructions provided in the Honda
engine manual.
BEFORE START UP (After long term storage)
1 Review this manual to refresh your memory regarding the proper operation of this machine.
2 Fill the fuel system with fresh fuel.
3 Change the oil in both the transmission gearbox and the indexer gearbox.
4 Check and adjust the tire pressure to 36 - 40 PSI.
LUBRICANTS
Grease: Any good grade of multi-purpose, waterproof
grease is acceptable.
Engine Oil: Consult the Honda owners’ manual for oil
recommendations.
Transmission Gearbox: SAE 80W or 90W gear oil.
(see illustration)
Indexer Gearbox: Mobile SHC 634 Synthetic Gear
Lubricant
DRAIN PLUG
FULL PLUG
FILLING
AREA
CAUTION
DO NOT leave the machine unattended during the hose draining process. Without fluid pres-
sure present, the hose may flatten slightly causing it to lay improperly on the drum. It may be
necessary to manually adjust the hose position on the hose drum during the draining process.
AS SHOWN WHEN CHECKING THE OIL LEVEL
THE OIL LEVEL HOLE
FILL THE GEARBOX TO THE INSIDE LIP OF

7
FIELD PREPARATION AND OPERATING TIPS
1 If your field width is greater than can be irrigated in one (1) pull but narrower than two (2)
pulls, divide the field into two (2) equal width pulls instead of one (1) full width pull and one
half width pull. (see illustration below)
There are two (2) reasons for this.
• Even division of the field allows
maximum versatility to combat
rising winds from any direction.
• The gun cart will track straight
and be less affected by gun
thrust.
During quarter circle operation (from the edge of a field), gun thrust tends to steer the
gun cart in the direction in which water is being thrown. This occurs when the gun is nearly per-
pendicular to the hose lane. If conditions dictate that a quarter circle pass is unavoidable, pre-
pare the travel lane by preparing a shallow trench for the hose and the cart wheels to follow.
Adding extra weight to the rear of the gun cart is also beneficial. If these preparations are not
possible or prove inadequate, reduce the size of the gun nozzle to reduce the amount of thrust.
Remember to adjust the retrieve rate to maintain your desired application rate.
During normal full pattern operation, (the gun operates to both sides of the cart) gun
thrust will correct this steering action automatically. The side to side movement of the cart
should be no more than the width of the cart’s rear wheels.
2 If you typically hill your row crops and plan to leave open travel lanes, hill and cultivate your
travel lanes as well. The absence of grass and weeds will dramatically reduce the amount of
towing effort and traction required to pull out the hose. The hills will also help guide the hose
and cart through the field.
3 Crops such as sod, alfalfa, potatoes and peas provide a great deal of resistance to pulling
the hose. If you irrigate such a crop, consider uncoupling the feeder hose at the mainline
valve and pulling out the hose slightly slower. This expels a good deal of the water from the
P.E. hose, reducing the amount of towing effort required.
4 I f
a curved pull is necessary, pull a minimum of 200 feet of hose straight out from the ma-
chine chassis before beginning a long gradual curve.
5 Provide for ample head land (lane way) space to allow the machine chassis to be pivoted
and setup.
6 Where field conditions permit, always attempt to pull the hose either up or down sloping ter-
rain instead of operating on a side hill. If a side hill condition is unavoidable, provide a hilled
trench as a guide for the hose and add extra weight to the gun cart to prevent upset.
PREFERRED
CAUTION
Several hundred gallons of water can be expelled. Exercise good judgement to
prevent excessive muddying of the area near the chassis of the machine.

8
WHEN APPLYING LIQUID MANURE . . .
Environmental concerns seem to be driving legislative agendas in many
agricultural areas across the continent. Current and pending laws in many agricultural
regions of North America are changing the ways in which the agricultural community is
expected to manage their liquid animal waste products.
The changes in legislation typically target two main issues; run-off prevention
during and after application and soil nutrient loading.
Run off seems to be the largest concern with nutrient application. Run off may
result from several different factors, most of which are controllable. These factors
include; exceeding the soil intake rate; nutrient application on steep grades; high
application amounts; leaking mainline fittings and seals; sudden rainfall during or
immediately after application; ground frost; etc. Constant watch must be kept and
immediate action taken when necessary to prevent run off from occurring.
Soil nutrient loading depends on many variables. Some of these variables (but
certainly not all) are soil type, type of crop being grown in the irrigated area, application
timing, nutrient value of the material being applied (nutrient value should be assessed at
the time of application as it can change throughout the year), etc.
Soil type will determine the intake rate at which liquid may be applied. Cultivation
of the field just prior to application can improve the intake rate of some soils.
Great potential benefit lies in using the nutritional value of the product being
applied to replace some or all of the traditional chemical fertilizer used. Application
timing and amount are important considerations. Soil analysis taken prior to planting and
during the growth periods of the crop will help determine if there is room for further
application amounts to be added prior to crop maturity. A total management plan should
include provisions to end the crop season without surplus nutrients left as residual.
These excess nutrients typically end up in the ground water supply. Local colleges,
universities and agricultural extension services are usually a good source of information.
They can usually help you determine an application program that prevents soil nutrient
overload due to excess application.
Cadman Power Equipment Limited cannot possibly provide up-to-date
recommendations with regard to the legal obligations you must deal with in your
particular area. However, as a manufacturer of equipment used in nutrient application
(liquid manure, milk house run-off, etc.), we feel it necessary to make you aware that the
municipal, regional and state governing bodies in your area may have recently enacted
new legislation or revised existing legislation with regard to nutrient handling practices
and procedures.
It is your responsibility to make yourself aware of and abide by the current
legislation in your area. Please take the time to contact your local agricultural
representative to obtain the latest information regarding legal nutrient application and
handling.

9
FIELD SET UP AND OPERATION
BEFORE operating your new CADMAN TRAVELLER, inspect the machine for any
damage or parts which may have come loose during shipping. REPORT ANY DAMAGE TO
YOUR DEALER IMMEDIATELY !
1. Tow the machine to the field. Park the traveller on the head land (lane way) at right angles
to the rows to be irrigated.
NOTE : For the first use of a new machine or a machine which has been drained prior to stor-
age, start in an area which will allow you to pull out the full length of hose ( EXCEPT
for one full coil ). This will allow you to be sure that the hose is properly laid on the
base layer and properly indexed.
If you are unable to pull out all of the hose in the area you are working, pull out enough
hose to reach the base layer. This will allow you to see if the coils of hose in the base layer are
stacked tightly together. If the hose is found to be improperly indexed (the hose tries to climb
up on itself or gaps exist between the coils of hose), do the following:
• Set the hose drum so that the hose connection is at the six o’clock position (closest
to the ground).
• Fully apply the brake to prevent further rotation of the hose drum.
• Manually move the coils of hose so that they are tightly stacked together all across
the base layer of hose.
Check the position of the hose guide in relation to the hose. If the hose does not travel
straight through the hose guide and lay snugly against the drum elbow, do the following (see
following page):
• Remove the indexer shield.
• Remove the # 40 chain which runs from the hose drum axle to the indexer gearbox.
• Manually adjust the hose guide position so that the hose travels in a straight line
through the hose guide and lays snuggly against the drum elbow.
• Re-install the # 40 chain from the hose drum axle to the indexer gearbox.
• Re-install the indexer shield.
CAUTION
Before moving a traveller at any time, be sure that the drive system is fully engaged,
the engine fuel valve is in the OFF position and the transport brake is fully applied.
CAUTION
Low pressure operation can cause indexing problems. The hose indexing sys-
tem of your Cadman traveller is set up to properly index the polyethylene hose onto the
hose drum under most operating conditions. However, when operating at very low in-
let pressures (110 PSI or less), the PE hose can flatten slightly causing the indexing
system to appear to be either out of adjustment or not functioning properly. This is
probably not the case in this circumstance.
It is advisable to increase the inlet pressure at the machine to at least 110 PSI to
help prevent further hose indexing problems related to low inlet pressures.


11
2 Adjust the tongue jack for a level frame position during operation.
3 Release the turntable lock and rotate the upper frame to the desired operating position and
re-engage the turntable lock.
NOTE: 2250 model Cadman Travellers are equipped with flip down stabilizer legs. Both legs
must be used at all times.
A
WRONG
RIGHT
WRONG
CAUTION
The upper frame position MUST allow
the hose to be pulled out straight from
the machine. Adjust the upperframe po-
sition if necessary to insure proper un-
reeling of the hose.
CAUTION
Never operate the machine with only one (1) stabilizer leg extended
Lower BOTH stabilizer legs. Remove the leg
pin “A” (see illustration above) allowing the
drop leg to extend.
Replace the pin in one of the available holes so
that when the jack is extended, the drop leg
and extension leg will be of approximately
equal length. This will balance the side loading
of the jack and help to prevent damage caused
from over-extending one of the inner jack legs.
Repeat these steps for the other jack.

12
5 Shift the transmission lever to the disengage
position (arrow).
6 Adjust the brake handle position so that a slight
amount of brake tension is applied. This tension should be enough to control the hose
drum and prevent loosening of the hose on the drum when the tractor stops pulling the
hose.
7 Set the track width of the gun cart as wide as possible. Lower the cart to the ground by
operating the hand winch on the side of the machine. Disconnect the lift chain from the
cart.
8 Move the tractor from the front of the machine, position it behind the gun cart and attach
the gun cart tow chain to the tractor drawbar.
9 Pull the desired amount of hose. (see illustration
on pg. 11)
10 At this time, set the part circle stops on the gun.
The gun should be set behind the cart so that the
travel path remains dry until the cart passes.
(see illustration)
210° - 270°
CAUTION
DO NOT exceed 3 MPH while pulling out the hose
DO NOT stop suddenly at the end of your travel lane. Slow gradually when nearing the
end of the pull.
ALWAYS leave at least a 3/4 wrap of hose on the drum.
WARNING
If a rear pull is needed, provisions MUST be made to leave the tractor attached to the
tongue of hte machine. The tractor must be left in gear and the parking brake ingaged.
This provides extra anchoring in addition to the stabilizer legs during the retrieve cycle.
DRIVE SYSTEM DISCONNECT
ENGAGEDISENGAGE

13
11 Check the nozzle size and check
that the nozzle cone is secure.
12 Remove the tractor from the gun cart and clear the area of operation.
13 Connect the feeder hose to the inlet on the traveller and lock it in place. Attach the other
end to the mainline or mainline valve.
14 If the hose is loose on the drum, use the hand crank to rotate the drum to tighten the hose.
Insure that the hose coils are stacked tightly together.
15 Adjust the brake handle to the full “ON” position after insuring that the hose is tight.
16 GRADUAL
pressurization of the system may now begin. Keep the pressure low (under 50
PSI) until ALL the air is purged from the system and a steady stream is flowing from the gun
nozzle. AFTER all the air is purged from the system, pressure may be slowly raised to a
maximum of 150 PSI at the inlet of the machine.
NOTE:
Ideally, operating pressures at the inlet will be between 120 PSI and 150 PSI. This
will allow gun pressures ranging from approximately 50 PSI to 110 PSI (depending on
nozzle size, hose size and length). Assuming proper nozzle selection has been made
based on the pressure and flow volume available, proper droplet sizing and proper
gun action, an even and uniform watering pattern will result.
17 Check the mainline and inlet elbow connections.
START UP OF THE RETRIEVE CYCLE
1 Check the engine oil and fuel levels.
2 Open the fuel valve on the engine, move the ON / OFF switch to the “ON” position and start
the engine.
NOTE: If after several attempts, the engine fails to start, check the shut off bar at the opposite end of the
machine to insure that BOTH shut off switches are depressed. The engine WILL NOT START if
either switch is released.
WARNING
Never leave the hand crank on the driveshaft. REMOVE IT IMMEDIATELY after use.
CAUTION
Operation of the machine with the inlet pressure below 110 PSI will allow the hose to flatten
slightly as it is rewound during the retrieve cycle. This flattening may cause the hose to lay im-
properly on the hose drum or make it impossible for all the hose to be rewound. In either case,
the hose must be pulled out to correct the problem. If you are unable to provide a minimum of
110 PSI to the inlet of the machine contact your dealer for help in improving your system design.
MODEL NOZZLE SIZE
2250 0.77”, 0.81” or 0.86”
2625 0.81”, 0.86”, 0.89” or 0.93”
3000S 1.18” or 1.26”
NOTE: Several nozzle sizes are supplied with the sprinkler gun. The “best” nozzle choice for
your application may take some experimentation to determine. Typically, two nozzle
sizes will perform well for each model. See the chart below for nozzles to try.

14
4 Check the adjustment of the compensator system
when the machine is first put into service and periodi-
cally during normal use to insure accuracy. The following outlines the set-up routine and
operation of the compensator system.
• When the engine is first started after pulling out the hose,
the pulley cam should rotate, positioning it for the start of
the retrieve cycle. The cam rollers should now be near the
top of the ramp (see illustration)
START POSITION
SECOND POSITION
RUN STOP
SHUT OFF
SWITCH
• To check the shut off switches, lift the shut off
bar to a vertical position, while manually holding
one (1) of the two (2) switches in the depressed
position. The engine should shut off as the op-
posite switch releases. Re-start the engine and
repeat the test for the opposite switch.
• Pull the compensator frame away from
the hose drum. As the frame clears the
outer edge of the drum, the engine
should shut off. 2.00"
• If the engine does not shut off at this point, adjust
the elevator bolt (arrow) so that the engine will.

15
5 Select a retrieve rate to achieve the desired application
rate. (see example on pg. 16)
• Determine the precipitation amount you require in inches.
• In the gun performance chart, pg. 16, find the gallons per minute you are pumping by
crossing your nozzle size with the pressure you have at the gun.
• From the “TIME REQUIRED TO WATER ONE (1) ACRE” chart (chart #4, pg. 17), find the
time required to cover one (1) acre by crossing your GPM (from the previous step) with
your desired application amount.
• In the “HOSE RETRIEVE RATE” chart (chart #5, pg. 17), find the required hose retrieve
rate by crossing the “TIME REQUIRED” (from the previous step) with the lane spacing you
are using.
6 With the engine running adjust the pulley control knob until the speedometer reads the
required retrieve rate (from step #5)
The control knob should maintain its position when released. If the control knob posi-
tion changes on its own, an increase in drag on the control stem may be gained by tightening
the drag adjustment screw (arrow “A”, top illustration).
As the hose is un-spooled to prepare for the
next irrigation cycle, the compensator frame will follow
the hose level. At this time, the compensator control
cable, the cable drive arm, and the pulley cam do not
move (the engine pulley cannot close against the drive
belt). As soon as the engine is started, the reset spring
will cause the pulley cam to return to its’ “START” posi-
tion (at the top of the cam ramp). If the cam does not
reposition properly it can be adjusted. This is accom-
plished by changing the length of the push-rod.
Push-rod Stop
THIRD POSITION
FINAL POSITION
A
During the hose retrieve cycle, the compensator
frame rests against the hose on the drum. As each layer of
hose is rewound, the compensator frame moves outward with
the hose. This movement causes the pulley cam to rotate a
measured amount, allowing the pulley to open slightly. This
changes the diameter of the pulley. The change in pulley di-
ameter changes the overall drive ratio which keeps the hose
retrieve rate constant (compensating for the increase in net
drum diameter). This process repeats for each layer of hose.
CAUTION
DO NOT adjust the pulley control knob unless the engine is running. Permanent damage
to the pulley may result.

16
NOTE:The speedometer reads actual hose speed ONLY on the base (1st) layer of
hose.
If the retrieve rate is set or checked on the second, third, or fourth layer, the
desired retrieve rate must be set to the “corrected value” for the layer being
loaded. This is easily done by referring to the chart attached to the machine next
to the speedometer. This “corrected value” is read directly from the
speedometer.
(eg.): The desired retrieve rate is 30 inches per minute. The hose is on the
second layer when the speed is set. On the SPEED CONVERSION
CHART, find 30 inches per minute in the line labeled BASE LAYER. Read
the corrected speed value on the 2ND LAYER line in the 30 inches per
minute column.
Set the speed so the speedometer reeds this corrected value (27).
The actual hose speed will be 30 inches per minute
If you are unsure of your retrieve rate for any reason, manually check the
retrieve rate by measuring the hose movement over a three (3) minute period
and average this measurement (divide by 3).
7. Shift the transmission lever to engage the drive system.
8. Fully release the brake.
9. Make a thorough visual inspection of the of the machine’s function to insure proper
operation.
EXAMPLE OF RETRIEVE RATE SELECTION
Determine the retrieve rate required to apply a 0.75” application to a field 200 feet in
width.
A 2625 model traveller is fitted with a Nelson SR-100 gun. The gun has a 0.89” ring
nozzle operating at 90 PSI.
• From the Nelson gun chart, find the
GPM you are pumping under the nozzle
size you have in the gun. The shaded block under the 0.89” ring nozzle
column tells you that the gun is flowing 173 GPM.
• From chart #4, determine how long it should take to cover one (1) acre, in
minutes, by crossing the GPM (from above) by the required application of
0.75”. The shaded block tells you that it should take 120 minutes to cover
one (1) acre.
• From chart #5, determine the retrieve rate you need to obtain the desired
application of 0.75” by crossing the time required to cover one acre (120
minutes) by the lane spacing (200 feet). The shaded block tells you to set
the hose retrieve rate at 21 inches per minute as a starting point.
• The gun should be set up so that the 200 foot width is covered plus sufficient
overlap (beyond the edge of the crop) to provide adequate watering at the
edge of the field.
NOTE: Keep in mind that the charts are to be used as a guide only. Always check the
actual application amount with rain gauges to confirm that the application
amount is correct.

NELSON 100 SERIES BIG GUN®24º TRAJECTORY
NOZZLE 0.71" RING 0.77" RING 0.81" RING 0.86" RING 0.89" RING 0.93" RING 0.96" RING
PSI GPM DIA. GPM DIA. GPM DIA. GPM DIA. GPM DIA. GPM DIA. GPM DIA.
40 66 208 78 212 91 215 103 224 118 235 134 238 152 242
50 74 220 88 225 100 230 115 240 129 250 150 255 167 260
60 81 235 96 240 110 245 125 260 141 270 164 275 183 280
70 88 245 104 250 118 260 135 275 152 290 177 295 198 300
80 94 255 111 265 127 275 145 285 163 300 189 305 211 315
90 99 265 117 275 134 285 154 295 173 310 201 315 224 325
100 105 270 124 280 142 295 162 305 182 320 212 325 236 335
110 110 275 130 290 149 305 170 315 191 325 222 335 248 345
NOZZLE 0.6" TAPER 0.65" TAPER 0.70" TAPER 0.75" TAPER 0.80" TAPER 0.85" TAPER 0.90" TAPER
PSI GPM DIA. GPM DIA. GPM DIA. GPM DIA. GPM DIA. GPM DIA. GPM DIA.
40 66 213 78 222 91 230 103 240 118 250 134 256 152 262
50 74 225 87 235 100 245 115 256 130 265 150 273 165 280
60 81 240 96 250 110 260 126 270 143 280 164 288 182 295
70 88 250 103 263 120 275 136 283 155 295 177 302 197 310
80 94 260 110 273 128 285 146 295 165 305 189 314 210 325
90 100 270 117 283 135 295 155 306 175 315 201 326 223 335
100 106 280 123 293 143 305 163 316 185 325 212 336 235 345
110 111 290 129 303 150 315 171 324 195 335 222 344 247 355
The diameter of throw is approximately 3% less for the 21º trajectory angle and 6% less for the 18º trajectory angle.
The NELSON BIG GUN®performance data has been obtained under idea test conditions and may be affected by wind, poor hydraulic
entrance conditions or other factors. Nelson Irrigation Corporation makes no representation regarding droplet condition, uniformity or application
rate.

CHART #4
MINUTES REQUIRED TO WATER ONE (1) ACRE
PRECIPITATION RATE ( ACRE INCHES )
GP
M
0.10" 0.20" 0.30" 0.40" 0.50" 0.75" 1.00" 1.25" 1.50"
80 34 68 102 136 170 255 339 424 509
90 30 60 91 121 151 226 302 377 453
100 27 54 81 109 136 204 272 339 407
110 25 49 74 99 123 185 247 309 370
120 23 45 68 91 113 170 226 283 339
130 21 42 63 84 104 157 209 261 313
140 19 39 58 78 97 145 194 242 291
150 18 36 54 72 91 136 181 226 272
160 17 34 51 68 85 127 170 212 255
170 16 32 48 64 80 120 160 200 240
180 15 30 45 60 75 113 151 189 226
190 14 29 43 57 71 107 143 179 214
200 14 27 41 54 68 102 136 170 204
CHART #5
RETRIEVE RATE ( INCHES PER MINUTE )
MIN. / LANE SPACING ( FEET )
ACRE 100 125 150 175 200 225 250 275 300
20 *** *** 174 149 131 116 105 95 87
25 *** 167 139 119 105 93 84 76 70
30 174 139 116 100 87 77 70 63 58
35 149 119 100 85 75 66 60 54 50
40 131 105 87 75 65 58 52 48 44
45 116 93 77 66 58 52 46 42 39
50 105 84 70 60 52 46 42 38 35
60 87 70 58 50 44 39 35 32 29
70 75 60 50 43 37 33 30 27 25
80 65 52 44 37 33 29 26 24 22
90 58 46 39 33 29 26 23 21 19
100 52 42 35 30 26 23 21 19 17
125 42 33 28 24 21 19 17 15 14
150 35 28 23 20 17 15 14 13 12
175 30 24 20 17 15 13 12 11 10
200 26 21 17 15 13 12 10 10 ***
250 21 17 14 12 10 *** *** *** ***
300 17 14 12 10 *** *** *** *** ***
350 15 12 10 *** *** *** *** *** ***
400 13 10 *** *** *** *** *** *** ***
500 10 *** *** *** *** *** *** *** ***
18
This manual suits for next models
2
Table of contents
Other Cadman Lawn And Garden Equipment manuals
Popular Lawn And Garden Equipment manuals by other brands

vita
vita CLASSIC CAMBRIDGE PLANTER Assembly guide

Addvent
Addvent AVIK20W Installation instructions and user guide

Skid Pro
Skid Pro QA4205 Operator's manual

Greentrees Hydroponics
Greentrees Hydroponics MULTI FLOW HYDROPONIC SYSTEM instructions

MAREDO
MAREDO VibeSpike GT 210 061 manual

Evotools
Evotools GEA 520 EPTO user manual