Caiman NITEHOG TIR-M50 User manual

EN 11-2019 rev. 1.0
MANUAL
NITEHOG TIR-M50 Caiman
Multifunctional Thermal Imager

ATTENTION!ATTENTION!
The proper usage of the device is important for safe exploita-
on! Therefore read carefully the present manual!
If the device was le in storage for a longer period of me, be-
fore exploitaon check its funconality.
Disassembling of the device is prohibited, except in authorized
repair centers.
The external opcal surfaces should be clean at all mes. Touch-
ing the opcal surfaces with bare hands is not recommended.
Sand and sea water can damage the opcal coangs!
Do not point the device directly at the sun!
Image performance is dependent on scenery and atmosphere
condions. Contrast in the same image may vary as a funcon
of the me of day due to the eect of the sun. For example, at
sunset objects will have absorbed dierent levels of heat result-
ing in greater temperature dierences and beer contrast.
When le in storage for a longer period of me, baeries have
to be removed and stored in polyethylene bags to prevent con-
tact with metal. It is recommended to recharge the baeries ev-
ery two to three months.v
When carrying or transporng the device, put the protecve
lens cap!
Condensaon can cause fogging of the opcal surfaces! Con-
densaon occurs when the temperature or humidity changes as
follows:
• When moving the device from cold to warm place or vice
versa;
• In places with high humidity.
When equalizing the temperature of the device with the envi-
ronmental, the condensaon disappears. Use the towel to re-
move moisture.
Clean the lens surfaces with the Lens Pen® or with the napkin!
LEGAL NOTICE
Before aaching to weapons, check the regional legal regulaons in the area of
applicaon. The aachment to a weapon is always the sole responsibility of the
user.
2 3

APPEARANCEAPPEARANCE
VIDEO OUT/
SYSTEM CABLE
DIGITAL
ZOOM
NUC (NON-UNIFORMITY
CORRECTION)
BRIGHTNESS / POLARITY
SWITCH ON/OFF
FOCUS RING BATTERY COMPARTMENT
CAP
TWIST-OFF
THREAD COVER FOCUS
LEVER
4 5

CONTROLSCONTROLS
NOTE
The integrated funcons of the device exceed the number of controls. Some features
are triggered by a combinaon of buons or temporary pressing and holding the
buons.
ATTENTION!
Turn o the device aer usage, otherwise you can permanently damage the bat-
teries!
6 7
ATTENTION!
The main operaons are performed through the buons , and .
NUC (NON-UNIFORMITY CORRECTION)NUC (NON-UNIFORMITY CORRECTION)
Each pixel of the matrix is suscepble to generate a signal, dierent from the signals of
other elements under the same condions of observaon. This non-uniformity leads
to the appearance of a geometric noise in the picture. This eect is especially shown
in the uncooled systems. Therefore it is necessary to perform a non-uniformity cor-
recon periodically, during operaon with the thermal device. The NUC algorithm can
be acvated manually or automacally (through specied intervals) by pressing
buon. Pressing and holding the buon (more than 2 seconds) deacvates the Auto
NUC funcon. In that case NUC will be carried out manually only when pressing .
The acvated automac modus will be shown in the le upper corner of the image.
DIGITAL ZOOMDIGITAL ZOOM
LUMINANCE / POLARITYLUMINANCE / POLARITY
The device has four xed values of the display luminance, marked with the following
icons: , , and . With prolonged use of the device in low lighng condi-
ons the lower brightness levels are recommended. This results in opmal energy con-
sumpon and greater observaon comfort. Press and hold the buon for more
than 2 seconds to invert the image, i.e. warm objects appear in dark tones, cold - in
white and vice versa.
Press the buon to acvate the digital zoom x2, press twice - x4.
The current digital zoom is shown at the top-right corner of the screen.
NOTE
The digital zoom reduces the quality of the image!
By pressing and holding the buon (more than 2 sec) a snapshot of the image is
taken and stored in the memory of the device. An indicaon (saved) is displayed.

50m
MENUMENU
Besides the main and secondary funcons, they serve also for entering and navigaon
through the menu. To acvate the menu, press the and buons simultane-
ously. Then use the and buon to move the cursor, and buon to select
the funcon.
AppearanceAppearance
NavigaonNavigaon
Range Finder
Sengs Language
English/Deutsch
Image Brightness NUC Type
Internal/External
Mode Monocular Weather Type
Hot/Normal/Wet
Standby
On/O
Exit Clip-On Filters
Smooth/Middle/Sharp Alignment
Palee
Rainbow/Rain/Isotherm
Black Hot/White Hot
Back
Snapshot
View/Erase All
Back
RF Range FinderRF Range Finder
SengsSengs
Please select the preferred language, using this
section. The default language is English.
Language
Language
NUC Type
Standby
Back
Stadiametric RF funcon allows measuring of approx. distance to a known object.
In order to do that select the object type you are observing. Align the marker so that
the base of the observed object ts the boom line and and the upper line ts the top
of the object (see the picture below). Once the object is ed in the marker borders
(up - down arrows), on the le side of the screen the approx. distance to the object is
displayed.
To exit the RF mode press the OK buon.
The following measurements have
been set to determine the distance:
deer (Cervus elaphus) - 1.40 m
wild boar - 0.85 m
deer (Capreolus capreolus) - 0.70 m
fox - 0.40 m
8 9
ATTENTION!
The buons , and are dual purpose buons!

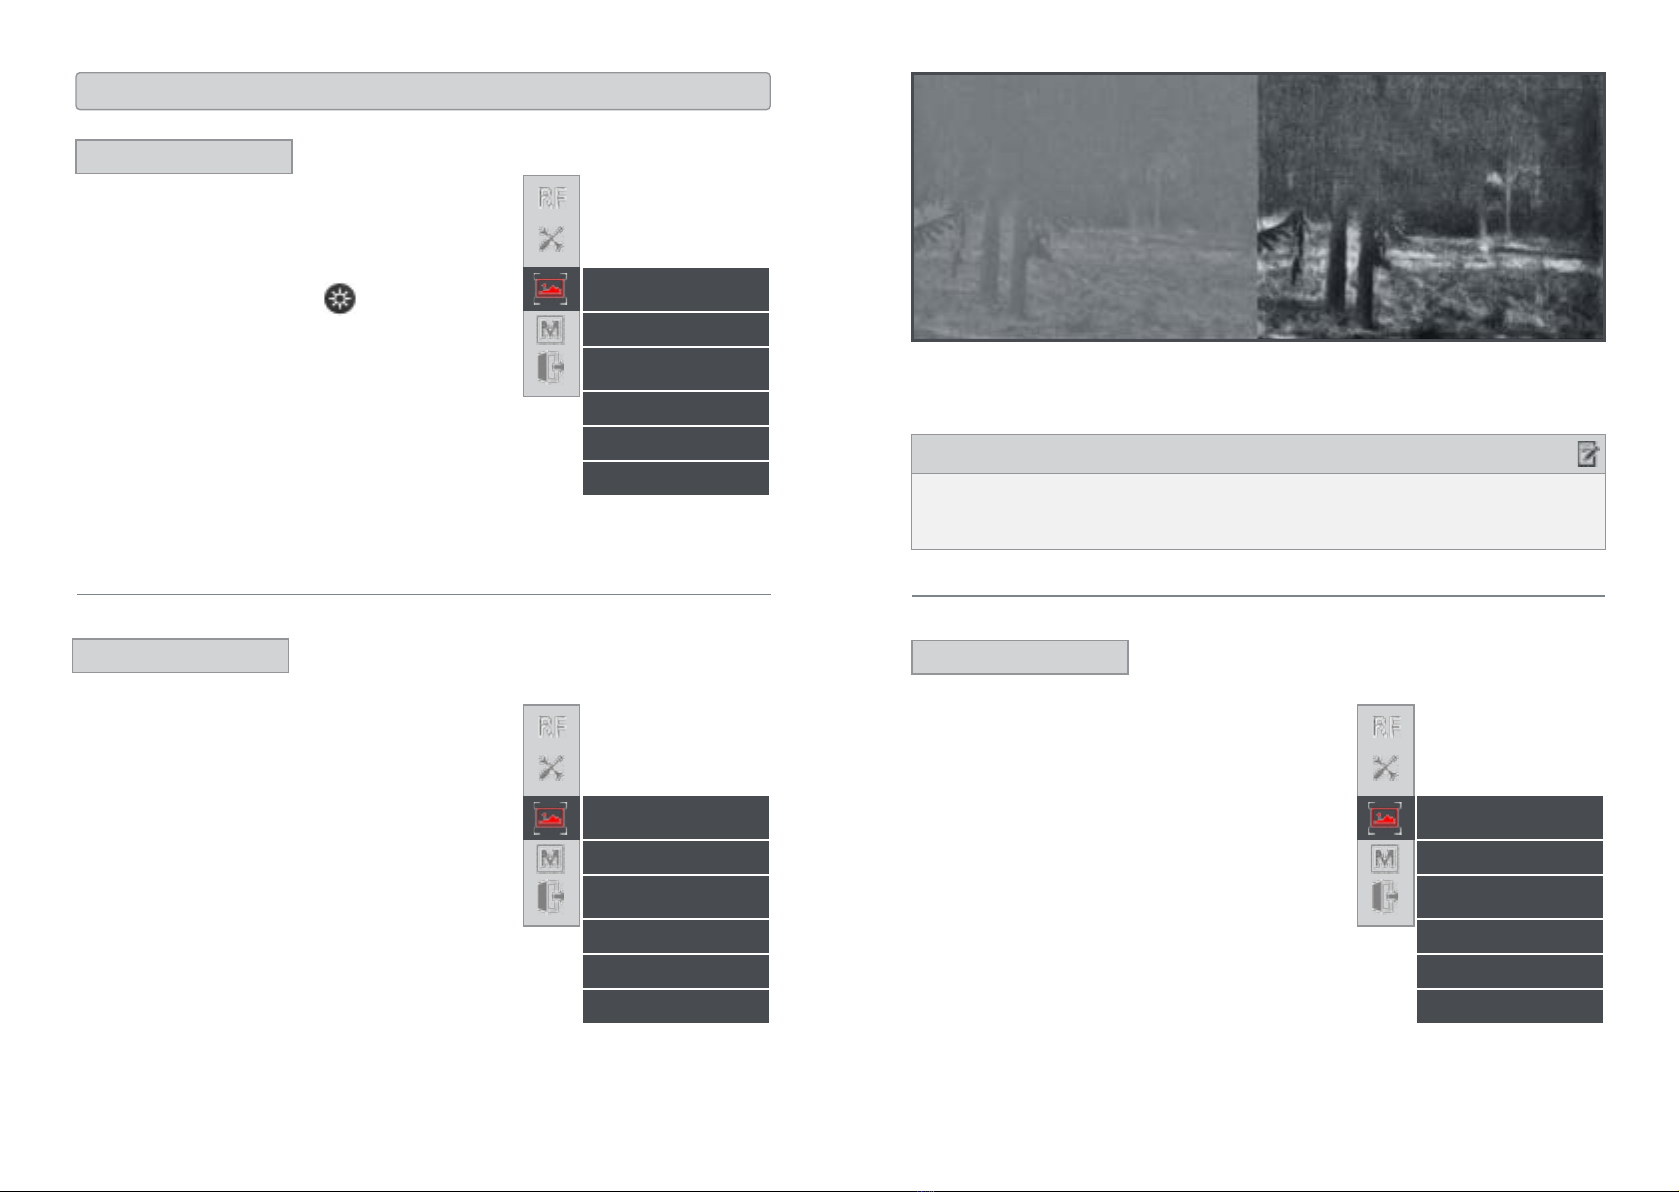
In that case the mechanism will be performed by the user, who must cover the objec-
ve lens, before pressing . In order to cover the objecve lens use the hand or the
protecve cap, otherwise the image of the display will resemble the negave eect of
the observed scene.
Upon power on, the device automacally performs two consecuve NUC-cycles. Dur-
ing this period of me it is desirable to cover the objecve lens with the protecve cap
or with the hand. These acons are necessary only when the External shuer mode
is acvated.
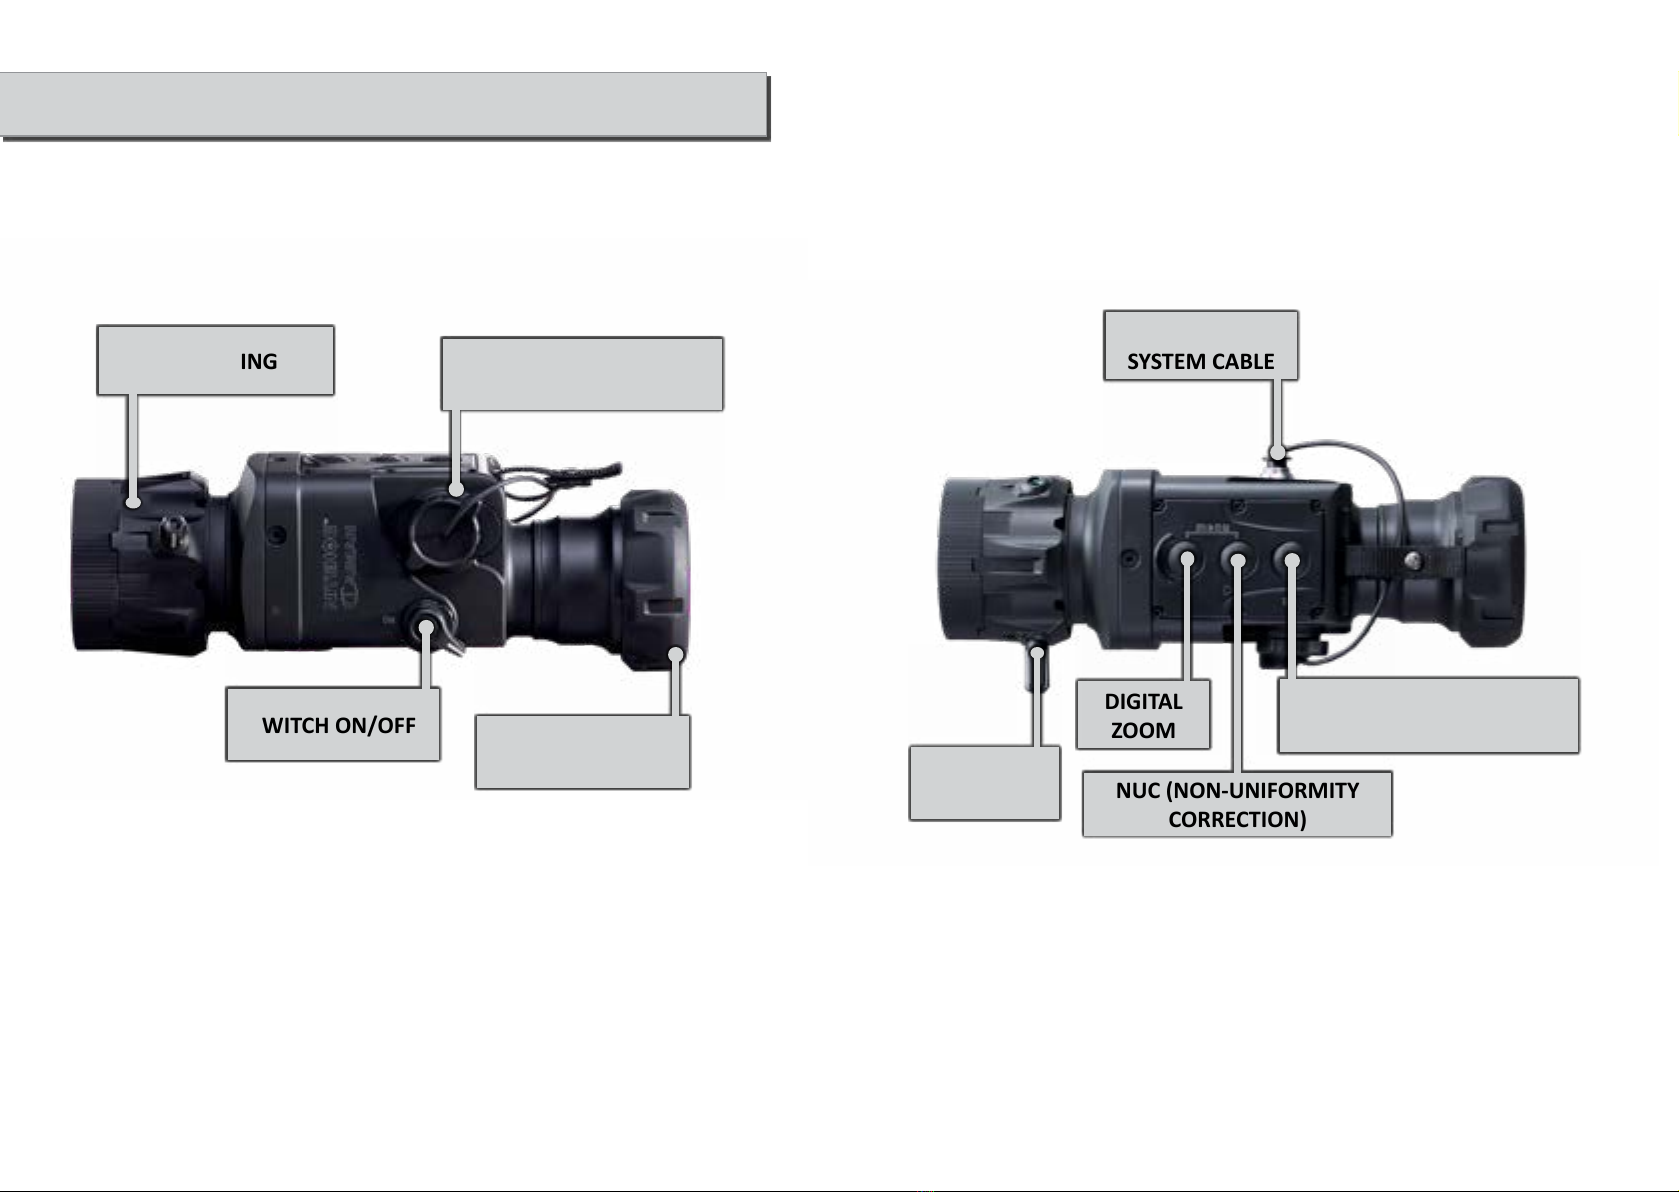
The non-uniformity correcon (NUC) of the signal is a complex electronic process, which
requires a uniform temperature body in front of the detector or the objecve lens.
For the convenience of the user, the device has a built-in motorized mechanism for per-
forming NUC procedure by automacally dropping a miniature shuer plate in front
of the detector. This process takes less than a second and is accompanied by acousc
noise resembling a click.
In situaons requiring maximum suppression of the
external noise, the device can operate in External
shuer mode, which isolates the operaon of the
motorized mechanism.
When the External shuer mode is acvated, the
motorized mechanism of the shuer is blocked, Auto
NUC funcon is deacvated.
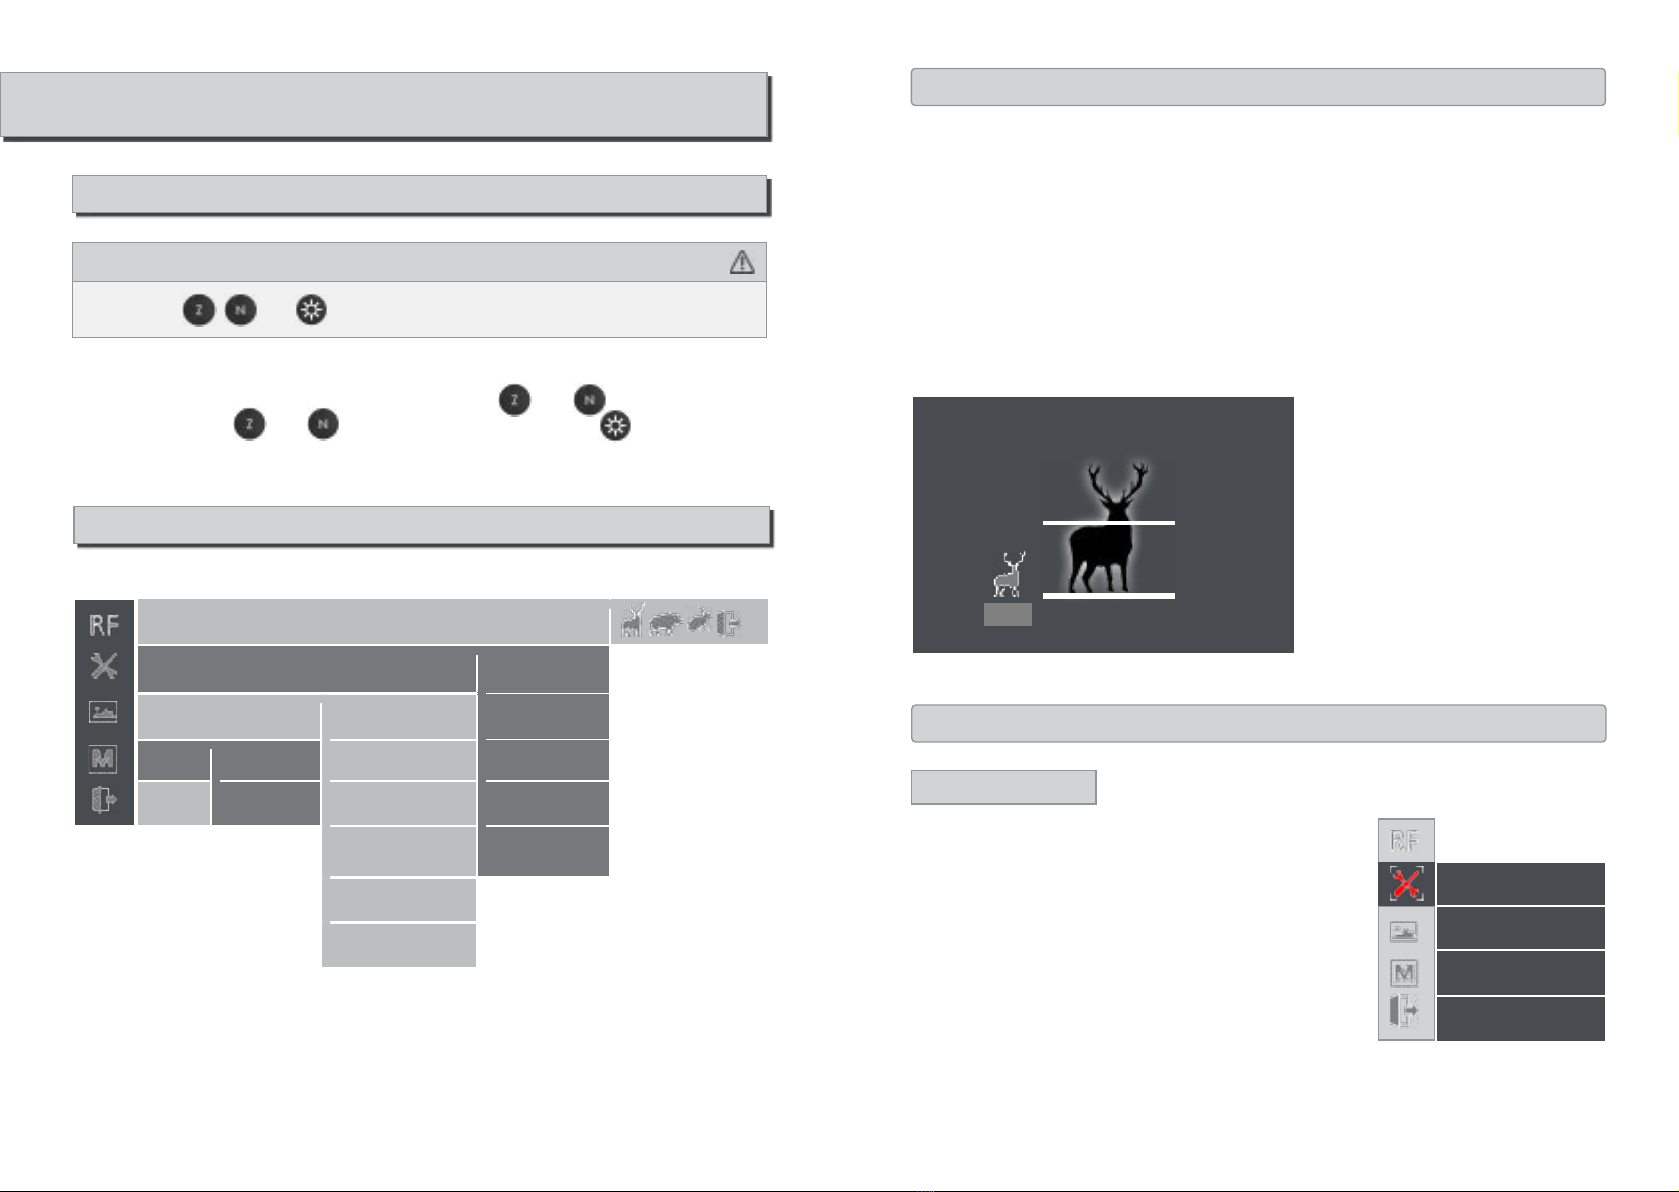
Selecng the NUC type changes the NUC mode be-
tween Internal and External.
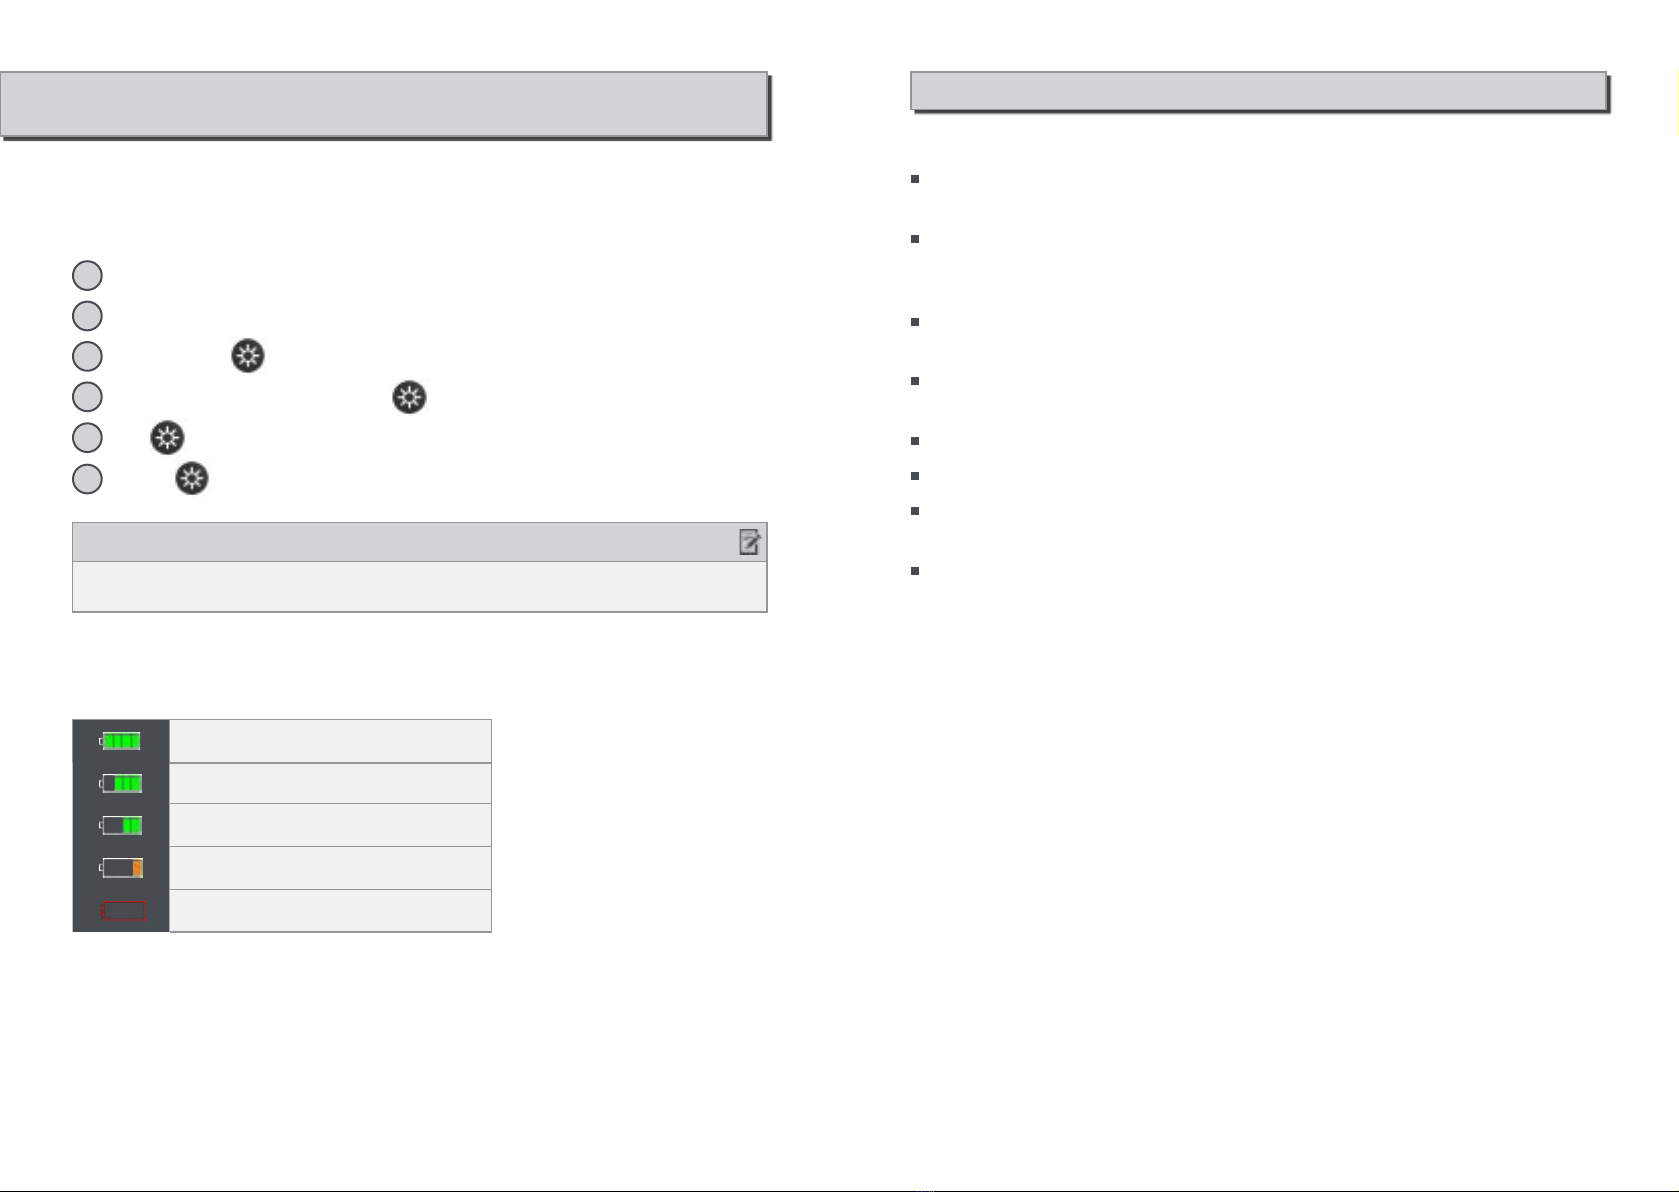
NUC Type
Language
NUC Type
Standby
Back
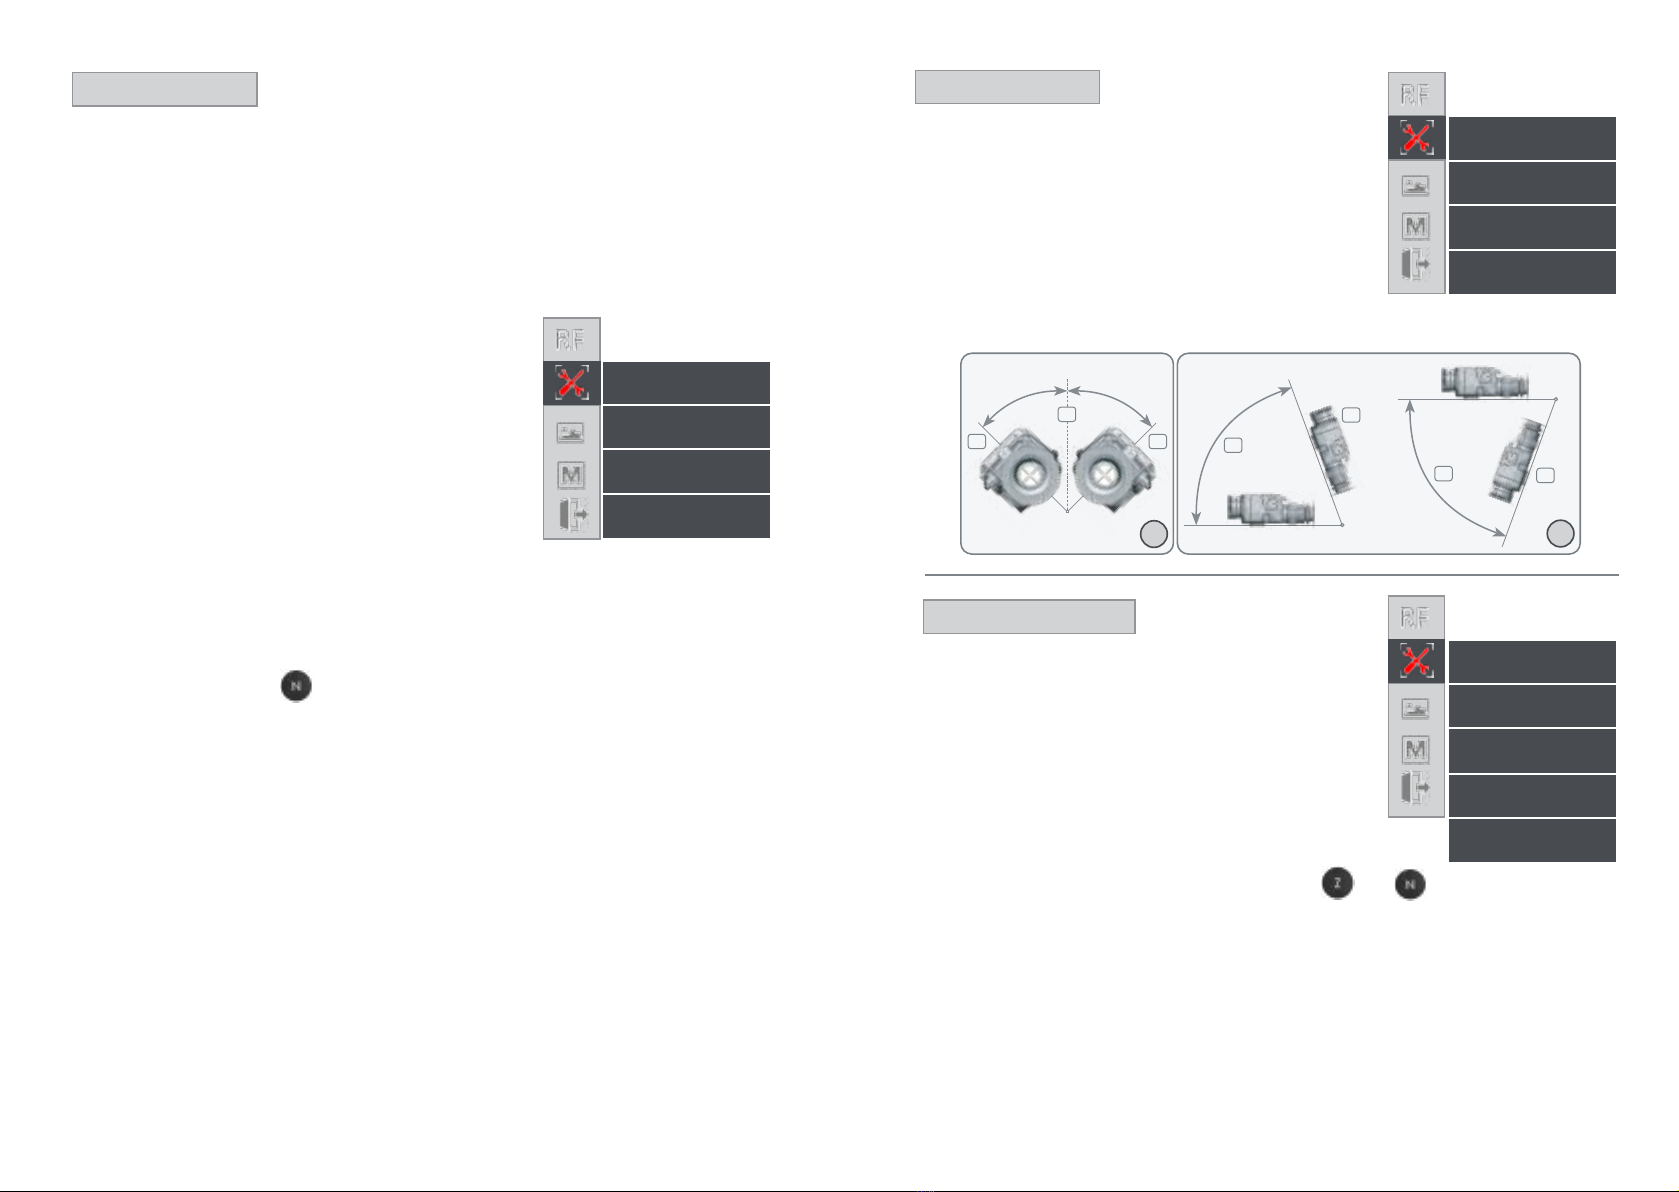
When Standby funcon is on, the device will be
powered on every me, when the lt angle is less
than 45° to both sides (g. 1) and 60° upwards
and downwards (g. 2). As soon as these condi-
ons are not fullled, the device will automa-
cally switch to standby mode.
OFF
ON
60°
OFF
ON
60°
45°
45°
OFFOFF
ON
f.1 f.2
Standby
Language
NUC Type
Standby
Back
With Alignment funconyou can precisely align
the opal axises of the day sight and the clip-on
atachment. The manufacturing process of the
device ensures the shoong precision tolerance
within 3 to 5 cm at 100 m. By this Alignment
funcon you can achieve much beer results in
the accuracy.
Alignment is made electronically by pressing the and buons, while being in
the menu Sengs > Alignment > Le/Right, Up/Down (in clip-on mode only). In posi-
on X: 0, Y: 0 the image is in center of the screen of the device. By using the alignment
funconuser moves the image in all direcons.
If the impact point is le of the target, the image should be moved to the right, increas-
ing the value of X, and vice versa.
The adjustment is limited to 10 steps in each direcon. Each step corresponds to ap-
prox. 3 cm at 100 m. If the need for alignment exceeds the limit of 3 steps, please
contact your vendor.
Alignment
Language
NUC Type
Standby
Alignment
Back
10 11

Selecng Brightness gives the opportunity to set your
own user-dened level of image brightness.
Brightness is not related with the Luminance adjust-
ment performed by the buon !
IMAGEIMAGE
Image quality is strongly depending from weather
condions. When the weather is wet (fog, rain,etc.)
the dynamic range of the scene is reduced, causing
low contrast performance of the device. We devel-
oped a special lter, that enhance the details in the
low contrast image by wet weather condions (incl.
fog and haze). You may choose between 3 lters -
Hot,Normal and Wet.
Brightness
Weather Type
Brightness
Weather Type
Filters
Palette
Snapshot
Back
Brightness
Weather Type
Filters
Palette
Snapshot
Back
Filters
Brightness
Weather Type
Filters
Palette
Snapshot
Back
12 13
NOTE
In good weather condions please select In good weather condions please select NormalNormal. Otherwise the image will be . Otherwise the image will be
noisy.noisy.
This type of lters aect the object edges. You may
choose between 3 lters - Smooth, Middle and
Sharp.Default and recommended value is Middle.
Take a few moments to feel the dierence between
lters.

A variety of color palees can be used. In dierent
palee modes the object’s temperature is reected
in the coloring.
White hot/ black hot/isotherm/rainbow/rain/
Isotherm palee
The objects above the threshold temperature are
colored in dierent shades of red.
The temperature threshold can be set (increase/
decrease) by the temperature scale shown.
Palee
Brightness
Weather Type
Filters
Palette
Snapshot
Back
Increasing the threshold value ignores the colorizaon of the colder objects.
This opon is highly dependent from the distance to the object. It is highly recom-
mended to try dierent values of the threshold in the daily usage to nd the right
value for your personal preference.
°
C
INCREASE
Snapshot funcon is performed by pressing and
holding the buon. Snapshots are stored in
the internal memory of the device. You can store
up to 20 images. You can review the images from
the Snapshot menu.
Images can be downloaded only via USB cable and
the provided GUI.
Erase All subfuncon deletes all images from inter-
nal memory of device. The deleon process takes
1 min.
Snapshot
Brightness
Weather Type
Filters
Palette
Snapshot
Back
14 15

Zoom inactive
MODE Monocular/Clip-onMODE Monocular/Clip-on
To use TIR-50M as a clip-on device select Mode>Clip-on from the menu.
All important On-screen elements are displayed in the central area of the image. The
reason is the reduced eld of view of the daysight by higher magnicaons.
The digital zoom is locked. The buon calls up the Infobox, which gives the infor-
maon about the current sengs of the device.
Reaching a low baery state the device gives a warning in the top le corner of the
central area. There is a possibility to ignore it by pressing the buon.
Isotherm
NOTE
It is recommended to use up to 5x magnicaon of the primary opcal unit in It is recommended to use up to 5x magnicaon of the primary opcal unit in
order to keep the menu and all submenus visible in clip-on mode.order to keep the menu and all submenus visible in clip-on mode.
TIR-M50 can be powered through two pieces of RCR123A recharge-
able baeries.
1. Turn counterclockwise to unlock the locking screw on the lid of the baery compart-
ment (located on the le side of the device);
2. Put the baeries in the compartment, minding the correct polarity as shown inside
the compartment!
3. To close the baery compartment hermecally, press rmly the lid compartment
and rotate clockwise unl the mechanism locks.
example
OPERATION WITH THE BATTERIESOPERATION WITH THE BATTERIES
16 17

baery is fully charged
baery has 75% residual charge
baery has 50% residual charge
baery has 25% residual charge
baery is fully discharged
The baery levels are as follows:
18 19
USING LITHIUM CELLSUSING LITHIUM CELLS
The device is capable of operang with two types of baeries - lithium and Li-Ion.
The Li-Ion baeries are automacally recognized by the device.
When using lithium cells, you have to “inform” the device by following these steps:
1 Make sure, that the device is in “power o ” state;
2 Insert the two lithium baeries in the device (following the upper instrucons);
3 Press and hold (do not release it);
4 Power on the device (with pressed );
5 Hold unl the display lights up;
6 Release .
NOTE
When intending using only lithium cells, these steps should be performed only one me!
Use the correct size and type of baery, specied in the technical descripon and
user manual.
Keep baery contact surfaces and baery compartment contacts clean. For this pur-
pose you can use a clean pencil rubber or a rough cloth each me you replace baer-
ies.
Remove the baeries from the device when it is le in storage for a longer period
of me.
Make sure that you insert baeries into your device properly (with the + (plus) and
– (minus) in the correct posion).
Store baeries in a dry place at normal room temperature.
Extreme temperatures reduce baery performance.
Do not aempt to recharge a baery, unless the baery specically is marked “re-
chargeable.”
Do not dump-out used lithium baeries! They need to be kept into appropriate
places.
Tips for proper baery care and useTips for proper baery care and use

TIR-M50 can be remotely controlled and adjusted through interface system cable.
Video cable serves for external displaying and recording of the observed scene.
Pull the cap of the panel connector (located on the right side of the device). The cables
enable the connecon with an external device like a PC, laptop or monitor with analog
video input.
One side of both cables ends with a 7-pin Fischer connector. When connecng it with
the device through the panel connector make sure the red markings (both on cable
Fischer connector and panel connector device) match.
20 21
BATTERY CHARGINGBATTERY CHARGING
Charger for RCR123 A baeries
When charging baeries, three yellow LED indicators in each slot will display the cur-
rent baery charging status. While the indicators blink, charging is in progress. When
charging completes, the three yellow LED indicators will illuminate steadily without
blinking.
When placing the baeries, observe the polarity and make sure that you insert baer-
ies in the charger properly (with the + (plus) and – (minus) in the correct posion. In-
serng the baeries incorrectly causing all three yellow LED indicators to blink. Should
this occurs reposion the baeries to the correct polarity.
ATTENTION!
Insert not more than one baery In a single slot! Do NOT use the 12 V car cable for
the Intellicharger to charge the oponal Baery Pack !
ATTENTION!
Recharge only the baeries provided in the delivery set!
Observe the polarity when placing the baeries in the charger!
2
1
CABLE CONNECTIONCABLE CONNECTION
Video cable System cable (USB)

Installaon in front of a primary opcsInstallaon in front of a primary opcs
ATTACHMENTATTACHMENT
The clip-on thermal device TIR-M50 comes with M52x0.75
adapter ring, that matches dierent types of xed adapter
rings ( 3 on the next page).
22 23
WARNING!
*The use of this device may be restricted in your country. You should consult with
your local authories prior to clip-on the device for e.g. on a primary opcs mounted
on a rearm.
Mounng your clip-on thermal device TIR-M50 for e.g. in front of a rie scope* as fol-
lowing:
Turn the adapter ring 2 clockwise and screw it into the thread 1, located on
the back side of the device unl stops.
Turn the xed adapter ring 3 clockwise and screw it on the outer thread of
the adapter ring 2.
Posion the clip-on thermal device TIR-M50 to the dayme rie scope with the
control buons located on top. Put the clip-on thermal device TIR-M50 with
the xed adapter on the front of the dayme rie scope 4 and x it by the
adapter thumb 5.
33
11
22
2
3
4
5
1
2

To maximize the life of your device and to protect it from damage we recommend stor-
ing it in the individual packaging in which you received it.
Before storing it, clean obligatory the device (if on its surface there are moisture, dust
or traces of dirt)!
Make sure that there are no traces of moisture, and the baery compartment is empty!
It is also possible for a short periods of me device to be stored in a suitable so pack,
bag or cartridge box.
The premises in which the device is kept for long term have to be dry, enclosed, un-
heated and venlated.
During the storage should not be allowed exposure to aggressive environments, tem-
peratures below -50°C and above +60°C, relave humidity greater than 80%, and pro-
longed periods of direct sunlight.
The product should be transported only with its original packaging and its individual
shockproof transport suitcase.
Before each transportaon, the product should be neatly packed in its original packag-
ing (transport bag) and all other items and accessories should be carefully and steadily
placed in the bag. Aer that the bag should be steadily placed in the transport suitcase.
You can ship the product with all types of transport at dierent distances and at al-
tude up to 12 000 m.
24 25
STORAGE ANDSTORAGE AND TRANSPORTATIONTRANSPORTATION PARAMETERSPARAMETERS
FOCAL PLANE ARRAY (FPA)
Type Microbolometer
Pixel Count (Resoluon) 640 x 512
Pitch Size 17 μm
Spectral Response 7 ÷ 14 μm
Thermal Sensivity (NETD) < 50 mK @ F / 1.0
THERMAL IMAGING PERFORMANCE
Brightness / Contrast Automac / Advanced Image Processing
Start-up Time ~ 5 sec
Image Polarity User Selectable
(White Hot / Black Hot)
Menu Dropdown Menu / OSD
IFOV 0.34 mRad
OPTICS
Focal Length of Objecve Lens 50 mm
FOV 12.4°(H) X 9.3°(V)
F/# 1.1
Material & Coang Germanium, Hard Carbon Coang
on the External Surface

Environmental protection
Old devices must not be disposed of with household waste!
If the device can no longer be used, then every consumer is legally obliged to keep
old devices separate from household waste and sumit it to a collection point of his
community / district. This ensures that waste equipment is recycled properly and that
negative environmental effects are avoided.
Therefore, electrical appliances are marked with the symbol.
The register number of our company is: WEEE Reg. Nr. DE 12523777
Batteries and rechargeable batteries are not to be disposed in household waste!
Every consumer is required by law to return all batteries and rechargeable batteries,
whether or not they contain harmful substances, to a collection point in his community
/ district or in commerce so that they can be disposed of in an environmental friendly
process.
Please hand in batteries and rechargeable batteries only in discharged condition!
If you have any questions, suggestions or critic regarding the product, please contact
your dealer or directly us. Our contact details can be found at www.nitehog.eu
ENVIRONMENTAL PROTECTION / CONTACTENVIRONMENTAL PROTECTION / CONTACT
26 27
VIDEO
Analog Video Output Format CCIR (PAL, 50 Hz) or RS-170 (NTSC, 60 Hz)
Viewnder Luminance Manual via OSD
Image Capture
Up to 20 Images
(On-Board Storage, Download via System
Cable)
POWER
Power Source
2 x CR 123 Lithium
2 x RCR 123 Li-Ion
oponal Baery Pack
Operang Time ~3 Hours with Lithium Baeries @ 25°C
Auxiliary Power External Power Supply Set
STATIC RANGE PERFORMANCE
Calculated for geometrical average ( HxW )
NOTE: The distances dened are calculated in geometrical values only, not accounting the
atmospheric conditions
Human Detecon Range ~1.390 m
Human Recognion Range ~460 m
Vehicle Detecon Range ~ 3.380 m
Vehicle Recognion Range ~ 1.120 m
ENVIRONMENTAL CHARACTERISTICS
Operang Temperature Range -30°C to +50°C
Storage Temperature Range -50°C to +60°C
Index of Protecon IP 66, IP 67 (oponal), Nitrogen Filled
PHYSICAL CHARACTERISTICS
Dimensions H x W x L without the
Eyecup 67 x 71 x 192 mm
Weight without Baeries ~ 515g

Visit us online:
Website / Shop:
www.nitehog.eu
Youtube:
video.nitehog.eu
Facebook:
www.facebook.com/nitehogeuropegmbh
Photos: Maria Parussel (maryloopics)
Layout / Design: Nitehog Europe GmbH
Nitehog is a registered trademark.
Typing and printing errors reserved.
28
Table of contents
Popular Laboratory Equipment manuals by other brands

Agilent Technologies
Agilent Technologies 1100 Series Reference manual

National Instruments
National Instruments NI VB-8012 SAFETY, ENVIRONMENTAL, AND REGULATORY INFORMATION

Microm
Microm HM 325 instruction manual

SDL Atlas
SDL Atlas QuickWash Plus instruction manual

R-Biopharm
R-Biopharm RIDA qLine Scan user manual

V&P Scientific
V&P Scientific SpinVessel VP 418SV3-1-350RB-CC operating instructions