CAKCITY Apache User manual

----Apache
User Manual

A . Features
➢Time:hour, minute, second, week, month, day.
➢12 / 24 Hourly format
➢Year from 2000 to 2099 fully automatic calendar.
➢Pedometer
➢Air pressure measurement (300~1100mbar/8.859~32.484inHg)
➢Height measurement (-698~+9164m/-2246~+30067F)
➢Temperature measurement (10 ~ + 60 ℃/ 14 ~ 140 ℉)
➢Compass
➢Alarms(2 alarms and hourly chime)。
➢Chronograph function:99 hours 59min59.99seconds(100 group for Lap)
➢Countdown timer(99hours59 minutes 59.99 seconds)
➢Pacer
➢The second time
➢Display low battery
➢EL backlight
B . Mode and Function
➢Press button A in any mode, EL illuminates for 3 seconds.
➢Press button B to choose modes.
➢In timekeeping mode, keep pressing button D for 2s to shift: week—temperature—altitude
curve—sea level atmospheric curve.
➢In timekeeping mode, press C to enter Altitude measurement mode directly.
➢In timekeeping mode, press D to enter Atmospheric pressure measurement mode directly.
(button C)DOWN/ALTI
(button D)UP/BARO
LIGHTT/SELECT(button A)
MODE/SET(button B)
Timekeeping mode
Pedometer
mode
Record
mode
Alarm mode
Chronograph
mode
Countdown
timer mode
Metronome
mode
The second
time mode
Compass
Atmospheric
pressure
measurement
Altitude
measurement
D
C
Button B
Button B

➢After enter the above mode, press B to exit and return to timekeeping mode.
1.Time and date setting
➢In timekeeping mode, keep pressing button B for 2s,the Second flashes, entering setting mode.
➢Press button B to set the flashing items.
➢Press D to increase the value, press and hold D to advance quickly.
➢Press C to decrease the value, press and hold C to decrease quickly.
➢When the Second flashes, press D OR C to reset
➢Press D/C to shift between 12/24 hours format
➢Resolution level:1-10, press D /C to increase or decrease
➢Keep pressing B for 2s to exit.
➢It will exit setting mode when no any key pressing for 1 minute.
2. Pedometer Mode
➢range :0~999999 Step
➢calories:0.0~99999.9 Kcal
➢mileage:0.00~9999.99 KM or 0.00~9999.99 Mile
➢exercise time:0~24H
➢in the pedometer mode, keep pressing C for 2s to turn on/off the pedometer
➢The pedometer symbol will display when the meter is on
➢press D to shift among these items:step→mileage→calories→exercise time→step
Set the pedometer
➢In pedometer mode, keep pressing button B for 2s,the unit flashes, entering setting mode
➢Press button B to set the flashing items: unit→step distance→weight
➢Press D /C to shift the unit of metric and English
➢Press Dto increase the value, press and hold D to advance quickly.
➢Press C to decrease the value, press and hold C to decrease quickly
➢Input your weight:20~200 kg or 44~441 lbs(default value75 kg or 165 lbs)
Timekeeping mode
“HOLD”
Flash
B
Set Second
Set Minute
Set Hour
Set Year
Set Month
Set Date
Set M/D format
Set 12/24H
Set LCD
resolution
BEEP on/off
B
B
B
B
B
B
B
B
B
B
Keep pressing button B for 2s
B
Step
Mileage
Calories
Exercise timer
D
D
D
B
B
B
B
Pedometer mode
Set unit
Step distance
Weight

➢Step distance:30~180 cm or 2~71 inch(default value 70 cm or 28 inch)
➢Keep pressing B for 2s to exit.
➢It will exit setting mode when no any key pressing for 1 minute.
3. Review records
➢In the record mode, press C to review the latest 7 days record
➢In the day record, you can shift the data for the following items by pressing D
➢If no data recorded on that day, pressing C/D is useless
4. Alarm mode
➢In alarm mode, press button D to shift among these items: AL1->AL2->Chime->AL1
➢Press C to turn on/off the alarm or hourly chime
➢In alarm mode, keep pressing button B for 2s,the Minute flashes, entering setting mode
➢Press B to move the setting items:
➢Press D to increase the value, press and hold D to advance quickly.
➢Press C to decrease the value, press and hold C to decrease quickly
➢Keep pressing B for 2s to exit.
➢It will exit setting mode when no any key pressing for 1 minute.
➢When the alarm is on, it will sound BB—BB for 30s once it's the alarm time, the sign will be
flashing. Press any button to stop it
5. Chronograph mode
➢The maximum timing range is 99 hours 59 minutes and 59.99 seconds.
➢In this mode, press D to start or stop .Press C key to 2s reset when it stop.
➢Split time record: When the chronograph is running, press C to choose the LAP,15s later it will display the
time of chronograph, then second pressing C to choose the next LAP, you can stop it by pressing D. keep
pressing B for 2 seconds to enter LAP record mode, C/D to review LAP
➢When LAP have been reach to 100,and you want to go on counting, press D/C to overlay it to the last
LAP
➢In the LAP mode, press B for 2s to exit and return to chronograph mode
➢When the chronograph is running, press B to enter other mode, but the chronograph still running
background
➢When the chronograph stop, it will return to timekeeping mode 5 min later
History record
review mode
12.17
12.18
12.23
C
C
C
Pedometer
Mileage
Calories
Exercise timer
D
D
D
Alarm mode
Set Hour
Set Minute
B
B

6、Countdown timer mode
➢The maximum countdown range is: 99 hours, 59 minutes and 59.99 seconds.
➢In the countdown timer mode, press button D to run/stop, press button C to return your setting value
when it stop.
➢When countdown to 0, the alarm will sound BB.BB.BB..for 30 seconds.
Set the counting down timer: In the counting down mode, press and hold button B for 2 seconds, Hour
flashes, entering counting down setting mode.
Press button B to select the following items for setting sequentially:
➢Press D to increase the value, press and hold D to advance quickly.
➢Press C to decrease the value, press and hold C to decrease quickly
➢Keep pressing B for 2s to exit.
➢It will exit setting mode when no any key pressing for 1 minute.
7、Metronome mode
➢In the metronome mode, press D to turn it on/off
➢When it stops, press C for 2s to reset
➢If the metronome is not stopped, it will start from 0 again when reaches 99999
➢In the metronome mode, keep pressing B for 2s to enter its frequency setting(30-180)
➢Press D to increase the value, press and hold D to advance quickly.
➢Press C to decrease the value, press and hold C to decrease quickly
➢Keep pressing B for 2s to exit.
➢It will exit setting mode when no any key pressing for 1 minute.
8、The second time setting
Running
Display
Running
Pause
LAP
Total time
ALP 1
ALP 31
C
10S
later
D
D
C
D
C
Press B for 2S
B
for
2S
2S
later
B
B
B
Countdown timer mode
"HOLD"
Flashes
Set Hour
Set Minute
Set Second
B
for
2S
D
Pacer mode
"HOLD"
flashes
Set pace

In the second time setting mode, keep pressing B for 2s,the Minute flashes, entering setting mode
Press button B to select the following items for setting sequentially:
➢Press D to increase the value, press and hold D to advance quickly.
➢Press C to decrease the value, press and hold C to decrease quickly
➢Keep pressing B for 2s to exit.
➢It will exit setting mode when no any key pressing for 1 minute.
9、Altitude measurement mode
➢In the timekeeping mode, press button C to enter altitude measurement mode
➢Press D to shift the top row display content: temperature→altitude trend
➢When it displays the trend, you can review the former hourly curve by quick pressing
➢Keep pressing D for 2s to shift the unit of temperature and altitude
℃/ft→℃/m→℉/m→℉/ft
➢It will return to timekeeping mode after 24h without any pressing, when the top row display curve, the
first line flashes(current altitude)
Altitude setting
Press button B for 2s to enter altitude setting mode,press B to move and set the following items
temperature On top Set the height to 0 Correct relative height Set sea level pressure Restore initial value
Relative altitude setting(ZERO)
➢Press D/C to shift“YES”/“NO”,when it is YES, that means the relative altitude is 0, when NO, that means
use the default value(work out according to default sea level atmosphere1013.25mb). If choose “Yes”,
the measurement result is relatively, and the (r) will occur on screen.
Input your current altitude
➢Input your current altitude(ALTI)
➢Press D to increase the value, press and hold D to advance quickly.
➢Press C to decrease the value, press and hold C to decrease quickly
➢Press button B for 2s to confirm, return to altitude measurement mode
Input sea level atmosphere value(SEAP)
➢Press D to increase the value, press and hold D to advance quickly.
➢Press C to decrease the value, press and hold C to decrease quickly
➢Press button B for 2s to confirm, return to altitude measurement mode
Factory default sea level atmospheric pressure value(FDEF)
B
for
2S
B
B
The 2nd time mode
"HOLD"
flashes
Set Minute
Set Hour
temperature On top
Altitude trend on top
D
B
B
B
B

➢Press D/C to shift“YES”/“NO”,when it is YES, that means use the default value 1013.25mb
10、Atmospheric pressure measurement mode
➢In timekeeping mode, press button D to enter atmospheric pressure measurement mode,
➢Press D to shift the display: temperature→sea level atmospheric pressure→trend
➢When it displays the trend by pressing C, you can review the former hourly curve
➢Keep pressing D for 2s to shift the unit of temperature and altitude
℃/hpa/mb→℃/Inhg→℉/Inhg→℉/hpa/mb
➢It will return to timekeeping mode after 24h without any pressing,
Atmospheric pressure setting
Press button B for 2s to enter atmospheric pressure setting mode, press B to move and set the following
items
Input your current atmospheric pressure
➢Input your current atmospheric pressure(AIRP)
➢Press D to increase the value, press and hold D to advance quickly.
➢Press C to decrease the value, press and hold C to decrease quickly
➢Press button B for 2s to confirm, return to atmospheric pressure measurement mode
Input your current temperature(TEMP)
➢Press D to increase the value, press and hold D to advance quickly.
➢Press C to decrease the value, press and hold C to decrease quickly
➢Press button B for 2s to confirm, return to atmospheric pressure measurement mode
Factory default atmospheric pressure value(FDEF)
➢Press D/C to shift“YES”/“NO”,when it is YES, that means use the default value for pressure and
temperature
➢Press button B for 2s to confirm, return to atmospheric pressure measurement mode
Note: when adjust the temp., it use the unit ℃,it will increase/decrease 0.1 each pressing, when unit is
℉,then 0.2 each pressing
11.Compass mode
➢When the watch is horizontal, move the watch to make the needle point to 0,the 12 o’clock direction is the
north.
D
D
Timekeeping mode
D
Display temp.
adjust pressure
Adjust humidity
Adjusting humidity
Reset
B
for
2S
B
B
B
Adjust compass
Measure after adjusting
Stop after 1min’s measure
D
D
Display temperature
Display trend
Display SEAP

➢In compass measurement mode, press C key to on / off reverse direction display. When open the reverse
direction, there is a “-“on the bottom left of the screen. And when needle point to 0, the "S" direction
indicated by the 12 o 'clock position is the south
➢It will exit the measuring mode after 1 min without button pressing, you can measure again by pressing D.
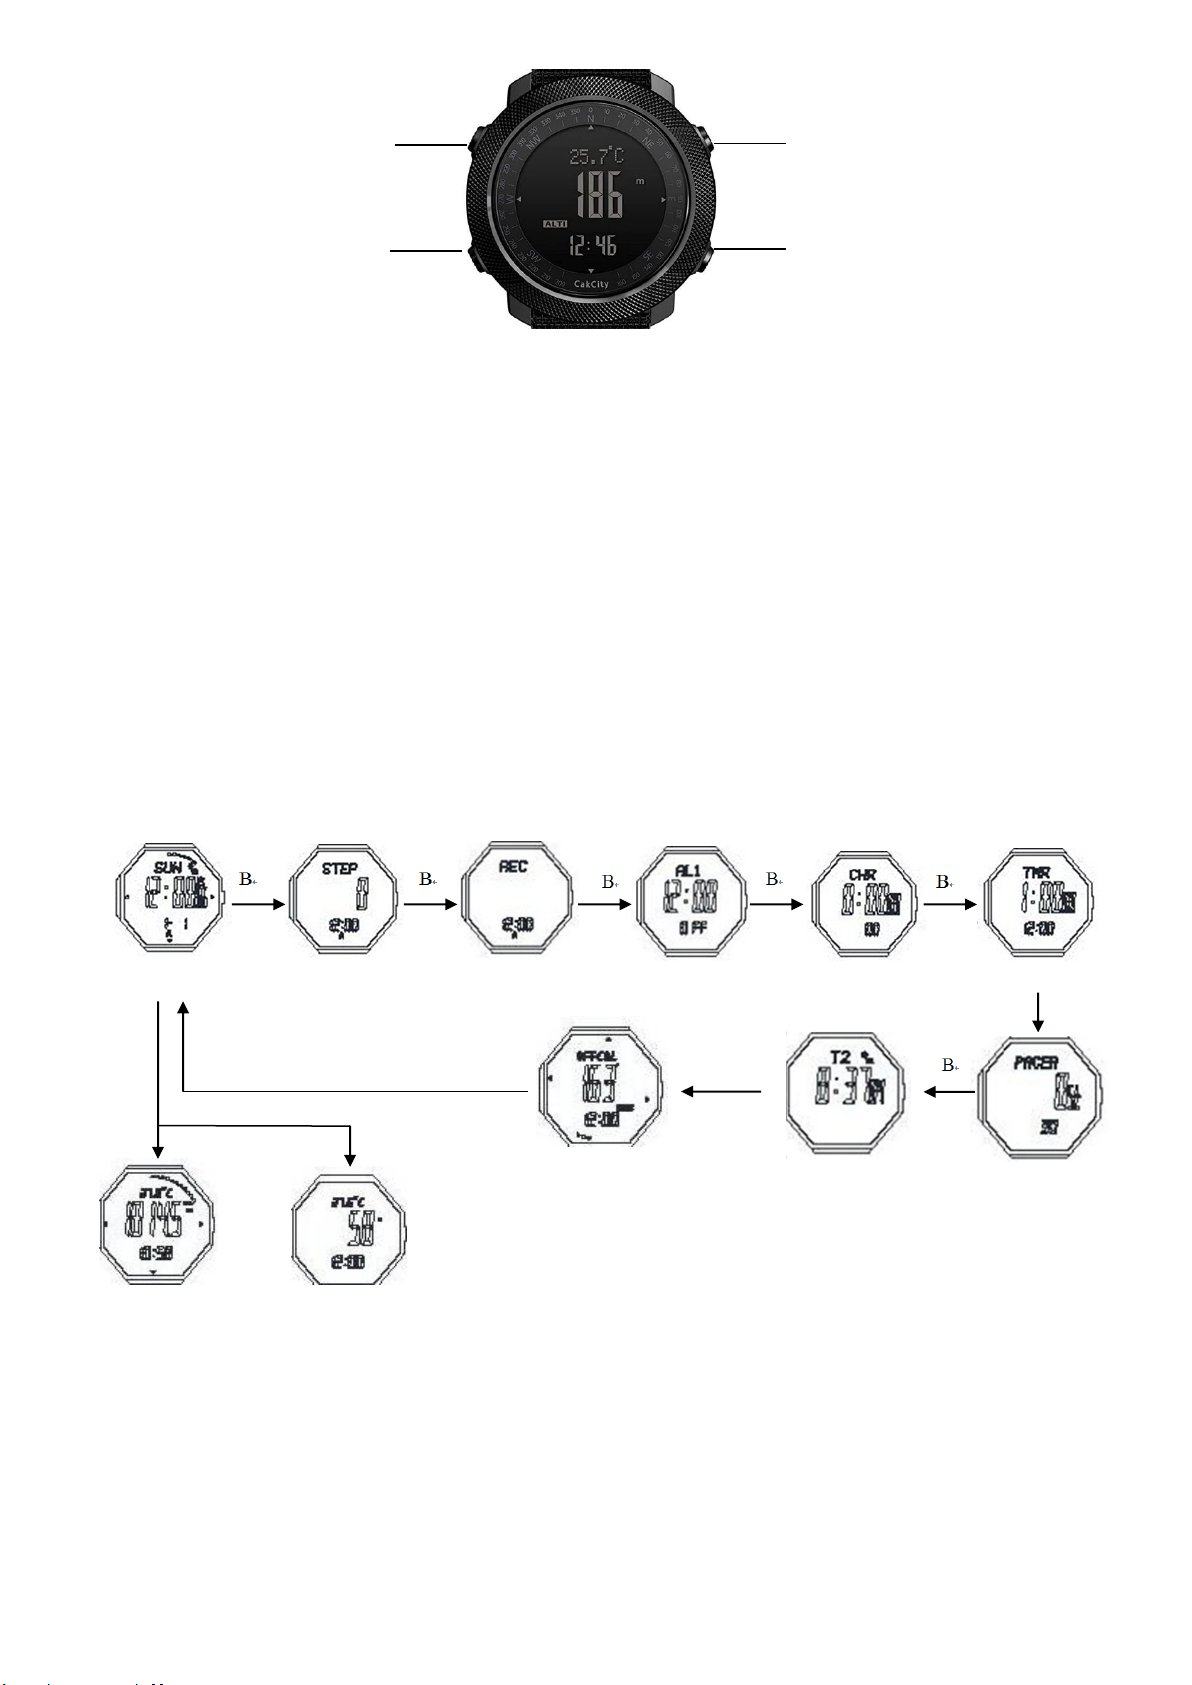
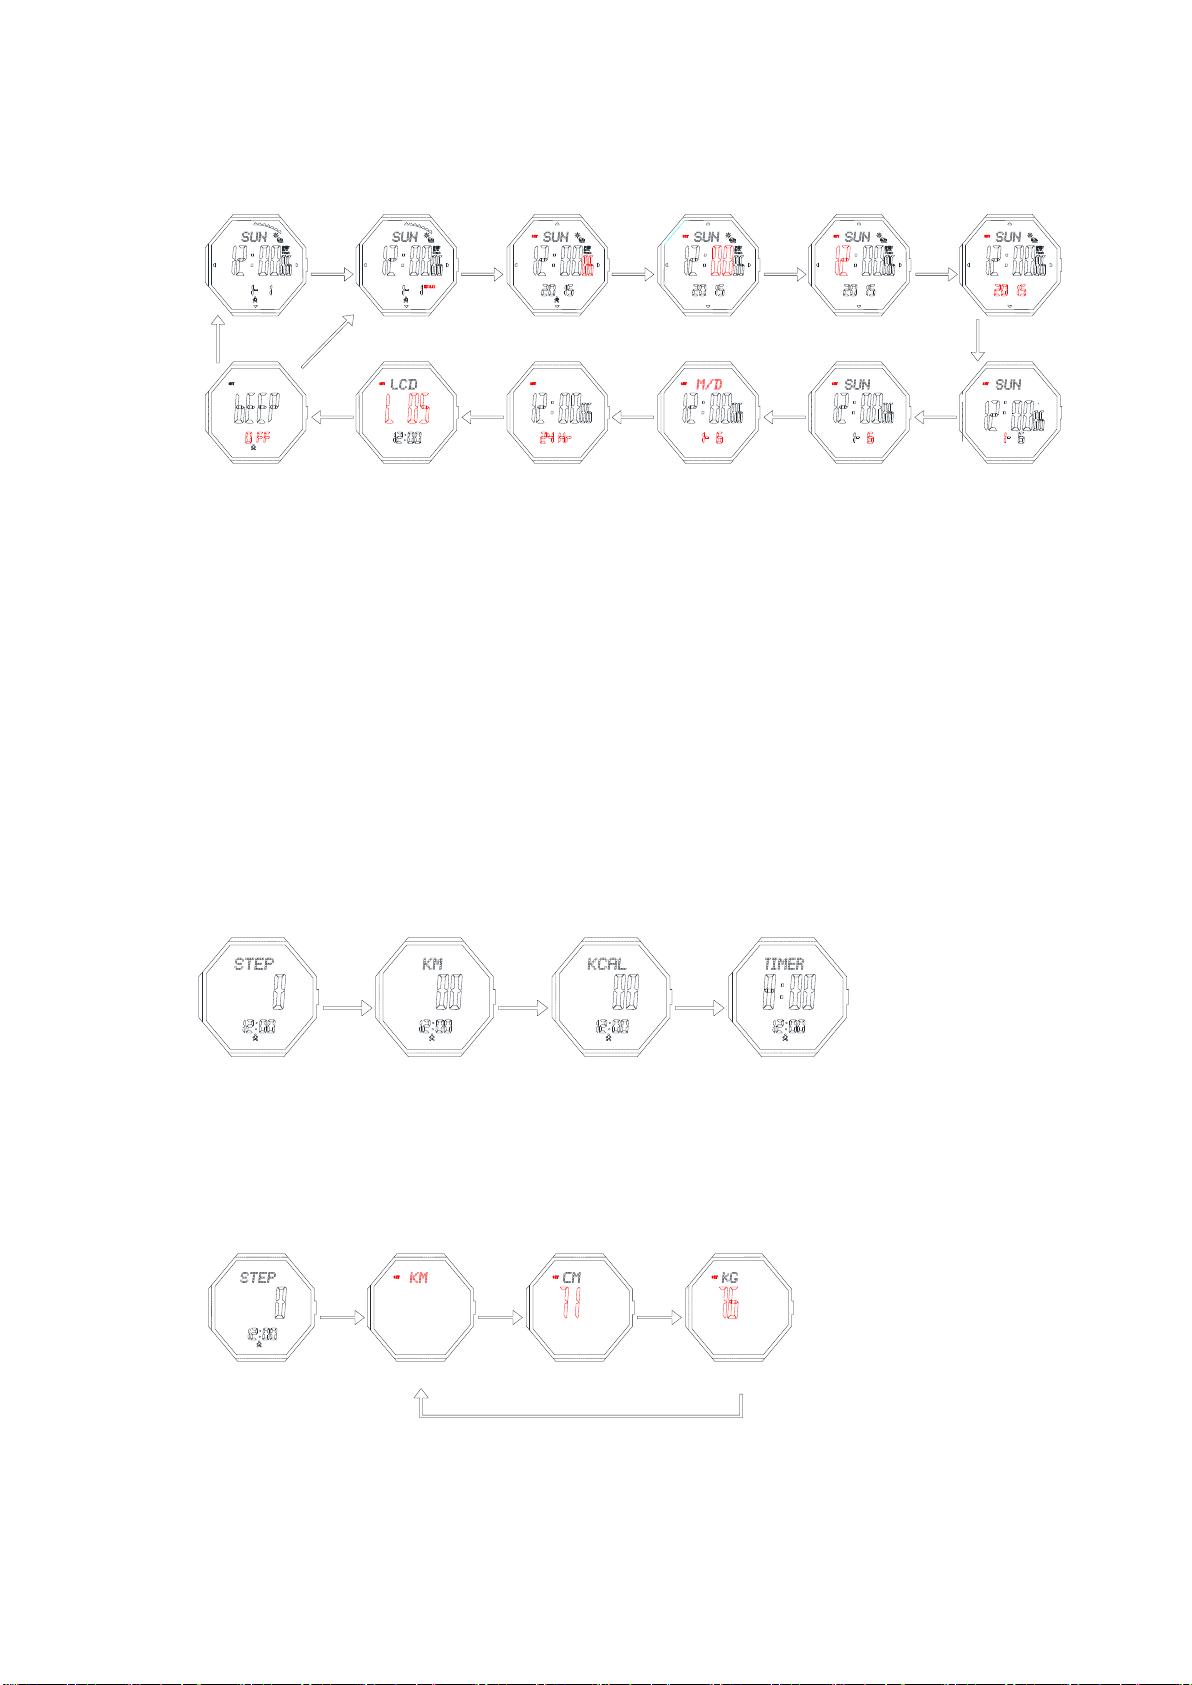
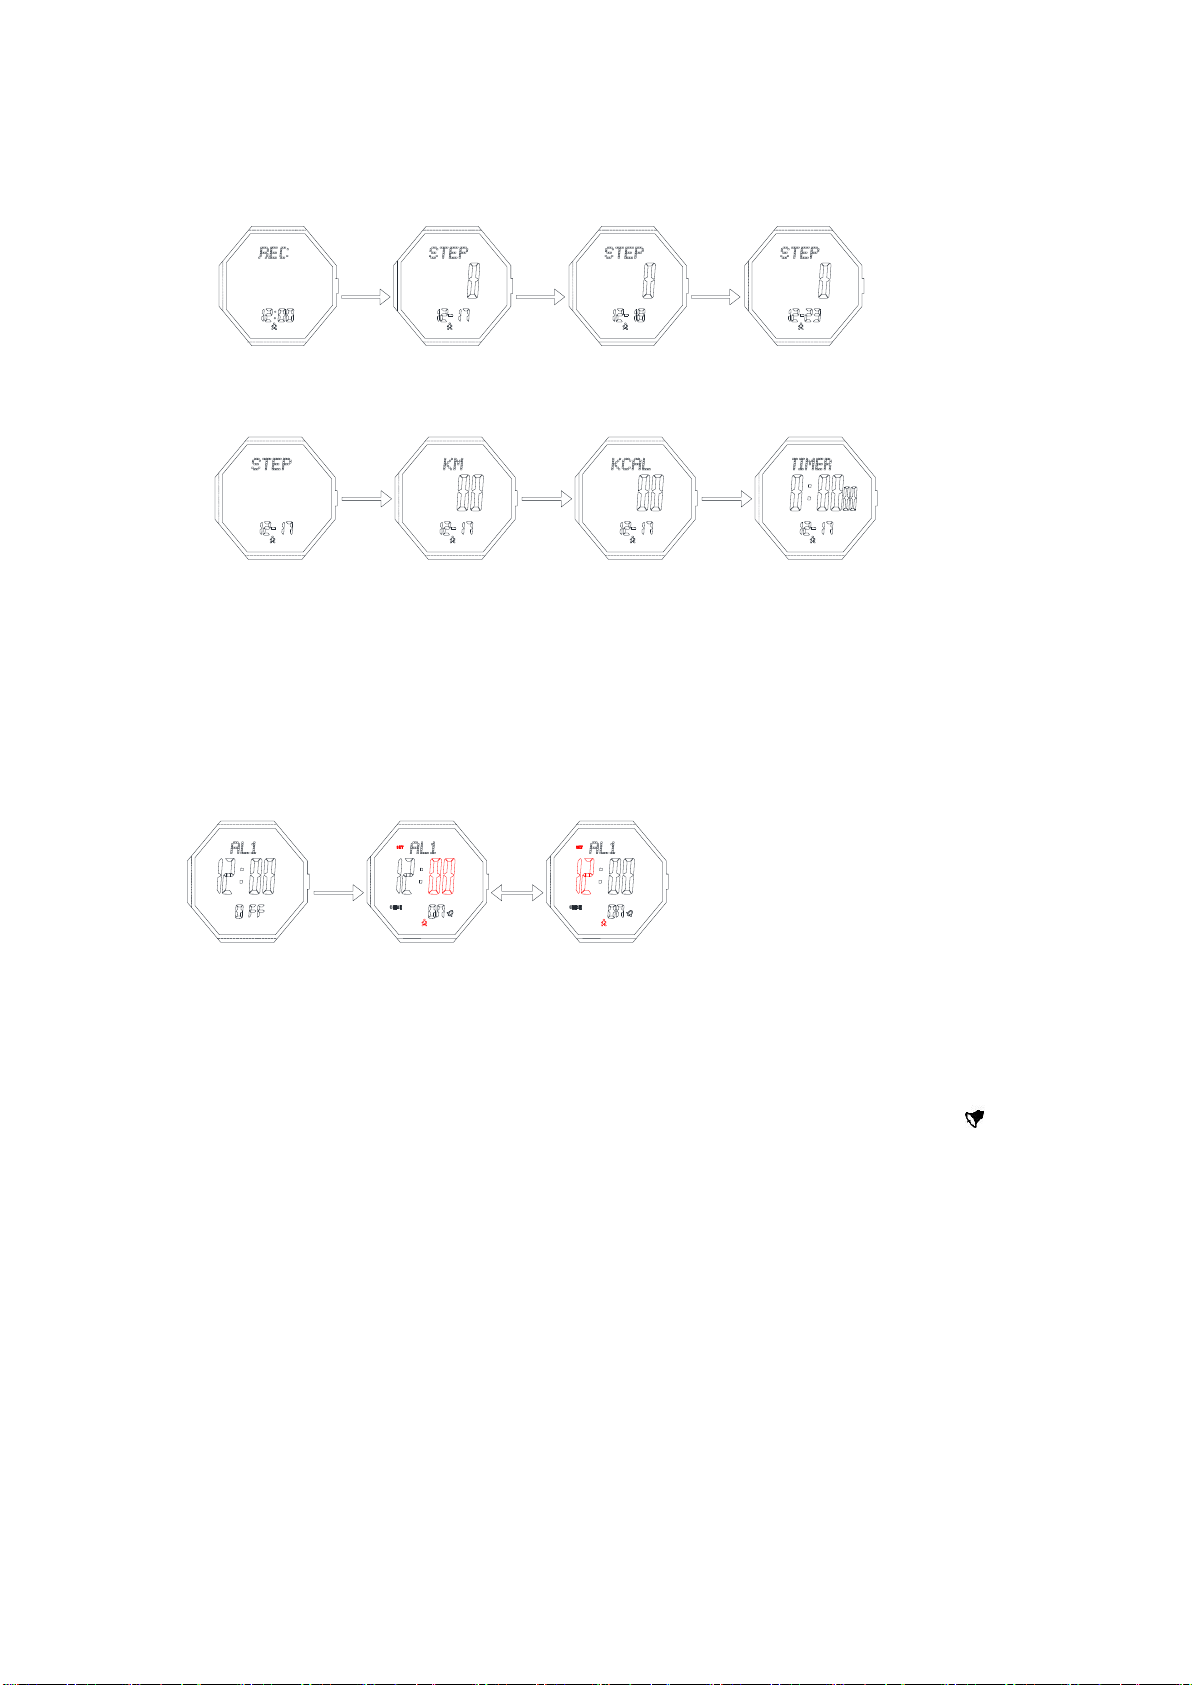
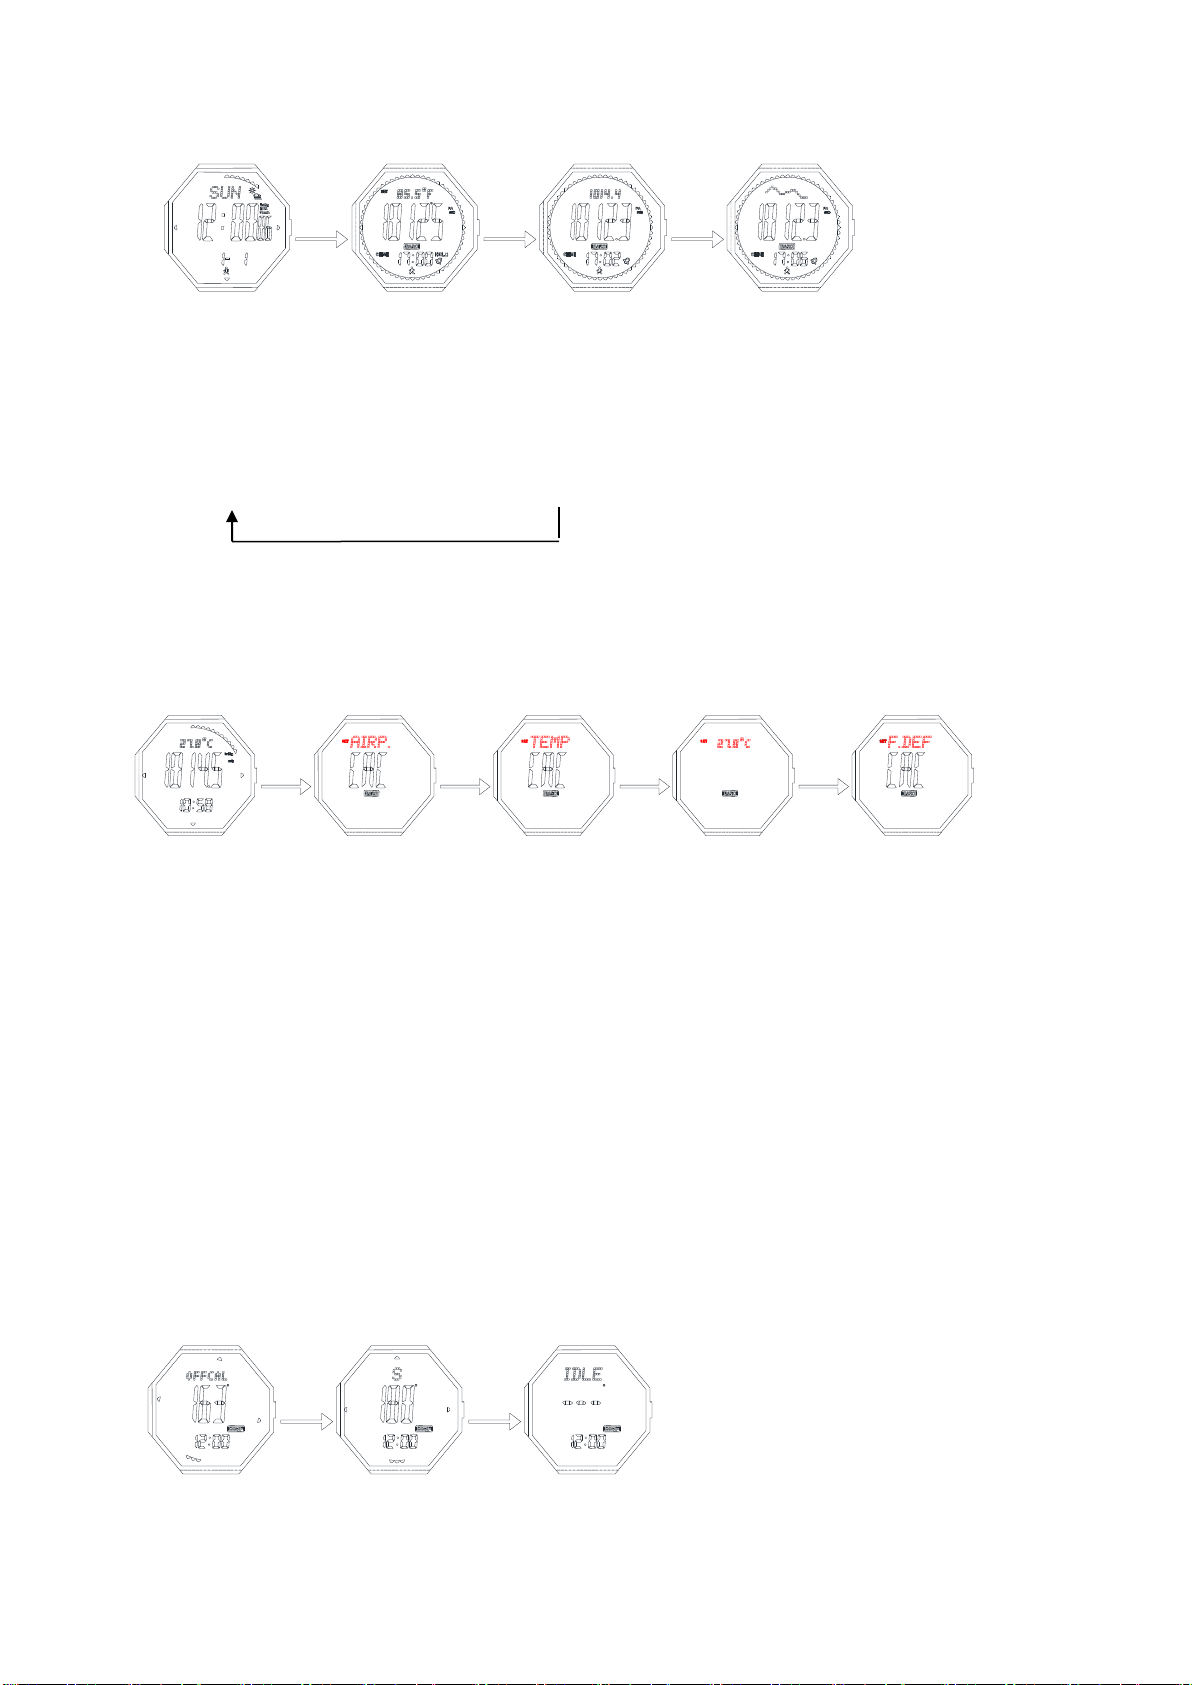
➢The follow table indicated the meaning of each acronym for each direction.
Note: if your compass never used before, please adjust as following method
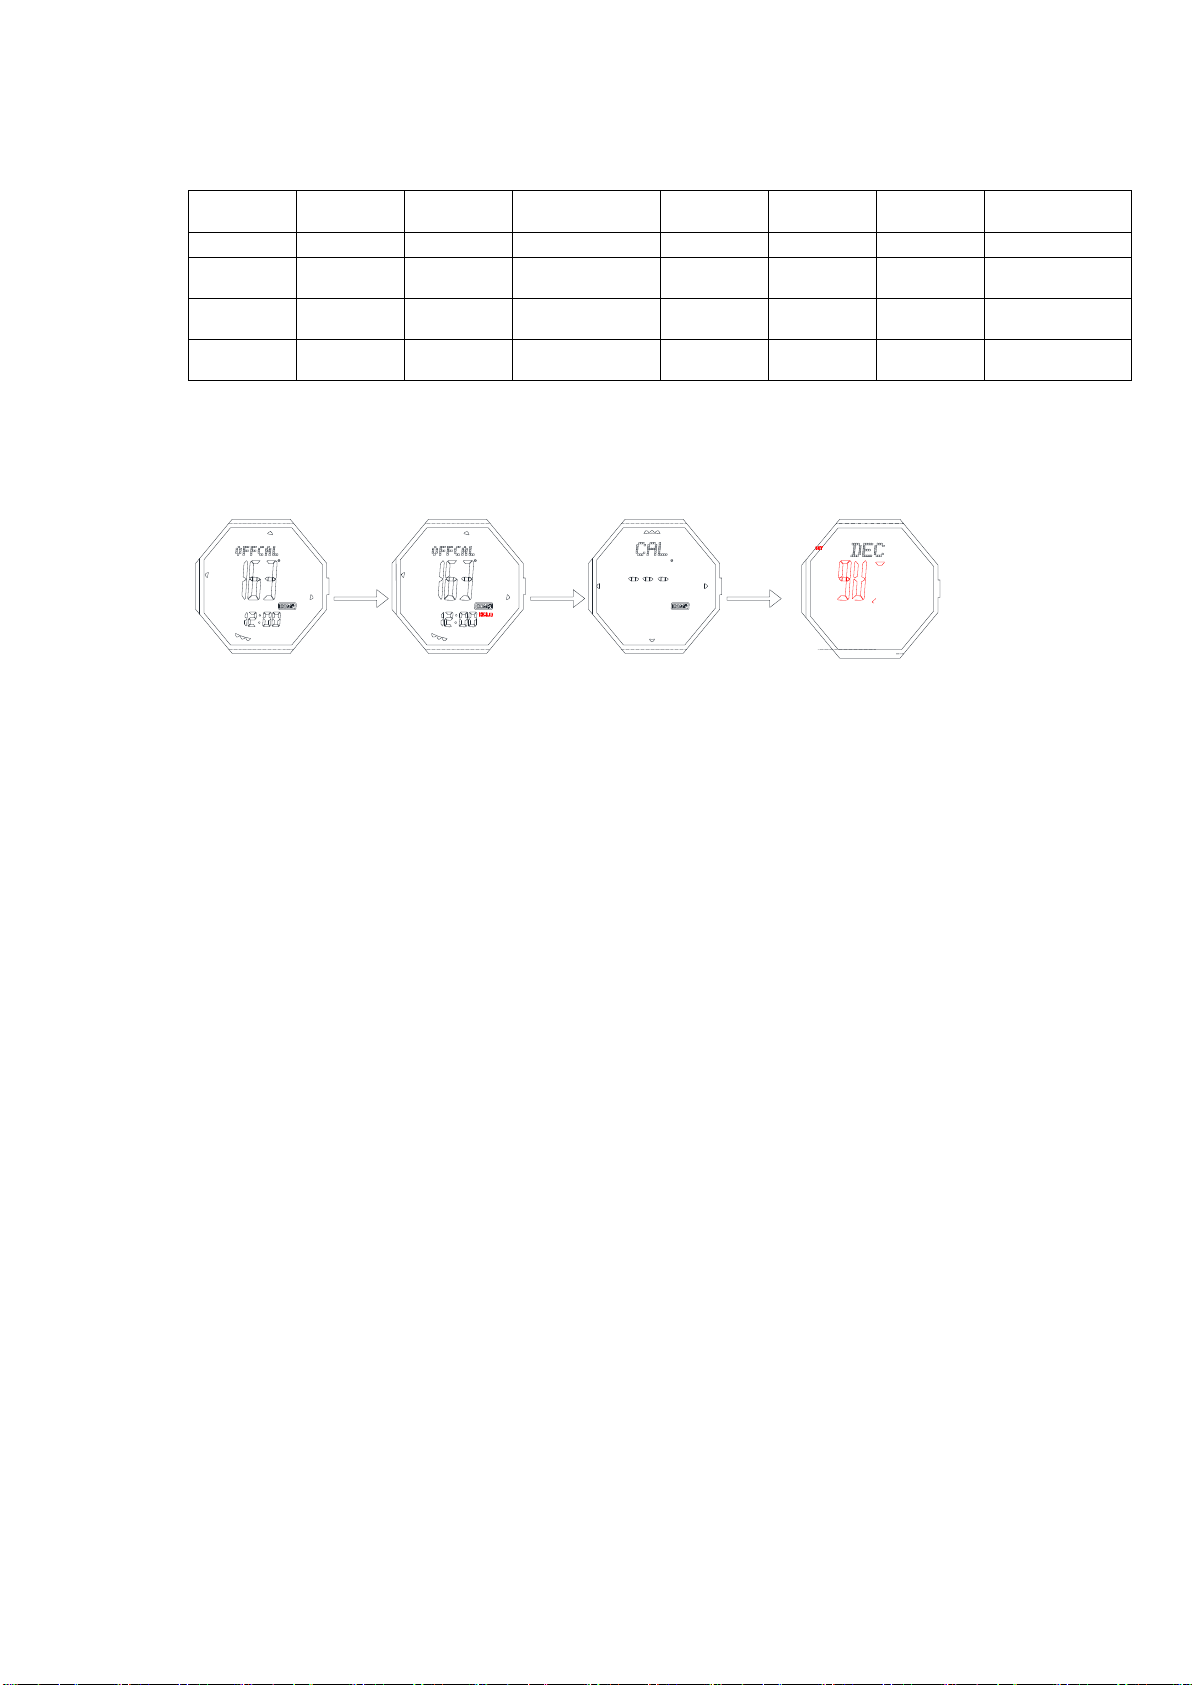
Compass adjust mode
Automatically adjust mode(CAL)
➢In compass mode, keep pressing B for 2s to enter CAL, press D or C, then turn the watch slowly, both
clockwise and anti-clockwise are ok. This watch will exit the correction mode automatically and return
to compass measurement mode after simply turning two circles in the same direction. During compass
correction, after 60 direction points illuminate and go out one by one sequentially, it will confirm this
correction automatically.(Note: After change battery and use the compass for the first time, it will enter
automatically adjust mode first)
Digital adjust mode(DEC)
➢If you have a correct north, and after DILE, it still deviate much, then use the DEC to correction.
➢In compass mode, keep pressing B for 2s to enter CAL, press B again to enter DEC(press D to increase
1,C decease 1)
➢The maximum correction angle range is ±90°(“W”“E”±90°)
➢Press B for 2s to confirm the corrected value, and return to normal measurement mode.
Note: you don’t need to print the below 2 items
⚫Explain on the sensor checking
➢When it is powered on, the error exist between MCU and sensor, it will display.
➢If it is between pedometer IC and MCU, it display “ERR1”
➢If it is between compass IC and MCU, it display “ERR2”
➢If it is between temp. sensor and MCU, it display “ERR3”
➢The above will display for 2s,and will not display again after enter timekeeping mode again
➢If everything is OK, then no error display, it will directly enter timekeeping mode
⚫Universal explain
1、The curve display in atmospheric pressure mode, is not the actual one. It detects the altitude every 15 min, if
the altitude change is not more than 8 meters, then it will own to the sea level change, not actual altitude. In
this case, it will work out the pressure value according to the former 15 min altitude. If it is more than 8
meter, it will figure out you are climbing, the pressure will be kept the same.
2、At the first 5 minute after entering altitude or pressure measurement mode or exiting the setting mode, it
will measure every 2 second; after 5 min later, every 2 min measred, and other mode will be 15 min.
3、When set the magnetic declination, if + is set, the actual declination plus adjusted one displayed, if it is
-,then the actual declination minus adjusted one displayed.
Direction
Meaning
Direction
Meaning
Direction
Meaning
Direction
Meaning
N
North
NNE
North-north-east
NE
North-east
ENE
East-north-east
E
East
ESE
East-south-east
SE
South-east
SSE
South-south-east
S
South
SSW
South-south-west
SW
South-west
WSW
West-south-west
W
West
WNW
West-north-west
NW
North-west
NNW
North-north-west
Adjust compass
"HOLD"
flashes
set
CAL
Set DEC
B
for
2S
B
B

4、Estimate the weather every hour (estimate the weather according to the air pressure diversification in the
former 4 hours). If air pressure value goes up gradually, it indicates that the weather will turn into better. If the
air pressure value goes down gradually, it indicates that the weather will turn into bad. There are 4 kinds of
weather status (from good to bad): Sunshine, Cloudy, Overcast sky, Rainy.
Method:
a) Detect the pressure every 59min 59s
b) The pressure from former 1 hour minus later 1 hour’s, totally 4 value(if the absolute value more than
2.5mbar,then it is useless),only use the valid value for their average. The weather is judge from the average
value.
Sunshine:0.8~2.5(mbar/h)
Cloudy:0.5~0.8(mbar/h)
No change:- 0.5~0.5(mbar/h)
Overcast sky:- 1.0~ - 0.5(mbar/h)
Rainy:- 2.5~ - 1.0(mbar/h)
Notes:
temperature measurement by personal temperature (when you wear a watch), the effect of direct sunlight and
humidity. In order to make the measurement of temperature more accurate, please take the watch from the wrist
and place it in a place not directly exposed to the sun and good ventilation and dry the case. It takes about 20 to
30 minutes for the watchcase to reach the actual ambient temperature.
Table of contents