Caliber HTT 101 User manual

HTT 101
Manual
GB

Before use
Included Items
Check to be sure the box includes all the supplied accessories shown below. Please
contact the store where you purchased this unit if any of these accessories are missing or
have been damaged during transportation.
Flit mat x 1
45 RPM adapter x 1
Unit x 1
Turntable cover x 1
AC adapter x 1
Owner manual x 1
Precautions for use
♦ Do not place anything on the turntable cover. Objects on the cover might cause noise
due to vibrations or fall off, especially during playback.
♦ Avoid placing the unit in direct sunlight, close to a source of heat or in other similar
conditions. Do not place the unit on top of an amplifier or other equipment that might
generate heat the exceeds the operating temperature range of this unit. Doing so could
cause discoloration, deformation or malfunction.
♦ As the unit could become warm during operation, always leave sufficient space around it
for ventilation. When installing this unit, leave a little space between it and other devices
and walls to allow good heat dissipation.
When placing it in a rack, for example, leave at least 35 cm open above it and 10 cm open
behind it. Failure to provide these gaps could cause heat to build up inside and result in
free.
♦ Do not move the unit during playback. During playback, the record rotates. Do not lift or
move the unit during playback. Doing so may damage the record, the stylus, the cartridge
or the unit.
♦ Always record the record before relocating or moving this unit. Moving the unit with a
record on the turntable could damage the record, the stylus and the cartridge or could
cause a malfunction.
♦ The voltage supplied to the unit should match the voltage as printed on the rear panel.
IF you are in any doubt regarding this matter, consult an electrician.

Maintenance
If the surface of the unit gets dirty, wipe it with a soft cloth or use diluted mild liquid soap.
Allow the surface of the unit to dry completely before using.
♦ Do not use chemical cleaning cloths, thinner or similar substances as they could
damage the surface or the unit.
Caution
♦ Do not use chemical cleaning cloths, thinner or similar substances as they could For
safety, disconnect the power cord from the socket before cleaning.
Notes about record to styluses
♦ Record styluses are precision parts, so handle them carefully to avoid
bending or damaging their tips. If a stylus becomes bent or damaged, it might
not be able to follow the audio groove precisely and could damage records or
cause other malfunction.
♦ If a stylus becomes dirty, use a commercially available stylus cleaner or
similar product to clean it.
♦ Do not rub the stylus tip forcefully with anything hard. Do not wipe the stylus
with thinner or other chemicals. Doing so could harm it.
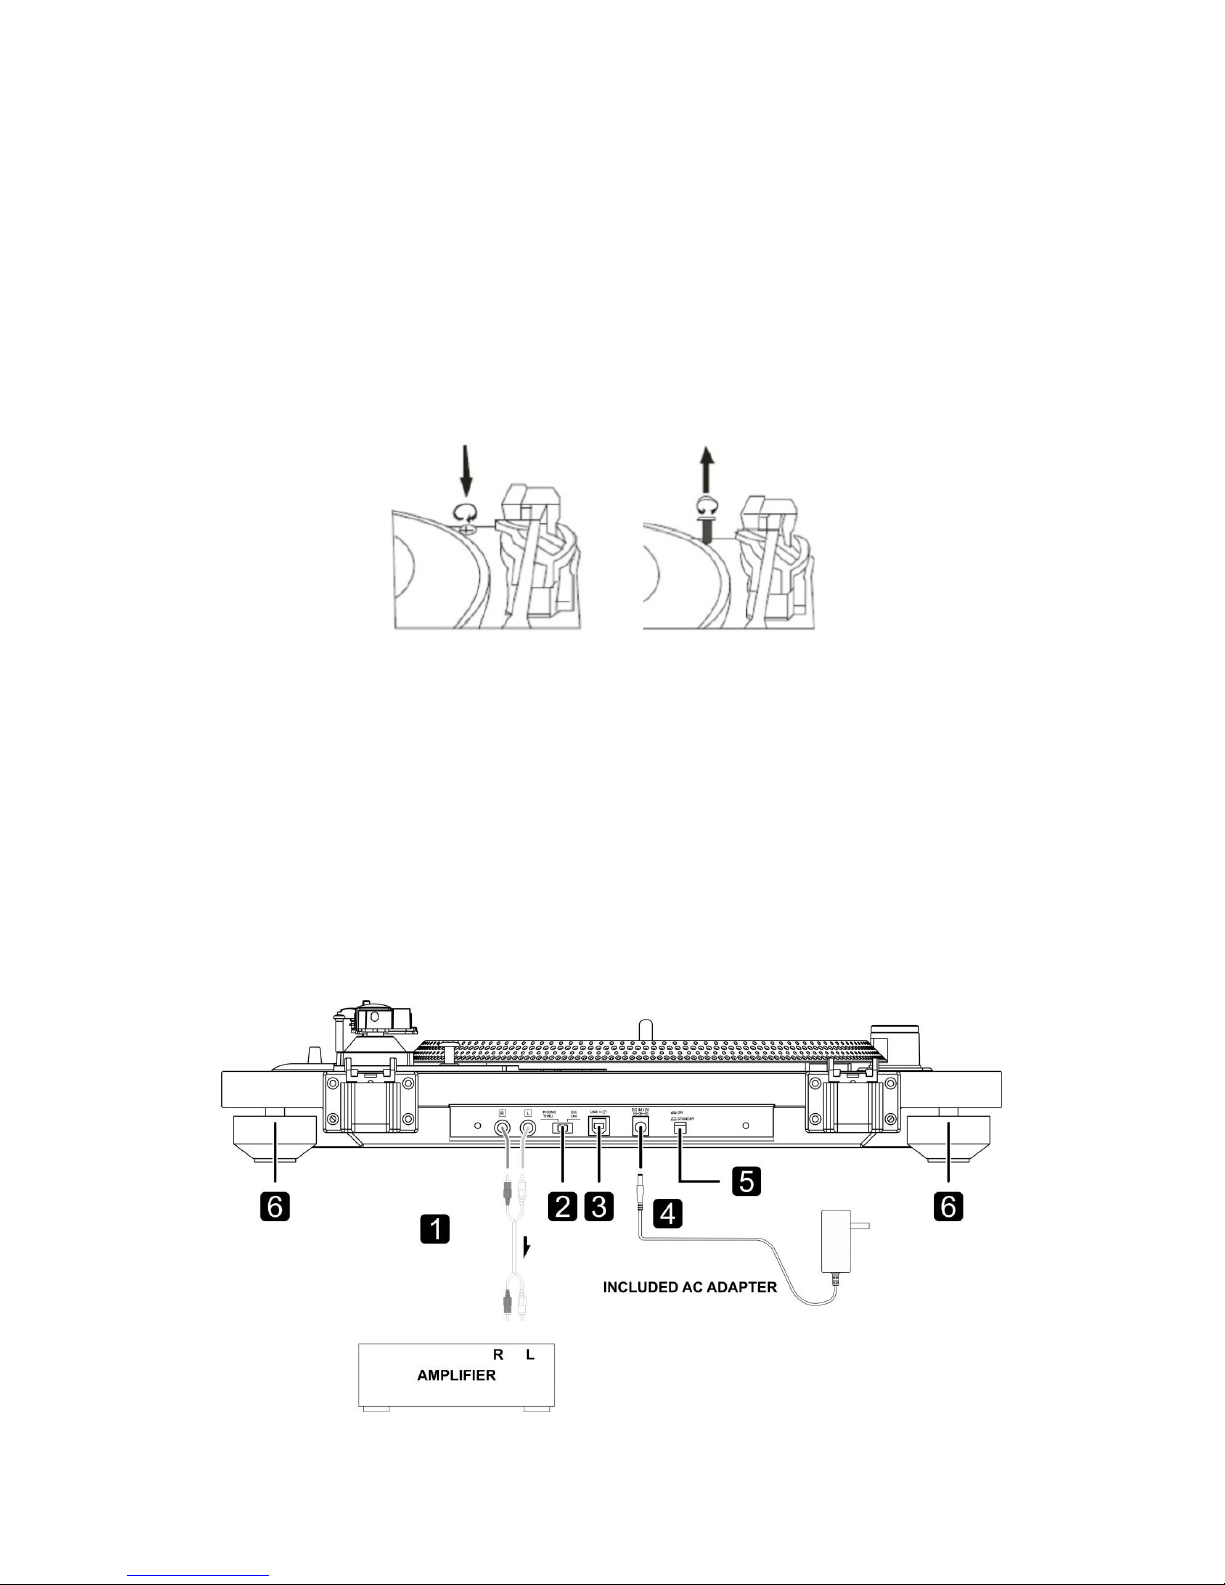
Replacing the stylus
♦ Lift the tone arm off the tone arm rest.
♦ At the front end of the tone arm, place the tip of your fingernail between the red stylus
holder and the black cartridge housing as shown, press down on the red stylus holder until
it separates form the cartridge housing.
♦ Completely remove the red stylus holder with worn stylus and discard it.
♦ Place the new red stylus holder with stylus under the cartridge housing. First, press
upward on the back side of the stylus holder, and then press up on the front edge of the
stylus holder until it snaps into place on the cartridge housing.

REPLACE THE CARTRIDGE FROM THE TONE ARM
PLEASE FOLLOW THE PROCEDUCE BELOW.
♦ Gently lift off the tone arm from
the tone arm rest.
♦ By using your left hand to hold
the tone arm and using your right
hand to hold the rear portion of
the cartridge. Then push the
cartridge backwards and downwards
according to the direction as shown
to the left to separate the cartridge
from the tone arm.
♦ Using either a tweezer or your fingers,
carefully unplug the terminals to the new
cartridge.
♦ Carefully connect the terminals to
the new cartridge(not included).
♦ To re-install the new cartridge to
the tone arm. First please lock the front end
of the new cartridge on the hook of the tone
arm.
♦ Press the rear side of the new cartridge
upwards to lock it on the to the tone arm.
Caution
♦ Since loud noises could suddenly occur, put the unit into standby before changing the
stylus.
♦ Be careful not to hurt your hand or the equipment.
♦ Be careful not to allow small children to accidentally swallow styluses.

TRANSPORTING THE SYSTEM
IMPORTANT!
To protect the turntable form the damage during transportation, a sliver transit screw is
located the upper right the turntable platform.
♦ Before playing, please use a screwdriver to turn the transit screw in clockwise
direction(screw going down) completely to unlock the turntable.
♦ To lock the turntable again for transportation, please turn screw in counter-clockwise
direction.
Belt Notice
♦ The red strap is wrapped around the belt, this allows you to use this red strap as a mounting
aid.
♦ When need play unit, please get rid of tape firstly, then pick up two sides of red strap with your
finger, wrapped around the belt to motor holder when you find it.
Connections

1. Analog audio output jacks(L/R)
These output analog audio signals.
The PHONO EQ switch setting changes the type of output signal.
Use the included audio cable ( or commercially available ones) to connect other
equipment to the output jacks of this unit.
2 PHONO EQ(audio output setting) switch on
Signals that have been amplified by the built-in equalizer amp are output from the analog
audio output jacks(L/R).
Caution
When set to ON, if connected to the PHONO inputs of an amplifier, form example, the output
from speakers and headphones will be very loud, which could damage equipment or harm
hearing.
3 USB port(USB B type)
Connect this to the USB port of a computer to convert the audio signal from this unit to digital
and output it to the computer.
4 DC input connector
After completing all other connections, connect the included AC adapter to this jack.
Confirm that the power plug of the AC adapter is plugged into a power outlet.
♦ Unplug the power cord from the outlet when your are not planning to use the unit for an
extended period of time.
♦ Do not use any AC adapter other than the one included.
Note
♦ Be sure to connect the power cord to an AC outlet that supplies the correct voltage.
Connection to an outlet that supplies incorrect voltage could cause fire or electric shock.
♦ Hold the power plug when plugging it into an outlet or unplugging it. Never pull or yank on the
power cord.
♦ Unplug the power cord from the outlet when you are not planning to use the unit from
extended period of time.
5 Standby/On button
♦ Press the STANDBY/ON button to turn the unit on or put it in Standby.

Names and functions of parts
1 Power Switch/Strobe 2 Strobe Dots 3 Slit Mat 4 Center Spindle
5 Head shell 6 Screw 7 Cueing lever 8 Speed select switch
9 Tone arm 10 Pitch Control Knob 11 START/STOP knob

Turntable Dust Cover
Attaching the turntable cover
♦ Insert the hinges completely into the hinge holders at the left and right ends of the back of the
main unit.
♦ Align the tops of the hinges with the turntable cover hinge holders and insert them.
Removing the turntable cover
Hold both edges of the turntable cover and lift it slowly to remove it along with the hinges from
the unit. Then, remove the hinges from the turntable cover.
Opening and closing the turntable cover

Opening
♦ Hold the front edge of the turntable cover and gently lift it open completely until it stops.
♦ The turntable cover will stay open in this position.
Closing
♦ Gently lower the turntable cover until it is closed.
Be careful not to pinch your hand when in opening and closing the turntable cover.
Handling records
Holding records
When holding a record or removing it from its sleeve, avoid touching the grooves by holding
the record by its label and edge with one hand or by holding it by its edge with both hands.
Cleaning
♦ Fingerprints and dust on a record can cause noise and the sound to skip, as well as damage
it record itself and the stylus. Use a commercially available record cleaner to clean records. Do
not use thinner or anything other than a record cleaner. Such chemicals could harm the surface
of the record.
♦ When using a record cleaner, wipe the surface of the record in a circular motion, following the
grooves.
Precautions
♦ Do not leave records in places that are exposed to direct sunlight or are very hot or very humid.
Leaving a record in such a condition for a long time could result in warping or other damage.
♦ Do not stack multiple records or place heavy objects on top of them. Do not leave records at
an angle for long amounts of time either. Doing so could result in warping or other damage.
♦ Do not allow hard objects to directly touch the audio grooves. Doing so could cause
scratches.
♦ After you finish playing a record, always put it back into its sleeve for storage. Leaving a
record unprotected could result in warping or scratching.
♦ Do not use cracked records.
]

Basic operation
Playing records
♦ Press the STANDBY/ON button on the back of the unit to turn it on.
♦ Open the turntable cover slowly.
♦ Place a record on the turntable. When playing a 45 RPM large-hole single record, use the
included adapter.
♦ Set according to the rotation speed (RPM)of the record. The rotation speed can be set to 33
1/3 or 45 RPM.

♦ Turn the START/STOP rotation knob to START to start the turntable.
♦ When the START/STOP rotation knob is set to START, the turntable will start rotating and the
blue LED will light.
♦ Move the tone arm clasp to the right to release the tone arm.
♦ Lift the cue lever.
You can also leave the cue lever down and moved the raised tone arm over the record and then
lower the tone arm slowly to start playback.
♦ Move the tone arm to the edge of the record or the track where you want to start playback.
♦ Lower the cue lever.
Lower the tone arm slowly until the stylus touches the record and playback begins. We
recommend that you close the turntable cover during record playback to avoid dust.
Do not place anything on the turntable cover. Objects on the cover might cause noise due to
vibrations or fall off, especially during playback.
Caution
♦ During playback, do not touch the tone arm or the rotating record.
♦ Do not stop turntable rotation during playback.
♦ During record playback, feedback could occur if the volume is too loud. If this happens, lower
the volume of the amplifier.
How to set pitch
♦ When the external adapter is connected and powered, turn the pitch function on
automatically.
♦ Use the Pitch Adjust Knob in conjunction with the Pitch to vary the platter’s rotational speed by
as much as +/- 50%.
How to measure pitch
♦ Four rows of strobe dots on the platter edge are designed to measure and verify the platter
speed.
♦ When the corresponding row of strobe dots appears to be stationary, the turntable will be at
the operating speed percentage indicated below:
If the dots appear to be moving to the right, the platter is moving below rated speed; if they
appear to be moving to the left, the platter is moving above rated speed.

When playback finishes
♦ Slightly lift the cue lever or the head-shell hook and return the tone arm to its resting position.
♦ Turn the START/STOP rotation knob to STOP to stop the turntable. When the turntable stops,
the blue LED will also become unlit.
Recording with a computer
Connect this record player to a computer using a commercially-available USB cable to convert
audio signals from a record to digital data and send them to the computer.
Connecting with a computer
♦ Connect this record player to a computer using a commercially-available USB cable to
convert audio signals from a record to digital data and send them to the computer.
♦Turn the computer on: confirm that the operating system is working correctly.
♦Turn the record player on.
♦ When they are connected, the computer will automatically detact this unit's USB port
and identify it as "USB Audio CODEC".

♦ To record audio from this record player using a computer, you must first install software
that can be used for audio recording on the computer. Please download the software:
Audacity as attached.
- Install Audacity software in your computer.
- Open the software.
- Click Append Record icon in the software: the encoding is going on.
- When finish the encoding, click STOP icon.
- Open the Files icon in the software and save the project.
- The project can be exported in MP3 or other audio format as you like.
♦ Reminder: When in encoding, please always select LINE mode, then you can record a
better quality resources.
Specifications:
Operating voltage
DC15V/330 mA
Power Consumption
0.5W in Standby;1.5W in operation
Dimensions(L*W*H)
453*362*108 mm
Unit Weight
4.12kg
Driving Method
Belt drive
Speeds
33-1/3 and 45RPM
S/N ratio
35dB
Cartridge type
Ceramic
Needle
Sapphire
Turntable
Plastic platter (11’’)diameter

Latest declaration form can be found at:
www.caliber.nl/media/forms/DeclarationHTT101.pdf
GB
Caliber hereby declares that the item HTT101 is in compliance
with the essential requirements and other relevant provisions of
Directive 2014/53/EU (RED), 2009/125/EC (ERP) and
2011/65/EU (RoHS).
FR
Par la présente Caliber déclare que l’appareil HTT101 est conforme
aux exigences essentielles et aux autres dispositions pertinentes de
la directive 2014/53/EU (RED), 2009/125/EC (ERP) et
2011/65/EU (RoHS).
DE
Hiermit erklärt Caliber, dass sich das Gerät HTT101 in
Übereinstimmung mit den grundlegenden Anforderung und
übrigen einschlägigen Bestimmungen der Richtlinie
2014/53/EU (RED), 2009/125/EC (ERP) und 2011/65/EU (RoHS)
bendet.
IT
Con la presente Caliber dichiara che questo HTT101 è conforme
ai requisiti essenziali ed alle alte disposizioni pertinenti stabilite
dalla directtiva 2014/53/EU (RED), 2009/125/EC (ERP) e
2011/65/EU (RoHS).
ES Por medio de la presente Caliber declara que el HTT101
cumple con los requisitos esenciales y otra disposiciones
aplicables o exigibles de la Directiva 2014/53/EU (RED),
2009/125/EC (ERP) y 2011/65/EU (RoHS).
PT
Caliber declara que este HTT101 está conforme com os requisitos
essenciais e outras disposições da Directiva 2014/53/EU (RED),
2009/125/EC (ERP) e 2011/65/EU (RoHS).
S
Härmed intygar Caliber att denna HTT101 Pro står i
överensstämmelse med de väsentliga egenskapskrav och övriga
relevanta bestämmelser som framgår av direktiv
2014/53/EU (RED), 2009/125/EC (ERP) och 2011/65/EU (RoHS).
PL
Niniejszym Caliber oświadcza, źe HTT101 jest zgodne
z zasadniczymi wymaganiami oraz innymi stosownymi
postanowieniami Dyrektywy 2014/53/EU (RED),
2009/125/EC (ERP) i 2011/65/EU (RoHS).
DK
Undertegnede Caliber erklærer hermed, at følgende udstyr
HTT101 overholder de væsentlige krav og øvrige relevante krav i
direktiv 2014/53/EU (RED), 2009/125/EC (ERP) og
2011/65/EU (RoHS).
EE
Käesolevaga kinnitab Caliber seadme HTT101 vastavust direktiivi
2014/53/EU (RED), 2009/125/EC (ERP) ja 2011/65/EU (RoHS)
pöhinõuetele ja nimetatud direktiivist tulenevatelle teistele
asjakohastele sätetele.
LT
Šiuo Caliber deklaruoja, kad šis HTT101 atitinka esminius
reikalavimus ir kitas 2014/53/EU (RED), 2009/125/EC (ERP) ir
2011/65/EU (RoHS) Direktyvos nuostatas.
FI
Caliber vakuuttaa täten että HTT101 tyyppinen laite on direktiivin
2014/53/EU (RED), 2009/125/EC (ERP) ja 2011/65/EU (RoHS)
oleellisten vaatimusten ja sitä koskevien direktiivin muiden ehtojen
mukainen.
IS
Hér með lýsi Caliber yr ϸvi að HTT101 erί samræmi við
grunnkröfur og aðrar kröfur, sem gerðar eru í tilskipun
2014/53/EU (RED), 2009/125/EC (ERP) og 2011/65/EU (RoHS).
NO
Caliber erklærer herved at utstyret HTT101 er i samsvar med de
grunn-leggende krav og øvrige relevante krav i drektiv
2014/53/EU (RED), 2009/125/EC (ERP) og 2011/65/EU (RoHS).
NL
Hierbij verklaart Caliber dat het toestel HTT101 in
overeenstemming is met de essentiële eisen en de andere
relevante bepalingen van richtlijn 2014/53/EU (RED),
2009/125/EC (ERP) en 2011/65/EU (RoHS).
DECLARATION OF CONFORMITY


WWW.CALIBER.NL
CALIBER EUROPE BV
•
Kortakker 10
•
4264 AE Veen
•
The Netherlands
Table of contents