call4tel NX-S/O 2 Series User manual

call4tel
NX-S/O 2/4/8 Series
Analog Gateway
User Manual
INDEX
Introduction 4
Sample Application 4
Front Panel 5
Back Panel 6
Main Features 6
System Features 6
Telephony Features 6
SIP Features 6
Network 6
Physical Information 7
Software 7
System 7
Status 7
Description of Time Settings 8
Login Settings 9
Description of Login Settings 9
Login Settings 9
General 10
Language Settings 10
Scheduled Reboot 10
Reboot Types 10
Tools 11
Reboot Prompt 11
Instruction of reboots 11
Update Firmware 11
Upload and Backup 12
Factory Reset 12
Information 12
System Information 12
Analog 13

2
Channel Settings 13
FXO Port Configure 13
FXS Port Configure 14
Pickup Settings 14
Pickup Configure 14
Definition of Pickup 15
Dial Matching Table 15
Port Configure 15
Advanced Settings 16
General Configuration 16
Instruction of General 16
Caller ID 17
Instruction of Caller ID 17
Hardware Gain 17
Instruction of Hardware gain 17
Fax Configuration 18
Definition of Fax 18
Country Configuration 18
Definition of Country 19
Special Function Keys 19
Function keys 19
SIP 20
SIP Endpoints 20
SIP Status 20
Main Endpoint Settings 20
Anonymous Registration 20
Register to Gateway 21
Register to Server 21
Definition of SIP Options 22
Advanced Registration Options 23
Call Settings 23
Advanced: Signaling Settings 23
Advanced: Timer Settings 24
Media Settings 25
FXS Batch Binding SIP 26
Batch Create SIP 26
Batch SIP Endpoints 26
Advanced SIP Settings 27
Networking 27
NAT Settings 27
RTP Settings 28
Parsing and Compatibility 29
Security 30
Media 30
Sip Account Security 31
TLS settings 31
Instruction of TLS 31
Routing 32
Call Routing Rules 32
Example of Setup Routing Rule 33
Definition of Call Routing Rule 33
Advance Routing Rule 33
Definition of Advance Routing Rule 34
Groups 35
Definition of Routing Groups 35
Batch Create Rules 35
Network 35
Network Settings 35
LAN Settings Interface 36
Definition of Network Settings 36
DNS Interface 37
Definition of DNS Settings 37
VPN Settings 37
VPN Interface 37
DDNS Settings 37
Toolkit 38
Definition of Channel Recording 38
Advanced 38
Asterisk API 38

3
Definition of Asterisk API 38
Asterisk CLI 40
Definition of Asterisk API 40
Asterisk File Editor 40
Configuration Files List 40
Logs 40
Log Settings 40
Definition of LOG 40
System 42
System Logs Output 42
CDR 42

4
INTRODUCTION
The NX-S/O 2/4/8 series Analog Gateway, is an open-source asterisk-based Analog VoIP Gateway solution for
SMBs and SOHOs. With a friendly GUI and unique modular design, users can easily set up their customized
Gateway. Also, secondary development can be completed through AMI (Asterisk Management Interface).
The NX-S/O 2/4/8 Analog Gateways are developed for interconnecting a wide selection of codecs including
G.711A, G.711U, G.729A, G.722, G.726, iLBC. The NX-S/O 2/4/8 series use standard SIP protocol and are compatible
with Leading VoIP platforms, IPPBX and SIP servers such as Asterisk, Issabel, 3CX, FreeSWITCH, BroadSoft and
VOS VoIP operating platform.
Sample Application

5
Front Panel
1: Power Indicator
2: System LED
3: Analog Telephone Interfaces and corresponding Channels State Indicators
Back Panel
1: Power interface
2: Reset button
3: Ethernet ports and indicators

6
MAIN FEATURES
System Features
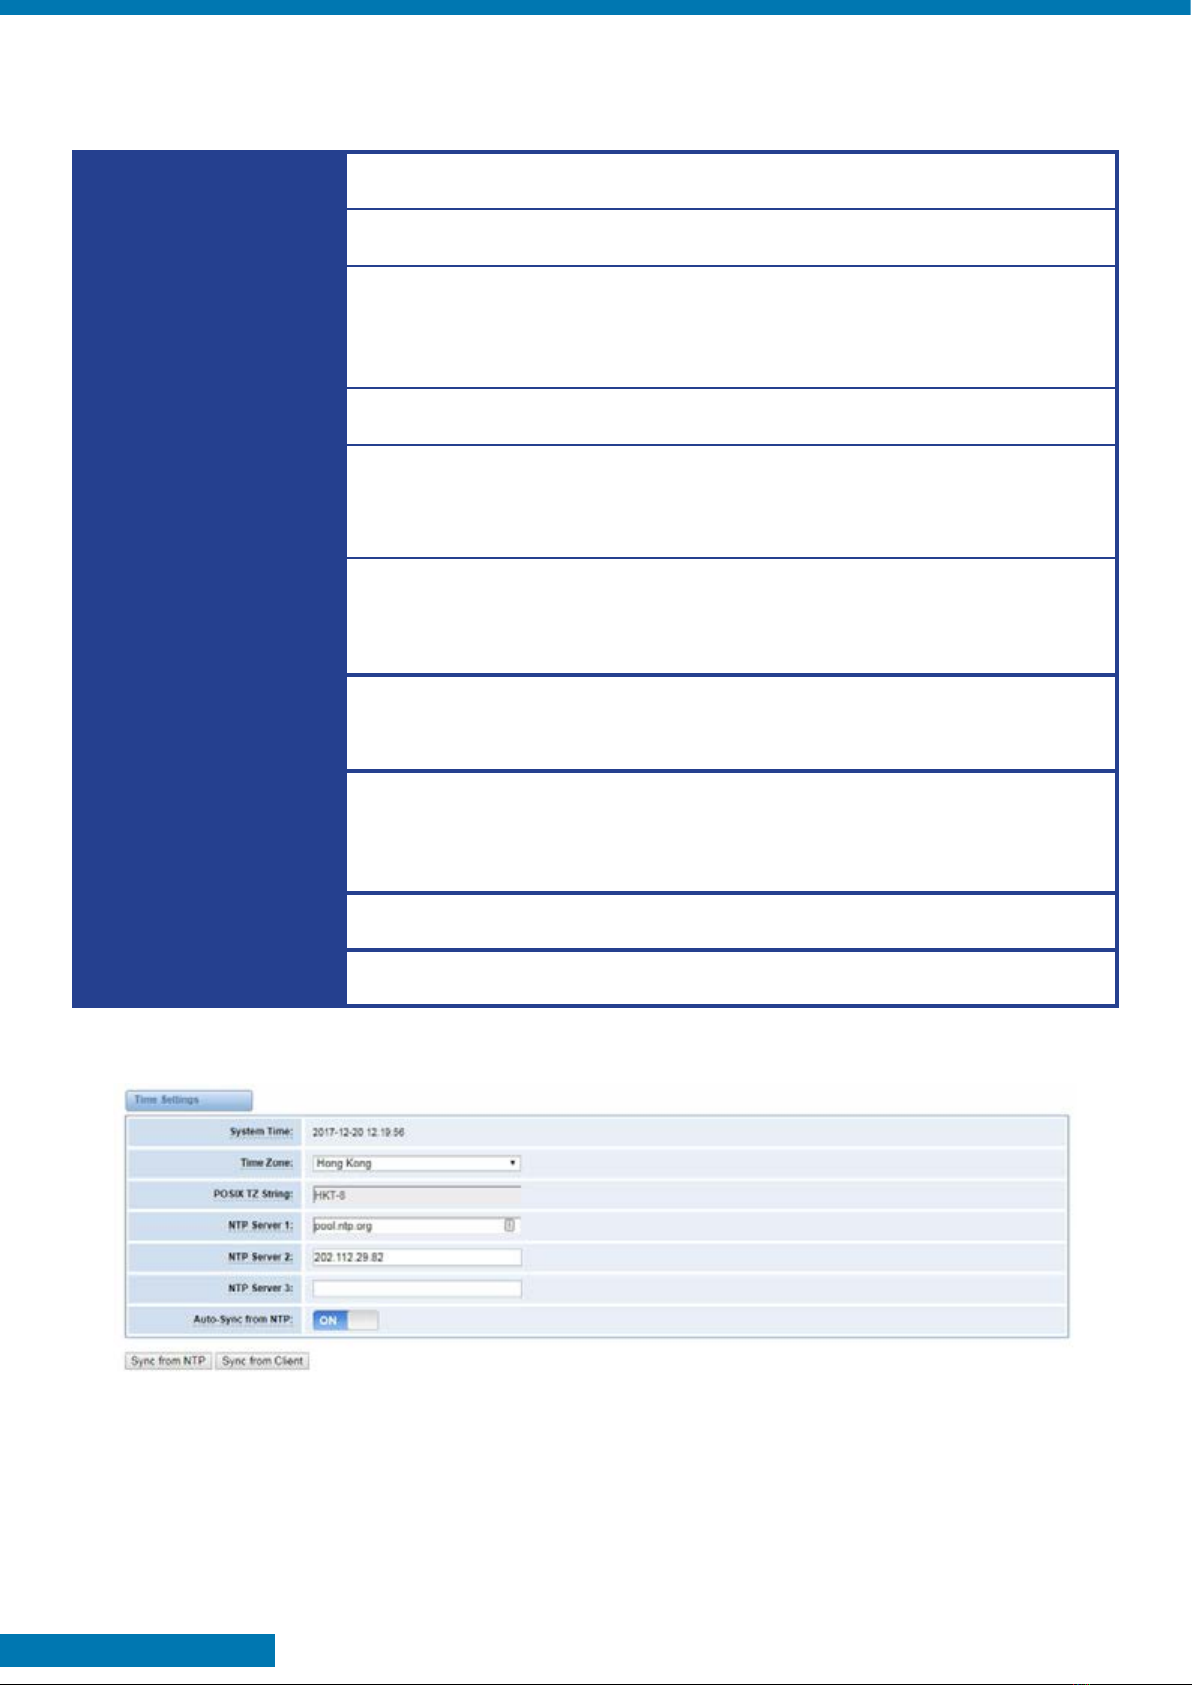
- NTP time synchronization and client time synchronization
- Support modify username and password for web login
- Update firmware online, backup/restore configuration file
- Abundant Log Info, Automatically Reboot, Call status display
- Language selection (Chinese/English)
- Open API interface (AMI), support for custom scripts, dialplans
- Support SSH remote operation and restore the factory settings
Telephony Features
- Support Volume adjustment, Gain adjustment, call transfer, call hold, call waiting, call forward, Caller ID
display
- Three way calling, Call transfer, Dial-up matching table
- Support T.38 fax relay and T.30 fax transparent, FSK and DTMF signaling
- Support Ring cadence and frequency setting, WMI (Message Waiting Indicator)
- Support Echo cancellation, Jitter buffer
- Support customizable DISA and other applications
SIP Features
- Support add, modify & delete SIP Accounts, batch add, modify & delete SIP Accounts
- Support multiple SIP registrations: Anonymous, Endpoint registers with this gateway, This gateway regis-
ters with the endpoint
- SIP accounts can be registered to multiple servers
Network
- Network type: Static IP, Dynamic
- Support DDNS, DNS, DHCP, DTMF relay, NAT
- Telnet, HTTP, HTTPS, SSH
- VPN client
- Network Toolbox

7
Physical Information
Weight 637g
Size 19cm*3.5cm*14.2cm
Temperature
-20~70°C (Storage)
0~50°C (Operation)
Operation humidity 10%~90% non-condensing
Power source 12V DC/2A
Max power 12W
SOFTWARE
Default IP: 172.16.99.1
Username: admin
Password: admin
Please enter the default IP in your browser to scan and configure the module you want.
SYSTEM
Status
On the “Status” page, you will see Port/SIP/Routing/Network information and status.

8
Description of Time Settings
Options Definition
System Time Your gateway system time.
Time Zone The world time zone. Please select the one which is the same or the clos-
est as your city.
POSIX TZ String Posix time zone strings.
NTP Server 1 Time server domain or hostname. For example, [time.asia.apple.com].
NTP Server 2 The first reserved NTP server. For example, [time.windows.com]. The sec-
ond reserved NTP server. For example, [time.nist.gov].
NTP Server 3 The second reserved NTP server. For example, [time.nist.gov].
Auto-Sync from NTP Whether enable automatically synchronize from NTP server or not. ON is
enable, OFF is disable this function.
Sync from NTP Sync time from NTP server.
Sync from Client Sync time from local machine.
For example, you can configure as shown below:
You can set your gateway time Sync from NTP or Sync from Client by pressing different buttons.

9
LOGIN SETTINGS
Your gateway doesn’t have administration roles. All you can do is reset your username and password to
manage your gateway. You can modify both your “Web Login Settings” and “SSH Login Settings”. If you have
changed these settings, you don’t need to log out, just re-enter your new user name and password.
Description of Login Settings
Options Definition
User Name
Define your username and password to manage your gateway, without
space here. Allowed characters
“-_+. < >&0-9a-zA-Z”. Length: 1-32 characters.
Password Allowed characters “-_+. < >&0-9a-zA-Z”. Length: 4-32 characters.
Confirm Password Please input the same password as ‘Password’ above.
Login Mode Select the mode of login.
HTTP Port Specify the web server port number.
HTTPS Port Specify the web server port number.
Port SSH login port number.
Login Settings
Note: Whenever you do some changes, do not forget to save your configuration.

10
GENERAL
Language Settings
You can choose different languages for your system. If you want to change the language, you must switch
the “Advanced” option on as shown below, and “Download” your current language package. After that, you
can modify the package with the language you need. Upload your modified packages, “Choose File” and “Add”.
Scheduled Reboot
If switched on, you can manage your gateway to reboot automatically. There are four reboot types for you to
choose, “By Day, By Week, By Month and By Running Time”.
Reboot Types

11
TOOLS
On the “Tools” pages, there are reboot, update, upload, backup and restore options.
You can choose system reboot and Asterisk reboot separately.
Reboot Prompt
If you press “Yes”, your system will reboot and all current calls will be dropped. Asterisk Reboot is the same.
INSTRUCTION OF REBOOTS
Options Definition
System Reboot This will turn off your gateway and then turn it back on. This will drop all
current calls.
Asterisk Reboot This will restart Asterisk and drop all current calls.
We offer two kinds of updates, you can choose System Update or System Online Update. System Online Up-
date is an easier way to update your system.
Update Firmware

12
If you want to store your previous configuration, you can first backup configuration, then you can upload
configuration directly. Notice, the version of backup and current firmware should be same, otherwise, it would
not take effect.
Upload and Backup
Factory Reset
To factory reset your gateway simply press the button as shown below and your gateway will be reset to
the factory status.
Information
On the “Information” page, you will find some basic information about your gateway. You can see the soft-
ware and hardware version, storage usage, memory usage and some help information.
System Information

13
ANALOG
You can see information about your ports on this page.
Channel Settings
On this page, you can see every port status, and click the action button to configure the port.
FXO Port Configure

14
FXS Port Configure
PICKUP SETTINGS
Call pickup is a feature used in a telephone system that allows one to answer someone else’s call. You can
set the “Time Out” and “Number” parameters either globally or separately for each port. The feature is ac-
cessed by pressing a special sequence of numbers which you set as “Number” parameter on the telephone
set when it is enabled this function.
Pickup Configure

15
Definition of Pickup
Options Definition
Enable ON(enabled),OFF(disabled)
Time Out Set the timeout, in milliseconds (ms).Note: You can only enter numbers.
Number Pickup number
DIAL MATCHING TABLE
Dialing rules are used to effectively judge whether the received number sequence is complete, in order to
timely end receiving numbers and send out numbers.
The correct use of dial-up rules, helps to shorten the turn-on time of phone calls.
Port Configure

16
ADVANCED SETTINGS
General Configuration
Instruction of General
Options Definition
Tone duration How long generated tones (DTMF and MF) will be played on the channel. (in
milliseconds)
Dial timeout Specifies the number of seconds we attempt to dial the specified devices.
Codec Set the global encoding : mulaw, alaw.
Impedance Configuration for impedance.
Echo cancel tap length Hardware echo canceler tap length.
VAD/CNG Turn on/off VAD/CNG.
Flash/Wink Turn on/off Flash/wink.
Max flash time Max flash time.(in milliseconds).
“#”as Ending Dial Key Turn on/off Ending Dial Key.
Checking SIP Status Turn on/off SIP Account registration status checking.

17
Caller ID
Instruction of Caller ID
Options Definition
The pattern of
sending CID
Some countries(UK) have ring tones with different ring tones(ring-ring),
which means the caller ID needs to be set later on, and not just after the
first ring, as per the default(1).
Waiting time before
sending CID
How long we will waiting before sending the CID on the channel.(in milli-
seconds).
Sending polarity rever-
sal(DTMF Only) Send polarity reversal before sending the CID on the channel.
Start code(DTMF Only) Start code.
Stop code(DTMF Only) Stop code.
Hardware Gain
Instruction of Hardware gain
Options Definition
FXS Rx gain Set the FXS port Rx gain. Range: from -150 to 120. Select -35, 0 or 35.
FXS Tx gain Set the FXS port Tx gain. Range: from -150 to 120. Select -35, 0 or 35.

18
Fax Configuration
Definition of Fax
Options Definition
Mode Set the transmission mode.
Rate Set the rate of sending and receiving.
Ecm Enable/disable T.30 ECM (error correction mode) by default.
Country Configuration

19
Definition of Country
Options Definition
Country Configuration for location specific tone indications.
Ring cadence List of durations the physical bell rings.
Dial tone Set of tones to be played when one picks up the hook.
Ring tone Set of tones to be played when the receiving end is ringing.
Busy tone Set of tones played when the receiving end is busy.
Call waiting tone Set of tones played when there is a call waiting in the background.
Congestion tone Set of tones played when there is some congestion.
Dial recall tone Many phone systems play a recall dial tone after hook flash.
Record tone Set of tones played when call recording is in progress.
Info tone Set of tones played with special information messages (e.g., number is out
of service.)
SPECIAL FUNCTION KEYS
Function keys SIP

20
SIP
SIP Endpoints
This page shows everything about your SIP, you can see status of each SIP.
SIP Status
Click on the button to add a new SIP endpoint, and if you want to modify existed end-
points, click on the button.
Main Endpoint Settings
There are 3 kinds of registration types to choose from. You can choose “Anonymous, Endpoint registers with
this gateway or This gateway registers with the endpoint”.
You can configure as follows:
If you set up a SIP endpoint by registration “None” to a server, then you can’t register other SIP endpoints to
this server. (If you add other SIP endpoints, this will cause Out-band Routes and Trunk confusion.)
Anonymous Registration
You can register your SIP endpoint to your gateway and your gateway will work as a server.
Other manuals for NX-S/O 2 Series
1
This manual suits for next models
2
Table of contents
Other call4tel Gateway manuals
Popular Gateway manuals by other brands

Huawei
Huawei HG658 V2 Quick start-up

Enterasys
Enterasys SNS-TAG-HPA installation guide

RTA
RTA 460MCBC-N2E Product user guide

SST Automation
SST Automation GT200-EI-CO user manual

Moxa Technologies
Moxa Technologies MGate 5102-PBM-PN-T user manual

QUNDIS
QUNDIS Q gateway 5.5 direct Operating and installation instructions