manuals.online logo
Brands
  1. Home
  2. •
  3. Brands
  4. •
  5. CALOR
  6. •
  7. Household Appliance
  8. •
  9. CALOR IT34 Series User manual

CALOR IT34 Series User manual

www.calor.fr
IT34XX
FR
EN
NL
DE
AR
1*
10*
4
6
75
8*
2
9
3
OFF
* FR Dépend du modèle / EN Depending on model /
NL Afhankelijk van het model/DE Je nach Modell/AR
1*
10*
4
6
75
8*
2
9
3
OFF
DESCRIPTION DU PRODUIT / PRODUCT DESCRIPTION
1. FR Cintre*
EN Hanger*
2. FR Tête vapeur
EN Steam Head
3. FR Cordon vapeur
EN Steam Hose
4. FR Pole ajustable
EN Adjustable poles
5. FR Bouton ON/OFF
EN ON / OFF Button
6. FR Réservoir amovible
EN Removable Water tank
7. FR De-calc ouverture
EN Draining Cap
8. FR Support vertical*
EN Vertical Support*
9. FR Brosse pour tissu
EN Fabric Brush
10. FR Cintre à pantalons*
EN Hanger & clips*
* FR Dépend du modèle / EN Depending on model
4
1. ASSEMBLAGE / ASSEMBLY
Insérez le tube dans le boîtier jusqu’à
ce que vous entendiez un clic.
FR
Insert the pole in the housing untill
you hear a "click".
EN
Open the three pole locks.
EN
Ouvrez les trois attaches du tube.
FR
Extend the pole fully.
EN
Étirez entièrement le tube.
FR
Close the three locks.
EN
Fermez les trois attaches du tube.
FR
5
1
2
2
CLICK
1
FR Insérer le cordon vapeur, puis
verouillez le en vissant jusqu'à
entendre un "clic".
Insert the steam hose , and lock it, by
screwing until hearing a "click".
EN
Ajoutez le support vertical amovible
et le cintre.
FR
Add the vertical support and the hanger.
EN
Fully insert the hanger vertically
ontop of the pole and lock it.
EN
Inserez completement le cintre
verticalement en haut du tube
etverrouillez le.
FR
Positionnez la tête vapeur sur son
support.
FR
Position the steam head on its craddle.
EN
* FR Dépend du modèle / EN Depending on model
6
2. AVANT L'UTILISATION/ BEFORE USE
1,5L
51OZ
MAX
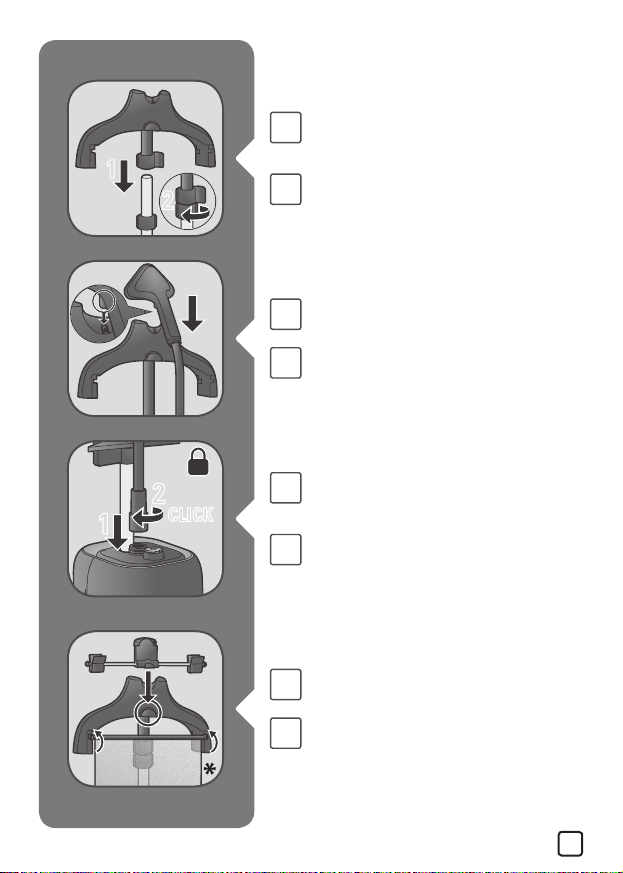
Deroulez le support et attachez-le,
en réglant la tension avec l'accroche
prévu à cet eet. Puis verrouillez.
FR
Unwind the support and x it, by
adjusting the tension with the
dedicated hook and lock it.
EN
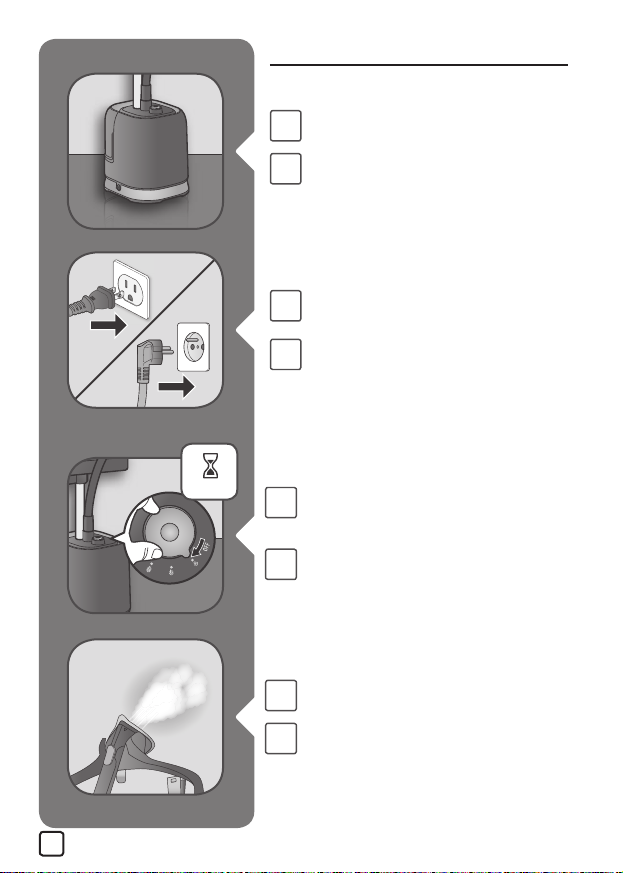
Retirez le réservoir d'eau.
FR
Remove the water tank.
EN
Retirez le bouchon puis remplissez le
réservoir d'eau.
FR
Remove the cap then ll in the water tank.
EN
Vissez complètement le bouchon du
réservoir d'eau et replacez le réservoir
dans l'appareil.
FR
Fully screw the water tank cap and
insert tank back in appliance.
EN
* FR Dépend du modèle / EN Depending on model
7
3. ACCESSOIRES / ACCESSORIES
Ajoutez le vêtement de votre choix sur
le cintre.
FR
Add the clothe of your choice on the
hanger.
EN
Les accessoires doivent être installés lorsque l'appareil est
froid et n'est pas en fonctionnement.
FR
Accessories must be settled when appliance is cold and not
running.
EN
La brosse à tissu ouvre le tissage des
tissus pour une meilleure pénétration
de la vapeur.
FR
The fabric brush opens the weaves
of the fabrics for better steam
penetration.
EN
8
4. UTILISATION /USE
45s
L'appareil doit rester posé
horizontalement sur le sol.
FR
The appliance must remain in a
horizontal position on the oor.
EN
Plug in the appliance.
EN
Branchez l’appareil.
FR
Turn the On/O Button, in order to
switch on the appliance. Then, adjust
steam output by turning the button.
EN
Tourner le bouton ON/OFF an
d'allumer l'appareil, et régler sur
ledébit vapeur approprié.
FR
Après environ 45 secondes, la vapeur
sera émise.
FR
After 45 seconds approximately, steam
will come out.
EN
9
Pour une utilisation optimale, passez
les jets de vapeur sur votre vêtement
de haut en bas.
FR
For optimal use, pass the steam jets on
your garment from top to bottom.
EN
Ne dirigez jamais la vapeur
directement vers des personnes.
FR
Never steam directly on people.
EN
5. DURANT L'UTILISATION / DURING USE
Si le ux de vapeur s'arrête, cela est
probablement dû au fait que le niveau
d'eau dans le réservoir est insusant.
FR
If steam is not coming out anymore,
this can be due to low water level in
tank.
EN
10
Tourner le bouton ON/OFF jusqu'à la
position OFF, an d'éteindre l'appareil.
FR
Turn the on/o button to the "OFF"
positioning, in order to switch o the
appliance.
EN
Débranchez l'appareil, et retirez le
réservoir d'eau.
FR
Unplug, then remove the water tank.
EN
Retirez le bouchon puis remplissez le
réservoir d'eau.
FR
Remove the cap then ll in the water
tank.
EN
Vissez complètement le bouchon du
réservoir d'eau et replacez le réservoir
dans l'appareil.
FR
Fully screw the water tank cap and
insert tank back in appliance.
EN
1,5L
51OZ
MAX

This manual suits for next models

2

Popular Household Appliance manuals by other brands

Allied Moulded Products SLIDERBOX SBFB-1N manual

Allied Moulded Products

Allied Moulded Products SLIDERBOX SBFB-1N manual

Pella 802Q0101 installation instructions

Pella

Pella 802Q0101 installation instructions

Ellia aspire ARM-1210 user guide

Ellia

Ellia aspire ARM-1210 user guide

IKEA VÄXER manual

IKEA

IKEA VÄXER manual

Mesko MS 9613 user manual

Mesko

Mesko MS 9613 user manual

impey Aqua-Grade Linear installation guide

impey

impey Aqua-Grade Linear installation guide

Coopers of Stortford F996 Instructions for use

Coopers of Stortford

Coopers of Stortford F996 Instructions for use

Gate House R100 manual

Gate House

Gate House R100 manual

AquaPur Terry CS99922 operating instructions

AquaPur

AquaPur Terry CS99922 operating instructions

Ecomist E6 Instruction booklet

Ecomist

Ecomist E6 Instruction booklet

SAFERA Smart R Stove Guard installation manual

SAFERA

SAFERA Smart R Stove Guard installation manual

GENROSE ALBERTA installation instructions

GENROSE

GENROSE ALBERTA installation instructions

Closed Loop CLOey operating manual

Closed Loop

Closed Loop CLOey operating manual

SelecTech FreeStyle Commercial installation guide

SelecTech

SelecTech FreeStyle Commercial installation guide

CXS 2266-01 Information for users

CXS

CXS 2266-01 Information for users

MOB CX1511 user manual

MOB

MOB CX1511 user manual

Klarstein TOUCHLESS 10035097 manual

Klarstein

Klarstein TOUCHLESS 10035097 manual

Voyager Dock Plant Hanger manual

Voyager Dock

Voyager Dock Plant Hanger manual

manuals.online logo
manuals.online logoBrands
  • About & Mission
  • Contact us
  • Privacy Policy
  • Terms and Conditions

Copyright 2025 Manuals.Online. All Rights Reserved.