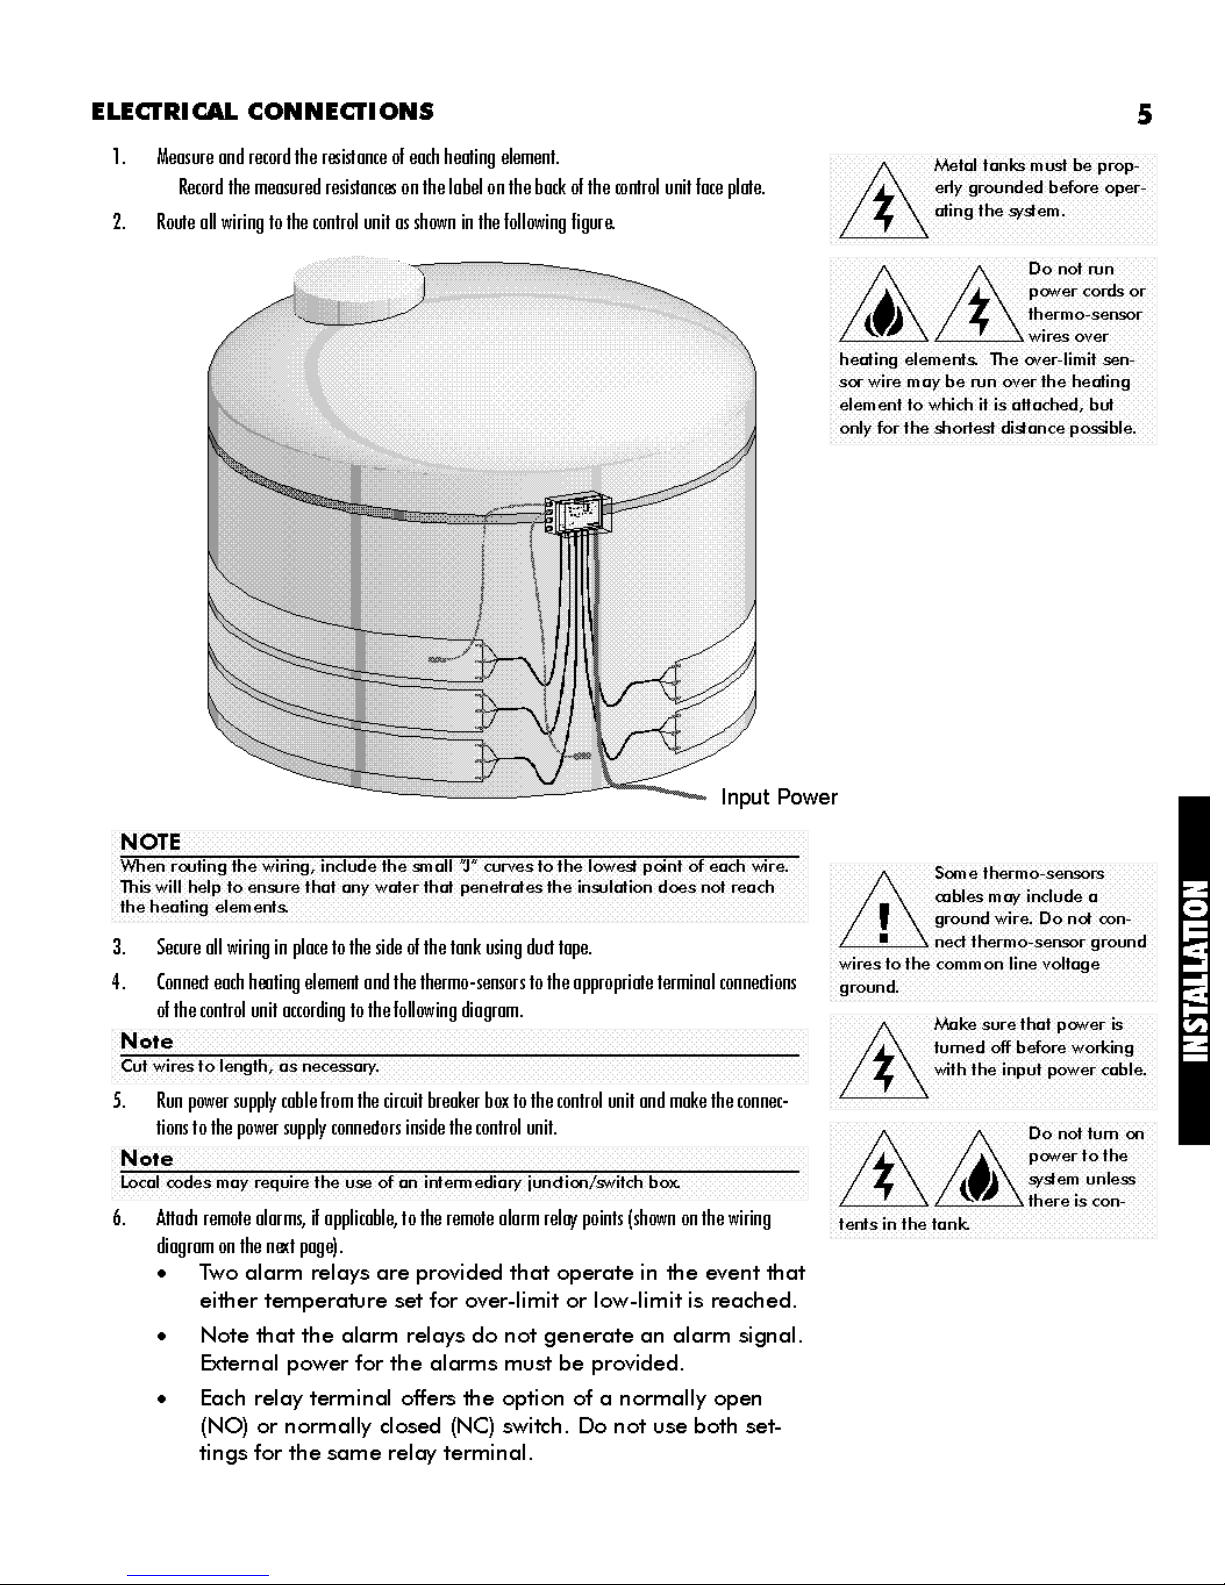
CALORIQUE THERMOLAR THS-206 User manual

Fhermofar® Fank Temperature
Maintenance tem

Confinn system voltage before con-
neding
the
system
lo
powersupply.
Do
not
conned
systems
to
any
vohoge
other
than
that for which they
were
designed.
Systems
operated
ol
higher
than
designed
vohoge
pose
o risk
of
eledric
shock
and/or
fire.
Systems
operated
ol
lower
than
designed
vohoge
may not maintain
temperature which could resub in loss
of
or
damage
lo
conlenls.
INTRODUQION
The
CalorJQue
Thermolar®
Tank
Temperature
Maintenance
System
is
a
low
heat-density
warming
system
designed
to
safely
and
effi-
ciently
maintain
the
contents
temperature
of
any
tank.
Ideal
for
pro-
cess
control,
adhesive
storage
(etc.)
the
THERMOLAR system
provides
uniform
heat
that
won't
scorch
tank
contents.
Note
TheThennolorSystem
is
designed for temperature
maintenance
only
and
typically
will
not provide sufficient
heal
lo
significantly raise
the
temperature
of
tonk contents.
When
installed
and
operated
in
accordance
with
these
instructions,
the
Thermolar
system
complies
with
National
Electrical
Code
article
427.
Failure
to
install
and
operate
this
system
in
accordance
with
the
manufacturer's
instructions
may
result
in
an
unsafe
condition
and
constitutes a
violation
of
the
system
warranty
and
voids
that
warranty.
Note
that
the
system
must
be
installed
on
a
branch
circuit
that
is
protected
by
a
fault
detector
that
is
suitable
for
equipment
protection.
PARTS
&
SPECIFICATIONS
PARTS -SUPPLIED
BY
CALOR/QUE
Cross
check
all
parts
with
the
System
Components
List
to
ensure
that
all
parts
are
included
and
in
good
condition
before
beginning
instal-
lation.
Quanti1ies
and/or
lengths
are
included
in
the
System
Components
List.
The
following
specifications
are
generic
to
the
Thermolar
system.
Complete
specifica1ions
for
the
par1icular system
being
installed
are
included
on
the
System
Components
List.
Included
with
the
control
unit
are
a strap
for
attaching
it
to
the
tank
and
two
remote
thermo-sensors
with
20
foot/6
m
leads.
Voltage:
THS-106:
THS-206:
120
Vac
240
Vac

CalorIQ.Je
Thermolar
hea1ing
elements
are
factory
assembled
with
an
integral
ground
shield,
adhesive
backing
and
moisture-proof
electrical connections.
Width:
Maximum
Temperature:
Lead Length:
PARTS -INSTALLER SUPPLIED
..,,.
11
inches/280
mm
Do
not
expose
any
Thermolar
heating
element
to
tempera-
tures
in
excess
of
l 80°F/82°C. See
pages
7
and
8
for
maximum
exposure
temperatures
of
standard
tank
types.
8
feet/3.5
m
Standard
grade
duct
tape
(or
equivalent)
rated
for
at
least
170"F/7
6°C.
,__Calle
Used
to
run
electrical
power
from
branch circuit
box
to
the
control
unit.
The
type
and
length
are
determined
by
local
code
and
individ-
ual
requiremen1s
of
the
installation.
,_
General
electrician's tools,
including
screwdriver,
linesmans
pliers,
wire
cutter/stripper, etc.
,_,,,__
Thermal
insulation
of
the
type
and
thickness
noted
on
the
System
Componen1s List
must
be
installed
on
the
tank
to
ensure
proper
and
safe opera1ion.
&
Do
not cut
or
otherwise
alter
the
Thennolor heat-
ing
elements
I

2
G,arif
Onnlnellf
,,,_diea
Fuse
or
circuit
breaker
rated
for
at
least
120%
of
1he system
amperage
rating.
,,_,,,,.,__
The
power
supply
must
include
a
fault
detector
suitable
for
equip-
ment
protec1ion. This
may
be
integral
wi1h
1he
overcurrent
protec-
tion.
INSTALLATION
Note
For best resuffs, insulate underneath
the
tonk
If
the
underside
will
not
be
oc.oessible ofter
installation
cl
the
Thermolorsy$fem, then in$foll insulation prior
lo
final placement
of
the
tonk. Insulating underneath
the
tonk
will
help ovoid excessive
heat
loss, reducing operat-
ing expense
and
the
risk
cl
damage
lo
sensitive contents.
CONTROL UNIT
1.
Determine
the
locution
of
the
control
unit.
•
II
the
control
unit
will
be
positionm
remotely
from
the
tonk,
skip
to
the
next
section,
Heating
Elements.
•
Attoching
the
control
un~
hmpororily
to
the
tonk
woll
ot
this
lime
will
oid
in
oligning
the
heoting
elements
so
thot
the
power
cords
will
reoch
the
controller.
•
lnstolling
the
control
unit
ot
4¥e
level
will
moke
completion
ond
operolion
eosier.
2.
Slide
the
strop
through
the
slots
providm
on
the
bock
of
the
control
unit.
3.
Run
the
strop
oround
the
tonk
ond
slip
the
free
end
into
the
budde.
4.
Pos~ion
the
box
obout
4
feet/1.2
m
from
the
bottom
of
the
tonk
ond
lighten
the
strop
to
hold
ii
in
ploce.

HEATING
ELEMENTS
Note
Do not install heating elements
when
the
oir
ond/or
tonk temperature is below
35°Fn°c. Below thistemperature
the
adhesive bocking initially moy
not
slick properly.
Once
the
healing elemenls hove
been
secured in place for
oJ
least
24
hours, tempera-
tures
ol
or
below
35
°F/2°C
will
nol adversely offed
the
adhesive.
1.
Altom
heoting
eltmmts
to
the
tonk
sidewoll
using
the
odhesive
bocking
provided.
Hold
the
elements
in
pos~ion
Ihm,
working
oround
the
tonk,
pe~
the
r~eose
poper
from
them
ond
press
light~
into
pos~ion.
Note
Press
the
elements lightly in place
ol
this time in
case
they
need
lo
be
reposi-
tioned later.
Note
The heating elements
ore
most effedive when placed
os
close
to
the
boltom
of
the
tonk
os
possible. Thiswill allow wormer material
to
flow upward, promoting
convedion rurrents ond
more
even internal healing.
2.
Repeot
step
l
lor
eoch
hmting
element.
Note
If
ony heating elements need
lo
be
moved,
do
so
before
the
adhesive
sets
up.
Aller o short time
the
heating elements con nol
be
removed without seriously
damaging them.
3.
Once
oll
of
the
elements
ore
in
ploce
proper~,
firmly
press
the
elmJmt/odhesive
into
ploce
securing
the
elmJmls
to
the
tonk.
4.
Seol
the
edges
of
eoch
elmJent
with
dud
lope.
This
will
ensure
thot
insulotion
does
not
come
between
the
~emenls
ond
the
tonk
woll
which
could
impede
heot
flow
into
the
tonk.
3
&~
Do
not install
..&
the
elements
'ID
~v~r mon:,voys,
'1
fillings, pipes,
ribs, channels, insulolion
or
anything
other
than
the
smoolh tonk wall itself.
Ensurethat
the
entire
element will
be
in smooth,
dired
oontod with
the
sur-
face d
the
tonk.
overlap
the
&~
Do
not fold
or
(."
heating ele-
ments

4
Note
a
Note

ELECTRICAL
CONNECTIONS
1.
Meosure
ond
record
the
resislonce
of
eoch
heoting
element.
Record
the
meosured
resislonces
on
the
lobel
on
the
bock
of
the
control
unit
foce
plote.
2.
Route
oll
wiring
to
the
control
unit
os
shown
in
the
following
figure.
5
&Metal tonks must
be
prop-
erly grounded before oper-
ating
the
system.
& ¾
~:::~:!:;
~~wires
over
healing elements. The 01/er-limil $en-
sor
wire
may
be
run over
the
healing
element
lo
which ii is attached, but
only for
the
shortest dist
once
possible.
Input Power
NOTE
When routing
the
wiring, include
the
small
"J"
curves
lo
the
lowest point
of
each wire.
This will help
lo
ensure
lhol any
waler
that penelroles
the
insulation
does
not reach
the
healing elements.
3.
Secure
oll
wiring
in
ploce
to
the
side
of
the
tonk
using
dud
lope.
4.
Conned
eoch
hmting
element
ond
the
thermo-sensors
to
the
oppropriote
terminol
connections
of
the
control
unit
occording
to
the
following
diogrom.
Note
Cut wires
lo
length,
os
necessary.
S.
Run
power
supply
coble
from
the
circuit
breoker
box
to
the
control
unit
ond
moke
the
connec-
tions
to
the
power
supply
connedors
inside
the
control
unit.
Note
Local
codes
may
require
the
U$e
of
on intermediary jundion/switch box.
ffi
Some thermo-sensors
cables may include o
ground wire.
Do
not con-
ned
lhermo-.
sensor
ground
wires
lo
the
common line voltage
ground.
&Milke
sure
that power is
turned off before working
with
the
input power coble.
&~
Do
not tum on
~
power
lo
the
ii
11
system unless
"!
'I
there
is con-
6.
Altom
remote
olorms,
a
opplicoble,
lo
the
remote
olorm
reloy
points
(shown
on
the
wiring
tents
in
the
tonk
diogrom
on
the
nB(f
poge).
• Two
alarm
relays
are
provided
that
operate
in
the
event
that
either
tempera1ure set
for
over-limit
or
low-limit
is
reached.
•
Note
that
the
alarm
relays
do
not
generate
an
alarm
signal.
External
power
for
the
alarms
must
be
provided.
• Each
relay
terminal
offers
the
option
of
a
normally
open
(NO)
or
normally
closed (NC) switch.
Do
not
use
both
set-
tings
for
the
same
relay
terminal.

6 1
8888
)
Over Limit Sensor
rInput Power
Maintenance Sensor
INSULATION
Insulate
the
tank
using
the
type
and
thickness
insula1ion
indicated
on
the
System
Component
List. This
insulation
factor
has
been
used
to
calculate
the
heating
load
required
by
the
system: using less
insu-
lation
may
result
in
contents
damage.
Note
Make
sure
that
the
control unit cover issecurely in plooe before insulation is applied
lo
the
tonk
lo
ensure
that
no
insulation
gets
into
the
oonlrol
una
itself.
Note
If
using blown-on insulation, creole o dam
around
the
control unit cover
lo
ensure
that
a
may
be
removed
to
allow for progmmming
and
the
indicator lights
to
be
seen.
OPEUTI0N
PROGRAMMING
The
programmable
controller
provides
four
different
user-settable
parameters
Maintenance
Temperature:
Differential:
Over-Limit
Temperature:
Low-Limit
Temperature:
The
desired
conten1s
temperature.
The precision
of
temperature
control.
The
highest
temperature
that
the
heating
elemen1s,
the
tank
conten1s
or
the
tank
i1self
should
reach.
The
lowest
allowable
contents
temperature.

[
8.8.8.8
.]
0 0 0
:-)
Jf
"
Jl
H H
Heater
Circuits Active
0
ltii!nH..attr
Rd,y
•
3+1
!
·);
t?sl
I
I=+
~bdel:( 1
Tank
Temperature
Maintenance
System
.._
__
_,
CAUTION
U-1c
jnc
Vott~c
Conductcr::
Arc
E:cp:iccd
\A/her
n-e
racep1Me
lsf1em:inc ' /
The
over-limit
and
low-limit
temperatures
are
used
in
conjunction
with
the
on-board
indicator
lights
and/or
remote
alarms
to
indicate
a
fault
situation.
If
the
over-limit
temperature
is
reached,
power
to
all
elements
will
be
shut
off.
Note
The c.ontrol unit
will
normally
be
preprogrammed with
the
temperaturesspecified
when
the
system
was
ordered. Before operating
the
system, confirm
the
temperature
programming.
To
set
temperatures:
1.
Press
the
Scroll
button
one
or
more
times
until
the
desired
lundion
setting
LED
ism.
The
LCD
disploy
now
indicotes
the
current
fund
ion
setting.
2.
Use
the
.6.
ond
"Y
buttons
to
set
the
temperoture
higher
or
lowe-
thon
the
currmt
setting.
See
the
following
se:tion,
Operating
Temperatures,
for
o
list
of
occeptoble
te-nperotures.
Note
Set
the
over-lima temperature at least l O'F/5°C higher
than
the
maintenance
ternperature.
3.
Press
the
Scroll
button
one
or
more
limes
to
e~her
highlight
onother
fund
ion
or
until
oll
lunc-
lion
lights
ore
out,
which
returns
the
control
unit
to
ope-oting
mode.
MAXIMUM
OPERATING
TEMPERATURES
Metal
Tanks
Maintenance
Temperature:
Over
Limit
Temperature:
Low
Limit
Temperature:
Crosslinked
Jl'ofyefflyfene
Tanks
Maintenance
Temperature:
Over
Limit
Temperature:
Low
Limit
Temperature:
up
to
160"F/70°C
up
to
170"F/75°C
up
to
155°F/65°C
up
to
130"F/55°C
up
to
140"F/60°C
up
to
125°F/50°C
7
ffi
When programming
the
oontrol
una
is complete,
ensure that all fundion
lights
ore
out. When
the
system is
in
programming
mode
(when
one
of
the
fundion lights islij)
the
heating elements
will
still
operate
but
there
is o possibility that
the
program-
ming may
be
changed inadvertently.
&~
~:~::::~d
(.'
lures
noted at
left.
Temperature settings above
those
listed
may
result
in
damage
lo
the
Thermolor
system,
the
tonk ond/o.-
the
tonk con-
tents.
&
~
Ensure that
the
t temperature
of
ll
the
contents
~
'I
being
loaded
into o tonk
does
not exceed
the
maxi-
mum temperature setting
os
noted at
left.

8
MAXIMUM
OPERATING
TEMPERATURES
(continued)
linear
Polyethylene
Tanks
Maintenance
Temperature:
Over
Limit
Temperature:
Low
Limit
Temperature:
OPERATION
up
to
120'F/50°C
up
to
130'F/55°C
up
to
115°F/45°C
Under
normal
operating
condi1ions,
no
adjustment
is necessary.
It
is
suggested
that
the
liquid
level
within
the
tank
be
maintained
to
at
least
the
level
of
the
highest
hea1ing
element.
This
will
ensure
that
each
heating
element
is
operating
at
its
peak
efficiency.
TEMPERATURE
ALARMS
User
intervention
may
be
required
if
either
the
over-limit
or
low-limit
alarm
lights
are
illuminated
or
if
remote
alarms
(if
installed)
are
ac1i-
vated.
Under
these circumstances, check
for
the
following
indica-
tions:
Note
In
normal operation,
the
over-limit temperature alarm
and
relay
may
occasionally
be
adivotecl
If
the
over-limit alarm
and
relay remain
on
for more
than
5 minutes
at
a
time remedial
adion
should
be
followed.
• Does
the
system
or
exterior
of
the
tank
look
damaged
in
any
way?
Determine
the
extent
of
the
damage
and
contact CalorJQ.Je
technical
support
at
(508)
291-4224
for
possible correc1ive
action.
•
Are
the
hea1ing
elements
damaged?
To
determine
if
the
elements
have
been
damaged:
1.
Remove
the
~stem
from
power.
2.
Disconnect
mch
heoting
element
from
the
terminol
strip
in
the
control
unit.
3.
II
possible,
visuol~
inspect
eoch
element
for
obvious
domoge.
4.
Using
on
ocwrote
ohm
or
multimeter,
determine
the
resistom:e
of
eoch
element.
These
rmdings
should
be
bttween
the
following
(
depending
on
vohoge):

15&10
high
resistonce
(120
volt
elemmts)
=
-------
roted
heot
output
in
wotts
13680
low
resistonce
(120
volt
elements)
roted
heot
output
in
wotts
63360
high
resistonce
(240
volt
elemmts)
=
-------
roted
heot
output
in
wotts
54720
low
resistonce
(240
volt
elements)
=
-------
roted
heot
output
in
wotts
The
numb11
of
wotts
is
givm
on
the
System
Components
List.
If
the
resistonce
1111ding
does
not
foll
within
the
obove
numbers,
contod
ColorIQue
techni-
col
support
of
(
SOB)
291-4
224
for
remedies.
• Is
the
input
voltage
to
the
heating
elemen1s correct?
•
The
design
voltage
is
clearly
marked
on
the
faceplate
of
the
control
unit.
Opera1ing hea1ing
elements
at
greater
than
their
design
voltage
can cause
overheating
of
the
elements
and
tank
conten1s. Opera1ing
elements
at
lower
than
their
design
voltage
may
result
in
insufficient
heat
output
to
properly
maintain
contents
temperafure.
•
If
1he
input
voltage
is
not
correct:
disconnect
the
system
from
power
and
contact
CalorIQue
technical support.
• Is
there
material
in
1he
tank?
• An emp1y
tank,
or
a
tank
with
a contents level
below
the
level
of
the
hea1ing
elements
will,
in
a
short
time,
result
in
an
over-temperature
situation.
•
If
no:
either
fill
the
tank
or
shut
off
the
heating
system
until
the
tank
has
been
filled.
•
If
yes:
check
to
see
if
1he
material
is
thick
and
sludge-like.
If
it
is,
then
mechanical
agitation
(mixing)
may
be
required
to
ensure
that
heat
is
evenly
distributed
through
the
contents.
If
1he
material
has
a
low
viscosi1y
0ike
water),
proceed
to
the
next
1roubleshooting
ques1ion.
• Is each
heating
element
operating?
Check
the
Heater
Circuits
Ac1ive
indicator
ligh1s.
When
the
Main
Heater
Relay
light
is
illuminated,
each
heater
circuit
light
should
also
be
lit
(unless
there
is
no
heating
element
attached
to
the
par1icular circuit). Ensure
that
any
non-operating
element
is
cor-
rec1ly
wired
into
1he con1rol
unit.
If
it
is
(1hey are):
contact
CalorIQue
technical support.
•
If
the
above
remedies
do
not
fix
the
problem,
call
CalorIQue
technical
support
at
(508) 291-4224
for
addi1ional
help.
9

Calor/Que
Ltd.
2380
Cranberry Highway
West Wareham,
MA
02576,
USA
(508)
291-4224
• (508)
291-2299
fax
Copyright © 1997
-2000
CalorJQue, Ltd.
All Rights
Reserved.
Printed in
USA
CM2001
-
2000-12
This manual suits for next models
1
Table of contents
Other CALORIQUE Controllers manuals
Popular Controllers manuals by other brands

Mitsubishi Electric
Mitsubishi Electric MELSEC iQ-R Series Module function block reference

Linear
Linear ADI Power DC2654A manual

Mitsubishi Electric
Mitsubishi Electric NZ2GF-CCB user manual

Samson
Samson TROVIS 5400 Mounting and operating instructions

ThinkFlood
ThinkFlood RedEye Pro quick start guide

Novy
Novy 906.270 installation instructions