CAMBRIDGE EDGE NQ User manual

1
EDGE NQ Network Player
Manual Generated: 28/09/2022 - 16:51

2
目录
EDGE NQ Network Player 3 ..................................................................................................................................................................................................................
Introduction 4 .......................................................................................................................................................................................................................................
What’s included with the EDGE NQ? 5 .................................................................................................................................................................................................
Front Panel Controls 6 ..........................................................................................................................................................................................................................
Display 7 ................................................................................................................................................................................................................................................
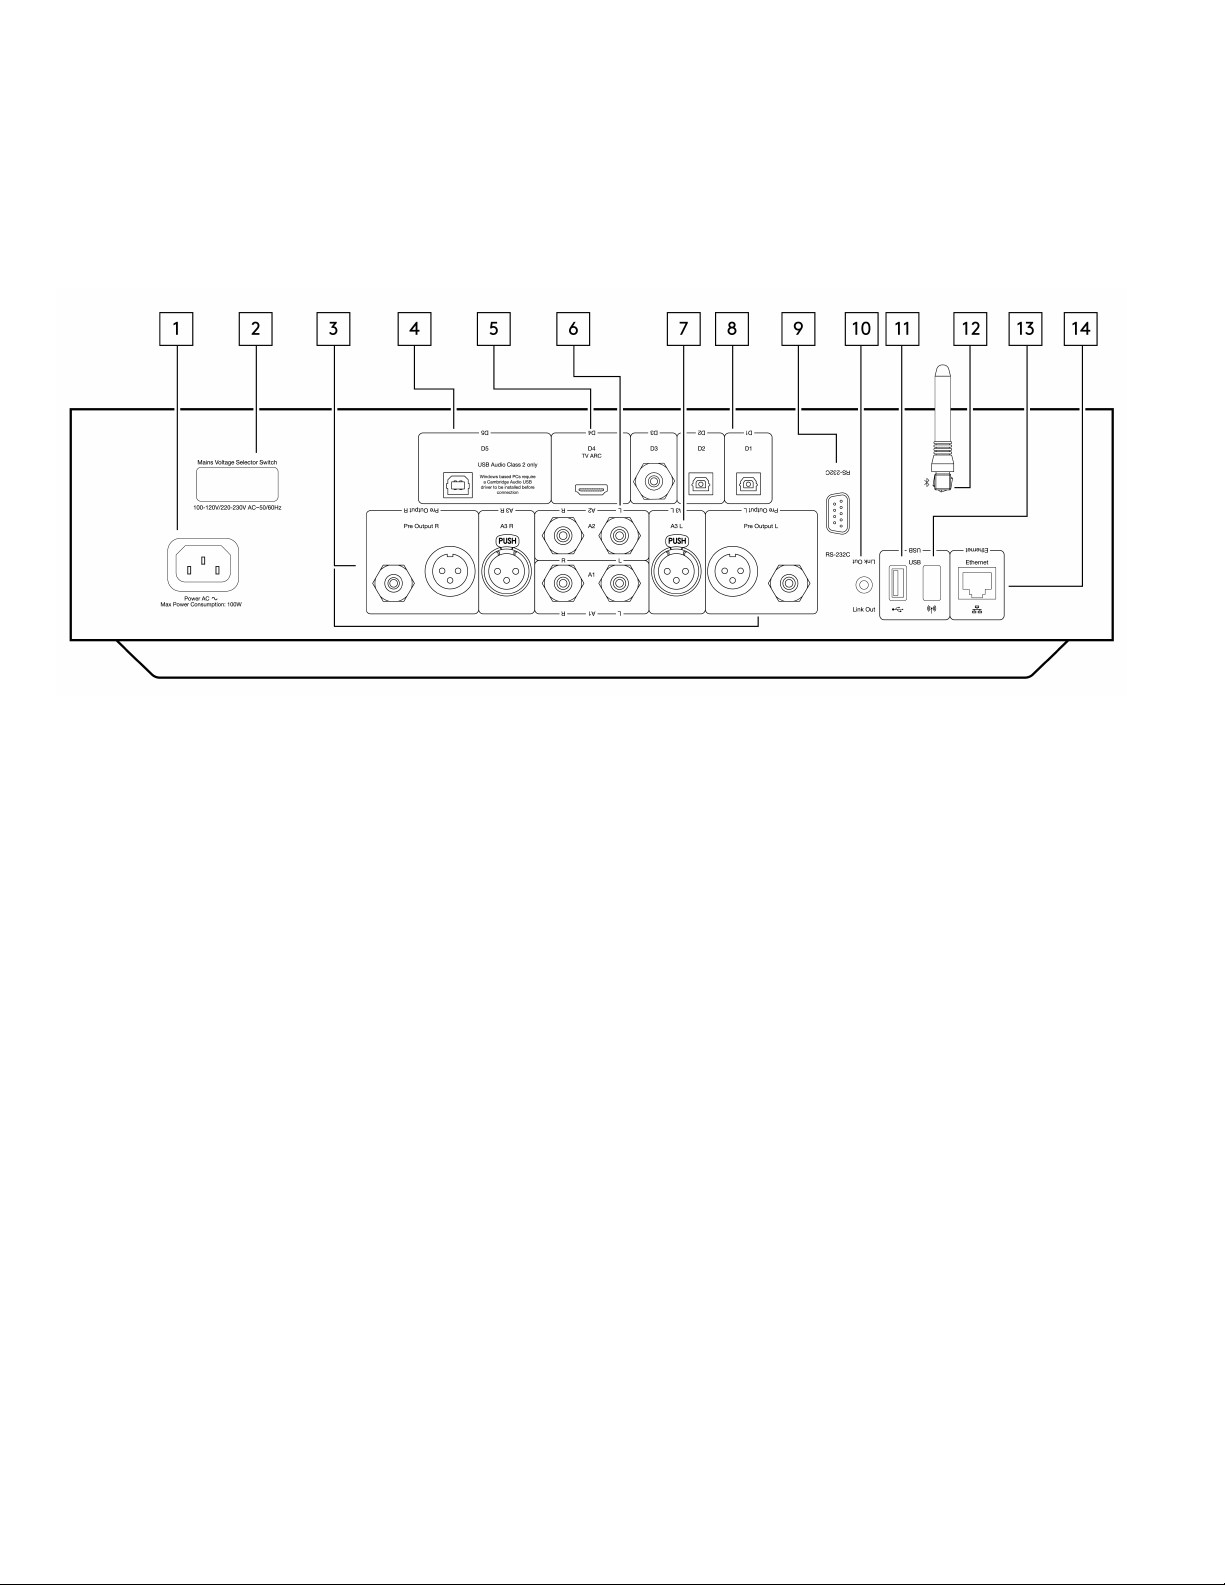
Rear Panel Connections 8 ....................................................................................................................................................................................................................
Remote Control 10 ...............................................................................................................................................................................................................................
Getting Connected 11 ...........................................................................................................................................................................................................................
StreamMagic App 13 ............................................................................................................................................................................................................................
Connecting to Wi-Fi 14 .........................................................................................................................................................................................................................
Built-in Streaming Services 16 .............................................................................................................................................................................................................
AirPlay 2 18 ...........................................................................................................................................................................................................................................
Chromecast 19 ......................................................................................................................................................................................................................................
Internet Radio 20 ..................................................................................................................................................................................................................................
Bluetooth 21 .........................................................................................................................................................................................................................................
USB Audio 22 ........................................................................................................................................................................................................................................
USB Media 26 ........................................................................................................................................................................................................................................
Streaming Your Local Digital Music Collection 27 ...............................................................................................................................................................................
Settings 28 ............................................................................................................................................................................................................................................
Technical Specification 30 ....................................................................................................................................................................................................................
Source Quality Matrix 32 ......................................................................................................................................................................................................................
Troubleshooting 33 ..............................................................................................................................................................................................................................

3
EDGE NQ Network Player
Last updated: 九月 2, 2022 12:52. Revision #5822
Users Manual

4
Introduction
Last updated: 九月 2, 2022 12:51. Revision #5800
This guide is designed to make installing and using this product as easy as possible. Information in this document has been carefully checked for accuracy
at the time of printing; however, Cambridge Audio’s policy is one of continuous improvement, therefore design and specifications are subject to change
without prior notice.
This document contains proprietary information protected by copyright. All rights reserved. No part of this manual may be reproduced by any mechanical,
electronic or other means, in any form, without prior written permission of the manufacturer. All trademarks and registered trademarks are the property
of their respective owners.
© Copyright Cambridge Audio Ltd 2022.
Qualcomm is a trademark of Qualcomm Incorporated, registered in the United States and other countries, used with permission. aptX is a trademark of
Qualcomm Technologies International, Ltd., registered in the United States and other countries, used with permission.
Qualcomm aptX is a product of Qualcomm Technologies International, Ltd.
The Bluetooth® word mark and logos are registered trademarks owned by the Bluetooth SIG, Inc. and any use of such marks by Audio Partnership Plc is
under license. Other trademarks and trade names are those of their respective owners.
For upcoming news on future products, software updates and exclusive offers, make sure you register your product
at https://www.cambridgeaudio.com/register

5
What’s included with the EDGE NQ?
Last updated: 九月 2, 2022 12:51. Revision #5801
Inside the box of your EDGE NQ you will receive:
1) Edge NQ Network Player
2) User Manual
3) 3 x AAA Batteries
4) Remote Control
5) Power Cable
6) Link Cable
7) Wi-Fi Dongle
8) Bluetooth Antenna

6
Front Panel Controls
Last updated: 九月 2, 2022 12:51. Revision #5802
1. Standby/On
Switches the unit between Standby Mode (indicated by dim power LED) and On (indicated by bright power LED). Standby Mode is a low power mode (0.5
Watts). The unit should be left in Standby Mode when not in use.
2. Headphones
For suitable headphones – connection will automatically mute the pre-out. Headphones with an impedance of between 8 and 600 Ohm's are
recommended.
3. Display
4. Infrared sensor
To enable IR sensor commands from the remote control.
5. Volume/Source Selector
To change the volume, rotate the front part.
To select a source, rotate the back part.

7
Display
Last updated: 九月 2, 2022 12:51. Revision #5803
1. Current Source
Shows the icon of the current source.
2. Source Indication
Indicates the current source in use.
3. Icons
Indicates Firmware Update Notifications, Headphones in use, USB Media in use and Network Connection.
Note: The Edge NQ will automatically display a notification when it is connected to a network and new firmware is available. To update the firmware, use
the StreamMagic app.

8
Rear Panel Connections
Last updated: 九月 2, 2022 12:51. Revision #5804
1. AC Power Socket
Once you have completed all connections to the amplifier, plug the AC power cable into an appropriate mains socket then switch on.
2. Voltage Selector Switch
Note: For use by Cambridge Audio service personnel only.
3. Pre Output (R and L)
Line Output (fixed or variable) used to provide a signal to another amplifier or a recording device.
4. USB Audio In (D5)
A USB B type socket to enable the playback of audio from a computer running either Microsoft Windows or Apple Mac OS X operating systems. Some
builds of Linux are also suitable.
Note: Class 2 USB Audio only. Windows based PC’s require a Cambridge Audio USB driver to be installed before connection.
5. Audio Return Channel (ARC) (D4)
For connection from a TV that supports ARC function.
6. Unbalanced RCA (A1 and A2 – L and R)
For use with unbalanced RCA connections.
7. Balanced XLR (A3 – L and R)
For use with balanced XLR connections. The balanced connection is the higher quality option and can reject noise and interference in the cable when used
with other equipment that supports this function.
8. Digital Inputs (D1, D2 and D3)
TOSLINK (x2) and S/P DIF co-axial digital inputs.
Coaxial – Use a high quality 75 ohm digital RCA Phono interconnect cable (not one designed for normal audio use). This input is suitable for 16-24 bit
content up to 192kHz.

9
TOSLINK Optical – Use a high quality TOSLINK fibre optic interconnect cable designed specifically for audio use. This input is suitable for 16-24 bit content
up to 96kHz (TOSLINK is not recommended at 192kHz sampling rates).
9. RS232
Note: For use by Cambridge Audio service personnel only.
10. Control Bus
Jack sockets used to send and receive power and volume commands from other connected Edge Series products. For more information on the Edge Link,
see Link section.
11. USB Media
For use with local media storage.
12. Bluetooth Antenna
Used for wireless streaming Bluetooth audio directly from most phones, tablets and laptops. For more information on the Bluetooth, see Bluetooth
section.
13. USB Wi-Fi
Connect the supplied Wi-Fi dongle to the correct USB input on the rear of Edge NQ – it will need to be within range of your wireless router.
Important Note: Do not connect/disconnect the Wi-Fi dongle when the unit is on.
14. Ethernet
Use to connect the Edge NQ directly to a Wi-Fi router.

10
Remote Control
Last updated: 九月 2, 2022 12:51. Revision #5805
1. Standby/On
Switches the EDGE NQ between On and Standby mode.
2. Volume
Volume level adjustment.
3. Skip
Skips between previous and next tracks.
4. Play/Pause and Mute/Unmute
Play or Pause current track.
Press to mute or unmute the loudspeakers, pre-out, sub, and the headphone outputs.
Note: This remote function is source dependent. Where possible the source will be paused and for other sources the
output will be muted.
5. Source Selection
Used to navigate between the various sources on the player.
6. Programable Buttons
Press and hold to store the current source and its volume level.
Note: If the remote control will not function, please check that the batteries have not expired, and that there is nothing
blocking the front panel IR receiver.

11
Getting Connected
Last updated: 九月 2, 2022 12:51. Revision #5806
Basic Analogue Connections
Important Note: Switch the power off before making any connections.
There are two analogue connection options for the EDGE NQ. Please see below for diagrams on how to make either a balanced or unbalanced connection
from your Edge NQ to an EDGE W.
Using either of these analogue connections will utilise the high-quality DAC within the EDGE NQ.
1. Unbalanced Audio Connection (RCA)
Important Note: If using RCA cables, please ensure to select the ‘Unbalanced’ switch on the EDGE W.
2. Balanced Audio Connection (XLR)
Balanced connections in an audio system are designed to reject electrical noise, from power wiring etc, as well as the effects of noise currents flowing
through ground connections. The basic principle of balanced interconnection is to get the signal you want by subtraction, using a three-wire connection.
One signal wire (the hot or in-phase) carries the normal signal, while other (the cold or phase-inverted) carries an inverted version. The balanced input
senses the difference between the two lines to give the wanted signal. Any noise voltages that appear identically on both lines (these are called common-
mode signals) are cancelled by the subtraction.
Important Note: If using XLR cables, please ensure to select the ‘Balanced’ switch on the EDGE W.

12
Edge Link
Edge Link allows Edge series products to synchronise when powering up the units. See the following diagrams when connecting the EDGE NQ using the
provided Link cable.
EDGE NQ with EDGE W (via StreamMagic app)
When using the app to turn the EDGE NQ on/off, this will also turn the EDGE W on/off.

13
StreamMagic App
Last updated: 九月 2, 2022 12:51. Revision #5807
The EDGE NQ allows you to stream music from many different sources both on your home network and from the internet.
To set up your player, please first download the StreamMagic app from the Apple app store or Google Play store.
Note: The StreamMagic app is only available for iOS and Android mobile devices such as smartphones and tablets. It is not available on PC or Mac.
Once your player is connected to your home network you'll have full control of your sources, including internet radio, streaming services, network and
USB drives and more via the StreamMagic app.
For more information on our StreamMagic app, please visit: https://www.cambridgeaudio.com/streammagic

14
Connecting to Wi-Fi
Last updated: 九月 2, 2022 12:51. Revision #5808
Important Note: It is vitally important that your EDGE NQ remains connected to a Wi-Fi network as often as possible. This will ensure that the unit is
regularly updated to meet essential security protocols, third party compatibility and the latest software requirements.
Failure to maintain your device with regular firmware updates as provided by Cambridge Audio will void the product warranty and is likely to cause major
issues to the unit in time. Please ensure that your unit is updated to the most current firmware version. Information on the latest firmware version for the
Edge NQ can be found here.
Note: The Edge NQ is not compatible with captive portal networks. It is also essential that the EDGE NQ runs on a 2.4GHz band on your router. Where
possible, avoid the use of powerline adapters, Wi-Fi signal boosters/extenders as these can disrupt the reliability of the network connection.
Connecting to a Wired Network
1. Connect a network cable (Category 5/5E straight-through Ethernet cable) between the EDGE NQ and your router.
2. Your EDGE NQ will now automatically connect to the network.
Connecting to a Wireless Network (iOS)
Important note: Do not plug/unplug the wireless dongle when the unit is on.
1. Ensure that your EDGE NQ is in range of your wireless router, and then power on your unit.
2. On an iOS device go to Wi-Fi settings and under ‘SETUP NEW AIRPLAY SPEAKER’ select 'Edge NQ (ef)’.
3. Once connected, to complete unit setup download and install the StreamMagic app from the Apple App store.

15
Connecting to a Wireless Network (Android)
Important note: Do not plug/unplug the wireless dongle when the unit is on.
1. Before attempting to connect your EDGE NQ to your wireless network, download and install the StreamMagic app from the Google Play store.
2. Ensure that your EDGE NQ is in range of your wireless router, and then power on your unit.
3. On an Android device, open the StreamMagic app and on the Home tab select CONNECT.
4. Under Choose a device select SET UP A NEW DEVICE, and choose Edge NQ as your product to setup.
5. Under the Set up your Edge NQ, choose WIRELSS CONNECTION and then CONTINUE.
6. Your Android device will now show all available Wi-Fi devices in range. Select Setup:Edge NQ (eb).
7. Once connected, you will be prompted to enter your Wi-Fi network password. Enter the password and select CONTINUE.
8. Your EDGE NQ will now connect to your Wi-Fi network, this may take up to a minute.
9. Once connected, complete initial setup of your unit within the StreamMagic app.

16
Built-in Streaming Services
Last updated: 九月 2, 2022 12:51. Revision #5809
The EDGE NQ has the following built-in streaming services:
Spotify Connect
TIDAL
Qobuz
Note: It is essential that the device you are streaming from (smartphone, tablet, computer, etc.) is on the same Wi-Fi network as the network player to
ensure that the units can communicate with each other.
Spotify Connect
1. Open the Spotify app and choose the playlist, album, song, etc. that you wish to stream to player.
2. Select the devices icon within Spotify and select your Cambridge Audio network player from the list of ‘Listening On’ devices.
3. Spotify Connect should now be streaming your chosen content to the player.
TIDAL (Connect)
1. Open the TIDAL app and choose the playlist, album, song, etc. that you wish to stream to player.
2. Select the Sound Output devices icon within TIDAL and select your Cambridge Audio network player from the list.
3. TIDAL Connect should now be streaming your chosen content to the player.
TIDAL (via StreamMagic)
1. Open the StreamMagic app and navigate to the Library tab, and then select TIDAL.
Note: Please ensure that you sign into your TIDAL account when prompted to do so. This will only be required on the first instance of use to link the
account to the StreamMagic app.
2. Choose the playlist, album, song, etc. that you wish to stream to player.
3. TIDAL should now be streaming your chosen content to the player.
Note: You may also add TIDAL content to your StreamMagic playing queue by selecting the three elliptical dots next to the content and selecting ‘Add to
queue’.

17
Qobuz (via Chromecast)
1. Open the Qobuz app and choose the playlist, album, song, etc. that you wish to stream to player.
2. Select the output devices icon within Qobuz and select the Cambridge Audio network player from the list.
3. Qobuz should now be casting your chosen content to the player.
Qobuz (via StreamMagic)
1. Open the StreamMagic app and navigate to the Library tab, and then select Qobuz.
Note: Please ensure that you sign into your Qobuz account when prompted to do so. This will only be required on the first instance of use to link the
account to the StreamMagic app.
2. Choose the playlist, album, song, etc. that you wish to stream to player.
3. Qobuz should now be streaming your chosen content to the player.
Note: You may also add Qobuz content to your StreamMagic playing queue by selecting the three elliptical dots next to the content and selecting ‘Add to
queue’.

18
AirPlay 2
Last updated: 九月 2, 2022 12:51. Revision #5810
AirPlay from iPhone or iPad
1. Ensure your player is connected to your network.
2. Open the app that you want to AirPlay from.
3. Select or .
4. Select your player as your AirPlay device.
Note: This product supports AirPlay 2 and requires your mobile device to be running iOS 11.4 or later.
Apple and AirPlay are trademarks of Apple Inc., registered in the U.S. and other countries.
Use of the Works with Apple badge means that an accessory has been designed to work specifically with the technology identified in the badge and has
been certified by the developer to meet Apple performance standards.

19
Chromecast
Last updated: 九月 2, 2022 12:51. Revision #5811
Cast from Android Phone or Tablet
1. Ensure your player is connected to your network.
2. Open the app that you want to Cast from.
3. Select .
4. Select your player as your Chromecast device.
Note: Currently Chromecast Audio only supports audio apps. Therefore, you will not be able to cast YouTube to your speakers. However, YouTube Music is
fully supported over Chromecast.
Android, Google Play and the Chromecast built-in logo are trademarks of Google Inc.

20
Internet Radio
Last updated: 九月 2, 2022 12:51. Revision #5812
You can assign up to 99 of your favourite Internet Radio stations to presets on your player, which can then be recalled using the StreamMagic app or
remote control (programmable buttons 1-4).
To search and assign a preset:
1. Within the StreamMagic app navigate to the Radio tab.
2. Use the Search for Radio search tab at the top of the page or enter a Custom URL link by selecting URL.
Note: Please ensure that the custom URL stream is one of the following supported file types: ALAC, WAV, FLAC, AIFF, DSF and DFF containing DSD64 at
2.8224 MHz or DSD128 at 5.6448 MHz, WMA, MP3, AAC, HE AAC, AAC+ and OGG Vorbis.
3. Once you have located the station you wish to store, select and you will be prompted with the option to Play now or Add to presets.
4. Add station to the desired preset for your player between 1-99.
5. You will then receive confirmation that the station is saved to the chosen preset.
To remove a preset:
1. Within the StreamMagic app navigate to the Home tab.
2. Scroll to the bottom of the page where you find your players Presets, and select EDIT.
3. To remove station from preset, tap the icon and then press Delete.
Table of contents
Other CAMBRIDGE Media Player manuals