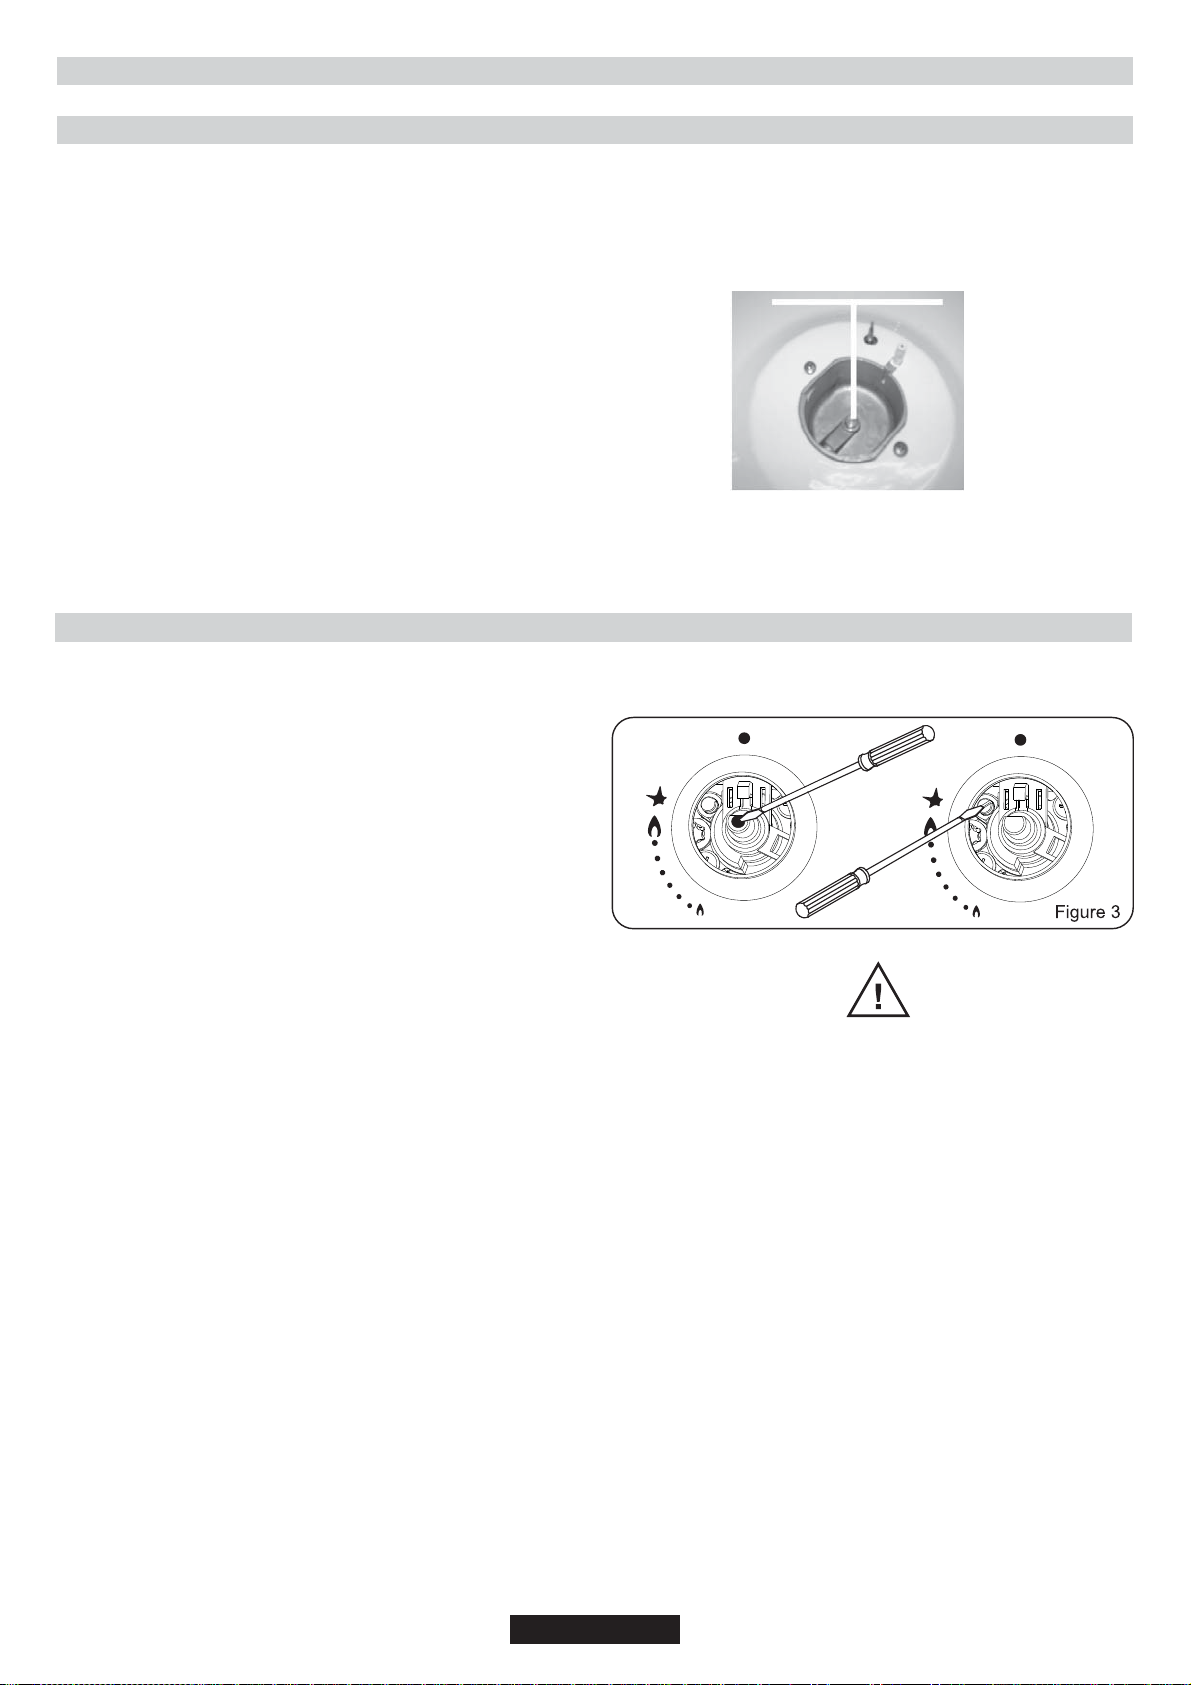
Candy TRIO TRI 5S Operation manual

PROPERTY OF
CL N° REV. DATE
SPECIFICATION
1/1
MODIFY DESCRIPTION
MODIFIED BY
BASE CODE
TREATMENT
MATERIAL
DATE SIGNATURE
DRAWN
CHECKED
FOR
WEIGHT SCALE
SIZE
NAME
PART CODE SHEET
REPLACE No ORIGIN CL No Class Specification
FR
35
RELEASE LEVEL
WITHOUT OUR WRITTEN CONSENT IS FORBIDDEN
ALL RIGHTS RESERVED, THE REPRODUCTION OF ANY PART
OF EU DIRECTIVE 2002/95/CE + AMENDMENTS
MATERIALS IN COMPLIANCE WITH REQUIREMENTS
A4 ------------
08.10.2018
CL 50389
08.10.2018
C.FİDANCI
A.KARADUMAN UM TRIO FR/NL/IT/GB/E/D
CANDY
GENERAL TOLERANCE
ISO 2768 - m
-
-
SC 000-000
PRODUCTION RELEASED
------------
-
A
B
C
D
E
4 4 0 0 7 2 8 3

ES
GB
INSTRUCTIONS FOR USE AND INSTALLATION
FR
IT
DE
NL
INSTRUCTIES VOOR GEBRUIK EN INSTALLATIE
ISTRUZIONI D'USO E DI INSTALLAZIONE
NOTICE D'EMPLOI ET D'INSTALLATION
MANUAL DE INSTRUCCIONES
GEBRAUCHS- UND INSTALLATIONSANWEISUNGEN
USINES DE ROSIÈRES - 30, rue Y. LACELLE - Rosières - 18400 - Lunery - France


SAFETY INSTRUCTIONS
03 GB
•During cooking, moisture may condense inside the oven cavity or on the glass of the door. This is a normal
condition. To reduce this effect, wait 10-15 minutes after turning on the power before putting food inside the
oven. In any case, the condensation disappears when the oven reaches the cooking temperature.
•Cook the vegetables in a container with a lid instead of an open tray.
•Avoid leaving food inside the oven after cooking for more than 15/20 minutes.
• Children under 8 Year of age must be kept away from the appliance unless they are continuously supervised.
•
This appliance can be used by children aged from 8 years and above and persons with reduced physical,
sensory or mental capabilities or lack of experience and knowledge if they have been given supervision or
instruction concerning use of the appliance in a safe way and understand the hazards involved.
•
Children must not play with the appliance.
•
This appliances is intended to be used in household and similar applications such as:
- staff kitchen areas in shops, offices and other working environments;
-farm houses;
- by clients in hotels, motels and other residential type environments;
- bed and breakfast type environments.
A different use of this appliance from household environment or from typical housekeeping functions, as
commercial use by expert or trained users, is excluded even in the above applications.
If the appliance is used in a manner inconsistent with this it may reduce the life of the appliance and may
void the manufacturer’s warranty.
Any damage to the appliance or other damage or loss arising through use that is not consistent with domestic or
household use (even if located in a domestic or household environment) shall not be accepted by the
manufacturer to the fullest extent permitted by law.
• The door should not be left in the open position since this could present a potential hazard ( es. tripping).
•WARNING !
Knives and other utensils with sharp points must be loaded in the basket with their points down or placed in
a horizontal position.
•When the appliance is located on a carpet floor,attention must be paid to ensure that there is no obstruction to
the bottom vents.
Make sure that the plug on the appliance remains accessible after installation.
• The appliance must be connected to the water mains using new hose-sets.
The old hose-sets should not be reused.
• Water pressure must be between 0,08 MPa and 0,8 MPa. If the pressure is below the minimum consult
our service department for advice.
• Before connecting the appliance to the mains supply it is important to ensure:
1. that the supply socket is properly earthed;
2. that your electricity supply is capable of meeting the consumption requirements listed on the rating plate of
your appliance.
• WARNING!
Ensure that your product is properly earthed.
In the absence of adequate earthing you will notice that when touching the metal parts of your appliance
an electrical dispersion can be felt, due to the presence of a radio interference suppressor.
• Manufacturer declines all responsibility for any damage due to non-earthing of the machine.
• Ensure that the dishwasher does not crush power cables.
• Do not remove the plug from the mains supply socket by pulling the mains cable or the machine itself.
• In general it is not advisable to use adaptors, multiple plugs and/or extension cables.
• Never touch the appliance when your hands or feet are wet or damp.
• Do not use when your feet are bare.
• Do not leave the appliance exposed to the elements (rain, sun etc).
• Leaning or sitting on the open door of the dishwasher could cause it to tip over.
•If the appliance breaks down or stops working properly, switch it off, turn off the water supply and do not
tamper with it.
Repair work should only be carried out by an approved service agent and only genuine spare parts should
be fitted. Any failure to follow the above advice may have serious consequences for the safety of the
appliance.
• Water left in the machine or on the dishes at the end of the wash programme should not be swallowed.
• The dishwasher is designed for normal kitchen utensils.

SAFETY INSTRUCTIONS
04 GB
Objects that have been contamined by petrol, paint, traces of steel or iron, corrosive chemicals, acids or
alkalis must not be washed in the dishwasher.
• WARNING: The appliance and its accessible parts become hot during use. Care should be taken to avoid
touching heating elements.
• Cleaning and user maintenance shall not be made by children without supervision
• WARNING: Unattended cooking on a hob with fat or oil can be dangerous and may result in fire.
• NEVER try to extinguish a fire with water, but switch off the appliance and then cover flame e.g. with a lid
or a fire blanket.
• WARNING: Danger of fire: do not store items on the cooking surfaces.
• WARNING: If the surface is cracked, switch off the appliance to avoid the possibility of electric shock.
• During use the appliance becomes hot. Care should be taken to avoid touching h eating elements inside
the oven.
• WARNING:Accessible parts may become hot during use. Young children must be kept away.
• Do not use harsh abrasive cleaners or sharp metal scrapers to clean the oven door glass since they can
scratch the surface, which may result in shattering of the glass.
• The oven must be switched off before removing the guard, after cleaning, the
guard must be replaced in accordance with the instructions.
• Only use the temperature probe recommended for this oven.
• Do not use a steam cleaner for cleaning operations.
•Any spillage should be removed from the lid before opening.
• The hob surface must be allowed to cool down before closing the lid.
• If present, do not to stare into halogen lamp hob elements.
• WARNING:Avoid possibility of electric shock - ensure the appliance is switched off before replacing the
lamp.
• If the range is placed on a base, measures must to be taken to prevent the appliance slipping off the base.
• The means for disconnection must be incorporated in the fixed wiring in accordance with the wiring rules.
• If the supply cord is damaged, it must be replaced by the manufacturer,its service agent or similarly
qualified persons in order to avoid a hazard.
• CAUTION: In order to avoid a hazard due to inadvertent resetting of the thermal cutout, this appliance
must not be supplied through an external switching device, such as a timer,or connected to a circuit that
is regularly switched on and off by the utility.
•The new hose-sets supplied with the appliance must to be used and the old hose-sets to be discarded.
• This appliance must be installed in accordance with the regulations in force and only used in a well
ventilated space. Read the instructions before installing or using this appliance.
• "These instructions are only valid if the country symbol appears on the appliance. If the symbol does not
appear on the appliance, it is necessary to refer to the technical instructions which will provide the necessary
instructions concerning modification of the appliance to the conditions of use of the country".
• "prior to installation, ensure that the local distribution conditions (nature of the gas and gas pressure) and
the adjustment of the appliance are compatible";
• "the adjustment conditions for this appliance are stated on the label (or data plate)";
• "this appliance is not connected to a combustion products evacuation device. It shall be installed and
connected in accordance with current installation regulations. Particular attention shall be given to the
relevant requirements regarding ventilation".
• The use of a gas cooking appliance results in the production of heat and moisture in the room in which it
is installed. Ensure that the kitchen is well ventilated: keep natural ventilation holes open or install a
mechanical ventilation device (mechanical extractor hood). Prolonged intensive use of the appliance may
call for additional ventilation, for example opening of a window, or more effective ventilation, for example
increasing the level of mechanical ventilation where present.
• "CAUTION: Accessible parts may be hot when the grill is in use. Young children must be kept away".
• “An additional protective means to avoid contact with the oven door is available. This part should be fitted
when young children are likely to be present.”


INSTALLATION
Installing a domestic appliance can be a complicated operation which if not carried out correctly, can seriously affect consumer
safety.
It is for this reason that a professionally qualified person should undertake the task who will carry it out in accordance with
the technical regulations in force.
In the event that this advice is ignored and the installation is carried out by an unqualified person, the manufacturer declines
all responsibility for any technical failure of the product whether or not it results in damage to goods or injury to individuals.
In case of installation of the cooker on a base, measures have to be taken to prevent the appliance slipping from the base
itself
*$6&211(&7,21
This must be done in compliance with the regulations in force in the installation country. In all cases, on the gas feed pipe provide a
stopcock, a regulator or regulator release device for propane gas. Only use valves, regulators ends and flexible tubes, regulators with
the official mark of the installation country.
Gas connection according to installation :
Natural Rigid, Flexible hose with mechanical fittings (1) - Soft rubber tube (2)
Butane Rigid, Flexible hose with mechanical fittings (1) - Soft rubber tube (2)
Propane Rigid, Flexible hose with mechanical fittings (1) - Soft rubber tube (2)
1 -provided the flexible hose can be inspected for its entire length.
2 -provided the soft rubber tube can be inspected for its entire length, its length does not exceed 1.5 metres and it is fitted with suitable
clamps at the ends.
1, 2 - soft tubes and flexible hoses with mechancial fittings must be arrange to be away from any flames, and not deteriorated by the
combustion gases, hot cooker parts or by any spills of hot food.
The flexible tube shall be fitted in such a way that does not pass through any space where it may become crushed/ kinked or damaged
in any way.
7+5((&211(&7,21237,216
• RIGID PIPE CONNECTION
Connect directly to the manifold fittings.
• CONNECTION BY FLEXIBLE HOSE WITH MECHANICAL FITTINGS
We recommend this type of connection.
Screw the hose nuts directly onto the manifold fitting on the one hand and onto the stop cock of the piping on the other hand.
• CONNECTION BY SOFT RUBBER
We do not recommend this type of connection.
To be reserved solely for old installations not enabling any other option.
Screw the compliant end piece (2)
Fit the soft tube to the end piece on
the one hand and to the regulator or
to the valve outlet on the other hand.
(2) In all cases, make sure the seal is fitted. Following the connection operations, test the leak tightness using soapy water, testing by
flame is strictly prohibited.
Warning: If gas can be smelt in the vicinity of this appliance turn off the gas supply to the appliance and call the engineer directly. Do
not search for a leak with a naked flame.
GAS MODEL
%HIRUHLQVWDOOLQJWKHDSSOLDQFHWKHWHFKQLFLDQPXVW
- Check the compatibility between the Trio and the gas installation.
The Trio is factory set for use with the gas type as stated on the packaging and repeated on the rating plate
affixed to the cooker.
Natural gas G 20-20 mbar / G 25-25 mbar : main gas
- If necessary, change the gas.
To adapt the gas burners cooker fit suitable jets that provide the nominal flow rate (as explained on
paragraph changing the gas type).
• For installation the technician must :
The Trio is Class2 - Sub class 1 ; furniture adjacent to the unit must not be higher than the top of the
appliance.
- If the Trio is fitted next to a cabinet on either side, the distance between the Trio and the cabinet must be at
least 15 cm (see Figure 1); while the distance between the Trio and the rear wall must be at least 5,5 cm.
The distance between the Trio and any other unit or appliance above it (e.g. An extractor hood) must be no
less than 70 cm (Figure 1).
- The cooker has adjustable feet for perfect levelling on the floor.
- Make the gas connection to the installation according to the gas supply.
- Connect the cooker electrically in compliance with the information given on paragraph electrcal connection.
- If the gas type has been changed, adjust the minimum flow of each gas burner (as explained on paragraph changing the gas type).
- Connect the Trio to the water supply and the water drainage (see paragraph water connection).
06 GB
ANY MODIFICATION MADE TO THE GAS SETTING SHOULD BE NOTED ON THE RATING PLATE AFFIXED TO THE COOKER.
Figure 1

the calorific capacity and pressure of the gas vary according to the type of gas.
When changing the gas, the technician should successively : change the jets, make the gas connection to the installation and set the
minimum flow of all the gas burner tap.
&+$1*,1*7+(*$67<3(
INSTALLATION
JET
Warning :
Never loosen
the others
screws !
07 GB
To adapt the Hob for use with different types of gas, carry out the
following instructions:
• Remove the grids and burners
• Insert on hexagonal spanner (7 mm) into the burner support
(Figure 2)
• Unscrew the injector and replace it with one suitable for the gas
to be used (see gas type table)
5(*8/$7,1*7+(0,1,080)/$0(
After lighting the burners, turn the control knob to the minimum
setting and then remove the knob (this can easily be removed by
applying gentle pressure).
Using a small «Terminal» type screwdriver the regulating screw
can be adjusted as in Figure 3. Turning the screw clockwise
reduces the gas flow, whilst turning it anticlockwise increases the
flow – Use this adjustment to obtain a flame of approximately 3
to 4 mm in length and then replace the control knob.
When the gas supply available is LPG - the screw to set the idle
flame must be turned (clockwise) to the end stop.
When you have carried out the new gas regulation, replace the
old gas rating plate on your appliance with one (supplied with
hob) suitable for the type of gas for which it has been regulated.
Figure 2

ELECTRICAL CONNECTION
"The installation must conform to the standard directives".
The manufacturer declines all responsibility for any damage that
may be caused by unsuitable or unreasonable use.
Warning :
l lVays checJbefore any electrical operationthe supply tension
shown on the electricity meter, the adjustment of the circuit-
breaker, the continuity of the connection to earth to the installation
and that the fuse is suitable.
lThe electrical connection to the installation should be made via
a socket with a plug with earth, or via an omni pole cut-out
switch .
If the appliance has a socket outlet, it must be installed so that
the socket outlet is accessible.
The manufacturer cannot be held responsible for any accidents
resulting from the use of an appliance which is not connected
to earth, or with a faulty earth connection continuity.
l ny Pueries regarding the power supply cord should be referred
to After Sales Service or a qualified technician.
Warning! This appliance must be earthed. In the absence of
adequate earthing you will notice that when touching the
metal parts of your appliance an electrical dispersion can be
felt due to the presence of a radio interference suppressor.
75,2
A power cord is supplied with the Trio which allows it to be
FRQQHFWHGRQO\WRDSRZHUVXSSO\RI9EHWZHHQ
SKDVHVRUEHWZHHQSKDVHDQGQHXWUDO&RQQHFWWRD
Amp socket.
75,2
A power cord is not supplied with this Trio, but it is equipped with
a terminal block that enables you to choose the correct connection
for the particular power supply.
The terminal block is located at the back of the Trio.
To open the terminal block :
. Locate the two tabs on the sides,
. place the screwdriver blade on the front of the tab, insert it (1)
and press down (2)
. Lift the cover off.
Terminal block
x 3 bars shunts
To connect :
. unscrew the cable grip,
. pass the cable through the cable grip,
. strip the insulation off the end of the each wire and connect them
to the according to the numbers shown in the table as well as
the "bars shunts".
INSTALLATION
Example of connection in monophase
3XWLQWKH
bars shunts 3XWLQ
the wires 3DVVWKHFDEOH
through the cable grip
Caution: incorrect tightening can cause dangerous heating
risks for the power supply cable.
H05VV-F
3 G 2,5 mm2
Monophase
9~
CABLE
TYPE-AERA
2 Phase
Shunt
Shunt
Neutral
Shunt
T Earth
CONNEC-
TION TO
THE
TERMINAL
BLOCK
To Shunt:
make a
bridge with
a shunt bar
H05RR-F,
H05VV-F or,
4 G 2,5 mm2
H05VV-F or,
H05RR-F
5 G 1,5 mm2
Three phases
229~
Three phases
91~
3KDVH
Shunt
3KDVH
Shunt
3KDVH
T Earth
3KDVH
2 Phase
3KDVH
Neutral
Shunt
T Earth
L2
L3
When the connection operation to the appliance terminals is
finished, tighten the cable clamp and close the cover.
08 GB

GAS BURNERS
Each burner is contolled by a tap with progressive settings allowing:
* a wider choice of settings from the maximum position to the
lowest and most precise one,
* easier flame regulation according to the pan diameter,
* no risk of cutting off the flame or switching off when the
flame is turned down quickly.
lTurn on the gas tap,
A symbol next to each control knob indicates which burner is lit.
lTurn and press in the relevant burner control knob to the
symbol, keeping it pressed in until the flame ignites. On
models fitted with electronic ignition the flame is ignited by an
electric spark. This is operated by the button or by pressing the
knob (for models with ignition under the knob).
For models not fitted with electronic ignition, or if there is no
electric power, light the flame with a match.
lSet the flame according to your cooking requirements.
Intermediate positions are available between the ( ) and ( )
settings on the control knob.
lTo turn the flame out, turn the control knob back to stop position.
lIf the burner is accidentally extinguished, turn the knob to “0”,
wait one minute and then try to ignite again.
PANS
For a proper use of the burners, choose pans which match the
dimensions given below :
* 9HU\IDVW FPDQGPRUH
)DVW IURPWRFP
6HPLIDVW FP
* $X[LOLDU\ FP
lPans with curved, ridged or warped bottoms are not
recommended.
lAluminium pans may leave marks on the enamelled
pan support. These marks can easily be removed with
a damp cloth and a light abrasive product.
SOME TIPS ....
lAvoid boiling food too intensely. Food is not cooked any more
quickly this way. In fact, it is subjected to severe agitation, which
may cause the food to lose some of its flavour.
To save gas, make sure that the flames do not overlap the bottom
of the pan.
l#o not use the gas burner with an empty pan.
IGNITION
RECOMMENDATIONS : when the burners are not in service,
the general gas supply tap should always be turned off.
NB: for models fitted with the SAFETY thermocouple, keep
the knob pressed in for a few seconds in order to activate
the safety system. If the knob is released straightaway
there is not time for the safety system to be activated and
the flame goes out. If this happens, repeat the ignition
procedure from the beginning waiting longer after the flame
is lit.
The rapid thermocouple safety device automatically cuts
off the gas supply if the flame is accidentally extinguished.
If there are particular local gas supply conditions which make
ignition difficult, you are advised to repeat the ignition procedure,
turning the knob to “minimum” ( ).
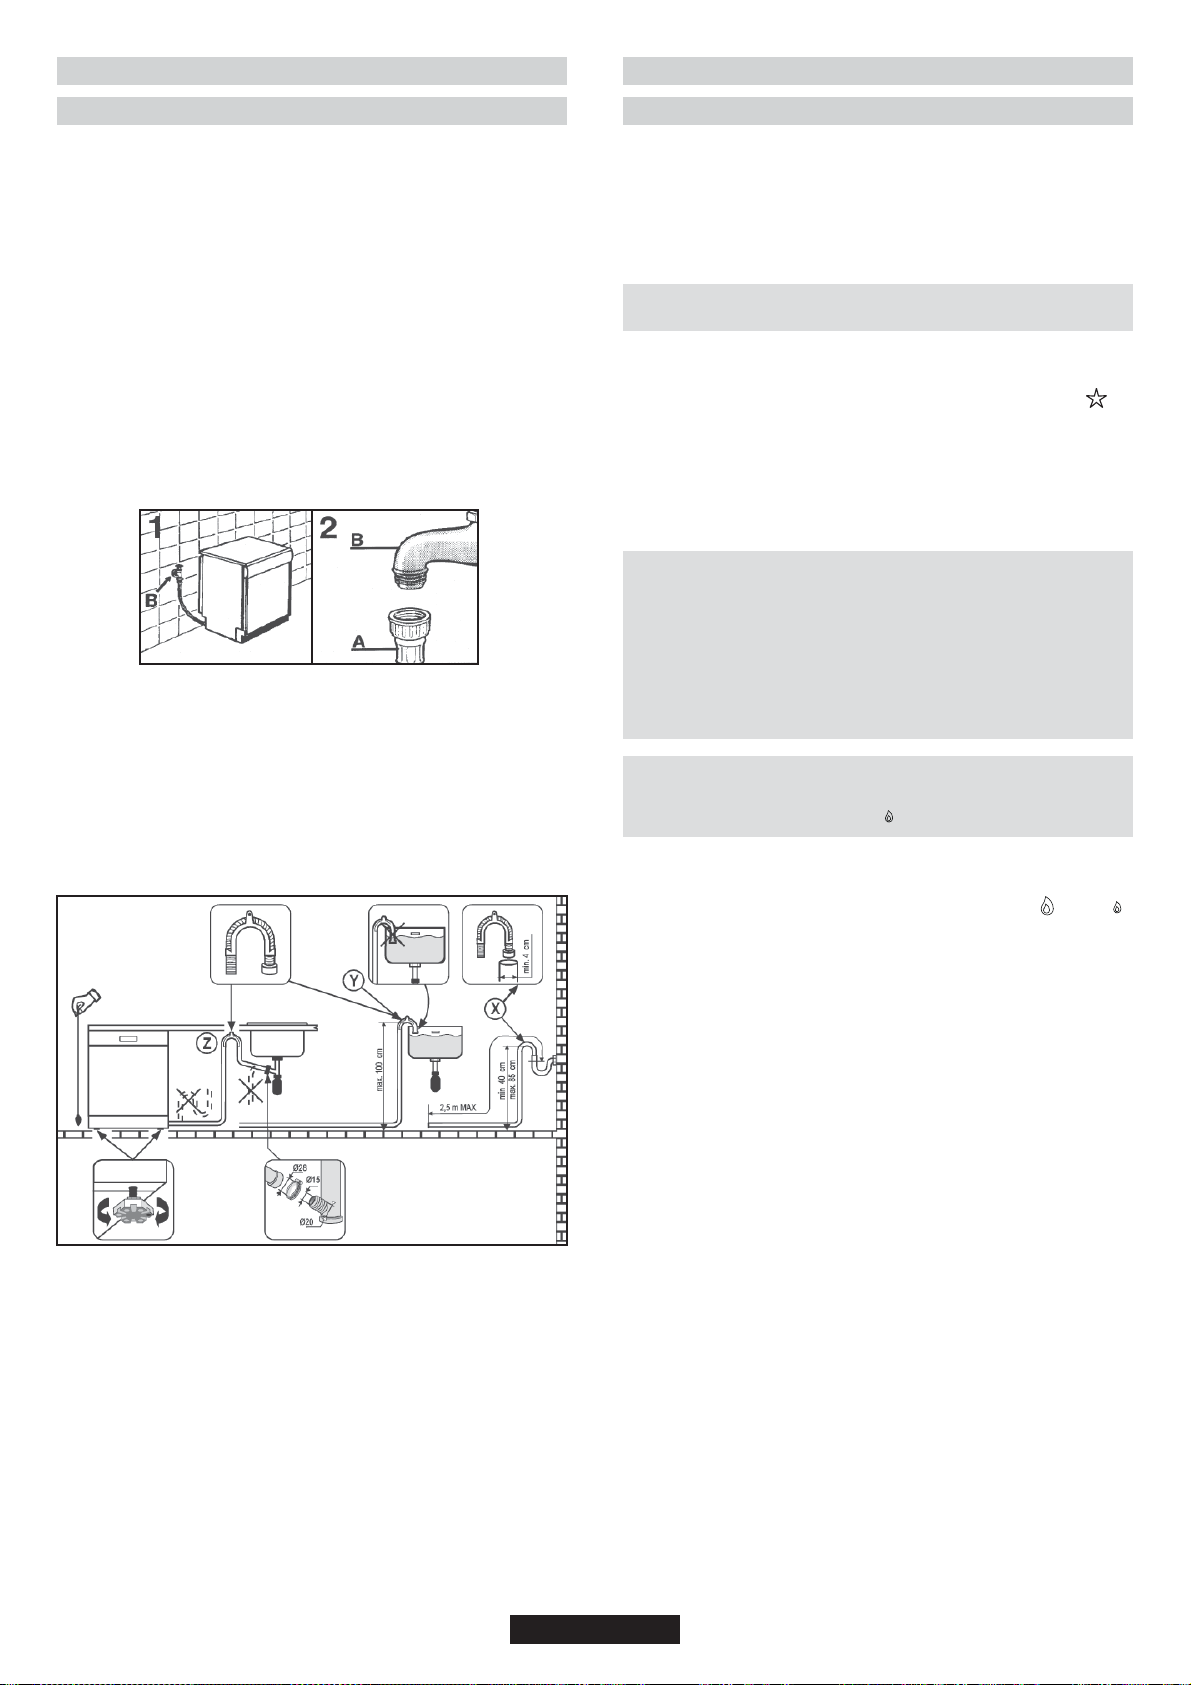
WATER CONNECTION :
The inlet and drain hoses can be directed to left or right.
The dishwasher can be connected to either cold or hot water, as
long as it is no hotter than 60°C.
Water pressure mut be between 0,08 MPa and 0,8 MPa. If the
pressure is below the minimum consult the service department
for advice.
The inlet hose must be connected to a tap so that the water supply
can be cut off when the machine is not in use (fig.1). The
dishwasher inlet hose is fitted with a 3/4" threaded connector
(fig.2). The inlet hose "A" should be tightly connected to a 3/4" tap
"B".
The water connection of the dishwasher must be done exclusively
with the pipe supplied. Do not use an old pipe.
If the machine is connected to new pipes or to pipes which have
not been in use for long time, run water through for a few minutes
before connecting the inlet hose. In this way no deposits of sand
or rust will clog up the water inflow filter.
The hose can be hooked over the side of the sink (it must not be
immersed in water, in order to prevent water from being siphoned
back to the machine when this is in operation) Check that there
are no kinks in the inlet and outlet hoses. To extend, if necessary
the intlet hose, contact the Customer Service.
:$7(5&211(&7,21:$7(5'5$,1$*(
USE
INSTALLATION
4
WATER DRAINAGE :
Take care not to bend or kink the drain hose when connecting it
to the machine so that the water can drain freely from it (fig.4y).
The drain hose must be at least 40 cm above floor level and it
must have an internal diameter af at least 4 cm. It is advisable to
fit an anti-odour air trap (fig.4x).
If necessary, the outlet hose can be extended up to 2,6 m, provided
that it is kept at a maximum height of 85 cm above floor level. For
this, contact Customer Service.
09 GB

Positions Some Tips
2
4
9ery Low
Low
Moderate
Medium
High
9ery High
To keep a dish hot, melt butter and chocolate...
Slow cooking, sauces, stews, rice pudding
poached eggs...
Beans, frozen foods, fruit, boiling water...
Steamed apples, fresh vegetables, pasta,
crepes, fish...
More intense cooking, omelettes, steaks...
Steaks, chops, frying...
7+(9,752&(5$0,&=21(
29(1(48,30(17 (According to the model)
Recommendations :
lNever cook food directly on the glass ceramic hob. Always use
the appropriate cookware.
lAlways place the pan in the centre of the unit that you are cooking on.
l#o not use the surface as a cutting board.
l#o not slide cookware across the hob.
l#o not store heavy items above the hob. If they drop onto the
hob, they may cause damage.
l#o not store heavy items above the hob. If they drop onto the
hob, they may cause damage.
l#o not use the hob as a working surface.
lAluminium foil and plastic pans must not be placed on heating
zones.
It is strongly recommended to keep children away from the
cooking zones while they are in operation or when they are
switched off, so long as the residual heat indicator is on, in
order to prevent the risks of serious burns.
It is necessary to do an initial cleaning of the equipment before
the first use of each of them. Wash them with a sponge. Rinse
and dry off.
7+(6+(/) : it is for holding
dishes, plates, and meat
joints when cooking with the grill.
It is fitted with rails which enables
the drip tray to be slid into.
When the oven is in use, any unused accessories should be removed.
7+(&,5&8,T%5($.(57,0(5
lIt takes in charge the functioning of the oven,
for between 1 and 120 minutes, with immediate
start and automatic stop. When the time is up,
the timer automatically cuts off the power supply
to the oven.
lHowever, the oven could be used without
programming. In this case, turn the control knob to the Hand
position .
Nota : to set a time, turn the control knob clockwise up to the 120
minutes mark and then turn it back to the required time.
Thanks to its special shape, the shelf always remains horizontal, even
when pulled to its fullest extent towards the front of the oven, thus
avoiding the risk of dishes sliding o or tipping over.
7+('5,P TRAY : collects meat
and grilling juices during grilling.
It can be put on the shelf, or slid
under it. Unless used with the grill,
the drip tray must not be stored
in the oven while in use.
Never use the drip tray as a roasting tray. This would cause smoke to
be produced, fat to be splashed and the oven would become
rapidly stained.
7+( PASTRY TRAY must be
placed on the shelf. It is for
cooking small pastries like choux,
biscuits, meringues, etc...
Never place the pastry tray directly on the oven bottom.
USE
7+(527,66(5,(is equipped with a skewer and an handle,
two forks and a skewer support.
USE
lEach zone is linked to a residual heat indicator located on the
hob. It lights up when the heat zone temperature reaches 60°C
and above. It will stay on, even if the unit is switched off, until
the surface has cooled down.
lTo switch off a heat zone, turn the corresponding control knob
until the position "0".
3RVLWLRQV the examples below are intended as a guide. When
you become familiar with using your hob you will be able to
work out the settings that suit you best.
lLocate the sign corresponding to the cooking
zone that you need.
lIt is recommended that heat setting is at its
highest until it has properly warmed up and then
lower to the desired cooking setting.
lThe power-on indicator light comes on to show
that the heat zone is operating.
1
2
3
4
5
6
7
8
9
10
11
12
10 20
30
40
50
60
70
80
90
100
110
120
$'9,&(6
The use of high quality utensils is important to obtain good cooking
results :
lAlways use good quality cookware with perfectly flat and thick
bases.
lEnsure that the base of the pot or pan is dry.
lUse pans whose diameter is wide enough to completely cover
the surface unit.
CHOOSING UTENSILS
The following information will help you to choose cookware which
will give good performance.
On the label, check the mark that shows if
the pan is compatible with the vitroceramic.
Stainless Steel : highly recommended. Especially good with a
sandwich clad base. The sandwich base combines the benefits
of stainless steel (appearance, durability and stability) with the
advantages of aluminium or copper (heat conduction, even heat
distribution).
Aluminium : heavy weight recommended. Good conductivity.
Aluminium residues sometimes appear as scratches on the hob,
but can be removed if cleaned immediately.
Because of its low melting point, thin aluminium should not be
used.
Cast Iron : usable, but not recommended. Poor performance.
May scratch the surface.
&RSSHU%RWWRPVWRQHZDUHheavy weight recommended. Good
performance, but copper may leave residues which can appear
as scratches. The residues can be removed, as long as the hob
is cleaned immediately. However, do not let these pots boil
dry. Overheated metal can bond to glass hobs. An overheated
copper pot will leave a residue that will permanently stain the hob.
3RUFHODLQHQDPHOGood perfomance only with a thinly smooth,
flat base.
7+(=21(6
KLJKOLJKW]RQHit is operational within 3 seconds and is suitable
for steady, homogeneous and sustained cooking.
6SULQWHUwith the sprinter facility, reduced cooking times of
up to 15% can be achieved.
10 GB

MEAT :
It is better not to salt meats until after cooking as salt encourages
the meat to splatter fat.
This will dirty the oven and make a lot of smoke.
Joints of white meat, pork, veal, lamb and fish can be put into the
oven cold. The cooking time is longer than in a preheated oven,
but it cooks through to the centre better as the heat has more time
to penetrate the joint.
&255(&735(+(ATING IS THE BASIS OF SUCCESSFUL
RED MEA7&22.(RY.
&$.(PASTRIES AND BISCUITS :
Avoid using shiny moulds because they reflect heat and can spoil
your cakes. If your cakes brown too quickly, cover them with
greaseproof paper or aluminium foil.
Caution : the correct way to use foil is with the shiny side inwards.
If not the heat is reflected by the shiny surface and does not
penetrate the cake.
Avoid opening the door during the first 20 to 25 minutes of
cooking: sponge cake, soufflés, brioche, etc., will tend to fall.
You can check if cakes are done, by pricking the centre with a
knife blade or metal knitting needle. If the blade comes out nice
and dry, your cake is ready, and you can stop the cooking. If the
blade comes out moist or with bits of cake attached, continue
baking but slightly lower the thermostat so that it finished off without
burning.
The following instructions are for guidance only. You may
wish to alter them according to your own experience or your
personal taste.
3UHKHDWLQJWLPHV
. 20 minutes between 210 and 240°C
. 15 minutes between 140 and 190°C
. 10 minutes between 65 and 115°C
7+(29(186(
IMPORTANT : always keep small children away from the Trio
while it is in use. If the Trio is fitted with a lid, lift it up before use.
9(5<,03257$17WKHRYHQDQGWKHGLVKZDKHUFDQQRWEHXVHG
at the same time.
To use the oven, you have to close the dishwasher.
7+(&22.,1*0(7+2'6 (According to the model)
lConventional cooking : the top and bottom heating elements
are used together.
This method is ideal for all traditional roasting and baking, for
sealing red meats, roast beef, leg of lamb, bread, flaky pastry.
Preheat the oven for about ten minutes and place the cooking
meat in the mid shelf position.
lGrill : using the top-heating element. Success is guaranteed
for mixed grills, kebabs and "gratin dishes". Five minutes
preheating is required to get the element hot.
lRotisserie : using the top-heating element in conjunction
with the rotisserie providing the real flavour of a traditional roast.
. Remove all accessories from the oven.
. Place the drip tray on the oven bottom.
. Skewer the food to be cooked and centre it between the two
forks.
. Fit the skewer into the bracket and slide the bracket and skewer
on to the second level. The end of the skewer will then be facing
the slot in the drive mechanism.
. Fit the skewer into the drive mechanism.
lRotisserie and conventional cooking : using in the same
time the rotisserie and the conventional cooking. It allows to
save time when cooking. However, you have to take care of
placing the shelf with rails up side down, with rails towards the
top and place the drip tray on it.
)DQDVVLVWHGJULOO : using the top heating element with the
fan circulating the air inside the oven. Ideal for cooking thick
food items, whole pieces such as roast pork, poultry etc..
Preheating is necessary for red meats but not for white meats.
Slide the drip tray under the shelf to collect juices. Make sure
that the food is not too close to the grill. Turn the food over
halfway through cooking.
)DQFRRNLQJ both top and bottom heating elements are
used with the fan circulating the air inside the oven. We
recommend you use this method for poultry, pastries, fish and
vegetables.. heat penetrates into the food better and both the
cooking and preheating times are reduced.
USE
lTurn the control
knob on the
requesting cooking
method and set a
temperature :
Temperature from 65°C to 240°C
lTurn the control knob of the circuit-breaker timer to the Hand
position or on a programming duration.
lThe regulator indicator light indicates that the
thermostat is working. It goes on and off regularly
during the cooking time.
&22.,1*$'9,&(6
USE
Conventional cooking
Grill
Rotisserie
Rotisserie + Conventional
cooking
Temperature 240°C
Temperature 240°C
Temperature 240°C
Fan assisted grill
Fan cooking
Temperature 240°C
Temperature from 65°C to 240°C
°C P
65
90
115
140
165
190
210
240
1 - 1,5 kg
48$17,7< FOOD Oven
Temperature
in °C
Shelf
position from
the bottom
Cooking
time
in minutes
FISH
1 kg
Trout 200 1 15 / 25
Whiting 190 1 50
MEAT
1 - 1,5 kg Roast-beef 190 1 90
1 kg Roast
veal 150 / 160 1 120 / 150
2 kg Blanquette
of veal 170 / 190 1 60 / 90
Leg
of lamp 150 / 160 1 60 / 75
1 - 1,5 kg Leg
of mutton 150 / 160 1 50 / 60
POULTRY
2 kg Pigeons 150 / 160 1 45
4 kg Goose 160 1 240 / 270
2 - 2,5 kg Duck 175 1 90 / 150
1 - 1,5 kg Chicken 170 1 60 / 80
9ARIOUS
Lasagne 200 1 40
Soufflès 200 1 20
Fritter 200 1 20
Pizza 200 1 20
PASTRY
175 1 40 / 50
Tart with
fruits 180 / 190 1 20 / 30
Biscuit
(leaven dough) 160 1 40 / 45
Meringue 100 1 90
Puff pastry 200 1 20
Buckwheat
cake
11 GB
*
*
* Tested in accordance with the CENELEC EN 60350-1 used for
definition of energy class.

USE THE DISHWASHER
DISHWASHER CONTROLS
A Programme selection indicator lights
B Programme selection button
C Programme description
'2QRIIEXWWRQ
SELECTING THE PROGRAMMES AND SPECIAL FUNCTIONS
The dishwasher and the oven cannot be used simultaneously.
Setting a programme
Open the door and press the On/off button ; the 4 Program selection LEDs start flashing.
- Set the required programme by pressing Programme selection button, LED of the chosen programme will turn on (2 LEDs for COLD
RINSE programme).
- Close the door (after audible signal), the chosen programme will start automatically.
USE THE DISHWASHER
12 GB
Opening the door
Grip the handle in the front panel and pull forward. If the machine
comes open while it is working, an electrical safety device
automatically switches everything off. For the machine to work
properly, the door should not be opened while it is in operation.
Closing the door
Place the basket in the dishwasher. Make sure that the spray arm
is free to rotate and is not obstructed by cutlery, crockery or pans.
Close the door, pressing on it to make sure it is firmly shut.
Interrupting a programme
lt is not recommended that the door be opened while a programme
is running, and especially not during the main wash phase and
final drying.
However, the appliance stops automatically when the door is
opened.
When the door is closed again, the programme continues
automatically.
If you wish to change or cancel a programme that is running, carry
out the following procedure:
lHold the "PROGRAMME SELECTION" button down for at least
seconds. The programme indicator lights will turn on and off
individually and sequentially and some audible signals will sound.
lThe running programme will be cancelled and all the programme
indicator lights will flash.
Before starting a new programme, you should check that there is
still detergent in the dispenser. If necessary, top up the dispenser.
WARNING: if the door is opened during the drying phase, an
intermittent audible signal is activated to advise that the cycle is
not yet completed.
A 5 seconds alarm will sound (if not muted) 3 times at 30 seconds
intervals to signal that the programme has ended.
The selected programme indicator light (2 indicator lights for the
"COLD RINSE" programme) will start to flash.
Dishes can now be removed and the dishwasher turned off by
pressing the 212)) button or dishes can be loaded for new
cycle.
The alarm for the programme end may be muted as follows:
IMPORTANT
The dishwasher must ALWAYS be offbefore start of this
procedure.
1. Hold down the "PROGRAMMESELECTION" button and at
the same time switch on the dishwasher by pressing the
212)) button (a brief audible signal will sound).
2. Keep the "PROGRAMME SELECTION" button pressed for at
least 15 seconds (during this time, 2 audible signals will sound).
3. Release the button when the second audible signal sounds (3
"PROGRAMME SELECTION" indicator lights will come on).
4. Press the same button again: the 3 indicator lights (which
indicate that the alarm is activated) will start flashing (to indicate
that the alarm is off).
5. Turn off the dishwasher by pressing the 212)) button to
confirm the new setting.
To turn the alarm on again, follow the same procedure.
WARNING!
If any problem occurs, turn the dishwasher off by
SUHVVLQJ WKH 212)) EXWWRQ DQG VWDUW WKH
procedure again from the beginning.

USE THE DISHWASHER
13 GB
Memorization of the last programme used
The last programme used can be memorized by following the
below:
IMPORTANT
The dishwasher must ALWAYS be off before start of this
procedure.
1. Hold down the "PROGRAMME SELECTION" button and at
the same time switch on the dishwasher by pressing the 212))
button (a brief audible signal will sound).
2. Keep the "PROGRAMME SELECTION" button pressed for at
least 30 seconds (during this time, 3 audible signals will sound).
3. Release the button when the THIRD audible signal sounds (all
the indicator lights will flash).
4. Press the same button again: the flashing indicator light
(memorization off) will stop flashing and remain on (memorization
on).
5. Turn off the dishwasher by pressing the 212)) button to
confirm the new setting.
To disable the memorization, follow the same procedure.
WARNING!
If any problem occurs, turn the dishwasher off by
SUHVVLQJWKH212))EXWWRQDQGVWDUWWKHSURFHGXUH
again from the beginning.
Fault Signals
If malfunctions or faults occur when a program is running, the LED
that corresponds to the selected cycle (2 LEDS for COLD RINSE
programme) will blink rapidly and an audible signal will be activated.
In this case, turn the dishwasher off by pressing the On / Off button.
After checking to make sure the water inlet hose tap is open, that
the drain hose is not bent and that the siphon or filters are not
clogged, re-start the selected program. If the anomaly persists,
contact Customer Service.
Important !
TRHQVXUHWKHFRUUHFWRSHUDWLRQRIWKHDQWLRYHUIORZVDIHW\
device, it is recommended not to move or to tilt the dishwasher
during operation.
If it is necessary to move or to tilt the dishwaher, first make
sure the washing cycle is finished and that no water is left in
the tank.
If there is any break in the power supply while the dishwasher is
operating, a special memory stores the selected programme and,
when the power isrestored, it continues where it left o.
$WWHQWLRQ7KHGLVKZDVKHULVHTXLSSHGZLWKDQDQWLRYHUIORZ
safety device which in the event of anomaly intervenes by
evacuating water in excess.
The filtering system is composed
of :
- a central filter cup which traps the
largest food particles.
- a flat filter which continuously filters
the washing water.
- the micro filter, situated under the
flat filter, which traps the smallest food particles ensuring a
perfect rinse.
For best results, the filter unit should be checked and cleaned
after each wash.
To remove the filter unit, simply grip the handle and lift the whole
unit out.
The central cup is just resting on top for easy cleaning.
The dishwasher is fitted with a self cleaning micro filter, which only
requires checking about once every 15 days.
However, it is advisable to check after every wash, that the central
cup and the flat filter are not clogged.
NB : After cleaning the filters, make sure that they are correctly
reassembled, one inside the other, and that the flat filter is properly
positioned at the bottom of the dishwasher.
A poor seating of the filter unit could have an adverse effect on
the efficiency of the appliance.
Important : Never use the dishwasher without filter.
PRELIMINARY OPERATIONS AND
CLEANING THE FILTER UNIT

The regulator control "B" is below the indicator and can be turned
with the finger, the recommended position is "3".
The hardness of the water can be judged by incrustation or by the
level of dryness.
It is therefore important that the correct dosage of Rinse Aid is
regulated to give the best results.
After the wash,
. if streaks occur on the dishes, decrease the amount by one
position.
. if whitish spots occur, increase the amount by one position.
LOADING THE SALT
The dishwasher is fitted with a softener that clears the water of
lime which could cause scale and damage the dishwasher.
On the bottom of the diswasher there is a salt dispenser for
regenerating the softener.
The filter element of the softener unit should be recharged with a
salt specially produced for dishwashers. This salt can be bought
either as tablets or as granules.
To add salt, unscrew the cap of the
salt dispenser on the bottom and
refill the dispenser.
During this operation a little water
will overflow but keep adding salt
until the dispenser is fill, clean the
thread of salt residue and retighten
the cap.
If the dishwasher is not required straightaway, set the
programme Cold rinse ("Eco+Rapid, 2 Leds") so that the salt
solution which has overflowed is discharged from the washing
tank.
The salt dispenser has a capacity of between 1.5 kg for efficient
use of the appliance, it should be refilled from time to time according
to the regulation of the water softener unit.
NB: it is necessary to add water until the dispenser overflows.
Only install the dishwasher completely filling the salt dispenser.
LOADING DISHES
It is essential to use a detergent that is specifically designed
for dishwashers either in powder, liquid or tablet form.
Unsuitable detergents, (like those for washing up by hand) do not
contain the proper ingredients for use in a dishwasher and impede
the efficient functioning.
Normal wash
The detergent dispenser is inside the door.
The dispenser lid should be closed before
every wash.To open it, simply press the
catch. At the end of each wash cycle the
lid is always open and ready for the next
time the dishwasher is used.
The amount of detergent to be used varies
according to how dirty the dishes are and
the type of wash. A 15g dose is normally
recommended. If the water is hard or the
dishes are exceptionally dirty, 25g of detergent should be
loaded. After pooring the detergent into the dispenser, close the
lid, since not all detergents are the same and the instructions on
the boxes of detergent can vary.
We should just like to remind users that too little detergent does
not clean the dishes properly whilst too much detergent not only
does not produce better results but is also a waste. Do not use
an excessive amout of detergent and help limit damage to the
environment at the same time.
Intensive washing
LOADING THE DETERGENT
FILLING THE RINSE AID DISPENSER
5(*8/$7,1*7+(5,16($,'IURPWR.
The rinse aid dispenser "B" is to the right of the detergent dispenser
and has a capacity of about 130 ml.
Open the lid and pour in enough liquid, which
will last several washes. Try to avoid
overloading. Close the lid.
This additive, which is automatically released
during the last rinse cycle, helps the dishes to
dry quickly and prevents spots and stains
forming. It is always advisable
to use rinse aid.
Check the rinse aid level
through the indicator eye "A"
which is situated in the centre
of the dispensers.
FULL - Dark EMPTY - Bright
USE
The basket has been carefully designed to make loading easy.
For good wash performance, remove any debris from the dishes
(bones, tooth picks, the remains of meat and vegetables) to avoid
blocking the filters, water outlet and washing arm nozzle and, as
a result, reducing washing efficiency.
Warning ! to avoid any injury from cutlery with blades or sharp
points, they can be placed with the handles upwards.
LOADING A3/$&(66(77,1*
(1
A- 6 glasses
B- 6 dessert plates
C- 6 saucers
D- Small bowl
E- 6 tea or coffee cups
F - 6 flat plates
G- 6 deep plates
H- Medium bowl
I - Serving dish
L – Cutlery
LOADING 4 PLACE SETTINGS
PLUS CASSEROLES
Casseroles, salad bowls, soup pans,
lids etc., can be loaded on the basket.
It is advisable to arrange the cutlery
in the basket provided for that
purpose. If there is any cutlery with
narrow handles, it should be placed
with handles upwards, to avoid falling
through the bottom of the basket and blocking the washing
arm. Do not put wooden handled lids in the basket, or any whose
lids are bonded with resin.
14 GB
When using the intensive wash
programme, add a second dose of
detergent of about 15g (1 soup
spoonful).
This extra dose should be put in the
small tank (see immage)
A
B

The water softener can treat water with a hardness level of up to 60°Fh (French grading) or 33°Dh (German grading) through 5 settings.
The settings are listed in the panel below:
Regulating the water softener with electronic programmer
Level Water hardness
°fH (French)
Water hardness
°dH (German)
Use of regenerating
salt Water softener
setting
2
4
4
no
yes
yes
yes
yes
USE
15 GB
,QGLFDWRUOLJKW
,QGLFDWRUOLJKW
,QGLFDWRUOLJKW
,QGLFDWRUOLJKW
WARNING!
If any problem occurs, turn thedishwasher off by pressing the "ON/OFF" button and start the procedure again from
the beginning (STEP 1).
1. Hold down the "PROGRAMME SELECTION" button and at the same time switch on the dishwasher by pressing the "ON/OFF"
button (a brief audible signal will sound).
2. Keep the "PROGRAMME SELECTION" button pressed for at least 5 seconds, UNTIL an audible signal sounds. Some "PRO-
GRAMME SELECTION" indicator lights will come on to indicate the current water softener setting level.
3. Press the same button again to select the required water softener level: each time the button is pressed, one indicator light will come
on (the water softener level is indicated by the number of lights on). For level 5, 4 lights will flash, for level 0 all lights will be off.
4. Turn off the dishwasher by pressing the "ON/OFF" button to confirm the new setting.
IMPORTANT
The dishwasher must ALWAYS be off before start of this procedure.
CONSUMPTION (main programmes)*
Power consumption of the off-mode and of the left-on mode: 0,1 W / 0,8 W
* Values are measured in a laboratory according to European Standard EN 50242 (consumption may
vary according to conditions of usage).
Programme
Universal
Hygiene+
Eco
Rapid 32'
1,25
0.93
0.67
0,60
15
12
8
8
Energy (kWh) Water (L)
Information for the test laboratories General programme comparison
Ref. EN 50242 standards:
1) Normal load
2) Shine setting: "4"
3) Amount of detergent: 18gr. for wash
WASHING PROGRAMME
PROGRAMME SELECTION BUTTON
LEDs

- To carry out a wash programme with a full load of dishes load the machine correctly after each meal and do a cold pre-wash between
each load to get rid of stains and remove the larger residues of food.
SOME PRACTICAL HINTS ....
HOW TO GET GOOD WASH RESULTS
1) Place the dishes face downwards.
2) Try to place the dishes in such a way that they are not touching one another. If they are loaded properly you will get better results.
3) Before placing the dishes in the dishwasher remove any remaining food (bones, shells, pieces of meat or vegetables, coffee grounds,
skin of fruit, cigarette ash etc. that could clog up the outflow and the washing arm jets.
4) After loading the dishes, check that the washing arm can rotate freely.
5) Pans and other dishes that have particularly stubborn food particles or remnants of burnt food should be left to soak in water with
dishwasher detergent.
6) To wash silver properly:
a) - rinse the silver immediately after use especially if it has been used for mayonnaise, eggs, fish etc.
b) - do not sprinkle detergent onto it.
c) - keep it seperate from other metals.
WHAT TO DO IF ...
You want to stop the dishwasher to put in more dishes whilst it is in the middle of a wash. Open the door, put in the dishes, and close the
door, the machine will start up again automatically.
WHAT NOT TO WASH ...
It should also be remembered that not all dishes are suitable for washing in a dishwasher.
We advise again using the dishwasher to wash items in thermoplastic, cutlery with wooden or plastic handles, saucepans with wooden
handles, items in aluminium, crystal, leaded glass unless otherwise stated.
Certain decorations may fade. It is therefore a good idea before loading the whole batch to wash just one of the items first so as to be
sure that others like it will not fade.
It is also a good idea not to put silver cultery with non-stainless steel handles into the dishwasher as there could be a chemical reaction
between them.
NB : when buying new crockery or cutlery always make sure that they are suitable for washing in a dishwasher.
$)7(586(After each wash, close the tap which supplies the water to the dishwasher and press the On/Off button to the Off position.
If the dishwasher is not going to be used for some time, the following precautions are advisable:
1 - carry out a wash programme, but with no dishes, to degrease the machine,
2 - pull the plug out,
3 - turn off the water supply tap,
4 - fill the rinse aid dispenser,
5 - leave the door slightly ajar,
6 - leave the inside of the machine clean,
7 - if the machine is to be left in a place where the
temperature is below 0°C, the water left in the dispenser could freeze.
Therefore, it is advisable to raise the temperature above 0°C, approximately 24 hours before using the machine again.
USE
16 GB
Programme for normally soiled
tableware (the most efficient in terms
of its combined energy and water
consumption for that type of tableware).
Programme standardised to EN
50242.
50°C 153

CLEANING
30° Maxi
lBefore carrying out any cleaning, you must :
lDisconnect the appliance from the electrical supply and wait for all the hot parts to cool.
lNever use abrasive cleaners, wire wool or sharp objects to clean the appliance.
7+((1$0(//('PARTS :
never use abrasives, scouring pads or sharp objects, as this will cause irreparable damage to the enamel.
Once the appliance has cooled down, simply clean with soapy water and dry with a clean cloth.
7+(9,752&(5$0,&+2%
Do not use a sponge that is too wet.
It is advisable to keep away from the hob all substances which are liable to melt, such as plastic items, sugar, or sugar-based products.
Maintenance :
- place a few drops of a specialist cleaning product on the hob surface.
- rub any stubborn stains with a soft cloth or with slightly damp kitchen paper.
- wipe with a soft cloth or dry kitchen paper until the surface is clean.
- Never use abrasive cleaners, wire wool or sharp objects to clean the glass oven door, as this may result in shattering of the glass
Stubborn stains :
- place a few drops of a specialist cleaning product on the hob surface.
- scrape with a scraper, holding it at an angle of 30° to the hob, until the stains disappear.
- wipe with a soft cloth or dry kitchen paper until the surface is clean.
- repeat the operation if necessary.
A scraper with a razor blade will not damage the surface, as long as it is
kept at an angle of 30°. Never leave a scraper with a razor blade within
reach of children.
A few hints :
Frequent cleaning leaves a protective layer which is essential for preventing scratches and wear.
Make sure that the surface is clean before using the hob again.
To remove marks left by water, use a few drops of white vinegar or lemon juice. Then wipe with absorbent paper and a few drops of specialist
cleaning fluid.
The glass ceramic surface will withstand scraping from flat-bottomed cooking vessels, however, it is always better to lift them when moving.
CLEANING
29(1/,*+7,1*
The bulb and its cover are made of material resistant to high temperatures: 230 V~ - E 14 base - 15 W - Temperature 300°C mini.
Replacing the bulb : disconnect the power supply from the oven before attempting to replace the lamp. Wait for the oven to cool down
before doing any operation.
To change a defective bulb, just unscrew the glass cover, unscrew the bulb, replace it with the same type, after replacing the defective
bulb, screw back the protective glass cover.
7+( ACCESSORIES
7KHRYHQ VKHOI WKHSDVWU\WUD\ do not clean the oven shelf with harsh abrasives, scouring pads or sharp objects. Simply use a cloth
wrung out in hot soapy water. Rinse with clean water and then dry.
The drip tray : after grilling, remove the drip tray from the oven and pour the grease into a container. Wash and rinse the drip tray in very hot
water, using a sponge and washing powder. If still stained withs sticky food, immerse in soapy water. The drip tray can be clean
in the dishwasher. Never put the drip tray back in the oven if still dirty.
7+(29(1'225*/$66
It is recommended to wipe the oven door glass with absorbent paper after each cooking cycle. If there is heavy staining, the glass can be
cleaned with a sponge cleaning agent.
29(1'225
it is possible to clean the oven door while in position or after removal.
To remove the door, carry out the following :
. open the door fully,
. release the hooks,
. pull the door upwards, closing it partially, until it is free.
To refit it, make sure you reposition the hinges carefully ; a notch located below them lets you fit he hinges correctly.
After the door is put back on its supports, fit the hinges in their initial position.
*$6%851(56 for cleaning, it is recommended to remove all greasy or burnt deposits with ammonia based products or usual cleaning
products. Do not immerse the burner caps in cold water immediately after use, to avoid cracking the enamel from the thermal shock. If
the holes become clogged, brush them with soapy water and dry with a cloth.
When re-assembling the burners, make sure that the burner caps and the burners themselves are dry and after, seat them correctly.
&DXWLRQ Be careful not to let any water get into the burners.
/,' once the Trio has cooled down, simply clean with soapy water and dry with a clean cloth. Before lifting the lid, make sure that
anything that might spill over has been removed.
17 GB
This appliance is marked according to the European directive 2012/19/EU on Waste Electrical and Electronic Equipment (WEEE). WEEE contains
both polluting substances (which can cause negative consequences for the environment) and basic components (which can be re-used). It is
important to have WEEE subjected to specific treatments, in order to remove and dispose properly all pollutants, and recover and recycle all materials.
Individuals can play an important role in ensuring that WEEE does not become an environmental issue; it is essential to follow some basic rules:
• WEEE shall not be treated as household waste.
• WEEE shall be handed over to the relevant collection points managed by the municipality or by registered companies. In many countries, for large
WEEE, home collection could be present.
•When youbuyanew appliance,theold one maybereturned totheretailerwho hastocollect it freeofcharge onaone-to-onebasis, aslongas the equipment
is of equivalent type and has the same functions as the supplied equipment.
ENERGY SAVING AND RESPECTING THE ENVIRONMENT
Where possible, avoid pre-heating the oven and always try to fill it. Open the oven door as infrequently as possible, because heat from the cavity disperses
every time it is opened. For a significant energy saving, switch off the oven between 5 and 10 minutes before the planned end of the cooking time, and use
the residual heat that the oven continues to generate. Keep the seals clean and in order, to avoid any heat dispersal outside of the cavity. If you have an
electric contract with an hourly tariff, the "delayed cooking" programme makes energy saving more simple, moving the cooking process to start at the reduced
tariff time slot.

TROUBLESHOOTING
REMEMBER! the oven and the dishwasher cannot be used in the same time.
Should the dishwasher fail to operate, before contacting the Service Centre, make the following checks:
FAULT
0DFKLQHFRPSOHWHO\GHDG
CAUSE REMEDY
Plug is not connected correctly
O/I button has not been pressed
No electricity
Door is open
Connect electric plug
Press button
Check the electricity supply
Close door
0DFKLQHGRHVQRWGUDZZDWHU
See causes for No 1
Water tap is turned off
Programme selector is not at correct position
The inlet hose is bent
The inlet hose filter is blocked
Check
Turn water tap on
Turn programme selector to correct position
Eliminate the bends in the hose
Clean the filter at the end of the hose
0DFKLQHGRHVQRWGLVFKDUJHZDWHU
Filter is dirty
Outlet hose is kinked
The outlet hose extension is not correctly connected
The outlet connection on the wall is pointing
downwards not upwards
Clean filter
Straighten outlet hose
Follow the instructions forconnecting the
outlet hose carefully
Call a qualified technician
0DFKLQHGLVFKDUJHVZDWHUFRQWLQXRXVO\
Lift outlet hose to at least 40 cm
above floor level
Position of outlet hose is too low
6SUD\DUPLVQRWKHDUGWRURWDWH Reduce amount of detergent
Check
Clean plate and cup filter
Excessive amount of detergent
Item prevents arm from rotating
Plate and cup filter very dirty
2QHOHFWURQLFDSSOLDQFHZLWKRXWD
display: "Eco" indicator light and indicator
OLJKW1RZLWKDXGLEOHVLJQDO
Switch off the appliance - Turn on the
tap - Re-set the cycle
Water inlet tap turned off
/RDGRIGLVKHVLVRQO\
partially washed
Check
Burnt on food remains must be soaked before
putting pans indishwasher
Reposition saucepans
Remove spray arm by unscrewing ring nut
clockwise and wash under running water
Do not place the dishes too closely together
The end of the outlet hose must not come into
contact with the outflow water
Increase the measure according to how dirty
the dishes are and change detergent
Tighten it fully.
Choose a more vigorous programme
See causes for No 5
Bottom of saucepans have not been washed well
Edge of saucepans have not been washed well
Spray arm is blocked
The dishes have not been properly loaded
The end of the outlet hose is in thewater
The incorrect amount of detergent has been
measured out; the detergent is old and hard
The tap of the salt dispenser is not closed very well
The wash programme is not thorough enough
3UHVHQFHRIZKLWHVSRWVRQGLVKHV Check salt and rinse aid level and regulate
amount. Should the fault persist, contact
Service Centre
Water is too hard
1RLVHGXULQJZDVK Load dishes better onto the basket
Load dishes better
The dishes knock against one another
The revolving arm knock against the dishes
7KHGLVKHVDUHQRW
completely dry
Leave the dishwasher door ajar at
the end of wash program to allow dishes to
dry naturally
Inadequate air flow
18 GB

INDICAZIONI DI SICUREZZA
19 IT
•Durante la cottura l'umidità può condensarsi all'interno della cavità o sul vetro della porta. È normale.
Per ridurre questo effetto, attendere 10-15 minuti dopo l'accensione prima di mettere il cibo all'interno del
forno. In ogni caso, la condensa scompare quando il forno raggiunge la temperatura di cottura.
•Cuocere le verdure in un contenitore con un coperchio invece di un vassoio aperto.
•Evitare di lasciare il cibo all'interno del forno dopo la cottura per un periodo superiore a 15/20 minuti.
• I bambini al di sotto di 8 anni dovrebbero essere tenuti a distanza se non continuamente supervisionati.
• L'apparecchio può essere usato da bambini dagli 8 anni in su e persone con ridotte capacità fisiche,
sensoriali o mentali o senza esperienza e conoscenza del prodotto se supervisionate o dando loro istruzioni
riguardo al funzionamento dell'apparecchio in maniera sicura e coscente del rischio possibile.
• I bambini non dovrebbero giocare con l'apparecchio.
• Questo apparecchio è destinato ad un uso in ambienti domestici e simili come per esempio:
- nelle aree ristoro di negozi, uffici e altri ambienti di lavoro;
- negli agriturismo;
- dai clienti negli hotels, motels e altre aree residenziali simili;
- nei bed & breakfast.
Un utilizzo diverso da quello tipico dell’ambiente domestico, come l’uso professionale da parte di esperti o
di persone addestrate, è escluso anche negli ambienti sopra descritti.
Un utilizzo non coerente con quello riportato, può ridurre la vita del prodotto e può invalidare la
garanzia del costruttore.
Qualsiasi danno all’apparecchio o ad altro, derivante da un uso diverso da quello domestico (anche quando
l’apparecchio è installato in un ambiente domestico), non sarà ammesso dal costruttore in sede legale.
• Non lasciare la porta aperta in posizione orizzontale, al fine di evitare potenziali pericoli (es.
inciampare).
• ATTENZIONE!
Coltelli ed altri utensili con l’estremità appuntite devono essere collocati nel cesto con le punte rivolte verso
il basso o in posizione orizzontale
• Nel caso si installi la macchina su un pavimento ricoperto da tappeti o con moquette, controllare che le
aperture di ventilazione alla base dell'apparecchio non vengano ostruite.
Inoltre, la spina dell'apparecchio deve rimanere accessibile anche dopo l'installazione.
• L’apparecchio deve essere connesso alla rete idrica, solo con i nuovi tubi di carico forniti in dotazione. I
vecchi tubi di carico non devono essere riutilizzati.
• La pressione idrica deve essere compresa tra un minimo di 0,08 MPa e un massimo di 0,8 MPa. Per
pressioni inferiori consultare il Centro Assistenza Tecnica.
• Prima di alimentare elettricamente l'elettrodomestico accertarsi:
1. che la presa abbia un corretto collegamento di messa a terra;
2. che la portata amperometrica del contatore elettrico risulti idonea per l'assorbimento indicato dai dati di
targa dell'elettrodomestico.
ATTENZIONE!
L'efficacia della sicurezza è comunque subordinata anche alla corretta messa a terra del Vostro
impianto.
Per la mancanza di un efficiente impianto di terra, si avverte una lieve dispersione di corrente sulle parti
metalliche dell'elettrodomestico per la presenza del filtro antidisturbo radio.
• La società costruttrice resta sollevata da ogni responsabilità per eventuali danni a persone o cose, derivanti
dal mancato allacciamento della linea di terra.
•
Fare attenzione che l'apparecchiatura non schiacci il cavo di alimentazione.
•
Non tirare il cavo di alimentazione, o l'apparecchio stesso, per staccare la spina dalla presa di corrente.
•
In generale è sconsigliabile l'uso di adattatori, prese multiple e/o prolunghe.
•
Non toccare l'apparecchio con mani o piedi bagnati o umidi.
•
Non usare l'apparecchio a piedi nudi.
•
Non esporre l'apparecchio ad agenti atmosferici (pioggia, sole, ecc.).
•
Appoggiarsi o sedersi sulla porta aperta della lavastoviglie, può causarne il ribaltamento.
•
In caso di guasto e/o di cattivo funzionamento dell'apparecchio, spegnerlo, chiudere il rubinetto dell'acqua
e non manomettere l'elettrodomestico.
Per l'eventuale riparazione rivolgersi solamente ad un Centro di Assistenza Tecnica (GIAS) e richiedere
l'utilizzo di ricambi originali.
Il mancato rispetto di quanto sopra può compromettere la sicurezza dell'apparecchio e dell'utilizzatore.
This manual suits for next models
1
Table of contents
Languages:
Other Candy Hob manuals

Candy
Candy CDH 30 Specification sheet

Candy
Candy TRIO 501 User manual

Candy
Candy CH64DVT User manual

Candy
Candy PVK 310 Operation manual

Candy
Candy PLE 64 User manual

Candy
Candy CHG6 User manual

Candy
Candy CDOY7W4X User manual

Candy
Candy CIES55MCTT/1 User manual

Candy
Candy CITT642SSC User manual

Candy
Candy CHG6D4WX User manual

Candy
Candy CIDMCS633TT User manual

Candy
Candy CHW6BR4WGTWA User manual

Candy
Candy CHW60LX User manual

Candy
Candy CH 64 X User manual

Candy
Candy CFX 64 P User manual

Candy
Candy CFI 82 User manual

Candy
Candy PGF75 User manual

Candy
Candy CEL7P4WX User manual

Candy
Candy CHK46C User manual

Candy
Candy CI 62 TP User manual