manuals.online logo
Brands
  1. Home
  2. •
  3. Brands
  4. •
  5. Canon
  6. •
  7. All In One Printer
  8. •
  9. Canon PIXMA MX432 Manual

Canon PIXMA MX432 Manual

K10375/K10374
XXXXXXXX ©CANON INC.2012
1
2
ESPAÑOL
Conguración del FAX
Para utilizar las funciones del equipo, puede introducir la
conguración del fax mediante Conguración fácil (Easy setup).Conecte una clavija de línea telefónica / Conecte un teléfono
En esta figura se muestra un método de conexión básico. Para ver otros métodos de
conexión, consulte el Manual en pantalla.
Usuarios en Europa: si utiliza su propio cable de línea telefónica, asegúrese de que es un
cable de línea telefónica de 6 hilos.
•
•
Conecte el equipo a una clavija de línea telefónica con el cable de línea telefónica
suministrado.
El conector lleva la etiqueta en la parte posterior del equipo.
11
Pulse el botón para mostrar el Menú Congurar (Setup menu).
Utilice el botón [] para seleccionar Conguración fax (Fax settings) y, a continuación, pulse el botón OK.
Utilice el botón [] para seleccionar Conguración fácil (Easy setup) y, a continuación, pulse el botón OK.
Utilice el botón [] para seleccionar Iniciar cong. (Start setup) y, a continuación, pulse el botón OK.
Se inicia la Conguración fácil (Easy setup).
Siga las instrucciones en pantalla para nalizar la conguración en función del entorno operativo.
11
22
33
44
Información complementaria sobre la conguración del fax utilizando Conguración
fácil (Easy setup)
Uso de Conguración fácil (Easy setup)
Al conectar un teléfono o un contestador automático, retire la tapa (Cap) y, a continuación,
conecte el teléfono o el contestador automático con un cable de línea telefónica.
El conector lleva la etiqueta en la parte posterior del equipo.
22
No utilice un adaptador de clavija telefónica doble.
Usuarios de Reino Unido: utilice un adaptador de B.T. para la conexión, si fuera necesario.
•
•
Cuando aparezca esta pantalla, realice las siguientes operaciones.
Setting Up the FAX To use the fax features of the machine, you can enter the fax
settings through the Easy setup.
ENGLISH
Press the button to display the Setup menu.
Use the [] button to select Fax settings, then press the OK button.
Use the [] button to select Easy setup, then press the OK button.
Use the [] button to select Start setup, then press the OK button.
Easy setup starts up.
Follow the on-screen instruction to complete the settings in accordance with the operating environment.
11
22
33
44
Connect to a Telephone Jack / Connect to a Telephone
A basic connection method is shown in this figure. For other connection methods, refer to
the On-screen Manual.
Users in Europe: If you prepare your own telephone line cable, be sure it is a 6-wire
telephone line cable.
•
•
Connect the machine to a telephone jack with the supplied telephone line cable.
The connector is labeled on the back of the machine.
11
When connecting a telephone or an answering machine, remove the Cap, then connect a
telephone or an answering machine with a telephone line cable.
The connector is labeled on the back of the machine.
22
Do not use a telephone jack line duplexer.
Users in UK: Use a B.T. adapter for connection as required.
•
•
Complementary Information about Fax Setting Using Easy setup
When this screen is displayed, perform the following operations.
Using Easy setup
QT5-4770-V01 PRINTED IN XXXXXXXX
Seleccione un tipo de línea
Para conectar directamente la clavija de línea telefónica de la pared
Para conectar una línea de extensión de PBX o un divisor xDSL
Utilice el botón [] para seleccionar Línea de teléfono (Telephone line)
y, a continuación, pulse el botón OK.
•
•
Para conectar un teléfono de Internet
Para conectar un módem xDSL
Para conectar una línea RDSI
Utilice el botón [] para seleccionar IP línea de teléfono (IP telephone
line) y, a continuación, pulse el botón OK.
•
•
•
Cuando aparezca la siguiente pantalla, seleccione un tipo de línea.
Dena el Tipo lín. telefónica (Telephone line type)
Un tipo de tono
Utilice el botón [] para seleccionar Tonos (Touch tone) y, a
continuación, pulse el botón OK.
•Ningún tipo de tono
Utilice el botón [] para seleccionar Pulso rotativo (Rotary pulse) y, a
continuación, pulse el botón OK.
•
Cuando aparezca la siguiente pantalla, dena el Tipo lín. telefónica (Telephone line type).
Introduzca la conguración del contestador automático externo
Si no desea utilizar un contestador automático
Utilice el botón [] para seleccionar No utilizar (Do not use) y, a
continuación, pulse el botón OK.
•
Si desea utilizar un contestador automático
Utilice el botón [] para seleccionar Utilizar (Use) y, a continuación,
pulse el botón OK.
•
Cuando aparezca la siguiente pantalla, seleccione si “utilizar o no un contestador automático en caso de que el fax y el teléfono
compartan la misma línea”.
Introduzca la Cong. usuario FAX (FAX user settings) y la Cong. hora/fecha (Date/time
setting)
Consulte el Manual en pantalla para introducir la conguración.
Introduzca la conguración del DRPD o del Conmutador de red (Network switch)
Consulte el Manual en pantalla para introducir la conguración.
DRPD sólo está disponible en Estados Unidos y Canadá.
El Conmutador de red (Network switch) podría no estar disponible dependiendo de la región o del país.
•
•
Para obtener información sobre otras conguraciones, consulte el Manual en pantalla.
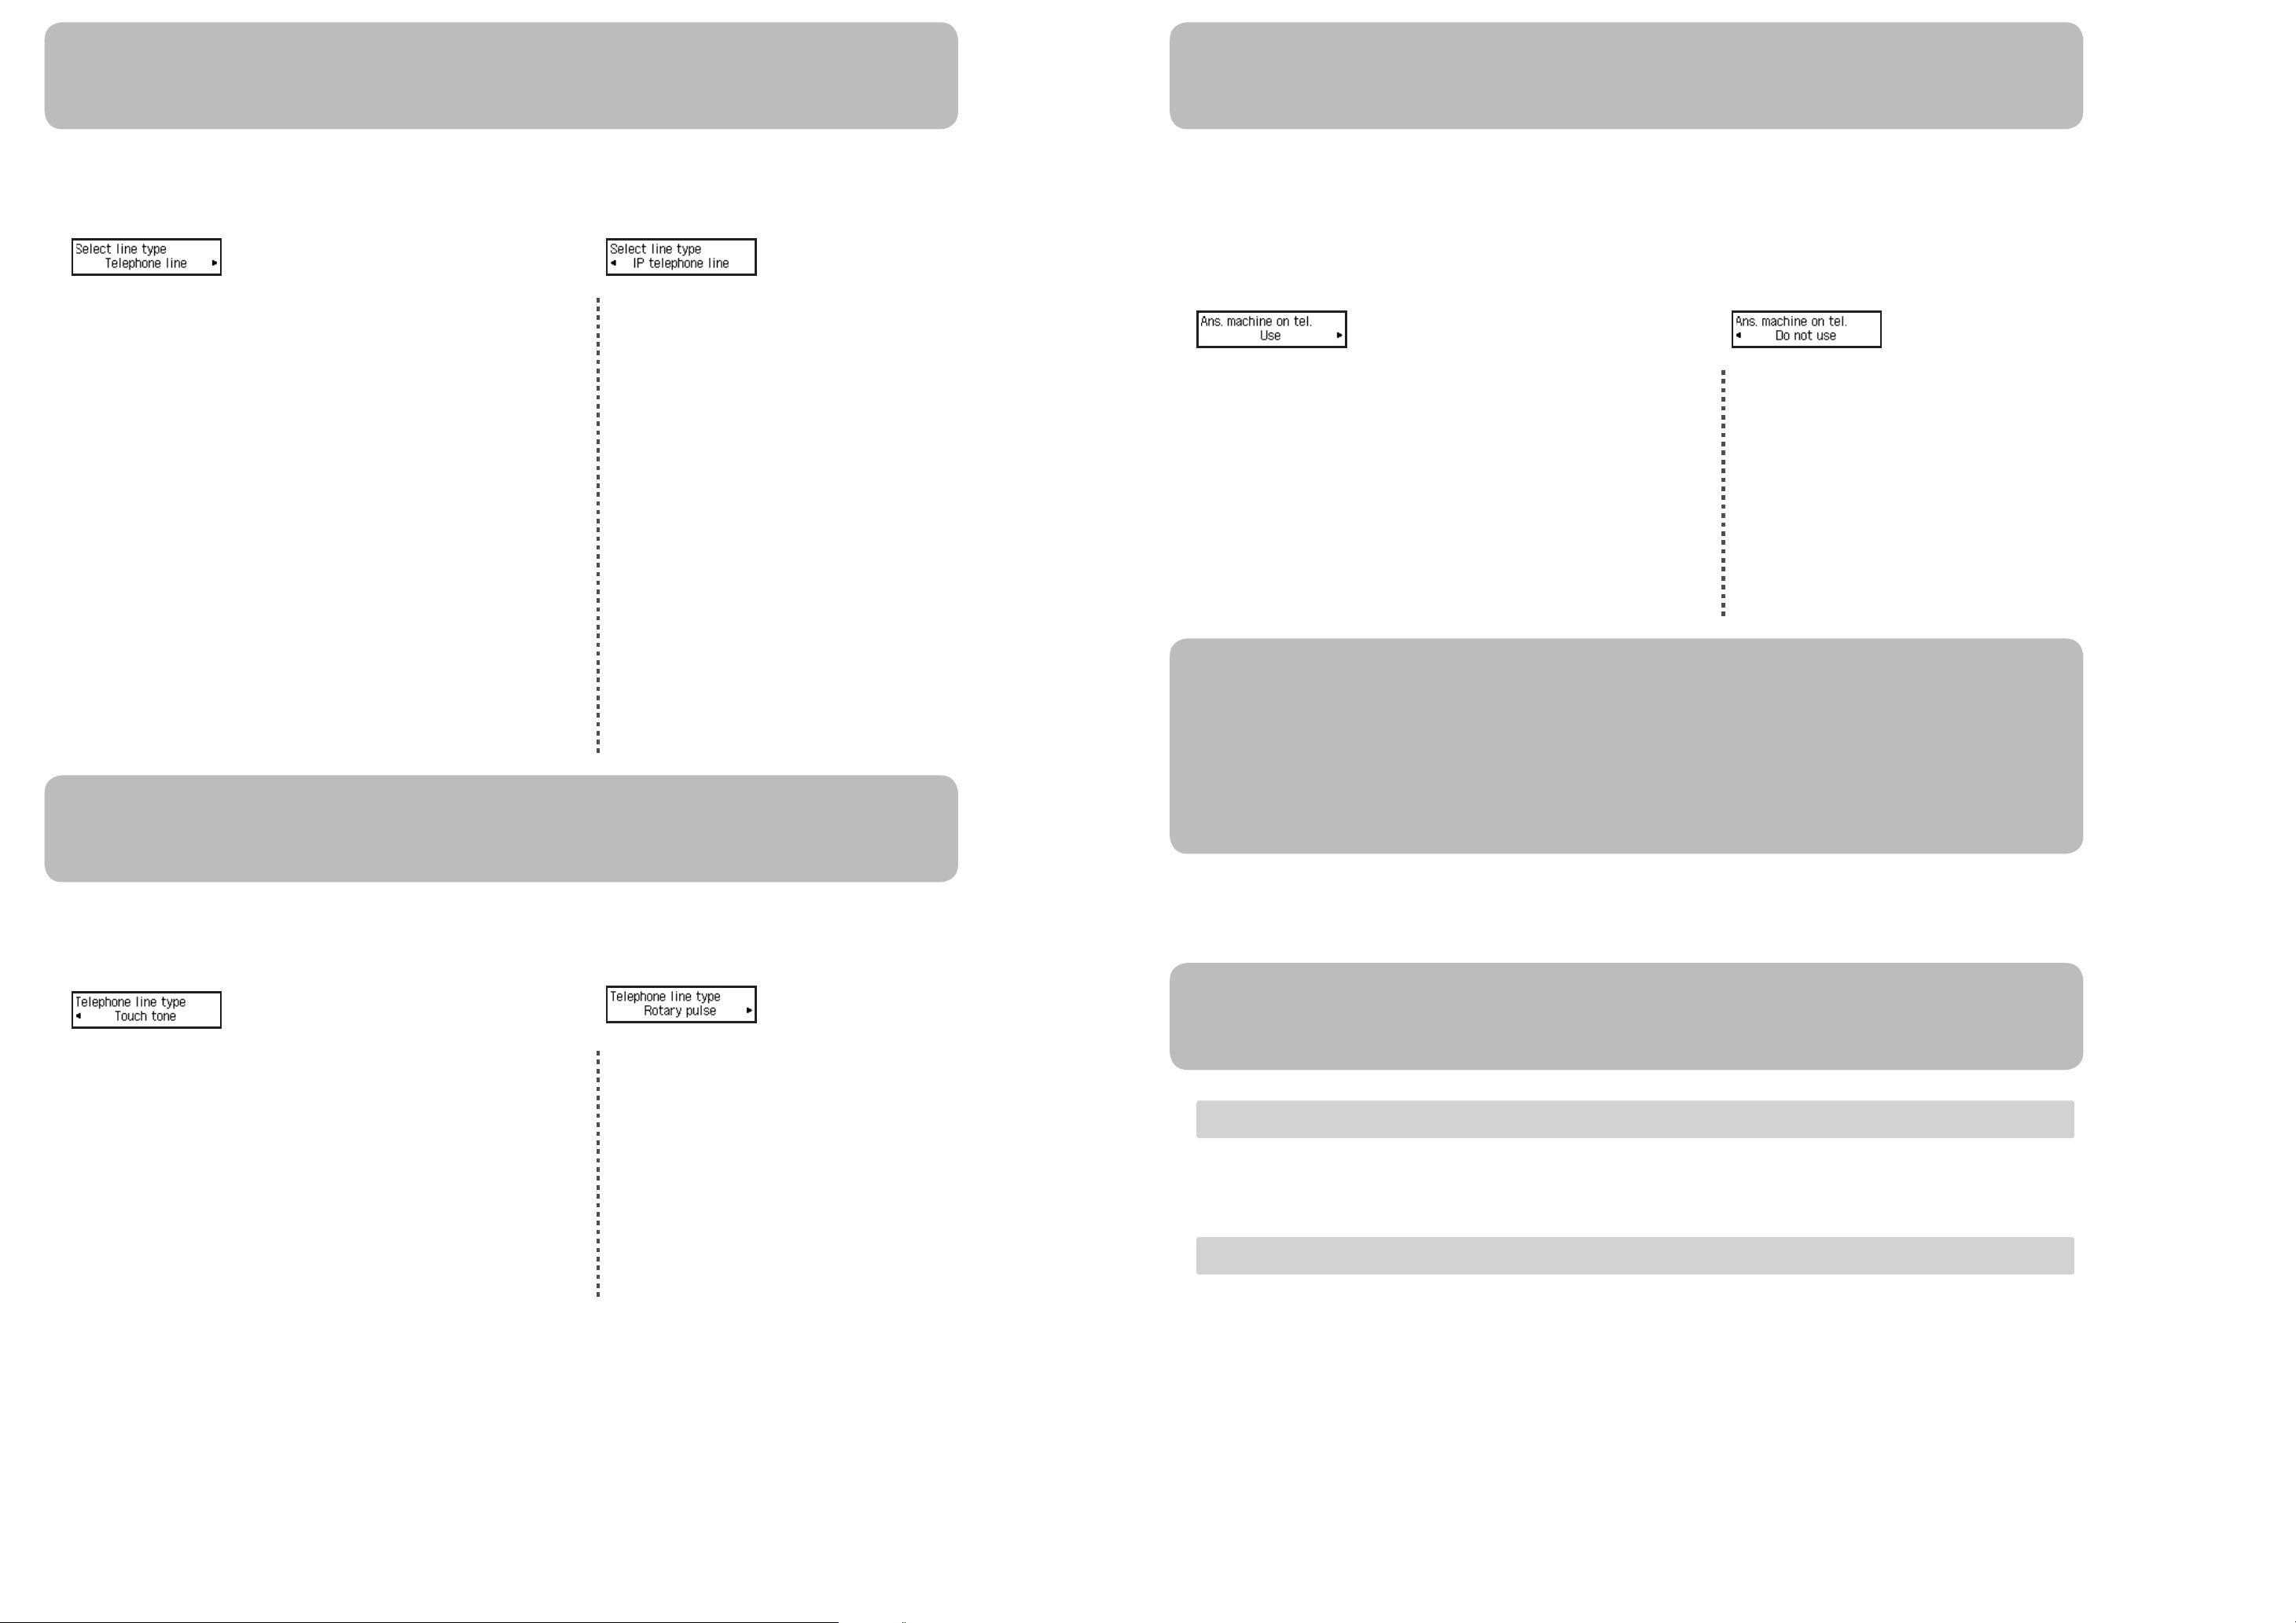
Select a Line Type
When the following screen is displayed, select a line type.
To connect directly to the telephone jack on the wall
To connect to a PBX extension line or a xDSL splitter
Use the [] button to select Telephone line, then press the OK button.
•
•
To connect to an internet telephone
To connect to a xDSL modem
To connect to an ISDN line
Use the [] button to select IP telephone line, then press the OK button.
•
•
•
Set the Telephone line type
When the following screen is displayed, set the Telephone line type.
A tone type
Use the [] button to select Touch tone, then press the OK button.
•Not a tone type
Use the [] button to select Rotary pulse, then press the OK button.
•
Enter the External Answering Machine settings
When the following screen is displayed, select “whether or not to use an answering machine in case fax and telephone are on the
same line”.
If you do not want to use an answering machine
Use the [] button to select Do not use, then press the OK button.
•
If you want to use an answering machine
Use the [] button to select Use, then press the OK button.
•
Enter the FAX user settings and Date/time setting
Refer to the On-screen Manual to enter the settings.
Enter the DRPD or Network switch settings
Refer to the On-screen Manual to enter the settings.
DRPD is available only in US and Canada.
Network switch may not be available depending on the region or country.
•
•
For the details of other settings, refer to the On-screen Manual.

Other manuals for PIXMA MX432

8

This manual suits for next models

2

Other Canon All In One Printer manuals

Canon Color imageCLASS MF8170c User manual

Canon

Canon Color imageCLASS MF8170c User manual

Canon imageCLASS MF4880dw Safety guide

Canon

Canon imageCLASS MF4880dw Safety guide

Canon imageRUNNER ADVANCE 4251 User manual

Canon

Canon imageRUNNER ADVANCE 4251 User manual

Canon IMAGE RUNNER 5050 Installation and maintenance instructions

Canon

Canon IMAGE RUNNER 5050 Installation and maintenance instructions

Canon MF5750 - ImageCLASS B/W Laser User manual

Canon

Canon MF5750 - ImageCLASS B/W Laser User manual

Canon PIXMA MP620 series Manual

Canon

Canon PIXMA MP620 series Manual

Canon ImageCLASS MF4690 User manual

Canon

Canon ImageCLASS MF4690 User manual

Canon imagerunner advance C5550i User manual

Canon

Canon imagerunner advance C5550i User manual

Canon IMAGECLASS MF4150 Setup guide

Canon

Canon IMAGECLASS MF4150 Setup guide

Canon PIXMA MG7120 User manual

Canon

Canon PIXMA MG7120 User manual

Canon PIXMA MG5220 Series User manual

Canon

Canon PIXMA MG5220 Series User manual

Canon Color imageCLASS MF8580Cdw Service manual

Canon

Canon Color imageCLASS MF8580Cdw Service manual

Canon MultiPASS L60 User manual

Canon

Canon MultiPASS L60 User manual

Canon Pixma MG7100 Series Setup guide

Canon

Canon Pixma MG7100 Series Setup guide

Canon Color imageRUNNER C3380 Series User manual

Canon

Canon Color imageRUNNER C3380 Series User manual

Canon PIXMA MX895 User manual

Canon

Canon PIXMA MX895 User manual

Canon PIXMA MP460 User manual

Canon

Canon PIXMA MP460 User manual

Canon PIXMA MP600R User manual

Canon

Canon PIXMA MP600R User manual

Canon Smart Base MP730 Service manual

Canon

Canon Smart Base MP730 Service manual

Canon IMAGERUNNER 7095 PRINTER User manual

Canon

Canon IMAGERUNNER 7095 PRINTER User manual

Canon MultiPASS MP390 User manual

Canon

Canon MultiPASS MP390 User manual

Canon imageCLASS LBP312dn User manual

Canon

Canon imageCLASS LBP312dn User manual

Canon Color imageCLASS MF8170c Installation and maintenance instructions

Canon

Canon Color imageCLASS MF8170c Installation and maintenance instructions

Canon PIXMA MG5600 Series Setup guide

Canon

Canon PIXMA MG5600 Series Setup guide

Popular All In One Printer manuals by other brands

Sharp MX-M264N Operation manual

Sharp

Sharp MX-M264N Operation manual

Epson Stylus Office BX600FW Series Basic operation guide

Epson

Epson Stylus Office BX600FW Series Basic operation guide

Copystar CS-C4035E Specifications

Copystar

Copystar CS-C4035E Specifications

Brother HL-2270DW Quick setup guide

Brother

Brother HL-2270DW Quick setup guide

Kyocera FS-1128MFP Driver guide

Kyocera

Kyocera FS-1128MFP Driver guide

Epson Artisan 725 quick guide

Epson

Epson Artisan 725 quick guide

Konica Minolta PagePro 1380 MF Technical guide

Konica Minolta

Konica Minolta PagePro 1380 MF Technical guide

Oki S700 user guide

Oki

Oki S700 user guide

Lexmark 2200 Series installation guide

Lexmark

Lexmark 2200 Series installation guide

Lexmark Pro900 Series Service manual

Lexmark

Lexmark Pro900 Series Service manual

Sharp MX4111N Specifications

Sharp

Sharp MX4111N Specifications

Brother MFC 230C - Color Inkjet - All-in-One Quick setup guide

Brother

Brother MFC 230C - Color Inkjet - All-in-One Quick setup guide

Xerox B1022 user guide

Xerox

Xerox B1022 user guide

Lexmark 101 user guide

Lexmark

Lexmark 101 user guide

Lexmark 5495 - X Color Inkjet Quick setup

Lexmark

Lexmark 5495 - X Color Inkjet Quick setup

Brother MFC-J615W user manual

Brother

Brother MFC-J615W user manual

Konica Minolta bizhub C450 user guide

Konica Minolta

Konica Minolta bizhub C450 user guide

Sharp MX-3110N Operation manual

Sharp

Sharp MX-3110N Operation manual

manuals.online logo
manuals.online logoBrands
  • About & Mission
  • Contact us
  • Privacy Policy
  • Terms and Conditions

Copyright 2025 Manuals.Online. All Rights Reserved.