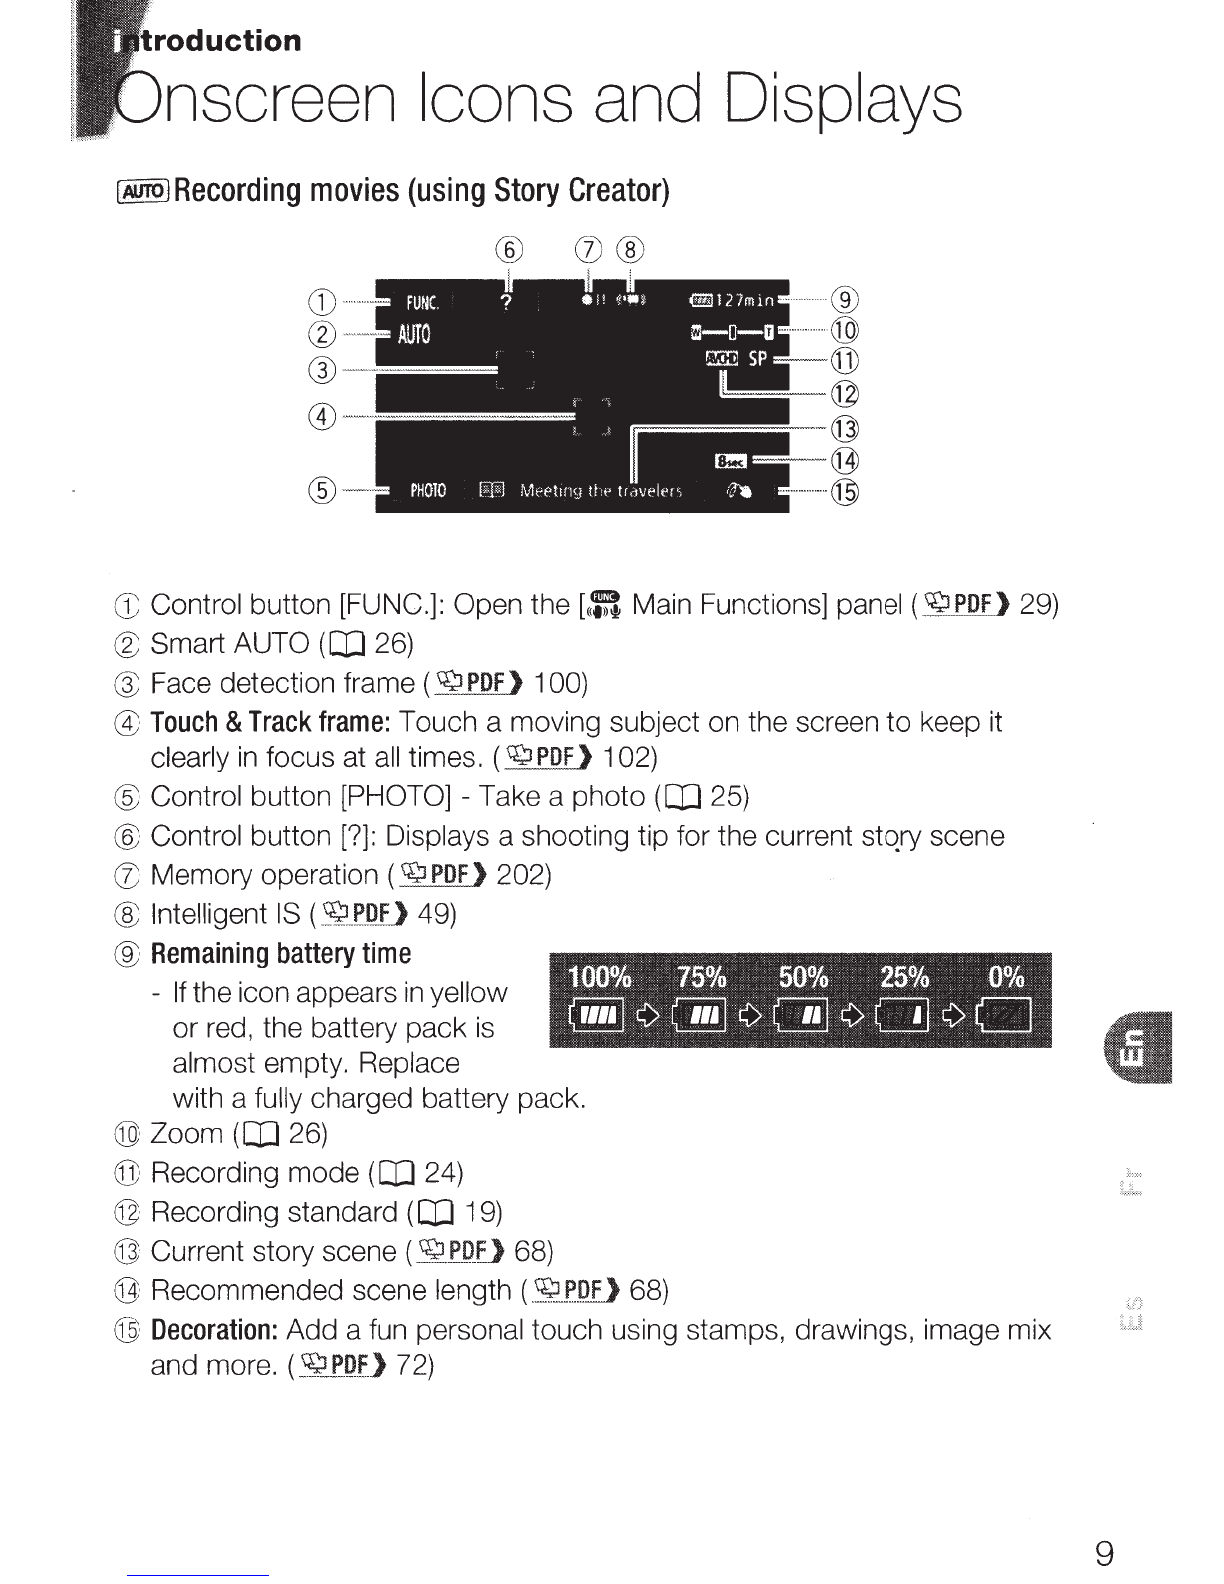
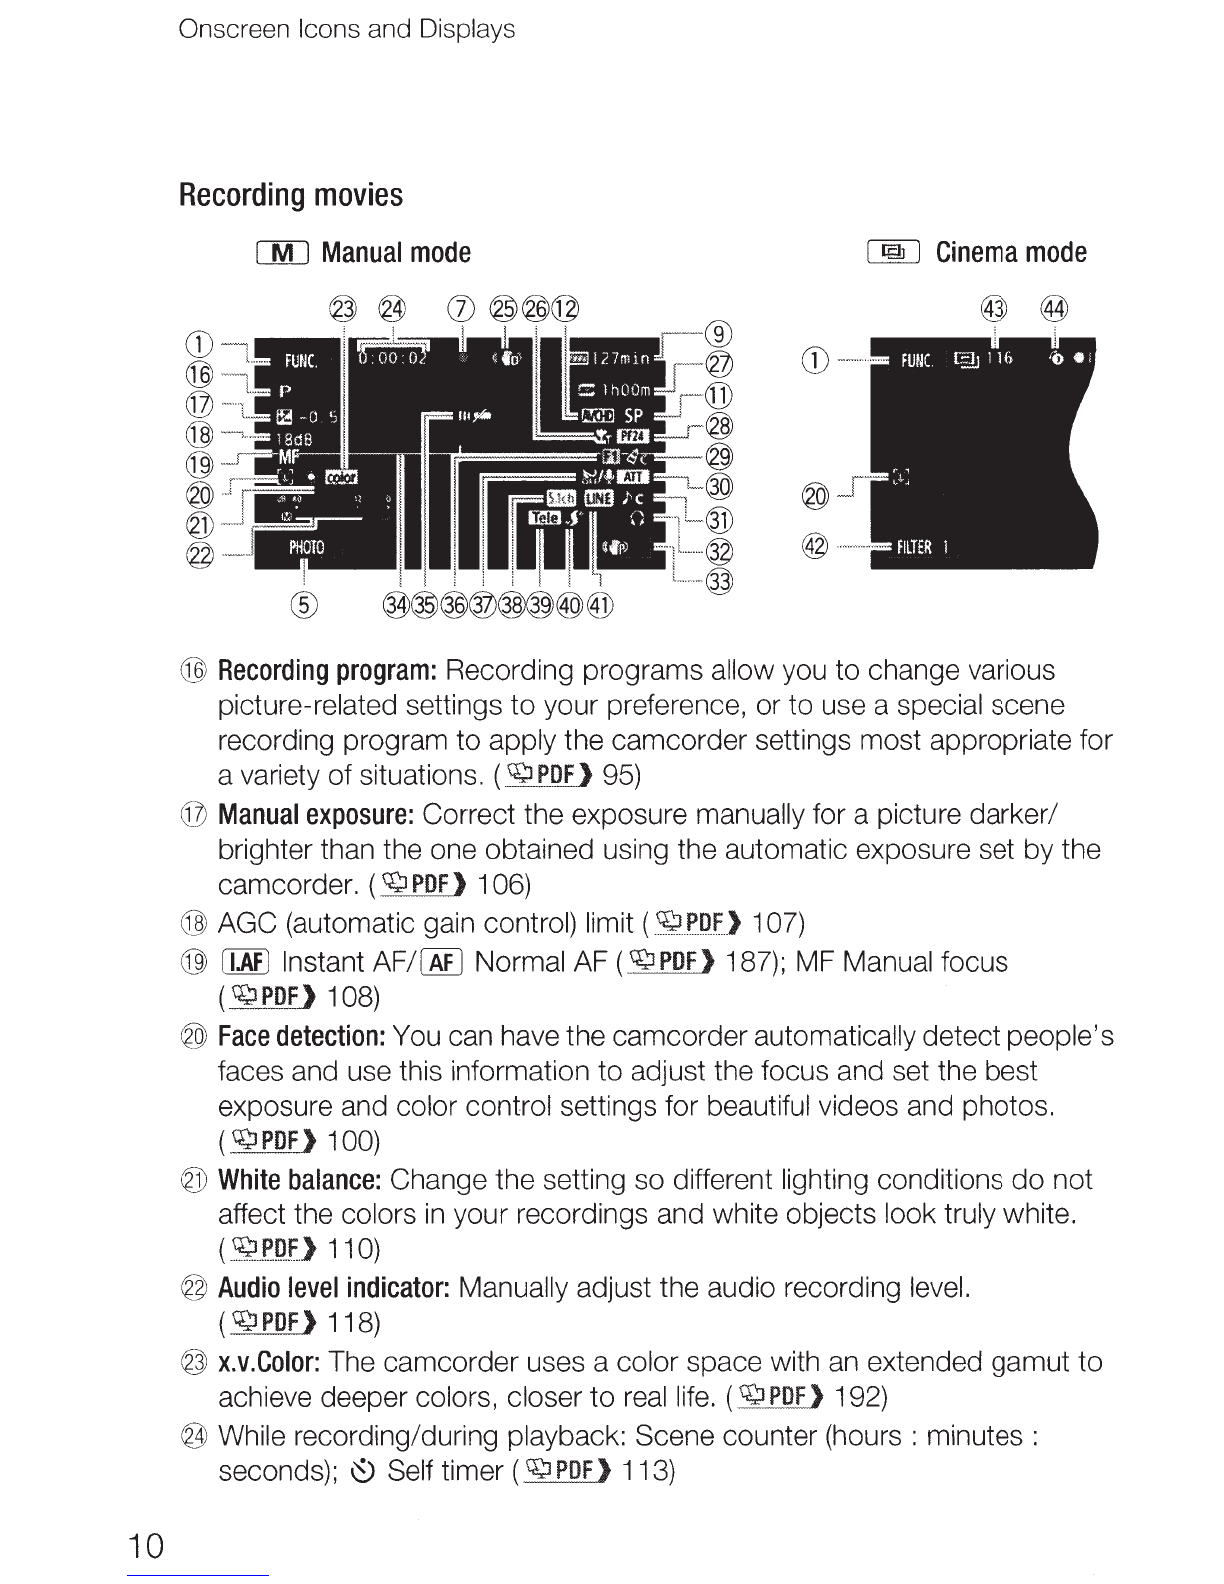
Canon VIXIA HF M50 User manual

canon
VIXIA
HFMSO
VI
XIA
HFM52
VI
XIA
HFMSOO
NTSC

2
Important Usage Instructions
WARNING
TO
REDUCE
THE
RISK
OF
FIRE
OR
ELECTRIC
SHOCK,
DO
NOT
EXPOSE
THIS
PRODUCT
TO
RAIN
OR
MOISTURE.
COPYRIGHT
WARNING:
Unauthorized
recording
of
copyrighted
materials
may
infringe
on
the
rights
of
copyright
owners
and
be
contrary
to
copyright
laws.
The
Mains
plug
is
used
as
the
disconnect
device.
The
Mains
plug
shall
remain
readily
operable
to
disconnect
the
plug
in
case
of
an
accident.
CAUTION:
•
Danger
of
explosion
if
the
wrong
type
of
batteries
are
attached.
Use
only
the
same
type
of
batteries.
•
Do
not
expose
batteries
or
product
to
excessive
heat
such
as
the
inside
of
a
car
under
direct
sunlight,
fire,
etc.
While
using
the
compact
power
adapter,
do
not
wrap
it
or
cover
it
with
a
piece
of
cloth,
and
do
not
place
it
in
confined
narrow
spaces.
CAUTION
RISK OF ELECTRIC SHOCK
DO
NOT
OPEN
I
CAUTION:
I
TO
REDUCE
THE
RISK
OF
ELECTRIC
SHOCK,
DO
NOT
REMOVE
COVER
(OR
BACK).
NO
USER-
I
SERVICEABLE
PARTS
INSIDE.
REFER
SERVICING
TO
QUALIFIED
SERVICE
PERSONNEL.
The
lightning
flash
with
arrowhead
symbol,
within
an
equilateral
triangle,
is
intended
to
alert
the
user
to
the
presence
of
uninsulated
"dangerous
voltage"
within
the
product's
enclosure,
that
may
be
of
sufficient
magnitude
to
constitute
a
risk
of
electric
shock
to
persons.
The
exclamation
point,
within
an
equilateral
triangle,
is
intended
to
alert
the
user
to
the
presence
of
important
operating
and
maintenance
(servicing)
instructions
in
the
literature
accompanying
the
product.

FCC/IC
NOTICE
HD
Camcorder,
VIXIA
HF
M52
I
VIXIA
HF
M50
I
VIXIA
HF
M500
systems
This
device
complies
with
Part
15
of
the
FCC
Rules.
Operation
is
subject
to
the
following
two
conditions:
(1)
This
device
may
not
cause
harmful
interference,
and
(2)
this
device
must
accept
any
interference
received,
including
interference
that
may
cause
undesired
operation.
Note:
This
equipment
has
been
tested
and
found
to
comply
with
the
limits
for
class
B
digital
device,
pursuant
to
Part
15
of
the
FCC
Rules.
These
limits
are
designed
to
provide
reasonable
protection
against
harmful
interference
in
a
residential
installation.
This
equipment
generates,
uses
and
can
radiate
radio
frequency
energy
and,
if
not
installed
and
use
in
accordance
with
the
instructions,
may
cause
harmful
interference
to
radio
communications.
However,
there
is
no
guarantee
that
interference
will
not
occur
in
a
particular
installation.
If
this
equipment
does
cause
harmful
interference
to
radio
or
television
reception,
which
can
be
determined
by
turning
the
equipment
off
and
on,
the
user
is
encouraged
to
try
to
correct
the
interference
by
one
or
more
of
the
following
measures:
•
Reorient
or
relocate
the
receiving
antenna.
•
Increase
the
separation
between
the
equipment
and
receiver.
•
Connect
the
equipment
into
an
outlet
on
a
circuit
different
from
that
to
which
the
receiver
is
connected.
•
Consult
the
dealer
or
an
experienced
radionv
technician
for
help.
Use
of
shielded
cable
is
required
to
comply
with
class
B
limits
in
Subpart
B
of
Part
15
of
FCC
Rules.
Do
not
make
any
changes
or
modifications
to
the
equipment
unless
otherwise
specified
in
the
manual.
If
such
changes
or
modifications
should
be
made,
you
could
be
required
to
stop
operation
of
the
equipment.
ModeiiD0008
(including
WLAN
Module
Model
WM217)
This
device
complies
with
Industry
Canada
license-exempt
RSS
standard(s).
Operation
is
subject
to
the
following
two
conditions:
(1)
this
device
may
not
cause
interference,
and
(2)
this
device
must
accept
any
interference,
including
interference
that
may
cause
undesired
operation
of
the
device.
This
transmitter
must
not
be
co-located
or
operated
in
conjunction
with
any
other
antenna
or
transmitter.
The
available
scientific
evidence
does
not
show
that
any
health
problems
are
associated
with
using
low-power
wireless
devices.
There
is
no
proof,
however,
that
these
low
power
wireless
devices
are
absolutely
safe.
Low-power
wireless
devices
emit
low
levels
of
radio
frequency
energy
(RF)
in
the
microwave
range
while
being
used.
Whereas
high
levels
of
RF
can
produce
health
effects
(by
heating
tissue),
exposure
to
low-level
RF
that
does
not
produce
heating
effects
causes
no
known
adverse
health
effects.
Many
studies
of
low-level
RF
exposures
have
not
found
any
biological
effects.
Some
studies
have
suggested
that
some
biological
effects
might
occur,
but
such
findings
have
not
been
confirmed
by
additional
research.
This
model
has
been
tested
and
found
to
comply
with
FCC/IC
radiation
exposure
limits
set
forth
for
an
uncontrolled
equipment
and
meets
the
FCC
radio
frequency
(RF)
Exposure
Guidelines
in
Supplement
C
to
OET65
and
RSS-1
02
of
the
IC
radio
frequency
(RF)
Exposure
rules.
Canon
U.S.A.,
Inc.
One
Canon
Plaza,
Lake
Success,
NY
11042,
U.S.A.
Tel
No.
(516)328-5600
I
This
Class
B
digital
apparatus
complies
with
Canadian
ICES-003.
3

4
IMPORTANT
SAFETY
INSTRUCTIONS
In
these
safety
instructions
the
word
"apparatus"
refers
to
the
Canon
HD
Camcorder
VIXIA
HF
M52
I
VIXIA
HF
M50
I
VIXIA
HF
M500
and
all
its
accessories.
1
Read
these
instructions.
2
Keep
these
instructions.
3
Heed
all
warnings.
4
Follow
all
instructions.
5
Do
not
use
this
apparatus
near
water.
6
Clean
only
with
dry
cloth.
7
Do
not
install
near
any
heat
sources
such
as
radiators,
heat
registers,
stoves,
or
other
apparatus
(including
amplifiers)
that
produce
heat.
8
Protect
the
power
cord
from
being
walked
on
or
pinched
particularly
at
plugs,
convenience
receptacles,
and
the
point
where
they
exit
from
the
apparatus.
9
Only
use
attachments/accessories
specified
by
the
manufacturer.
1
0
Unplug
this
apparatus
during
lightning
storms
or
when
unused
for
long
periods
of
time.
11
Refer
all
servicing
to
qualified
service
personnel.
Servicing
is
required
when
the
apparatus
has
been
damaged
in
any
way,
such
as
power-supply
cord
or
plug
is
damaged,
liquid
has
been
spilled
or
objects
have
fallen
into
the
apparatus,
the
apparatus
has
been
exposed
to
rain
or
moisture,
does
not
operate
normally,
or
has
been
dropped.
I
CA-11
0
identification
plate
is
located
on
the
bottom.
REGIONS
OF
USE
VIXIA
HF
M52
and
VIXIA
HF
M50
are
in
compliance
(as
of
January
2012)
with
the
radio
signal
regulations
of
the
regions
listed
below.
For
details
on
other
regions
where
they
can
be
used,
make
inquiries
with
the
contacts
listed
on
the
back
side
of
this
instruction
manual.
•
Canada,
Hong
Kong
S.A.R.,
USA
I
Model
ID0008:
VIXIA
HF
M52
I
VIXIA
HF
M50

Important
Note
About
the
Memory
• Observe the following precautions while the ACCESS indicator
is
on or
flashing. Failing to do so may result
in
permanent data loss or damage to
the memory.
-Do not open the memory card slot cover.
-Do not disconnect the power source or turn off the camcorder.
-Do not change the camcorder's operating mode.
Trademark
Acknowledgements
•
SD
,
SDHC
and
SDXC
Logos
are
trademarks
of
SD-3C
,
LLC.
•
Microsoft
and
Windows
are
trademarks
or
registered
trademarks
of
Microsoft
Corporation
in
the
United
States
and/or
other
countries.
•
App
Store,
iPhone,
iTunes
,
Mac
OS
and
Macintosh
are
trademarks
of
Apple
Inc
.,
registered
in
the
U.S.
and
other
countries.
•
"x.v.Color"
and
the
"x
.v.
Color"
logo
are
trademarks
.
•
HDMI,
the
HDMIIogo
and
High-Definition
Multimedia
Interface
are
trademarks
or
registered
trademarks
of
HDMI
Licensing
LLC
in
the
United
States
and
other
countries
.
•
"AVCHD
"
and
the
"AVCHD
"
logo
are
trademarks
of
Panasonic
Corporation
and
Sony
Corporation
.
•
Manufactured
under
license
from
Dolby
Laboratories.
"Dolby"
and
the
double-D
symbol
are
trademarks
of
Dolby
Laboratories.
•
YouTube
is
a
trademark
of
Google
Inc.
•
Face
book
is
a
registered
trademark
of
Facebook,
Inc
.
•
Wi-Fi
is
a
registered
trademark
of
the
Wi-Fi
Alliance.
II]
DOLBY
DIGITAL I
STEREO
CREATOR
•
Wi-Fi
Certified,
WPA,
WPA2
,
and
the
Wi-Fi
Certified
logo
are
trademarks
of
the
Wi-Fi
Alliance.
•
WPS
as
used
on
the
camcorder
's
settings,
onscreen
displays
and
in
this
manual
signifies
Wi-Fi
Protected
Setup
.
•
DLNA
,
the
DLNA
Logo
and
DLNA
CERTIFIED
are
trademarks,
service
marks
,
or
certification
marks
of
the
Digital
Living
Network
Alliance.
•
Other
names
and
products
not
mentioned
above
may
be
trademarks
or
registered
trademarks
of
their
respective
companies.
•
This
device
incorporates
exFAT
technology
licensed
from
Microsoft.
• "
Full
HD
1
080"
refers
to
Canon
camcorders
compliant
with
high-definition
video
composed
of
1
,080
vertical
pixels
(scanning
lines).
•
ANY
USE
OF
THIS
PRODUCT
OTHER
THAN
CONSUMER
PERSONAL
USE
IN
ANY
1080
MANNER
THAT
COMPLIES
WITH
THE
MPEG
-2
STANDARD
FOR
ENCODING
VIDEO
INFORMATION
FOR
PACKAGED
MEDIA
IS
EXPRESSLY
PROHIBITED
WITHOUT
A
LICENSE
UNDER
APPLICABLE
PATENTS
IN
THE
MPEG-2
PATENT
PORTFOLIO:
WHICH
LICENSE
IS
AVAILABLE
FROM
MPEG
LA
,
L.L.C
.,
250
STEELE
STREET
,
SUITE
300,
DENVER,
COLORADO
80206.
•
This
product
is
licensed
under
AT&T
patents
for
the
MPEG-4
standard
and
may
be
used
for
encoding
MPEG-4
compliant
video
and/or
decoding
MPEG-4
compliant
video
that
was
encoded
only
(1)
for
a
personal
and
non-commercial
purpose
or
(2)
by
a
video
provider
licensed
under
the
AT&T
patents
to
provide
MPEG-4
compliant
video.
No
license
is
granted
or
implied
for
any
other
use
for
MPEG-4
standard.
5

6
Package contents
• CA-11 0 Compact Power Adapter*
[CD]
* CA-11
OE
including power cord,
in
Asia.
• BP-718 Battery Pack
• Stylus pen
[@]
• HTC-1 00/S HOMI Cable
[@]
• IFC-300PCU/S USB Cable [@]
•
IIII~IJtJ
/IIII~IJ1t1
Wi-Fi Basic Setup Guide
• 2 Software CO-ROMs
-PIXELA CD-ROM**
1111&1JtJ/IIII~IJ1t1
Contains VideoBrowser for managing, editing, and
playing back movies, and Network Utility for transferring recordings
wirelessly
to
a computer.
llllt,IJ1tltl
Contains Transfer Utility for saving and transferring movies and
music files you can use as background music.
-
~
VIXIA CD-ROM
Contains the full-version Instruction Manual of the camcorder
(PDF
file).
See the explanation on next page.
**The
CD-ROM includes the instruction manual of the software
(PDF
file).
A
printed Startup Guide for PIXELA's software
is
also supplied. Refer
to
this
Startup Guide for details about the supplied software.

Table of Contents
6 Package contents
9 Onscreen Icons and Displays
14
Charging the Battery Pack
17
Basic Preparations
20 Setting the Date/Time and Language
22
Using a Memory Card
25
Shooting Video and Taking Photos
29 Playing Back Movies and Viewing Photos
32 Playback on a TV Screen
34 Saving and Sharing Your Recordings
35 Abridged Specifications
About
the
Camcorder's
Wi-Fi
Functions
(
llll®lttJ
I
1111®1t1tJ
only)
You can make your camcorder
an
active part of your Wi-Fi network to fully
enjoy a variety
of
Wi-Fi functions. While these Wi-Fi functions are beyond the
scope of this Quick Guide, you can read the Wi-Fi Basic Setup Guide
supplied with the camcorder
to
complete the connection of the camcorder
to
your home Wi-Fi network. And you have the complete information
in
the
full-version Instruction Manual (PDF
file*).
About
the
Camcorder's
PDF
Instruction
Manual
This guide will get you started and show you how to use the most basic
functions ofyour camcorder to shoot video, take photos and play back your
recordings (using the camcorder or connecting
it
to
yoL:Jr
TV).
To learn more
about the more advanced functions of your camcorder, to read important
handling precautions and
to
consult the troubleshooting section
if
an
error
message
is
displayed, be sure
to
read the full-version Instruction Manual
(PDF
file*).
In
this Quick Guide, the
~PDF)
mark indicates reference page
numbers
in
the PDF file.
*
Adobe®
Reader®
6
or
later
is
required to view the
PDF
Instruction
Manual.
7

8
Installing
the
Camcorder's
Instruction
Manual
(PDF
file)
1 Turn on the computer.
2 Insert the VIXIA CD-ROM into the computer's disc drive.
3 Windows: Open the drive into which you inserted the CD-ROM
using Windows Explorer.
Mac
OS: Use Finder and click on the CD-ROM icon.
4 Click/Double-click the Disc_Setup.exe icon.
5
In
the installer panel, click [Instruction Manual of the
Camcorder] and select your language.
6 When the installation is complete, click [OK], then [Exit].
The installer will save the camcorder's Instruction Manual (PDF
file)
on
the computer and will create a shortcut icon on the desktop for easy
access.

reduction
nscreen Icons and Displays
fAIJTOI
Recording
movies
(using
Story
Creator)
CD
@
®
®~~--::====~
0®
®
···@
@
©
G)
~======'---@
@
···®
CD
Control button [FUNC.]: Open
the[<=
Main Functions] panel
C~PDF)
29)
® Smart AUTO
(III
26)
@ Face detection frame (
~PDF)
100)
@
Touch
&
Track
frame:
Touch a moving subject on the screen to keep it
clearly
in
focus at
all
times.
(~PDF>
102)
® Control button [PHOTO] -Take a photo
(III
25)
@ Control button
[?]:
Displays a shooting tip for the current stqry scene
(j) Memory operation (
~PDF)
202)
® Intelligent
IS
(_~_EJlf_}
49)
®
Remaining
battery
time
-
If
the icon appears
in
yellow
or red, the battery pack
is
almost empty. Replace
100o/o
75%
5(}o/o
25o/o
0°/o
~aC1m~~~CJJ~D
with a fully charged battery pack.
® Zoom
(III
26)
@ Recording mode
(III24)
© Recording standard
(III19)
@ Current story scene (
-~P[)_E}
68)
@!
Recommended scene length
(_~_p_p£}
68)
@
Decoration:
Add a fun personal touch using stamps, drawings, image mix
and more.
(~P.Qf.}
72)
9

10
Onscreen Icons and Displays
Recording
movies
CD
@
@
@
®
®
@
@
[][]
Manual
mode
I
[§)
I
Cinema
mode
@
Recording
program:
Recording programs allow you to change various
picture-related settings to your preference, or to use a special scene
recording program to apply the camcorder settings most appropriate for
a variety of situations. (
~_p_DF)
95)
@
Manual
exposure:
Correct the exposure manually for a picture darker/
brighter than the one obtained using the automatic exposure set by the
camcorder.
(~PDF)
106)
@ AGC (automatic gain control) limit (
.~.P..P..f...)
107)
@
[I.AF]
Instant AF/[
AF
I Normal
AF
(~PDF)
187);
MF
Manual focus
(~PDF)
1
08)
@
Face
detection:
You can have the camcorder automatically detect people's
faces and use this information to adjust the focus and set the best
exposure and color control settings for beautiful videos and photos.
(~PDF)
100)
@
White
balance:
Change the setting so different lighting conditions
do
not
affect the colors
in
your recordings and white objects look truly white.
(
.~.1'-P.f..)
11
0)
@
Audio
level
indicator:
Manually adjust the audio recording level.
(~PDF)
118)
@
x.v.Color:
The camcorder uses a color space with
an
extended gamut to
achieve deeper colors, closer to
real
life.
(~PDF)
192)
@ While recording/during playback: Scene counter (hours : minutes :
seconds);
~
Self timer
(~PDF)
113)

@ Image stabilizer (
~
..
PPF}
98)
® Tele macro
(~P
.
PI}
109)
@ Remaining recording time
Onscreen
Icons
and Displays
§1
On the memory card; ©
In
the built-in memory*
~
Relay recording
(~PDF)
40)*
-When there
is
no more free space on the memory,
[©
End] (built-in
memory*)
or
[§l
End] (memory card) will
be
displayed
in
red and
recording will stop.
*
IIII&IIYJ
I
1#11&111t1
only.
@ Frame rate
(~
_P..P..f..
)
94)
@
Image
effects:
Fine-tune the brightness, sharpness, color and contrast
of
your recordings. (
-~
~DF}
112)
®
Microphone
attenuator:
Use the attenuator
to
avoid audio distortions when
the sound
is
too
loud. (
-
~
PQI} 188)
® Audio scene select (
~_!P£}
114)
@ Headphone
output
(
~PDF)
120)
@ Custom control button (
.~
..
P.P..f.
_}
196)
®
Level
marker:
Display onscreen markers to
check
your composition and
make sure horizontal
or
vertical lines
do
not appear crooked
in
your
recordings.
(~PDF)
188)
® Remote sensor off (
.~P.
.
P.f..}
195)
®
Fader (
~PDF_}
103)
®
Auto
wind
screen:
Wind screen removes the background sound of wind
when recording outdoors. You may want to turn it off when recording
indoors
in
very quiet surroundings.
(~PDF)
116)
®
Directionality
of
the optional SM-V1 Surround Microphone
(~
..
P.P.F.}
123)
@ Conversion lens
(T
ele-converter shown) (
~PDF)
188)
@ Mini advanced shoe
(
~PDF)
122)
@ External audio input
(
~PDF_}
126)
© Control button [FILTER
1]
-
Cinema-look
filters:
Use cinema-look filters
to
create unique movies with distinctive looks. (
~.P..PI}
70)
@
In
record pause mode: Total
number
of
scenes
@
Pre-recording:
The
camcorder
will start recording video 3 seconds before
you press
[START/STOP
I,
so you
do
not miss important shooting
opportunities.
(
~PDF}
99)
11

12
Onscreen Icons and Displays
1
~
·
I
Playing
movies
(during
playback)
AVCHD
movies:
._.
~i"'
€Eil84mln
til,._
fiJ
0
00
Ol
-
Jj€)
t
I
SP
11
tl
~
II
•
~
~
fJ•p
1}'6 3
oo
r-r.~;
Oct
25
2012
lm]
1m
-
MP4
movies:
m
~
m
m
ml
~
®
@
@
®
~~"'········
..
····
(j})
@
@
@
External audio input
(~fPI)
84)
@
Eye-Fi
Wireless
Communication:
Using an Eye-Fi card you can upload you
recordings wirelessly. Important restrictions apply so be sure to refer to
Using an Eye-Fi
card
(
~PDF>
160).
@
Scene number
@
Playback control buttons
(OJ
30)
@
Data
code:
Displays information depending on the type of recording.
(~PDF)
66,
189)
® Volume and background music balance controls
(~PDF>
56, 83)
®
File
number
(~PDF)
192)
@Volume
controls
(~PDF)
56)

Onscreen Icons and Displays
Qi1J
Viewing
photos
@ Control button [Edit] -Open the Edit panel
(~PDF>
185)
®
Current photo
I
Total
number
of
photos
®
Control button
[to]
-
Photo
jump
(~
_
P.O.f...)
133)
®
Control button
[....,.]
-
Slideshow:
Play
back
a slideshow
of
your photos and
use your favorite background music. (
~fg_E}
136)
®Control
button
[~]-
Return
to
the [Photos] index screen
(~PDF)
132)
13

14
p 1
hargi
ng
the Battery Pack
The camcorder can be powered with a battery pack or directly using the
compact power adapter. When you use the compact power adapter, the
power
of
the battery pack will not be consumed. Charge the battery pack
before use.
D
Connect the compact power
adapter.
CD
Connect to the adapter (for Asia only).
® Plug into a power outlet.
Connect the camcorder.
Plug into the
DC
IN
terminal.
Insert the battery pack.
CD
Press softly into the battery attachment
unit.
® Slide up until
it
clicks
in
place.
Charging will start when the
camcorder is turned off.
.--------
~POWER
JON/OFFc:::J
'\
.
(CHG)
~mp~
l
(camcorder turned
off)
c:::J
Red lamp on
(charging)
Lamp
off
(battery pack fully charged)
•
•..
:
..•
•••
t:::::)
•••
•..
:
..•
•

Charging the Battery Pack
I
Charging
times
Charging the supplied BP-718 Battery Pack will take approximately
5 hours 10 minutes. A fully charged battery pack will allow for the
following operations (movies
in
FXP
mode).
llll&lltJ
I
llll~ll1el
1
hr.
15
min.
3
hr.
Built-in
memory
'···'"··
····
··
·······
·······
···
···
···
··
All given times are approximate and vary according to recording mode
and charging, recording
or
playback conditions.
See Charging, Recording
and
Playback Times
(~PDF)
231) for details.
0
IMPORTANT
• The battery pack
will
be
charged only when the camcorder
is
off.
•
Do
not connect to the camcorder's
DC
IN
terminal
or
to the compact power
adapter any electrical equipment that
is
not expressly recommended for
use with this camcorder.
•
Do
not connect the supplied compact power adapterto voltage converters
or special power sources such
as
those on aircraft, DC-AC inverters, etc.
~5

16
Charging the Battery Pack
CD
NOTES
• We recommend charging the battery pack
in
temperatures between 10
oc
and 30
oc
(50
oF
and 86
oF).
If
either the ambient temperature or the
battery pack's temperature
is
outside the range of approx. 0 oc to 40
oc
(32
oF
to 104
°F),
charging will not start.
•
If
remaining battery time
is
an
issue, you can power the camcorder using
the compact power adapter so the battery pack will not be consumed.
• Charged battery packs continue to discharge naturally. Therefore, charge
them
on
the day of use, or the day before, to ensure a
full
charge.
• We recommend that you prepare battery packs to last 2 to 3 times longer
than you think you might need.
•
USA
and
Canada
only:
The Lithium ion/polymer battery that
powers the product
is
recyclable. Please
call
1-800-8-BATIERYfor information on how to recycle this
battery.

p2
asic Preparations
Before you begin, make basic adjustments and learn about a few
of
the
frequently-used parts.
See Grip Belt and Straps
(~P.Pf)
24), Adjusting the LCD Screen
(~PDF)
26)
for details.
D
Fasten the grip belt.
Adjust
it
so you can reach the zoom
lever with your index finger, and
I
START/STOP]
with your thumb. You can
use the grip belt together with
an
optional
shoulder strap.
Open the LCD panel and adjust
the angle.
CD
Rotate
it
up to 90 degrees down (for
example, to record with your hand
extended above a crowd).
@ Rotate
it
up to 180degrees toward the
lens (for example, to record video of
yourseln.
Become familiar with the touch
screen.
In
addition
to
touching buttons to select
items, you can also drag your finger
across the screen for operations such as
scrolling menus. While applying pressure,
swipe your finger across the screen.
You can also use the supplied stylus for
more precise operations.
See
Handling Precautions
(~PDF)
222),
Cleaning
(~PDF)
227)
for important
information about how to take care of the touch screen.
17

18
Basic Preparations
0
IMPORTANT
• The
camcorder
uses a pressure-sensitive touch screen. Press firmly
when using
touch
operations.
n Set the camera mode and
iii
recording standard.
Press
(HOME)
to open the HOME menu.
From there, you can access the
[:Camera
Mode] and
[cde
Recording
Standard] menus.

Basic Preparations
Camera mode
Touch
[=
Camera Mode] and then select
one of the following camera modes.
[
fi!!IID]
In
!AUTo!
mode, the camcorder takes
care of most of the settings.
[M]
In
CMJ
mode, you have access to
all
the menus and can use a wide
array of advanced functions.
[I
E!J]
In
I18J
I mode, you can give your
recordings a cinematic look and still
have access to
all
the menus.
See Advanced Functions
(~PDF)
89) for more details.
Recording standard
Press
(HOME)
. Then, touch
[c:d•e
Recording
Standard] and choose to record AVCHD
movies or MP4 movies.
[•"]
If
you plan on showing your movies
on
an
HDTV, then select this option
so you can play them back with
fantastic quality.
[IT:~]
Story Creator mode allows you
to
create video stories by following a
story theme and receiving shooting
tips.
[@;"']
MP4 movies have smaller file sizes
so they are much easier to upload to
the Web and transfer
to
other
devices.
19

20
p3
etting
the
Date!fime
and
Language
When you turn on the camcorder for the first time, you will need to set the
date and time before using the camcorder. You can also change the date
format and time zone. (For your convenience, you can
do
so after
changing the language to your preference.)
See Changing the Time Zone (
~l'Jlf)
36) for details.
Press
[PowER]
.
•
When the internal clock
is
not set, the
[Date/Time] screen
will
appear.
Change the date/time.
CD
Touch a field you want to change.
® Touch [
T]
or [_.] to change the field.
Select your preferred date/time
format.
CD
Touch one of the control buttons.
®Touch
to use 24-hour clock.
Touch [OK].
Other manuals for VIXIA HF M50
2
This manual suits for next models
2
Table of contents
Other Canon Camcorder manuals

Canon
Canon ZR100 User manual

Canon
Canon Legria HF R66 User manual

Canon
Canon Vixia HG21 User manual

Canon
Canon RC 260 User manual

Canon
Canon VIXIA HF11 User manual

Canon
Canon MV MVX 200 User manual

Canon
Canon MV750i E User manual

Canon
Canon XL H1A User manual

Canon
Canon XA40 User manual

Canon
Canon OPTURA200 MC User manual