Caple C201 User manual

Instruction Manual
Electric
Fan Ovens
Multifunction
Ovens
Models: C 201 F/W
C 201 F/B
C 211 F/W
C 211 F/GRN
C 221 F/W
C 221 F/B
C 223 F/SS
Models: C 230 M/M
C 230 M/W
C 206 M/SS

2
Safety Reminders ................................................................................................. 3
Electrical Requirements ........................................................................................ 4
Electrical Installation ................ ............................................................................. 5
How To Install Your Oven ........................... ......................................................... 6
Multifunction Ovens ............................ ................................................................ 10
Electric Fan Ovens ............................................................................................. 16
Alarm 60’............................ .................................................................................. 21
Cut-off Timer 120’............................ .................................................................... 21
Electronic Timer .................................................................................................. 22
Electronic Programmer ............................ ........................................................... 23
Analogical Programmer ............................ .......................................................... 26
Cleaning and Maintenance............................ ...................................................... 29
Helpful Advice ..................................................................................................... 30
Cooking Guide ......................... ........................................................................... 31
Your Guarantee ................................................................................................... 32
Thank you for buying your new CAPLE Built-Under Oven. To ensure that you get
the best results from your new CAPLE oven, we strongly suggest that you read this
instruction manual thoroughly before use. This manual contains installation advice,
cleaning tips and a cooking guide, as well as other important facts about your
CAPLE oven. If treated with care, your CAPLE oven should give you years of trou-
ble-free cooking.
For Spare Parts, Technical Advice
or Product Service call the
CAPLE HELPLINE on 0870 241 1142
(Answerphone outside office hours)

3
The Grill and Top oven element
(multifunction ovens only)
are exposed, so take great care when
placing food in the oven or removing it.
Use the grill pan handles or gloves.
DO NOT line the oven, grids, trays etc.
with aluminium foil as this could adverse-
ly affect the heating elements and it
could also damage the interior surfaces.
DO NOT place flammable materials in
the oven.
Faults
Do not continue to use this appliance if
it appears to be faulty.
After Use
Switch the oven controls off.
Always switch off at the isolating switch
before cleaning the appliance, or
attempting any maintenance task, or
when not in use for long periods (when
on holiday).
CAPLE Service
To ensure the continued safe and effi-
cient operation of this appliance, we rec-
ommend that any servicing or repairs are
carried out only by an authorised CAPLE
SERVICE ENGINEER.
Instruction Book
This appliance should only be used for
it’s intended purpose as described in
these instructions.
Ensure that you fully understand these
instructions before operating this appli-
ance.
Space Requirements
Ensure that the specified ventilation
space around the appliance is not
obstructed.
Food Splashes
Always wipe clean the oven after use.
Food splashes can carry on cooking next
time and may become a fire hazard.
Hot Surfaces
It is important to remember that the sur-
faces of cooking appliances get hot dur-
ing use and retain the heat for some time
after switching off.
It is therefore advisable to keep small
children away from the appliance.
Safety precautions
During use the oven door glass
becomes hot.
In the presence of children, in order to
avoid contact with the hot door, a third
internal glass should be mounted.
This third internal glass is supplied on
request as an optional (not included in
price).
Please contact your retailer or the After-
Sales Service, indicating the model
bought.
Safety Reminders

4
This Installation should be carried out by
a competent electrician in accordance
with current l.E.E. Regulations.
This CAPLE product must be connected
to an electricity supply at the voltage
shown on the rating plate. Connection
must be made via a double pole isolating
switch with a contact separation of at
least 3 mm.
Use supply cable, having a minimum con-
ductor cross-sectional area of 1.5 mm2.
Where both hob unit and an oven are
to be installed adjacent to each other,
both appliances may be supplied via
the same double pole isolating switch
using separate supply cables. Check that
the total loading of the installation is with-
in the capacity of the double pole isolat-
ing switch and the supply circuit.
Allow sufficient length in the supply
cable(s) for removal of the appliance(s)
for any subsequent servicing. Ensure
that this extra cable is not trapped and
is not in contact with the underside of
any hob when fitting the appliance(s) in
position.
As with all electrical appliances aIways
switch off the electricity supply when not
in use for long periods (when on holiday)
and before attempting any maintenance
task.
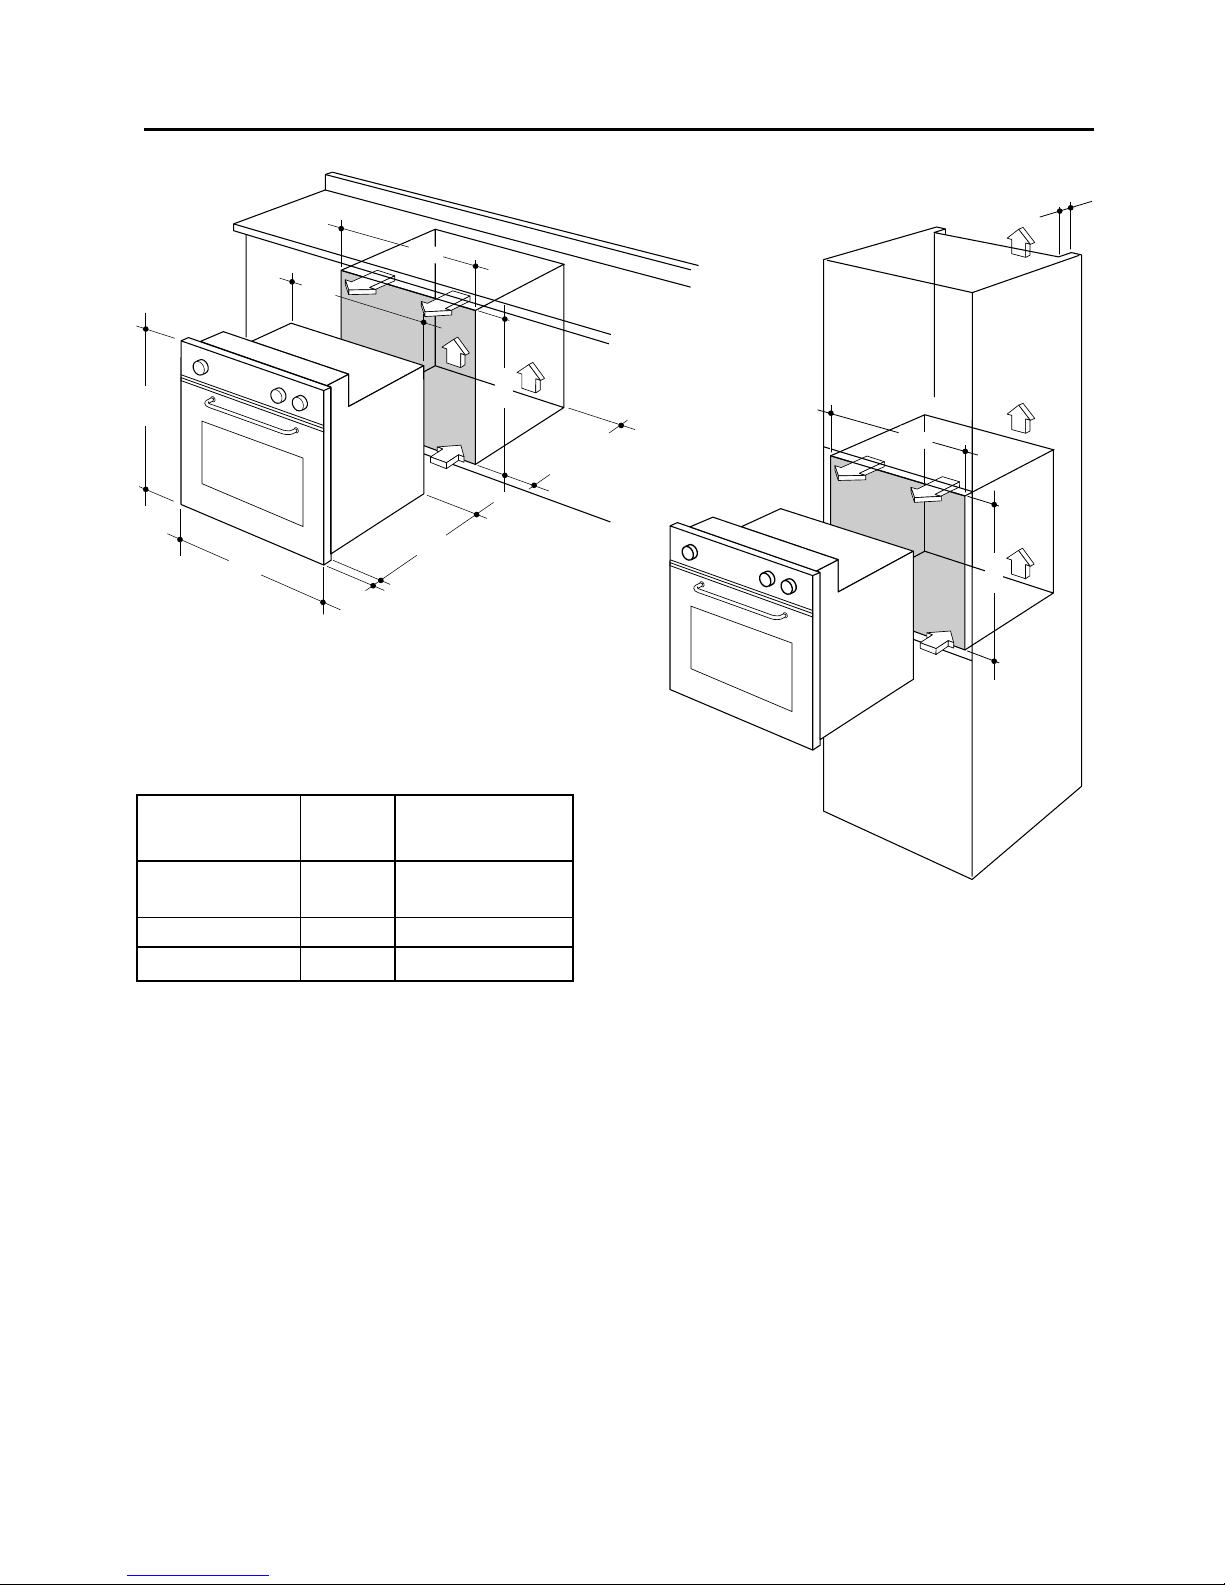
Fitting Into position
Your new CAPLE oven is designed to fit
into a kitchen unit which is at least 550
mm deep.
Before proceeding with the installation,
check that the oven will fit into the space
intended for it, appropriate ventilation
slots are provided as per installation
instructions on page 6 and that all pack-
ing material has been removed.
IMPORTANT
Materials used to build the oven housing
must be capable ot withstanding temper-
atures of up to 100°C and the housing
must be firmly fixed in position.
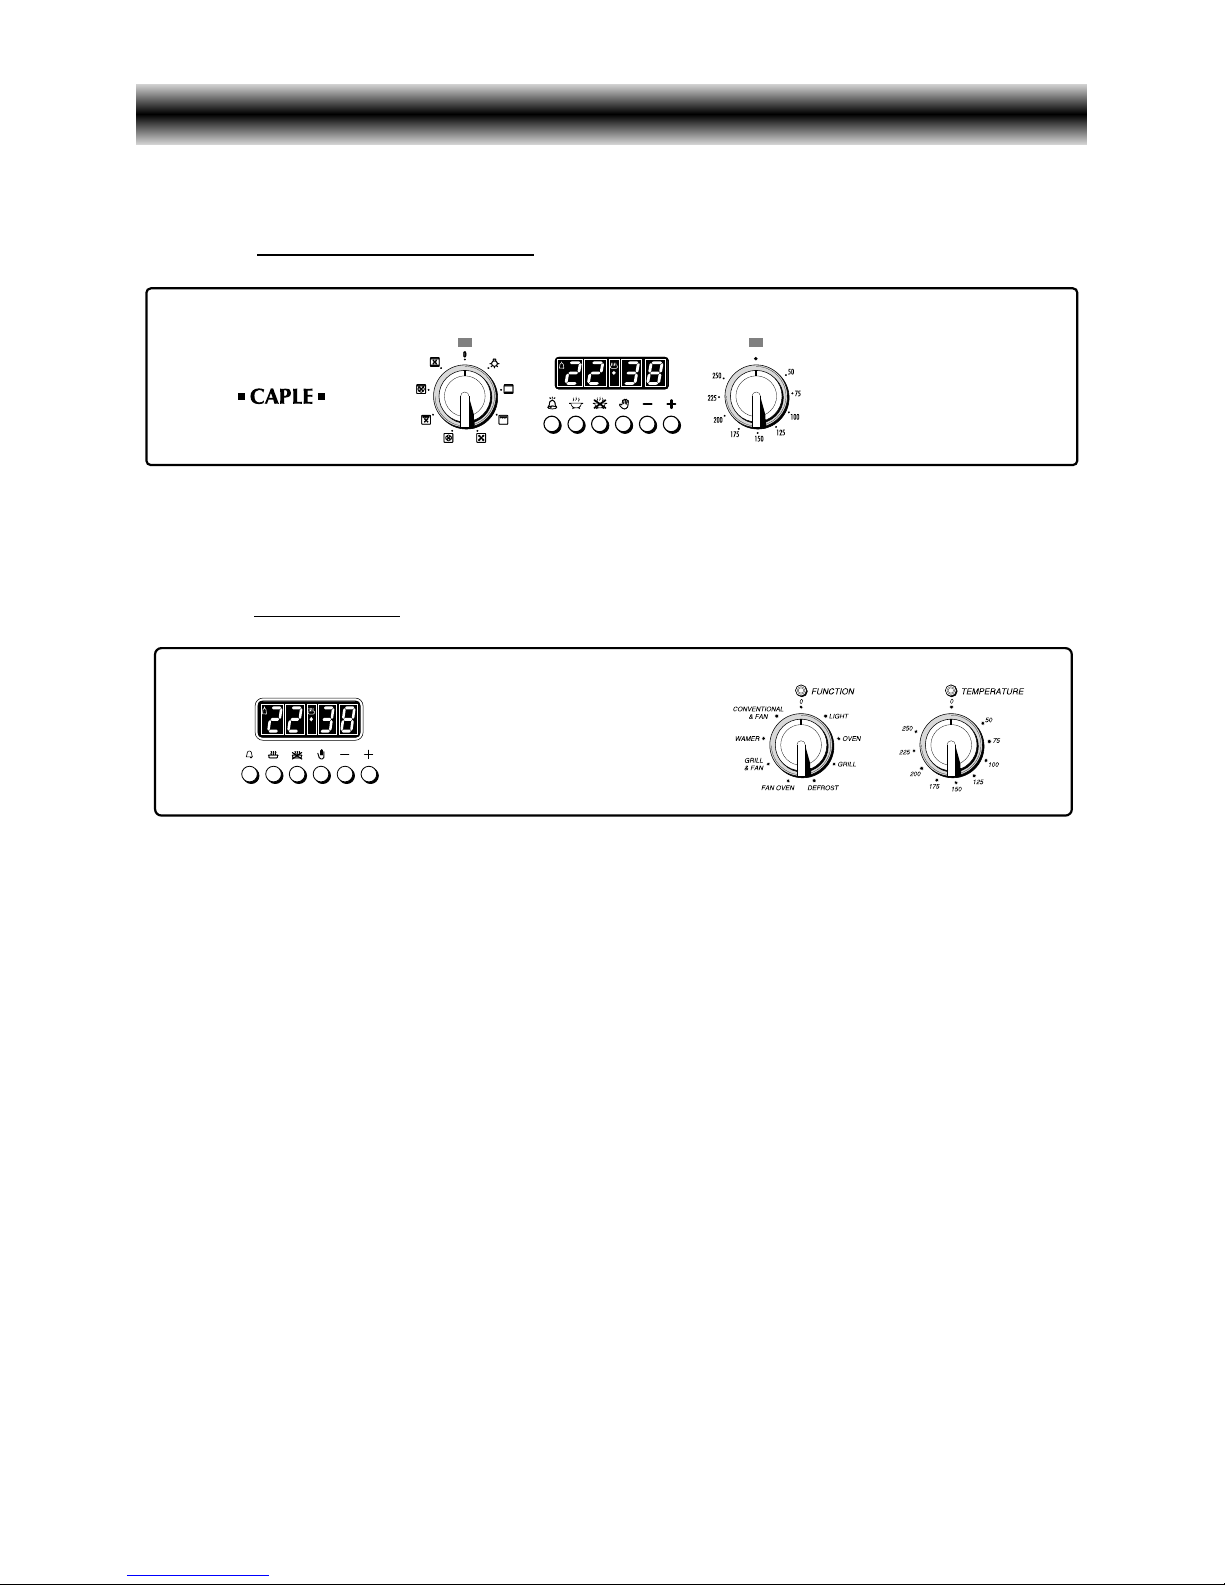
Before Use
Check that all accessories have been
removed from the oven interior.
Set the temperature to 225°C (fan
ovens) or 250°C (multifunction ovens)
using the temperature control knob.
Leave on for approximately 30 min-
utes. This will burn off any protective
coating applied to the oven during
manufacture.
The kitchen should be well ventilated
during this time as there may be an
odour given off.
When cool, wash the accessories and
the oven with warm water and mild
detergent.
WARNING!
ELECTRICITY CAN BE
EXTREMELY DANGEROUS.
THIS APPLIANCE MUST BE
EARTHED.
Electrical Requirements

5
Electrical Installation
This appliance must be connected to a
double pole isolating switch (fig. 1) and
to the terminal block in the oven (figs. 2
& 3) using the following guide:
FUSE
DOUBLE POLE SWITCHED
FUSED SPUR OUTLET
USE A 13 AMP FUSE
ON
Fig. 1
1) The wire which is coloured brown
must be connected to the terminal
marked L(Live), or coloured Red.
2) The wire which is coloured blue
must be connected to the terminal
marked N(Neutral), or coloured
Black.
3) The wire which is coloured green
and yellow must be connected to
the terminal marked E(Earth)
or coloured Green.
IMPORTANT: These connections must
be carried out by a qualified electrical
engineer.
Fig. 2 Fig. 3

6
How To Install Your Oven
The oven is designed to fit into a cabinet 600 mm wide. The oven can be built-in or
built-under the kitchen units.
It is essential that the oven housing is well ventilated.
If the oven is being installed into a fully enclosed built-under oven housing (fig. 4) it
may be necessary to cut a small slot in the top of the plinth panel fitted under the unit.
Cut a section 400 mm wide and a minimum of 15 mm high to allow air to pass under
the unit.
Also ensure that the front rail the top of the unit is not installed as it could restrict
ventilation.
If the oven is being built in to a kitchen unit (fig. 5) ensure that the oven is ventilated
with a 50 mm space at the top of the kitchen unut.
Fig. 4 - Built under
Fig. 5 - Built in
560
591
594
594
540
20
555
min.
550
560
50
585
Dimensions
(mm)
Height
Width
Depth
594
594
560
585
Built in
591
Built Under
560
550
Housing
Oven
You need the following housing area to
fit your oven correctly.

7
How To Install Your Oven
Fallure to allow adequate ventilation for the appliance may result in over heating or dam-
age to adjacent units.
Caple does not accapt any responsibility for any damage caused due to non-compli-
ance with these instructions.
To install the oven into a kitchen unit (fig. 5) first ensure that the oven housing is firml-
ysecured to the wall and/or adjacent fittings.
Lift the oven carefully into position on the shelf, taking care NOT to lift it by the door
handle.
If you lower the oven door, you will see four screw holes, two on each side of the oven.
The oven should then be secured to the housing by fitting screws into these holes.
Fig. 6
30 mm
600
50 mm
50 550
Fig. 7
To ensure internal ventilation, aeration
channels must be provided as illustrated
in the figures 6 and 7.

8
How To Install Your Oven
The rating plate can be found on the bottom right hand side of the inner door.
Clean the oven thoroughly before using it for the first time; use water and soap, then
rinse carefully.
Once the above operations are completed, heat the oven to the max. temperature for
about one and a half hours so as to eliminate any residual factory grease that might
impart unpleasant smells to the meals being cooked.
Models with hump wall oven
C 221 F/W, C 221 F/B
Fitting up of oven shelves
The oven shelves are provided with a security block to prevent accidental extraction.
They must be inserted operating as per bottom figure 8.
To pull them out operate in the inverse order.
Important:
As a safety measure, before you start cleaning the oven be sure to disconnect it
from the mains supply.
Fig. 8

9
How To Install Your Oven
Fig. 9
Fig. 10
Models with smooth wall
oven
C 201 F/W, C 201 F/B
C 230 M/M, C 230 M/W
C 211 F/W, C 211 F/GRN
C 223 F/SS
C 206 M/SS
Assembling and removing
the side racks
– Fit the side runner frames into the
holes on the side walls inside the oven
(Fig. 9).
– Slide the drip pan and rack into the
runners as shown in Fig. 10.
The rack must be fitted so that the
safety catch, which stops it sliding
out, faces the inside of the oven.
– To dismantle, operate in reverse
order.
Important:
As a safety measure, before you start
cleaning the oven be sure to
disconnect it from the mains supply.

10
A
U
T
O
CB A
Fig. 11
Multifunction ovens
Models: C 230 M/M, C 230 M/W
Model: C 206 M/SS
A
U
T
O
C
B
D
E
D
E
A
Fig. 12
General features
This is a MULTI-FUNCTION oven.
As its name indicates, this is an oven
that presents particular features from an
operational point of view.
In fact, it is possible to insert 7 different
programs to satisfy every cooking need.
The 7 positions, thermostatically con-
trolled, are obtained by 4 heating ele-
ments which are:
- Lower element 1400 W
- Upper element 1000 W
- Grill element 2500 W
- Circular element 2500 W
Controls description
A. Digital electronic programmer
B. Oven switch knob
C. Oven thermostat knob
Pilot lamp:
D. Oven temperature indicator lamp
E. Power on indicator lamp

11
Operating principles
Heating and cooking in the MULTI-FUNCTION oven are obtained in the following ways:
a. by normal convection. The heat is produced by the upper and lower heating elements.
b. by forced convection
A fan sucks in the air contained in the oven muffle, which sends it through the circular
heating element and then sends it back through the muffle. Before the hot air is
sucked back again by the fan to repeat the described cycle, it envelops the food in
the oven, provoking a complete and rapid cooking.
It is possible to cook several dishes simultaneously.
c. by semi-forced convection
The heat produced by the upper and lower heating elements is distributed throughout
the oven by the fan.
d. by radiation
The heat is irradiated by the infra red grill element.
e. by radiation and ventilation
The irradiated heat from the infra red grill element is distributed throughout the oven
by the fan.
7 - Function Oven
Models: C 230 M/M, C 230 M/W
Model: C 206 M/SS Fig. 14
Fig. 13

12
Function selector knob
Rotate the knob clockwise to set the
oven for one of the following functions.
Thermostat knob
This only sets the cooking temperature
and does not switch the oven on.
Rotate clockwise until the required tem-
perature is reached (from 50 to 250°C)
OVEN
The upper and lower heating elements
come on. The heat is dispersed by nat-
ural convection and the temperature
must be set to between 50° and 250°C
via the thermostat knob.
The oven must be preheated before
cooking.
Recommended for:
Food that requires the same degree of
cooking both inside and out, for example
roasts, spare pork ribs, meringues etc.
LIGHT
By setting the knob to this position, only
the oven light comes on (15 W).
It remains on in all the cooking modes.
DEFROST
Only the oven fan comes on. Use with
the thermostat knob set to “0” - other
positions have no effect. The food is
thawed by ventilation without heating.
Recommended for:
Quick thawing of frozen foods; one kg
requires approximately 1 hour.
Thawing times vary according to the
quantity and type of food to be thawed.
GRILL
The infrared electrical resistance comes
on. The heat is dispersed by radiation.
Use with the thermostat knob set to
200°C and the oven door closed.
For cooking hints, see the chapter
“GRILLING and AU GRATIN”.
Caution: The oven door becomes
very hot during operation. Keep
children well out of reach.
Recommended for:
Intense grilling, browning, cooking au
gratin and toasting etc.
It is recommended that you do not
grill for longer than 30 minutes at any
one time.
7 - Function Oven

13
GRILL & FAN
The infrared grill and the fan come on.
The heat is dispersed mainly by radia-
tion and the fan then distributes it all
over the oven.
Use with the door closed. The temper-
ature can be regulated via the thermo-
stat knob to between 50° and 175° max.
The oven must be preheated for approx-
imately 5 minutes. For cooking hints,
see the chapter “GRILLING AND
COOKING AU GRATIN.
Caution: The oven door becomes
very hot during operation. Keep
children well out of reach.
Recommended for:
Grilling where quick browning on the
outside is required to keep the juices in.
For example: veal steaks, chops, ham-
burgers etc.
It is recommended that you do not
grill for longer than 30 minutes at any
one time.
WARMER
The upper resistance, the circular resis-
tance and the fan come on.
The heat is dispersed by forced convec-
tion with greater intensity in the upper
part.
The temperature can be set to between
50° and 140°C via the thermostat knob.
Recommended for:
Keeping food warm after any type of
cooking. Slow heating of cooked food.
CONVENTIONAL & FAN
The upper and lower heating elements
come on and the fan.
The heat coming from above and below
is dispersed by convection with ventila-
tion.
The temperature can be set to between
50° and 250°C via the thermostat knob.
Recommended for:
Voluminous dishes and large quantities
which require the same degree of cook-
ing both inside and out, for example
rolled roasts, turkey, roast legs, cakes
etc.
7 - Function Oven
FAN OVEN
The circular resistance and fan come
on. The heat is dispersed by forced con-
vection and the temperature can be reg-
ulated to between 50° and 250°C via the
thermostat knob. The oven does not
require preheating.
Recommended for:
Food which has to be well-cooked out-
side and soft or rosy inside, for example
lasagne, lamb, roast beef, whole fish
etc.

14
Regeneration
Set the switch to position CON-
VENTIONAL & FAN and the ther-
mostat knob to position 150° C.
Bread becomes fragrant again if wet with
a few drops of water and put into the
oven for about 10 minutes at the highest
temperature.
Simultaneous cooking of
different foods
The MULTI-FUNCTION oven set on
position CONVENTIONAL &
FAN consents a simultaneous hetero-
geneous cooking of different foods.
Different foods such as fish, cake and
meat can be cooked together without
mixing the smells and flavors together.
This is possible since the fats and
vapors are oxidized while passing
through the electrical element and there-
fore are not deposited onto the foods.
The only precaution to follow are:
– The cooking temperatures of the dif-
ferent foods must be as close to as
possible, with a maximum difference of
20° - 25 °C.
– The introduction of the different dishes
in the oven must be done at different
times in relation to the cooking times
of each one.
The time and energy saved with this type
of cooking is obvious.
Grilling and “au gratin”
Grilling may be done without the roasting
jack on position GRILL & FAN of
the switch, because the hot air completely
envelops the food that is to be cooked.
Set the thermostat to position 175 °C
and after having preheated the oven,
simply place the food on the rack.
Close the door and let the oven operate
with the thermostat on position 175 °C,
until grilling is done.
Adding a few dabs of butter before the
end of the cooking time gives the golden
“au gratin” effect.
It is recommended that you do not
grill for longer than 30 minutes at any
one time.
Attention: the oven door becomes
very hot during operation.
Keep children away.
7 - Function Oven
Cooking advice
Sterilization
Sterilization of foods to be conserved, in
full and hermetically sealed jars, is done
in the following way:
a. Set the switch to position FAN
OVEN.
b. Set the thermostat knob to position
185 °C and preheat the oven.
c. Fill the dripping pan with hot water.
d. Set the jars onto the dripping pan
making sure they do not touch each
other and the door and set the ther-
mostat knob to position 135 °C.
When sterilization has begun, that is,
when the contents of the jars start to
bubble, turn off the oven and let cool.

15
7 - Function Oven
Grease Filter
The inside of the oven can be easily
cleaned with a wet cloth and oven
cleaner.
As a safety measure, before you start
cleaning the oven, make sure the
electrical supply is switched off.
You should clean the oven when it is
cold.
Do not leave acid or alkaline residues
(lemon juice, vinegar, salt, tomato, etc)
on the enamelled surfaces.
Avoid abrasive cleaning products on the
painted parts.
Use of the grill
Set the switch to position GRILL
and the thermostat to position 200 max.
Leave to warm up for approximately 5
minutes with the door closed.
Introduce the food to be cooked, posi-
tioning the rack as close to the grill as
possible.
The dripping pan should be placed
under the rack to catch the cooking
juices and fats.
Grilling with the oven door closed.
Grilling with the oven door closed and
do not for longer than 30 minutes at
any one time.
Attention: the oven door becomes
very hot during operation.
Keep children away.
Fig. 15
Roasting
To obtain classical roasting, it is neces-
sary to remember:
– that it is advisable to maintain a tem-
perature between 180 and 200 °C.
– that the cooking time depends on the
quantity and the type of foods.
A special screen is provided at the back
of the fan oven to catch grease particles,
mainly when meat is being roasted.
When baking pastry etc, the filter should
be removed.
Always clean the filter after cooking as
any solid residues on it might adversely
affect the oven performance.

16
C
BF
Fig. 16
Models: C 221 F/W, C 221 F/B
D
Controls description
F. Alarm 60’
B. Oven switch knob
C. Oven thermostat knob
G. 120’ cut-off timer knob
H. Electronic timer (end cooking)
I. Electronic timer (start/end cooking)
Pilot lamp:
D. Oven temperature indicator lamp
Electric fan ovens
Fig. 17
Model: C 223 F/SS
D
A
U
T
O
Fig. 18
Models: C 201 F/W, C 201 F/B
D
C
C
BH
BG
XII
VIII
VII
VI
V
IV
XI
X
IX
I
II
III
Fig. 19
Models: C 211 F/W, C 211 F/GRN
D
IBC

17
Electric Fan Oven
Fig. 21
Operating principles
Heating and cooking in the FAN oven are
obtained in the following ways:
a. by forced convection
A fan sucks in the air contained in the
oven muffle, which sends it through the
circular heating element and then
sends it back through the muffle.
Before the hot air is sucked back again
by the fan to repeat the described
cycle, it envelops the food in the oven,
provoking a complete and rapid cook-
ing.
It is possible to cook several dishes
simultaneously.
b. by radiation
The heat is irradiated by the infra red
grill element.
General features
The heating and cooking in electrical hot
air ovens take place by forced
convection.
The two elements which make this pro-
cess take place are:
- Circular element 2500 W
- Grill element 2500 W
NOTE:
Upon first use, it is advisable to operate
the oven at the maximum temperature
(thermostat knob on position 225) for 60
minutes in the position FAN OVEN
and for another 15 minutes in the
GRILL mode in order to eliminate any
traces of grease from the electrical resis-
tances.
Fig. 20
Models: C 221 F/W, C 221 F/B
Models: C 201 F/W, C 201 F/B, C 223 F/SS

B. Function Selector
C
ook or grill by turning the knob until the
indicator on it is in line with the function
required.
LIGHT The oven light is switched on.
FAN The fan switches on. This
function can be used for
defrosting food.
FAN OVEN Use in conjunction with the
temperature selector C.
GRILL Grill with the door closed. Set
the function selector B to the
grill position and the temper-
ature selector C to the desired
temperature till to max.
200°C. The temperature can
be varied depending on the
food being cooked. Before
using the grill, pre-heat for
about five minutes. Position
the grill pan on the highest
shelf position and check con-
tinually as the food could eas-
ily burn.
Note: it is recommended
that you do not grill for
longer than 30 minutes at
any one time.
Attention: the oven door
becomes very hot during
operation.
Keep children away.
18
Cooking advice
Sterilization
Sterilization of foods to be conserved, in
full and hermetically sealed jars, is done
in the following way:
a.
Set the switch to position FAN OVEN
b. Set the thermostat knob to position
185 °C and preheat the oven.
c. Fill the dripping pan with hot water.
d. Set the jars onto the dripping pan mak-
ing sure they do not touch each other
and the door and set the thermostat
knob to position 135 °C.
When sterilization has begun, that is,
when the contents of the jars start to bub-
ble, turn off the oven and let cool.
Electric Fan Oven
Fig. 22
C.Temperature Selector
The light above this dial will illuminate
when the oven is switched on and turns
off when the oven reaches the correct
temperature.
The light will cycle on and off during
cooking in line with the oven tempera-
ture.
Models: C 211 F/W, C 211 F/GRN

19
Roasting
To obtain classical roasting, it is neces-
sary to remember:
– that it is advisable to maintain a tem-
perature between 180 and 200 °C.
– that the cooking time depends on the
quantity and the type of foods.
Regeneration
Set the switch to position FAN OVEN
and the thermostat knob to position 150°
C.
Bread becomes fragrant again if wet with
a few drops of water and put into the
oven for about 10 minutes at the highest
temperature.
Simultaneous cooking of dif-
ferent foods
The FAN consents a simultaneous het-
erogeneous cooking of different foods.
Different foods such as fish, cake and
meat can be cooked together without
mixing the smells and flavors together.
This is possible since the fats and vapors
are oxidized while passing through the
electrical element and therefore are not
deposited onto the foods.
The only precaution to follow are:
– The cooking temperatures of the dif-
ferent foods must be as close to as
possible, with a maximum difference of
20° - 25 °C.
– The introduction of the different dishes
in the oven must be done at different
times in relation to the cooking times
of each one.
The time and energy saved with this type
of cooking is obvious.
Electrical grill
The electrical grill is made up of an elec-
trical element which, becoming red hot,
generates infra red rays which permit grill
cooking (input 2500 W).
Use of the grill
Switch the grill on, setting the two knobs:
– Function selector to GRILL position.
– Thermostat selector to position 200°C
max.
Leave to warm up for approximately 5
minutes with the door closed.
Place the food inside positioning the rack
as near as possible to the grill.
Insert the drip pan under the rack to col-
lect the cooking juices.
Grilling with the oven door closed.
Grilling with the oven door closed and
do not for longer than 30 minutes at
any one time.
Attention: the oven door becomes very
hot during operation.
Keep children away.
Electric Fan Oven

20
A special screen is provided at the back
of the fan oven to catch grease particles,
mainly when meat is being roasted.
When baking pastry etc, the filter should
be removed.
Always clean the filter after cooking as
any solid residues on it might adversely
affect the oven performance.
The inside of the oven can be easily
cleaned with a wet cloth and oven
cleaner.
As a safety measure, before you start
cleaning the oven, make sure the
electrical supply is switched off.
You should clean the oven when it is
cold.
Do not leave acid or alkaline residues
(lemon juice, vinegar, salt, tomato, etc)
on the enamelled surfaces.
Avoid abrasive cleaning products on the
painted parts.
Grease Filter
Fig. 23
Electric Fan Oven
This manual suits for next models
17
Table of contents
Other Caple Oven manuals