Car Keys Express Simple TYPKA-7000-0 User manual

USER GUIDE
Pairing Instructions for Toyota Remote Key Replacement Keys
V1.0520
KE
Y
TM
Powered By
Instruction Manual
Part Number: TYPKA-7000-0
Replacing car keys is simple and affordable again.™www.CarKeysExpress.com

SIMPLE™ KEY USER GUIDE SIMPLE™ KEY USER GUIDE
23
IMPORTANT NOTES
►You MUST have at least one existing key that already works with your vehicle in order to use the EZ
Installer™. If you have no working keys, return the Simple™ Key to the retailer where it was purchased.
►The new keyblade MUST be cut before pairing. It can be cut at any local hardware store.
►Vehicle battery should be in good condition and fully charged prior to pairing the new key. Turn off
headlights, radio, A/C fan, etc. to minimize battery draw during the process.
►Do not use the EZ Installer™ while the vehicle is in motion. Unplug it from the OBD port before driving the
vehicle.
►Only original remote features will work, regardless of buttons included on the Simple™ Key. This key does
not add remote features that your vehicle did not have before.
►For your security, a tamper-evident security label is installed over the EZ Installer™ connector. If this label is
missing, damaged, or the word “VOID” appears on the EZ Installer™, please exchange this Simple™ Key for a
new one at the retailer where it was purchased.
►Before pairing, familiarize yourself with the Simple™ Key’s compatibility with the make, model, year, and
transponder chip for your vehicle on pages 4-5.
LET’S GET STARTED
Simple™ Key requires two steps: “KEY PAIRING” and “REMOTE PAIRING.” Key pairing allows the new key to start your
vehicle. Remote pairing allows the key’s remote functions to work. It is important to follow these steps in order to
successfully complete setup.
If you skip a step, the key WILL NOT work properly, and you will have to repeat the setup process.
Find your EZ Installer™ DIAL POSITION in the following chart by referencing your vehicle’s make, model, year, and
transponder key (chip) type.
COMPATIBILITY LOOKUP
NOTE: Only FCC IDs ending in “BBY” or “BDM” will work with Simple™ Key. To check your key’s FCC ID, turn your key
over or remove the remote cover. The FCC ID is engraved on the back of the remote or under the remote cover.
NOTE: Determine the type of transponder chip that is in your vehicle’s key. To do this, look at your existing key. The
transponder key chip type is engraved on the base of the key blade. Transponder key chip types are identified in this
User Manual as the letter H, or Dot. If you cannot find the key chip type, try all EZ Installer™ dial positions for your
vehicle’s make, model, and year.
Dot Chip H Chip

SIMPLE™ KEY USER GUIDE SIMPLE™ KEY USER GUIDE
45
MAKE/MODEL
TOYOTA
TRANSPONDER KEY
CHIP TYPE
PAIR KEY EZ INSTALLER™
DIAL POSITION
PAIR REMOTE EZ INSTALLER™
DIAL POSITION
ERASE KEY EZ INSTALLER™
DIAL POSITION
ERASE REMOTE EZ INSTALLER™
DIAL POSITION
PRIMARY DIAL
POSITION
PRIMARY DIAL
POSITION
PRIMARY DIAL
POSITION
PRIMARY DIAL
POSITION
ALTERNATE DIAL
POSITION
ALTERNATE DIAL
POSITION
ALTERNATE DIAL
POSITION
ALTERNATE DIAL
POSITION
YEAR
Camry Dot 2006-2011 1 3 2 4 5 7 6 8
Camry H 2014-2018 3 1 2 4 7 5 6 8
Corolla Dot 2009-2010 1 3 2 4 5 7 6 8
Corolla H 2014-2019 3 1 2 4 7 5 6 8
RAV4 Dot 2006-2010 1 3 2 4 5 7 6 8
RAV4 H 2013-2018 3 1 2 4 7 5 6 8
COMPATIBILTY LOOKUP COMPATIBILTY LOOKUP
Visit www.CarKeysExpress.com for the most up-to-date vehicle compatibility lookup. Visit www.CarKeysExpress.com for the most up-to-date vehicle compatibility lookup.

SIMPLE™ KEY USER GUIDE SIMPLE™ KEY USER GUIDE
67
5. Insert the original key and turn the ignition to the ON/RUN position. If there are no markings, turn the key
clockwise and stop just short of starting the engine.
6. Press and release the EZ Installer™ button. You will hear a short beep.
a. NOTE: If you hear a series of 5 quick beeps, this indicates that the maximum number of keys have been paired,
and an error has occurred. Please see FAQs to learn more.
7. Wait 30 seconds, the EZ Installer™ will beep twice. You will then have 12 seconds to complete the next step (step 8).
8. Remove the original key and insert the new key into the ignition. Do not turn the key. Then, press and release the
button on EZ Installer™.
a. NOTE: If you do not complete this step in 12 seconds, the EZ Installer™ will beep continuously, and an error has
occurred (see FAQs for more information). Unplug the device, remove the key, and begin again at Step 1. If you
do not hear any sound, you have started the pairing process. Continue below.
9. Wait 60 seconds. When pairing is complete, the EZ Installer™ will beep 3 quick, different pitch beeps.
10. To pair additional keys, repeat the pairing process for any additional keys, beginning with KEY PAIRING STEP 5.
11. Leave the EZ Installer™ plugged into the OBD port and continue to STEP 2 (of 2) REMOTE PAIRING.
a. NOTE:: If you are not pairing a remote, or your key does not have remote functions, unplug the EZ Installer™. If
the EZ Installer™ is left in the vehicle’s OBD port for more than 20 minutes, an alarm will sound reminding you
to remove it.
12. To test the new key, start the vehicle.
STEP 1 (OF 2) KEY PAIRING
Instructions have timing requirements. If you wait too long between steps, your vehicle’s computer may time
out, requiring you to start over. Once you begin the pairing procedure, move at a quick and even pace.
NOTE: If you have a Toyota RAV4 (2006-2010), your vehicle may not have a transponder key. Try starting
the vehicle with your new cut key, without completing the steps below. If the vehicle starts and runs for
10 seconds, move on to STEP 2 (of 2) REMOTE PAIRING. If the vehicle does not start or does not continue
running, begin at Step 1 below to pair the key.
1. Find your vehicle’s make, model, year, and transponder key type in the Compatibility Lookup on pages
4-5. Turn the dial on the EZ Installer™ to the position listed for your vehicle’s make, model, year, and
transponder key type under the column labeled, “Pair Key EZ Installer™ Dial Position.”
a. NOTE: If more than one dial position exists for your vehicle, try the PRIMARY dial position first. If you
are unable to successfully pair the key, try the ALTERNATE dial position listed for your vehicle.
b. NOTE: One working key and the new key should be present during the pairing process.
2. Enter the vehicle and ensure all doors are closed.
3. Begin with the vehicle in PARK and the engine OFF.
4. Remove the security label from the EZ Installer™ and insert it firmly into the on-board diagnostic (OBD)
port located under the dash.
a. The location of your vehicle’s OBD port can be found in your owner’s manual.
TOYOTA IGNITION POSITIONS

SIMPLE™ KEY USER GUIDE SIMPLE™ KEY USER GUIDE
89
STEP 2 (OF 2) REMOTE PAIRING
Instructions have timing requirements. If you wait too long between steps, your vehicle’s computer may time out,
requiring you to start over. Once you begin the pairing procedure, move at a quick and even pace.
NOTE: If you have a Toyota Camry or Corolla, your vehicle may not be equipped with a remote. This key does
not add remote features that your vehicle did not have before.
1. Find your vehicle’s make, model, year, and transponder chip type in the Compatibility Lookup on pages 4-5.
Turn the dial on the EZ Installer™ to the position listed for your vehicle’s make, model, year, and transponder
chip type under the column labeled, “Pair Remote EZ Installer™ Dial Position.”
a. NOTE: If more than one dial position exists for your vehicle, try the PRIMARY dial position first. If you
are unable to successfully pair the key, try the ALTERNATE dial position listed for your vehicle.
b. NOTE: One working key and the new key should be present during the pairing process.
2. Enter the vehicle and ensure all doors are closed.
3. Begin with the vehicle in PARK and the engine OFF.
4. Remove the security label from the EZ Installer™ and insert it firmly into the on-board diagnostic (OBD) port
located under the dash.
a. The location of your vehicle’s OBD port can be found in your owner’s manual.
5. Insert the original key, buttons facing down, and turn the ignition to the ON/RUN position. If there are no
markings, turn the key clockwise and stop just short of starting the engine.
a. NOTE: It is important to make sure that you insert the key, buttons facing down, so that when you
turn the key to the ON/RUN position, buttons are facing up and easily visible and accessible for the
following steps.
6. To continue, press and release the EZ Installer™ button.
a. NOTE: If you hear a series of 5 quick beeps, this indicates that the maximum number of remotes have
been paired, and an error has occurred. Please see FAQs to learn more.
7. Wait and listen for 2 quick beeps from the EZ Installer™.
8. On the new remote, simultaneously press the LOCK and UNLOCK buttons. Then, press and release the
UNLOCK button.
9. When pairing is complete, you will hear 3 quick beeps from the EZ Installer™. Depending on the model, your
vehicle may also beep twice.
a. NOTE: : If you do not hear beeps from the EZ Installer™ and/or your vehicle an error may have occurred
(see FAQs for more information). Repeat Step 8 again.
10. To pair additional remotes, repeat the pairing process for any additional remotes, beginning with REMOTE
PAIRING STEP 5.
TOYOTA IGNITION POSITIONS

SIMPLE™ KEY USER GUIDE SIMPLE™ KEY USER GUIDE
10 11
11. Unplug the EZ Installer™. If the EZ Installer™ is left in the vehicle’s OBD port for more than 20 minutes, an
alarm will sound reminding you to remove it.
12. Remove the key from the ignition and test the new remote.
OPTIONAL STEP: ERASE KEY
Instructions have timing requirements. If you wait too long between steps, your vehicle’s computer may time out,
requiring you to start over. Once you begin the pairing procedure, move at a quick and even pace.
NOTE: The following steps are only only necessary if you received the maximum number of keys error during
KEY PAIRING (see FAQs for more information). Once you have completed the steps below, go back to KEY
PAIRING.
1. Find your vehicle’s make, model, year, and transponder chip type in the Compatibility Lookup on pages 4-5.
Turn the dial on the EZ Installer™ to the position listed for your vehicle’s make, model, year, and transponder
chip type under the column labeled, “Erase Key EZ Installer™ Dial Position.”
a. NOTE: If more than one dial position exists for your vehicle, try the PRIMARY dial position first. If you are
unable to successfully pair the key, try the ALTERNATE dial position listed for your vehicle.
b. NOTE: One working key and the new key should be present during the pairing process.
c. NOTE: Make sure any keys are removed from the ignition.
2. Enter the vehicle and ensure all doors are closed.
3. Begin with the vehicle in PARK and the engine OFF.
4. Remove the security label from the EZ Installer™ and insert it firmly into the on-board diagnostic (OBD) port
located under the dash.
a. The location of your vehicle’s OBD port can be found in your owner’s manual.
5. Insert the original key and turn the ignition to the ON/RUN position. If there are no markings, turn the key
clockwise and stop just short of starting the engine.
6. Press and release the EZ Installer™ button. You will hear a short beep.
7. Wait 30 seconds, the EZ Installer™ will beep twice. You will then have 12 seconds to complete the next step
(step 8).
8. Remove the key and re-insert it. Do not turn the key. Then, press and release the button on EZ Installer™.
a. NOTE: If you do not complete the steps in 12 seconds, the EZ Installer™ will beep continuously, and an
error has occurred. Unplug the device, remove the key, and begin again at Step 1. If you do not hear any
sound, you have started the pairing process. Continue below.
9. Wait 60 seconds. When erasing is complete, the EZ Installer™ will beep 3 quick, different pitch beeps.
10. If you need to pair keys, leave the EZ Installer™ plugged into the OBD port and continue to STEP 1 (of 1)
KEY PAIRING.
TOYOTA IGNITION POSITIONS

SIMPLE™ KEY USER GUIDE SIMPLE™ KEY USER GUIDE
12 13
OPTIONAL STEP: ERASE REMOTE
Instructions have timing requirements. If you wait too long between steps, your vehicle’s computer may time out,
requiring you to start over. Once you begin the pairing procedure, move at a quick and even pace.
NOTE: This process is only necessary if you received the maximum number of keys error during REMOTE
PAIRING (see FAQs for more information). Once you have completed the steps below, go back to REMOTE
PAIRING.
1. Find your vehicle’s make, model, year, and transponder chip type in the Compatibility Lookup on pages 4-5.
Turn the dial on the EZ Installer™ to the position listed for your vehicle’s make, model, year, and transponder
chip type under the column labeled, “Erase Remote EZ Installer™ Dial Position.”
a. NOTE: If more than one dial position exists for your vehicle, try the PRIMARY dial position first. If you are
unable to successfully pair the key, try the ALTERNATE dial position listed for your vehicle.
b. NOTE: One working key and the new key should be present during the pairing process.
2. Enter the vehicle and ensure all doors are closed.
3. Begin with the vehicle in PARK and the engine OFF.
4. Remove the security label from the EZ Installer™ and insert it firmly into the on-board diagnostic (OBD) port
located under the dash.
a. The location of your vehicle’s OBD port can be found in your owner’s manual.
5. Insert the original key, buttons facing down, and turn the ignition to the ON/RUN position. If there are no
markings, turn the key clockwise and stop just short of starting the engine.
a. NOTE: It is important to make sure that you insert the key, buttons facing down, so that when you
turn the key to the ON/RUN position, buttons are facing up and easily visible and accessible for the
following steps.
6. To continue, press and release the EZ Installer™ button.
7. Wait and listen for 2 quick beeps from the EZ Installer™.
8. On the key in the ignition, simultaneously press the LOCK and UNLOCK buttons on the remote. Then, press and release the
UNLOCK button.
a. NOTE: All other paired remotes will be erased.
9. If ERASE REMOTE is successful, you will hear 3 quick beeps from the EZ Installer™. Depending on the model, your vehicle
may also beep twice.
a. NOTE: If you do not hear beeps from the EZ Installer™ and/or your vehicle, an error may have occurred (see FAQs for
more information). Repeat Step 8 again.
10. If you need to pair keys, leave the EZ Installer™ plugged into the OBD port and continue to STEP 1 (of 1) KEY PAIRING.
TOYOTA IGNITION POSITIONS

SIMPLE™ KEY USER GUIDE SIMPLE™ KEY USER GUIDE
14 15
FREQUENTLY ASKED QUESTIONS
Q: The EZ Installer™ beeps 5 times after pushing the button to initiate the pairing process and will not pair the new key.
A: Your vehicle allows a maximum of 5 paired keys or 6 paired remotes. If the vehicle already has 5 keys paired to it, a new key
cannot be paired. If the EZ Installer™ beeps 5 times early in the pairing process, this indicates that the maximum number of keys
have been paired. Perform both the ERASE KEY and ERASE REMOTE steps. Then, try the KEY PAIRING and REMOTE PAIRING
processes again. Gray colored valet keys should be paired before black master keys or remotes.
Q: Can I use the same EZ Installer™ on other vehicles?
A: No, the EZ Installer™ will be locked to the first vehicle it is used on. You may add more keys to the same vehicle again as
needed, but it will not work on different vehicles. If the EZ Installer™ sounds 3 beeps at 1 second intervals, then beeps rapidly, this
signifies that the device has already been used on another vehicle. Visit CKESimpleKey.com or your local retailer to purchase
additional key.
Q: The EZ Installer™ sounds 3 or 4 beeps at 1 second intervals 3 times then beeps continuously.
A: When problems occur during the pairing process, EZ Installer™ will beep an error code, followed by continuous faster beeps.
The number of error beeps correspond to specific error codes, explained below.
• Three distinct beeps at 1 second intervals indicate the device has already been used on another vehicle. The EZ Installer™
can only pair Simple™ Keys to one vehicle. The EZ Installer™ will be locked to the first vehicle it is used on. You may add
more keys to the same vehicle again as needed, but it will not work on different vehicles.
• Four distinct beeps at 1 second intervals indicate that the incorrect dial position was selected on the EZ Installer™. Carefully
read the instructions and refer to the compatibility lookup on pages 4-5.
Please contact Car Keys Express customer service at 888-598-8910 for any questions.
Q: The new key won’t pair to my car.
A: If the EZ Installer™ doesn’t pair the key to your car, most likely an incorrect dial position was used. In this case,
the EZ Installer™ will beep continuously after you press the pairing button. Check the compatibility section on
pages 4-5 to confirm the correct dial position for your make, model, year, and transponder chip of your original
key. If an alternate dial position(s) is listed for your vehicle, unplug the EZ Installer™, turn the knob to the alternate
position, and try pairing again. If the key still won’t pair, please contact customer service at 888-598-8910.
Q: The EZ Installer™ was unplugged during the pairing process.
A: The EZ Installer™ must remain plugged into the on-board diagnostic (OBD) port until pairing is complete. If the
EZ Installer™ becomes unplugged during the pairing process, turn the ignition to the OFF position, remove the
key, and begin the pairing process again.
Q: The vehicle won’t start with the new key or old keys after attempting to pair.
A: Please call Car Keys Express customer service at 888-598-8910.
FCC AND ISED REGULATORY STATEMENT
MODEL: RT-TOY-A or 12BBY MODEL: RT-TY54B or 12BDM
FCC ID: 2AOKM-TOY-V1 or HYQ12BBY FCC ID: 2AOKM-TY5 or HYQ12BDM
IC: 24223-TYV1 or 1551A-12BBY IC: 24223-TY5 or 1551A-12BDM
This device complies with Part 15 of the FCC Rules and with Industry Canada license-exempt RSS standard(s). Operation is subject
to the following two conditions: (1) This device may not cause harmful interference, and (2) this device must accept any interference
received, including interference that may cause undesired operation.
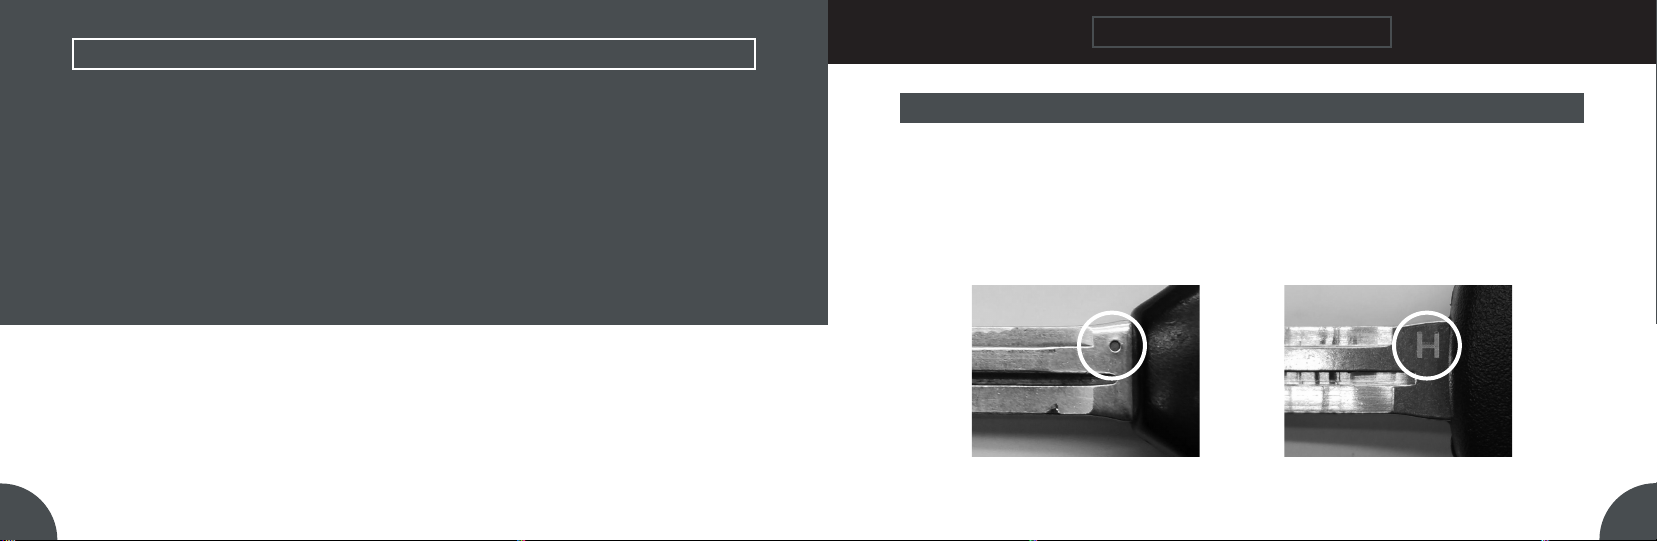
TRANSPONDER CHIP: DOT TRANSPONDER CHIP: H

Patent Pending
Designed and assembled in the USA
828 East Market Street Louisville, KY 40206
© 2020 Car Keys Express
www.CarKeysExpress.com
Replacing car keys is simple and affordable again.™
Warning: Changes or modifications to this device not expressly approved by iKeyless LLC could void the user’s authority to
operate the equipment.
Le présent appareil est conforme à la réglementation FCC part 15 et aux CNR d’Industrie Canada applicables aux appareils radio
exempts de licence. L’exploitation est autorisée aux deux conditions suivantes: (1) l’appareil ne doit pas produire de brouillage, et (2)
l’appareil doit accepter tout brouillage radioélectrique subi, même si le brouillage est susceptible d’en compromettre le fonctionnement.
Attention: Tout changement ou modification n’ayant pas été expressément approuvé(e) par iKeyless LLC est susceptible d’annuler
l’autorité de l’utilisateur à faire fonctionner l’équipement.
HELP
For help or assistance, please contact technical support at: 888-598-8910.
OTHER KEYS
Visit CarKeysExpress.com to find a variety of award-winning products, like Universal Car Keys, Universal Car Remotes, and OEM keys
and remotes. New Ford, Lincoln, Toyota, and Honda, Simple™ Keys are coming soon.

MANUAL DE USUARIO
Instrucciones de emparejamiento para llaves de repuesto de llaves remotas para Toyota
V1.0520
KE
Y
TM
Desarrollado por
Parte del manual de
instrucciones número: TYPKA-7000-0
Replacing car keys is simple and affordable again.™www.CarKeysExpress.com

23
SIMPLE™ KEY MANUAL DE USUARIO SIMPLE™ KEY MANUAL DE USUARIO
NOTAS IMPORTANTES
►DEBE tener al menos una llave existente que ya funcione con su vehículo para poder usar el EZ Installer™. Si no tiene
llaves que funcionen, devuelva la Simple™ Key a la tienda donde la compró.
►La nueva llave extraíble DEBE cortarse antes del emparejamiento. Se puede cortar en cualquier ferretería local.
►La batería del vehículo debe estar en buen estado y completamente cargada antes de emparejar la nueva llave.
Apague los faros, la radio, el aire acondicionado, entre otros, para minimizar el consumo de batería durante el proceso.
►No use el EZ Installer™ mientras el vehículo esté en movimiento. Desconéctelo del puerto OBD antes de
conducir el vehículo.
►Solo funcionarán las características remotas originales, independientemente de los botones incluidos en la Simple™
Key. Esta llave no agrega características remotas que su vehículo no tenía antes.
►Para su seguridad, se instala una etiqueta de seguridad con precinto sobre el conector del EZ Installer™. Si falta esta
etiqueta, está dañada o aparece la palabra “VOID” [inválido] en el EZ Installer™, cambie esta Simple™ Key por una nueva
en la tienda donde la compró.
►Antes del emparejamiento, familiarícese con la compatibilidad de la Simple™ Key con la marca, el modelo, el año y el
chip transpondedor de su vehículo según las páginas 4-5.
COMENCEMOS
La Simple™ Key requiere dos pasos: “EMPAREJAMIENTO DE LA LLAVE” y “EMPAREJAMIENTO DEL CONTROL REMOTO”. El
emparejamiento de la llave permite que la nueva llave arranque el vehículo. El emparejamiento del control remoto permite que las
funciones remotas de la llave funcionen. Es importante seguir estos pasos para completar con éxito la configuración.
Si se saltea un paso, la llave NO funcionará correctamente, y usted tendrá que repetir el proceso de configuración.
Encuentre su POSICIÓN DEL DIAL del EZ Installer™ en la siguiente tabla según la referencia de la marca, el modelo, el año y el tipo de
llave de transpondedor (chip) de su vehículo.
BÚSQUEDA DE COMPATIBILIDAD
NOTA: Solo los FCC ID que terminen en “BBY” o “BDM” funcionarán con la Simple™ Key. Para comprobar el FCC ID de su llave, dé
vuelta su llave o quite la cubierta del control remoto. El FCC ID se encuentra impreso en el reverso del control remoto o debajo de la
cubierta del control remoto.
NOTA: Determine el tipo de chip transpondedor que se encuentra en la llave de su vehículo. Para hacer esto, mire la llave existente.
El tipo de chip de la llave de transpondedor se encuentra impreso en la base de la llave extraíble. Los tipos de chip de la llave de
transpondedor se identifican en este Manual de usuario con la letra H o un Punto. Si no puede encontrar el tipo de chip de su llave,
intente todas las posiciones del dial del EZ Installer™ para la marca, el modelo y el año de su vehículo.
Chip Punto Chip H

45
SIMPLE™ KEY MANUAL DE USUARIO SIMPLE™ KEY MANUAL DE USUARIO
MARCA/MODELO
TOYOTA
TIPO DE CHIP
DE LA LLAVE DE
TRANSPONDEDOR
POSICIÓN DEL DIAL DEL EZ INSTALLER™
PARA EMPAREJAR LA LLAVE
POSICIÓN DEL DIAL DEL EZ INSTALLER™
PARA EMPAREJAR EL CONTROL REMOTO
POSICIÓN DEL DIAL DEL EZ INSTALLER™
PARA BORRAR LA LLAVE
POSICIÓN DEL DIAL DEL EZ INSTALLER™
PARA BORRAR EL CONTROL REMOTO
PRIMARIA PRIMARIA PRIMARIA PRIMARIAALTERNATIVA ALTERNATIVA ALTERNATIVA ALTERNATIVA
AÑO
Camry Punto 2006-2011 1 3 2 4 5 7 6 8
Camry H 2014-2018 3 1 2 4 7 5 6 8
Corolla Punto 2009-2010 1 3 2 4 5 7 6 8
Corolla H 2014-2019 3 1 2 4 7 5 6 8
RAV4 Punto 2006-2010 1 3 2 4 5 7 6 8
RAV4 H 2013-2018 3 1 2 4 7 5 6 8
BÚSQUEDA DE COMPATIBILIDA COMPATIBILTY LOOKUP
Visite www.CarKeysExpress.com para la búsqueda más actualizada sobre la compatibilidad de vehículos. Visite www.CarKeysExpress.com para la búsqueda más actualizada sobre la compatibilidad de vehículos.

67
SIMPLE™ KEY MANUAL DE USUARIO SIMPLE™ KEY MANUAL DE USUARIO
5. Inserte la llave original y gire el encendido a la posición ON/RUN [Prendido/funcionando]. Si no hay marcas, gire la llave en el
sentido de las agujas del reloj y deténgase justo antes de arrancar el motor.
6. Presione y suelte el botón del EZ Installer™. Escuchará un breve pitido.
a. NOTA: Si escucha una serie de 5 pitidos rápidos, esto indica que se emparejó el número máximo de llaves y que se produjo
un error. Consulte la sección de Preguntas frecuentes para obtener más información.
7. Espere 30 segundos, el EZ Installer™ sonará dos veces. Entonces tendrá 12 segundos para completar el siguiente paso (paso 8).
8. Retire la llave original e inserte la nueva llave en el encendido. No gire la llave. Luego, presione y suelte el botón del EZ Installer™.
a. NOTA: Si no completa este paso en 12 segundos, el EZ Installer™ emitirá un pitido continuo, que indica que se produjo un
error (consulte las Preguntas frecuentes para obtener más información). Desconecte el dispositivo, retire la llave y comience
de nuevo con el Paso 1. Si no escucha ningún sonido, esto significa que inició el proceso de emparejamiento. Continúe con los
pasos a continuación.
9. Espere 60 segundos. Cuando se complete el emparejamiento, el EZ Installer™ emitirá 3 pitidos rápidos y de diferente tono.
10. Para emparejar llaves adicionales, repita el proceso de emparejamiento para toda llave adicional y comience con el PASO 5 –
EMPAREJAMIENTO DE LA LLAVE.
11. Deje conectado el EZ Installer™ al puerto OBD y continúe con el PASO 2 (de 2) - EMPAREJAMIENTO DEL CONTROL REMOTO.
a. NOTA: Si no está emparejando un control remoto, o su llave no tiene funciones remotas, desconecte el EZ Installer™. Si el EZ
Installer™ se deja introducido en el puerto de diagnóstico a bordo (OBD) del vehículo durante más de 20 minutos, sonará una
alarma que le recordará que lo retire.
PASO 1 (DE 2) - EMPAREJAMIENTO DE LA LLAVE
Las instrucciones tienen requisitos de tiempo. Si espera demasiado entre los pasos, es posible que la computadora de su
vehículo se apague, lo que lo obligará a comenzar de nuevo. Una vez que comience el proceso de emparejamiento, hágalo a
un ritmo rápido y uniforme.
NOTA: Si tiene un Toyota RAV4 (2006-2010), es posible que su vehículo no tenga una llave de transpondedor. Intente
arrancar el vehículo con su nueva llave cortada, sin completar los pasos que aparecen a continuación. Si el vehículo arranca y
funciona durante 10 segundos, continúe con el PASO 2 (de 2) - EMPAREJAMIENTO DEL CONTROL REMOTO. Si el vehículo
no arranca o no sigue en funcionamiento, comience con el Paso 1 que aparece a continuación para emparejar la llave.
1. Encuentre la marca, el modelo, el año y el tipo de llave de transpondedor de su vehículo en la Búsqueda de
compatibilidad según las páginas 4-5. Gire el dial del EZ Installer™ a la posición indicada para la marca, el modelo, el año y
el tipo de llave de transpondedor de su vehículo que aparece debajo de la columna denominada “Posición del dial del EZ
Installer™ para emparejar la llave.”
a. NOTA: Si existe más de una posición del dial para su vehículo, intente en primer lugar con la posición PRIMARIA
del dial. Si no puede emparejar la llave con éxito, intente con la posición ALTERNATIVA del dial para su
vehículo.
b. NOTA: Debe tener consigo una llave que funcione y la nueva llave durante el proceso de emparejamiento.
2. Ingrese al vehículo y asegúrese de que todas las puertas estén cerradas.
3. Continúe con el vehículo estacionado y el motor apagado
4. Retire la etiqueta de seguridad del EZ Installer™ e insértelo firmemente en el puerto de diagnóstico a bordo (OBD)
ubicado debajo del tablero.
a. Puede encontrar la ubicación del puerto OBD de su vehículo en el manual de uso.
POSICIONES DE IGNICIÓN DE TOYOTA

89
SIMPLE™ KEY MANUAL DE USUARIO SIMPLE™ KEY MANUAL DE USUARIO
12. Para probar la nueva llave, arranque el vehículo.
PASO 2 (DE 2) - EMPAREJAMIENTO DEL CONTROL REMOTO
Las instrucciones tienen requisitos de tiempo. Si espera demasiado entre los pasos, es posible que la computadora de
su vehículo se apague, lo que lo obligará a comenzar de nuevo. Una vez que comience el proceso de emparejamiento,
hágalo a un ritmo rápido y uniforme.
NOTA: Si tiene un Toyota Camry o un Corolla, es posible que su vehículo no esté equipado con un control remoto.
Esta llave no agrega características remotas que su vehículo no tenía antes.
1. Encuentre la marca, el modelo, el año y el tipo de chip transpondedor de su vehículo en la Búsqueda de
compatibilidad según las páginas 4-5. Gire el dial del EZ Installer™ a la posición indicada para la marca, el modelo,
el año y el tipo de chip transpondedor de su vehículo que aparece debajo de la columna denominada “Posición
del dial del EZ Installer™ para emparejar el control remoto.”
a. NOTA: Si existe más de una posición del dial para su vehículo, intente en primer lugar con la posición
PRIMARIA del dial. Si no puede emparejar la llave con éxito, intente con la posición ALTERNATIVA del dial
para su vehículo.
b. NOTA: Debe tener consigo una llave que funcione y la nueva llave durante el proceso de
emparejamiento.
2. Ingrese al vehículo y asegúrese de que todas las puertas estén cerradas.
3. Continúe con el vehículo estacionado y el motor apagado.
4. Retire la etiqueta de seguridad del EZ Installer™ e insértelo firmemente en el puerto de diagnóstico a bordo
(OBD) ubicado debajo del tablero.
a. Puede encontrar la ubicación del puerto OBD de su vehículo en el manual de uso.
5. Inserte la llave original, con los botones hacia abajo y gire el encendido a la posición ON/RUN [Prendido/
funcionando]. Si no hay marcas, gire la llave en el sentido de las agujas del reloj y deténgase justo antes de
arrancar el motor.
a. NOTA: Es importante que se asegure de insertar la llave, con los botones hacia abajo, de modo que cuando
gire la llave a la posición ON/RUN, los botones miren hacia arriba y sean fácilmente visibles y accesibles para los
siguientes pasos..
6. Para continuar, presione y suelte el botón del EZ Installer™.
a. NOTA: Si escucha una serie de 5 pitidos rápidos, esto indica que emparejó el número máximo de controles
remotos y que se produjo un error. Consulte las Preguntas frecuentes para obtener más información.
7. Espere y escuche 2 pitidos rápidos por parte del EZ Installer™.
8. En el nuevo control remoto, pulse simultáneamente los botones LOCK [bloqueo] y UNLOCK [desbloqueo]. Luego, presione y
suelte el botón UNLOCK.
9. Cuando se complete el emparejamiento, el EZ Installer™ emitirá 3 pitidos rápidos. Dependiendo del modelo, su vehículo también
puede emitir dos pitidos.
a. NOTA: : Si no escucha los pitidos por parte del EZ Installer™ y/o de su vehículo puede haber ocurrido un error (consulte las
Preguntas frecuentes para obtener más información). Repita el Paso 8 nuevamente.
10. Para emparejar controles remotos adicionales, repita el proceso de emparejamiento para todo control remoto adicional y
POSICIONES DE IGNICIÓN DE TOYOTA

10 11
SIMPLE™ KEY MANUAL DE USUARIO SIMPLE™ KEY MANUAL DE USUARIO
comience con el PASO 5 – EMPAREJAMIENTO DEL CONTROL REMOTO.
11. Desconecte el EZ Installer™. Si el EZ Installer™ se deja introducido en el puerto OBD del vehículo durante más de 20 minutos,
sonará una alarma que le recordará que lo retire.
12. Retire la llave del encendido y pruebe el nuevo control remoto.
PASO OPCIONAL: BORRAR LLAVE
Las instrucciones tienen requisitos de tiempo. Si espera demasiado entre los pasos, es posible que la computadora de su
vehículo se apague, lo que lo obligará a comenzar de nuevo. Una vez que comience el proceso de emparejamiento, hágalo a
un ritmo rápido y uniforme.
NOTA: Los siguientes pasos solo son necesarios si recibió el error de número máximo de llaves durante el EMPAREJAMIENTO DE
LA LLAVE (consulte las Preguntas frecuentes para obtener más información). Una vez que haya completado los siguientes pasos,
regrese al EMPAREJAMIENTO DE LA LLAVE.
1. Encuentre la marca, el modelo, el año y el tipo de chip transpondedor de su vehículo en la Búsqueda de compatibilidad según las
páginas 4-5. Gire el dial del EZ Installer™ a la posición indicada para la marca, el modelo, el año y el tipo de chip transpondedor de
su vehículo que aparece debajo de la columna denominada “Posición del dial del EZ Installer™ para borrar la llave.”
a. NOTA: Si existe más de una posición del dial para su vehículo, intente en primer lugar con la posición PRIMARIA del dial. Si
no puede emparejar la llave con éxito, intente con la posición ALTERNATIVA del dial para su vehículo.
b. NOTA: Debe tener consigo una llave que funcione y la nueva llave durante el proceso de emparejamiento.
c. NOTA: Asegúrese de que se retiren las llaves del encendido.
2. Ingrese al vehículo y asegúrese de que todas las puertas estén cerradas.
3. Continúe con el vehículo estacionado y el motor apagado.
4. Retire la etiqueta de seguridad del EZ Installer™ e insértelo firmemente en el puerto de diagnóstico a bordo (OBD) ubicado
debajo del tablero.
a. NOTA: Puede encontrar la ubicación del puerto OBD de su vehículo en el manual de uso.
5. Inserte la llave original y gire el encendido a la posición ON/RUN [Prendido/funcionando]. Si no hay marcas, gire la llave en el
sentido de las agujas del reloj y deténgase justo antes de arrancar el motor.
6. Presione y suelte el botón del EZ Installer™. Escuchará un breve pitido.
7. Espere 30 segundos, el EZ Installer™ sonará dos veces. Entonces tendrá 12 segundos para completar el siguiente paso (paso
8).
8. Retire la llave y vuelva a insertarla. No gire la llave. Luego, presione y suelte el botón del EZ Installer™.
a. NOTA: Si no completa este paso en 12 segundos, el EZ Installer™ emitirá un pitido continuo, que indica que se produjo
un error. Desconecte el dispositivo, retire la llave y comience de nuevo con el Paso 1. Si no escucha ningún sonido, esto
significa que inició el proceso de emparejamiento. Continúe con los pasos a continuación.
9. Espere 60 segundos. Cuando se complete el emparejamiento, el EZ Installer™ emitirá 3 pitidos rápidos y de diferente tono.
10. Si necesita emparejar llaves, deje conectado el EZ Installer™ al puerto OBD y continúe con el PASO 1 (de 1) -
EMPAREJAMIENTO DE LA LLAVE.
POSICIONES DE IGNICIÓN DE TOYOTA

12 13
SIMPLE™ KEY MANUAL DE USUARIO SIMPLE™ KEY MANUAL DE USUARIO
PASO OPCIONAL: BORRADO DEL CONTROL REMOTO
Las instrucciones tienen requisitos de tiempo. Si espera demasiado entre los pasos, es posible que la computadora de
su vehículo se apague, lo que lo obligará a comenzar de nuevo. Una vez que comience el proceso de emparejamiento,
hágalo a un ritmo rápido y uniforme.
NOTA: Este proceso solo es necesario si obtiene el error de número máximo de llaves durante el EMPAREJAMIENTO DEL
CONTROL REMOTO (consulte las Preguntas frecuentes para obtener más información). Una vez que haya completado los
siguientes pasos, vuelva al EMPAREJAMIENTO DEL CONTROL REMOTO.
1. Encuentre la marca, el modelo, el año y el tipo de chip transpondedor de su vehículo en la Búsqueda de compatibilidad según las
páginas 4-5. Gire el dial del EZ Installer™ a la posición indicada para la marca, el modelo, el año y el tipo de chip transpondedor de
su vehículo que aparece debajo de la columna denominada “Posición del dial del EZ Installer™ para borrar el control remoto.”
a. NOTA: Si existe más de una posición del dial para su vehículo, intente en primer lugar con la posición PRIMARIA del dial. Si
no puede emparejar la llave con éxito, intente con la posición ALTERNATIVA del dial para su vehículo.
b. NOTA: Debe tener consigo una llave que funcione y la nueva llave durante el proceso de emparejamiento.
2. Ingrese al vehículo y asegúrese de que todas las puertas estén cerradas.
3. Continúe con el vehículo estacionado y el motor apagado.
a. The location of your vehicle’s OBD port can be found in your owner’s manual.
4. Retire la etiqueta de seguridad del EZ Installer™ e insértelo firmemente en el puerto de diagnóstico a bordo (OBD) ubicado
debajo del tablero.
a. NOTA: Puede encontrar la ubicación del puerto OBD de su vehículo en el manual de uso.
5. Inserte la llave original, con los botones hacia abajo y gire el encendido a la posición ON/RUN [Prendido/funcionando]. Si no hay
marcas, gire la llave en el sentido de las agujas del reloj y deténgase justo antes de arrancar el motor.
a. NOTA: Es importante que se asegure de insertar la llave, con los botones hacia abajo, para que cuando gire la llave a la
posición ON/RUN, los botones miren hacia arriba y sean fácilmente visibles y accesibles para los siguientes pasos.
6. Para continuar, presione y suelte el botón del EZ Installer™.
7. Espere y escuche 2 pitidos rápidos por parte del EZ Installer™.
8. Con la llave en el encendido, pulse simultáneamente los botones LOCK [bloqueo] y UNLOCK [desbloqueo] del control remoto.
Luego, presione y suelte el botón UNLOCK.
a. NOTA: Se borrarán todos los demás controles remotos emparejados.
9. Si logra BORRAR EL CONTROL REMOTO, escuchará 3 pitidos rápidos del EZ Installer™. Dependiendo del modelo, su vehículo
también puede emitir dos pitidos.
a. NOTA: Si no escucha los pitidos por parte del EZ Installer™ y/o de su vehículo, puede que haya ocurrido un error (consulte
las Preguntas frecuentes para obtener más información). Repita el paso 8 nuevamente.
10. Si necesita emparejar llaves, deje conectado el EZ Installer™ al puerto OBD y continúe con el PASO 1 (de 1) - EMPAREJAMIENTO
DE LA LLAVE.
POSICIONES DE IGNICIÓN DE TOYOTA

14 15
SIMPLE™ KEY MANUAL DE USUARIO SIMPLE™ KEY MANUAL DE USUARIO
PREGUNTAS FRECUENTES
P: El EZ Installer™ emite 5 pitidos después de presionar el botón para iniciar el proceso de emparejamiento y no empareja la nueva
llave.
R: Su vehículo permite un máximo de 5 llaves emparejadas o 6 controles remotos emparejados. Si el vehículo ya tiene 5 llaves
emparejadas, no puede emparejar una nueva llave. Si el EZ Installer™ emite 5 pitidos al principio del proceso de emparejamiento, esto
indica que emparejó el número máximo de llaves. Realice los pasos de BORRAR LLAVE y BORRAR CONTROL REMOTO. Luego,
intente nuevamente los procesos de EMPAREJAMIENTO DE LA LLAVE y EMPAREJAMIENTO DEL CONTROL REMOTO. Las llaves
de repuesto de color gris deben emparejarse antes que los controles remotos o llaves principales de color negro.
P: ¿Puedo usar el mismo EZ Installer™ en otros vehículos?
R: No, el EZ Installer™ se bloqueará en el primer vehículo en el que se utilice. Puede volver a agregar más llaves al mismo vehículo
según sea necesario, pero no funcionará en vehículos diferentes. Si el EZ Installer™ emite 3 pitidos en intervalos de 1 segundo, y luego
emite pitidos rápidos, esto significa que el dispositivo ya se utilizó en otro vehículo. Visite CKESimpleKey.com o su tienda local para
adquirir llaves adicionales.
P: El EZ Installer™ emite 3 o 4 pitidos en intervalos de 1 segundo 3 veces y luego emite pitidos continuos.
R: Cuando ocurren problemas durante el proceso de emparejamiento, el EZ Installer™ emitirá un pitido de código de error, seguido de
pitidos continuos más rápidos. El número de pitidos de error corresponde a códigos de error específicos, que se explican a an a an a
continuación.
• Tres pitidos distintos en intervalos de 1 segundo indican que el dispositivo ya se utilizó en otro vehículo. El EZ Installer™ solo
puede emparejar las Simple™ Keys con un solo vehículo. El EZ Installer™ se bloqueará luego de haber sido utilizado en el primer
vehículo. Puede volver a agregar más llaves al mismo vehículo según sea necesario, pero no funcionará en vehículos diferentes.
• Cuatro pitidos distintos a intervalos de 1 segundo indican que se seleccionó la posición del dial incorrecta del EZ Installer™. Lea
atentamente las instrucciones y consulte la búsqueda de compatibilidad según las páginas 4-5.
Comuníquese con el servicio de atención al cliente de Car Keys Express al 888-598-8910 si tiene preguntas.
P: La nueva llave no se empareja con mi auto.
R: Si el EZ Installer™ no empareja la llave con su auto, lo más probable es que haya utilizado una posición de dial incorrecta. En este caso,
el EZ Installer™ emitirá un pitido continuo después de que pulse el botón de emparejamiento. Consulte la sección de compatibilidad en
las páginas 4-5 para confirmar la posición correcta del dial para la marca, el modelo, el año y el chip transpondedor de su llave original. Si
aparece una posición o posiciones alternativas del dial para su vehículo, desconecte el EZ Installer™, gire la perilla a la posición alternativa
e intente el emparejamiento nuevamente. Si la llave sigue sin emparejarse, comuníquese con el servicio de atención al cliente al 888-598-
8910.
P: Se desconectó el EZ Installer™ durante el proceso de emparejamiento del control remoto/transpondedo.
R: El EZ Installer™ debe permanecer conectado en el puerto de diagnóstico a bordo (OBD) hasta que se complete el emparejamiento
del control remoto/transpondedor. Si se desconecta el EZ Installer™ durante el proceso de emparejamiento del control remoto/
transpondedor, gire el encendido a la posición OFF, retire la llave, y comience nuevamente con el proceso de emparejamiento del
control remoto/transpondedor.
P: El vehículo no arranca con la llave nueva o las llaves anteriores después de intentar el emparejamiento.
R: Comuníquese con el servicio de atención al cliente de Car Keys Express al 888-598-8910.
DECLARACIÓN DE NORMAS FCC E ISED

Patente Pendiente
Diseñado y ensamblado en los Estados Unidos
828 East Market Street Louisville, KY 40206
© 2020 Car Keys Express
www.CarKeysExpress.com
Replacing car keys is simple and affordable again.™
MODELO: RT-TOY-A or 12BBY MODELO: RT-TY54B or 12BDM
FCC ID: 2AOKM-TOY-V1 or HYQ12BBY FCC ID: 2AOKM-TY5 or HYQ12BDM
IC: 24223-TYV1 or 1551A-12BBY IC: 24223-TY5 or 1551A-12BDM
Este dispositivo cumple con la Parte 15 de las Normas de la FCC y con los estándares RSS exentos de licencia de Industry Canada. El
funcionamiento está sujeto a estas dos condiciones a saber: (1) Este dispositivo no puede causar interferencias perjudiciales, y (2) este
dispositivo puede aceptar cualquier interferencia recibida, incluidas las interferencias que puedan causar un funcionamiento no deseado.
Advertencia: Los cambios o las modificaciones a este dispositivo no aprobados expresamente por iKeyless LLC podrían
anular la autoridad del usuario para operar el equipo.
AYUDA
Para solicitar ayuda o asistencia, comuníquese con el soporte técnico al 888-598-8910.
OTRAS LLAVES
Visite CarKeysExpress.com para encontrar una variedad de productos premiados, como llaves universales para autos, controles
remotos universales para autos, y llaves y controles remotos del fabricante original. Pronto tendremos nuevas Simple™ Keys para Ford,
Lincoln, Toyota y Honda.
CHIP TRANSPONDEDOR: PUNTO CHIP TRANSPONDEDOR: H
Table of contents
Other Car Keys Express Automobile Accessories manuals