FRANÇAIS
9
EXTRACTION DE POUSSIÈRES
Le fonctionnement de la machine (meulage de
minéraux) génère de la poussière qui peut être
nocive pour la santé. Toucher ou respirer des
poussières peut provoquer des réactions aller-
giques et/ou conduire à des infections respira-
toires pour l’opérateur ou les personnes présentes.
• Pour atteindre un degré élevé d’extraction de la pous-
sière générée par l’utilisation de la machine, utiliser un
aspirateur de catégorie M.
• Assurer une bonne ventilation du lieu de travail.
• Il est recommandé de porter un appareil respiratoire
classe FFP2.
Pour chaque matériau spécique à usiner, vous devez res-
pecter les règlements en vigueur dans votre pays.
An de réduire les émissions de poussières qui se pro-
duisent pendant le travail, veuillez respecter les consignes
suivantes :
• Suivre les recommandations données par Carat en uti-
lisant uniquement une combinaison associant des outils
de meulage diamant montés sur une meuleuse à béton
avec carter de protection et hotte d’extraction relié avec
un aspirateur classe M. D’autres combinaisons peuvent
conduire à une collecte et une séparation de poussières
insusantes.
• Respecter le mode d’emploi de l’aspirateur pour
l’entretien et le nettoyage de celui-ci et du ltre. Vider
les conteneurs de collecte de poussière dès qu’ils sont
pleins. Nettoyer régulièrement les ltres de l’aspirateur
et insérer toujours complètement les ltres dans
l’aspirateur.
• Utiliser uniquement les tuyaux d’aspiration prévus par
Carat. Ne pas manipuler le tuyau d’aspiration. Lorsque
des roches ou des morceaux de pierre ou de maçonnerie
sont aspirés dans le tuyau d’aspiration, cesser immédia-
tement le travail et nettoyer le tuyau d’aspiration. Veiller
à ce que le tuyau d’aspiration ne soit ni plié ni froissé.
• Utiliser la meuleuse à béton uniquement pour sa fonction
spécique.
• Utilisez uniquement des outils qui sont en parfait état.
Utiliser un outil usé ralentit l’avancement des travaux.
• Prévoir une bonne ventilation.
• Veiller à ce que la zone de travail soit libre de tout obsta-
cle. Pour les travaux de meulage plus longs, l’aspirateur
doit en permanence pouvoir se déplacer librement.
• L’opérateur doit porter une protection auditive, des lu-
nettes de protection, un masque anti-poussière et des
gants. Comme masque anti-poussière, utiliser au moins
un demi-masque ltrant de classe FFP 2.
• Utiliser un aspirateur adapté pour le nettoyage du lieu
de travail. Ne pas balayer an d’empêcher la poussière
de tourbillonner.
INSTRUCTIONS DE MONTAGE
Avant toute intervention sur la machine, vous
devez retirer la che de secteur de la prise
d’alimentation.
Il est recommandé de porter des gants de travail lors de
l’assemblage ou du changement des disques diamant.
En raison du développement continu du produit et des
améliorations techniques, les informations techniques
peuvent être modiées sans préavis.
SÉCURITÉ PERSONNELLE
Lire attentivement les instructions de fonction-
nement et de sécurité avant d’utiliser la ma-
chine. Pour votre sécurité vous devez suivre
strictement les instructions de ce manuel.
DONNÉES DE LA MACHINE
Type SL-1253N
Puissance d’entrée 1700W
Classe de protection 2 / II
Vitesse à vide 10.200 min-1
Largeur entre boulons 13 mm
de serrage plats
Alésage du disque Ø 22,2 mm (7/8”)
Diamètre des disques diamant Ø 125 mm
Profondeur de coupe 0 – 27 mm
Largeur de rainure 10 – 40 mm
Poids 4,5 kg
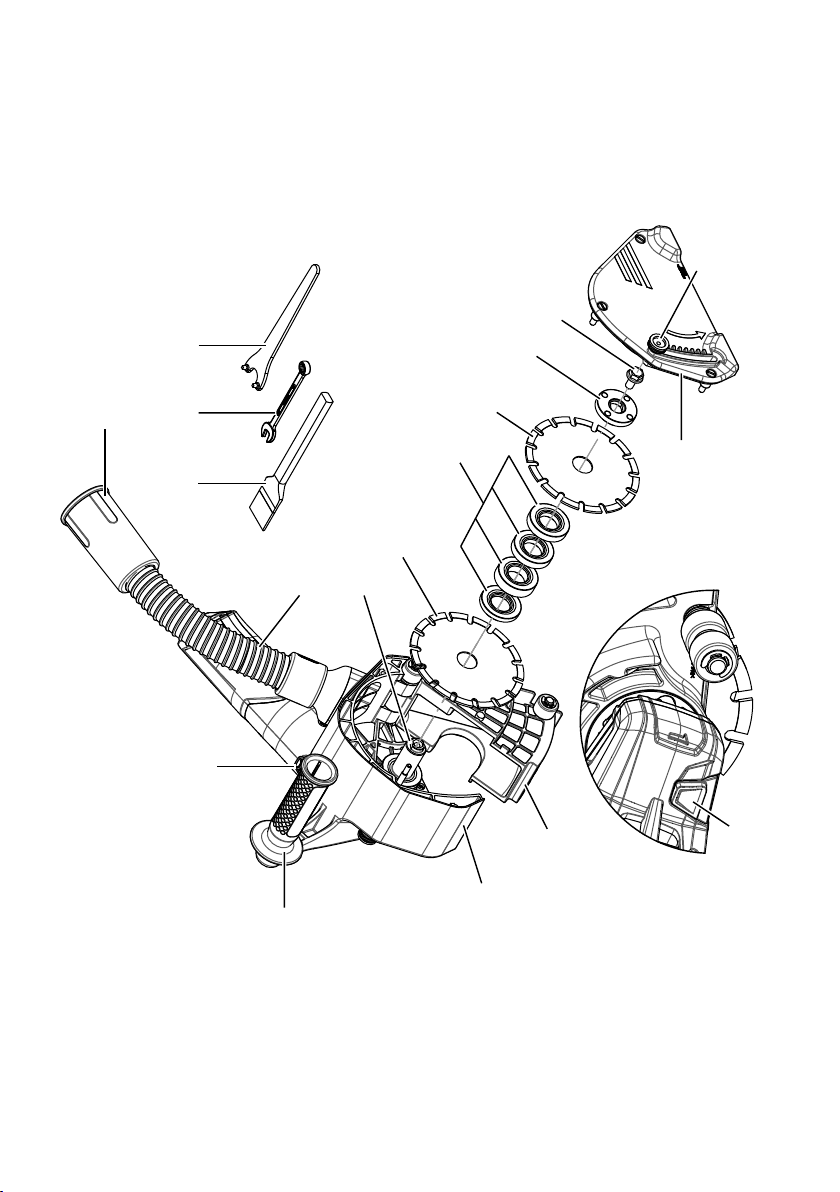
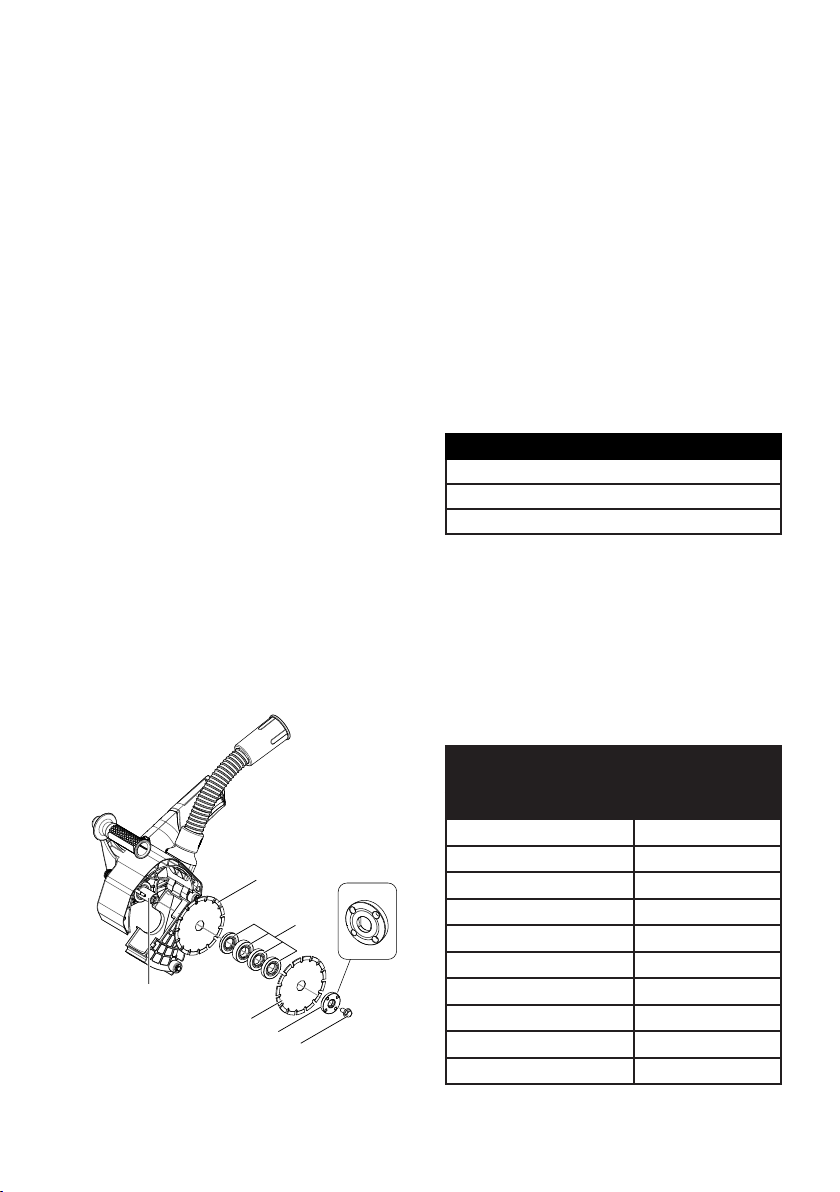
PIÈCES PRINCIPALES
Les pièces principales sont numérotées sur le schéma de
la machine, visible en page 3 de ce manuel.
1. Carter de protection et hotte d’extraction
2. Carter de protection
3. Protection intérieure
4. Tuyau d’aspiration
5. Connexion d’aspiration
6. Poignée auxiliaire
7. Interrupteur Marche/Arrêt (ON/OFF)
8. Touche de verrouillage de la broche (ne sera pas uti-
lisée)
9. Bride de montage
10. Disques diamant de meulage
11. Entretoises
12. Brides de verrouillage
13. Ecrou de serrage
14. Verrouillage de profondeur de coupe
15. Cale
16. Clé pour boulon de verrouillage
17. Clé à deux broches pour écrou de serrage
UTILISATION
La machine est destinée à réaliser des saignées, dans
des matières minérales telles que les surfaces en béton,
maçonnerie et chaussée. La rainureuse travaille en coor-
dination avec un aspirateur de poussière catégorie M sans
utiliser d’eau.
SOURCE D’ALIMENTATION ÉLECTRIQUE
L’outil doit être connecté uniquement à une source
d’alimentation de la même tension que celle indiquée sur
la plaque signalétique, et ne peut être utilisé qu’avec un
courant alternatif monophasé. Grâce à sa double isolation,
l’outil est conforme à la norme européenne et peut donc
être utilisé sans prise de terre.