Carbest 4-KAMMER DRUCKPUMPE Installation instructions

4-KAMMER DRUCKPUMPE
DIAPHRAGM PUMP
620560
DE – BENUTZERHANDBUCH
UK – USER‘S INSTRUCTION
12V
3,5 A MAX7,5 A
3,8
BAR
11,3
LITER/MIN INCL.FILTER

2
Carbest 4-Kammer Druckpumpe| Diaphragm Pump | 620560DE
DE BEDIENUNGSANLEITUNG................................................................................................3 - 9
UK MANUAL......................................................................................................................10 -15
www.reimo.com © 2019

3
Carbest 4-Kammer Druckpumpe| Diaphragm Pump | 620560DE
INHALT
MERKMALE.................................................................................................... 3
ANWENDUNGEN............................................................................................ 3
INSTALLATION | Materialien | Einrichtung ................................................ 4 – 5
DER BYPASS .................................................................................................. 6
GEWÄHRLEISTUNG ........................................................................................ 6
REPARATURSATZ............................................................................................ 7
FEHLERSUCHE .............................................................................................. 8
EINSTELLUNGEN ABSCHALT-UND BYPASSDRUCK ......................................... 9
VIELEN DANK, DASS SIE SICH FÜR UNSER PRODUKT ENTSCHIEDEN HABEN!
Bitte lesen Sie sich diese Anleitung vor der Anwendung gründlich durch
und bewahren Sie diese auf, um später darauf zurückgreifen zu können.
Unsere Pumpe weist die gleiche Kraft und den Druck auf wie ihre Vor-
gänger, kann aber auch an Situationen angepasst werden, bei denen
kein hoher Durchfluss nötig ist. Sie ist kompakt und leistungsstark und
eignet sich perfekt für beengte Platzverhältnisse. Sie kann außerdem
mit unterschiedlichen Einlasstypen mit jeweils eigenen speziellen
Anschlussstücken versehen werden und lässt sich somit an jede poten-
tielle Anwendungsart anpassen.
MERKMALE
• 4-Kammer-Membranpumpe
• Dauerbetrieb
• Bypass: für reduzierten Pumpenbetrieb
• Trockenlauffähig für normale Arbeitsbelastung
• Automatik: Steuerung durch Druckschalter
• Montage nach Industriestandard
• Selbstansaugend
• Ruhiger Lauf
• Zündschutz
ANWENDUNGEN
• Druckwassersysteme für Jachten/Wohnmobile/Wohnwagen
• Spritzgeräte (fahrzeugmontierte Spritzgeräte, Elektrospritzgeräte)
• Reinigungsmaschinen, Luftbefeuchter, Wasseraufbereitung,
medizinische Geräte
• Lebensmittel- und Getränkeabfüllung & Flüssigkeitstransfer
• Solarwassersysteme
• Alle anderen Überdrucksysteme

4
Carbest 4-Kammer Druckpumpe| Diaphragm Pump | 620560DE
INSTALLATION
Material
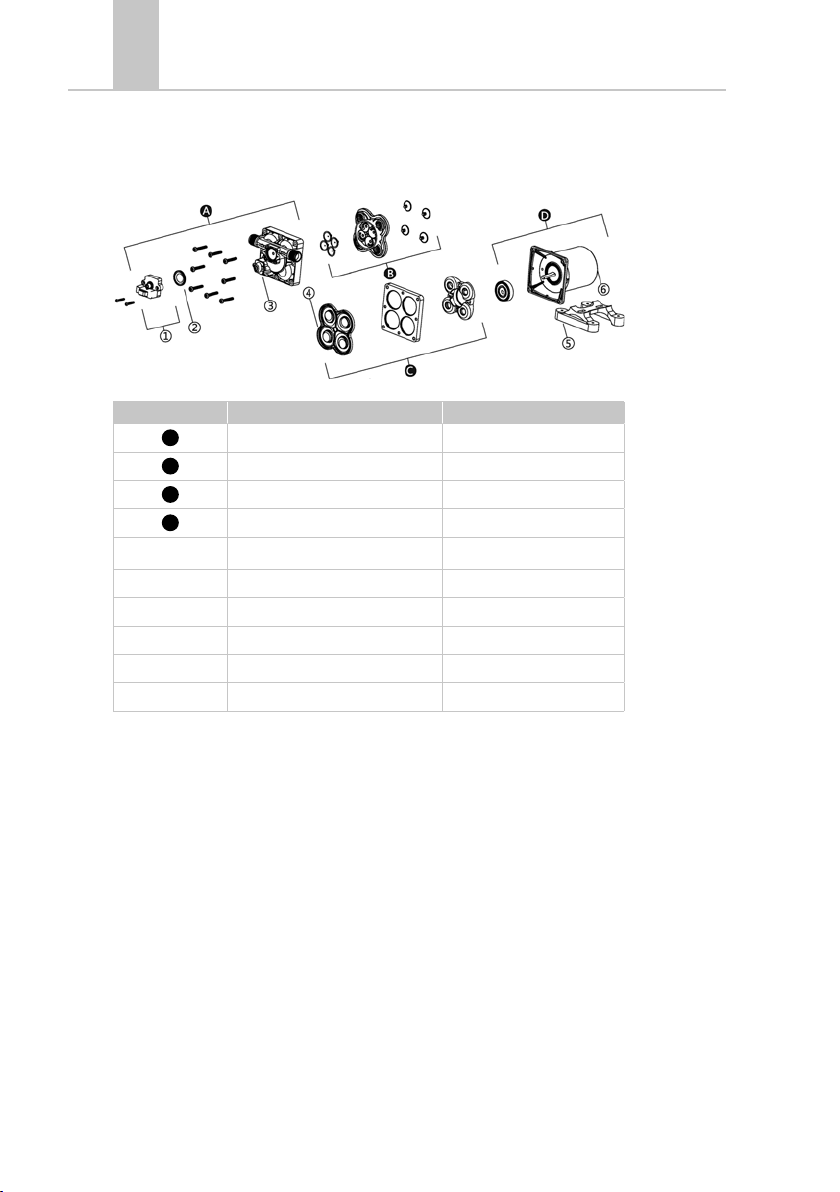
1 Membranpumpe mit Zubehör
2 (mindestens) flexible, verstärkte Schlauchleitungsstücke, mit einer Quetsch-
kraft von zweimal dem kritischen Einlassdruck, Schlauchstärke mindestens
½ Zoll
4 Schlauchklemmen und Schrauben aus Edelstahl
4 Schrauben zur Befestigung der Pumpe an der Montagefläche
1 elektrischer Abschalter
1 Sicherung
1 Schraubendreher
1 starkes Schneidwerkzeug für Schlauchmaterial
(optional) Teflonband oder Dichtmittel
Einrichtung
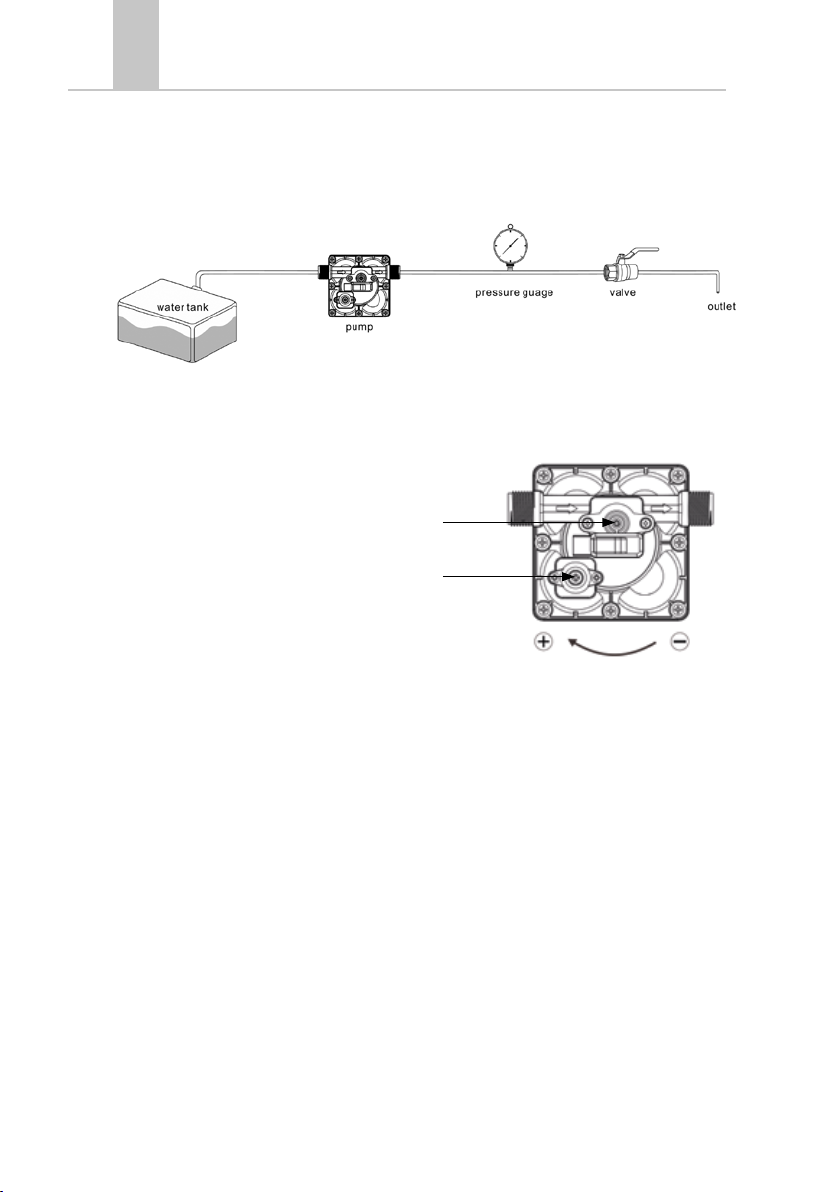
1. Die Pumpe kann in jeder Position montiert werden. Bei vertikaler Montage
sollte sich der Pumpenkopf in unterer Position befinden, um im Fall einer
Fehlfunktion Auslauf in den Motormantel zu verhindern.
2. Die Füße müssen sicher befestigt werden, dürfen aber nicht zusammen-
gedrückt werden. Durch zu starkes Anziehen der Befestigungsschrauben
kann ihre Fähigkeit zur Ableitung von Geräuschen und Vibrationen reduziert
werden.
3. Der Einlassschlauch muss mindestens ½ Zoll (13 mm) stark und gepanzert
sein. Die Hauptverteilungsleitung vom Pumpenauslass muss ebenfalls ½
Zoll (13 mm) stark sein und die Abzweigungen und einzelnen Zufuhrleitun-
gen zu den Auslässen dürfen nicht kleiner sein als
3
/8Zoll (10 mm).
4. Das System mit umflochtenem Hochdruckschlauch (zweifacher Pumpen-
nennwert) anschließen, um Vibrationen/Geräusche minimal zu halten.
5. Den Einlassdruck unter 30psi halten. Generell sollte Einlassdruck vollständig
vermieden werden.
6. Knicke oder Anschlussstücke vermeiden, die übermäßige Behinderungen
schaffen würden.
7. Der Siebfilter muss an der Einlassseite angebracht werden.
8. Zur Verhinderung von Undichtigkeiten müssen die Anschlussstücke fest
angezogen werden.
9. An beiden Schlauchenden Klemmen anbringen, um Lufteintritt in die Was-
serleitung zu vermeiden.
10. Wenn im Leitungssystem ein Rückschlagventil angebracht wird, muss es
einen Öffnungsdruck von maximal 2 psi haben.
11. Wenn ein Abdichtungs- oder Rohrleitungsband verwendet wird, ist darauf
zu achten, es nicht zu straff festzuziehen, weil es in die Pumpe gesaugt
werden könnte.

5
Carbest 4-Kammer Druckpumpe| Diaphragm Pump | 620560DE
12. Diese Pumpe muss an ihren eigenen Stromkreis angeschlossen werden.
Die positive Leitung (rot) an die positive Batterieklemme und die negative
Leitung (schwarz) an die negative Batterieklemme anschließen.
13. An einer gut erreichbaren Stelle sollte ein Schalter zur Unterbrechung der
Stromzufuhr zur Pumpe angebracht werden. Die Pumpe abstellen, wenn
sie über einen längeren Zeitraum nicht gebraucht wird oder wenn der Tank
leer ist.
14. Der Stromkreis muss mit einer Überstromschutzvorrichtung (Sicherung)
in der positiven Leitung geschützt werden. Diese Pumpe benötigt eine
15-A-Sicherung.
15. Der Pumpenstromkreis darf keine anderen elektrischen Lasten enthalten.
16. Da die Wasserversorgungspumpe nicht unbedingt erforderlich ist, siehe die
Leitungstabelle unter den Informationen zur Elektrik. Es ist darauf zu ach-
ten, dass die korrekte Leitungsstärke für die jeweils verwendete Leitungs-
länge genommen wird.
17. Nach der Installation die Spannung am Pumpenmotor überprüfen.
Die Spannung muss bei laufender Pumpe überprüft werden.
Am Pumpenmotor muss zu jeder Zeit die volle Spannung anliegen.
Hinweise
1. An der Pumpe wird ein flexibler Trinkwasserschlauch oder ein Schlauch aus
vernetztem Polyethylen anstelle einer starren Rohrleitung empfohlen. Wenn
eine starre Rohrleitung gewählt wird, muss zwischen Rohr und Pumpe ein
kurzes Schlauchstück angebracht werden, um Geräusche und Vibrationen
zu vermeiden.
2. Wir raten von Anschlussstücken aus Metall ab. Soweit möglich sollten die
mitgelieferten Anschlussstücke aus Kunststoff verwendet werden.
3. Der Bypass darf nicht ohne Hilfe eines Technikers angepasst werden.
4. Ein Mangel an Hygiene und Wartung ist einer der Hauptgründe für unzurei-
chende Leistung der Pumpe. Es ist darauf zu achten, die Pumpe zu den
richtigen Zeiten zu warten und winterfest zu machen, insbesondere vor und
nach längeren Lagerungszeiten.

6
Carbest 4-Kammer Druckpumpe| Diaphragm Pump | 620560DE
DER BYPASSS
Bitte wenden Sie sich an einen qualifizierten Techniker, falls der Bypass ange-
passt werden muss. Durch falsche Anpassung des Bypasses kann die Pumpe
beschädigt werden. Der Bypass wurde für optimalen Betrieb der Pumpe vor-
eingestellt. Wenn für Ihre Anwendung eine andere Einstellung des Bypasses
erforderlich ist, können Sie sie selbst ändern. Die Schraube vorsichtig festzie-
hen oder lösen, um den Mindestbetriebsdruck des Bypasses zu erhöhen bzw.
zu verringern.
VORSICHT
!
Zur Installation des Produkts bitte die Anweisungen im Anleitungs-
handbuch befolgen. Durch Maßnahmen, die von den Empfehlungen
in diesem Handbuch abweichen, kann die Pumpe beschädigt werden.
Schäden an der Pumpe durch unangemessene Installation oder
Bedienung werden von der Garantie nicht abgedeckt
GEWÄHRLEISTUNG
Der Gewährleistungszeitraum beträgt 36 Monate. Reimo behält sich das Recht
vor, mögliche Fehler zu beseitigen. Die Garantie wird für alle Schäden ausge-
schlossen, die durch fehlerhafte Verwendung oder unsachgemäße Handhabung
entstanden sind.
Haftungsbeschränkungen: Reimo ist in keinem Fall für Begleitschäden, Fol-
geschäden oder indirekte Schäden, Kosten, Ausgaben, Nutzungsausfall oder
Gewinnausfall haftbar. Der angegebene Verkaufspreis des Produkts stellt den
entsprechenden Betrag der Haftungsbeschränkung von Reimo dar.

7
Carbest 4-Kammer Druckpumpe| Diaphragm Pump | 620560DE
REPARATURSÄTZE
Position Bezeichnung Menge
APumpenkopfbaugruppe 1
BVentilbaugruppe 1
CMembranbaugruppe 1
DMotorbaugruppe 1
1Druckschalter 1
2Membran des Druckschalters 1
3Pumpenkopf 1
4Membran 1
5Gummifüße 1
6Motor 1

8
Carbest 4-Kammer Druckpumpe| Diaphragm Pump | 620560DE
FEHLERSUCHE
Pulsierender Materialfluss – Pumpe geht an und aus
• Leitungen auf Knicke untersuchen.
• Rohrleitungen oder Anschlussstücke sind u. U. zu klein.
• Armaturen und Filter reinigen.
• Anschlussstücke auf Luftundichtigkeiten überprüfen.
Geräusche
• Überprüfen, ob die Montagefüße zu fest zusammengedrückt sind.
• Ist die Montagefläche nachgiebig? Wenn ja, kann sie zur Geräuschbildung
beitragen.
• Überprüfen, ob Kopf/Schrauben lose sind.
• Wenn die Pumpe mit starrem Rohr angeschlossen ist, können Geräusche
leichter übertragen werden.
Pumpe saugt nicht an, aber Motor läuft – kein Pumpenausstoß
• Behinderung in Einlass- oder Auslassleitung.
• Luftundichtigkeit in Einlassleitung.
• Durchstochene Pumpenmembran.
• Anfängliche Stromstärke reicht nicht aus, um den Motor richtig zu starten.
• Fremdkörper verstopfen die Ventile.
• Riss im Pumpengehäuse.
Motor springt nicht an
• Lose oder falsche Verdrahtung.
• Pumpenstromkreis erhält keinen Strom.
• Durchgebrannte Sicherung oder ausgelöster Wärmeschutz.
• Ausgefallener Druckschalter.
• Defekter Motor.
Pumpe geht nicht aus, nachdem alle Armaturen geschlossen wurden
• Durchstochene Membran.
• Undichte Auslassleitung.
• Defekter Druckschalter.
• Unzureichende Spannung.
• Verstopfte Ventile im Pumpenkopf.
• Niedriger Durchfluss und Druck
• Luftundichtigkeit am Pumpeneinlass.
• Fremdkörperansammlung in Pumpe oder Leitungen.
• Verschlissenes Pumpenlager (möglicherweise begleitet von lauten
Geräuschen).
• Durchstochene Membran.
• Defekter Motor.

9
Carbest 4-Kammer Druckpumpe| Diaphragm Pump | 620560DE
ABSCHALT- UND BYPASSDRUCK WIE FOLGT EINSTELLEN
Die Pumpe entsprechend der folgenden Abbildung installieren
1. Druckeinstellung
Einstellschraubentyp; 5/64-Inbusschlüssel
2. Bypasseinstellung
Einstellschraubentyp; 5/64-Inbusschlüssel
c
• Die Druckeinstellschraube vollständig entfernen; die Schraube in Bezug auf das Schalterge-
häuse markieren, um einen Bezugspunkt für die Anzahl der »Umdrehungen« zu haben; die
Einstellschraube im Uhrzeigersinn um »9 bis 9½ Umdrehungen« wie cdrehen. Dadurch wird
der Abschaltdruck auf ca. 60 psi erhöht.
• Die Bypasseinstellschraube vollständig entfernen; die Schraube in Bezug auf das Bypassge-
häuse markieren, um einen Bezugspunkt für die Anzahl der »Umdrehungen« zu haben; die Ein-
stellschraube im Uhrzeigersinn um »10½ bis 11 Umdrehungen« wie cdrehen. Dadurch wird
der maximale Bypassdruck auf ca. 67psi erhöht.
Wie werden Abschalt- und Bypassdruck kontrolliert?
• Nach Einstellung der Schraube das Ventil langsam schließen, bis es ganz geschlossen ist.
Die momentanen Werte, die durch den zitternden Zeiger des Druckmessers angezeigt werden,
stellen den Abschalt-/Bypassdruck dar.

10
Carbest 4-Kammer Druckpumpe| Diaphragm Pump | 620560UK
CONTENTS
FEATURES ....................................................................................................10
APPLICATIONS ............................................................................................... 8
INSTALLATION |Materials | Setup.................................................................. 9
ABOUT THE BYPASS .....................................................................................10
WARRANTY ...................................................................................................10
REPAIR KIT ...................................................................................................11
TROUBLESHOOTING.................................................................................... 12
ADJUST SHUT-OFF AND BY-PASS PRESSURES..............................................13
THANK YOU FOR USING OUR PRODUCT!
Please read this instruction carefully before operating and retain the
instructions for future reference.
Our Pump retains the raw power and pressure of its predecessors, but
also can adapt to situations where huge flow is not needed. Compact
but capable, it is a great fit for tight spaces. lt also may be configured
with different inlet types, each with their own unique fittings, to be sure
that it fits any application you can find.
FEATURES
• 4 chamber diaphragm pump
• Continuous duty
• Bypass: reduces cycling
• Run dry capable for normal workloads
• Automatic: controlled by pressure switch
• lndustry standard mounting pattern
• Self priming
• Quiet Operation
• lgnition protected
APPLICATIONS
• Yacht/RV/caravan pressurized water system
• Sprayer fixtures (vehicle-mounted sprayers, electric sprayers)
• Cleaning machines, humidifier, water purification, medical apparatus
• Food beverage filling & liquid transfer
• Solar water system
• Any other pressurization system

11
Carbest 4-Kammer Druckpumpe| Diaphragm Pump | 620560UK
INSTALLATION
Materials
1 diaphragm pump with related accessories
2 (at least) pieces of flexible, reinforced hose piping, with collapsing strength
of twice the inlet collapsing pressure, hose must be minimum ½“
4 stainless steel hose clamps and screws
4 screws to fasten the pump to the mounting surface
1 electrical cutoff switch
1 fuse
1 screwdriver
1 strong cutting implement for tubing
(if desired) Teflon tape or sealant
Setup
1. The pump may be mounted in any position. lf mounted vertically, the pump
head should be in the down position to avoid leakage into the motor casing
in the event of a malfunction.
2. Secure the feet, but do not compress them. Overtightening the securing
screws may reduce their ability to dissipate noise and vibration.
3. lntake hose must be minimum ½“ (13 mm) reinforced hose. Main
distribution line from pump outlet should also be ½“ (13mm) with branch
and individual supply lines to outlets no smaller than 3/8“ (10 mm).
4. Plumb the system using high pressure (2 x pump rating), braided, flexible
tubing to minimize vibration/noise.
5. Do not apply inlet pressure in excess of 30psi. In general, try to avoid any
inlet pressure completely.
6. Avoid any kinks or fittings which could cause excessive restrictions.
7. Strainer should be attached to the inlet side.
8. The fittings must be secured to avoid leakage.
9. Use clamps at both ends of hose to prevent air leaks into the water line.
10. lf a check valve is installed in the plumbing, it must have a cracking
pressure of no more than 2 psi.
11.lf applying a sealer or plumbing tape, be careful to not overtighten, as they
may be sucked into pump.
12.This pump should be wired on its own dedicated circuit. Connect the
positive lead (red} to the positive terminal of your battery and the negative
wire (black) to the negative terminal of your battery.
13. ln an easily accessible location, install a switch to control electricity to the
pump. Turn the pump off when not used for extended periods or when the
tank is empty.
14.The electrical circuit should be protected with an over-current protection
device (fuse) in the positive lead. This pump requires a 15 amp fuse.
15.The pump circuit should not include any other electrical loads.

12
Carbest 4-Kammer Druckpumpe| Diaphragm Pump | 620560UK
16. As the water supply pump is non-essential, reference the wire Chart under
the electrical information. Be sure to have the correct wire sizing for the
length of wire you are using.
17.After installation, check the voltage at the pump motor. Voltage should
be checked when pump is operating. Full voltage must be available at the
pump motor at all times.
Notes
1. Flexible potable water hose or PEX tubing is recommended instead of rigid
piping at pump. lf you choose to use rigid piping, provide a short length of
hose between pipe and the pump to avoid noise and vibration.
2. We do not recommend the use of metal fittings. When possible, use the
provided plastic fittings.
3. Do not adjust the bypass personally without the help of technician.
4. Lack of sanitizing and maintenance is one of the main reasons of under
performance of the pump. Please do maintenance and winterize the pump
at appropriate times, especially before and after a period of storage.
ABOUT THE BYPASS
Please consult a professional technician in the case that the bypass needs
adjustment. lmproper adjustment of the bypass may damage the pump.
The bypass comes preset for optimal operation of the pump. lf your application
calls for a different setting for the bypass, you may change it yourself. Carefully
tighten the screw to increase or loosen the screw to decrease the minimum
operational pressure of the bypass.
CAUTION
!
Please do follow the instruction manual to install the product. Any
action outside what is recommended in this manual may bring damage
to the pump. Any inappropriate installation or operation that causes
the pump damage is not covered by warranty.
WARRANTY
The warranty period is 36 months. Reimo reserves the right to rectify eventual
defaults. The guarantee is excluded for all damages caused by faulty use or
improper handling.
Liability limitations:
In no case Reimo will be reliable for collateral-, secondary- or indirect
damages, costs, expenditure, missed benefits or missed earnings. The
indicated sales price of the product is representing the equivalent value of
Reimo’s liability limitations.

13
Carbest 4-Kammer Druckpumpe| Diaphragm Pump | 620560UK
REPAIR KITS
Key Description Quantity
APump Head Assembly 1
BValve Assembly 1
CDiaphragm Assembly 1
DMotor Assembly 1
1Pressure switch 1
2Diaphragm of Pressure Switch 1
3Pump Head 1
4Diaphragm 1
5Rubber Feet 1
6Motor 1

14
Carbest 4-Kammer Druckpumpe| Diaphragm Pump | 620560UK
TROUBLESHOOTING
Pulsating flow-pump cycles on and off
• Check lines for kinks.
• Plumbing lines or fittings may be too small.
• Clean faucets and filters.
• Check fitting tightness for air leaks.
Noisy
• Check if the mounting feet are compressed too tightly.
• Is the mounting surface flexible? lf so, it may be adding noise.
• Check for loose head/screws.
• lf the pump is plumbed with rigid pipe, then it may transmit noise more easily.
Failure to prime but motor operates-no pump discharge
• Restricted intake or discharge line.
• Air leak in intake line.
• Punctured pump diaphragm.
• Initial amp supply is not enough to sufficiently start the motor.
• Debris clogged in the valves.
• Crack in pump housing.
Motor fails to turn on
• Loose or improper wiring.
• Pump circuit has no power.
• Blown fuse or thermal protection tripped.
• Failed pressure switch.
• Defective motor.
Pump fails to turn off after all fixtures are closed
• Punctured diaphragm.
• Discharge line leak.
• Defective pressure switch.
• lnsufficient voltage.
• Clogged valves in pump head.
Low flow and pressure
• Air leak at pump intake.
• Accumulation of debris inside pump or plumbing.
• Worn pump bearing (possibly accompanied by loud noise).
• Punctured diaphragm.
• Defective motor.

15
Carbest 4-Kammer Druckpumpe| Diaphragm Pump | 620560UK
USE THE FOLLOWING PROCESS TO ADJUST SHUT-OFF
AND BY-PASS PRESSURES
lnstall the pump as the following picture
1. pressure adjustment set
set screw type; 5/64 allen key
2. by-pass adjustment
set screw type; 5/64 allen key
c
• Remove the pressure adjustment screw completely, mark the screw in relati-
on to the switch housing for reference as to number of »turns«, start screwing
the set screw clockwise »9 to 9½ turns«, as the c. This will increase the
pressure to shut-off at approximately 60 psi.
• Remove the by-pass adjustment screw completely, mark the screw in relation
to the by-pass housing for reference as to number of »turns«, start screwing
the set screw clockwise »10½ to 11 turns« as the c. This will increase the
maximum bypass pressure to approximately 67 psi.
How to verity the shut-off and by-pass pressures?
• After adjustment the screw, slowly close the valve until shutout. The pressure
gauge pointer jitter instantaneous data is shut-off/by-pass pressure.

REIMO REISEMOBIL-CENTER GMBH
63329 EGELSBACH · BOSCHRING 10
GERMANY · WWW.REIMO.COM
MADE IN CHINA
www.reimo.com © 2019
This manual suits for next models
1
Table of contents
Languages:
Other Carbest Water Pump manuals
Popular Water Pump manuals by other brands

Grundfos
Grundfos GiM CIU Installation and operating instructions

ProMinent
ProMinent Sigma 2 S2Cb operating instructions

Zoeller
Zoeller 81 Series installation instructions

Grundfos
Grundfos MTC Series Installation and operating instructions

KSB
KSB Ama-Drainer100 Installation & operating manual

Marco
Marco UP8-RE Instructions for use