carrello Milano CRL-0001 User manual

CRL-0001 INSTRUCTION MANUAL
GB
RU
UA

1
GB INSTRUCTION MANUAL
Thank you for choosing the product of T.M. “CARRELLO”.
This instruction manual contains important information about
assembly process, safety regulations and maintenance of the stroller.
Please read these instructions carefully before use and keep them for
later reference. The safety of your child could be put at risk if you do
not follow these instructions.
IMPORTANT NOTES
ALWAYS FOLLOW THE MANUFACTURERS INSTRUCTIONS.
READ ALL INSTRUCTIONS CAREFULLY BEFORE ASSEMBLY AND USE OF THIS
STROLLER.
THE CORRECT USE AND MAINTENANCE OF THIS PRODUCT IS ESSENTIAL.
• USE GREAT CARE WHEN USING THE STROLLER ON STAIRS, ESCALATORS,
TRAVELATORS OR OTHER MOVING SURFACES.
• IT IS RECOMMENDED TO REMOVE THE CHILD FROM THE STROLLER
BEFORE GOING UP OR DOWN STAIRS OR ESCALATORS.
• DO NOT LIFT THE STROLLER BY THE BUMPER.
• DO NOT ALLOW CHILDREN TO STAND ON THE SEAT.
• DO NOT HANG BAGS OR GOODS FROM THE HANDLE AS THIS COULD
CAUSE THE STROLLER TO TIP OVER.
• DO NOT LEAVE THE STROLLER AND ITS ACCESSORIES NEAR AN OPEN FIRE OR
EXPOSED FLAME.
• DO NOT PLACE MORE THAN 3 KG IN THE BASKET, OR 0.5 KG IN THE
CANOPY POCKET (IF SUPPLIED).

2
WARNING
TO AVOID INJURY ALWAYS APPLY THE BRAKES WHENEVER THE STROLLER IS
STATIONARY
• DO NOT LEAVE CHILDREN UNATTENDED.
• SECURE THE CHILD IN THE HARNESS AT ALL TIMES.
• DO NOT CARRY EXTRA CHILDREN OR BAGS ON THIS STROLLER.
• MAKE SURE CHILDREN ARE CLEAR OF ANY MOVING PARTS IF YOU ADJUST
THE STROLLER.
• DO NOT USE ANY ACCESSORIES OTHER THAN THOSE APPROVED FOR USE
WITH THIS STROLLER BY THE MANUFACTURER.
• IT IS UNSAFE TO USE ACCESSORIES NOT APPROVED FOR USE WITH THIS
STROLLER.
• THE MAXIMUM WEIGHT OF THE CHILD USING THIS STROLLER IS NOT TO
EXCEED 22 KG.
FOR IMPORTANT NOTES AND WARNINGS ON ACCESSORIES - REFER TO
THEIR INDIVIDUAL SECTIONS IN THIS BOOK. THE MAXIMUM WEIGHT
VARIES FOR EACH ACCESSORY.
CAUTION
This CAUTION Symbol is shown at certain steps
in this Instruction Manual to highlight the
danger of being injured by moving parts.

PART LIST
3
a) 1 x Frame, Seat and Basket
c)
1 x Bumper
e)
2 x Rear Wheels
b)
1 x Canopy
d)
2 x Front Wheels
f)
2 x Shoulder Pads

ASSEMBLY AND OPERATING INSTRUCTIONS
4
Storage
latch
CAUTION
click
AB
2
2
2
OPENING THE STROLLER
• RELEASE THE STORAGE LATCH WITH DUE CARE AND OPEN THE FRAME.
• WHEN OPENING THE STROLLER, BE AWARE OF THE DANGER OF BEING
INJURED BY MOVING PARTS AND LOCKING DEVICES DURING THE PROCESS.
KEEP ALL HANDS AND LIMBS CLEAR OF THESE PARTS.
• THERE IS POTENTIAL FOR FINGERS OR PARTS OF THE BODY TO BE INJURED
WHEN THE STROLLER IS BEING UNFOLDED, DUE CARE SHOULD BE
EXERCISED.
• KEEP CHILDREN CLEAR OF THE STROLLER WHEN UNFOLDING THE
STROLLER.
• OPEN THE STROLLER SLOWLY AND BE CAREFUL WHERE YOU PLACE YOUR
HANDS. KEEPING YOUR HANDS ON THE HANDLE IS THE BEST WAY TO
UNFOLD THE STROLLER.
ARelease the storage latch (1) located on the rear leg.
BOpen the frame as shown by the arrows (2) until you hear a ‘click’ which
indicates the frame is fully opened and locked. Push down on the stroller
1

ASSEMBLY AND OPERATING INSTRUCTIONS
5
click
A
Quick
release
B
A
Metal Latch
B
2
1
ASSEMBLING AND REMOVING THE FRONT SWIVEL WHEELS
A
Take each front swivel wheel assembly and push it into each of the front leg
mouldings until you here a ‘click’ which indicates the wheel is locked in. Pull on
B
To remove each front swivel wheel assembly, press the black quick
release button on the top of the front leg mouldings.
ASSEMBLING AND REMOVING THE REAR WHEELS
AInsert each wheel axle into the moulding and push in until locked. You should
hear a ‘click’ which indicates the wheel has locked in. Pull on the wheel to make
sure it is engaged. Repeat the process if not locked in.
BTo remove the wheels, pull the metal latch downwards on the underneath of

6
ASSEMBLY AND OPERATING INSTRUCTIONS
A
+
A
B
B
A
USING THE FRONT SWIVEL WHEELS
PLEASE NOTE: Always lock the swivel wheels when using the stroller on rough
surfaces as this will minimise wheel wobble.
The swivel wheels should only be locked when the wheels are in the trailing
position (wheels under frame).
ATo lock the swivel wheels, push the locking clip down. To allow the wheels to
swivel, push the locking clip up on the front of each wheel.
ATTACHING AND USING THE CANOPY
The sun is very strong. DO NOT LEAVE YOUR CHILD EXPOSED TO THE SUN. The
canopy or hood on this product will not give your child total protection from the
harmful rays of the sun.
ATo attach the canopy, slide the canopy mouldings (as shown by the arrow) into
the frame mouldings until they lock together.
B Attach the hook strip (A) on the outside edge of the canopy to the loop strip (B)
on the inside edge of the stroller seat side panel.
7
ASSEMBLY AND OPERATING INSTRUCTIONS
C
Zipper
FE
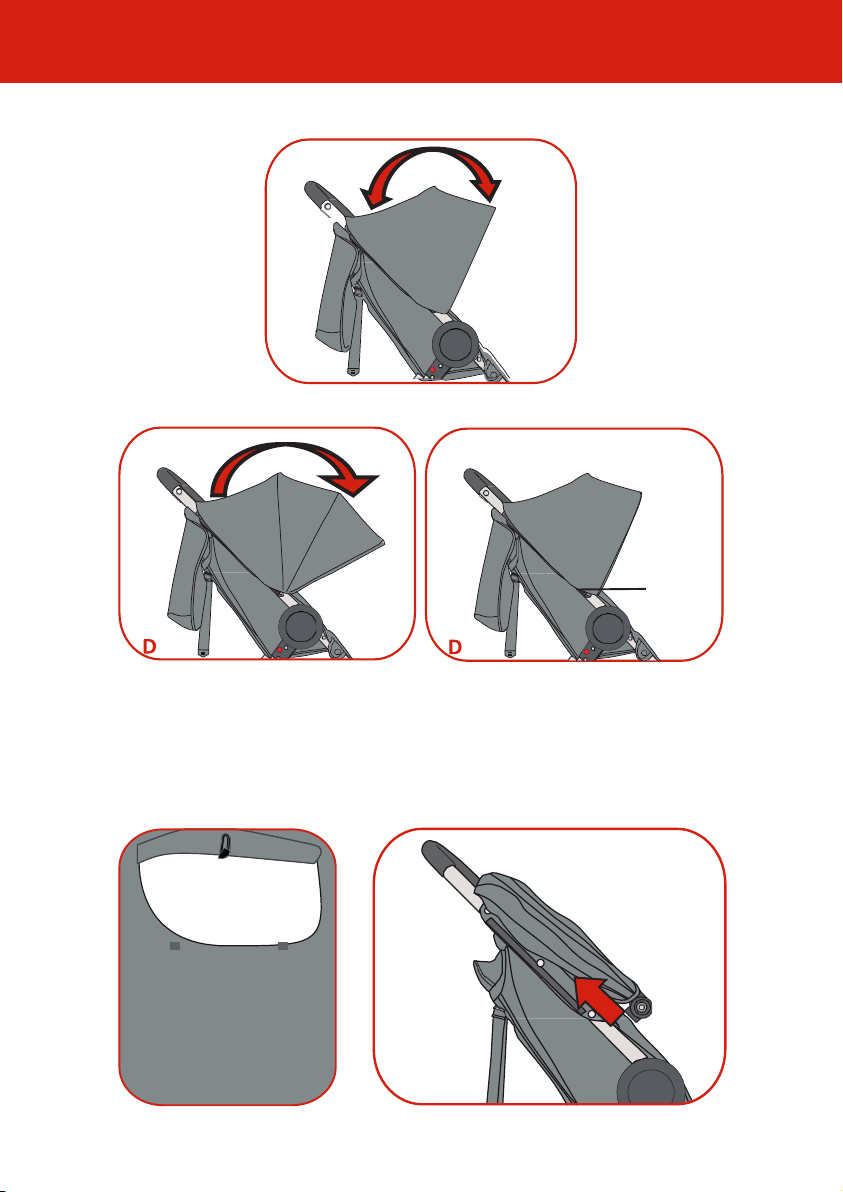
CTo adjust the canopy, open by pulling forward, or close by pushing it backward.
DTo increase the canopy length, open the zipper to access extra canopy section.
E which is
with the elastic loop and toggle.
FTo remove the canopy, slide the canopy mouldings (as shown by the
arrow) out of the frame mouldings.

8
ASSEMBLY AND OPERATING INSTRUCTIONS
ATTACHING AND REMOVING THE BUMPER
WARNING: WHEN A CHILD IS IN THE STROLLER KEEP THE BUMPER ATTACHED TO
THE ADAPTORS AT ALL TIMES.
AStand beside the stroller and pull the fabric back from the sides of the stroller
to expose the stroller hinge. Slide the bumper mouldings onto the stroller hinge
(as shown by the arrow) until you hear a ‘click’ which indicates the arm bar has
locked in. Pull up on the arm bar to ensure it hasfully locked in.
BTo remove the bumper, push the red quick release tabs in on the inside of each
stroller hinge and slide the arm bar out of the stroller.
ADJUSTING THE BACKREST
WARNING:
• THE UPRIGHT POSITIONS ARE NOT SUITABLE FOR USE WITH CHILDREN LESS THAN 6
MONTHS OLD.
• THE LOWEST RECLINE POSITION SHOULD BE USED TO TRANSPORT BABIES. THE
BACKREST CAN BE ADJUSTED TO A MORE UPRIGHT POSITION AS THE CHILD GROWS
OLDER AND IS ABLE TO SUPPORT ITS HEAD WITHOUT ASSISTANCE.
PLEASE NOTE: If the child is sitting in the seat, support the backrest as it reclines. If you
to allow you to raise or lower the backrest with ease.
Click
A
1
2
B
Main
adjuster
moulding
Backrest
adjuster
1
2

9
ASSEMBLY AND OPERATING INSTRUCTIONS
A
straps and with the other hand push the backrest up to the desired position.
BTo lower the backrest, support the backrest with one hand and with the other
hand press the backrest adjuster button down and pull the backrest adjuster
moulding downwards to lower the backrest to the desired position.
USING THE BRAKES
WARNING: ALWAYS APPLY THE BRAKES WHEN THE STROLLER IS STATIONARY.
ATo lock the rear wheels, press the brake pedal down. Check that the brakes
have locked by trying to push the stroller forward. If not locked, repeat this step.
To release the brakes, push the brake pedal up.
B
A
Brake
Pedal
Table of contents
Languages:
Other carrello Stroller manuals


