Cartrend Akku-Poliermaschine User manual

Akku-
Poliermaschine
D
GB
F
I
CZ
SK
SLO
Bedienungsanleitung 3
Instructions for use 7
Mode d’emploi 11
Manuale d’istruzioni 15
Návod k obsluze 19
Návod na obsluhu 23
Navodila za uporabo 27
70346 30163

2
Akku-Poliermaschine

D
3
EINLEITUNG
In dieser Bedienungsanleitung oder/und am Gerät
werden folgende Piktogramme verwendet:
Ni Cd
Beachten Sie diese Bedienungsanleitung
bei der Verwendung des Geräts.
Warn- und Sicherheitshinweise beachten!
Ni Cd
Entsorgen Sie Verpackung, Gerät und
Zubehör umweltgerecht!
Akku umweltgerechter Wiederverwertung
zuführen!
Akku keiner großen Hitze aussetzen!
Akku nicht ins Feuer werfen!
Akku nicht in Gewässer werfen!
Hinweis:
Für die Akku-Poliermaschine wird in dieser Bedie-
nungsanleitung auch der Begri Gerät verwendet.
VERPACKUNGSINHALT
Kontrollieren Sie unmittelbar nach dem Auspacken
den Lieferumfang. Prüfen Sie das Gerät sowie alle
Teile auf Beschädigungen. Nehmen Sie ein defektes
Gerät oder Teile nicht in Betrieb.
1x Akku-Poliermaschine
2x 12 VAkku / 1,3 Ah
1x Ladestation (Ladeadapter, 230V Ladenetzteil)
2x Mikrofaser-Polierhaube
1x Bedienungsanleitung
Geben Sie alle Unterlagen auch an andere Benutzer
weiter!
Ni Cd
Ni Cd
Ni Cd
Ni Cd
VORGESEHENER
VERWENDUNGSZWECK
Die Akku-Poliermaschine wurde zum Polieren von
Autolackflächen konzipiert.
Die Akku-Poliermaschine ist nur zur Verwendung
im privaten Bereich vorgesehen und nicht für den
gewerblichen Einsatz bestimmt.
Wird das Gerät zu anderen Zwecken eingesetzt, ist
dies bestimmungswidrig und kann zu Gefährdungen
führen. Für mögliche Schäden, die durch nicht bestim-
mungsgemäße Verwendung verursacht werden, haftet
der Hersteller nicht.
SICHERHEITSHINWEISE
Lebens- und Unfallgefahr für Kinder! Halten Sie das
Gerät aus der Reichweite von Kindern fern. Kinder
können die Gefahren, die durch das Produkt entste-
hen, nicht erkennen!
Arbeitsplatz
• Halten Sie Ihren Arbeitsplatz sauber und aufge-
räumt. Unordnung und unbeleuchtete Arbeitsberei-
che können zu Unfällen führen.
• Explosionsgefahr! Verwenden Sie das Gerät nicht
in explosionsgefährdeter Umgebung (z. B. Stäube,
brennbare Gase, Lösungsmitteldämpfe).
Elektrische Sicherheit
• Den Anschlussstecker des Ladenetzteils nur in eine
230V Netzsteckdose stecken. Der Stecker darf in
keiner Weise verändert werden.
• Achtung! Das Gerät ist nicht wasserdicht. Setzen
Sie das Gerät nicht Regen oder nassen Bedingun-
gen aus. Vermeiden Sie es, Wasser oder andere
Flüssigkeiten darüber zu verschütten oder zu
tropfen.
• Lebensgefahr! Stecken Sie das 230V Ladenetzteil
nie mit feuchten oder nassen Händen ein oder aus.
• Lebensgefahr! Ziehen Sie nie am Kabel des 230V
Ladenetzteils. Ziehen Sie das Kabel nur am Stecker
aus der Netzsteckdose. Das Kabel kann beschädigt
werden und es besteht die Gefahr eines elektri-
schen Schlags.
• Halten Sie Kabel fern von Hitze, Öl, scharfen Kanten
oder sich bewegenden Geräteteilen. Beschädigte
Kabel erhöhen das Risiko eines elektrischen
Schlags.

4
Akku-Poliermaschine
PRODUKTÜBERSICHT
1. Vorderer Handgri
2. Gehäuse mit Belüftungsönungen
3. Hinterer Handgri
4. 12 VAkku
5. EIN-/AUS-Schalter
6. Polierteller mit Schaumstopad
7. Mikrofaser-Polierhaube
8. 230V Ladenetzteil
9. Ladeadapter
10. LED-Ladezustandsanzeige
TECHNISCHE DATEN
Spannung: DC 12V
Akku: 1,3 Ah
Aufnahmeleistung: 75Watt min. / 200Watt max.
Polierbewegung: 2800min-1 (exzentrisch)
Ø-Polierteller: 150mm
Gewicht: ca. 3,5kg
Schalldruckpegel LpA: 63dB
Schallleistungspegel LwA: 66,2 dB
Ladezeit: ca. 5h
Ladegerät: 230V AC / 15V DC 400mA
1234
5
6
7
8
10
9
• Decken Sie die Ladestation und den Akku während
des Ladevorgangs nicht ab.
• Brandgefahr! Stellen Sie die Verwendung des Geräts
oder des Ladenetzteils sofort ein, wenn Rauch
sichtbar wird oder ein ungewöhnlicher Geruch
wahrzunehmen ist.
• Verletzungsgefahr! Akkus können platzen oder
explodieren, wenn sie ins Feuer geworfen oder
extremer Hitze ausgesetzt werden. Setzen Sie das
Gerät keiner extremen Hitze aus.
Sicherheit von Personen
• Arbeiten Sie sorgfältig und gewissenhaft. Benutzen
Sie das Gerät nicht, wenn Sie müde sind oder unter
dem Einfluss von Drogen, Alkohol oder Medikamen-
ten stehen.
• Tragen Sie immer eine Schutzbrille, eine Staub-
maske und Gehörschutz. Je nach Art und Einsatz
des Geräts verringert sich dadurch das Risiko von
Verletzungen.
• Tragen Sie keine weite Kleidung oder Schmuck.
Halten Sie Haare, Kleidung und Handschuhe fern
von sich bewegenden Geräteteilen, damit sie nicht
erfasst werden können.
• Bei längerem Einsatz können Ermüdungserschei-
nungen durch Vibrationen und Lärm auftreten.
Legen Sie beim Polieren regelmäßig Pausen ein.
Sorgfältiger Umgang und Gebrauch
• Lebensgefahr! Ein beschädigtes 230V Ladenetzteil
kann einen tödlichen elektrischen Schlag auslösen.
Verwenden Sie ein beschädigtes Ladenetzteil nicht
mehr.
• Verletzungsgefahr! Prüfen Sie das Gerät vor jeder
Benutzung auf Beschädigungen. Nehmen Sie ein
defektes Gerät nicht in Betrieb.
• Verletzungsgefahr! Das Gerät nicht verändern,
önen oder manipulieren. Es besteht sonst erhöhte
Verletzungsgefahr.

D
5
• Verwenden Sie das Gerät nicht, wenn das Schaum-
stopad beschädigt ist oder sich vom Polierteller
gelöst hat.
• Tragen Sie beim Trockenpolieren immer eine Staub-
schutzmaske.
• Verwenden Sie nur saubere Mikrofaser-Polierhau-
ben und polieren Sie nur saubere und schmutzfreie
Oberflächen.
• Verwenden Sie keine zu großen Mengen Polier-
mittel.
• Polieren Sie schwer erreichbare Stellen von Hand.
• Polieren Sie Fahrzeuge nicht öfter als zwei- bis
dreimal im Jahr um unnötige Lackabnutzung zu
vermeiden.
Polierhaube aufsetzen
Ziehen Sie eine Mikrofaser-Polierhaube stra und
gleichmäßig über das Schaumstopad am Polierteller.
Ein-/Ausschalten
Einschalten: Ein-/Ausschalter drücken und halten.
Ausschalten: Ein-/Ausschalter loslassen.
Polieren
1. Setzen Sie eine Mikrofaser-Polierhaube auf das
Schaumstopad.
2. Tragen Sie das Poliermittel gleichmäßig auf die
Mikrofaser-Polierhaube auf.
3. Setzen Sie die Poliermaschine mit der Mikrofaser-
Polierhaube an die zu polierende Fläche an.
4. Schalten Sie die Poliermaschine ein und polieren
Sie die Fläche gleichmäßig im Kreuzgang oder mit
Kreisbewegungen. Üben Sie dabei nur geringen
Druck auf die Polierfläche aus.
5. Schalten Sie die Maschine immer aus, bevor Sie
diese von der Polierfläche nehmen.
Schwingungsgesamtwerte (Vektorsumme dreier
Richtungen) ermittelt entsprechend EN 60745:
Schwingungspegel ah: 4,26 m/s²
Unsicherheit K = 1,5 m/s²
VERWENDUNG
Akku aufladen
Hinweis: Mitgelieferte Akkus sind bei Auslieferung nur
teilweise geladen und müssen vor der Verwendung
vollständig aufgeladen werden. Die volle Akkukapazi-
tät wird erst nach ca. 4 Ladevorgängen erreicht.
Warnung! Laden Sie den Akku nur mit dem
mitgelieferten 230V Ladenetzteil und dem La-
deadapter. Sonst besteht Brandgefahr oder der Akku
kann beschädigt werden.
1. Kabel des 230V Ladenetzteils in die Buchse am
Ladeadapter einstecken.
2. 230V Ladenetzteil in Netzsteckdose einstecken.
3. Akku in den Ladeadapter stecken.
4. Wenn der Akku richtig eingesetzt ist, leuchtet die
LED-Ladezustandsanzeige:
• LED leuchtet: Akku wird geladen.
• LED aus: Akku ist vollständig geladen.
5. Nach Ende des Ladevorgangs den Akku entneh-
men und das 230V Ladenetzteil aus der Netzsteck-
dose ziehen.
• Laden Sie die Akkus ca. alle 2 Monate auf, auch
wenn Sie diese nicht verwenden, um eine Tiefen-
entladung zu vermeiden.
• Wird der Akku nicht verwendet, kann er im
Ladegerät eingesteckt bleiben, ohne dass er
beschädigt oder überladen wird. Wird der Akku
längere Zeit nicht verwendet, ziehen Sie das
230 V Ladenetzteil aus der Netzsteckdose.
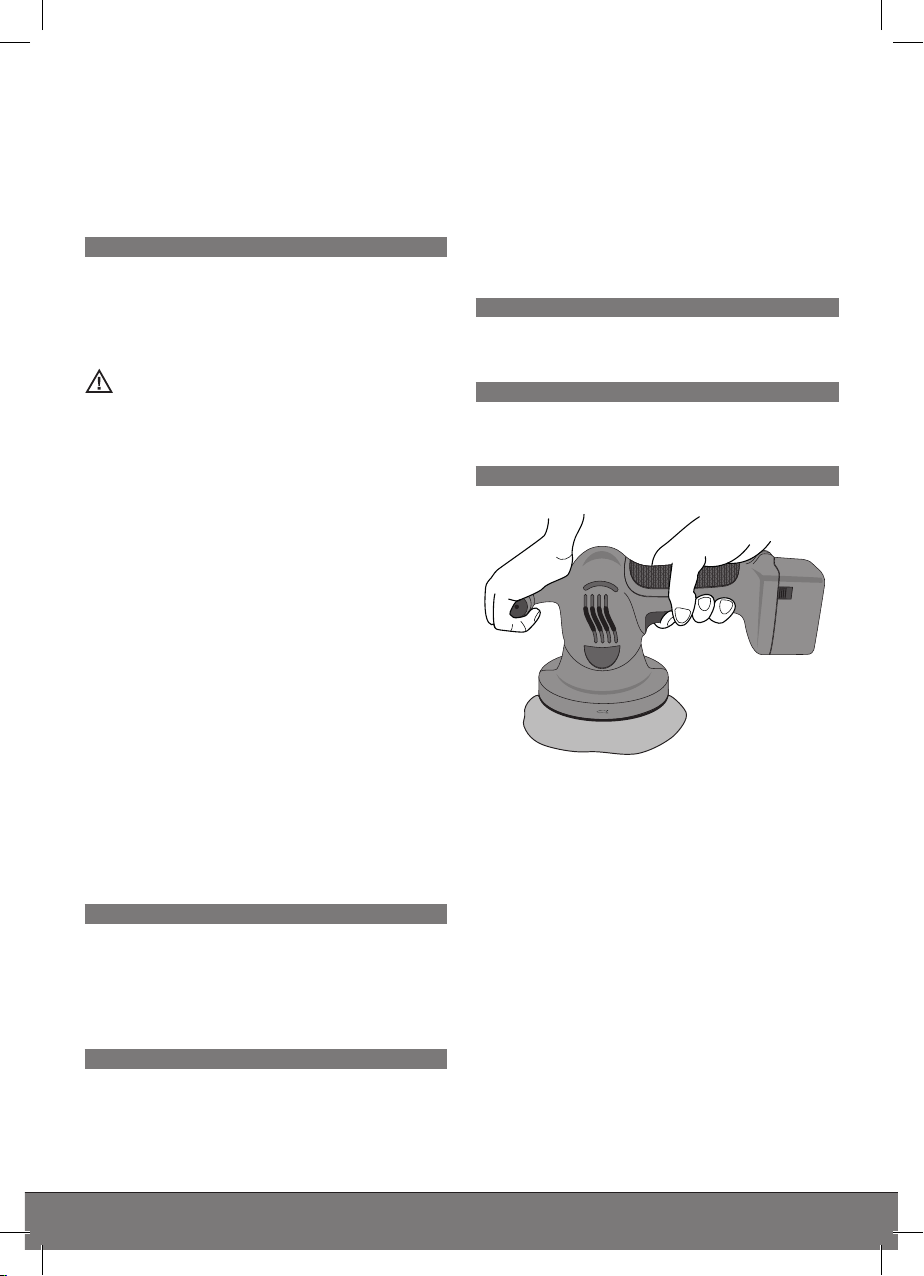
Akku einsetzen/entnehmen
Schalten Sie die Poliermaschine aus.
• Entnehmen: Drücken Sie die beiden Arretierungen
am Akku und ziehen Sie den Akku dabei heraus.
• Einsetzen: Schieben Sie den Akku in die Aufnahme
am Gehäuse, bis er einrastet.
Hinweise zum Polieren
• Beachten Sie beim Polieren von Fahrzeugen die
Bedienungsanleitung des Fahrzeugherstellers.
• Beachten Sie die Hinweise des Poliermittelherstel-
lers.

6
Akku-Poliermaschine
ENTSORGUNG
Die Verpackung besteht aus umweltfreundlichen
Materialien, die Sie über die örtlichen Recyclingstellen
entsorgen können.
Werfen Sie Elektrogeräte nicht in den Hausmüll!
Gemäß Europäischer Richtlinie 2002/96/EC über
Elektro- und Elektronik-Altgeräte und Umsetzung in
nationales Recht müssen verbrauchte Elektrogerä-
te getrennt gesammelt und einer umweltgerechten
Wiederverwertung zugeführt werden. Über Entsor-
gungsmöglichkeiten für ausgediente Elektrogeräte
informieren Sie sich bitte bei Ihrer Gemeinde- oder
Stadtverwaltung.
Abbildungen können geringfügig vom Produkt abwei-
chen. Änderungen, die dem technischen Fortschritt
dienen, vorbehalten. Dekoration nicht enthalten.
WARTUNG & SERVICE
Pflege
Warnung! Trennen Sie das 230V Ladenetzteil
immer von der Netzsteckdose, bevor Sie die
Ladestation reinigen oder prüfen.
• Akkus unterliegen mit der Zeit einer gewissen Ent-
ladung. Laden Sie den Akku alle zwei Monate auf,
wenn Sie das Gerät nicht regelmäßig verwenden.
• Reinigen Sie das Produkt mit einem weichen,
trockenen Tuch. Verwenden Sie keine aggressiven
Reinigungs- oder Lösungsmittel zur Reinigung.
• Reinigen Sie die Mikrofaser-Polierhaube mit einem
handelsüblichen Feinwaschmittel und Handwäsche.
• Tauchen Sie das Gerät nicht in Flüssigkeiten.
• Lagern Sie das Gerät an einem sauberen, trockenen
Ort.
Reparatur und Service
Lassen Sie das Gerät und die Ladestation nur von
qualifiziertem Fachpersonal reparieren. Damit wird
die Sicherheit des Gerätes sichergestellt und bleibt
erhalten.
Garantie
Die allgemeinen Garantiebedingungen beziehen sich
auf Produktions- und Materialdefekte. Falls das Gerät
fehlerhaft ist, bringen Sie es zu Ihrem Fachhändler
bzw. der betreenden Verkaufsstelle zurück.
Um die Garantie- und Reparaturarbeiten am Gerät zu
beschleunigen, brauchen Sie Folgendes:
• Eine Kopie des Kassenzettels (Lieferschein,
Kassenbon) mit dem Erwerbsdatum.
• Grund für die Beschwerde oder Beschreibung des
Fehlers.

GB
7
INTENDED USE
The rechargeable polisher has been designed for
polishing automotive paint jobs.
The rechargeable polisher has been designed solely
for private use and not for commercial purposes.
Using the rechargeable polisher for other purposes
is considered improper and can cause danger. The
manufacturer is not liable for damages caused by
improper use.
SAFETY NOTICE
Risk of bodily or fatal injury to children! Keep the
machine out of the reach of children. Children are
unable to assess the risks associated with use of this
product!
Workplace
• Keep your workplace clean and tidy. Untidiness and
poorly-lit working areas can lead to accidents.
• Explosion hazard! Do not use the machine in areas
that are subject to the risk of explosion (e.g. dust,
flammable gasses, solvent fumes).
Electrical Safety
• Only attach the charger plug to a 230 V mains
socket. Do not attempt to alter the plug in any way,
shape or form.
• Warning! The machine is not waterproof. Never use
the machine in rain or wet conditions. Avoid drip-
ping or spilling liquids over the machine.
• Risk of fatal injury! Never plug in or unplug machine
with wet or moist hands.
• Risk of fatal injury! Never pull on the 230 V charging
cable. This can damage the cable and cause electri-
cal shock. Unplug from socket by the plug itself.
• Keep the cable away from heat sources, oil, sharp
edges or moving objects. Damaged cables increase
the risk of electrical shock.
• Do not cover the machine whilst charging.
• Fire hazard! Stop using the machine immediately if
you detect smoke or if the machine begins to emit a
strange odour.
• Risk of injury! Rechargeable batteries can burst or
explode when exposed to excessive heat or thrown
into fire. Never expose the machine to excessive
heat.
INTRODUCTION
The following icons are used in these instructions / on
the machine itself:
Ni Cd
Follow instructions when using the
machine.
Observe warnings and safety guidelines!
Ni Cd
Consider the environment when disposing
of the packaging!
Dispose of the rechargeable battery in an
environmentally friendly manner!
Do not expose the rechargeable battery
to excessive heat!
Do not expose the rechargeable battery
to fire!
Do not expose the rechargeable battery
to water!
Note:
These instructions also refer to the rechargeable
polisher as “the machine”.
PACKAGE CONTENTS
Be sure to verify contents immediately upon opening
the product. Check the product and all parts for ama-
ge. Do not use a defective product or parts.
1x Rechargeable polisher
2x 12 V rechargeable batteries / 1.3 Ah
1x Charging station (charging adapter,
230 V power supply)
2x Microfibre polishing bonnet
1x Set of instructions
Please include all relevant documentation to other
users!
Ni Cd
Ni Cd
Ni Cd
Ni Cd

8
Rechargeable Polisher
PRODUCT OVERVIEW
1. Front handle
2. Casing with ventilation opening
3. Rear handle
4. 12 V rechargeable battery
5. ON/OFF switch
6. Polishing disc with foam pad
7. Microfibre polishing bonnet
8. 230 V charging unit
9. Charger adapter
10. LED charge display monitor
TECHNICAL DATA
Voltage: DC 12 V
Rechargeable battery: 1.3 Ah
Input power: 75 Watt min. / 200 Watt max.
Polishing performance: 2800 min-1 (eccentric)
Ø Polishing disc: 150 mm
Weight: approx. 3.5 kg
Sound Pressure Level LpA: 63 dB
Sound power level LwA: 66.2 dB
Charging time: approx. 5 h
Charging unit: 230 V AC / 15 V DC 400 mA
1234
5
6
7
8
10
9
Personal Safety
• Work carefully and attentively. Do not use the
machine if you are tired or under the influence of
drugs, alcohol or medicines.
• Always wear protective goggles, a dust-mask and
ear protectors. Depending on the machine and its
use, this can reduce the risk of injury.
• Do not wear baggy clothing or jewellery. Keep
your hair, clothes and gloves well away from the
machine’s moving parts so that they cannot be
unintentionally caught by the machine.
• Vibration and noise can cause fatigue over exten-
ded periods. When polishing, be sure to take regular
breaks.
Careful Handling and Use
• Risk of fatal injury! A damaged 230 V charging unit
can cause deadly electrical shocks. Never use a
damaged charging unit.
• Risk of fatal injury! Check the machine and charger
for damage before every use. Never use a damaged
charging unit.
• Risk of fatal injury! Never attempt to change, open
or manipulate the machine in any way, shape or
form. Ignoring this advice can cause injury.

GB
9
• Do not use the machine if the foam pad is damaged
or is no longer properly attached to the polishing
disc.
• Always wear a protective mask when dry polishing.
• Use only clean microfibre polishing bonnet and
polish only clean and dirt-free surfaces.
• Avoid using too much polishing agent.
• Polish dicult to reach places by hand.
• Do not polish your vehicle more than 2 or 3 times a
year in order to minimise unnecessary paint wear.
Putting on the Polishing Hood
Tauten the microfibre polishing bonnet and pull it
uniformly over the foam pad on the polishing disc.
Switching ON and OFF
ON: Press the ON/OFF switch and hold it pressed.
OFF: Release the ON/OFF switch.
Polishing
1. Place the microfibre polishing bonnet over the
foam pad.
2. Spread the polishing agent uniformly over the
microfibre polishing bonnet.
3. Place the polishing machine with the microfibre
polishing bonnet onto the surface to be polished.
4. Switch on the polishing machine and polish the
surface in a cross-ways or circular motion. Only
apply minimum pressure onto the surface.
5. Always switch the machine o before removing it
from the polishing surface.
Vibration Total Value (triple directional vector sum)
tested and approved according to EN 60745:
Vibration level ah: 4.26 m/s²
Uncertainty K = 1.5 m/s²
USE
Charge the battery
Note: The rechargeable batteries supplied with the
machine are only partially charged and must be fully
charged before initial use. The batteries are fully char-
ged after a charging time of approximately 4 hours.
Warning! To charge the batteries, use only
the 230 V charging unit and adapter supplied.
Failure to observe this can damage the rechargeable
batteries and cause fire.
1. Plug the 230 V charger into the charging adapter
socket.
2. Plug the 230 V charging adapter into a mains so-
cket.
3. Plug the rechargeable batteries into the charging
adapter.
4. If the rechargeable batteries have been correctly
connected the LED charging monitor will light up:
• LED is lit: Batteries are being charged.
• LED is o: Batteries are completely charged.
5. After the batteries have been charged, discon-
nect the batteries and the charger from the mains
supply.
• Charge the batteries every 2 months, even when
the unit is not in use in order to minimise the risk
of battery discharge.
• Even if the rechargeable batteries are not in
regular use they can remain in the charger unit
without the risk of damage or overcharging. If the
rechargeable batteries are not in regular use, dis-
connect the 230 V charger from the mains supply.
Inserting / Removing the battery
Switch the polishing machine o.
• Removal: Press both of the latches on the battery
and simultaneously pull the battery out.
• Inserting: Push the battery into the battery casing
until it clicks into place.
Polishing hints
• When polishing vehicles, please observe the vehicle
manufacturer’s instruction manual.
• Please observe the polishing machine
manufacturer’s instructions.

10
Rechargeable Polisher
DISPOSAL
The packaging consists of non-contaminating
materials that you can dispose of at your local
recycling point.
Do not throw electrical appliances in with
domestic waste!
In accordance with European Directive 2002 / 96 /
EC for waste electrical and electronic equipment
(WEEE) and conversion to national law, used electrical
appliances must be collected separately and taken to
a recycling point. For ways to dispose of old electrical
appliances please contact your community or city
administration.
Illustrations may vary slightly from the product
itself. We reserve the right to modify the product in
accordance with technical advances. Decoration not
included.
MAINTENANCE & SERVICE
Care
Warning! Always disconnect the 230 V charger
from the mains supply before cleaning or che-
cking the charging station.
• Rechargeable batteries lose power over time.
Charge your batteries every 2 months if you are not
using the machine regularly.
• Clean the product with a soft, dry cloth. Do not use
aggressive solvents of detergents to clean it.
• Hand-wash the microfibre polishing bonnet with a
standard detergent.
• Never dip the machine in liquid.
• Store the machine in a clean, dry place.
Repair and Service
Leave the repair of the device to qualified technical
personnel. Thus, the safety of the device is guaran-
teed and maintained.
Warranty
The general guarantee conditions apply to manufactu-
ring and material defects. If the device is faulty, return
it to your dealer or sales oce.
In order to accelerate the warranty and repair work on
the device, you will need to provide the following:
• A copy of the receipt (delivery note, bill) with the
purchase date.
• Reason for the complaint or description of the fault.

F
11
UTILISATION PRÉVUE
La polisseuse à batterie a été conçue pour le polissa-
ge de peintures automobiles.
La polisseuse à batterie a été conçue pour un usage
par les particuliers et non pour une utilisation com-
merciale.
Si l‘appareil est utilisé à d‘autres fins, cela n‘est pas
conforme et entraîne des risques. Le fabricant décline
toute responsabilité quant aux dommages possibles
dus à une utilisation non conforme.
CONSIGNES DE SÉCURITÉ
Risque d‘accident et danger de mort pour les enfants!
Maintenez l‘appareil hors de portée des enfants. Les
enfants ne peuvent pas reconnaître les risques liés à
la machine !
Poste de travail
• Maintenez le poste de travail propre et rangé. Le
désordre et un espace de travail mal éclairé peuvent
entraîner des accidents.
• Risque d‘explosion ! N‘utilisez pas l‘appareil dans
des environnements explosifs (par ex. poussières,
gaz inflammables, vapeurs de solvants).
Sécurité électrique
• Le cordon du bloc d‘alimentation du chargeur doit
être uniquement branché sur une prise secteur de
230 V. Il est interdit de modifier le cordon.
• Attention ! L‘appareil n‘est pas étanche. Ne
l‘exposez pas à la pluie ou à l‘humidité. Evitez de
renverser ou de faire goutter dessus de l‘eau et
autres liquides.
• Danger de mort ! Ne branchez et débranchez jamais
le bloc d‘alimentation de 230 V avec des mains
mouillées ou humides.
• Danger de mort ! Ne tirez jamais sur le câble du
bloc d‘alimentation 230 V. Débranchez le câble de la
prise uniquement par le cordon. Le câble peut être
endommagé et il existe un risque d‘électrocution.
• Maintenez le câble éloigné de toute source de cha-
leur, de l‘huile, des bords pointus ou des pièces de
l‘appareil en mouvement. Les câbles endommagés
augmentent le risque d‘électrocution.
INTRODUCTION
Les pictogrammes suivants sont utilisés dans la pré-
sente notice d‘utilisation et/ou sur l‘appareil :
Ni Cd
Lorsque vous utilisez l‘appareil, veuil-
lez vous conformer à la présente notice
d‘utilisation.
Respectez les avertissements et les
consignes de sécurité !
Ni Cd
Éliminez l’emballage et l’appareil de
manière respectueuse de l’environnement !
Recycler la batterie dans le respect de
l‘environnement !
Ne pas exposer la batterie à une grande
chaleur !
Ne pas jeter la batterie au feu !
Ne pas jeter la batterie dans l‘eau !
Remarque :
La polisseuse à batterie est désignée également dans
la présente notice d‘utilisation sous le nom d‘appareil.
CONTENU DE
L‘EMBALLAGE
Contrôlez le volume de livraison immédiatement après
le déballage. Contrôlez l’appareil et les pièces pour
dépister tout endommagement. Ne mettez pas un
appareil endommagé en marche.
1 x polisseuse à batterie
2 x batteries 12 V / 1,3 Ah
1x station de charge (adaptateur de charge, bloc
d‘alimentation de charge 230 V)
2 x bonnets de polissage en microfibres
1 x notice d‘utilisation
Fournissez tous les documents aux autres utilisa-
teurs!
Ni Cd
Ni Cd
Ni Cd
Ni Cd

12
Polisseuse à batterie
APERÇU DU PRODUIT
1. Poignée avant
2. Carter avec ouvertures de ventilation
3. Poignée arrière
4. Batterie 12 V
5. Interrupteur ON/OFF
6. Polissoir avec tampon en mousse
7. Bonnet de polissage en microfibres
8. Bloc d‘alimentation 230 V
9. Adaptateur de charge
10. Achage à LED du niveau de charge
CARACTÉRISTIQUES
TECHNIQUES
Tension : DC 12 V
Batterie : 1,3 Ah
Puissance absorbée : 75 W min. / 200 W max.
Mouvement de polissage : 2800 min-1 (excentrique)
Ø du polissoir : 150 mm
Poids : env. 3,5 kg
Niveau de pression acoustique LpA : 63 dB
Niveau de puissance acoustique LwA : 66,2 dB
Temps de charge : env. 5 h
Chargeur : 230 V AC / 15 V DC 400 mA
1234
5
6
7
8
10
9
• Ne recouvrez jamais l‘appareil lorsqu‘il est en
charge.
• Risque d‘incendie ! Arrêtez immédiatement
l‘appareil ou le bloc d‘alimentation de charge
lorsque vous voyez de la fumée ou sentez une
odeur inhabituelle.
• Risque de blessure ! Les batteries peuvent exploser
lorsqu‘elles sont jetées au feu ou exposées à une
chaleur extrême. N‘exposez pas l‘appareil à une
chaleur extrême.
Sécurité des personnes
• Travaillez de façon minutieuse et consciencieuse.
N‘utilisez pas l‘appareil lorsque vous êtes fatigué
ou sous l‘influence de drogues, d‘alcools ou de
médicaments.
• Portez toujours des lunettes de protection, un
masque contre la poussière et une protection
auditive. En fonction du type et de l‘utilisation
de l‘appareil, cela permet de réduire le risque de
blessures.
• Ne portez pas de vêtements amples ni de bijoux.
Maintenez vos cheveux, vêtements et gants éloig-
nés des pièces en mouvement de l‘appareil pour
qu‘ils ne soient pas happés.
• En cas d‘utilisation prolongée, les vibrations et le
bruit peuvent fatiguer. Faites des pauses régulières
lors du polissage.
Manipulation et utilisation soigneuses
• Danger de mort ! Un bloc d‘alimentation 230 V en-
dommagé peut entraîner une électrocution mortelle.
N‘utilisez plus un bloc d‘alimentation endommagé.
• Risque de blessure ! Contrôlez l‘appareil avant
chaque utilisation du point de vue d‘éventuels dom-
mages. N‘allumez pas un appareil défectueux.
• Risque de blessure ! Ne pas modifier, ouvrir ou
manipuler l‘appareil. Sinon, le risque de se blesser
est accru.

F
13
Consignes de polissage
• Pour le polissage des véhicules, conformez-vous à
la notice d‘utilisation de leur fabricant.
• Conformez-vous aux consignes du fabricant du
produit de polissage.
• N‘utilisez pas l‘appareil lorsque le tampon en
mousse est endommagé ou s‘est décroché du
polissoir.
• Portez toujours un masque de protection contre la
poussière lorsque vous polissez à sec.
• Utilisez uniquement un bonnet de polissage en
microfibres propre et polissez uniquement les sur-
faces propres et non salies.
• N‘utilisez pas de trop grandes quantités de produit
de polissage.
• Polissez les zones dicilement accessibles à la
main.
• Polissez les véhicules pas plus de deux à trois fois
par an pour éviter toute usure inutile de la peinture
Placer le bonnet de polissage
Appliquez un bonnet de polissage en microfibres
bien tendu et sans pli sur le tampon en mousse du
polissoire.
Allumer et éteindre
Allumer : Appuyez sur et maintenir enfoncé
l‘interrupteur de marche/arrêt.
Eteindre : Relâchez l‘interrupteur de marche/arrêt.
Polir
1. Placez un bonnet de polissage en microfibres sur
le tampon en mousse.
2. Appliquez le produit de polissage régulièrement
sur le bonnet en microfibres.
3. Placez la polisseuse avec le bonnet en microfibres
sur la surface à polir.
4. Allumez la polisseuse et polissez la surface réguli-
èrement en eectuant des mouvements circulaires.
Exercez ce faisant uniquement une pression faible
sur la surface que vous polissez.
5. Eteignez toujours la machine avant de la retirer de
la surface polie.
Valeurs générales de vibration (somme vectorielle
de trois directions) calculées en respect de EN 60745 :
Niveau de vibration ah : 4,26 m/s²
Incertitude K = 1,5 m/s²
UTILISATION
Charger la batterie
Remarque : les batteries fournies sont partiellement
chargées au moment de la livraison et doivent être
entièrement chargées avant utilisation. La capacité
complète de la batterie est atteinte après env. 4 cycles
de charge.
Avertissement ! Chargez la batterie uniquement
avec le bloc d‘alimentation de charge 230 V et
avec l‘adaptateur de charge fournis. Il existe sinon un
risque d‘incendie et la batterie peut être endomma-
gée.
1. Brancher le câble du bloc d‘alimentation 230 V
dans le fiche femelle de l‘adaptateur de charge.
2. Brancher le bloc d‘alimentation 230 V dans une
prise secteur.
3. Brancher la batterie à l‘adaptateur de charge.
4. Si la batterie est correctement positionnée,
l‘achage à LED de l‘état de charge s‘allume.
• LED allumée : la batterie est en charge.
• LED éteinte : la batterie est entièrement chargée.
5. Une fois le processus de charge terminé, retirer la
batterie et débrancher le bloc d‘alimentation 230 V
de la prise.
• Rechargez les batteries tous les 2 mois environ
même si vous ne les utilisez pas afin d‘éviter
qu‘elles ne se déchargent trop.
• Lorsque la batterie n‘est pas utilisée, elle peut
rester dans le chargeur sans qu‘elle ne soit
endommagée ou trop chargée. Si la batterie n‘est
pas utilisée pendant une durée prolongée, dé-
branchez le bloc d‘alimentation 230 V de la prise.
Insérer / retirer la batterie
Eteignez la polisseuse.
• Retirer la batterie : appuyez sur les deux dispositifs
de blocage de la batterie et retirez-la.
• Insérer la batterie : Faites glisser la batterie dans le
logement du carter jusqu‘à ce qu‘elle s‘enclenche.

14
Polisseuse à batterie
MISE AU REBUT
L’emballage est composé de matériaux respectueux
de l’environnement que vous pourrez éliminer dans
les points de recyclages locaux prévus à cet eet.
Ne jetez pas les appareils électriques avec vos
déchets ménagers !
Conformément à la directive européenne 2002 / 96 /
EC relative aux appareils électriques et électroniques
usagés et à sa transposition dans le droit national,
vous devez eectuer le tri sélectif des appareils et
les apporter dans des points de collecte spécialisés
qui assureront leur recyclage dans le respect de
l’environnement. Pour connaître les lieux où vous pou-
vez déposer vos anciens appareils électriques pour
leur mise au rebut, adressezvous à votre mairie ou à
votre administration locale.
Les images peuvent diérer légèrement du produit.
Nous nous réservons le droit d’y apporter des modifi-
cations dans l’intérêt du progrès technique. Décorati-
on non comprise.
MAINTENANCE ET
SERVICE APRÈS-VENTE
Entretien
Avertissement ! Débranchez toujours le bloc
d‘alimentation 230 V de la prise avant de nettoy-
er ou de contrôler la station de charge.
• Les batteries sont soumises avec le temps à une
certaine décharge. Rechargez la batterie tous les
deux mois si vous n‘utilisez pas l‘appareil régulière-
ment.
• Nettoyez le produit avec un chion doux et sec.
N‘utilisez aucun produit agressif ni aucun dissolvant
pour le nettoyage.
• Nettoyez le bonnet de polissage en microfibres
avec une lessive douce traditionnelle et une lessive
à la main.
• Ne plongez pas l‘appareil dans du liquide.
• Stocker l‘appareil dans un endroit propre et sec.
Réparations et service après-vente
Faites réparer l’appareil uniquement par du personnel
technique qualifié. De cette manière, vous assurerez
et préserverez la sécurité de l’appareil.
Garantie
Les conditions générales de garantie s’appliquent aux
défauts de fabrication et de matériau. Si l’appareil est
défaillant, portez-le à votre distributeur spécialisé ou
bien au point de vente où vous l’avez acheté.
Afin d’accélérer les travaux et les réparations de
l’appareil couverts par la garantie, vous aurez besoin
des éléments suivants :
• Une copie du reçu (bon de livraison, facture) avec la
date d’achat.
• Motifs de la réclamation ou description du prob-
lème.

I
15
USO PREVISTO
La lucidatrice a batteria è stata prevista per lucidare
le superfici verniciate di autovetture.
La lucidatrice a batterie è stata progettata per il solo
uso privato e non professionale.
L’uso dell’apparecchio per scopi non previsti potrebbe
causare danni. Il produttore non si assume alcuna
responsabilità per eventuali danni derivanti dall’uso
improprio.
INDICAZIONI DI
SICUREZZA
Pericolo di vita e di incidenti per i bambini! Tenere
l’apparecchio lontano dalla portata dei bambini. I
bambini non sanno riconoscere i pericoli legati al
prodotto!
Postazione di lavoro
• Mantenere pulita e ordinata la postazione di lavoro.
Il disordine e la mancanza di illuminazione suci-
ente nelle aree di lavoro possono essere fonte di
incidenti.
• Pericolo di esplosione! Non utilizzare l’apparecchio
in un ambiente a rischio di esplosione (ad es. polve-
ri, gas infiammabili, fumi di solventi).
Sicurezza elettrica
• Inserire il connettore a spina del caricabatterie
solamente in una presa di corrente 230V. Evitare
assolutamente di apportare modifiche alla spina.
• Attenzione! L’apparecchio non è a tenuta stagna.
Non esporre l’apparecchio a pioggia o umidità. Evi-
tare che acqua o altri liquidi gocciolino o vengano
versati sull’apparecchio.
• Pericolo di morte! Non collegare o scollegare mai il
caricabatterie 230V con le mani umide o bagnate!
• Pericolo di morte! Non tirare mail il cavo del cari-
cabatterie 230V. Sconnettere il cavo staccandolo
solo tramite la spina dalla presa di corrente. Il cavo
può essere danneggiato, ciò comporta il rischio di
scariche elettriche.
• Tenere il cavo lontano da fonti di calore, olio, spigoli
taglienti o oggetti in movimento. Cavi danneggiati
aumentano il rischio di scariche elettriche.
INTRODUZIONE
In queste istruzioni e/o sull’apparecchio vengono
utilizzati i seguenti pittogrammi:
Ni Cd
Attenersi a queste istruzioni per l’uso quan-
do viene utilizzato l’apparecchio.
Osservare le avvertenze e le indicazioni di
sicurezza!
Ni Cd
Smaltimento ecocompatibile della confezi-
one e del dispositivo!
Smaltire l’accumulatore in modo compatibi-
le con l’ambiente!
Non esporre l’accumulatore a temperature
eccessive!
Tenere l’accumulatore lontano dal fuoco o
da fonti di calore!
Non immergere l’accumulatore in acqua!
Avvertenza:
La lucidatrice a batterie in queste istruzioni per l’uso
viene anche indicata con il termine apparecchio.
CONTENUTO DELLA
CONFEZIONE
Controllare la fornitura subito dopo averla aperta.
Controllare se il dispositivo o i pezzi sono danneggiati.
Non utilizzare l‘apparecchio o pezzi guasti.
1 x lucidatrice a batteria
2 x accumulatore 12V / 1,3 Ah
1 x stazione di ricarica (adattatore, caricabatterie
230V)
2 x cue per lucidare in microfibra
1 x istruzioni per l’uso
Consegnare la documentazione completa agli altri
utenti!
Ni Cd
Ni Cd
Ni Cd
Ni Cd

16
Lucidatrice a batteria
DESCRIZIONE DEL
PRODOTTO
1. Impugnatura anteriore
2. Alloggiamento con fori di aerazione
3. Impugnatura posteriore
4. Accumulatore 12V
5. Interruttore ON/OFF
6. Disco lucidante con tampone in spugna
7. Cua per lucidare in microfibra
8. Caricabatterie 230V
9. Adattatore
10. Indicatore di carica a LED
DATI TECNICI
Tensione: DC 12V
Accumulatore: 1,3 Ah
Potenza assorbita: 75 Watt min. / 200 Watt max.
Movimento di lucidatura: 2800 min-1 (eccentrico)
Ø disco di lucidatura 150 mm
Peso: ca. 3,5 kg
Livello di pressione sonora LpA: 63 dB
Livello di potenza sonora LwA: 66,2 dB
Tempo di carica: ca. 5 h
Dispositivo di carica: 230 V AC / 15 V DC 400 mA
Valore complessivo delle oscillazioni (somma vetto-
riale in tre direzioni) misurato conformemente alla
1234
5
6
7
8
10
9
• Non coprire mai l’apparecchio durante il carica-
mento.
• Pericolo d’incendio! Interrompere immediatamen-
te l’utilizzo dell’apparecchio o del caricabatterie
quando è visibile del fumo o si sente un odore
inconsueto.
• Pericolo di lesioni! Gli accumulatori possono
scoppiare o esplodere se gettate nel fuoco o a
sottoposte a temperature eccessive. Non sottoporre
mai l’apparecchio a temperature eccessive.
Sicurezza delle persone
• Lavorare in modo accurato e preciso. Non utilizzare
l’apparecchio quando si è stanchi o sotto l‘eetto di
droghe, alcol o farmaci.
• Indossare sempre guanti protettivi, mascherina
antipolvere e protezioni per le orecchie. A seconda
di come viene utilizzato l’apparecchio diminuisce
anche il rischio di lesioni.
• Non indossare indumenti larghi o gioielli. Tenere
i capelli, i vestiti ed i guanti lontani da pezzi in
movimento dell’apparecchio così che non possano
impigliarsi.
• Un utilizzo prolungato può provocare aaticamento
dovuto a vibrazioni e rumore. Durante la lucidatura
eettuare regolarmente delle pause.
Maneggio ed impiego accurato
• Pericolo di morte! Un caricabatterie da 230V dann-
eggiato può provocare una scossa elettrica mortale.
Non riutilizzare un caricabatterie danneggiato.
• Pericolo di lesioni! Prima di utilizzare l’apparecchio
accertarsi sempre che non sia danneggiato. Non
utilizzare l’apparecchio se difettoso.
• Pericolo di lesioni! Non modificare, aprire o manipo-
lare l’apparecchio. Il rischio di lesioni è elevato.

I
17
dell’autoveicolo.
• Attenersi alle avvertenze del produttore del luci-
dante.
• Non utilizzare l’apparecchio se il tampone di spugna
è danneggiato o si è staccato dal disco lucidante.
• Durante la lucidatura a secco indossare sempre una
mascherina antipolvere.
• Utilizzare solamente cue per lucidare in microfibra
pulite e lucidare solamente superfici pulite.
• Non utilizzare un quantitativo eccessivo di lucidan-
te.
• Lucidare a mano le zone dicili da raggiungere.
• Non lucidare l’autoveicolo più di due o tre volte
all’anno per evitare un’inutile usura della vernice.
Montaggio della cuffia per lucidare
Posizionare la cua per lucidare in microfibra in
modo uniforme e teso sul tampone in spugna nel
disco lucidante.
Accensione/spegnimento
Accensione: premere e tener premuto l’interruttore
ON/OFF
Spegnimento: rilasciare l’interruttore ON/OFF
Lucidare
1. Applicare una cua lucidante in microfibra sul
tampone in spugna.
2. Distribuire il lucidante in modo uniforme sulla cua
lucidante in microfibra.
3. Avvicinare la lucidatrice con la cua lucidante in
microfibra alla superficie da lucidare.
4. Accendere la lucidatrice e lucidare la superficie in
modo uniforme, trasversalmente o con movimenti
circolari. Esercitare solo una leggera pressione
sulla superficie da lucidare.
5. Spegnere sempre la lucidatrice prima di allontanar-
la dalla superficie da lucidare.
norma EN 60745.
Livello delle vibrazioni ah: 4,26 m/s²
Incertezza K = 1,5 m/s²
USO
Caricamento della batteria
Avvertenza: gli accumulatori inclusi nella confezione
sono solo parzialmente carichi ed devono essere
caricati completamente prima dell’uso. La capacità
massima dell’accumulatore viene raggiunta dopo
circa 4 cicli di carica.
Avviso! Caricare l’accumulatore solamente con
il caricabatterie 230V e l’adattatore inclusi nella
confezione. Ciò per non incorrere in pericolo
d’incendio o di danneggiamento dell’accumulatore
stesso.
1. Inserire il cavo del caricabatterie 230V nella presa
dell’adattatore.
2. Collegare il caricabatterie 230V nella presa di
corrente.
3. Inserire l’accumulatore nell’adattatore.
4. Quando la batteria è inserita correttamente
l’indicatore di carica a LED lampeggia:
• LED lampeggiante: l’accumulatore è in carica.
• LED spento: l’accumulatore è completamente
carico.
5. Al termine del processo di carica estrarre
l’accumulatore e scollegare il caricabatterie 230V
dalla presa di corrente.
• Ricaricare l’accumulatore ca. ogni due mesi
se questo non viene utilizzato per evitare una
scarica profonda.
• Se l’accumulatore non viene utilizzato, può
essere lasciato nel caricabatterie senza pericolo
di danneggiamenti o di carica eccessiva. Se
l’accumulatore non viene utilizzata a lungo, scon-
nettere il caricabatterie dalla presa di corrente.
Inserire/estrarre l’accumulatore
Spegnere la lucidatrice a batterie.
• Estrarre: schiacciare entrambi i dispositivi di bloc-
caggio dell’accumulatore ed estrarlo
• Inserire: far scivolare l’accumulatore
nell’alloggiamento fino a quando scatta in posizi-
one.
Avvertenze per la lucidatura
• Durante il processo di lucidatura dell’autoveicolo at-
tenersi alle istruzioni per l’uso fornite dal produttore

18
Lucidatrice a batteria
SMALTIMENTO
La confezione è composta da materiali a basso impat-
to ambientale, riciclabili negli appositi siti di raccolta.
Non buttare i dispositivi elettrici nei rifiuti
domestici!
Secondo la direttiva europea 2002/96/CE in materia di
dispositivi elettrici ed elettronici usati e la relativa
conversione in legge nazionale, le apparecchiature
elettriche usate devono essere raccolte separatamen-
te e portate a un impianto di riciclaggio ecologico.
Per informazioni sullo smaltimento degli apparecchi
elettrici usati rivolgersi all’amministrazione cittadina.
Le illustrazioni possono leggermente dierire dal
prodotto. Il produttore si riserva il diritto di apportare
modifiche funzionali al miglioramento tecnico. Deco-
razione non inclusa.
MANUTENZIONE &
ASSISTENZA
Cura
Avviso! Sconnettere sempre il caricabatterie
230V dalla presa di rete prima di pulire o testare
la stazione di carica.
• Gli accumulatori sono soggetti a scarica. Caricare
gli accumulatori ogni due mesi, se l’apparecchio
non viene utilizzato regolarmente.
• Pulire il prodotto con un panno morbido e asciutto.
Non utilizzare detergenti o solventi aggressivi per
la pulizia.
• Pulire la cua per lucidare in microfibra con un
detersivo per capi delicati e per il bucato a mano.
• Non immergere l’apparecchio in liquidi
• Conservare l’apparecchio in un luogo pulito e
asciutto.
Riparazioni e assistenza
Far riparare il dispositivo solo da personale qualifi-
cato, in modo da mantenere integra la sicurezza del
dispositivo.
Garanzia
Le condizioni generali di garanzia si riferiscono a
difetti legati alla produzione e ai materiali. In caso di
malfunzionamento del dispositivo, riportarlo al riven-
ditore specializzato o al punto vendita dove è stato
acquistato.
Per usufruire della garanzia e delle riparazioni sono
necessari:
• Una copia dello scontrino (ricevuta di consegnao
ricevuta d’acquisto) con la data di consegna.
• Motivo del reclamo o descrizione del malfunziona-
mento.

CZ
19
POUŽÍVÁNÍ K URČENÉMU
ÚČELU
Akumulátorová leštička je koncipovaná na leštění
automobilových laků.
Akumulátorová leštička je určená jen k privátnímu
použití, není určená pro průmyslové nebo podnikatels-
ké účely.
Jiné použití přístroje než k určenému účelu může vést
k různým druhům ohrožení. Výrobce neručí za škody
způsobené jiným použití přístroje než k určenému
účelu.
BEZPEČNOSTNÍ
UPOZORNĚNÍ
Nebezpečí ohrožení života a zranění dětí! Uchová-
vejte přístroj mimo dosah dětí. Děti nerozpoznávají
nebezpečí, která může přístroj způsobit!
Pracoviště
• Udržujte Vaše pracoviště čisté a uklizené.
Nepořádek a neosvětlené pracoviště může zapříčinit
zranění.
• Nebezpečí výbuchu! Nepoužívejte přístroj ve
výbušném prostředí (obsahující např. prach,
výbušné plyny, výpary z rozpouštědel).
Bezpečnost elektrických komponentů a napájení
• Zástrčku nabíjecího síťového adaptéru připojujte jen
do zásuvky s elektrickým proudem o napětí 230 V.
Zástrčka se nesmí žádným způsobem měnit nebo
manipulovat.
• Pozor! Přístroj není vodotěsný. Nevystavujte ho
dešti nebo mokru. Zabraňte jeho polití vodou anebo
jinými tekutinami.
• Nebezpečí ohrožení života! Nepřipojujte nabíjecí
síťový adaptér na 230 V vlhkýma nebo mokrýma
rukama.
• Nebezpečí ohrožení života! Nevytahujte nikdy
zástrčku nabíjecího síťového adaptéru ze zásuvky
za kabel. Při vytahování uchopte vždy zástrčku. V
opačném případě může dojít k poškození kabelu a
hrozí nebezpečí zásahu elektrickým proudem.
• Chraňte kabel před vysokými teplotami, olejem,
ostrými hranami nebo pohyblivými částmi přístroje.
Poškozený kabel zvyšuje nebezpečí zásahu elekt-
rickým proudem.
ÚVOD
V tomto návodu k obsluze a na přístroji jsou použité
následující piktogramy:
Ni Cd
Při používání přístroje dbejte vždy na tento
návod k obsluze.
Dodržujte upozorněni a bezpečnostní
pokyny!
Ni Cd
Z likvidujte obal s ohle dem na životni
prostředí!
Akumulátor odstraňujte do odpadu ekologi-
cky, zajistěte recyklaci!
Nevystavujte akumulátor vysokým teplo-
tám!
Neházejte akumulátor do ohně!
Neházejte akumulátor do vodní toků a
zdrojů!
Poznámka:
V tomto návodu k obsluze se používá pro pojmeno-
vání „akumulátorová leštička“ i výraz „přístroj“.
OBSAH BALENÍ
Po rozbalení okamžitě proveďte kontrolu kompletnosti
dodávky. zkontrolujte, zda není poškozeno zařízení ani
žádná z jeho součástí. neuvádějte vadné zařízení nebo
jeho část do činnosti.
1x akumulátorová leštička
2x akumulátor 12 V / 1,3 Ah
1x nabíječka (nabíjecí adaptér, nabíjecí síťový adaptér
230 V)
2x mikrovláknitý leštící návlek
1x návod k obsluze
Předávejte tyto podklady i jiným uživatelům!
Ni Cd
Ni Cd
Ni Cd
Ni Cd

20
Akumulátorová leštička
POPIS VÝROBKU
1. Přední rukojeť
2. Těleso s větracími otvory
3. Zadní rukojeť
4. Akumulátor 12 V
5. Vypínač
6. Leštící kotouč s polštářkem z pěnové hmoty
7. Leštící návlek z mikrovláknitého materiálu
8. Nabíjecí síťový adaptér 230 V
9. Nabíjecí adaptér
10. LED kontrolka nabíjení
TECHNICKÉ ÚDAJE
Napětí: DC 12 V
Akumulátor: 1,3 Ah
Příkon: minimálně 75 W / maximálně 200 W
Leštící pohyby: 2800 min-1 (excentrické)
Ø leštícího kotouče: 150 mm
Váha: cca 3,5 kg
Hladina akustického tlaku LpA: 63 dB
Hladina akustického výkonu LwA: 66,2 dB
Doba nabíjení: cca 5 hodin
Nabíječka: 230 V AC / 15 V DC 400 mA
1234
5
6
7
8
10
9
• Při nabíjení přístroj ničím nepřikrývejte.
• Nebezpečí požáru! Přerušte okamžitě používání
přístroje nebo nabíjecího síťového adaptéru, jestliže
je viditelný kouř nebo cítit neobvyklý zápach.
• Nebezpečí zranění! Akumulátory vhozené do ohně
nebo vystavené vysoké teplotě mohou vybuchnout.
Nevystavujte přístroj extrémním teplotám.
Bezpečnost osob
• Pracujte pečlivě a svědomitě. Nepoužívejte přístroj,
jestliže jste unavení, pod vlivem drog, alkoholu nebo
léků.
• Noste vždy ochranné brýle, masku proti prachu a
ochranu sluchu. V závislosti na způsobu použití
přístroje se tím snižuje nebezpečí zranění.
• Nenoste při práci žádné široké oblečení nebo
šperky. Držte Vaše vlasy, oblečení a rukavice v
bezpečném odstupu, aby je nezachytily pohyblivé
části přístroje.
• Při delším používání může dojít k únavě vlivem
vibrací a hluku. Proto dělejte při leštění pravidelné
přestávky.
Pečlivé zacházení a používání
• Nebezpečí ohrožení života! Poškozený nabíjecí
síťový adaptér na 230 V může zapříčinit zásah elekt-
rickým proudem. Poškozený nabíjecí síťový adaptér
dále nepoužívejte.
• Nebezpečí zranění! Kontrolujte přístroj před každém
použití, jestli není poškozený. Poškozený přístroj
neuvádějte do provozu.
• Nebezpečí zranění! Neprovádějte změny na přístroji,
neotevírejte ho ani přístroj nemanipulujte. V
opačném případě hrozí zvýšené nebezpečí zranění.
Table of contents
Languages:
Other Cartrend Sander manuals
Popular Sander manuals by other brands

Central Pneumatic
Central Pneumatic 93742 Assembly and operating instructions

Far Tools
Far Tools CP 127 Original manual translation

BLACK DECKER
BLACK DECKER BDEQS15C instruction manual

PROPOINT
PROPOINT Air Belt Sander user manual

Far Tools
Far Tools one S 150D Original manual translation

Far Tools
Far Tools BDS 150 Original manual translation