CASABREWS 5700 PRO User manual

1
1360 S Valley Vista Dr. , Suite 108
Diamond Bar, California 91765
United States of America
support@casabrews.com
www.casabrews.com
Rev 1.0
CASABREWS BRANDS INC.

Scan & Save!
Scan the QR code, register your product,
and get a 6-month Extended Warranty!
HOUSEHOLD USE ONLY
Please read all instructions carefully before using the product
INSTRUCTION MANUAL
Espresso Coee Machine
Model: 5700 PRO


Contents
IMPORTANT SAFEGUARDS ...................................................................................................... 1-3
KNOW YOUR COFFEE MACHINE ............................................................................................... 4
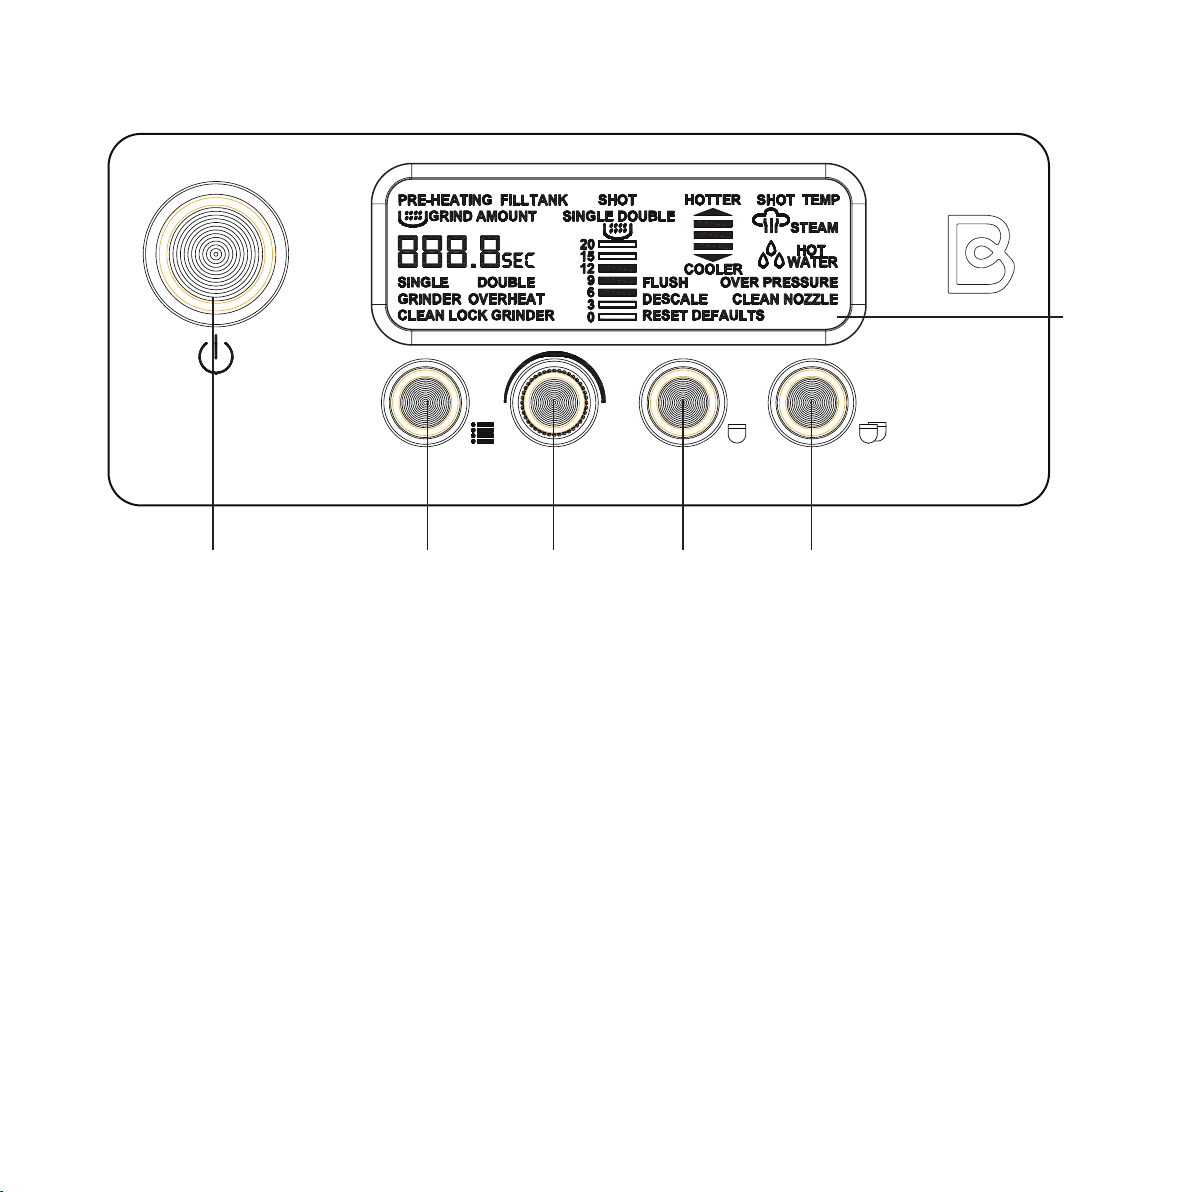
CONTROL PANEL .......................................................................................................................... 5
SPECIFICATIONS .......................................................................................................................... 6
BEFORE FIRST USE ........................................................................................................................ 7
FILLING THE WATER TANK ....................................................................................................... 7
ATTACHING THE BEAN CONTAINER .................................................................................. 7
ATTACHING THE FILTERHOLDER BRACKET .................................................................. 7
INITIAL USE ......................................................................................................................................... 8
HOW TO USE THE GRINDER ....................................................................................................... 9
SETTING THE GRIND SIZE ......................................................................................................... 9
SELECTING THE FILTER SIZE ................................................................................................. 10
GRINDING THE COFFEE BEANS ........................................................................................... 10
AUTOMATIC GRINDING ....................................................................................................... 10-11
MANUAL GRINDING ......................................................................................................................11
HOW TO TAMP THE GROUND COFFEE ................................................................................... 12
DISTRIBUTING THE GROUND COFFEE ............................................................................ 12
TAMPING THE GROUND COFFEE ........................................................................................ 12
HOW TO MAKE A ESPRESSO ..................................................................................................... 13
INSERTING THE PORTAFILTER ............................................................................................. 13
MAKING ESPRESSO ...................................................................................................................... 13
IDEAL EXTRACTION .................................................................................................................... 13
UNDER EXTRACTION .................................................................................................................. 14
OVER EXTRACTION ...................................................................................................................... 14
HOW TO SET THE STEAM TEMPERATURE ..................................................................... 14
HOW TO PROGRAM THE VOLUME OF SINGLE/DOUBLE ESPRESSO ................................. 15
PROGRAMMING ESPRESSO VOLUME ................................................................................ 15
RESETTING TO DEFAULTS ....................................................................................................... 16
HOW TO MAKE HOT WATER .................................................................................................... 16
HOW TO FROTH THE MILK .................................................................................................. 17-18
CLEANING AND MANTAINANCE ............................................................................................. 19
FLUSH CLEANING CYCLE ......................................................................................................... 19
DESCALING ....................................................................................................................................... 20
CLEANING THE GRINDER ........................................................................................................ 21
CLEANING THE BREW HEAD ................................................................................................. 21
CLEANING THE FILTERS AND PORTAFILTER .............................................................. 22
CLEANING THE STEAM WAND ............................................................................................. 22
CLEANING THE DRIP TRAY ..................................................................................................... 22
ERROR MODE ......................................................................................................................... 23-24
TROUBLESHOOTING ............................................................................................................ 25-26
WARRANTY INFORMATION ...................................................................................................... 27
CUSTOMER SUPPORT ................................................................................................................. 27

IMPORTANT SAFEGUARDS
Before using the appliance, the following basic precautions should always be followed:
01. Read all instructions.
02. Before using check that the voltage of wall outlet corresponds to rated voltage marked on the rating plate.
03. This appliance has been incorporated with a grounded plug. Please ensure the wall outlet in your house is
well earthed.
04. To protect against fire, electric shock and injury to persons, do not immerse main parts of the product, cord,
or plug, in water or other liquid.
05. The appliance must not be immersed.
06. Remove plug from wall outlet before cleaning and when not in use. Allow appliance to cool down
completely before taking o or attaching components or before cleaning.
07. Do not operate any appliance with a damaged cord or plug or after the appliance malfunctions, or is
dropped or damaged in any manner. Return appliance to the nearest authorized service facility or contact
the manufacturer at their customer service telephone number for information on examination, repair or
electrical or mechanical adjustment.
08. The use of accessory attachments not recommended by the appliance manufacturer may result in fire,
electric shock or injury to persons.
09. Place appliance on flat surface or table, do not hang power cord over the edge of table or counter.
10. Ensure the power cord does not touch the hot surface of the appliance.
11. Do not place the coee maker on hot surface or beside an open flame.
12. To disconnect, remove plug from wall outlet. Always hold the plug, but never pull the cord.
13. Do not use appliance for other than intended use and place it in a dry environment.
14. Be careful not to get burned by the steam.
15. Do not touch any hot surface of the appliance (such as steam wand, and the steel mesh . Use handle or
knobs.

16. Do not let the coee machine operate without water.
17. DO NOT remove the metal portafilter while brewing coee. Metal parts will be hot. Please make sure to
hold it by the handle and use caution when moving unit with hot liquids.
18. Connect plug to wall outlet before using and turn o all switches for plug is removed from the wall
outlet. To unplug, grasp the plug and pull from the outlet. Never pull from the power cord.
19. This appliance can be used by children aged 8years and above if they have been given supervision or
instruction concerning use of the appliance in a safe way and if they understand the hazards involved.
Cleaning and user maintenance shall not be made by children unless they are older than 8and supervised.
Keep the appliance and its cord out of reach of children under the age of 8. Close supervision is necessary
when any appliance is used by or near children. Children should be supervised to ensure that they do not
play with the appliance.
20. Appliances can be used by persons with reduced physical, sensory or mental capabilities or lack of
experience and knowledge if they have been given supervision or instruction concerning use of the
appliance in a safe way and understand the hazards involved.
21. Children shall not play with the appliance.
22. This appliance is intended for household use.
23. Do not use outdoors.
24. Avoid contact with moving parts.
25. Check bean container for presence of foreign objects before using.
26. Note the high temperature at the top of the machine.
27 a) A short power-supply cord (or detachable power-supply cord) is provided to prevent becoming
entangled in or tripping over a longer cord.
b) Longer detachable power-supply cords or extension cords are available and maybe used if care is
exercised in their use.
c) If a long detachable power-supply cord or extension cord is used:
1) The marked electrical rating of the detachable power-supply cord or extension cord should be at least
as great as the electrical rating of the appliance;

WARNING
To prevent hot steam and hot water from scalding the body or causing other personal injury,
and also to prevent damage to the product, do not remove the water tank or portafilter when
you use this coee machine to brew coee or froth milk. Before removing portafilter to brew another cup of
coee, make sure the coee machine is in standby mode If you want to add more water to the water tank, press
the power button until the appliance powers o.
WARNING
Do not touch the top cover of the machine after the machine has been working for a long time
so as to prevent burns.
2) If the appliance is of the grounded type,the extension cord should be a grounding type 3-wire cord;
3) The longer cord should be arranged so that it will not drape over the counter top or table top where it
can be pulled on by children or tripped over.
SAVE THESE INSTRUCTIONS
FOR HOUSEHOLD USE ONLY

KNOW YOUR COFFEE MACHINE
1
2
3
4
8
9
13
14
15
16
18
19
20
5
6
7
10 11 12
17
22
21
23
24
25
1. Bean Container Cover
2. Bean Container
3. Control Panel
4. Grinder
5. Powder Collector
6. Grind Bracket
7. Main Body
8. Drip Plate
9. Drip Tray
10. Coee Spoon
11. Cleaning Brush
12. Cleaning Needle
13. Water Tank Cover
14. Water Tank
15. Steam Knob
16. Silicon Steam Tube
17. Steam Wand
18. Single Espresso Filter
19. Double Espresso Filter
20. Filter Holder/Portafilter
21. Tamper
22. Distributor
23. Tamping Mat
24. Decorating Pen
25. Milk Jug

A. Power Button: Press to power on/o.
B. MENU/EXIT Button: Press to enter/exit the main menu.
C. DOSE Button: Press to select the single/double grind amount, turn to increase/decrease the grind time.
D. SINGLE Button: Press to brew a single espresso.
E. DOUBLE Button: Press to brew a double espresso.
F. LCD Display Screen: With grinding and extracting progress animations.
CONTROL PANEL
MENU/EXIT DOSE SINGLE DOUBLE
ON/OFF
F
EDCBA

Model: 5700 PRO
Voltage: 120V~ 60Hz
Power: 1500W
Pump: Italian 20 Bar
Capacity of water tank: 2.7 L/91 OZ
Capacity of bean container: 200g
Product size: 13.62*11.85*16.22 inches
Net weight: 20.88 LBS
Length of power cord: 1m
SPECIFICATIONS
Dear customer,
Thank you for your purchase of the CASABREWS Espresso Coee Machine. To ensure
you get the best use of this machine, please take the time to read this manual and learn
how to use this espresso machine with integrated grinder, even if you are an
experienced home barista – this machine may be dierent to ones you have operated
before. The operating instructions will show you how to use the product optimally and
safely, and with a little experimenting you will soon find your preferred settings. We
hope that you enjoy your purchase!

ATTACHING THE FILTERHOLDER BRACKET
Hang the portafilter bracket onto the machine by lifting it slightly, then push
it downwards.
Replace the water daily. The water tank should be filled with fresh, cold tap water before each use.
NOTE:
Remove and discard all labels and packaging materials attached to your espresso machine.
Ensure you have removed all parts and accessories before discarding the packaging.
Remove the packaging and the plastics bags containing the accessories.
Clean the water tank, portafilter, filter baskets, milk jug and drip tray using warm water and a gentle dishwashing
liquid. Rinse well, then dry thoroughly before reassembling.
FILLING THE WATER TANK
Fill the water tank with cold potable tap water to below the MAX marking indicated on the side of the water tank.
BEFORE FIRST USE
ATTACHING THE BEAN CONTAINER
01. Attach the bean container to the top of the machine. Ensure the mark
“ ” on the container aligns with the mark “ ” on the machine.
02. Turn the bean container clockwise to secure it in place. Fill the bean
container with fresh coee beans.
03. Fill the bean hopper with fresh coee beans.
The freshness of the coee beans will aect the flavor of the
coee and the pressure of extraction. Using stale coee beans may result in bitter and watery
coee To get the best flavor and extraction, we recommend changing the coee beans in the bean container at
least once a week.
NOTE:

04. Place an empty cup under the steam wand.
05. Turn the steam knob to the “HOT WATER” position. Let the hot water dispense from the steam wand for
eight seconds, then return the steam knob to OFF. This process allows the water to flow through the empty
pump for the first use.
06. Pour out the hot water and place the empty cup under the brew head.
07. Press the single button once. Let the machine run through a cycle.
08. After the brewing cycle has finished, pour the water out.
Now your machine is ready to use.
INITIAL USE
The initial use is necessary before using the machine. It will help to rinse the machine and prime the heating
system before the first use.
01. Fill the water tank with cold potable tap water, and fill the bean hopper with fresh coee beans.
02. Insert the plug into a wall outlet with suitable voltage (120V~, 60Hz).
03. Press the Power button. The button indicators turns on and
the coee machine starts to preheat automatically. Once the
preheating has finished, all the buttons will light up
continuously. The machine is in READY mode.
This preheating process takes about 2minutes.
"READY" mode

WARNING
Only grind roasted coee beans in this machine. Do not process any other foods, such as nuts,
spices or liquids, to avoid damaging the grinder. Please do not operate the grinder when it is
empty, i.e. without coee beans.
Do not set the grind setting at 1-3 initially.
No coee grounds may come out because the
grind settings are too fine when the machine is new. The grinder will
become more suitable with prolonged use of the machine.
NOTE:
When grinding coee beans, the grind size should be fine, but not too fine. The grind size will aect the rate at
which water flows through the ground coee in the filter, the pressure of extraction and the taste of the espresso.
If the grind is too fine, the water will not flow through the coee, even when under pressure. The resulting
espresso will be OVER EXTRACTED, dark in color and bitter in flavor.
If the grind is too coarse, the water will flow through the ground coee in the filter too quickly, and the pressure
will be under 5bar. The resulting espresso will be UNDER EXTRACTED and lacking in color and flavor.
SETTING THE GRIND SIZE
This machine has 15 grind settings to select from. The smaller the
number, the finer the grind size; the larger the number, the coarser
the grind size.
Use the GRIND SIZE selector to adjust the grind size.
For a new user, we suggest setting the grind setting to 8initially, and
then make adjustments depending on the extraction of the coee and the pressure shown by the pressure gauge.
Select a finer grind setting when the pressure is under 5bar then retry.
Select a coarser grind setting when the pressure is over 12 bar then retry.
The grind setting will vary depending on the coee bean you used. You may need to experiment with which the
grind setting should be chosen to achieve the idea pressure.
HOW TO USE THE GRINDER
Coarser Finer
x

This machine includes 2single wall filters: a “single espresso” filter and a
“double espresso” filter.
The provided filters are designed for:
single espresso filter = approx. 11-13g
double espresso filter = approx. 19-21g
Insert either the single espresso size filter or double espresso size filter into the portafilter.
Select the single espresso size filter if you want to make a single espresso and double espresso size filter if you
want to make a double.
You will need to adjust the grind amount and size if switching from a single to a double filter, or vice versa.
GRINDING THE COFFEE BEANS
The grind amount will also aect the rate at which water flows through the ground coee in the filter, the pressure
of extraction and the taste of the espresso.
Grinding too much coee will lead to OVER EXTRACTION, and not grinding enough will lead to UNDER
EXTRACTION.
AUTOMATIC GRINDING
01. Ensure the filter bracket is locked in place.
02. Insert the portafilter into the bracket.
03. If required, press the DOSE button to select the filter
basket size; Single or Double.
04. If required, turn the DOSE dial to change the grind
time; clockwise to increase the time and
anti-clockwise to decrease.
SELECTING THE FILTER SIZE
double espressosingle espresso

MANUAL GRINDING
To manually grind the coee bean, push and hold the portafilter in the bracket until the desired amount of ground
coee has been ground. To stop grinding, release the portafilter.
The timer will count up, displaying the grind time.
It is normal for the portafilter to appear overfilled with ground coee.
NOTE:
The grinding time will vary depending on the coee bean you used. You may need to experiment
with how long the grinder needs to run to achieve the correct dose.
NOTE:
05. Push and release the portafilter to activate automatic grinding. The LCD will show the filter filling, and the
timer starts counting down.
06. If you need to pause the grinding process, push and release the portafilter. The machine will pause
grinding, and the grind time stops counting down. It will remain paused for 15 seconds before returning to
READY mode.
07. Push and release the portafilter to resume grinding.
The default grind times are 14 seconds for a single espresso filter and 21 seconds for a double
espresso filter.
NOTE:

The surface of ground coee should not be beyond the MAX mark after
tamping, otherwise the portafilter might not be able to be locked into the
brew head.
NOTE:
DISTRIBUTING THE GROUND COFFEE
01. Remove the portafilter from the bracket.
02. Using the distributor, tamp down firmly on the coee.
Then rotate the distributor to even the surface of the ground
coee.
TAMPING THE GROUND COFFEE
01. Using the tamper, tamp down firmly using approx. 11-22lbs (5-10kg) of pressure.
02. Wipe excess coee from the rim of the filter to ensure a proper seal is achieved in
the brew head.
As a guide to using the right amount of ground coee, the top edge of the metal cap on
the tamper should be level with the top of the filter after the ground coee has been
tamped.
Also, the MAX marks in both of the filters are intended to assist in identifying the correct
quantity of ground coee more easily.
HOW TO TAMP THE GROUND COFFEE

INSERTING THE PORTAFILTER
Place the portafilter underneath the brew head so that the handle is aligned with the
INSERT position. Insert the portafilter into the brew head and rotate the handle towards
the centre until firm resistance is felt.
MAKING ESPRESSO
01. Place a pre-warmed cup beneath the portafilter.
02. Press the single or double button for desired volume.
The machine starts brewing.
03. The LCD will show the pressure of extraction, and the timer
will start to count up.
04. The pre-programmed volume of a single espresso is approx.
30ml, and the double espresso is approx. 60ml.
05. The machine will automatically stop once the pre-set volume
has been extracted, and the LCD will go back to standby mode.
IDEAL EXTRACTION
If the pressure shown on the LCD is between 6-12 bar, it means the espresso has been extracted at the ideal
pressure.
Features:
* Slow flow like warm honey.
* Crema is golden brown with a fine mousse texture.
* Espresso is dark brown.
HOW TO MAKE A ESPRESSO
INSERT LOCK
Brewing a single espresso
Brewing a double espresso

The main menu
HOW TO SET THE SHOT TEMPERATURE
01. Press the MENU button to enter the main menu.
02. Use the DOSE dial to navigate through the menu, select
SHOT TEMP then press the DOSE dial.
03. Turn the DOSE dial to select the shot temperature you want,
then press the DOSE dial.
04. The machine will beep to indicate that the customer setting has
been programmed. The machine will return to READY mode.
Selecting the shot temperature
OVER EXTRACTION
If the pressure shown on the LCD is over 12 bar, you have either too much ground coee in the filter and /or the
grind is too fine. This is an OVER EXTRACTED shot.
UNDER EXTRACTION
If the pressure shown on the LCD is under 6bar, you do not have enough ground coee in the filter and /or the
grind is too coarse. This is an UNDER EXTRACTED shot.
Solutions:
* Select a finer grind setting and retry.
* Increase the amount of ground coee and retry.
* Increase the tamping pressure and retry.
Features:
* Fast flow like water.
* Crema is thin and pale.
* Espresso is pale brown.
* Tastes bitter/sharp, weak and watery.
Features:
* Flow drips very slowly or not at all.
* Crema is dark and spotty.
* Espresso is very dark brown.
* Tastes bitter and burnt.
Solutions:
* Select a coarser grind setting and retry.
* Decrease the amount of ground coee and retry.
* Decrease the tamping pressure and retry.

The adjustable volume for a single espresso ranges between 20 ml/0.68 oz and 60 ml/2.03 oz,
and a double espresso ranges between 60ml/2.03 oz and 100 ml/3.38 oz. The machine will fail
to program volumes outside of this range.
NOTE:
04. To stop the extraction at the desired level, press the single or double button again. The LCD and
single/double button will stop flashing and the machine will beep to indicate that the custom setting has
been programmed . The machine will then return to READY mode. The custom setting can now be
activated by pressing the single or double button.
PROGRAMMING ESPRESSO VOLUME
01. Press the MENU button to enter the main menu.
HOW TO PROGRAM THE VOLUME OF SINGLE/DOUBLE ESPRESSO
02. Use the DOSE dial to navigate through the menu to SINGLE or DOUBLE SHOT. To select, press the dial.
03. Press the single or double button, the machine starts to brew. The single or double button will flash when
brewing.
The main menu
When select to program the
volume of single espresso
When select to program the
volume of double espresso

The hot water will stop after 45 seconds automatically, but the knob must be turned back manually
to the standby position.
NOTE:
Making hot water
The hot water function can be used to clean and preheat cups, or to add hot water manually.
To activate the hot water, turn the STEAM knob to HOT WATER.
The LCD will show that HOT WATER has been activated, and the
timer starts to count up.
To stop the hot water, turn the knob back to the OFF position.
HOW TO MAKE HOT WATER
The main menu
RESETTING TO DEFAULTS
01. Press the MENU button to enter the main menu.
02. Use the DOSE dial to navigate through the menu, select RESET DEFAULTS then press the DOSE dial.
03. The machine will beep.
04. The GRIND AMOUNT, SHOT TEMP, single espresso and double espresso volume settings will all return
to the default settings. The machine will return to READY mode.
STEAM
STEAM
READY
OFF
HOT
WATER
Table of contents
Other CASABREWS Coffee Maker manuals

CASABREWS
CASABREWS CM1699 User manual

CASABREWS
CASABREWS KCM010A User manual

CASABREWS
CASABREWS CM5418BC-UL User manual

CASABREWS
CASABREWS CM5418BC-UL User manual

CASABREWS
CASABREWS 5700 Gense User manual

CASABREWS
CASABREWS CM5418BC-UL User manual

CASABREWS
CASABREWS 5700 Gense User manual

CASABREWS
CASABREWS CM5418BC-UL User manual

CASABREWS
CASABREWS 3700 ESSENTIAL User manual