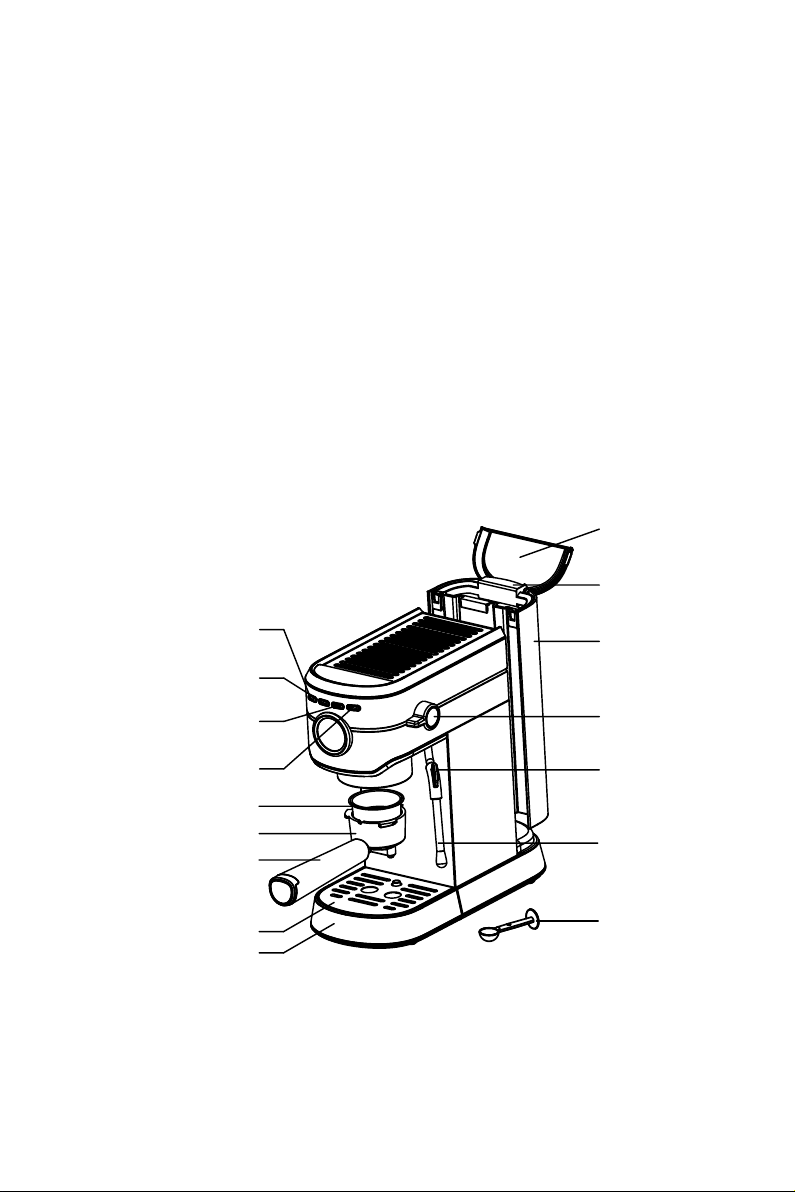
CASABREWS CM5418BC-UL User manual

IMPORTANT SAFEGUARDS
1
Before using the electrical appliance, the following basic
precautions should always be followed including the following:
1. Read all instructions.
2. Before using check that the voltage of wall outlet corresponds to
rated voltage marked on the rating plate.
3. This appliance has been incorporated with a grounded plug. Please
ensure the wall outlet in your house is well earthed.
4. To protect against fire, electric shock and injury to persons do not
immerse cord, plug, in water or other liquid.
5. Remove plug from wall outlet before cleaning and when not in use.
Allow appliance cool down completely before taking off, attaching
components or before cleaning.
6. Do not operate any appliance with a damaged cord or plug or after
the appliance malfunctions, or is dropped or damaged in any
manner. Return appliance to the nearest authorized service facility for
examination, repair or electrical or mechanical adjustment.
7. The use of accessory attachments not recommended by the appli-
ance manufacturer may result in fire, electric shock or injury to
persons.
8. Place appliance on flat surface or table, do not hang power cord
over the edge of table or counter.
9. Ensure the power cord do not touch hot surface of appliance.
10. Do not place the coffee maker on hot surface or beside fire in order
to avoid to be damaged.
11. To disconnect, turn any control to “OFF,” then remove plug from
wall outlet. Always hold the plug. But never pull the cord.
12. Do not use appliance for other than intended use and place it in a
dry environment.
13. Close supervision is necessary when your appliance is being used
by or near children.
14. Be careful not to get burned by the steam.
15. Do not touch the hot surface of appliance (such as steam wand,
and the steel mesh just boiling). Use handle or knobs.
16. Do not let the coffee maker operate without water.

2
SAVE THESE INSTRUCTIONS
17. Scalding may occur if the water tank is removed during the brew-
ing cycles.
18. Do not remove the metal funnel when appliance in brewing coffee
or when steam and hot water escape from metal funnel and ensure
to release the pressure in water tank before removing metal funnel.
19. Connect plug to wall outlet before using and turn any switch off
before plug is removed from wall outlet.
20. Relief pressure through steam wand before removing tank cover
or metal funnel.
21. This appliance is not intended for used by persons
(including children) with reduced physical, sensory or mental capabil-
ities, or lack of experience and knowledge, unless they have been
given supervision or instruction concerning use of the appliances by a
person responsible for their safety.
22. Children should be supervised to ensure that they do not play with
the appliance.
23. This appliance is intended to be household use only.
24. Do not use outdoors.
25. Do not place on or near a hot gas or electric burner, or in a heated
oven.
Note of plug
This appliance has a polarized plug (one blade is wider than the
other). To reduce the risk of electric shock, this plug is intended to fit
into a polarized outlet only one way. If the plug does not fit fully into
the outlet, reverse the plug.
If it still does not fit, contact a qualified electrician. Do not attempt to
modify the plug in any way.
Note of cord
a) A short power-supply cord (or detachable power-supply cord) is
provided to reduce the risk resulting from becoming entangled in or
tripping over a longer cord.
b) Longer detachable power-supply cords or extension cords are

3
KNOW YOUR COFFEE MAKER
(Product may be subject to change without prior notice)
Tank cover
Handle
Water tank
Knob
Steam handle
Steam wand
Power indicator/
button
Single-cup indicator/
button
Brewing filter
Metal funnel
Funnel handle
Drip plate
Drip tray
Measuring
spoon
Double-cup indicator/
button
Steam indicator/
button
available and may be used if care is exercised in their use.
c) If a longer detachable power-supply cord or extension cord is used.
1) The marked electrical rating of the cord set or extension cord should
be at least as great as the electrical rating of the appliance;
2) The cord should be arranged so that it will not drape over the
countertop or tabletop where it can be pulled on by children or
tripped over unintentionally;
3) If the appliance is of the grounded type, the cord set or extension
cord should be a grounding-type 3-wire cord.

4
BEFORE THE FIRST USE
PRE-HEATING
To ensure the first cup of coffee tastes excellent, you should rinse
the coffee maker with warm water as follows:
1. Remove the plug at the bottom of the tank.
2. Pour water into water tank, the water level should not exceed the
“MAX” mark in the water tank. Then close the tank cover.
Note: the appliance is supplied with a water tank for easy cleaning,
you can fill the water tank with water firstly, and then put the water
tank into the appliance.
3. Set brewing filter into metal funnel (no coffee in brewing filter).
4. Place an espresso cup on drip plate. Make sure the knob is at the
horizontal position (off-position).
Note: the appliance is not equipped with jug, please use your jug or
coffee cup.
5. Connect to power source, press the power button“ON/OFF ”. The
power indicator will be illuminated and 1 CUP / 2 CUP steam indicator
will flashing.
6. The appliance will start heating,When 1 CUP / 2 CUP steam indica-
tor becomes solid, it shows the pre-heating is finished. Press 2 CUP
button “2 CUP”,wait for a moment, The water will flow out.
7. When the appliance stops pumping water automatically, you can
pour the water in container out then clean them thoroughly, now you
can start brewing.
Note: There may be noise when pumping the water on the first time,
it is normal, the appliance is releasing the air in the appliance. After
about 20s, the noise will disappear.
To make a cup of good hot Espresso coffee, we recommend you
preheating the appliance before making coffee, including the metal
funnel, brewing filter and cup, so that the coffee flavour can not be
influenced by the cold parts.
1. Remove the water tank and open the tank cover to fill it with
desired water, the water level should not exceed the “MAX” mark in
the water tank. Then place the water tank into the appliance proper-

5
MAKE ESPRESSO COFFEE
ly.
2.Set brewing filter into metal funnel, make sure the tube on the
funnel aligns with groove in the appliance, then insert the funnel into
the appliance from the “LOCK” position, and you can fix them into
coffee maker firmly through turn it anticlockw-ise until it is at the
“CLOSE” position. 3. Place an espresso cup on drip plate.
4. Then connect the appliance to power supply source. Make sure the
knob is at the horizontal position(off-position).
5. Press the power button“ON/OFF”, The power indicator will be
illuminated and 1 CUP / 2 CUP steam indicator will flashing.
6. When 1 CUP / 2 CUP steam indicator becomes solid, it shows the
pre-heating is finished.
1. Remove the funnel by turning it in clockwise, Add ground coffee to
brewing filter with measuring spoon, a spoon ground coffee power
can make about a cup of top-grade coffee, then press the ground
coffee powder tightly with the measuring spoon.
2. Set brewing filter into metal funnel, make sure the tube on the
funnel aligns with groove in the appliance, then insert the funnel into
the appliance as indicating of “LOCK”mark, and you can fix them into
coffee maker firmly through turning it anticlockwise until it is at the
“CLOSE” position .
3. Then place the hot cup on drip plate.
4. Select “1 CUP” or “2 CUP” according to your demand and then
press the corresponding button of the selected function. After waiting
for a moment, there will be coffee flowing out.
5. The appliance will stop working when the coffee-brewing is
finished, and then your coffee is ready now.
Warning: Do not leave the coffee maker unattended during making
the coffee, as you need operate manually sometimes!
6. After finishing making the coffee, you can take the metal funnel out
through turn clockwise, then pour the coffee residue out .

6
MAKE HOT WATER
FROTHING MILK/ MAKE CAPPUCCINO
1. After finish preheating, turn the knob to “ ” position, and then the
hot water will dispense from steam wand. When desired amount of
hot water is got, turn the knob off. Before making hot water, put a cup
under the steam wand.
You get a cup of cappuccino when you top up a cup of espresso
with frothing milk.
Note: during making steam, the metal funnel must be assembled in
position. Before frothing milk, release steam for 10 seconds.
Method:
1. Press the steam button“STEAM”, the steam indicator will flashing.
When steam indicator becomes solid, the pre-heating is finished.
2. Prepare espresso first with container big enough according to the
part “MAKE ESPRESSO COFFEE”.
3. Fill a jug with about 100 grams of milk for each cappuccino to be
prepared, you are recommended to use whole milk at refrigerator
temperature (not hot!).
Note: In choosing the size of jug, it is recommended the diameter is
not less than 70±5mm, and bear in mind that the milk increases in
volume by 2 times, make sure the height of jug is enough.
4. Insert the steam wand into the milk about two centimetre, then
turn the knob to the “ ” position, steam will come out from the steam
outlet. Froth milk in the way moving vessel round from up to down.
Warning: Be sure to operate carefully as the steam may result in
scald to person.
5. When the required purpose is reached, you can turn the knob off.
Note: Clean steam outlet with wet sponge immediately after steam
stops generating, but care not to hurt!
6. Pour the frothed milk into the espresso prepared, now the cappuc-
cino is ready. Sweeten to taste and if desired, sprinkle the froth with a
little cocoa powder. The steam wand can be used to froth milk singly

7
SET THE DISPENING AMOUNT
orr make hot beverages like drinking chocolate and water.
Note: After making steam, you can press “1 CUP” or “2 CUP” button
immediately to brew coffee again. The coffee indicator will flasing
quickly if the temperature is too high, at this time, you need to reduce
the temperature by following the operation as below. Turn the knob to
“Hot water” setting “ ”, and then the hot water will dispense. When
the temperature goes down ,the pump will stop automatically and
you should turn the knob off , then you can brew coffee again.
If you do not want to brew coff ee when the high-temperature
warning occurs, you can press the “1 CUP” or “2 CUP” button again to
cancel.
1. Dispensing amount of 1 CUP
Hold and press the “1 CUP” button for 3 seconds to enter into the
mode of setting the dispensing amount. And then press the “1 CUP”
button again, the coffee starts to dispense and the “1 CUP indicator”
flashes at the same time, when the desired amount is got, press the “1
CUP” button again, the coffee stops dispensing. At that time, the
setting for the dispensing amount of 1 CUP is finished and it will be
saved for next operation. The adjustable dispensing amount of 1CUP
ranges between 25ml and 60ml.
2. Dispensing amount of 2 CUP
Hold and press the “2 CUP” button for 3 seconds to enter into the
mode of setting the dispensing amount, then follow the operation of
setting the dispensing amount of 1 CUP. The adjustable dispensing
amount of 2 CUP ranges between 70ml and 110ml.
3. Restore factory setting
Simultaneously hold and press the “1 CUP” and “2 CUP” buttons for
3 seconds to recover the factory setting of dispensing amount.

8
AUTOMATICALLY POWER-OFF
FUNCTION
CLEAN AND MAINTENANCE
CLEANING MINERAL DEPOSITS
1. After pressing power button, if there is no any operation within 29
minutes, the unit will power off automatically.
2. After pressing power button, if there is no any operation after pump
puming about 215ml water , the pump will stop automatically.
3. After pressing power button, if there is no any operation after pump
worked for 180s during froth milk, the pump will stop automatically.
1. Cut off power source and let the coffee maker cool down complete-
ly before cleaning.
2. Clean housing of coffee maker with moisture-proof sponge often
and clean water tank, drip tray and drip plate regularly then dry
them.
Note: Do not clean with alcohol or solvent cleanser. Never immerse
the housing in water for cleaning.
3. Detach the metal funnel by turning it clockwise, get rid of coffee
residue inside, then you can clean it with cleanser, but at last you
must rinse with clear water.
4. Clean all the attachments in the water and dry thoroughly.
1. To make sure your coffee maker operating efficiently, internal piping
is cleanly and the peak flavor of coffee, the coffee machine needs to
be descaled, cleaned and maintained periodically. descaling warning
will be shown when the appliance has cumulatively worked for 500
cycles, at that time, all indicators will flash for 5 times , which means
that the coffee machine needs to be performed descaling, and then
the appliance will go back into normal condition. descaling warning
will be shown each time when you turn on the appliance if you do not
cancel.
2. Fill the water tank with water and descaler to the MAX level ( the

9
Water leaks out of outer
side of filter. There is some coffee powder
on filter edge. Get rid of them.
Acid (vinegar) taste
exists in Espresso coffee.
No clean correctly after
cleaning mineral deposits. Clean coffee maker per the
content in “before the first
use” for several times.
The coffee maker
cannot work any more.
The coffee powder is stored
in a hot, wet place for a long
time. The coffee powder
turns bad.
Please use fresh coffee
powder, or store unused
coffee powder in a cool,
dry place. After opening a
package of coffee powder,
reseal it tightly & store it in
a refrigerator to maintain
its freshness.
TROUBLE SHOOTING
Symptom Cause Corrections
Water leaks from the
bottom There is much water in the
drip tray. Please clean the drip tray.
Of coffee maker. The coffee maker is
malfunction. Please contact with the
authorized service facility
for repairing.
The power outlet is not
plugged well.
Plug the power cord into a
wall outlet correctly, if the
appliance still does not
work, please contact with
the authorized service
facility for repairing.
scale of water and descaler is 4:1, the detail refers to the instruction of
descaler. Please use “household descaler”, you can use the citric acid
(obtainable from chemist’s or drug stores) instead of the descaler (the
one hundred parts of water and three parts of citric acid).
3. Press “2 CUP” button once to make coffee and make hot water for
about 100ml. Then turn off the appliance and leave the descaling
solution in the applia-nce for 5 minutes.
4. Turn on the appliance and repeat the Step 3 for 3 times.
5. Repeat the steps of 3 for 2 times with tap water in the MAX level
(it is not necessary to wait for 5 minutes).
6. After finish descaling, you need to cancel the descaling
Warning: Simultaneously hold and press the “1 CUP button” . “2 CUP
button” & “STEAM button ” for 3 seconds.

10
Do not take apart the appliance by yourself if the cause of failure is
not found, you had better contact certified serving center.
Customer service: support@casabrews.com
1 CUP indicator & 2 CUP
indicator blinking
quickly
Make hot water for 215ml and
theknob is not reset
The knob is not reset after
cooling down
Reset knob to off position
Steam indicator
blinking quickly Make steam for 180s and the
knob is not reset Reset knob to off position
1 CUP indicator 、2 CUP
indicator and steam
indicator blinking
quickly
The knob is not reset to off
position, but the machine
turned on
Reset knob to “OFF”
position
1 CUP indicator or 2 CUP
indicator blinking
quickly
Bolier temp is too high Turn knob to “ ”positon,
perform cooling operation
The steam cannot froth.
The white indicator is not
illuminated Only after the white
indicator is illuminated,
the steam can be used to
froth.
The container is too big or
the shape is not fit. Use high and narrow cup.
You have used skimmed milk Use whole milk or
half-skimmed milk.
CUSTOMER SERVICE

1
Room 1913,No.13,Dongcheng section,
Dongguan Avenue,Dongcheng
Dongguan Guangdong, China
support@casabrews.com
DONGGUAN HAISI INTERNATIONAL TRADING Co.,Ltd
Other manuals for CM5418BC-UL
3
Table of contents
Other CASABREWS Coffee Maker manuals

CASABREWS
CASABREWS 3700 ESSENTIAL User manual

CASABREWS
CASABREWS KCM010A User manual

CASABREWS
CASABREWS CM5418BC-UL User manual

CASABREWS
CASABREWS CM5418BC-UL User manual

CASABREWS
CASABREWS 5700 Gense User manual

CASABREWS
CASABREWS CM5418BC-UL User manual

CASABREWS
CASABREWS CM1699 User manual

CASABREWS
CASABREWS 5700 Gense User manual

CASABREWS
CASABREWS 5700 PRO User manual