6. Alexa and Google setup
1. Download Alexa or Google Home App
2. Open your Smart Life App. Check the bottom
Tab bar and click on ‘Me’. Then choose ‘more
services’ and select Alexa or Google Home.
3. Follow on screen instruction and enjoy.!
Log in or register your account with your mobile
number or e-mail address. Type in the verication
code sent to your mobile or mail box, then set your
login password. Click "Create Family" to enter into
the APP.
Mobile number/e-mail address
Region
Open the APP, selecting "+" on top right to add
device. Choose the type of device, for example
"Smart Lighting".
Make sure your smart phone and Wi-Fi switch
module are under the same Wi-Fi network at
2.4GHz connection. Conrm when the strips
ash quickly (twice a second).
Add Device
Help
that light blinks rapidly
Add Device
The pairing will take about 10-120 seconds to
complete depending on your network condition.
Connecting
Device found
Register device to the smart cloud
Initializing device
Make sure your router,mobile,and
device are as close as possible
2%
When pairing is done, the Wi-Fi switch will be
shown on the App.
Device added successfully
All Device
Connect to amazon alexa or Google Assistant
for voice control, or share the devices with your
families or friends.
More
Deivec name
Basic information about the device
Supported Third-party
Control Others
Others
Shared devices
Create Group
Device information
Feedback
Device Location
Check network
amazon
alexa Google
Assistant
Enjoy your smart life of home automation for
lighting control by using our All-in-one mobile
app wherever you are in the world or simply by
voice control when you are sitting at home
comfortably.
Voice control
Apps control
APP
Confirm light blinks rapidly
Obtain verification code
Electrical
Add manually Search Device
Cancel
Home
Appliance...
Lighting
Devices Lighting
Devices
(bluetooth)
Lighting
Devices
(ZigBee)
kitchen
Security
& Sensor
sport
& Health
Add Device
Smart
Lighting
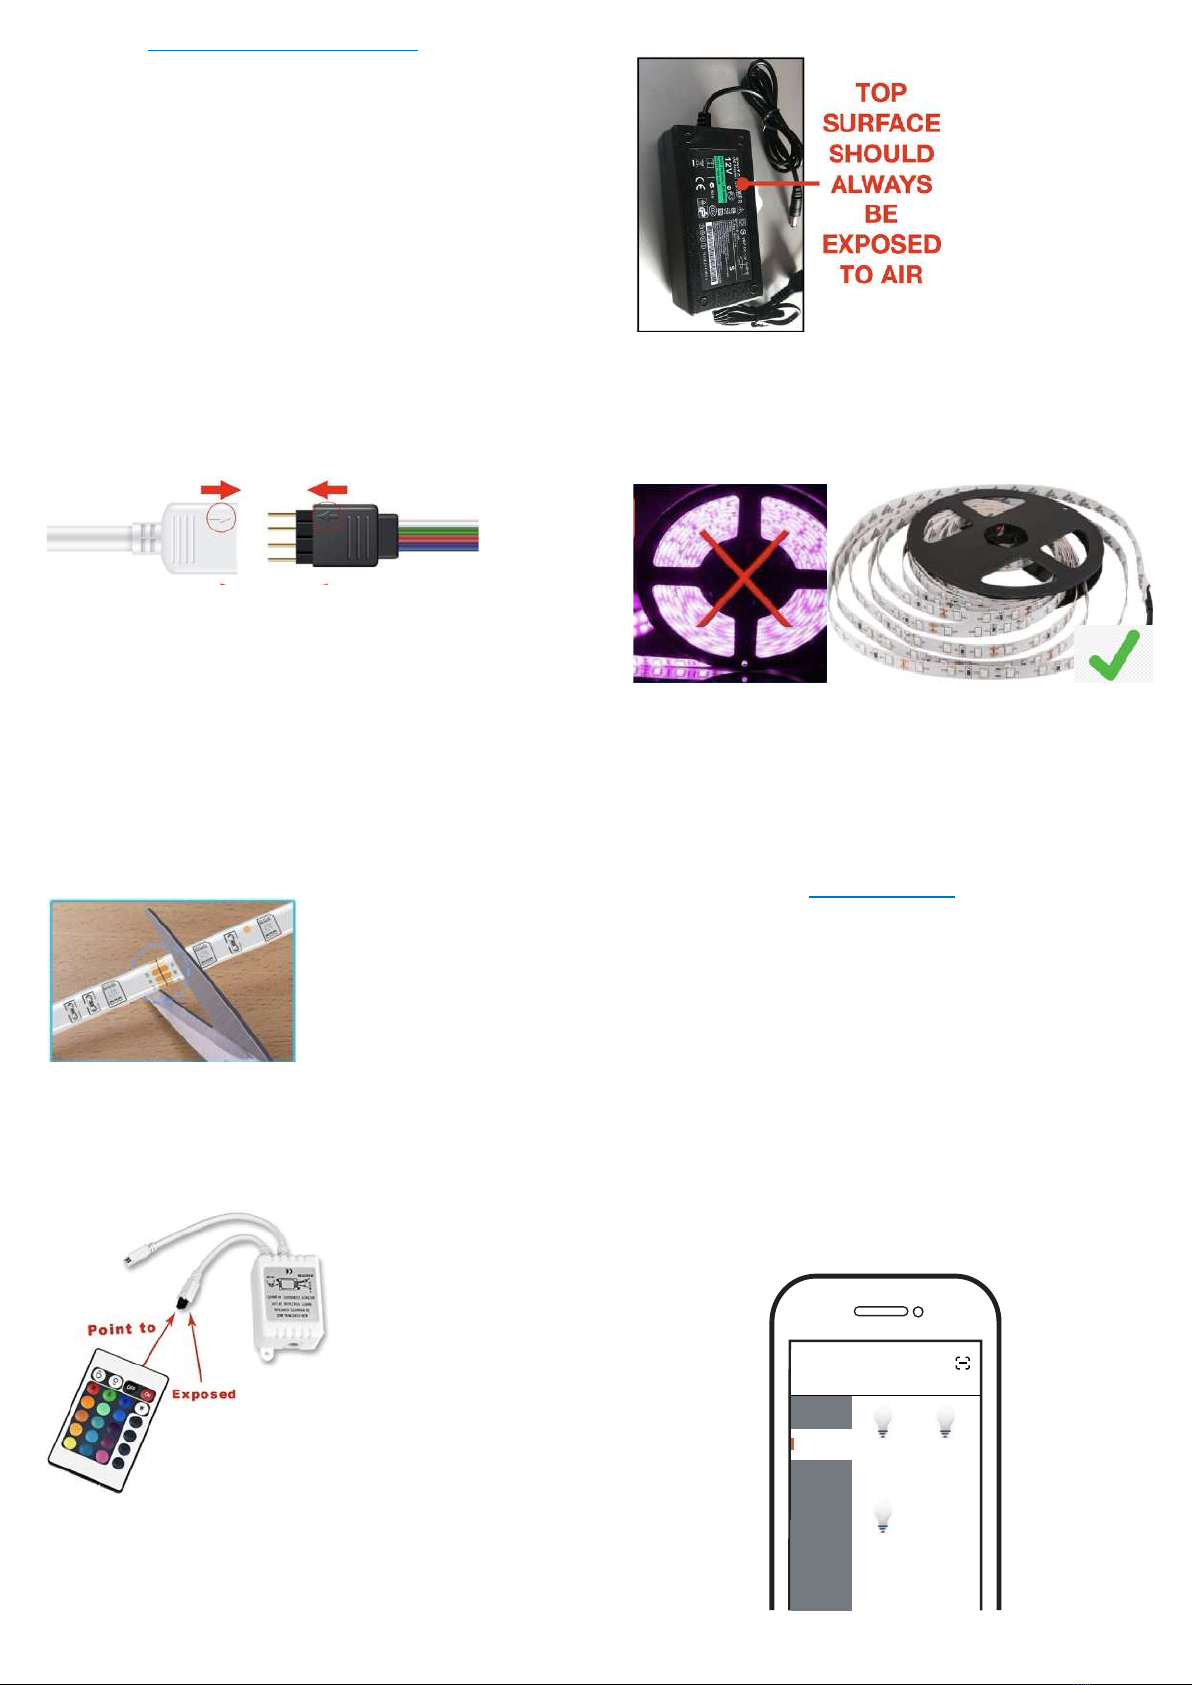
After the wiring of WiFi controller is done, press
the reset button for 10 seconds or more till the
strips attached ash quickly for pairing mode.
LED controller
Step 3: Add device “Default Mode”
The app supports two configurations: Default mode
and AP mode. Click “AP MODE” at the top right
corner of the “DEFAULT MODE” page to switch
between modes. !
To select “Default mode”, please make sure the
Strip is flashing rapidly in RED (blinking twice per
second) and then click the button to proceed to the
next step. !
If the indicator light is not flashing rapidly, click
“HELP “ to view the instructions.
To select “AP MODE”, please make sure the
indicator light on the smart device is flashing slowly.
Step 4: Complete pairing
For Default Mode to work please keep your Mobile
very close to Led Controller during the setup. The
pairing will take about 10-120 seconds to complete
depending on your network condition.
Do’s
1. Turn off the power adapter when led strip is not in
use. This will improve life of controller and adapter.
2. Always expose the Top surface of controller to air
for heat transfer. Do not place the controller upside
down, this will damage the controller. (Top surface
is the surface with Tuya QR code sticker)
3. The Led strip is only suitable to stick on plastic or
aluminium profile surface.
Dont’s
1. Do not directly stick the led strip on dry wall or
ceiling, it is bound to fall off. Purchase an
additional double sided foam tape and the stick led
strip on the foam tape.
2. Do not install the led strip at places where it can
come into water contact.
3. Led controller and Power adapter are not water
proof keep they away from water contact.
4. The 72 Watt power adapter can only handle 4
metre of RGB led strip, please do not add another
led strip or extend the length of existing led strip
with the adapter provided.
8. Warranty Terms and Conditions
Introduction
1. If you are not 100% satisfied with your order, we
will be happy to arrange a complete return for
any unused items purchased within 10 days.
2. If you have used the item and not followed the
given instructions and something goes wrong or
you are not 100% satisfied with your item, our
support team will help trouble shoot, offer advice
and determine if your parts are defective. In the
event that something is determined to be a
manufacturer error or failure due to defective
materials, we will repair, exchange the item(s) or
refund the complete amount as needed. Refund
will be provided incase item is out of stock.
3. Please contact us with your order number,
description of your setup, and any information
about your situation that may help us and we
will provide you appropriate solution.
** for SKU-SLCONT-24IR i.e. Smart WiFi RGB
controller with only Remote model which is not
provided with Led strip and Power Adapter, in such
models warranty will be applicable only to
Controller and Remote.