Casio Celviano AP-265 User manual

AP265-E-3A
EN
USER’S GUIDE (Full)
Before using this Digital Piano for the first time,
be sure to read the separate USER’S GUIDE to
familiarize yourself with basic operations.
AP-265

EN-1
Contents
General Guide .................................EN-2
FUNCTION Button......................................................... EN-3
Auto Resume and Operation Lock ................................ EN-3
About Music Score data ................................................ EN-3
Power Outlet....................................EN-4
Turning Power On or Off ............................................... EN-4
Returning the Digital Piano to Its Factory Default
Settings.......................................................................... EN-4
Playing with Different Tones .........EN-5
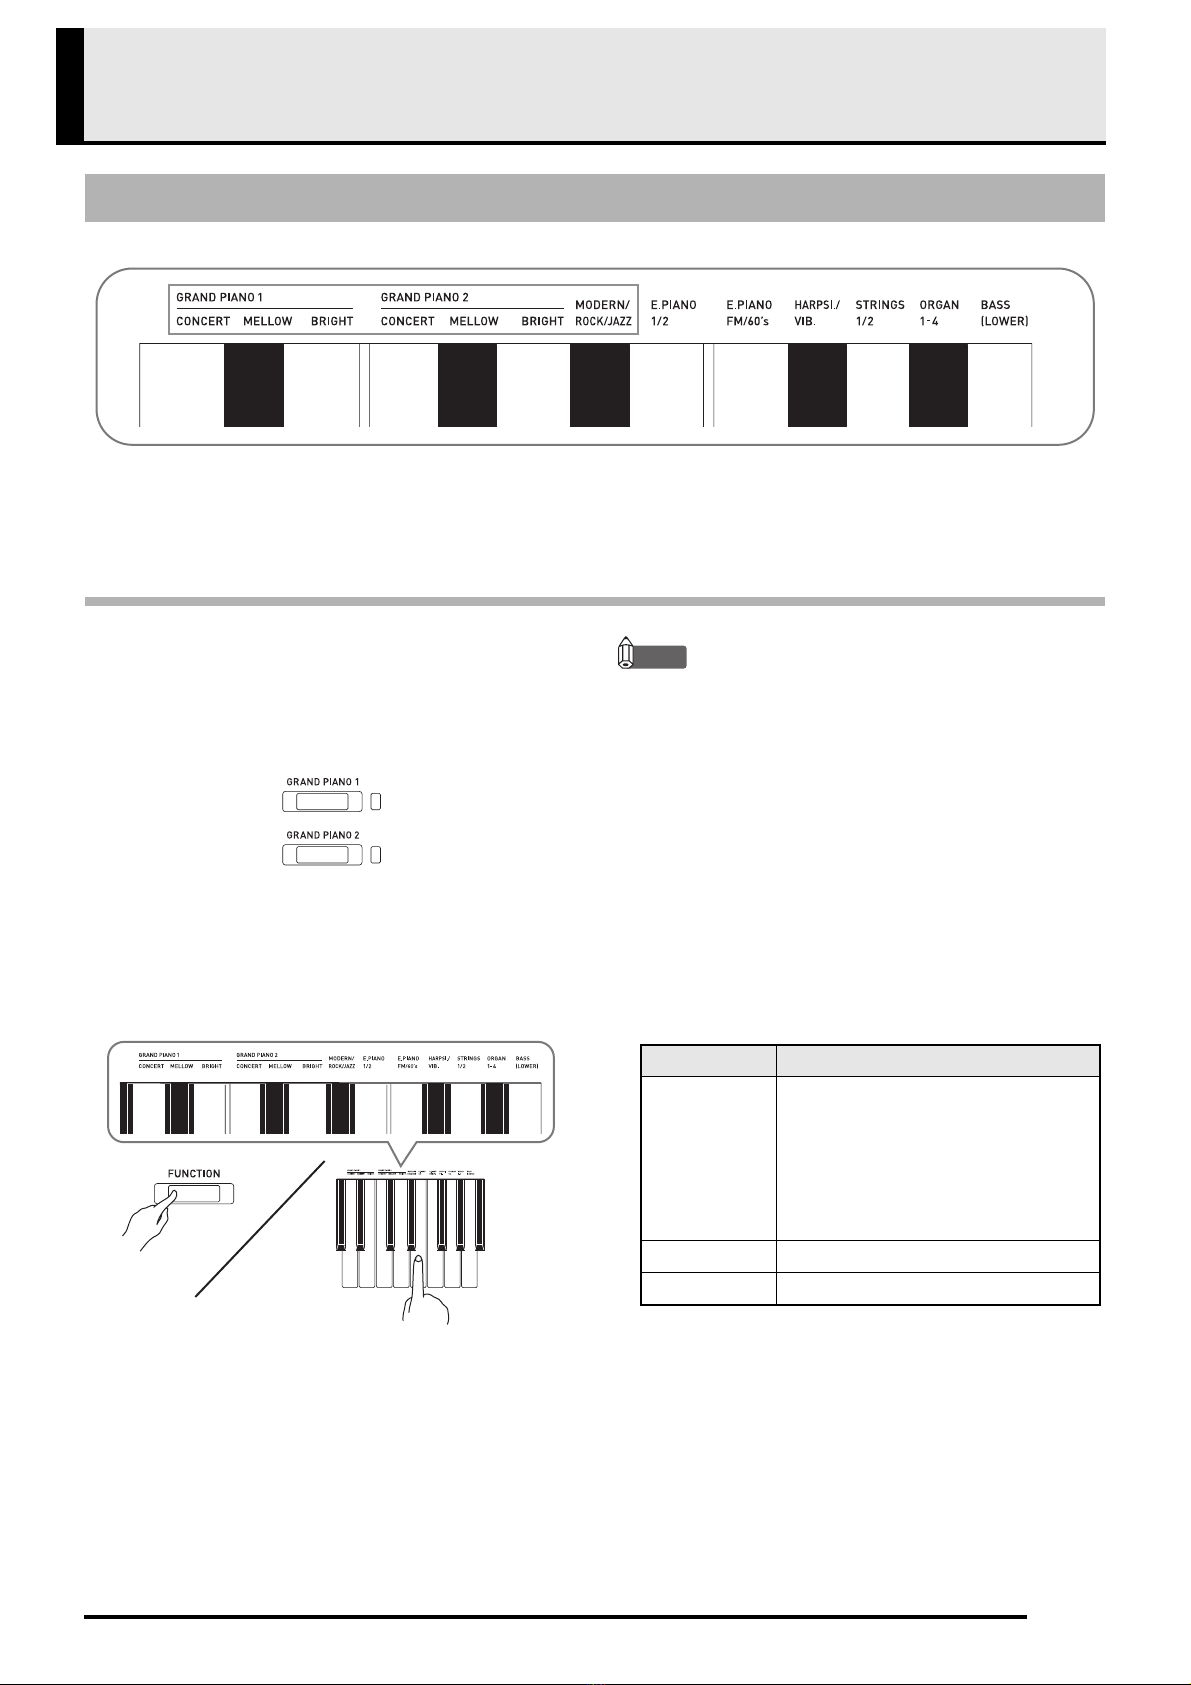
Selecting and Playing a Tone........................................ EN-5
Layering Two Tones ...................................................... EN-6
Using Effects ................................................................. EN-7
Using the Digital Piano’s Pedals.................................... EN-8
Using the Metronome .................................................... EN-9
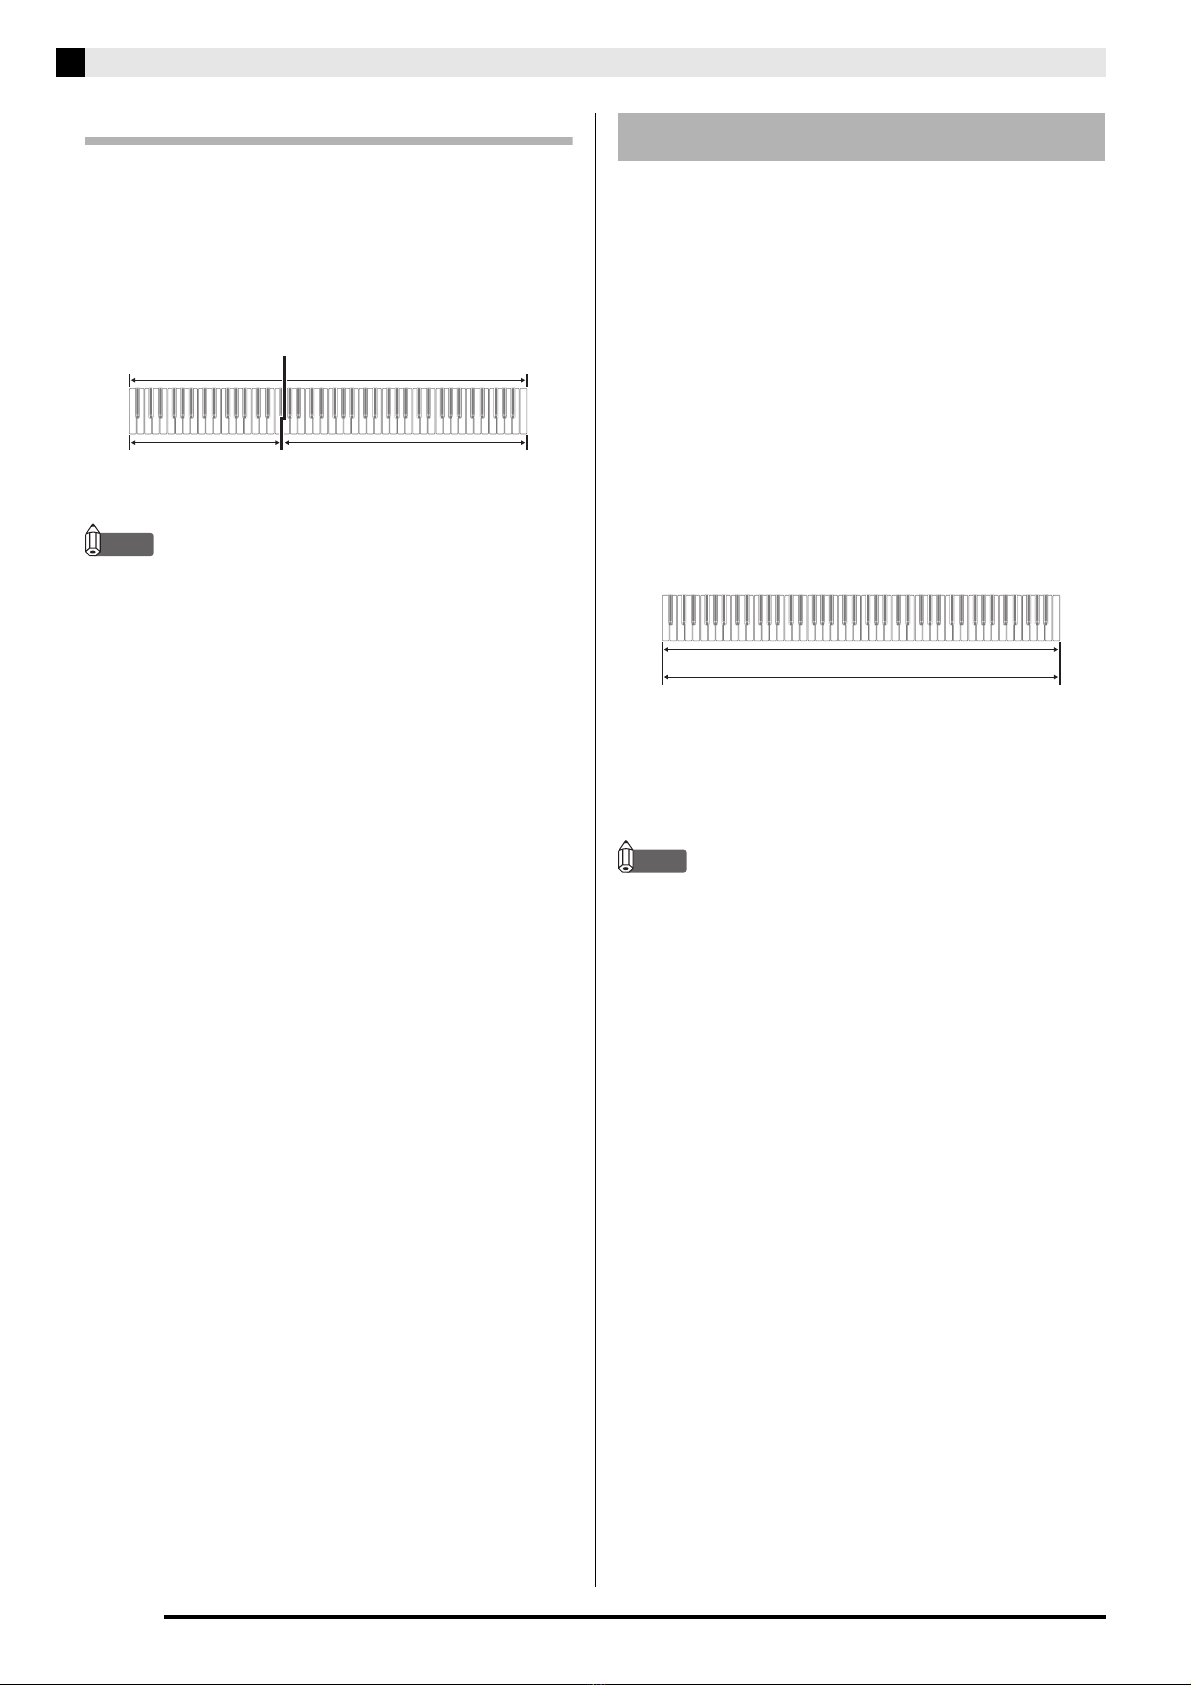
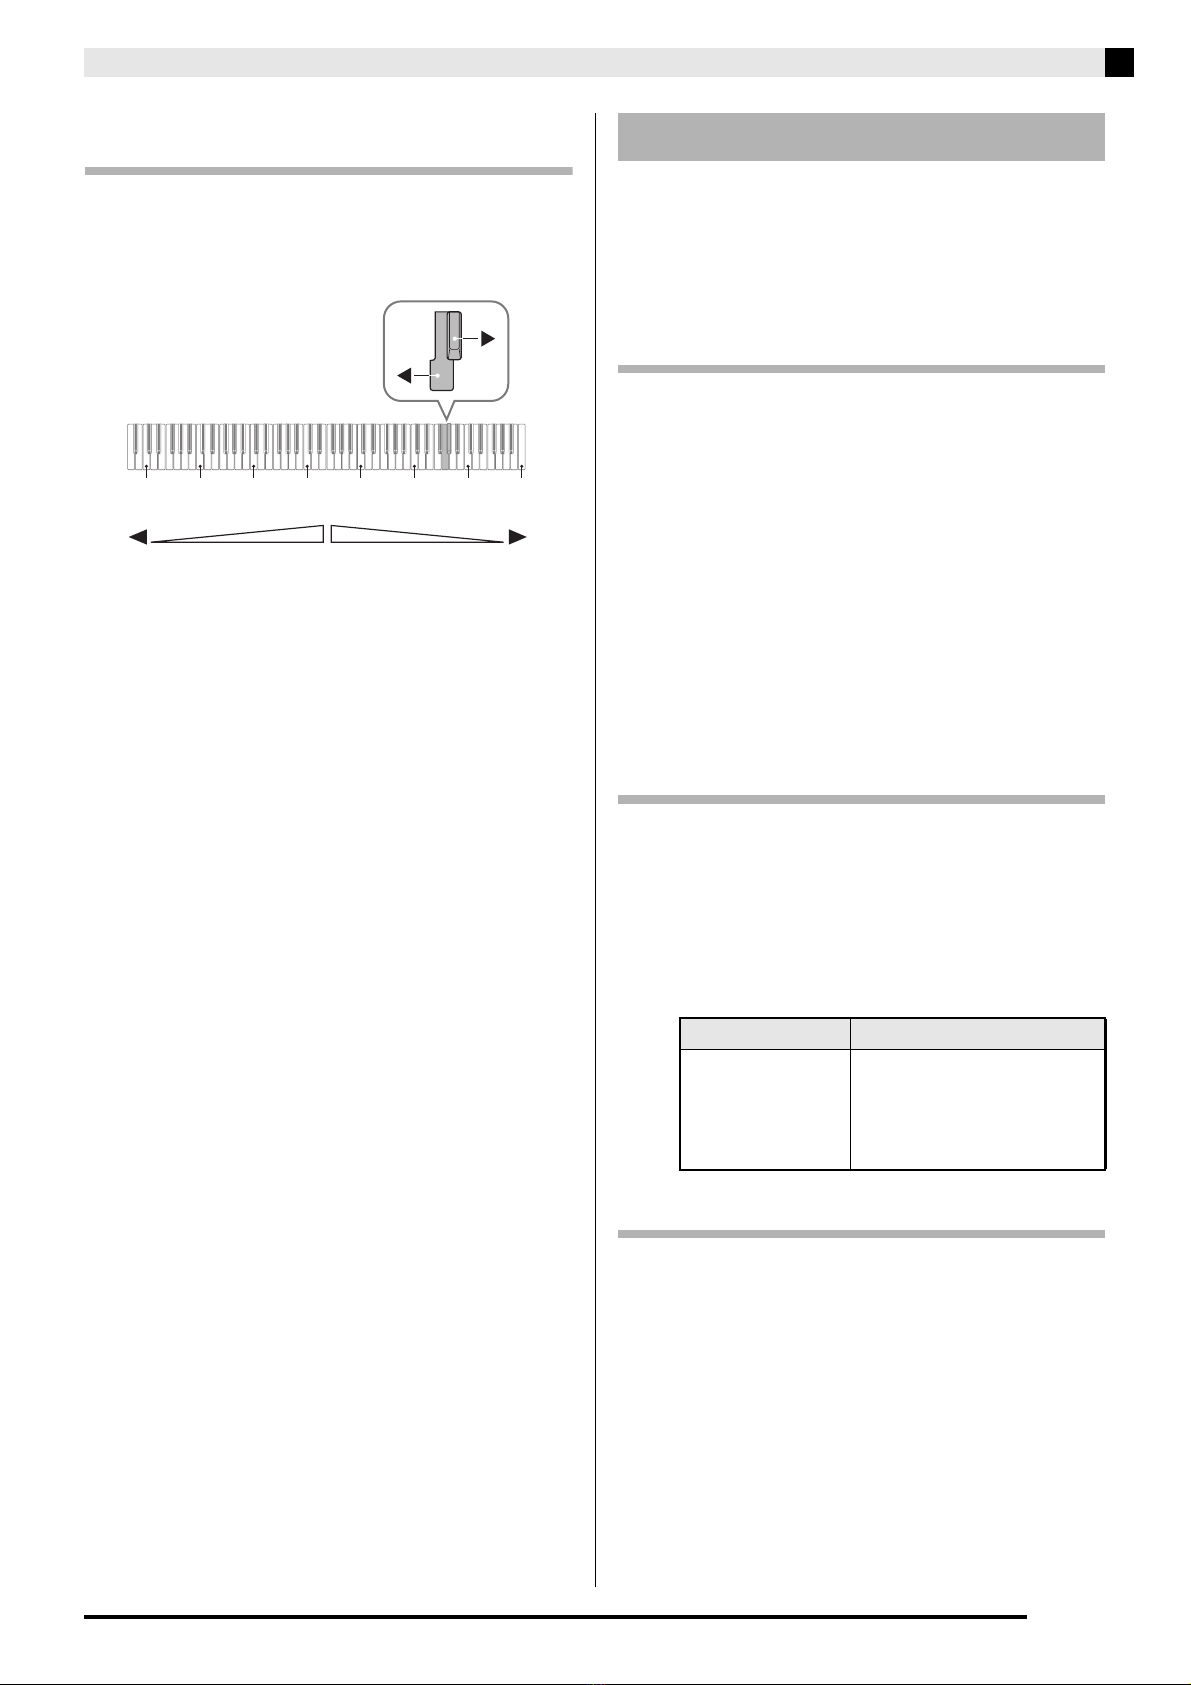
Splitting the Keyboard for Duet Play............................ EN-10
Using Built-in Songs
(Concert Play, Music Library,
Demo Tunes) .................................EN-12
Performing Demo Play ................................................ EN-12
Concert Play ................................................................ EN-12
Practicing with a Concert Play Song ........................... EN-13
Music Library ............................................................... EN-14
Playing Back a Specific Music Library Song ............... EN-15
Practicing with a Music Library Song........................... EN-15
Recording and Playback ..............EN-16
Recording to Built-in MIDI Recorder............................ EN-16
Using the MIDI REC Button......................................... EN-16
Configuring Settings with the
Keyboard .......................................EN-19
To configure settings with the keyboard ...................... EN-19
Keyboard Keys Used for Configuring Settings ............ EN-20
Parameter List ............................................................. EN-21
Reverb ..................................................................... EN-21
Tone selection.......................................................... EN-21
Chorus ..................................................................... EN-21
Brilliance .................................................................. EN-21
Layer balance .......................................................... EN-21
Lower Pedal............................................................. EN-21
Damper noise........................................................... EN-21
Select layer tone ...................................................... EN-21
Duet mode ............................................................... EN-21
Music Library song select
(MUSIC LIBRARY SELECT).................................... EN-22
Tempo (TEMPO)...................................................... EN-22
Beat (BEAT)............................................................. EN-22
METRONOME TEMPO ........................................... EN-22
METRONOME BEAT............................................... EN-22
CONCERT PLAY a............................................. EN-22
LISTEN..................................................................... EN-22
LESSON................................................................... EN-22
PLAY ........................................................................ EN-22
CONCERT PLAY SELECT (Song) (SELECT +/–) ... EN-22
CONCERT PLAY VOLUME (VOLUME +/–) ............ EN-22
Music Library volume ............................................... EN-22
Metronome volume .................................................. EN-22
Temperament........................................................... EN-23
Temperament Base note.......................................... EN-23
Temperament select ................................................ EN-23
Touch response ....................................................... EN-23
Transpose ................................................................ EN-23
A-tuning.................................................................... EN-23
Octave shift .............................................................. EN-23
Keyboard volume ..................................................... EN-23
USB flash drive mode .............................................. EN-24
Local control............................................................. EN-24
Send channel ........................................................... EN-24
Operation tone ......................................................... EN-24
Panel lock................................................................. EN-24
Auto Resume ........................................................... EN-24
Linking with an Application (APP Function) ................. EN-25
Connecting to a Computer...........EN-26
Minimum Computer System Requirements ................. EN-26
Connecting the Digital Piano to Your Computer .......... EN-26
Using MIDI ................................................................... EN-27
Transferring Song Data with a Computer .................... EN-27
Reference.......................................EN-36
Troubleshooting ........................................................... EN-36
Product Specifications ................................................. EN-37
Appendix............................................ A-1
Tone List ...........................................................................A-1
Concert Play List...............................................................A-1
Music Library List..............................................................A-1
MIDI Implementation Chart
Getting Ready ..................................................................................................... EN-30
Assembling the Stand ............................................... EN-30
To connect the cable................................................. EN-33
To install the music stand............................................ EN-33
Removing the Protective Tape from the Keyboard
..... EN-34
Connecting Headphones ...........................................EN-34
Connecting Audio Equipment or an Amplifier............EN-35
Bundled and Optional Accessories............................EN-35
Company and product names used in this manual may
be registered trademarks of others.

EN-2
General Guide
1
3
4
7
8
9
65
2
bn
bo
bmbl
bk
Front
Bottom
Rear

General Guide
EN-3
*CAUTION
•Make sure that the cover is fully open whenever you are playing on the keyboard. A partially open cover can
suddenly close unexpectedly and pinch your fingers.
NOTE
•The names shown here are always indicated in bold when they appear within the text of this manual.
The FUNCTION button is used in combination with other buttons
and keys.
To change a setting, hold down the FUNCTION button as you press
the button or key that is assigned the setting you want to configure.
When you press a key, the Digital Piano beeps to indicate the
current setting.
A long beep indicates that a setting is turned off.
NOTE
•For details about operations and settings, see “Configuring Settings with the Keyboard” on page EN-19.
Your Digital Piano can be configured to save its current settings when power is turned off and restore them when
turned back on again (Auto Resume). You can also lock its buttons to protect against operation errors (Operation
Lock). For details, see “Parameter List” on pages EN-21 - EN-24.
You can use a computer to download music score data from the CASIO Website. For more information, visit the
URL below.
https://support.casio.com/global/en/emi/manual/AP-265/
FUNCTION Button
Auto Resume and Operation Lock
About Music Score data
P(POWER) button
VOLUME controller
FUNCTION button
METRONOME button
REVERB button
MIDI REC button
abutton
GRAND PIANO 1 button
GRAND PIANO 2 button
Pedal connector
USB port
Power terminal (DC 12V)
PHONES/OUTPUT jacks
Power lamp

EN-4
Power Outlet
After you finish assembling the stand, turn on the
Digital Piano. For details, see “Getting Ready” on page
EN-30.
1.
Press the P(POWER) button to turn on
Digital Piano power.
•The power lamp lights and the Digital Piano powers
up. The power up operation takes about 5 seconds.
2.
To turn off the Digital Piano, hold down the
P(POWER) button until the power lamp
goes out.
NOTE
•Pressing the P(POWER) button to turn off power
actually puts the Digital Piano into a standby state.
Minute amounts of current continue to flow within
the Digital Piano in the standby state. If you do not
plan to use the Digital Piano for a long time or if
there is a lightning storm in your area, be sure to
unplug the AC adaptor from the power outlet.
Auto Power Off
This Digital Piano is designed to turn off automatically
to avoid wasting power after no operation is
performed for a preset amount of time. The Auto
Power Off trigger time is about four hours.
•You also can use the procedure below to temporarily
suspend Auto Power Off.
■To disable Auto Power Off
1.
While the Digital Piano is turned on, press the
P(POWER) button to turn it off.
2.
While holding down the FUNCTION button,
press the P(POWER) button to turn on the
Digital Piano.
•Auto Power Off will be disabled at this time.
NOTE
•Turning off the Digital Piano after performing the
above steps will re-enable Auto Power Off.
Perform the following procedure when you want to
return the Digital Piano’s stored data and settings to
their initial factory defaults.
1.
Turn off the Digital Piano.
2.
Holding down the FUNCTION, MIDI REC and
GRAND PIANO 2 buttons, press the
P(POWER) button.
3.
Hold down the FUNCTION, MIDI REC and
GRAND PIANO 2 buttons until the GRAND
PIANO 2 lamp, and then the GRAND PIANO 1
lamp, and then the R lamp start to flash.
•After some time, the flashing will stop.
4.
Release the FUNCTION, MIDI REC and
GRAND PIANO 2 buttons.
•The Digital Piano will initialize its internal system.
You will be able to use the Digital Piano in a short
while.
NOTE
•See “Turning Power On or Off” (page EN-4) for
information about turning power on and off.
Turning Power On or Off Returning the Digital Piano to
Its Factory Default Settings

EN-5
Playing with Different Tones
The Digital Piano comes with 22 built-in tones. *1
*1: The names of the tones are marked above the keyboard keys to which they are assigned.
*2: In this manual, these nine tones are collectively referred to as “piano tones”. The CONCERT, MELLOW, and
BRIGHT tones are collectively referred to as “GRAND PIANO tones”.
To select a tone
Selecting and Playing a Tone
*2
1.
Select the tone you want.
To select GRAND PIANO 1 or GRAND
PIANO 2
•Press the GRAND PIANO 1 button or
GRAND PIANO 2 button.
•The button lamp of the selected tone will
light.
To select one of the other tones
•While holding down the FUNCTION
button, press the keyboard key that
corresponds to the tone you want to select.
2.
Use the VOLUME controller to adjust the
volume.
NOTE
•Some keys may have more than one tone assigned.
In this case, each press of the key cycles to the next
assigned tone. Which tone is selected by the key
press is indicated by beeps.
Example: Cycling through MODERN, ROCK, and
JAZZ settings
MODERN: (1 beep)
ROCK: (2 beeps)
JAZZ: (3 beeps)
•Of the Digital Piano’s 22 built-in tones, the first six
are grand piano tone. Each tone has its own
distinctive merits, so you should select the tone that
suits the song you are playing along with or your
own personal preferences.
Tone Name Characteristics
CONCERT This is a full concert grand piano tone
for dynamic and natural tone changes.
This tone is designed to reproduce
damper, resonance, and other piano
nuances, which makes it ideal for
virtually any type of piano
performance.
MELLOW A warm, subdued grand piano tone.
BRIGHT A bright and clear grand piano tone.

EN-6
Playing with Different Tones
Bass Tone (BASS)
Selecting the BASS (LOWER) tone in step 1 of the
above procedure will assign the bass tone to the low
range (left side) of the keyboard. The high range (right
side) will be assigned the tone that was selected when
you pressed the BASS key.
•BASS tone lets you effectively split the keyboard
between two different tones.
NOTE
•To return the keyboard to a single tone, select any
tone other than BASS.
•You cannot select BASS when recording to Track 2.
•You can configure settings to sustain reverberation
of the BASS (LOWER) tone while the damper pedal
or sostenuto pedal is pressed. For more information,
see “Lower Pedal” (page EN-21).
Use the following procedure to layer two tones, so they
sound at the same time.
When specifying two tones for layering, first tone you
select will be the main tone, while the second tone will
be the layered tone.
1.
Hold down the FUNCTION button and press
the Select Layer Tone key.
•For details about using the keyboard keys for
settings, see “Keyboard Keys Used for Configuring
Settings” (page EN-20).
•Each press of the keyboard key toggles between on
and off.
2.
Hold down the FUNCTION button and press
key of the tone to be layered.
3.
To return to the original tone, hold down the
FUNCTION button and press the Select
Layer Tone key (which exits the Layer Mode).
NOTE
•You cannot layer the BASS tone with another tone.
•You cannot perform the layer operation when
recording to Track 2.
Split Point
Low Range High Range
BASS GRAND PIANO 2 MELLOW
(Currently selected tone)
Layering Two Tones
GRAND PIANO 1 BRIGHT
STRINGS 2

Playing with Different Tones
EN-7
To adjust the volume balance between
two layered tones
1.
While holding down the FUNCTION button,
use the keyboard keys shown below to adjust
the volume of the layered tones.
•To return the volume setting to its initial default, hold
down the FUNCTION button and press both of the
keys at the same time.
•For details about using the keyboard keys for
settings, see “Keyboard Keys Used for Configuring
Settings” (page EN-20).
To apply Reverb
1.
Each press of the REVERB button toggles
reverb between on and off.
•Reverb is applied when it is turned on.
■To select the reverb type
1.
While holding down the FUNCTION button,
press the keyboard key of the reverb type to
be applied.
1: Room
2: Small hall
3: Large hall
4: Stadium
To apply chorus to a tone
1.
While holding down the FUNCTION button,
use the Chorus keyboard key to cycle
through the available settings.
•Each press of the Chorus keyboard key causes the
Digital Piano to beep according to which setting is
selected, as shown in the table below.
•Chorus
About DSP
DSP makes it possible to digitally produce complex
acoustic effects. The DSP is assigned to each tone
whenever you turn on Digital Piano power.
C1 C2 C3 C4 C5 C6 C7 C8
Center
Volume of the main tone
(First tone you selected)
Volume of the layered tone
(Second tone you selected)
Using Effects
Reverb : Makes your notes resonate.
Chorus: Adds more breadth to your notes.
Number of Beeps Setting
1 (long)
1 (short)
2
3
4
Off (OFF)
Light Chorus
Medium Chorus
Deep Chorus
Flanger (whooshing effect)

EN-8
Playing with Different Tones
Your Digital Piano comes equipped with three pedals:
damper, soft, and sostenuto
Pedal Functions
Damper Pedal
Pressing the damper pedal while playing will cause the
notes you play to reverberate for a long time. Half-
pedal operation (pressing the pedal part way) is also
supported.
•When one of the GRAND PIANO tones or the
MODERN piano tone is selected, using the damper
pedal adds damper resonance that is similar to that
produced on an acoustic grand piano.
Sostenuto Pedal
Only the notes of the keys that are depressed when this
pedal is pressed are sustained until the pedal is
released.
Soft Pedal
Pressing this pedal while playing suppresses notes
played on the keyboard after the pedal was pressed,
and makes them sound softer.
NOTE
•If pressing the pedal does not produce the desired
effect, it could mean that the pedal cord is not
connected properly. Refer to step 1 under “To
connect the cable” (page EN-33).
Disabling Damper Noise Output
Damper noise is a slight metallic ringing sound that is
generated as the damper of an acoustic piano separates
from the wires pedal when the damper pedal is
pressed. The damper resonance of your Digital Piano
normally includes damper noise, but you can perform
the procedure below to disable its output. Damper
noise can be applied to the six GRAND PIANO tones
and MODERN.
1.
While holding down the FUNCTION button,
press the Damper Noise keyboard key.
•For details about using the keyboard keys for
settings, see “Keyboard Keys Used for Configuring
Settings” (page EN-20).
•Each press of the key toggles the setting and causes
the Digital Piano to beep as described below.
–Long beep: Damper noise output disabled
–Short beep: Damper noise output enabled
Using the Digital Piano’s
Pedals
Soft pedal Damper pedal
Sostenuto pedal

Playing with Different Tones
EN-9
1.
Press the METRONOME button.
•This starts the metronome.
•The lamp flashes with each beat.
2.
While holding down the FUNCTION button,
press the METRONOME BEAT keyboard
key.
•Keep the FUNCTION button depressed as you
advance to step 3.
3.
Hold down the FUNCTION button and press
the BEAT keyboard key (0 to 9) that
corresponds to the beat you want to specify.
•You can specify a beat value in the range of 0 to 9
(beats per measure). A chime will sound on the first
beat of each measure, and clicks will sound for the
remaining beats. Specifying 0 plays a straight click,
without any chime. This setting lets you practice with
a steady beat.
4.
Release the FUNCTION button and then hold
it down again as you press the
METRONOME TEMPO keyboard key.
•Keep the FUNCTION button depressed as you
advance to step 5.
5.
While holding down the FUNCTION button,
use the TEMPO keys to specify a tempo
value in the range of 20 to 255 beats per
minute.
•Each press of the + or – key raises or lowers the
tempo value by 1.
•You can also use the tempo value input keys (0 to 9)
to enter a specific tempo value.
•Input three digits as the tempo value.
Example: To set a tempo of 20, press keys 0, 2, and
then 0.
6.
Press the METRONOME button to turn off
the metronome.
NOTE
•If you used the numeric input (0 to 9) keyboard keys
to input beat and/or tempo values and the values
are within the allowable setting ranges, the Digital
Piano will emit a high pitch beep when you release
the FUNCTION button. If a value is outside the
allowable range, a low-pitch sound will be emitted.
•In step 5 of the above procedure, pressing the + and
– keys at the same time will set the tempo of the
Concert Play lesson song or Music Library song (in
the case of a recorded song, the tempo when the
song was recorded) that was last selected on the
Digital Piano.
Using the Metronome

EN-10
Playing with Different Tones
To adjust the metronome volume
You can perform the following procedure at any time,
regardless of whether or not the metronome is
sounding.
1.
While holding down the FUNCTION button,
use the Metronome Volume keys to specify a
volume value in the range of 0 to 42.
•For details about using the keyboard keys for
settings, see “Keyboard Keys Used for Configuring
Settings” on page EN-20.
•Each press of the + and – key raises or lowers the
metronome volume value by 1.
NOTE
•To return to the initial default setting, press + and –
at the same time.
You can split the keyboard in the center so the left and
right sides have the same range. The left outer pedal is
the left side damper pedal, while the right outer pedal
is the right side damper pedal.
NOTE
•Only the damper pedal for the right side keyboard
supports half-pedal operations.
1.
Select the piano tone you want to use for the
duet.
Example: GRAND PIANO 1 (BRIGHT)
2.
To cycle between the Duet Mode settings
below, hold down the FUNCTION button and
press the Duet Mode key.
Off
On
Pan: Outputs left side keyboard tone from the left
speaker and right side keyboard tone from the
right speaker.
IMPORTANT!
• The Octave Shift and Transpose settings cannot be
changed while On or Pan is selected for the Duet
Mode setting.
• While Pan is selected for the Duet Mode settings,
the Hall Simulator, Reverb, and Chorus settings
cannot be changed.
Splitting the Keyboard for
Duet Play
C3 C4 C5 C6 C3 C4 C5 C6
Keyboard
Split point
Left keyboard Right keyboard
(middle C)(middle C)
Pedals
Left side damper pedal
Left and right side damper pedal
Right side damper pedal

Playing with Different Tones
EN-11
Changing the Octaves of the duet
keyboards
You can change the ranges of the left and right
keyboards in octave units from their initial default
settings. This comes in handy, for example, if the initial
default range is not enough when one person is
playing the left hand part and another person is
playing the right hand part.
1.
While holding down the FUNCTION and
GRAND PIANO 1 buttons, press the
keyboard C key that you want located at C4
(middle C) of the left keyboard. Keep
FUNCTION and GRAND PIANO 1 buttons
depressed as you advance to step 2, below.
•This will sound the note assigned to C4 and change
the octave of the left keyboard.
Example: Press the keyboard key of the leftmost C will
assign the range shown below.
2.
While still holding down the FUNCTION and
GRAND PIANO 1 buttons, press the
keyboard C key that you want located at C4
(middle C) of the right keyboard.
•This will sound the note assigned to C4 and change
the octave of the right keyboard.
NOTE
•Exiting the Duet Mode and then selecting On or Pan
for the Duet Mode setting again will return the
keyboards to their initial default ranges.
C4 C5 C6 C7 C3 C4 C5 C6
Left keyboard Right keyboard
(Pressed key)
1 octave higher than initial
setting
Unchanged

EN-12
Using Built-in Songs (Concert Play, Music
Library, Demo Tunes)
Your Digital Piano comes with 10 built-in piano and
orchestra tunes (Concert Play 1 through 10), and 60
piano solos (Music Library 1 to 60).
Concert Play lets you enjoy playing along with
orchestral accompaniment. You can use Music Library
to practice famous piano pieces.
IMPORTANT!
• Whenever you change to another song, this Digital
Piano loads the song data. Note that button
operations are disabled while song loading is in
progress. If you are playing something on the
keyboard, changing the song may cause note output
to stop.
1.
While holding down the FUNCTION button,
press the METRONOME button.
•This starts sequentially looped playback of all
Concert Play (Listen) songs and Music Library songs.
•You can play along with a song on the keyboard as it
is playing. The tone assigned to the keyboard is the
one that is preset for the song that is playing.
2.
To change the demo song, hold down the
FUNCTION button and press the MIDI REC
button or REVERB button.
•To advance to the next demo song, hold down the
FUNCTION button and press the MIDI REC button.
•To return to the previous demo song, hold down the
FUNCTION button and press the REVERB button.
•For a list of songs, see page A-1.
3.
Press the abutton to stop built-in song
play.
NOTE
•Pressing the METRONOME button while holding
down the FUNCTION button during Concert Play
jumps to the first Music Library song. Performing
the same operation during Music Library play jumps
to the first Concert Play song.
•The tune selection and playback stop operations
described above are the only operations that are
possible during demo tune play.
Concert Play has recordings of a live orchestra, which
you can use to play along with authentic
accompaniment.
You can also use Concert Play for 3-step practice.
Step 1: LISTEN
Listen to playback of the piano and orchestra to
familiarize yourself with the music.
Step 2: LESSON
Practice the Concert Play piano part.
•You can turn off the left hand part or right hand
part of a built-in song and play along on the piano.
Step 3: PLAY
Play along with the orchestra accompaniment.
•The Concert Play contains actual recordings of an
orchestra. Because of this, the instrument sounds are
different from the tones that can be selected with this
piano (page EN-5). This also means that Concert
Play playback includes breath sounds and
performance noises.
Performing Demo Play
Concert Play

Using Built-in Songs (Concert Play, Music Library, Demo Tunes)
EN-13
To listen to a Concert Play song (LISTEN)
1.
While holding down the FUNCTION button,
use the CONCERT PLAY SELECT + and –
keyboard keys to scroll song numbers in
sequences (from 1 to 10).
•For information about Concert Play songs, see the
“Concert Play List”on page A-1.
2.
While holding down the FUNCTION button,
press the LISTEN keyboard key.
•This enters the Listen Mode for listening to the piano
and orchestra performance.
•Playback tempo is fixed and cannot be changed
during Listen Mode playback.
3.
While holding down the FUNCTION button,
press the CONCERT PLAY akeyboard
key to start playback.
•Playback will stop automatically when the end of the
song is reached.
4.
To stop playback, hold down the FUNCTION
button as you press the CONCERT PLAY
akeyboard key again.
NOTE
•You can use adjust the volume level of the playback,
if you want. See “Configuring Settings with the
Keyboard” (page EN-19) for more information.
Practicing with a Concert Play
Song

EN-14
Using Built-in Songs (Concert Play, Music Library, Demo Tunes)
To practice the piano part (LESSON)
PREPARATION
•You can change tempo of the playback, if you want.
See “Configuring Settings with the Keyboard” (page
EN-19) for more information.
NOTE
•Some Concert Play tunes incorporate tempo changes
in their arrangements. Because of this, the playback
tempo may at times be faster or slower than the
tempo setting.
1.
While holding down the FUNCTION button,
press the LESSON keyboard key.
•This enters the Lesson Mode, which allows simple
play along with the piano part.
2.
While holding down the FUNCTION button,
press the abutton to select the part you
want to turn off.
•Pressing a button toggles its part on (button lamp on)
and off (button lamp off).
3.
While holding down the FUNCTION button,
press the CONCERT PLAY akeyboard
key.
•This starts playback, without the part you turned off
in step 2.
4.
Play the missing part on the keyboard.
5.
To stop playback, hold down the FUNCTION
button as you press the CONCERT PLAY
akeyboard key again.
To play along with the orchestra
accompaniment (PLAY)
1.
While holding down the FUNCTION button,
press the PLAY keyboard key.
•This will enter the Play Mode, which plays the
orchestra part without the piano part.
2.
While holding down the FUNCTION button,
press the CONCERT PLAY akeyboard
key to start playback.
•Playback tempo is fixed and cannot be changed
during Play Mode playback.
3.
Play the piano part on the keyboard.
4.
To stop playback, hold down the FUNCTION
button as you press the CONCERT PLAY
akeyboard key again.
You can use the Music Library for your listening
enjoyment or to practice piano songs.
•The Music Library includes 60 songs, numbered 1
through 60.
•You can also import up to 10 songs*from a
computer to Digital Piano memory, and assign them
Music Library song numbers 61 through 70.
*You can download music data from the Internet and
then transfer it from your computer to Digital Piano
memory. See “Transferring Song Data with a
Computer” on page EN-27 for more information.
Left hand Right hand
Both parts on Right hand
part off
Left hand
part off
Music Library

Using Built-in Songs (Concert Play, Music Library, Demo Tunes)
EN-15
1.
Find the song number of the song you want to
play in the “Music Library List” on page A-1.
2.
To change to another song, hold down the
FUNCTION button as you use the MUSIC
LIBRARY SELECT (+, –, 0 to 9) keys to
specify a song number.
•Each press of the + or – key raises or lowers the song
number by 1.
•You can also input a value from 0 to 9 to specify a
Music Library song number.
•Input two digits as the song number.
Example: To specify song number 5, press keys 0 and
then 5.
3.
Press the abutton.
•This starts the playback of the song.
4.
To stop playback, press the abutton
again.
•Playback will stop automatically when the end of the
song is reached.
NOTE
•Pressing the + and – keys at the same time in step 2
of the above procedure will select song number 1.
•You also can adjust the playback tempo and volume
of the song. See “Configuring Settings with the
Keyboard” on page EN-19 for more information.
You can turn off the left hand part or right hand part of
a song and play along on the Digital Piano.
NOTE
•The Music Library includes a number of duets.
While a duet is selected, you can turn off the first
piano (Primo) or second piano (Secondo) tone and
play along with the song.
•Some music library tunes incorporate tempo
changes in their arrangements. Because of this, the
playback tempo may at times be faster or slower
than the tempo setting.
PREPARATION
•Select the song you want to practice and adjust the
tempo. See step 3 under “Using the Metronome”
(page EN-9).
1.
While holding down the FUNCTION button,
press the abutton to select the part you
want to turn off.
•Pressing a button toggles its part on (button lamp on)
and off (button lamp off).
2.
Press the abutton.
•This starts playback, without the part you turned off
in step 1.
3.
Play the missing part on the keyboard.
4.
To stop playback, press the abutton
again.
Playing Back a Specific Music
Library Song
Practicing with a Music Library
Song
Left hand Right hand
Both parts on Right hand
part off
Left hand
part off

EN-16
Recording and Playback
You can record notes you play with the Digital Piano’s
MIDI recorder for later playback.
Tracks
A track is a container of recorded data, and a song
consists of two tracks: Track 1 and Track 2. You can
record each track separately and then combine them so
they play back together as a single song.
Memory Capacity
•You can record approximately 5,000 notes in Digital
Piano memory.
•The MIDI REC button lamp will flash at high speed
when memory runs low.
•Recording stops automatically if the number of
notes in memory exceeds the maximum.
Recorded Data
•Keyboard play
•Tone used for keyboard play
•Beat (Track 1 only)
•Tempo setting (Track 1 only)
•Layer setting (Track 1 only)
•Duet (Track 1 only)
•Temperament (Track 1 only)
•Keyboard volume (Track 1 only)
•Chorus (Track 1 only)
•Brilliance (Track 1 only)
•Reverb setting (Track 1 only)
•Damper Noise On/Off (Track 1 only)
Recording Data Storage
•Starting a new recording deletes any data that was
previously recorded in memory.
•Should power fail during recording, all of the data in
the track you are recording will be deleted.
IMPORTANT!
• CASIO COMPUTER CO., LTD. takes no
responsibility for any damages, lost profits, or claims
by third parties arising from the deletion of recorded
data due to malfunction, repair, or for any other
reason.
Each press of the MIDI REC button cycles through the
recording options in the sequence shown below.
Recording to a Specific Song Track
After recording to either of the tracks of a song, you can
record to the other track while listening to playback
what you recorded in the first track.
1.
Press the MIDI REC button once or twice so
the MIDI REC lamp is flashing.
•At this time the Llamp will flash to indicate that the
Digital Piano is standing by for recording to Track 1.
Recording to Built-in MIDI
Recorder
Track 1 Record While playing
back. . .
Track 2 Record
Song
Using the MIDI REC Button
Playback
Standby
Record
Standby Normal
Lit Flashing Off

Recording and Playback
EN-17
2.
While holding down the FUNCTION button,
press the abutton to select the track you
want to record.
•Make sure that the indicator lamp for the record track
is flashing.
Track 1: Llamp
Track 2: Rlamp
Example: Track 1 selected
3.
Select the tone and effects (Track 1 only) you
want to use in your recording.
•Tone (page EN-5)
•Effects (page EN-7)
NOTE
•If you want the metronome to sound while you are
recording, configure the beat and tempo settings,
and then press the METRONOME button. See
“Using the Metronome” on page EN-9 for more
information.
4.
Press the abutton or start playing.
•Recording will start automatically.
5.
To stop recording, press the abutton.
•This will cause the MIDI REC button lamp and the
lamp of the track you recorded to change from
flashing to lit.
•To play back the track you just recorded, press the
abutton.
6.
After you are finished recording or playing
back, press the MIDI REC button so its lamp
goes out.
Recording to One Track while Listening
to Playback of the Other Track
1.
Press the MIDI REC button so its lamp is lit.
2.
While holding down the FUNCTION button,
press the abutton to select the track you
want to play back while recording.
3.
Press the MIDI REC button so its lamp is
flashing.
•This will cause the Llamp to flash.
4.
While holding down the FUNCTION button,
press the abutton to select the track you
want to record.
•Make sure that the indicator lamp for the record track
is flashing.
Example: To listen to playback of Track 1 as you record
to Track 2
5.
Select the tone and effects (Track 1 only) you
want to use for your recording.
6.
Press the abutton or start playing.
•This will start both playback of the recorded track
and recording to the other track.
•If, while recording is in progress, you want to
rerecord from the beginning, hold down the MIDI
REC button until the Digital Piano beeps. This
discards the current recording data and enters
recording standby.
7.
To stop recording, press the abutton.
Lit (Play) Flashing (Record Standby)

EN-18
Recording and Playback
Playing Back from Digital Piano Memory
1.
Press the MIDI REC button so its lamp is lit.
NOTE
•When a song has something recorded in both tracks,
you can turn off one track and play back just the
other track, if you want.
2.
Press the abutton.
•This starts playback of the song and/or track you
selected.
NOTE
•You can change the tempo setting as a track is
playing.
•Press the abutton again to stop playback.
Deleting Recorded Data
The following procedure deletes a specific track of a
song.
IMPORTANT!
• The procedure below deletes all of the data of the
selected track. Note that the delete operation cannot
be undone. Check to make sure you really do not
need the data in Digital Piano memory before you
perform the following steps.
1.
Press the MIDI REC button once or twice so
the MIDI REC lamp is flashing.
2.
While holding down the FUNCTION button,
press the abutton to select the track you
want to delete.
3.
Press the MIDI REC button until its lamp is lit.
•This will cause the lamp of the track you selected in
step 2 of this procedure to flash.
Example: If you selected Track 2 for deletion
4.
Once again, hold down the FUNCTION
button as you press the abutton.
•This deletes the selected track and enters record
standby.
•To cancel the delete operation at any time, press the
MIDI REC button so its lamp becomes unlit.
NOTE
•Only the Digital Piano’s abutton are operational
from step 3 until you actually perform the delete
operation in step 4. No other button operation can be
performed.
Off Flashing: Delete standby

EN-19
Configuring Settings with the Keyboard
In addition to selecting tones and songs (Concert Play
or Music Library), you also can use the FUNCTION
button in combination with the keyboard keys to
configure effect, keyboard touch, and other settings.
1.
Use the “Parameter List” on pages EN-21 -
EN-24 to find the setting you want to
configure, and note its details.
2.
Use “Keyboard Keys Used for Configuring
Settings” on page EN-20 to find the location
on the keyboard for configuring the setting
you want.
3.
While holding down the FUNCTION button,
press the keyboard key for the setting you
want to configure.
•The Digital Piano will sound an operation tone after it
configures the setting.
Example: To lower the Concert Play volume, press the
CONCERT PLAY VOLUME minus (–) key.
4.
Release the FUNCTION button to complete
the setting procedure.
NOTE
•You can configure the Digital Piano so no operation
tone sounds in step 3. For details, see “ Operation
tone” under “Parameter List” on pages EN-21 -
EN-24.
Keyboard Setting Operation Types
There are four types of operations that you can perform
while configuring settings with the keyboard keys:
Type A, Type B, Type C, and Type D.
•Holding down a key raises or lowers the setting at
high speed.
•To return to the initial default setting, press both
keys at the same time.
•To input a two-digit value, press 0 and then 2. To
input a three-digit value, press 0, 2, and then 0.
•When you press a key, the Digital Piano will beep to
let you know which setting is selected.
•A long beep indicates that the applicable setting is
turned off.
Example: While chorus is turned off, pressing the Chorus
keyboard key twice will cause the Digital Piano
to beep twice, which indicates that the Medium
Chorus setting is selected.
NOTE
•You can find out what operation type applies to each
setting by checking the “Operation Type” in the
“Parameter List” on pages EN-21 - EN-24.
To configure settings with the
keyboard
CONCERT PLAY
VOLUME – key
Type A : Direct input
Type B: Raising or lowering a setting using the + and
– keyboard keys
Type C: Inputting a value using the number
(0 through 9) keyboard keys.
Type D: Toggling or cycling through settings by
pressing a keyboard key
Table of contents
Other Casio Musical Instrument manuals

Casio
Casio WK-1200 User manual

Casio
Casio Celviano AP-60R User manual

Casio
Casio CDP-S90 User manual

Casio
Casio CDP-S350 User manual

Casio
Casio AP-10 User manual

Casio
Casio Casiotone CT-S195 User manual

Casio
Casio Celviano AP-38 User manual

Casio
Casio Aculaser M2 User manual

Casio
Casio LK-130 User manual

Casio
Casio Casiotone MT-140 User manual

Casio
Casio Casiotone MT-520 User manual

Casio
Casio Celviano AP-22S User manual

Casio
Casio Privia PX-5S Manual

Casio
Casio Privia PX-760 User manual

Casio
Casio Tone Bank CA-110 User manual

Casio
Casio Celviano AL-100R User manual

Casio
Casio PX830ES1B User manual

Casio
Casio AP-710 User manual

Casio
Casio AP-710 User manual

Casio
Casio DG-20 Operator's manual