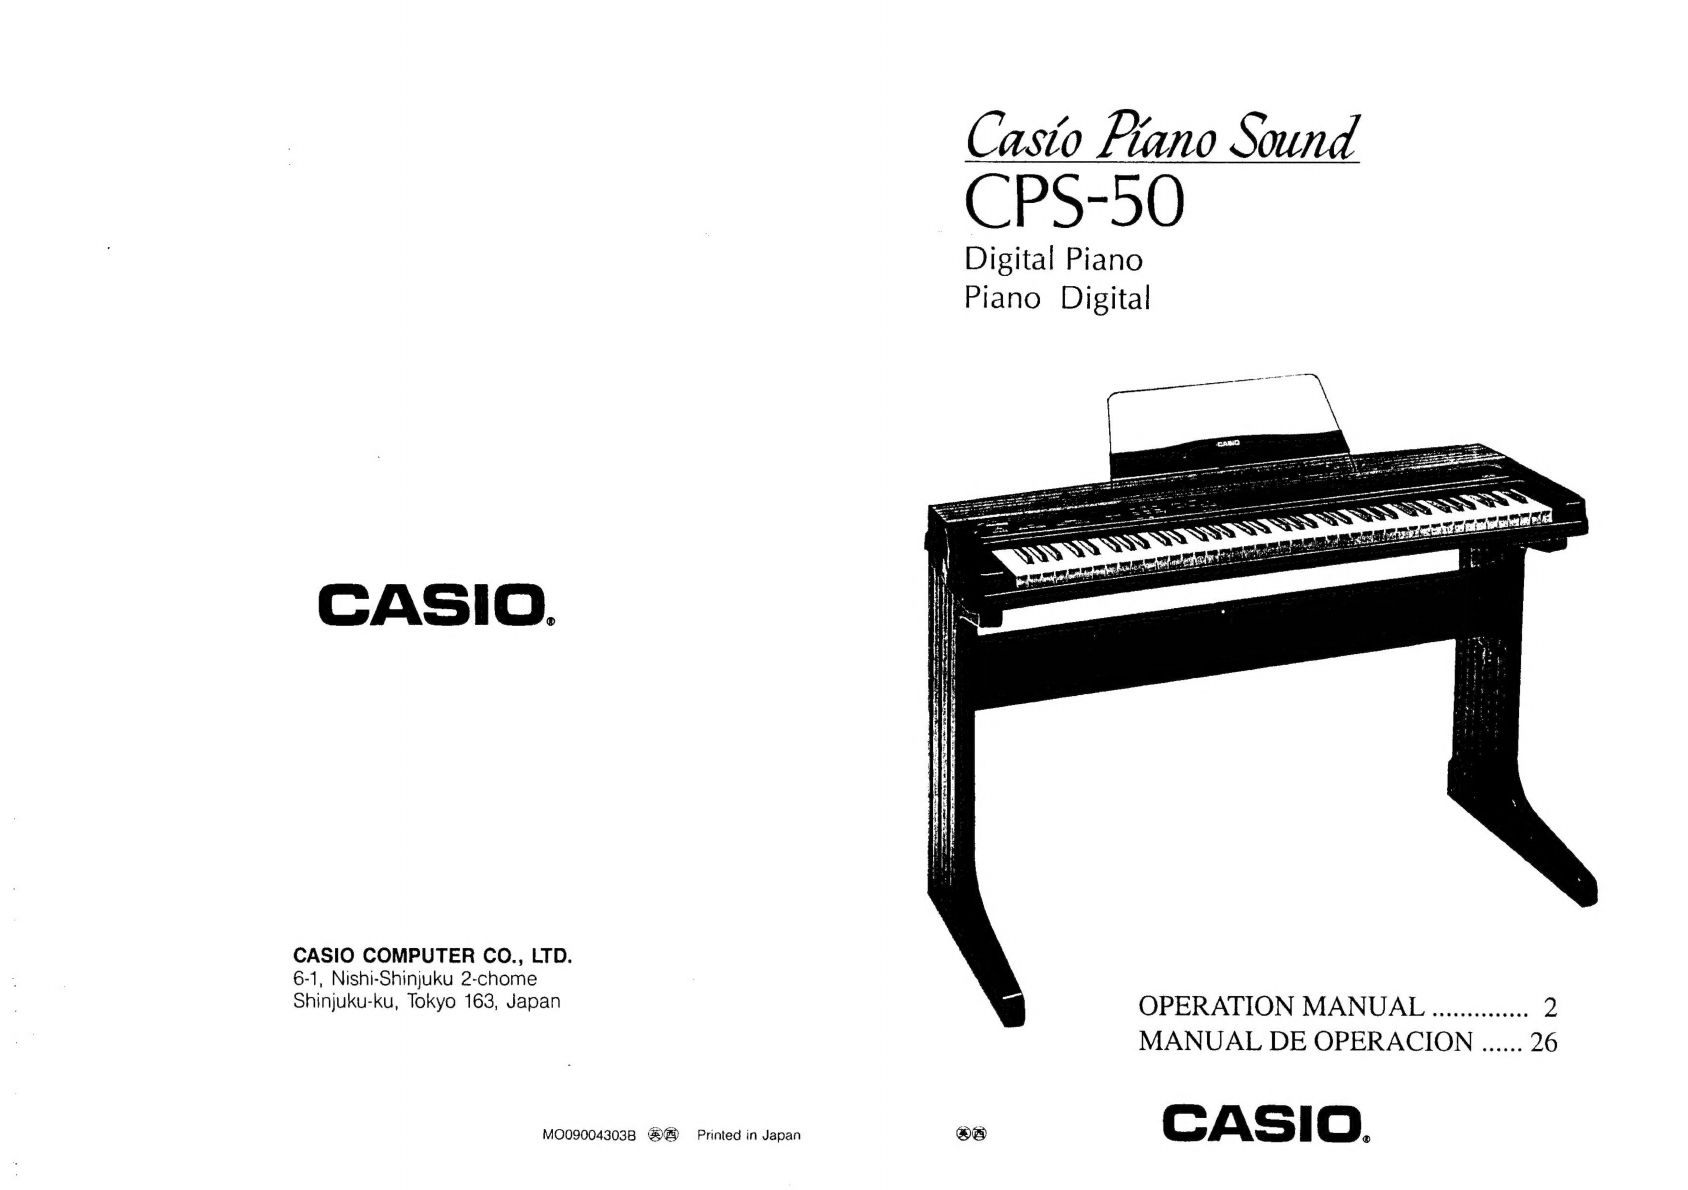
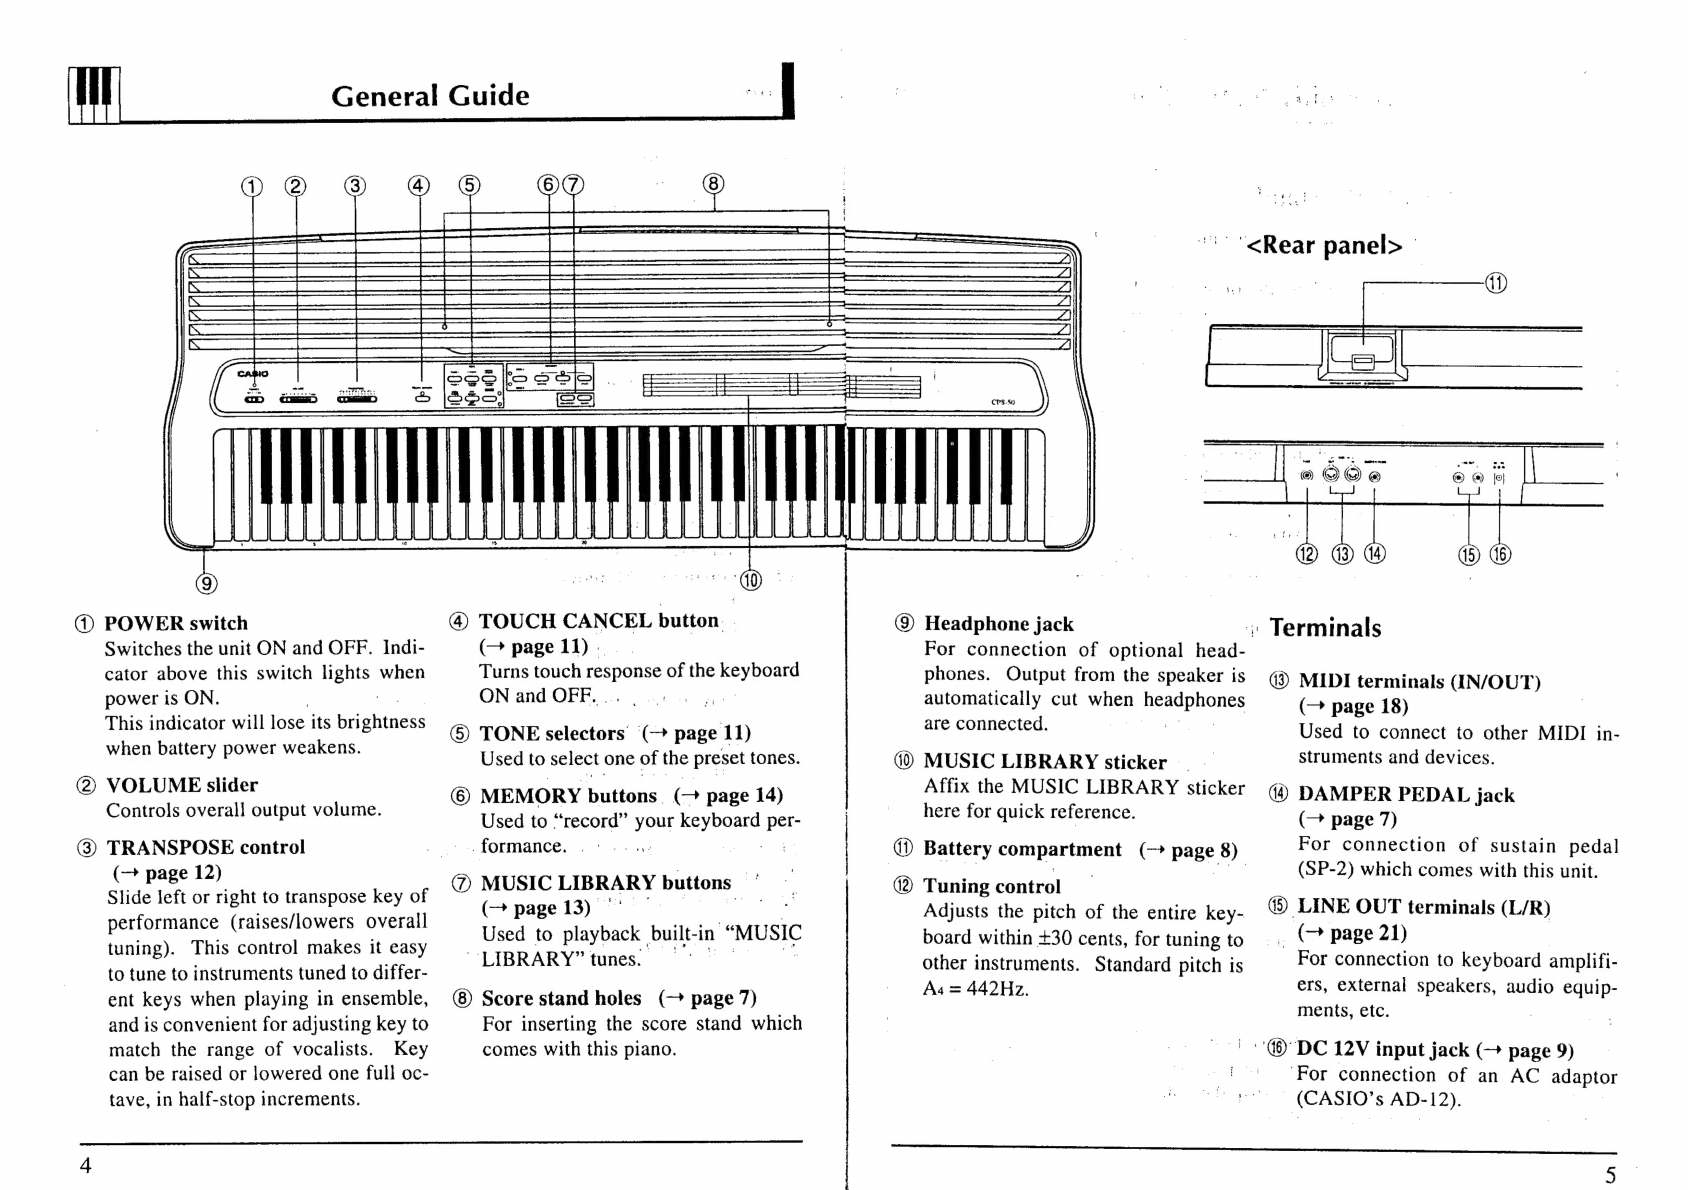
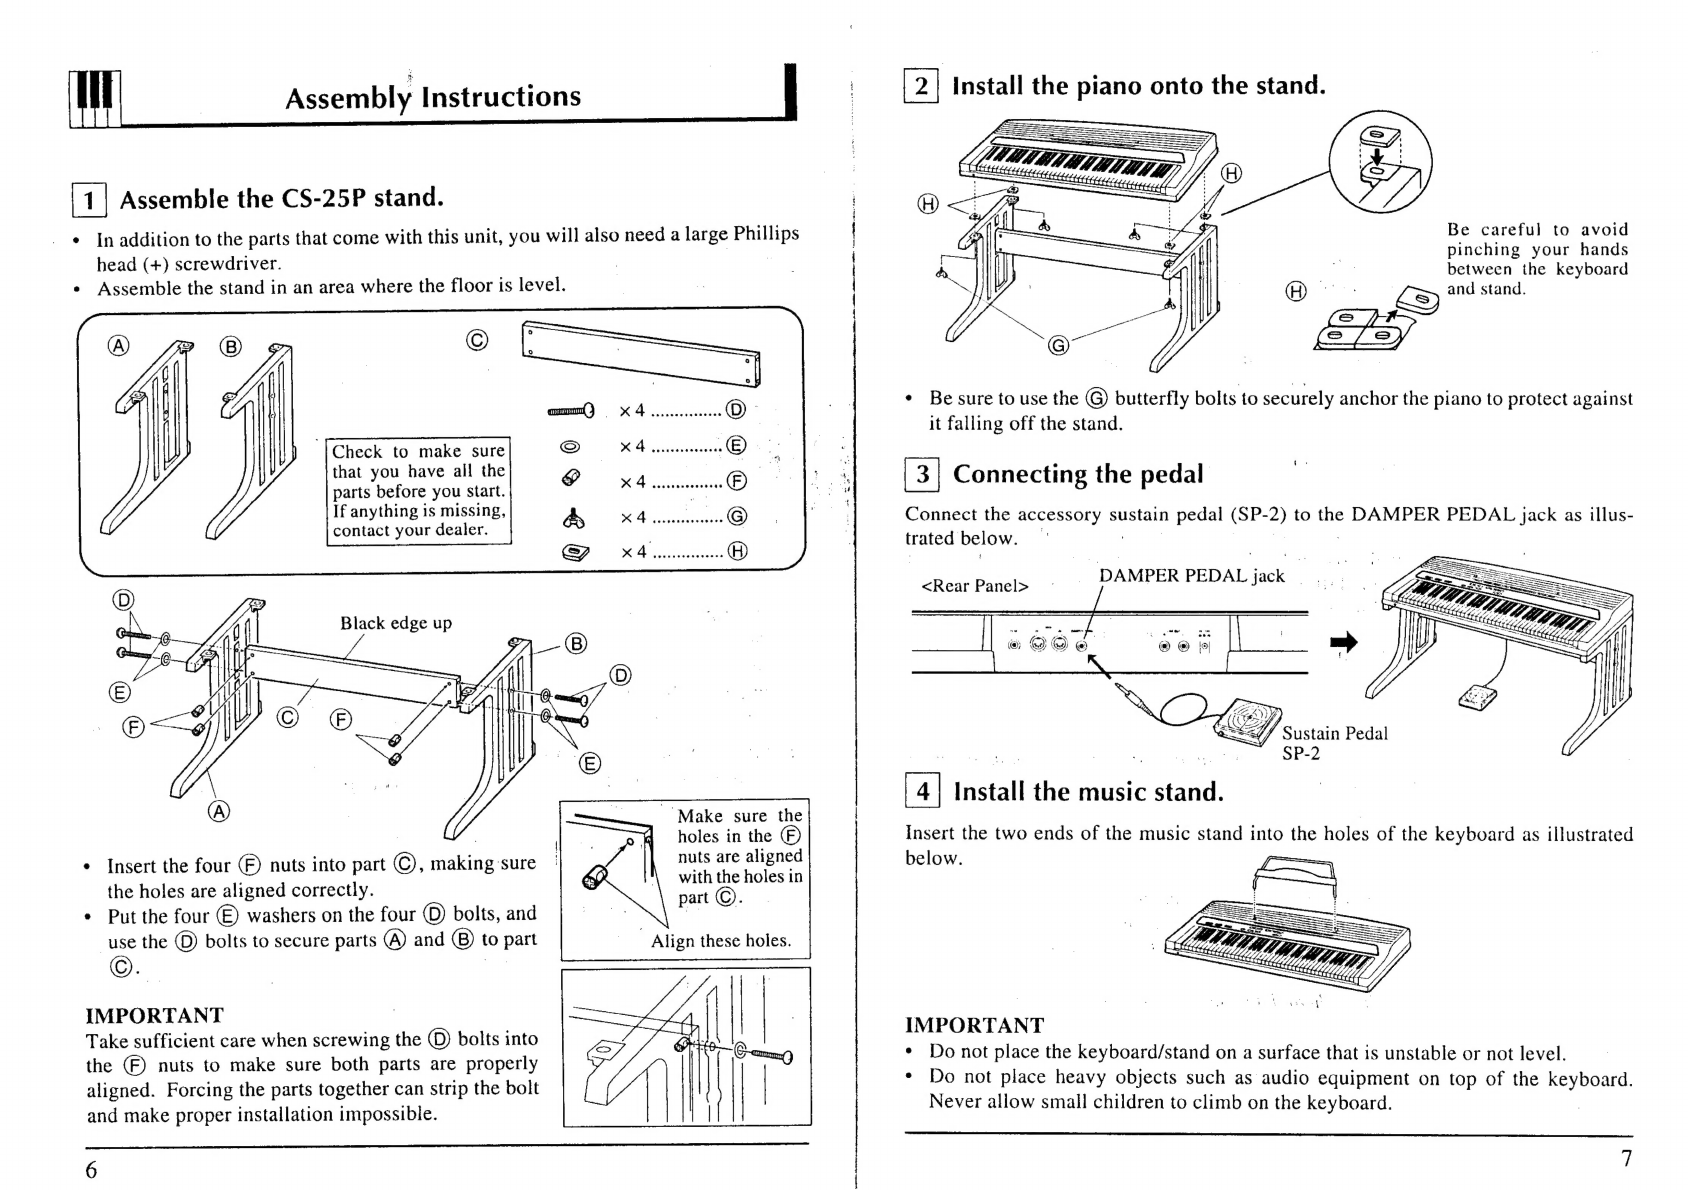
Casio Piano Sound CPS-50 User manual

Casto
Fiano
Sound
CPS-50
Digital
Piano
Piano
Digital
CASIO
COMPUTER
CoO.,
LTD.
6-1,
Nishi-Shinjuku
2-chome
ohinjuku-ku,
Tokyo
163,
Japan
MANUAL
DE
OPERACION
......
26
MOQ090043038
@@
Printed
in
Japan
Qe
CASI
©.

Casio
Piano
Sound
CPS-50
Digital
Piano
Thank
you
and
congratulations
on
your
purchase
of
the
CASIO
CPS-50.
In
order
to
enjoy
the
features
and
functions
of
the
CPS-50
to
their
fullest,
be
sure
to
carefully
read
this
manual
and
follow
the
instructions
contained
herein.
Features
10
Preset
Tones
—
The
CPS-50
lets
you
choose
from
10
different
built-in
tones
provided
by
an
advanced
PCM
sound
source.
76-Key
Keyboard
with
Touch
Response
—
From
the
lightest
pianissimo
to
the
most
thunderous
fortissimo,
the
CPS-50’s
“Touch
Response”
keyboard
responds
to
even
the
most
subtle
changes
in
keyboard
dynamics.
And
a
full
76-key
keyboard
gives
you
expanded
freedom
of
musical
expression.
20
“Music
Library”
Built-in
Tunes
—-
Choose
from
a
total
of
20
different
auto-
play
demonstration
tunes
that
showcase
the
performance
of
the
CPS-50.
Choose
from
favorites
by
Beethoven,
Bach,
Chopin
and
other
popular
classical
masters.
Memory
Function
—
The
memory
function
lets
you
“record”
notes
as
you
play
them
on
the
keyboard.
You
can
record
up
to
2
different
pieces.
MIDI
Compatibility
—
The
CPS-50
features
MIDI
—
the
Musical
Instrument
Digital
Interface.
This
industry-standard
interface
lets
you
connect
your
keyboard
with
other
MIDI
instruments,
sound
sources
and
devices
for
synchronized
perfor-
mance.
NOTICE
This
equipment
has
been
tested
and
found
to
comply
with
the
limits
for
a
Class
B
digital
device,
pursuant
to
Part
15
of
the
FCC
Rules.
These
limits
are
designed
to
provide
reasonable
protection
against
harmful
interference
in
a
residential
installation.
This
equipment
generates,
uses
and
can
radiate
radio
frequency
energy
and,
if
not
installed
and
used
in
accordance
with
the
instructions,
may
cause
harmful
interference
to
radio
communications.
However,
there
is
no
guarantee
that
interference
will
not
occur
in
a
particular
installation.
If
this
equipment
does
cause
harmful
interference
to
radio
or
television
reception,
which
can
be
determined
by
turning
the
equipment
off
and
on,
the
user
is
encouraged
to
try
to
correct
the
interference
by
one
or
more
of
the
following
measures:
e
Reorient
or
relocate
the
receiving
antenna.
e
increase
the
separation
between
the
equipment
and
receiver.
e
Connect
the
equipment
into
an
outlet
on
a
circuit
different
from
that
to
which
the
receiver
is
connected.
e
Consult
the
dealer
or
an
experienced
radio/TV
technician
for
help.
FCC
WARNING
Changes
or
modifications
not
expressly
approved
by
the
party
responsible
for
compliance
could
void
the
user's
authority
to
operate
the
equipment.
:
e
—
=_—
iteintemammnen
-emines-
alee
5
ates
agg:
Se
epsenteennchearchchema
teatime
tania
etter
amibidiate
tetelitenitinad
ahinne
tenemmieneceemienen
amined
iandhtnes
neaneanaenaanaaeenee
i
fas
Oran
dick
nara
ME
5D
7
:
Contents
ON
11
13
14
18
21
22
23
23
25
General
Guide
Terminals
Assembly
Instructions
Power
Supply
Installing
batteries
Using
AC
power
Memory
backup
power
Auto
power
off
function
Tones
|
Selecting
a
tone
About
touch
response
(To
cancel
touch
response)
©
About
“W.BASS/PIANO”
tone
Key
transpose
Music
Library
(20
built-in
aed,
To
playback
all
of
the
pieces
To
playback
a
specific
piece
Performance
Memory
Recording
Playing
back
recorded
music
To
delete
recorded
music
Recording
two
different
parts
of
the
same
tune
in
SONG
A
and
B
Playing
back
two
different
parts
in
SONG
A
and
B
at
the
same
time
About
memory
backup
power
MIDI
:
MIDI
terminal
functions
Communicable
functions
Setting
the
MIDI
channel
Connecting
to
an
External
Amplifier
Troubleshooting
Care
of
Your
Piano
Specifications
List
of
MUSIC
LIBRARY
Tunes

General
Guide
ie
‘
'<Rear
panel>
-
@)
POWER
switch
@
TOUCH
CANCEL
button.
©
Headphone
jack
;
| | ,
|
:
J
:
Terminals
Switches
the
unit
ON
and
OFF.
Indi-
(>
pagell).
For
connection
of
optional
head-
cator
above
this
switch
lights
when
te
nn
ea
of
the
Beynon
phones.
Output
from
the
speaker
is
@)
MIDI
terminals
(IN/OUT)
power
is
ON.
|
be
an
te
Seas.
a
automatically
cut
when
headphones
(—
page
18)
This
indicat
ill
lose
its
brightness
ee
a,
ae
een
ever
acakens.
©
TONE
selectors
(>
page
11)
meenene
-
Used
to
connect
to
other
MIDI
in-
Used
to
select
one
of
the
preset
tones.
MUSIC
LIBRARY
sticker
struments
and
devices.
@)
cones
arr
ne
eae
©
MEMORY
buttons
(—
page
14)
Affix
the
MUSIC
LIBRARY
sticker
@j
DAMPER
PEDAL
jack
Pp
Used
to
“record”
your
keyboard
per-
:
here
for
quick
reference.
(—
page
7)
(3)
TRANSPOSE
control
_.
formance.
.
»
ge
oe
ae
@
Battery
compartment
(>
page
8)
For
connection
of
sustain
pedal
ay
page
12)
@)
MUSIC
LIBRARY
buttons
:
®
Tunin
ate
|
|
(SP-2)
which
comes
with
this
unit.
Slide
left
or
right
to
transpose
key
of
Sle
eee
ne
ning
f
ee
i]
(—
page
13)
|
Adjusts
the
pitch
of
the
entire
key-
4
LINE
OUT
terminals
(L/R)
performance
(raises/lowers
overa
cS
hie
aes
y
oe
|
. ;
;
Used
to
playback
built-in
“MUSIC
board
within
+30
cents,
for
tuning
to
.
(~
page
21)
tuning).
This
control
makes
it
easy
LIBRARY”
Seperate
akg.
ee
;
g
to
3
;
to
tune
to
instruments
tuned
to
differ-
tunes.
other
instruments.
Standard
pitch
is
For
connection
to
keyboard
amplifi-
ent
keys
when
playing
in
ensemble,
Score
stand
holes
(—
page
7)
Aa
=
442Hz,
ers,
external
speakers,
audio
equip-
and
is
convenient
for
adjusting
key
to
For
inserting
the
score
stand
which
7
|
ments,
etc.
.
match
the
range
of
vocalists.
Key
comes
with
this
piano.
|
|
"@8)
DC
12V
input
jack
(—
page
9)
can
be
raised
or
lowered
one
full
oc-
-
}
“For
connection
of
an
AC
adapto
tave,
in
half-stop
increments.
~
(CASIO’s
AD-12).
|
ag
5

Assembly
Instructions
1
|
Assemble
the
CS-25P
stand.
¢
In
addition
to
the
parts
that
come
with
this
unit,
you
will
also
need
a
large
Phillips
head
(+)
screwdriver.
:
¢
Assemble
the
stand
in
an
area
where
the
floor
is
level.
Check
to
make
sure}
«§-
DIF
eeeeeereseenees
that
you
have
all
the
parts
before
you
start.
If
anything
is
missing,
contact
your
dealer.
eaeceteoneansesas
aeeeeasaseseeee
“Make
sure
the
holes
in
the
nuts
are
aligned
with
the
holes
in
part
©).
¢
Insert
the
four
)
nuts
into
part
©,
making
‘sure
the
holes
are
aligned
correctly.
©
Put
the
four
)
washers
on
the
four
(©)
bolts,
and
use
the
(D)
bolts
to
secure
parts
(A)
and
to
part
©.
|
|
IMPORTANT
Take
sufficient
care
when
screwing
the
(D)
bolts
into
the
(F)
nuts
to
make
sure
both
parts
are
properly
aligned.
Forcing
the
parts
together
can
strip
the
bolt
and
make
proper
installation
impossible.
6
Install
the
piano
onto
the
stand.
Be
careful
to
avoid
pinching
your
hands
between
the
keyboard
and
stand.
(
¢
Be
sure
to
use
the
@
butterfly
bolts
to
securely
anchor
the
piano
to
protect
against
it
falling
off
the
stand.
Connecting
the
pedal
-
Connect
the
accessory
sustain
pedal
(SP-2)
to
the
DAMPER
PEDAL
jack
as
illus-
trated
below.
—
|
|
-
ee
yee
DAMPER
PEDAL
jack
..__.
|
SZ
/
Sustain
Pedal
SP-2
4
Install
the
music
stand.
Insert
the
two
ends
of
the
music
stand
into
the
holes
of
the
keyboard
as
illustrated
below.
IMPORTANT
¢
Do
not
place
the
keyboard/stand
on
a
surface
that
is
unstable
or
not
level.
*
Do
not
place
heavy
objects
such
as
audio
equipment
on
top
of
the
keyboard.
Never
allow
small
children
to
climb
on
the
keyboard.

Power
Supply
You
can
power
your
keyboard
with
6
D
batteries
or
standard
AC
power.
Installing
the
batteries
This
keyboard
can
be
powered
by
6
D
size
(SUM-1/R20P)
manganese
dry
cell
batteries.
Make
sure
that
the
POWER
switch
is
set
to
the
OFF
position
when
installing
batteries.
:
1.
Open
the
battery
compartment
cover
on
the
back
of
the
unit.
2.
Load
new
batteries
taking
care
that
the
plus
(+)
and
minus
(—)
poles
are
facing
in
the
correct
directions.
|
¢
Standard
battery
life
is
approximately
4
hours.
.
Notes
|
ie
¢
Weakened
batteries
will
uit
in
lower
volume
or
poor
‘onal
quality.
The
power
indicator
lamp
will
gradually
lose
its
brightness
when
battery
power
weakens.
At
this
time,
change
batteries
or
shift
to
one
of
the
alternate
power
sources.
¢
If
battery
power
drops
below
a
certain
level,
the
quality
of
the
tone
produced
deteriorates,
a
totally
different
tone
may
sound,
or
the
demo
tune
or
auto
rhythm
may
become
abnormal.
Should
any
of
these
symptoms
occur,
replace
batteries
as
_
soon
as
possible.
|
|
re
PRECAUTIONS
Incorrectly
using
batteries
can
cause
them
to
leak
or
de
and
may
damage
your
unit.
Note
the
following
precautions:
:
¢
Be
sure
that
the
plus
(+)
and
minus
(-)
poles
are
facing
in
the
correct
directions.
¢
Do
not
mix
battery
types.
|
OO
¢
Do
not
mix
new
batteries
with
old
ones.
¢
Never
leave
dead
batteries
in
the
battery
compartment.
*
Remove
batteries
when
not
using
the
unit
for
extended
periods.
¢
Never
try
to
recharge
the
batteries
that
are
specified
for
the
power
supply
of
this
unit.
|
¢
Do
not
expose
batteries
to
direct
heat,
let
them
become
shorted
or
se
to
take
them
apart.
a,
(If
a
battery
leaks,
clean
out
the
battery
compartment
of
the
unit
pedal
'
taking
care
to
avoid
letting
the
peer)
fluid
come
into
direct
contact
with
your
skin.)
:
-
ae
seortarama/terrrattsrnssmsemps
ums
gia
errr
cabernet
Pe
PR
PET
A
nt
tart
EA
ae
ASP
ARSE
ror
=
—T—assercrarnrnaiaraci:
=
er<Aeerlimnhuer
i
«1+
=
tare
wares
te
TSAR
©
Using
AC
power
An
AC
adaptor
(AD-12)
is
required
when.
using
household
current.
Use
only
a
genuine
CASIO
adaptor
with
the
same
voltage
rating
(100,
120,
220
or
240V)
as
the
power
supply
in
your
area
to
prevent
damage
to
internal
components.
Be
sure
to
turn
the
power
of
the
unit
off
before
you
connect
the
adaptor
to
the
unit.
Plug
the
AC
adaptor
into
the
AC
outlet
and
the
cord
into
the
unit.
‘This
will
automatically
cut
off
the
pale
power
SUPPIY:
DC
12V
wid
jack
AC
adaptor
AD-12
ZA
AC
outlet
IMPORTANT
¢
The
adaptor
may
become
warm
when
it
is
being
used.
This
is
normal
and
does
not
indicate
any
problem.
¢
Be
sure
to
unplug
the
adaptor
from
the
power
source
when
you
are
not
using
the
unit.
*
Whenever
connecting
or
disconnecting
the
adaptor,
be
sure
that
the
power
of
the
unit
1s
switched
off.
¢
Never
use
a
power
supply
that
does
not
match
that
specified
for
the
unit.
Doing
so
can
damage
the
adaptor
or
your
unit.
Memory
Backup
Power
The
Performance
Memory
(page
14)
is
electronic
memory,
which
means
that
it
retains
its
contents
even
when
you
switch
power
off,
as
long
as
power
is
supplied
through
the
AC
adaptor
or
by
batteries.
This
means
that
Performance
Memory
contents
will
be
lost
when
there
are
no
batteries
loaded
(or
when
the
batteries
go
dead)
and
the
AC
adaptor
is
not
plugged
in
(or
power
through
the
AC
adaptor
is
interrupted
for
any
reason).
Note
the
following
advice
to
keep
your
Performance
Memory
data
safe.
¢
Make
sure
that
the
batteries
loaded
in
the
keyboard
never
go
dead.
¢
When
replacing
batteries,
be
sure
to
connect
the
AC
adaptor
to
supply
power
first.
9

Auto
power
off
function
Power
is
automatically
cut
off
approximately
6
minutes
after
the
last
operation
of
the
unit.
Power
supply
can
be
restored
by
switching
power
OFF
and
then
ON
again.
The
Auto
power
off
function
is
inoperative
when
playing
back
the
demonstration
tunes
(power
is
not
Ee
off,
even
though
you
don’t
touch
the
keyboard).
To
caneel
the
Auto
power
off
Faction
| |
To
cancel
the
Auto
Power
Off
function,
turn
the
power
switch
ON
while
holding
down
the
E.PIANO
tone
selector.
The
unit
will
remain
ON
until
you
turn
OFF
manually.
Wu
Tones
:
|
Selecting
a
tone
You
can
choose
from
10
different
tones.
To
select
a
tone,
follow
the
steps
below.
TONE
'
PIANO
1
E.PIANO
|
papas
|)
came
7
camp
|
enme
W.BASS/
STRINGS
PIANO
2
PIANO
PIANO
rer
>|
ef
a
eee
rh
a
“|
=)
cou
iui
VIBRA-
PHONE
PIPE
ORGAN
JAZZ
STRINGS
Banal
TONE
selectors
SELECT
button
I.
Set
the
POWER
switch
to
ON.
PIANO
I
tone
is
automatically
selected
when
you
turn
on
this
piano.
2.
Specify
either
the
upper
or
lower
row
of
preset
tones
by
pressing
the
SELECT
button.
The
upper
or
lower
indicator
lights
to
show
the
active
row.
3.
Press
one
of
the
TONE
selectors
to
choose
a
preset
tone.
About
touch
response
This
piano
features
“Touch
response”
function
which
controls
the
volume
of
the
tones
produced
according
to
the
keyboard
pressure.
Using
TOUCH
CANCEL
button
You
can
switch
touch
response
function
on
and
off
using
TOUCH
CANCEL
button.
When
TOUCH
CANCEL
button
is
switched
on
(the
indicator
above
this
button
lights),
tones
are
produced
at
a
fixed
volume
regardless
of
the
keyboard
_
pressure.
TOUCH
CANCEL
O
C™
Note
¢
TOUCH
CANCEL
button
is
OFF
when
the
power
of
the
piano
is
switched
ON.
11

About
“W.BASS/PIANO”
tone
The
“W.BASS/PIANO”
tone
splits
the
keyboard
and
assign
two
sounds
—-
Wood
bass
sound
on
the
left
and
PIANO
sound
on
the
right
of
the
i
ices
AAT
~<——
woop
BASS-———>}-<—__——
PIANO.
Key
transpose
The
key
of
the
entire
keyboard
can
be
transposed
in
half-tone
steps
between
F*
and
F
by
simply
sliding
the
TRANSPOSE
control
right
and
left.
The
central
position
sets
the
keyboard
to
the
key
of
C.
Note
When
you
choose
the
W.BASS/PIANO
tone,
the
keyboard
split
point
of
the
two
sounds
moves
according
to
the
key
transpose
setting.
12
WW
Music
Library
(20
built-in
tunes)
|
I
This
piano
features
a
20-tune
Music
Library,
offering
a
wide
range
of
classical
pieces,
from
etudes
to
sonatas.
You
can
specify
individual
pieces
from
the
Music
Library
for
playback,
or
you
can
play
back
all
20
pieces
straight
through.
MUSIC
LIBRARY
COC)
“DEMO/RESET
SELECT
To
playback
all
of
the
pieces
°
1.
Slide
the
POWER
switch
to
the
ON
position.
2.
Press
the
DEMO/RESET
button.
—
¢
Playback
starts
from
the
first
piece
of
the
Music
Library,
and
continues
with
the
other
pieces
in
sequence.
After
the
20th
piece
ends,
playback
starts
again
from
the
first
piece.
3.
To
stop
playback,
press
the
DEMO/RESET
button
again.
To
playback
a
specific
piece
|
anal
.
Slide
the
power
switch
to
the
ON
position.
_
2.
Press
the
SELECT
button.
|
3.
Press
the
keyboard
key
whose
number
in
the
illustration
below
corresponds
to
the
number
of
the
piece
you
want:
to
play’
back
a
to
the
“List
of
MUSIC
LIBRARY
Tunes”
on
page
49).
¢
Playback
starts
from
the
beginning
of
the
ies
you
select.
When
the
end
of
the
piece
is
reached,
playback
starts
again
from
the
beginning
of
the
selected
piece:
4.
To
stop
playback,
press
the
DEMO/RESET
button.
NA
13

Notes
|
:
|
a
e
All
the
Music
(ioraey
tunes
use
PIANO
|
tone,
aud
you
cannot
change
the
playback
tone.
¢
You
can
control
the
tone
of
the
keyboard
when
you
play
along
with
a
Music
Library
tune.
¢
Key
transpose
setting
(page
12)
does
not
affect
the
playback
of
Music
Library
tunes.
¢
TOUCH
CANCEL
button
is
inoperable
while
playing
back
a
Music
Library
tune.
ay
Mis
t
Performance
Memory
The
memory
function
of
this
piano
allows
real-time
recording
of
notes
as
they
are
played
on
the
keyboard.
You
can
record
2
songs
separately,
up
to
1,200
notes
in
all.
Please
note
that
2
songs
are
recorded
separately
into
two
independent
“song”
area
—
SONG
A
and
SONG
B.
MEMORY
RECORD
button
STOP
button.
START
button
Song
Select
button
Recording
1.
Specify
recording
“song”
area
(SONG
A
or
SONG
B)
you
want
to
aco”
to
Bey
pressing
the
Song
select
button.
When
you
turn
the
power
ON,
SONG
A
1s
automatically
selected.
2.
Select
a
preset
tone
you
want
to
use
for
recording.
©
3.
Press
the
RECORD
button
and
the
MEMORY
indicator
flashes
to
indicate
that
the
piano
is
in
fecore
standby.
IMPORTANT
,
| |
The
next
step
erases
the
tune
in
the
song
area
ne
or
1:
B)
you
selected
in
step
1
above.
Make
sure
that
you
no
longer
need
the
tune
in
the
selected
song
area
before
continuing.
If
you
need,
you
can
abort
the
recording
staneDy
by
pressing
the
RECORD
button
again,
without
erasing
the
tune.
14
4.
Start
playing
the
piano
and
recording
starts
automatically.
MEMORY
indicator
remains
flashing
while
recording.
Recording
also
starts
by
pressing
the
START
button.
5.
To
stop
recording,
press
the
STOP
button.
Note
that
the
Notes
3
*
You
can
record
changes
in
the
efolibwink:
ppeciioas
as
well
as
etevtuad
play
during
recording.
Changing
preset
tones
Damper
pedal
effects
¢
Performance
data
received
from
MIDI
IN
terminal
can
also
be
recorded
(refer
to
“MIDI”
on
page
18).
«°
Memory
capacity
is
approximately’
1
200
notes
in
all.
_
memory
capacity,
recording
automatically
ends.
©
TOUCH
CANCEL
button
ON/OFF
setting
cannot
be
recorded,
though
this
button
is
operable
while
recording.
When
you
avecee
the
Playing
back
recorded
music
I.
Press
the
Song
select
button
to
select
the
song
you
want
to
play
back.
2.
Press
the
START
button.
The
MEMORY
indicator
lights
and
prayouck
Starts.
3.
To
stop
een
press
the
STOP
button.
Notes
“You
can
control
the
tone
of
the
keyboard
when
you
play
along
with
the
playback
of
recorded
music.
*
You
can
change
the
tone
of
the
playback
by
pressing
a
TONE
selector
while
playing.
back
recorded
music.
To
delete
recorded
music|
1,
Press
the
Song
select
button
to
Selech
the
song
you
want
to
delete.
2.
Press
the
RECORD
button.
The
MEMORY
indicator
flashes.
IMPORTAN
T
The
next
step
erases
the
tune
in
the
song
area
(A
or
B)
you
selected
in
step
|
above.
Make
sure
that
you
no
longer
need
the
tune
in
the
selected
song
area
before
continuing.
:
3.
Press
the
START
button
and
then
STOP
button.
[5

Recording
two
different
parts
of
the
same
tune
in
SONG
A.
and
B
—
"2
_
|
|
Instead
of
recording
two
tunes
in
SONG
A
and
B
separately,
you
can
record
two
different
“parts”
of
the
same
tune
in
these
song
areas.
For
example,
you
can
record
the
left
hand
part
of
a
tune
in
SONG
A
area,
and
the
right
hand
part
in
SONG
B
area.
To
do
this,
follow
the
steps
below.
—
START
button
RECORD
button
STOP
button
|
Song
Select
button
¢
Recording
the
left
hand
part
of
a
tune
in
SONG
A
area’
|
1.
Switch
the
CPS-50
power
OFF.
|
oo
2.
While
holding
down
the
HARPSICHORD
tone
selector,
set
the
POWER
switch
to
back
ON.
a
3.
Press
the
RECORD
button
and
the
MEMORY
indicator
flashes
to
indicate
that
the
piano
is
in
record
standby.
.
ee
IMPORTANT
1
OS
=
-
The
next
step
erases
the
tune
in
the
SONG
A
area.
Make
sure
that
you
no
longer
need
the
tune
in
the
SONG
A
area
before
continuing.
Ifyou
need,
you
can
abort
the
recording
standby
by
pressing
the
RECORD
button
again,
without
erasing
the
tune.
4.
Start
playing
the
left
hand
part
of
a
tune
and
recording
starts
automatically.
|
5.
To
stop
recording,
press
the
STOP
button.
a
ee
¢
Recording
the
right
hand
part
of
a
tune
in
SONG
B
area
|
6.
Press
the
Song
select
button
twice
so
that
both
of
the
SONG
indicators
light.
In
this
status,
you
can
record
to
SONG
B
area
while
listening
to
the
playback
of
SONG
A
area.
| |
7.
Press
the
RECORD
button
and
the
MEMORY
indicator
flashes
to
indicate
that
the
piano
is
in
record
standby.
tS
16
Scania
neh
oa
meee
msaioe
nsimrimiredem's
i
pbainacincsmiarenah
Saimin?
tai
parmograhN-
me
bie
mes
IMPORTANT
7
The
next
step
erases
the
tune
in
the
SONG
B
area.
Make
sure
that
you
no
longer
need
the
tune
in
the
SONG
B
area
before
continuing.
If
you
need,
you
can
abort
the
recording
standby
by
pressing
the
RECORD
button
again,
without
erasing
the
tune.
|
:
|
8.
Start
playing
the
right
hand
part
of
a
tune
and
recording
starts
automatically.
9.
To
stop
recording,
press
the
STOP
button.
,
¢
Playing
back
both
parts
together
10.Check
your
performance.
If
you
want
to
listen
to
the
recorded
music
(SONG
A
and
SONG
B
together),
press
the
START
button.
The
both
parts
start
to
play
together.
|
Note
*
You
cannot
record
to
SONG
A
area
while
listening
to
the
playback
of
SONG
B
area.
Playing
back
two
different
parts
in
SONG
A
and
B
at
the
same
time
_
After
you
recorded
two
different
parts
of
a
tune
in
SONG
A
and
SONG
B,
you
can
play
them
back
at
the
same
time
by
the
following
procedure.
|
1.
While
holding
down
the
HARPSICHORD
tone
selector,
set
the
POWER
switch
to
ON.
oe
7
2.
Press
the
Song
select
button
twice
so
that
both
of
the
SONG
indicators
light.
3.
Press
the
START
button.
The
MEMORY
indicator
lights
and
playback
of
the
both
song
areas
start
at
the
same
time.
4.
To
stop
playback,
press
the
STOP
button.
About
memory
back-up
power
The
Performance
Memory
is
electronic
memory,
which
means
that
it
retains
its
contents
even
when
you
switch
power
OFF,
as
long
as
power
is
supplied
through
the
AC
adaptor
or
by
batteries.
This
means
that
Performance
Memory
contents
will
be
lost
when
there
are
no
batteries
loaded
(or
when
the
batteries
go
dead)
and
the
AC
adaptor
is
not
plugged
in
(or
power
through
the
AC
adaptor
is
interrupted
for
any
reason).
Note
the
following
advice
to
keep
your
Performance
Memory
data
safe.
¢
Make
sure
that
the
batteries
loaded
in
the
keyboard
never
go
dead.
¢
When
replacing
batteries,
be
sure
to
connect
the
AC
adaptor
to
supply
power
first.
{7

Mt
MIDI
a
I
“MIDI”
stands
for
“Musical
Instrument
Digital
Interface”.
Practically
speaking,
it
lets
you
connect
this
keyboard
to
other
MIDI-equipped
musical
instruments
and
devices,
such
as
synthesizers,
drum
machines,
sequencers,
and
even
personal
com-
puters.
7
MIDI
terminal
functions
MIDIIN
—
Receives
external
MIDI
messages.
MIDI
OUT
—
Sends
MIDI
messages
to
external
devices.
acral
acres
OUT
Communicable
functions
The
following
functions
can
be
sent
and
received
through
the
CPS-50’s
MIDI
terminals.
For
details
on
the
MIDI
functions,
see
the
“MIDI
Implementation
Chart”
inside
the
back
cover
of
this
manual.
Note
Number,
Velocity
Keyboard
pitch
ON/OFF,
Touch
Response
data.
¢
When
TOUCH
CANCEL
button
is
ON,
the
velocity
data
can
be
sent
but
not
received.
FP
yt
a
A
TP
En
A
tg
REE
ee
Program
Change
Each
preset
tone
corresponds
to
the
program
change
number
0~9
as
listed
below.
Tone
Prog.No.
_
Tone
Prog.No.
PIANO
1
0
PIANO
2
5
E.PIANO
|
W.BASS/PIANO
6
HARPSICHORD
2
STRING
PIANO
7
VIBRAPHONE
30
STRINGS
8
PIPE
ORGAN
4
JAZZ
ORGAN
9
Sustain
pedal
ON/OFF
Sustain
pedal
ON/OFF
data
can
be
sent
when
you
connect
a
sustain
pedal
to
the
DAMPER
PEDAL
jack
of
the
CPS-50.
Notes
¢
Soft
pedal
ON/OFF
message
can
also
be
received,
though
it
cannot
be
sent
from
the
CPS-50.
¢
The
MUSIC
LIBRARY
tune
performance
data
or
the
performance
memory
data
cannot
be
sent
as
MIDI
data.
|
<<Connection
example>>
By
connecting
MIDI
OUT
terminal
of
the
CPS-50
to
MIDI
IN
terminal
of
another
MIDI
keyboard,
the
MIDI
keyboard
plays
the
same
note
as
you
play
on
the
CPS-50.
The
result
is,
the
sounds
of
both
keyboards
can
be
played
in
ensemble
to
make
a
“thick”
voice
or
totally
new
sound.
oe
MID!
OUT
MIDI
IN
MIDt
keyboard

Setting
the
MIDI
channel
4
Mt
Connecting
to
an
external
amplifier
:
In
order
to
communicate
with
other
MIDI
devices,
the
MIDI
channel
numbers
of
both
units
must
match.
The
MIDI
channel
can
be
set
between
channel
|
and
channel
16.
Follow
the
steps
below
to
set
the
MIDI
channel
of
the
CPS-50.
|
)
IMPORTANT
¢
Before
you
connect
the
CPS-50
to
any
other
device,
be
sure
to
first
switch
OFF
the
power
of
the
CPS-50
and
the
other
device.
When
turning
the
CPS-50’s
power
ON
or
OFF
after
having
made
connections,
please
set
the
volume
controllers
on
both
the
CPS-50
and
the
other
device
to
“minimum”.
Also
please
be
sure
to
read
the
owner’s
manuals
of
the
equipment
to
be
connected.
|
1.
Switch
the
CPS-50
power
OFF.
|
|
2.
Hold
down
the
PIANO
1
tone
selector
and
turn
the
power
back
ON..
,
;
3.
While
still
holding
down
the
PIANO
1
tone
selector,
press
the
key
on
the
|
keyboard
which
corresponds
to
the
desired
channel
number.
Channel
numbers
are
assigned
to
keyboard
keys
as
shown
below.
,
ae
ett
mete
If
you
connect
the
CPS-50’s
LINE
OUT
terminals
to
audio
equipment
or
keyboard
amplifiers,
you
can
enjoy
playing
at
more
impressive
volumes.
Note
that
the
|
|
connecting
cord
you
use
depends
on
the
type
of
jack
you
are
connecting
to.
<<Connection
ExaDIee
=
|
_
Aras
hiereaneul
|
jacks
(usually
,
labeled
“AUX
IN”)
‘e
—
1
§
19
18
20
‘CPS-50
(Rear
panel)
|
.
:
AUX
IN
LINE
OU
Notes
¢
Once
you
select
a
channel
by
pressing
a
keyboard
key,
the
MIDI
channel
setting
mode
is
cancelled
automatically.
|
e
The
MIDI
channel
is
automatically
set
to
“1”
when
the
power
is
turned
ON.
¢
Tocancel
the
Auto
Power
OFF
function
in
the
MIDI
mode,
use
the
E.PIANO
tone
selector
instead
of
the
PIANO
|
tone
selector
in
procedure
2.
¢
The
same
MIDI
channel
is
applied
to
both
transmission
and
reception
of
MIDI
data.
1/4-inch
(6.3mm)
plug
Pin
plug
20
71
Tyree
treet
rae
rr
ei
ra
gS
A
rs
Pr?
a
ly
i,
naa
PPS
nh
-Pt
Tre
rer
nn
FORA
a
A
I
ST
IO
Se
A
ee
ah
8
cet
teem
Ft

Wh
Troubleshooting
|
:
;
€
4
av
ta
ll.
pate
tom
Possible
cause,
pq-
para
Fer
ie
fice
emit
Ag
ag
A
z
er
F
oy
f
"
3
¥
Far
wii
ewe
3ie
od]
Soivol
Whe
Lire
|
od:
pon
Remedy.
re
}oet
>
Volume
control
set
to
|
Change
volume
control
MIN.
setting.
Headphones
connected
to
Disconnect
headphones.
keyboard.
|
a
Transpose
setting
is
not
|
Set
transpose
to
“C”
oe
Gy
(page
12).
| |
Tuning
control
is
off.
Adjust
the
tuning
control
(page
5).
Volume
control
set
to
|
Change
volume
control
MIN.
setting.
Headphones
connected
to
|
Disconnect
headphones.
keyboard.
|
et
ee
eee
ses
See
TAO
doPYMP
No
sound
when
keyboard
keys
are
pressed.
Keyboard
out
of
tune.
|
Cannot
play
back
dem-
onstration
tunes.
Occasional
interference.
|
Wall
outlet
used
to
power
|
-
|
keyboard
is
located
too
close
to
outlet
being
used
for
a
refrigerator,
washing
machine,
or
other
electri-
cal
appliance.
Use
a
power
outlet
as
far
away
as
possible
from
appliance
thought
to
be
causing
interference.
Ze
.
ee
eee
rte
i
SA
RE
A
AO
eR
TOA
OA
te
errr
—
‘rms
Ui
Care
of
Your
Piano
I
Avoid
heat,
humidity
or
direct
sunlight.
Do
not
overexpose
the
unit
to
direct
sunlight,
or
place
near
an
air
conditioner,
or
in
any
extremely
hot
place.
|
Take
care
not
to
drop
the
unit
and
avoid
strong
impact.
Strong
impact
may
cause
malfunctions.
When
carrying
or
transporting
the
unit,
protect
the
keyboard
and
switches
with
soft
cloth
or
other
material.
Keep
the
unit
free
of
liquids,
dust,
etc.
Do
not
allow
foreign
matter
to
get
between
the
keys,
especially
metallic
objects
such
as
hairpins,
sewing
needles
or
coins.
Also,
do
not
let
the
unit
get
wet.
Never
attempt
to
modify
any
parts
of
the
unit.
The
unit
is
a
precision
instrument,
made
of
electronic
parts.
Any
modification
of,
or
tampering
with
inner
parts
may
cause
malfunction.
|
Bs
Do
not
use
lacquer,
thinner
or
similar
chemicals
for
cleaning.
Clean
the
keyboard
with
a
soft
cloth
dampened
in
a
weak
solution
of
water
and
a
neutral
detergent.
(Soak
the
cloth
in
the
solution
and
squeeze
until
it
is
almost
dry.)
Specifications
|
Model:
CPS-50
Keyboard:
76
keys,
with
initial
touch
Polyphonic:
max.
16
notes
Tones:
10;
PIANO
1,
PIANO
2,
E.PIANO,
HARPSICHORD,
VIBRAPHONE,
PIPE
ORGAN,
JAZZ
ORGAN,
W.BASS/PIANO,
STRINGS
PIANO,
STRINGS
real-time
memory,
2
songs
(memory
capacity:
approx.
1,200
notes
in
all)
Built-in
tunes:
20
tunes
Memory:
23

focee
¢
Transpose
(F*~C~F:
half-note
increments)
¢
Tuning
control
(Aa
=
442Hz
+30
cents)
¢
Volume
control
¢
LINE
OUT
terminals
(L,
R):
Output
impedance;
1
kQ,
Output
voltage;
1V
(RMS)
MAX
¢
DAMPER
PEDAL
jack
¢
Headphone
jack
¢
MIDI
IN/OUT
terminals
©DC12V
jack
Speakers:
14
cm
x
2
(output:
SW
+
5W)
Power
supply:
2-way
AC/DC
power
source;
aie
-
e
AC:
100,
120,
220
or
240V
(+
10V),
50/60
Hz,
with
optional
AC
adaptor
AD-12
,
oe
¢
DC:
6
D
size
manganese
dry
batteries.
Battery
life:
approx.
4
Control:
Terminals:
hours
Power
consumption:
18W
Dimensions:
1!224(W)
x
409(D)
x
95(H)
mm
48
3/16"(W)
X
16!/3"(D)
X
3
3/4"(H)
Dimensions
1224(W)
x
500(D)
x
767(H)
mm
48
3/i6"(W)
X
19
!1/16"(D)
x
30
3/16"(H)
with
stand:
Weight:
12.
1kg
(26.7lbs)
i.
[18:6kg
(41.0lbs)
with
stand]
_
Accessories:
Stand
(CS-25P),
Sustain
pedal
(SP-2),
Music
Library
Piano
Scores,
Music
Library
sticker,
Dust
cover,
Score
stand
*
Designs
and
specifications
are
subject
to
change
without
notice.
.
a4
24
nee
oe
Oe
ee
er
ee
ee
we
a
ee
a
nN
te
ee
ae
AN
Tp
cp
a
oe
Se
ete
List
of
MUSIC
LIBRARY
Tunes
Pea
Grit
Time
en
pet?
Golliwog’s
Cake-walk
C.
A.
Debussy
229°
(from
“Children’s
Corner’)
pgs
RS
t
t..
‘se
Pears
fae
Le
P3049
Pa
<
‘
:
+
mes)
pe
RIUG
ee
_.-Composer
|
|
poppe
Pa
ged
PA)
SAAD
Poly
mierios
pb
otery
eeneorn
|
ot
do
Etude
Op.
10
No.
5
“Black
Keys”
Etude
Op.
10
No.
12
F.
F.
Chopin
2'35"
“Revolutionary”
Sonate
K.
545
Ist
Mov.
Tango
(de
la
Suite
“Espafia”’)
2nd
Mov.
[invenions
Ba
Moments
Musicaux
Op.
94
F.
P.
Schubert
No.
3
2
Walzer
No.
[5
(Duets)
Total
playing
time
:
op
is
8
le
17
0
Z3

Piano
Sound
Casio
CPS-50
Piano
digital
Muchas
gracias
y
felicitaciones
por
la
compra
del
CASIO
CPS-50.
Con
el
objeto
de
disfrutar
al
mdximo
de
las
caracteristicas
y
funciones
del
CPS-50,
asegtirese
de
leer
cuidadosamente
este
manual
y
de
seguir
las
instrucciones
contenidas
en
el
mismo.
,
Caracteristicas
10
sonidos
programados
—
E]
CPS-50
le
permite
elegir
entre
10
diferentes
sonidos
programados
suministrados
por
una
avanzada
fuente
de
sonido
PCM.
|
Teclado
de
76
teclas
con
respuesta
de
pulsacién
—
Desde
el
mas
leve
pianfsimo
hasta
el
mas
estruendoso
fortisimo,
el
teclado
con
“Respuesta
de
pulsacién”
del
CPS-50
responde
aun
a
los
cambios
mas
sutiles
de
la
dindmica
del
teclado.
Y
un
teclado
completo
de
76
teclas
le
brinda
una
amplia
libertad
de
expresi6n
musical.
“Biblioteca
musical”
de
20
melodias
incorporadas
—
Elija
entre
un
total
de
20
melodias
de
demostraci6n
de
ejecuci6n
aulomatica
que
representan
el
desempefio
del
CPS-50.
Elija
entre
temas
predilectos
por
Beethoven,
Bach,
Chopin
y
otros
populares
maestros
de
la
musica
clasica.
3
Funcién
de
memoria
—
La
funcién
de
memoria
le
permite
“registrar”
notas
a
medida
que
Ud.
las
toca
en
el
teclado.
Ud.
puede
registrar
hasta
2
piezas
diferentes.
Compatibilidad
MIDI
—
El
CPS-50
cuenta
con
MIDI
—
la
Interfase
Digital
para
Instrumentos
Musicales.
Esta
interfase
de
estandar
industrial
le
permite
conectar
su
teclado
con
otros
instrumentos,
fuentes
de
sonido
y
dispositivos
MIDI,
para
una
ejecucidn
sincronizada.
26
Indice
28
30
32°
35
37
38
42
Guia
general
Terminales
Instrucciones
de
montaje
Fuente
de
alimentacién
—
Instalacion
de
las
pilas
Utilizacién
de
la
alimentacién
de
CA
Alimentacién
de
apoyo
de
la
memoria
Funcion
de
desactivado
automatico
Sonidos
Seleccién
de
un
sonido
Acerca
de
la
respuesta
de
pulsacién
Utilizacién
del
bot6n
TOUCH
CANCEL
Acerca
del
sonido
“W.
BASS/PIANO”
*
Transposicién
de
tono
a
Biblioteca
musical
(20
melodias
incorporadas)
Para
reproducir
todas
las
piezas
Para
reproducir
una
pieza
especifica
|
Memoria
de
ejecucién
Registro
Reproduccién
de
la
musica
registrada
Para
borrar
musica
registrada
Registro
de
dos
partes
diferentes
de
la
misma
melodia
en
SONG
A
y
B
Reproduccion
de
dos
partes
differntes
en
SONG
A
y
B
al
mismo
tiempo
Alimentacion
de
apoyo
de
la
memoria
ee
MIDI
|
Funciones
de
los
erlnaics
MIDI]
Funciones
comunicables
Ajuste
del
canal
MIDI
_
Conexion
a
un
amplificador
externo
Localizacién
de
fallas
Cuidado
de
su
piano
Especificaciones
ee
de
melodias
de
la
BIBLIOTECA
MUSICAL
27

tt
Guia
general
|
YO@®
®@
®@
©
®
9
Interruptor
POWER
(alimentacién)
Activa
(ON)
y
desactiva
(OFF)
la
unidad.
El
indicador
que
esta
sobre
este
interruptor
se
ilumina
cuando
la
alimentacion
esta
activada.
Este
indicador
ha
de
perder
su
brillo
cuando
se
debilite
la
potencia
de
las
pilas.
Deslizante
VOLUME
(volumen)
Controla
la
totalidad
del
volumen
de
salida.
Control
TRANSPOSE
(transposicién)
(—
pagina
36)
Deslicelo
a
la
izquierda
o
a
la
derecha
para
transponer
el
tono
de
ejecucién
(incrementa/disminuye
la
totalidad
del
afinado).
Este
control
facilita
el
armonizar
con
instrumentos
afinados
para
diferentes
tonos
cuando
se
ejecuta
en
conjunto,
y
es
conveniente
para
ajustar
el
tono
a
fin
de
corresponder
al
registro
de
los
vocalistas.
Los
tonos
se
pueden
incrementar
o
disminuir
una
octava
completa,
en
incrementos
de
semitono.
In
O@®
Om
TN
Bot6n
TOUCH
CANCEL
(cancelacién
de
pulsacion),
(—
pagina
35)
Activa
y
desactiva
la
respuesta
de
pulsacion
del
teclado.
7
Selectores
de
TONE
(sonido)
(>
pagina
35)
Se
utilizan
para
seleccionar
sidiinio
de
los
sonidos
programados.
Botones
de
bbs
Nahata
(memoria)
(—
pagina
38)
©
.
Se
utilizan
para
“registrar”
su
ejecucion
del
teclado.
Botones
de
MUSIC
LIBRARY
(biblioteca
musical)
(~
pagina
37)
Se
utilizan
para
reproducir
las
melodias
incorporadas
de
la
“BIBLIOTECA
MU-
SICAL”.
Orificios
para
el
soporte
de
partituras
(—
pagina
31)
Para
insertar
el
soporte
de
partituras
que
viene
con
este
piano.
28
eee
ees
x
c=
AM
(9)
Toma
para
auriculares
Para
la
conexiédn
de
_
auriculares
opcionales.
La
salida
del
altavoz
se
corta
automaticamente
cuando
se
conectan
los
-
auriculares.
Etiqueta
adhesiva
de
la
BIBLIOTECA
MUSICAL
Pegue
aqui
la
etiqueta
adhesiva
de
la
BIBLIOTECA
MUSICAL
para
una
referencia
rdpida.
Compartimiento
para
pilas
(—
pagina
32)
_
Control
de
afinado
Ajusta
el
tono
del
teclado
entero
dentro
de
+30
centésimas
de
semitono,
para
afinar
con
otros
instrumentos.
El
tono
estandar
es
As
=
442
Hz.
_
<Panel
posterior>
@
|
©.
©
«
®
©
©
io
®
®t
Terminales
(3)
Terminales
MIDI
(IN/OUT)
(—
pagina
42)
Se
utilizan
para
la
conexi6én
a
otros
instrumentos
y
dispositivos
MIDI.
Toma
DAMPER
PEDAL
(pedal
del
forte)
(—
pagina
31)
Para
la
conexién
del
pedal
de
sostenido
(SP-2)
que
viene
con
esta
unidad.
‘Terminales
LINE
OUT
salida
de
linea
(L/R)
(-»
pagina
45)
Para
la
conexién
a
amplificadores
de
teclado,
altavoces
externos,
equipos
de
audio,
etc.
Toma
de
entrada
de
CC
12V
_(—
pagina
33)
Para
la
conexidén
de
un
adaptador
de
CA
(AD-12
de
CASIO).
29

Ti
Instrucciones
de
montaje
4
|
Monte
el
soporte
CS-25P.
¢
Ademias
de
las
piezas
que
vienen
con
esta
unidad,
Ud.
necesitara
también
un
destornillador
grande
de
cabeza
Phillips
(+).
;
¢«
Monte
la
unidad
en
un
area
donde
el
piso
esté
a
nivel.
Verifique
para
asegu-
rarse
de
tener
todas
las
piezas
antes
de
comenzar.
St:
falta
algo,
po6ngase
en
contacto
con
su
distribuidor.
Parte
superior
de
borde
negro
Asegirese
de
que
los
orificios
de
las
tuercas
(©)
queden
alineados
con
'
los
orificios
de
la
pieza
©).
Alinee
estos
orificios.
*
Inserte
las
cuatro
tuercas
()
en
la
pieza
©
'
asegurdndose
de
que
los
orificios
queden
alineados
correctamente.
—_
*
Ponga
las
cuatro
arandelas
(€)
en
los
cuatro
pernos
(0),
y
utilice
los
pernos
(Q)
para
asegurar
las
piezas
(A)
y
ala
pieza
©).
IMPORTANTE
Tenga
suficiente
cuidado
al
atornillar
los
tornillos
©)
en
las
tuercas
(F)
para
asegurarse
de
que
ambas
piezas
queden
correctamente
alineadas.
El
forzar
las
piezas
juntas
puede
estropear
el
tornillo
y
hacer
imposible
la
instalacién
correcta.
30
ee,
le
ec
Instale
el
piano
en
el
soporte.
Tenga
cuidado
para
evitar
apretarse
las
manos
entre
el
teclado
y
|
|
soporte.
CS
*
(Se
4
[ow
A
Cercidrese
de
utilizar
los
tornillos
de
orejetas
G@)
para
fijar
seguramente
el
piano
y
protegerlo
de
que
caiga
del
soporte.
Conexion
del
pedal
Conecte
el
pedal
de
sostenido
(SP-2)
accesorio
a
la
toma
DAMPER
PEDAL
tal
como
se
ilustra
a
continuaci6n,
oon
_
<Panel
posterior>
Toma
DAMPER
PEDAL
a&06
oes
f
Pedal
de
sostenido
SP-2
4
|
Instale
el
atril.
Inserte
los
dos
extremos
del
atril
en
los
orificiogs
del
teclado
tal
como
se
ilustra
a
continuaci6n.
IMPORTANTE
*
No
coloque
el
teclado/soporte
sobre
una
superficie
inestable
o
que
no
esté
nivelada.
No
coloque
objetos
pesados
tales
como
un
equipo
de
audio
sobre
el
teclado.
Nunca
permita
que
ninos
pequefios
se
suban
al
teclado.
31

Fuente
de
alimentacion
|
Ud.
puede
suministrar
energia
a
su
teclado
con
6
pilas
D
o
con
alimentacién
estindar
de
CA.
Instalacion
de
las
pilas
El
teclado
se
puede
alimentar
con
6
pilas
secas
de
manganeso
de
tamafio
D
(SUM-1/R20P).
Asegtrese
de
que
el
interruptor
POWER
este
ajustado
en
la
posicién
OFF
al
instalar
las
pilas.
1.
Abra
la
cubierta
del
compartimiento
para
pilas
de
la
parte
posterior
de
la
unidad.
2.
Cargue
pilas
nuevas
teniendo
cuidado
de
que
los
polos
positivo
(+)
y
negativo
(—)
estén
orientados
en
la
direccidn
correcta.
¢
La
duracién
estandar
de
las
pilas
es
de
4
horas
aproximadamente.
Notas
¢
Pilas
débiles
darian
como
resultado
un
bajo
volumen
o
una
calidad
tonal
deficiente.
La
lampara
del
indicador
de
alimentacién
ird
perdiendo
gradualmente
su
brillo
a
medida
que
se
debilite
la
potencia
de
las
pilas.
En
ese
momento,
cambie
las
pilas
0
pase
a
una
de
las
fuentes
de
alimentacién
alternativas.
|
| ,
:
*
Sila
potencia
de
las
pilas
cae
por
debajo
de
cierto
nivel,
la
calidad
del
tono
producido
se
deteriora,
puede
sonar
un
tono
totalmente
diferente,
o
la
melodia
de
demostracién
o
el
ritmo
automatico
pueden
resultar
anormales.
Si
tuviera
lugar
alguno
de
estos
sintomas,
reemplace
las
pilas
lo
mas
pronto
posible.
PRECAUCIONES
La
utilizacion
incorrecta
de
las
pilas
puede
ocasionar
que
las
mismas
se
sulfaten
o
exploten,
y
pueden
dafiar
su
unidad.
Tenga
en
cuenta
las
siguientes
precauciones:
*
Cercidrese
de
que
los
polos
positivo
(+)
y
negativo
(—)
estén
orientados
en
la
direccion
correcta.
7
.
¢
No
mezcle
pilas
de
distintos
tipos.
¢
No
mezcle
pilas
usadas
con
pilas
nuevas.
¢
Nunca
deje
pilas
agotadas
en
el
compartimiento
para
pilas.
¢
Retire
las
pilas
cuando
no
utilice
la
unidad
por
un
periodo
de
tiempo
prolongado.
©
Nunca
trate
de
recargar
las
pilas
que
se
especifican
para
la
fuente
de
alimentacion
de
esta
unidad.
¢
No
exponga
las
pilas
al
calor
directo,
no
permita
que
se
pongan
en
cortocircuito
ni
trate
de
desarmarlas.
(Si
una
pila
legara
a
sulfatarse,
limpie
inmediatamente
el
compartimiento
para
pilas
de
la
unidad,
teniendo
cuidado
para
evitar
que
el
electrélito
de
la
pila
se
ponga
con
contacto
directo
con
Su
piel.)
:
|
:
a2
a
rer
co
te
ar
ts
etd
at
teen
tenet
eta
gee
ee,
Utilizacién
de
la
alimentaci6n
de
CA
Cuando
se
utiliza
la
alimentacién
de
la
Ifnea
domiciliaria,
se
requiere
un
adaptador
de
CA
(AD-12).
Utilice
unicamente
un
adaptador
original
CASIO
con
la
misma
tensién
nominal
(100,
120,
220
0
240V)
que
la
alimentacién
de
su
drea
para
evitar
dafios
a
los
componentes
internos
del
teclado.
Asegtrese
de
desactivar
la
alimentacién
de
la
unidad
antes
de
conectar
el
adaptador
a
la
unidad.
Enchufe
el
adaptador
de
CA
en
el
tomacorriente
de
CA
y
el
cable
en
la
unidad.
Esto
cortaré
automdticamente
la
alimentacién
mediante
pilas.
Toma
de
entrada
de
CC
12V
Adaptador
de
CA
AD-12
Ze
(11)
Tomacorriente
de
CA
IMPORTANTE
°
El
adaptador
puede
calentarse
cuando
se
lo
esta
utilizando.
Esto
es
normal
y
no
indica
ningun
problema.
Asegurese
de
desenchufar
el
adaptador
de
la
fuente
de
alimentacién
cuando
no
esté
utilizando
la
unidad.
Cuando
conecte
o
desconecte
el
adaptador,
asegtirese
de
que
la
alimentacién
de
la
unidad
esté
desactivada.
Nunca
utilice
una
fuente
de
alimentacié6n
que
no
concuerde
con
la
que
se
especifica
para
la
unidad.
Hacer
tal
cosa
puede
dafiar
el
adaptador
o
su
unidad.
Alimentacién
de
apoyo
de
la
memoria
La
Memoria
de
ejecuci6n
(pagina
38)
es
una
memoria
electrénica,
lo
cual
significa
que
la
misma
retiene
su
contenido
aun
cuando
Ud.
desactive
la
alimentacién,
siempre
que
se
suministre
alimentacién
a
través
del
adaptador
de
CA
o
mediante
pilas.
Esto
significa
que
el
contenido
de
la
Memoria
de
ejecuci6n
se
perdera
cuando
no
haya
pilas
cargadas
(0
cuando
las
pilas
se
agoten)
y
el
adaptador
de
CA
no
esté
enchufado
(o
la
alimentaci6n
a
través
del
adaptador
de
CA
se
haya
interrumpido
por
alguna
razon).
Tenga
en
cuenta
los
consejos
siguientes
para
conservar
seguros
sus
datos
de
la
Memoria
de
ejecucién.
*
Asegtirese
de
que
las
pilas
cargadas
en
el
teclado
nunca
lleguen
a
agotarse.
°
Cuando
reemplace
las
pilas,
asegtirese
de
conectar
primero
el
adaptador
de
CA
a
Ja
fuente
de
alimentacion.
33

Funcion
de
desactivado
automatico
La
alimentaci6n
se
corta
en
forma
automatica
aproximadamente
6
minutos
después
de
la
Ultima
operacién
de
la
unidad.
La
fuente
de
alimentacién
se
puede
restablecer
desactivando
la
alimentaci6n
(OFF)
y
luego
activandola
(ON)
nuevamente.
|
La
funcién
de
desactivado
automatico
es
inoperativa
cuando
se
reproducen
las
melodias
de
demostracién
(la
alimentacién
no
se
desactiva
aun
cuando
Ud.
no
toque
el
teclado).
|
Para
cancelar
la
funcién
de
desactivado
automatico
Para
cancelar
la
funcién
de
desactivado
automatico,
ponga
en
ON
el
interruptor
de
alimentacion
mientras
mantiene
presionado
el
selector
de
sonido
E.PIANO.
La
unidad
permanecera
activada
hasta
que
Ud.
la
desactive
manualmente.
34
me
ee
a
ea
ea
rita
a
et
i
EN
ST
A
—
a
eae
a
A
I
a
Sonidos
Ud
puede
elegir
entre
10
sonidos
diferentes.
Para
seleccionar
un
sonido,
siga
los
pasos
Siguientes,
|
a
|
Seleccién
de
un
sonido
TONE
PIANO
1
E.PIANO
nae
TT
STRINGS
VIBRA-
PHONE
STRINGS
Selectores
de
TONE
Bot6n
SELECT
I.
Ponga
el
interruptor
POWER
en
ON.
El
sonido
PIANO
|
se
selecciona
automaticamente
cuando
Ud.
activa
este
piano.
2
Especifique
la
fila
superior
o
la
inferior
de
los
sonidos
programados
mediante
la
presi6n
del
boton
SELECT.
El
indicador
superior
o
inferior
se
ilumina
para
indicar
la
fila
activa.
3.
Presione
uno
de
Jos
selectores
de
TONE
para
elegir
un
sonido
programado.,
Acerca
de
la
respuesta
de
pulsacién
Este
piano
cuenta
con
la
funcién
de
“Respuesta
de
pulsacién”
que
controla
el
volumen
de
los
sonidos
producidos
de
acuerdo
con
la
presién
de
las
teclas.
|
Utilizacion
del
bot6n
TOUCH
CANCEL
Ud.
puede
activar
y
desactivar
la
funcién
de
res
é
sacid
liz
5
puesta
de
pulsacién
utilizando
el
botén
TOUCH
CANCEL.
Cuando
se
activa
el
bot6n
TOUCH
CANCEL
(el
indicador
que
esta
sobre
este
boton
se
ilumina),
los
sonidos
se
producen
a
un
volumen
fijo
sin
tenerse
en
cuenta
la
presion
del
teclado.
TOUCH
CANCEL
O
C™
Nota
*
El
botoén
TOUCH
CANCEL
queda
desactivado
cuando
se
activa
la
alimentacion
del
piano.
25

Acerca
del
sonido
“W.BASS/PIANO”
El
sonido
“W.BASS/PIANO”
divide
el
teclado
y
asigna
dos
sonidos
—
sonido
de
Contrabajo
de
madera
a
la
parte
izquierda
y
sonido
de
Piano
a
la
parte
derecha
del
teclado.
AAAs
}<——
Contrabajo
de
Se
ian
madera
Transposicion
de
tono
El
tono
del
teclado
entero
se
puede
transponer
en
intervalos
de
semitono
entre
F*
y
F
simplemente
deslizando
el
control
TRANSPOSE
a
la
izquierda
y
a
la
derecha.
La
posicién
central
ajusta
el
teclado
en
el
tono
de
C.
Nota
Cuando
Ud.
elige
el
sonido
“W.BASS/PIANO”,
el
punto
de
divisién
del
teclado
para
los
dos
sonidos
se
desplaza
de
acuerdo
con
el
ajuste
de
transposicién
de
tono.
|
36
ui
Biblioteca
musical
(20
melodias
incorporadas)
:
Este
piano
cuenta
con
una
Biblioteca
musical
de
20
melodjfas,
ofreciendo
una
amplia
gama
de
piezas
clasicas,
desde
estudios
hasta
sonatas.
Ud.
puede
especificar
piezas
individuales
de
la
Biblioteca
musical
para
reproducci6n,
0
puede
reproducir
el
total
de
20
piezas
de
principio
a
fin.
7
|
|
MUSIC
LIBRARY
_
DEMO/RESET
SELECT
Para
reproducir
todas
las
piezas
each
*
Deslice
el
interruptor
POWER
a
la
posicién
ON.
2.
Presione
el
bot6n
DEMO/RESET.
¢
La
reproduccién
comienza
desde
la
primera
pieza
de
la
Biblioteca
musical,
y
continda
secuencialmente
con
las
otras
piezas.
Después
de
finalizar
la
20ma.
pieza,
la
reproduccién
comienza
nuevamente
desde
la
primera
pieza.
3.
Para
detener
la
reproducci6n,
presione
nuevamente
el
bot6n
DEMO/RESET.
Para
reproducir
una
pieza
especifica
1.
Deslice
el
interruptor
POWER
a
la
posicién
ON.
2.
Presione
el
bot6n
SELECT.
3.
Presione
la
tecla
del
teclado
cuyo
numero
en
la
ilustracién
de
mas
abajo
corresponda
al
numero
de
la
pieza
que
Ud.
desee
reproducir
(refiérase
a
la
“Lista
de
melodias
de
la
BIBLIOTECA
MUSICAL”.de
la
pagina
49
que
viene
con
este
piano).
¢
La
reproducci6n
comienza
desde
el
principio
de
la
pieza
que
Ud.
selecciona.
Cuando
se
llega
al
final
de
la
pieza,
la
reproduccién
comienza
nuevamente
desde
el
principio
de
la
pieza
seleccionada.
4.
Para
detener
la
reproducci6n,
presione
el
botén
DEMO/RESET.
37

re
Notas
|
|
2
:
pF
ee
*
Todas
las
melodias
de
la
Biblioteca
musical
utilizan
cl
sonido
PIANO
I,
y
Ud.
no
puede
-
cambiar
el
sonido
de
la
reproducci6n.
¢
Ud.
puede
controlar
el
sonido
del
teclado
cuando
ejecuta
junto
con
una
melodia
de
la
Biblioteca
musical.
7
|
*
El
ajuste
de
transposicién
de
tono
(pagina
36)
no
afecta
la
reproduccién
de
las
melodfas
de
la
Biblioteca
musical.
|
¢
El
bot6én
TOUCH
CANCEL
es
inoperable
durante
la
reproducci6n
de
una
melodia
de
la
Biblioteca
musical.
Memoria
de
ejecucién
La
funcion
de
memoria
de
este
piano
permite
el
registro
de
notas
en
tiempo
real
a
medida
que
las
mismas
se
ejccutan
en
el
teclado.
Ud.
puede
registrar
2
canciones
por
separado,
hasta
1.200
notas
en
total.
Tenga
a
bien
recordar
que
2
canciones
se
registran
por
separado
en
dos
areas
independientes
para
“cancién”
—
SONG
A
ySONGB.
.°:
|
-—
—E
SS
Ho
oW
oR
of
a
HT
Botoén
de
Boton
.
Béton
_
Boton
seleccién
de
RECORD
STOP
|
START
cancion
Registro
I.
Especifique
el
area
de
registro
para
“cancién”
(SONG
A
o
SONG
B)
en
la
que
Ud.
quiera
registrar,
mediante
la
presién
del
botdn
de
seleccién
de
cancion.
ee
Cuando
Ud.
activa
la
alimentacién,
SONG
A
se
selecciona
autométicamente.
2.
Seleccione
un
sonido
programado
que
Ud.
desee
utilizar
para
el
registro.
3.
Presione
el
bot6n
RECORD
y
el
indicador
MEMORY
destellard
para
indicar
que
el
piano
estd
en
espera
para
el
registro”
*
.
’
-
_
2.
5
38
IMPORTANTE
oe
ae
eee
,
E]
paso
siguiente
borra
la
melodia
del
drea
para
cancidn
(A
o
B)
que
Ud.
ha
seleccionado
en
el
paso
|
anterior.
Asegtirese
de
que
ya
no
necesita
la
melodia
del
drea
para
cancioén
_Seleccionada
antes
de
continuar.
Si
Ud.
la
necesita,
puede
cancelar
la
espera
para
el
registro
mediante
una
nueva
presi6n
del
bot6n
RECORD,
sin
borrado
de
la
melodia.
4.
Comience
a
tocar
el
piano
y
el
registro
se
iniciard
automaticamente.
Tenga
en
cuenta
que
el
indicador
MEMORY
permanece
destellando
mientras
se
efectia
cl
registro.
EI
registro
también
comienza
mediante
la
presién
del
boton
START.
5.
Para
detener
el
registro,
presione
el
bot6n
STOP.
Notas
¢
Ud.
puede
registrar
cambios
en
las
operaciones
siguientes
al
igual
que
en
la
ejecucién
del
teclado
durante
el
registro.
|
ms
a
_Cambio
de
sonidos
programados
Efectos
de
pedal
del
forte
*
Los
datos
de
ejecucién
recibidos
desde
el
terminal
MIDI
IN
también
se
pueden
registrar
(refiérase
a
“MIDI”
de
la
pagina
42).
*
La
capacidad
de
memoria
es
de
aproximadamente
1.200
notas
en
total.
Cuando
Ud.
_.
sobrepasa
la
capacidad
de
memoria,
el
registro
finaliza
automaticamente.
°
El
ajuste
activ./desactiv.
del
bot6én
TOUCH
CANCEL
no
se
puede
registrar,
aunque
este
botén
es
operable
durante
el
registro.
|
Reproduccion
de
la
musica
registrada
-
1.
Presione
el
botén
de
seleccién
de
cancién
para
seleccionar
la
pieza
que
Ud.
desee
reproducir.
2.
Presione
el
botén
START.
El
indicador
MEMORY
se
ilumina
y
comienza
la
reproducci6n.
3.
Para
detener
la
reproduccién,
presione
el
bot6n
STOP.
Notas
¢
Ud.
puede
controlar
el
sonido
del
teclado
cuando
ejecuta
junto
con
la
reproduccién
de
musica
registrada.
|
.
|
Ud.
puede
cambiar
el
sonido
de
la
reproduccién
mediante
la
presion
de
un
selector
TONE
mientras
se
reproduce
la
musica
registrada.
Para
borrar
misica
registrada
I,
Presione
el
botén
de
seleccién
de
cancién
para
seleccionar
la
pieza
que
Ud.
desee
borrar.
2.
Presione
el
bot6n
RECORD.
E]
indicador
MEMORY
destellard.
-
IMPORTANTE
El
paso
siguiente
borra
la
melodja
del
drea
para
cancién
(A
o
B)
que
Ud.
ha
seleccionado
en
el
paso
|
anterior.
Asegtirese
de
que
ya
no
necesita
la
melodfa
del
drea
para
canci6n
seleccionada
antes
de
continuar,
3.
Presione
el
bot6n
START
y
a
continuacién
el
boton
STOP.
eee
39
Table of contents
Languages:
Other Casio Musical Instrument manuals

Casio
Casio Privia PX-A100 User manual

Casio
Casio CTK-800 Troubleshooting guide

Casio
Casio LK-170 User manual

Casio
Casio DG-10 Operator's manual

Casio
Casio AP-10 User manual

Casio
Casio Celviano AP-25 User manual

Casio
Casio VL-Tone VL-1 User manual

Casio
Casio WK-200 User manual

Casio
Casio PX-S3100BK User manual

Casio
Casio Privia PX-720 Troubleshooting guide

Casio
Casio CTK-520L User manual

Casio
Casio Privia PX-S7000 User manual

Casio
Casio AP-20 User manual

Casio
Casio DG-1 Operator's manual

Casio
Casio CDP-200R User manual

Casio
Casio TONEBANK CT-636 User manual

Casio
Casio Casiotone MT-205 User manual

Casio
Casio CDP-S160 User manual

Casio
Casio VA-10 User manual

Casio
Casio Celviano AP-265 User manual