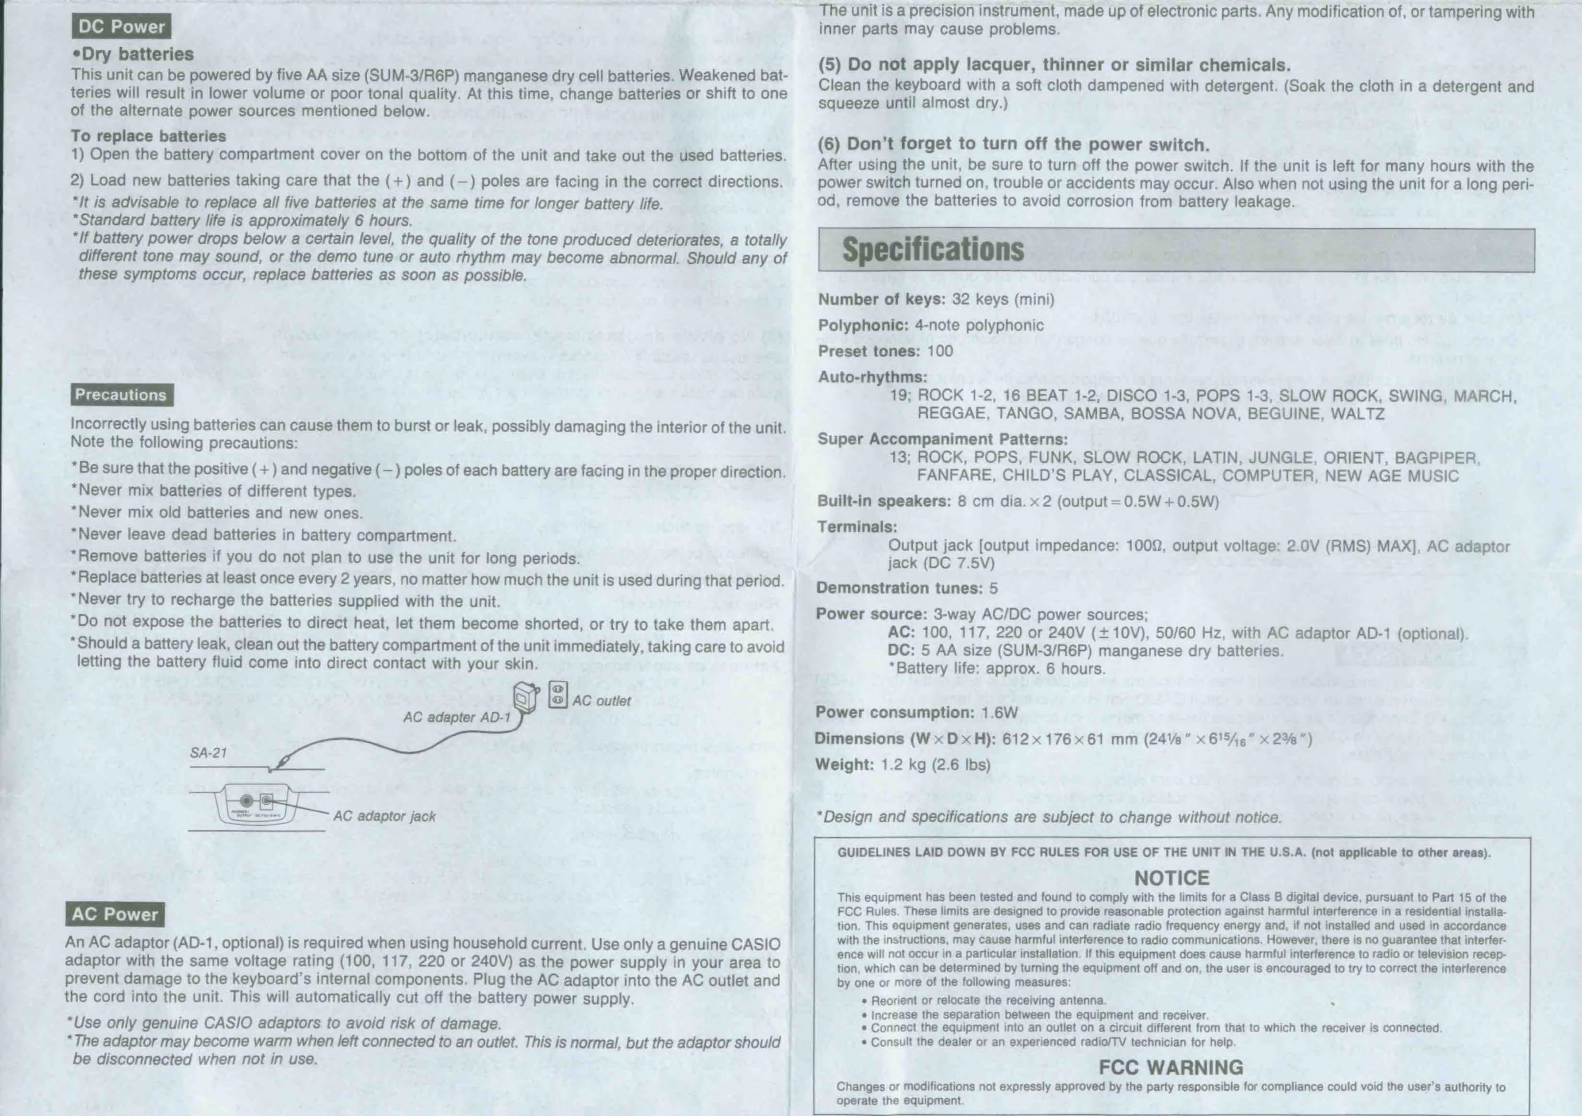
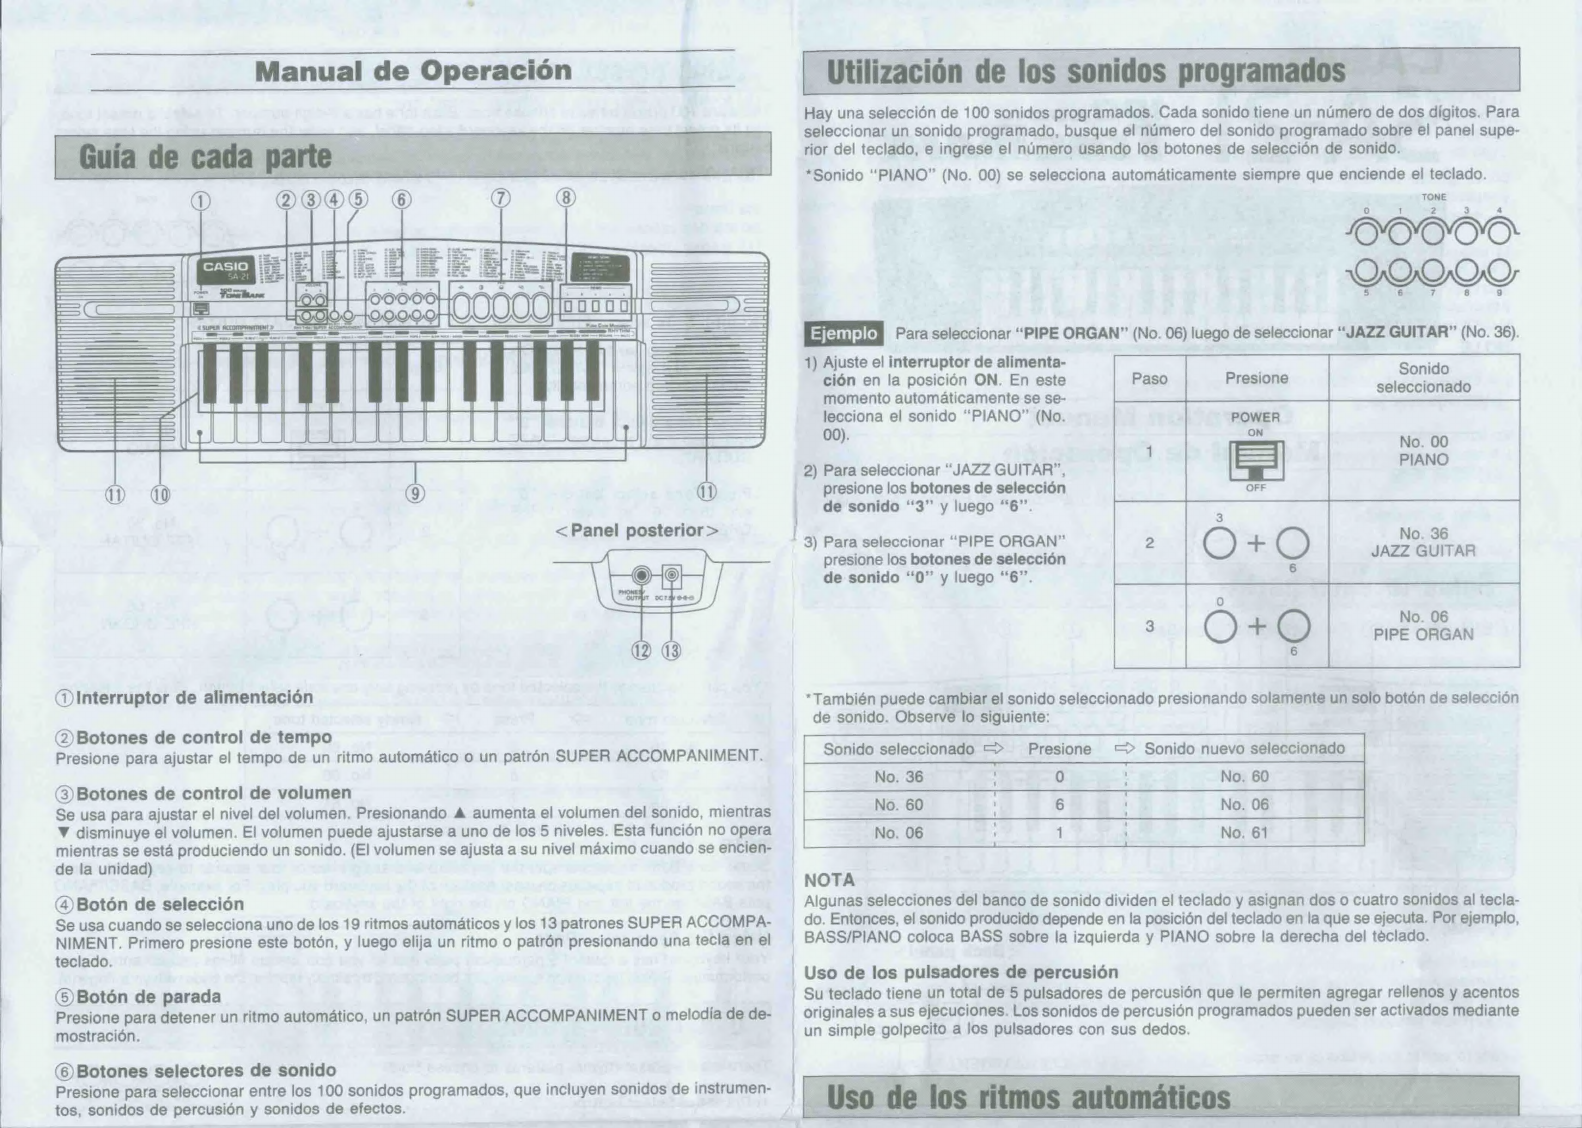
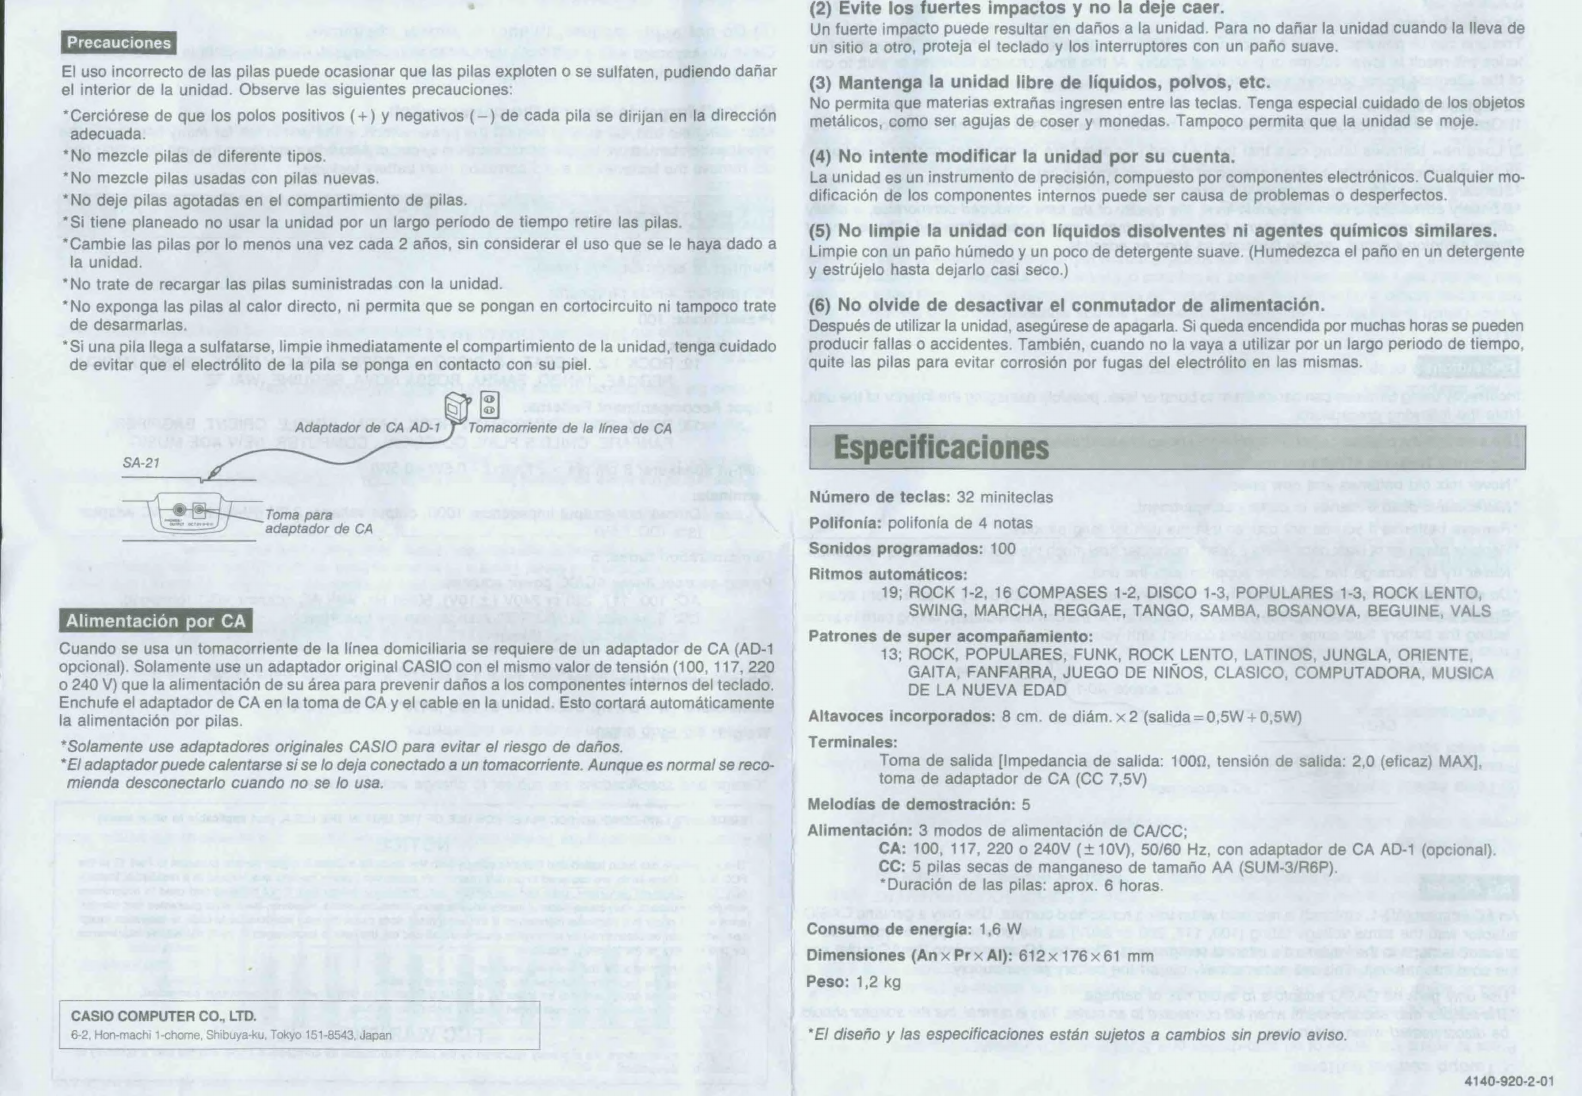
Casio SA-21 User manual

CASIO
—
a
SA-21
Fordian
There
are
100
preset
tones
to
choose
from.
Each
tone
has.a
2-digit
number.
To
select
a
preset
tone,
find
its
preset
tone
number
on
the
keyboard’s
top
panel,
and
enter
the
number
using
the
tone
select
buttons,
*“PIANO”
tone
(No.
00)
is
selected
automatically
whenever
you
switch
the
power
of
the
keyboard
ON.
TONE
OOOOO
_
=
——~
~
:
a
On,On,OvOnO
5
6
7
8
5
To
select
“PIPE
ORGAN”
(No.
06)
after
selecting
“JAZZ
GUITAR”
(No.
36),
1)
Set
the
Power
switch
to
the
ON
position.
At
this
time
“PIANO”
(No.
00)
is
selected
automatically.
Operation
Manual
2)
Press
Tone
select
buttons
“3”
m2
and
then
“6”
to
select
“JAZZ
Manual
de
Operacion
GUITAR”.
SA0841C
SA21ES-1
Printed
in
Malaysia
3)
Press
Tone
select
buttons
“0”
S8
u
and
then
“6”
to
select
“PIPE
ORGAN”.
No.
06
PIPE
ORGAN
Selected
tone
>
Press
=>
Newly
selected
tone
No,
36
No.
60
No.
60
!
!
No.
06
No.
06
,
,
No.
61
NOTE
Some
Tone
Bank
selections
split
the
keyboard
and
assign
two
or
four
sounds
to
keyboard.
Then,
the
sound
produced
depends
on
what
position
of
the
keyboard
you
play.
For
example,
BASS/PIANO
puts
BASS
on
the
left
and
PIANO
on
the
right
of
the
keyboard.
Sinniinn
—
Ahi
bul
|
”
wi
li
Using
the
Percussion
Pads
Your
keyboard
has
a
total
of
5
percussion
pads
that
let
you
add
unique
fill-ins
and
accents
to
your
performance.
Preset
percussion
sounds
can
be
triggered
by
simply
tapping
the
pads
with
your
finger(s).
There
are
19
preset
rhythm
patterns
to
choose
from.
SOn,OnOKWO-

(1)
Power
switch
(2)Tempo
control
buttons
Press
to
adjust
the
tempo
of
an
auto-rhythm
or
a
SUPER
ACCOMPANIMENT
pattern.
(3)
Volume
control
buttons
Used
to
adjust
the
level
of
the
volume.
Pressing
A
increases
the
volume
of
the
sound,
while
¥
decreases
volume.
Volume
can
be
set
to
one
of
5
levels.
This
function
does
not
operate
while
a
sound
|
is
being
produced.
(Volume
is
set
to
its
maximum
level
when
power
is
switched
ON.)
(4)Select
button
Used
when
selecting
one
of
the
19
auto-rhythms
and
the
13
SUPER
ACCOMPANIMENT
patterns.
Press
this
button
first,
and
then
choose
a
rhythm
or
pattern
by
pressing
a
keyboard
key.
()Stop
button
Press
to
stop
an
auto-rhythm,
a
SUPER
ACCOMPANIMENT
pattern
or
demonstration
tune.
(6)
Tone
select
buttons
Press
to
select
from
among
the
100
preset
tones,
which
include
instrumental
sounds,
percussion
sounds
|
and
effect
sounds.
(7)Percussion
pads
(8)
DEMO
buttons
Press
these
buttons
to
hear
preset
demonstration
tunes.
(9)Rhythm
select
keys
(White
keyboard
keys)
Press
to
select
an
auto-rhythm
after
pressing
the
select
button.
(0
SUPER
ACCOMPANIMENT
select
keys
(Black
keyboard
keys)
Press
to
select
a
SUPER
ACCOMPANIMENT
pattern
after
pressing
the
select
button.
(1)
Built-in
speakers
(2
Output
jack
For
connection
of
optional
headphones,
audio
amplifier
or
keyboard
amplifier.
Connecting
headphones
automatically
cuts
speaker
output.
(3)AC
adaptor
jack
For
connection
of
optional
AC
adaptor
(or
car
adaptor).
NOTE
A
click
(which
is
actually
the
Tone
Bank
“Typewriter’’)
sounds
whenever
you
press
the
volume
con-
trol
buttons,
tempo
control
buttons,
select
button,
or
tone
select
buttons.
This
sound
helps
you
con-
firm
that
your
entry
was
properly
registered.
In
this
case
of
the
volume
control
and
tempo
control
buttons,
if
you
press
a
button
and
the
click
does
not
sound,
it
means
that
the
setting
is
already
at
its
minimum
or
maximum.
*Playing
the
Demonstration
Tunes
5
different
demonstration
tunes
showcase
all
of
the
characteristic
features
and
functions
of
the
key-
board.
Simply
press
one
of
the
DEMO
buttons
(8),
and
listen
to
the
keyboard
play.
*The
selected
demonstration
tune
is
played
in
an
endless
loop.
Press
one
of
the
DEMO
buttons
again,
or
the
stop
button
to
stop
the
tune.
"You
cannot
use
the
keyboard
and
adjust
the
tempo
while
the
demonstration
tune
is
playing.
"You
can
adjust
the
level
of
volume
but
a
click
(Typewriter
sound)
doesn’t
sound.
|
7
i
About
the
power
supply
2)
Press
one
of
the
white
keyboard
keys.
And
the
auto-rhythm
pattern
labeled
above
the
white
key
ACCOMPANIMENT
select
keys
(black
keys)
Rhythm
select
keys
(white
keys)
3)
Adjust
the
tempo
using
the
Tempo
control
buttons.
Each
press
of
&
speeds
up
the
tempo,
while
pressing
¥
slows
it
down.
"You
can
set
the
tempo
level
to
one
of
16
steps.
4)
Play
along
with
the
selected
rhythm
pattern.
5)
Press
the
Stop
button
to
stop
the
auto-rhythm.
NOTE
You
can
change
the
auto-rhythm
while
it
is
playing
by
repeating
steps
1)
and
2)
above.
“SUPER
ACCOMPANIMENT”
patterns
back
up
your
melodies
with
full
chord
progressions,
arpeggio
patterns,
sounds
effects
and
more!
There's
13
to
choose
from,
including
such
standard
fare
as
Rock,
Latin
&
Pops,
and
more
exotic
patterns
like
Orient,
New
Age
Music
and
Fanfare.
1)
Press
the
Select
button.
2)
Press
one
of
the
black
keyboard
keys,
and
the
SUPER
ACCOMPANIMENT
pattern
labeled
above
the
black
key
immediately
starts
to
play.
3)
Play
along
with
the
selected
pattern.
4)
Press
the
Stop
button
to
stop
the
SUPER
ACCOMPANIMENT
play.
NOTE
You
can
change
the
SUPER
ACCOMPANIMENT
pattern
while
it
is
playing
by
repeating
steps
1)
and
2)
above.
(1)
Avoid
heat,
humidity
or
direct
sunlight.
Do
not
overexpose
the
unit
to
direct
sunlight,
or
place
near
an
air
conditioner,
or
in
any
extremely
hot
place.
(2)
Take
care
not
to
drop
the
unit
and
avoid
strong
shocks.
A
strong
shock
may
cause
malfunctions.
When
carrying
or
transporting
the
unit,
protect
the
keyboard
and
switches
with
soft
materials.
(3)
Keep
the
unit
free
of
liquids,
dust,
etc.
Do
not
allow
foreign
matter
to
get
between
the
keys.
Be
especially
careful
with
metallic
objects,
such
as
hairpins,
Sewing
needles,
and
coins.
Also,
do
not
let
the
unit
get
wet.
ae:
Di...
42,
2s.
es
eo.
—ewe—
8
ES
eer
»s
-
-at

eDry
batteries
This
unit
can
be
powered
by
five
AA
size
(SUM-3/R6P)
manganese
dry
cell
batteries.
Weakened
bat-
teries
will
result
in
lower
volume
or
poor
tonal
quality.
At
this
time,
change
batteries
or
shift
to
one
of
the
alternate
power
sources
mentioned
below.
To
replace
batteries
1)
Open
the
battery
compartment
cover
on
the
bottom
of
the
unit
and
take
out
the
used
batteries.
2)
Load
new
batteries
taking
care
that
the
(+)
and
(—)
poles
are
facing
in
the
correct
directions.
“It
is
advisable
to
replace
all
five
batteries
at
the
same
time
for
longer
battery
life.
*Standard
battery
life
is
approximately
6
hours.
"If
battery
power
drops
below
a
certain
level,
the
quality
of
the
tone
produced
deteriorates,
a
totally
different
tone
may
sound,
or
the
demo
tune
or
auto
rhythm
may
become
abnormal.
Should
any
of
these
symptoms
occur,
replace
batteries
as
soon
as
possible.
Precautions
Incorrectly
using
batteries
can
cause
them
to
burst
or
leak,
possibly
damaging
the
interior
of
the
unit.
Note
the
following
precautions:
“Be
sure
that
the
positive
(+)
and
negative
(—)
poles
of
each
battery
are
facing
in
the
proper
direction.
“Never
mix
batteries
of
different
types.
“Never
mix
old
batteries
and
new
ones.
“Never
leave
dead
batteries
in
battery
compartment.
“Remove
batteries
if
you
do
not
plan
to
use
the
unit
for
long
periods.
“Replace
batteries
at
least
once
every
2
years,
no
matter
how
much
the
unit
is
used
during
that
period.
“Never
try
to
recharge
the
batteries
supplied
with
the
unit.
“Do
not
expose
the
batteries
to
direct
heat,
let
them
become
shorted,
or
try
to
take
them
apart.
*Should
a
battery
leak,
clean
out
the
battery
compartment
of
the
unit
immediately,
taking
care
to
avoid
letting
the
battery
fluid
come
into
direct
contact
with
your
skin.
(g]
AC
outlet
AC
adapter
AD-1
AC
adaptor
jack
An
AC
adaptor
(AD-1,
optional)
is
required
when
using
household
current.
Use
only
a
genuine
CASIO
adaptor
with
the
same
voltage
rating
(100,
117,
220
or
240V)
as
the
power
supply
in
your
area
to
prevent
damage
to
the
keyboard’s
internal
components,
Plug
the
AC
adaptor
into
the
AC
outlet
and
the
cord
into
the
unit.
This
will
automatically
cut
off
the
battery
power
supply.
*Use
only
genuine
CASIO
adaptors
to
avoid
risk
of
damage.
*The
adaptor
may
become
warm
when
left
connected
to
an
outlet.
This
is
normal,
but
the
adaptor
should
be
disconnected
when
not
in
use.
The
unit
is
a
precision
instrument,
made
up
of
electronic
parts.
Any
modification
of,
or
tampering
with
inner
parts
may
cause
problems.
(5)
Do
not
apply
lacquer,
thinner
or
similar
chemicals.
Clean
the
keyboard
with
a
soft
cloth
dampened
with
detergent.
(Soak
the
cloth
in
a
detergent
and
squeeze
until
almost
dry.)
(6)
Don’t
forget
to
turn
off
the
power
switch.
After
using
the
unit,
be
sure
to
turn
off
the
power
switch.
If
the
unit
is
left
for
many
hours
with
the
power
switch
turned
on,
trouble
or
accidents
may
occur.
Also
when
not
using
the
unit
for
a
long
peri-
od,
remove
the
batteries
to
avoid
corrosion
from
battery
leakage.
Number
of
keys:
32
keys
(mini)
Polyphonic:
4-note
polyphonic
Preset
tones:
100
Auto-rhythms:
19;
ROCK
1-2,
16
BEAT
1-2,
DISCO
1-3,
POPS
1-3,
SLOW
ROCK,
SWING,
MARCH,
REGGAE,
TANGO,
SAMBA,
BOSSA
NOVA,
BEGUINE,
WALTZ
Super
Accompaniment
Patterns:
13;
ROCK,
POPS,
FUNK,
SLOW
ROCK,
LATIN,
JUNGLE,
ORIENT,
BAGPIPER,
FANFARE,
CHILD’S
PLAY,
CLASSICAL,
COMPUTER,
NEW
AGE
MUSIC
Built-in
speakers:
8
cm
dia.
x
2
(output
=
0.5W
+0.5W)
Terminals:
Output
jack
[output
impedance:
1000,
output
voltage:
2.0V
(RMS)
MAX],
AC
adaptor
jack
(DC
7.5V)
Demonstration
tunes:
5
Power
source:
3-way
AC/DC
power
sources;
AC:
100,
117,
220
or
240V
(+10V),
50/60
Hz,
with
AC
adaptor
AD-1
(optional).
DC:
5
AA
size
(SUM-3/R6P)
manganese
dry
batteries.
*Battery
life:
approx.
6
hours.
Power
consumption:
1.6W
Dimensions
(W
x
Dx
H):
612
17661
mm
(24%”
x
61545”
x
2%”)
Weight:
1.2
kg
(2.6
Ibs)
“Design
and
specifications
are
subject
to
change
without
notice.
GUIDELINES
LAID
DOWN
BY
FCC
RULES
FOR
USE
OF
THE
UNIT
IN
THE
U.S.A.
(not
applicable
to
other
areas).
NOTICE
This
equipment
has
been
tested
and
found
to
comply
with
the
limits
for
a
Class
B
digital
device,
pursuant
to
Part
15
of
the
FCC
Rules,
These
limits
are
designed
to
provide
reasonable
protection
against
harmful
interference
in
a
residential
installa-
tion,
This
equipment
generates,
uses
and
can
radiate
radio
frequency
energy
and,
if
not
installed
and
used
in
accordance
with
the
instructions,
may
Cause
harmful
interference
to
radio
communications.
However,
there
is
no
guarantee
that
interfer-
ence
will
not
occur
in
a
particular
installation.
If
this
equipment
does
cause
harmful
interference
to
radio
or
television
recep-
tion,
which
can
be
determined
by
turning
the
equipment
off
and
on,
the
user
is
encouraged
to
try
to
correct
the
interference
by
one
or
more
of
the
following
measures:
*
Reorient
or
relocate
the
receiving
antenna.
.
¢
Increase
the
separation
between
the
equipment
and
receiver.
*
Connect
the
equipment
into
an
outlet
on
a
circuit
different
from
that
to
which
the
receiver
is
connected.
*
Consult
the
dealer
or
an
experienced
radio/TV
technician
for
help.
FCC
WARNING
Changes
or
modifications
not
expressly
approved
by
the
party
responsible
for
compliance
could
void
the
user’s
authority
to
operate
the
equipment.

Manual
de
Operacion
:
eg
Xe)
nOrO!}
~~
S
Ror
UPT
2c
Comer
Hay
una
seleccién
de
100
sonidos
programados.
Cada
sonido
tiene
un
numero
de
dos
digitos.
Para
seleccionar
un
sonido
programado,
busque
el
numero
del
sonido
programado
sobre
el
panel
supe-
rior
del
teclado,
e
ingrese
el
numero
usando
los
botones
de
seleccién
de
sonido.
*Sonido
“PIANO”
(No.
00)
se
selecciona
automaticamente
siempre
que
enciende
el
teclado.
TONE
OOOO0O
20.000
Stsuieiem
Para
seleccionar
“PIPE
ORGAN”
(No.
06)
luego
de
seleccionar
“JAZZ
GUITAR”
(No.
36).
;
Sonido
Presione
:
No.
00
PIANO
1)
Ajuste
el
interruptor
de
alimenta-
cién
en
la
posicién
ON.
En
este
momento
automaticamente
se
se-
lecciona
el
sonido
“PIANO”
(No.
00).
2)
Para
seleccionar
“JAZZ
GUITAR”,
presione
los
botones
de
seleccion
de
sonido
“3”
y
luego
“6”.
}
i
*
3)
Para
seleccionar
“PIPE
ORGAN”
<Panel
posterior>
@)Interruptor
de
alimentacién
(2)Botones
de
control
de
tempo
Presione
para
ajustar
el
tempo
de
un
ritmo
automatico
o
un
patron
SUPER
ACCOMPANIMENT.
(3)Botones
de
control
de
volumen
Se
usa
para
ajustar
el
nivel
del
volumen.
Presionando
4
aumenta
el
volumen
del
sonido,
mientras
¥
disminuye
el
volumen.
El
volumen
puede
ajustarse
a
uno
de
los
5
niveles.
Esta
funcion
no
opera
mientras
se
esta
produciendo
un
sonido.
(E]
volumen
se
ajusta
a
su
nivel
maximo
cuando
se
encien-
de
la
unidad)
(4)
Boton
de
seleccion
Se
usa
cuando
se
selecciona
uno
de
los
19
ritmos
automaticos
y
los
13
patrones
SUPER
ACCOMPA-
NIMENT.
Primero
presione
este
botdén,
y
luego
elija
un
ritmo
o
patrén
presionando
una
tecla
en
el
teclado.
(5)Botén
de
parada
Presione
para
detener
un
ritmo
automatico,
un
patron
SUPER
ACCOMPANIMENT
0
melodia
de
de-
mostracion.
(6)
Botones
selectores
de
sonido
Presione
para
seleccionar
entre
los
100
sonidos
programados,
que
incluyen
sonidos
de
instrumen-
tos,
sonidos
de
percusién
y
sonidos
de
efectos.
No.
36
presione
los
botones
de
seleccién
JAZZ
GUITAR
de
sonido
“0”
y
luego
“6”.
No.
06
PIPE
ORGAN
*También
puede
cambiar
el
sonido
seleccionado
presionando
solamente
un
solo
boton
de
seleccion
de
sonido.
Observe
lo
siguiente:
=>
Sonido
nuevo
seleccionado
No.
60
No.
06
No.
61
Presione
0
;
No.
60
!
6
No.
06
Sonido
seleccionado
—
No.
36
!
'
4
1
\
NOTA
Algunas
selecciones
del
banco
de
sonido
dividen
el
teclado
y
asignan
dos
o
cuatro
sonidos
al
tecla-
do.
Entonces,
el
sonido
producido
depende
en
la
posicidn
del
teclado
en
la
que
se
ejecuta.
Por
ejemplo,
BASS/PIANO
coloca
BASS
sobre
la
izquierda
y
PIANO
sobre
la
derecha
del
teclado.
Uso
de
los
pulsadores
de
percusién
|
Su
teclado
tiene
un
total
de
5
pulsadores
de
percusién
que
le
permiten
agregar
rellenos
y
acentos
_
originales
a
sus
ejecuciones.
Los
sonidos
de
percusién
programados
pueden
ser
activados
mediante
un
simple
golpecito
a
los
pulsadores
con
sus
dedos.

(8)
Botones
DEMO
Presione
estos
botones
para
escuchar
las
melodias
de
demostracién
programadas.
(9)
Teclas
de
seleccién
de
ritmo
(Teclas
blancas
del
teclado)
Presione
para
seleccionar
un
ritmo
automatico
luego
de
presionar
el
botén
selector.
(0
Teclas
de
selecci6n
SUPER
ACCOMPANIMENT
(Teclas
negras
del
teclado)
Presione
para
seleccionar
el
patron
SUPER
ACCOMPANIMENT
luego
de
presionar
el
botén
de
se-
leccion.
()
Altavoces
incorporados
(2
Toma
de
salida
Para
la
conexion
de
auriculares
opcionales,
amplificador
de
audio
o
amplificador
de
teclado.
La
co-
nexion
de
los
auriculares
automaticamente
corta
la
salida
del
altavoz.
(3)
Toma
de
adaptador
de
CA
Para
la
conexi6én
del
adaptador
de
CA
opcional
(o
adaptador
para
bateria
del
automovil).
NOTA
Siempre
que
se
presionan
los
botones
de
control
de
volumen,
botones
de
control
de
tempo,
botén
de
seleccién,
0
botones
de
seleccién
de
sonido,
suena
un
ruido
metalico
(que
realmente
es
la
‘“‘ma-
quina
de
escribir”
del
banco
de
sonido).
Este
sonido
ayuda
a
confirmar
que
su
ingreso
ha
sido
ade-
cuadamente
registrado.
En
este
caso
de
los
botones
de
control
de
tempo
y
control
de
volumen,
si
presiona
un
botén
y
no
se
escucha
el
sonido
metalico,
significa
que
el
ajuste
se
encuentra
en
su
minimo
o
maximo.
eEjecucién
de
las
melodias
de
demostracién
S
melodias
diferentes
de
demostracién
muestran
todas
las
caracteristicas
y
funciones
del
teclado.
Simplemente
presione
uno
de
los
botones
DEMO
@),
y
escuche
la
ejecucidén
del
teclado.
“La
melodia
de
demostracién
seleccionada
se
ejecuta
en
un
ciclo
sin
fin.
Para
parar
la
melodia,
pre-
sione
nuevamente
una
de
los
botones
DEMO
o
el
botén
de
Parada.
“No
puede
usarse
e/
teclado
y
ajustar
e/
tempo
mientras
se
esta
ejecutando
la
melodia
de
demostracion.
“El
nivel
de
volumen
puede
ajustarse
pero
no
se
escuchara
el
ruido
metélico
(sonido
de
‘‘maquina
de
escribir’).
Alimentacion
por
CC
*Pilas
secas
Esta
unidad
puede
energizarse
mediante
cinco
pilas
secas
de
tamafio
AA
(SUM-3/R6P).
Las
pilas
agotadas
resultaran
en un
bajo
volumen
o
pobre
calidad
tonal.
En
este
momento,
cambie
las
pilas
0
a
una
de
las
alimentaciones
alternativas
que
se
mencionan
a
continuacidén.
Para
cambiar
las
pilas
1)
Abra
la
cubierta
del
compartimiento
de
pila
en
la
Parte
inferior
de
la
unidad
y
retire
las
pilas
usadas.
2)
Coloque
las
nuevas
pilas
teniendo
cuidado
de
que
los
polos
(+)
y
(—)
se
dirijan
en
las
direcciones
correctas.
“Se
aconseja
reemplazar
las
cinco
pilas
al
mismo
tiempo
para
una
mayor
duracién
de
las
mismas.
"La
duracion
de
una
pila
estandar
es
de
aproximadamente
6
horas.
a
ee
eS
a
whee
——__———
MENT
OM
PERTTI
CAMIVIITIGIUY
SAISLICIilco.
WWOO-
VTEMPOA
SELECT
STOP
RHYTHM
/
SUPER
ACCOMPANIMENT
1)
Presione
el
botén
de
seleccién.
2)
Presione
una
de
las
teclas
del
teclado
blanco.
Y
e!
patrén
de
ritmo
automatico
rotulado
sobre
la
tecla
blanca
inmediatamente
comienza
a
ejecutarse.
selecci6én
SUPER
ACCOMPANIMENT
(Teclas
negras
de/
teclado)
Teclas
de
seleccién
de
ritmo
(Teclas
blancas
del
teclado)
3)
Ajuste
el
tempo
usando
los
botones
de
control
de
tempo.
A
cada
presién
de
A
aumenta
el
tem-
po,
mientras
presionando
YW
lo
disminuye.
*Se
puede
ajustar
el
nivel
del
tempo
a
uno
de
los
16
pasos.
4)
Ejecute
junto
con
el
patrén
de
ritmo
seleccionado.
5)
Para
detener
el
ritmo
automatico
presione
el
botén
de
parada.
NOTA
Puede
cambiarse
el
ritmo
automatico
mientras
se
esta
ejecutando,
repitiendo
los
pasos
1)
y
2)
ante-
riores.
nee
Bec:
:
|
as
easel
ee
coos
Gar
a
es
A
Los
patrones
“SUPER
ACCOMPANIMENT”
hacen
de
fondo
a
sus
melodias
con
progresiones
de
acor-
des
completos,
patrones
de
arpegio,
jefectos
de
sonido
y
aun
mas!
Hay
13
para
elegir,
incluyendo
tales
patrones
estandares
como
rock,
latinos
y
populares,
y
los
patrones
mas
exoticos
semejante
a
Oriente,
musica
de
la
nueva
edad
y
fanfarra.
1)
Presione
el
botén
de
seleccion.
2)
Presione
una
de
las
teclas
del
teclado
negro,
y
el
patron
SUPER
ACCOMPANIMENT
rotulado
sobre
la-tecla
negra
comienza
inmediatamente
a
ejecutarse.
/
3)
Ejecute
junto
con
el
patrén
seleccionado.
|
|
4)
Presione
el
botén
de
parada
para
detener
la
ejecucién
de
SUPER
ACCOMPANIMENT.
NOTA
Puede
cambiarse
el
patron
SUPER
ACCOMPANIMENT
mientras
se
esta
ejecutando,
repitiendo
los
|
pasos
71)
y
2)
anteriores.
(1)
Evite
el
calor,
la
humedad
y
los
rayos
solares
directos.
No
exponga
la
unidad
a
los
rayos
solares
directos,
ni
la
coloque
cerca
de
un
calefactor,
o
en
areas
sujetas
a
altas
temperaturas.

Precauciones
E!
uso
incorrecto
de
las
pilas
puede
ocasionar
que
las
pilas
exploten
o
se
sulfaten,
pudiendo
danar
el
interior
de
la
unidad.
Observe
las
siguientes
precauciones:
*“Cercidrese
de
que
los
polos
positivos
(+)
y
negativos
(—)
de
cada
pila
se
dirijan
en
la
direccién
adecuada.
*No
mezcle
pilas
de
diferente
tipos.
“No
mezcle
pilas
usadas
con
pilas
nuevas.
*No
deje
pilas
agotadas
en
el
compartimiento
de
pilas.
*Si
tiene
planeado
no
usar
la
unidad
por
un
largo
periodo
de
tiempo
retire
las
pilas.
*Cambie
las
pilas
por
lo
menos
una
vez
cada
2
afios,
sin
considerar
el
uso
que
se
le
haya
dado
a
la
unidad.
*No
trate
de
recargar
las
pilas
suministradas
con
la
unidad.
*No
exponga
las
pilas
al
calor
directo,
ni
permita
que
se
pongan
en
cortocircuito
ni
tampoco
trate
de
desarmarlas.
*Si
una
pila
llega
a
sulfatarse,
limpie
inmediatamente
el
compartimiento
de
la
unidad,
tenga
cuidado
de
evitar
que
el
electrdlito
de
la
pila
se
ponga
en
contacto
con
su
piel.
Toma
para
adaptador
de
CA
Alimentacion
por
CA
Cuando
se
usa
un
tomacorriente
de
la
linea
domiciliaria
se
requiere
de
un
adaptador
de
CA
(AD-1
opcional).
Solamente
use
un
adaptador
original
CASIO
con
el
mismo
valor
de
tensién
(100,
117,
220
0
240
V)
que
la
alimentacién
de
su
area
para
prevenir
dafos
a
los
componentes
internos
del
teclado.
Enchufe
el
adaptador
de
CA
en
la
toma
de
CA
y
el
cable
en
la
unidad.
Esto
cortara
automaticamente
la
alimentacién
por
pilas.
*Solamente
use
adaptadores
originales
CAS/O
para
evitar
el
riesgo
de
dafios.
“El
adaptador
puede
calentarse
si
se
lo
deja
conectado
a
un
tomacorriente.
Aunque
es
normal
se
reco-
mienda
desconectarilo
cuando
no
se
/o
usa.
CASIO
COMPUTER
CO.,
LTD.
6-2,
Hon-machi
1-chome,
Shibuya-ku,
Tokyo
151-8543,
Japan
|
|
(2)
Evite
los
fuertes
impactos
y
no
la
deje
caer.
Un
fuerte
impacto
puede
resultar
en
dafnos
a
la
unidad.
Para
no
dafar
la
unidad
cuando
la
lleva
de
un
sitio
a
otro,
proteja
el
teclado
y
los
interruptores
con
un
pafho
suave.
(3)
Mantenga
la
unidad
libre
de
liquidos,
polvos,
etc.
No
permita
que
materias
extrahas
ingresen
entre
las
teclas.
Tenga
especial
cuidado
de
los
objetos
metalicos,
como
ser
agujas
de
coser
y
monedas.
Tampoco
permita
que
la
unidad
se
moje.
(4)
No
intente
modificar
la
unidad
por
su
cuenta.
La
unidad
es
un
instrumento
de
precisién,
compuesto
por
componentes
electrénicos.
Cualquier
mo-
dificacidn
de
los
componentes
internos
puede
ser
causa
de
problemas
o
desperfectos.
(5)
No
limpie
la
unidad
con
liquidos
disolventes
ni
agentes
quimicos
similares.
Limpie
con
un
paho
humedo
y
un
poco
de
detergente
suave.
(Humedezca
el
pano
en
un
detergente
y
estrujelo
hasta
dejarlo
casi
seco.)
(6)
No
olvide
de
desactivar
el
conmutador
de
alimentaci6n.
Después
de
utilizar
la
unidad,
asegurese
de
apagarla.
Si
queda
encendida
por
muchas
horas
se
pueden
producir
fallas
o
accidentes.
También,
cuando
no
la
vaya
a
utilizar
por
un
largo
periodo
de
tiempo,
quite
las
pilas
para
evitar
corrosién
por
fugas
del
electrdlito
en
las
mismas.
Numero
de
teclas:
32
miniteclas
Polifonia:
polifonia
de
4
notas
Sonidos
programados:
100
Ritmos
automaticos:
19;
ROCK
1-2,
16
COMPASES
1-2,
DISCO
1-3,
POPULARES
1-3,
ROCK
LENTO,
SWING,
MARCHA,
REGGAE,
TANGO,
SAMBA,
BOSANOVA,
BEGUINE,
VALS
Patrones
de
super
acompafamiento:
13;
ROCK,
POPULARES,
FUNK,
ROCK
LENTO,
LATINOS,
JUNGLA,
ORIENTE,
GAITA,
FANFARRA,
JUEGO
DE
NINOS,
CLASICO,
COMPUTADORA,
MUSICA
DE
LA
NUEVA
EDAD
Altavoces
incorporados:
8
cm.
de
diam.
x
2
(salida=0,5W
+
0,5W)
Terminales:
Toma
de
salida
[Impedancia
de
salida:
1002,
tensién
de
salida:
2,0
(eficaz)
MAX],
toma
de
adaptador
de
CA
(CC
7,5V)
Melodias
de
demostracién:
5
Alimentacién:
3
modos
de
alimentacién
de
CA/CC;:
CA:
100,
117,
220
o
240V
(+
10V),
50/60
Hz,
con
adaptador
de
CA
AD-1
(opcional).
CC:
5
pilas
secas
de
manganeso
de
tamafio
AA
(SUM-3/R6P).
*“Duracion
de
las
pilas:
aprox.
6
horas.
Consumo
de
energia:
1,6
W
Dimensiones
(An
x
Pr
x
Al):
612
x
176
x
61
mm
|
Peso:
1,2
kg
*El
disefio
y
las
especificaciones
estan
sujetos
a
cambios
sin
previo
aviso.
4140-920-2-01
Table of contents
Languages:
Other Casio Musical Instrument manuals

Casio
Casio PX-860 User manual

Casio
Casio CGP-700 User manual

Casio
Casio CTK-710 User manual

Casio
Casio Privia PX-5S User manual

Casio
Casio SK-5 - SERVICE Troubleshooting guide

Casio
Casio SongBank SA-35 User manual

Casio
Casio Privia PX-S1000 User manual

Casio
Casio AP-710 User manual

Casio
Casio Celviano AP-25 User manual

Casio
Casio Casiotone MT-205 User manual

Casio
Casio CDP-100 User manual

Casio
Casio CDP-S360 User manual

Casio
Casio Celviano AP-250 User manual

Casio
Casio TONEBANK MT-750 User manual

Casio
Casio DM-100 User manual

Casio
Casio Casiotone CT-S195 User manual

Casio
Casio TONE BANK CT-395 User manual

Casio
Casio MT-640 User manual

Casio
Casio EG-5 User manual

Casio
Casio MA-170 User manual