1
Operation Guide 3125
Alarm
When the daily alarm is turned on, the alarm tone sounds
when the alarm time is reached.
You can also turn on an Hourly Time Signal that causes
the watch to beep twice every hour on the hour.
•All of the operations in this section are performed in the
Alarm Mode, which you enter by pressing B.
Alarm Operation
The alarm tone sounds at the preset time for 10 seconds,
regardless of the mode the watch is in.
MA0801-EA
About This Manual
•Button operations are indicated using the letters shown
in the illustration.
•Each section of this manual provides you with the
information you need to perform operations in each
mode. Further details and technical information can be
found in the “Reference” section.
(Light)
(Light)
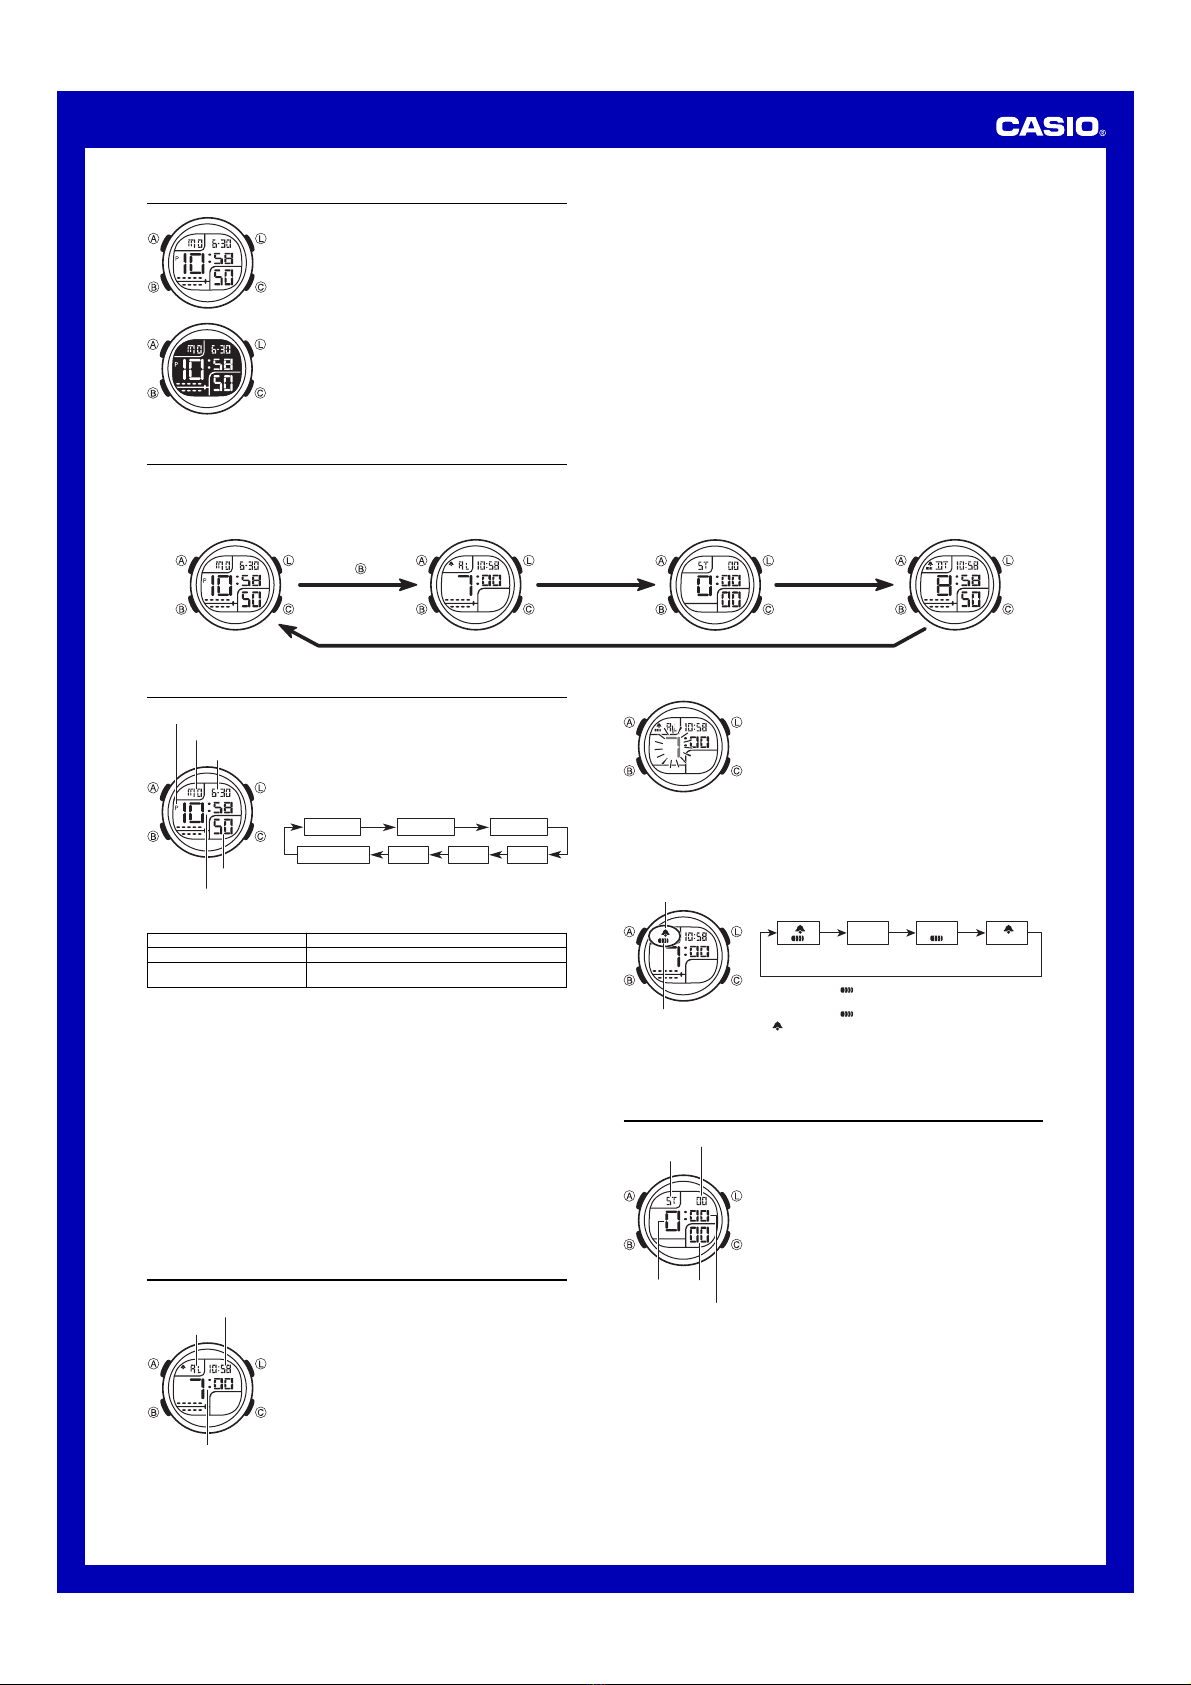
General Guide
•Press Bto change from mode to mode.
•In any mode, press Lto illuminate the display.
Timekeeping
Use the Timekeeping Mode to set and view the current
time and date.
To set the time and date
1. In the Timekeeping Mode, hold down Auntil the
seconds start to flash, which indicates the setting
screen.
2. Press Bto move the flashing in the sequence shown
below to select other settings.
Seconds Hour Minutes
YearMonthDay of week Day
To change this setting
Seconds
Hour, Minutes, Year, Month,
Day, Day of week
Perform this button operation
Press Cto reset to 00.
Press Cto increase the setting.
Holding down Cchanges the setting at high speed.
•Pressing Cwhile the seconds are in the range of 30 to 59 resets them to 00 and
adds 1 to the minutes. In the range of 00 to 29, the minutes are unchanged.
4. Press Ato exit the setting screen.
•The year can be set in the range of 2000 to 2099.
•The watch’s built-in full automatic calendar makes allowances for different month
lengths and leap years. Once you set the date, there should be no reason to change
it except after you have the watch’s battery replaced.
To toggle between 12-hour and 24-hour timekeeping
In the Timekeeping Mode, press Cto toggle between 12-hour timekeeping and
24-hour timekeeping.
•With the 12-hour format, the P(PM) indicator appears to the left of the hour digits for
times in the range of noon to 11:59 p.m. and no indicator appears to the left of the
hour digits for times in the range of midnight to 11:59 a.m.
•With the 24-hour format, times are displayed in the range of 0:00 to 23:59, without
any indicator.
•The Pindicator is not displayed with the Timekeeping Mode time on the Alarm Mode
and Dual Time Mode screens.
•The 12-hour/24-hour timekeeping format you select in the Timekeeping Mode is
applied in all other modes.
To set an alarm time
1. In the Alarm Mode, hold down Auntil the hour setting
starts to flash, which indicates the setting screen.
•This operation automatically turns on the alarm.
2. Press Bto move the flashing between the hour and
minutes.
3. While a setting is flashing, use Cto increase it.
Holding down Cchanges the setting at high speed.
•With the 12-hour format, set the time correctly as a.m.
(no indicator) or p.m. (Pindicator).
4. Press Ato exit the setting screen.
To stop the alarm tone after it starts to sound
Press any button.
To turn the Daily Alarm and Hourly Time Signal on and off
In the Alarm Mode, press Cto cycle through the on and
off settings as shown below.
Alarm On Indicator/Hourly Time Signal On Indicator
Daily alarm
only
Both off
Both on Hourly Time
Signal only
•The alarm on ( ) indicator flashes while the alarm is
sounding.
•The alarm on ( ) indicator and Hourly Time Signal on
() indicator are displayed in all modes.
To test the alarm
In the Alarm Mode, hold down Cto sound the alarm.
Stopwatch
The stopwatch lets you measure elapsed time, split times,
and two finishes.
•The display range of the stopwatch is 23 hours,
59 minutes, 59.99 seconds.
•The stopwatch continues to run, restarting from zero
after it reaches its limit, until you stop it.
•The stopwatch measurement operation continues even
if you exit the Stopwatch Mode.
•Exiting the Stopwatch Mode while a split time is frozen
on the display clears the split time and returns to
elapsed time measurement.
•All of the operations in this section are performed in the
Stopwatch Mode, which you enter by pressing B.
Timekeeping Mode Alarm Mode Stopwatch Mode Dual Time Mode
Press .
Day of week
Seconds
Hour : Minutes
PM indicator
Month – Day
3. When the setting you want to change is flashing, press Cto change it as
described below.
Alarm time
(Hour : Minutes)
Timekeeping Mode tim
(Hour : Minutes)
Mode indicator
Hourly time signal
on indicator
Alarm on indicator
Seconds
1/100 second
Mode indicator
Hours
Minutes


 User manual")


