Casio 5142 User manual

CASIO COMPUTER CO., LTD.
6-2, Hon-machi 1-chome
Shibuya-ku, Tokyo 151-8543, Japan
5142 5
5SERS'UIDE
"EDIENUNGSANLEITUNG
-ODEDEMPLOI
'U¤ADELUSUARIO
'UIDADELLUTILIZZATORE
%
Printed in Japan
Imprimé au Japon
Gedruckt in Japan
MA1107-000000A
Module No. 5142

CASIO COMPUTER CO., LTD.
6-2, Hon-machi 1-chome
Shibuya-ku, Tokyo 151-8543, Japan
5142 KHE
MODEL:...................................................................................................................................................
DATE OF PURCHASE:............................................................................................................................
CUSTOMER’S NAME:.............................................................................................................................
OFFICIAL DEALER STAMP:
WARRANTY CARD
5SERS'UIDE 7ARRANTY#ARD
+(%
7
Printed in Japan
MA1107-000000A
Module No. 5142

E-1
ENGLISH
Congratulations upon your selection of this CASIO watch.
To ensure that this watch provides you with the years of service for which it is
designed, be sure to carefully read and follow the instructions in this manual,
especially the information under “Operating Precautions” and “User Maintenance”.
Be sure to keep all user documentation handy for future reference.
Note that the product illustrations in this manual are intended for reference only, and so•
the actual product may appear somewhat different than depicted by an illustration.
This watch does not have a city code that corresponds to the UTC offset of –3.5
hours. Because of this, the radio-controlled atomic timekeeping function will not
display the correct time for Newfoundland, Canada.
Note that CASIO COMPUTER CO., LTD. assumes no responsibility for any
damage or loss suffered by you or any third party arising through the use of this
product or its malfunction.
E-2
About This Manual
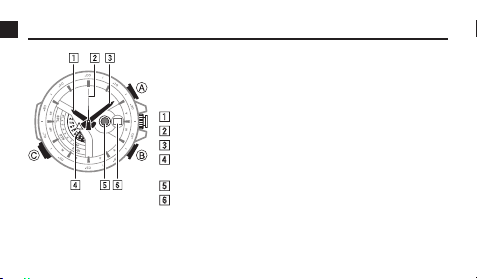
In this manual, operations are performed using the watch’s
crown, and the three buttons indicated by the letters A,
Band C.
Hands and Indicators
z Hour Hand
x Second Hand
c Minute Hand
v Mode Disk: Rotates to indicate the current mode and
other information.
b Chronograph Signal
n Day
This User’s Guide uses numbers shown above to identify
watch hands and indicators.
+
6*>
@B

E-3
Using the Crown
The crown of this watch has a button part and a ring part. You can use the crown’s
button and ring to perform a number of different crown operations.
Locking the Crown
To lock the crown, push down its ring part as far as it will go as you
rotate the ring away from you until it is relatively tight. While the
crown is locked correctly, the only crown operations possible are
pressing the crown button and unlocking the crown.
Important!
Push down on the ring as you slowly rotate it. You should be able to feel it screwing•
securely into place.
You should normally have the crown locked during normal daily use. Leaving the•
crown unlocked creates the risk of unintended operations or even damage due to
impact.

E-4
Note that rotating the ring without pushing it down as far as it will go will change the•
settings of the watch. When locking the crown, be sure to press down firmly on the
ring as you rotate it.
Unlocking the Crown
Rotate the ring part of the crown towards you until it loosens
completely.
Pressing the Crown Button
You can press the crown button while the crown is locked.
Crown ring
Press

E-5
Pulling the Crown Out
After unlocking the crown, grasp the ring and pull the crown out.
Rotating the Crown
With the crown pulled out, grasp the ring and rotate the crown
towards you to move the hands of the watch.
You can also perform high-speed hand movement using the
operations described below. Note that there are two levels of high-
speed movement (High-speed 2 is faster).
Use High-speed 2 when changing the minute hand setting in the•
Timekeeping Mode, Timer Mode, and Alarm Mode.

E-6
High-speed 1
With the crown pulled out, rotate it rapidly away from you two times.
High-speed 2
After starting the High-speed 1 operation, rotate the crown rapidly
away from you two more times.
High-speed Cancel
Rotate the crown towards you or press any button.

E-7
Note
You can use high-speed hand movement when configuring time settings in the•
Timekeeping Mode, Alarm Mode, or Countdown Timer Mode, or when adjusting the
home positions of the hands.
Pushing the Crown In
Carefully press the button of the crown the push the crown back in.
Important!
To prevent unintentional operation, the button press operation of the crown•
becomes disabled automatically for about eight seconds after you push the crown
back in. It will become re-enabled after about eight seconds.

E-8
Note
If you do not perform any operation for more than three minutes after pulling out the•
crown, crown operations will become disabled automatically. If this happens, push
the crown back in and then pull it out again to re-enable crown operations.
Disabling Crown Button Mode Switching
You can use the following operation to disable crown button mode switching, so the
watch does not change modes when the crown button is pressed.
To disable crown button mode switching
While pressing and holding down the crown button for about two seconds, press A.
This will disable mode switching when the crown button is pressed.
While crown button mode switching is disabled, pressing the crown button will•
cause the xSecond Hand to move to the 3 o’clock position. The watch will not
change modes. The xSecond Hand will resume normal timekeeping when you
release the crown button.
Other manuals for 5142
1
Table of contents
Other Casio Watch manuals

Casio
Casio 4709 User manual

Casio
Casio QW-1840 User manual

Casio
Casio 1949 User manual

Casio
Casio QW-1210 Configuration guide

Casio
Casio 5381 User manual

Casio
Casio 3542 User manual

Casio
Casio G-Shock G-5600-9 User manual

Casio
Casio 5078 User manual

Casio
Casio 1583 Configuration guide

Casio
Casio 3429 User manual
 User manual")


