manuals.online logo
Brands
  1. Home
  2. •
  3. Brands
  4. •
  5. Casio
  6. •
  7. Watch
  8. •
  9. Casio 3178 User manual

Casio 3178 User manual

1
Operation Guide 3178
MA0905-EA
About This Manual
•Depending on the model of your watch, display text
appears either as dark figures on a light background or
light figures on a dark background. All sample displays
in this manual are shown using dark figures on a light
background.
•Button operations are indicated using the letters shown
in the illustration.
•Each section of this manual provides you with the
information you need to perform operations in each
mode. Further details and technical information can be
found in the “Reference” section.
Timekeeping Mode World Time ModeAlarm ModeCountdown Timer ModeStopwatch Mode (ST1) Stopwatch Mode (ST2)
Press .
General Guide
•Press Cto change from mode to mode.
•In any mode (except when a setting screen is on the display), press Bto illuminate
the display.
To set the time and date
1. In the Timekeeping Mode, hold down Auntil the
seconds start to flash, which indicates the setting
screen.
2. Press Cto move the flashing in the sequence shown
below to select other settings.
Seconds Home Time Zone Hour
Year MinutesDay
DST
Month
3. When the setting you want to change is flashing, use Dand Bto change it as
described below.
Home time zone
Timekeeping
Use the Timekeeping Mode to set and view the current
time and date.
Read This Before You Set the Time and Date !
The times displayed in the Timekeeping Mode and World
Time Mode are linked. Because of this, make sure you
select a Home Time zone before you set the time and
date.
Day of week
Month – Day
Hour : Minutes
PM indicator
Seconds
DST indicator
Screen
To do this:
Reset the seconds to 00
Toggle between Daylight Saving
Time (ON) and Standard Time (OFF)
Specify the UTC offset
Change the hour or minutes
Change the year
Change the month or day
Do this:
Press D.
Press D.
Use D(+) and B(–).
Use D(+) and B(–).
•See “Daylight Saving Time (DST)”for details about DST setting.
•The UTC offset setting range is –12.0 to +14.0, in 0.5-hour units.
•When DST is turned on, the UTC offset setting range is –11.0 to +15.0, in
0.5-hour units.
4. Press Ato exit the setting screen.
•The day of the week is displayed automatically in accordance with the date (year,
month, and day) settings.
Daylight Saving Time (DST)
Daylight Saving Time (summer time) advances the time setting by one hour from Standard
Time. Remember that not all countries or even local areas use Daylight Saving Time.
To toggle the Timekeeping Mode time between DST and Standard Time
1. In the Timekeeping Mode, hold down Auntil the
seconds start to flash, which indicates the setting
screen.
2. Press Cto display the DST setting screen.
3. Press Dto toggle between Daylight Saving Time
(ON displayed) and Standard Time (OFF displayed).
4. Press Ato exit the setting screen.
•The DST indicator appears on the display to indicate
that Daylight Saving Time is turned on.
1/100 second
Minutes
Seconds
Timekeeping Mode time
*During stopwatch elapsed
time measurement,
shows the number of
hours elapsed.
To toggle between 12-hour and 24-hour timekeeping
In the Timekeeping Mode, press Dto toggle between 12-hour timekeeping and 24-
hour timekeeping.
•With the 12-hour format, the P(PM) indicator appears to the left of the hour digits for
times in the range of noon to 11:59 p.m. and no indicator appears to the left of the
hour digits for times in the range of midnight to 11:59 a.m.
•With the 24-hour format, times are displayed in the range of 0:00 to 23:59, without
any indicator.
•The 12-hour/24-hour timekeeping format you select in the Timekeeping Mode is
applied in all other modes.
•The Pindicator is not displayed when the current time is displayed in other modes.
Stopwatches
Your watch has two stopwatch modes:Stopwatch Mode
(ST1) and Stopwatch Mode (ST2). Both stopwatch modes
let you measure elapsed time, split times, and two
finishes. The Stopwatch Mode (ST1) includes Auto-Start.
•A display range of the stopwatch is 999 hours,
59 minutes, 59.99 seconds.
•A stopwatch continues to run, restarting from zero after
it reaches its limit, until you stop it.
•A stopwatch measurement operation continues even if
you exit a Stopwatch Mode.
•Exiting a Stopwatch Mode while a split time is frozen on
the display clears the split time and returns to elapsed
time measurement.
•All of the operations in this section are performed in the
Stopwatch Mode (ST1) or Stopwatch Mode (ST2),
which you enter by pressing C.
To measure times with the stopwatch
(Stopwatch Mode (ST1) and Stopwatch Mode (ST2))
Elapsed Time
Start Stop Re-start Stop Clear
Start Split
( displayed)
Split release Stop Clear
Start Split Stop Split release Clear
Split Time
Two Finishes
First runner finishes.
Display time of first
runner.
Second runner
finishes.
Display time of
second runner.
About Auto-Start (Stopwatch Mode (ST1))
With Auto-Start, the watch performs a 5-second countdown, and stopwatch operation
starts automatically when the countdown reaches zero.
During the final three seconds of the countdown, a beeper sounds with each second.
To use Auto-Start (ST1)
1. While the stopwatch screen is showing all zeros in the
Stopwatch Mode, press A.
•This displays a 5-second countdown screen.
•To return to the all zeros screen, press Aagain.
2. Press Dto start the countdown.
•When the countdown reaches zero, a tone sounds and
a stopwatch timing operation starts automatically.
•Pressing Dwhile the Auto-Start countdown is in
progress starts the stopwatch immediately.
2
Operation Guide 3178
Seconds
Hours
Minutes
Countdown Timer
The countdown timer can be set within a range of one
minute to 24 hours. An alarm sounds when the countdown
reaches zero. The countdown timer also has an auto-
repeat feature and a progress beeper that signals the
progress of the countdown.
•All of the operations in this section are performed in the
Countdown Timer Mode, which you enter by pressing
C.
Configuring the Countdown Timer
The following are the settings you should configure before
actually using the countdown timer.
Countdown start time; Auto-repeat on/off; Progress
beeper on/off
•See “To configure the countdown timer”for information
about setting up the timer.
Auto-repeat
When auto-repeat is turned on, the countdown restarts automatically from the
countdown start time when it reaches zero.
When auto-repeat is turned off, the countdown stops when it reaches zero and the
display shows the original countdown start time.
•Pressing Dwhile an auto-repeat countdown is in progress pauses the current
countdown. You can resume the auto-repeat countdown by pressing D, or you can
press Ato reset to the countdown time starting value.
Countdown Timer Beeper Operations
The watch beeps at various times during a countdown so you can keep informed
about the countdown status without looking at the display. The following describes the
types of beeper operations the watch performs during a countdown.
Countdown End Beeper
The countdown end beeper lets you know when the countdown reaches zero.
•When the progress beeper is turned off, the countdown end beeper sounds for
about 10 seconds, or until you press any button to stop it.
•When the progress beeper is turned on, the countdown end beeper sounds for
about one second.
Progress Beeper
When the progress beeper is turned on, the watch uses beeps to signal countdown
progress as described below.
•Starting from five minutes before the end of the countdown, the watch emits four
short beeps at the top of each countdown minute.
•30 seconds before the end of the countdown, the watch emits four short beeps.
•The watch emits a short beep for each of the last 10 seconds of the countdown.
•If the countdown start time is six minutes or greater, the watch emits a short beep for
each second of the final 10 seconds before the five-minute point is reached. Four
short beeps are emitted to signal when the five-minute point is reached.
To configure the countdown timer
1. While the countdown start time is on the display in the
Countdown Timer Mode, hold down Auntil the current
countdown start time starts to flash, which indicates the
setting screen.
•If the countdown start time is not displayed, use the
procedure under “To use the countdown timer”
to display it.
2. Press Cto move the flashing in the sequence shown
below to select other settings.
Hours
Progress Beeper
Minutes
Auto-repeat
3. When the setting you want to change is flashing, use Band Dto change it as
described below.
Setting
Hours, Minutes
Auto-repeat
Progress Beeper
Screen Button Operation
Use D(+) and B(–) to change the setting.
Press Dto toggle auto-repeat on ( displayed) and off
(displayed).
Press Dto toggle the progress beeper on ( ) and off ( ).
•To specify a countdown start time of 24 hours, set .
4. Press Ato exit the setting screen.
•You can also perform steps 1 and 2 of the above procedure whenever you need to
view the current auto-repeat and progress beeper settings.
To use the countdown timer
Press Dwhile in the Countdown Timer Mode to start the
countdown timer.
•The countdown timer operation continues even if you
exit the Countdown Timer Mode.
•Press Dwhile a countdown operation is in progress to
pause it. Press Dagain to resume the countdown.
•To stop a countdown operation completely, first pause it
(by pressing D), and then press A. This returns the
countdown time to its starting value.
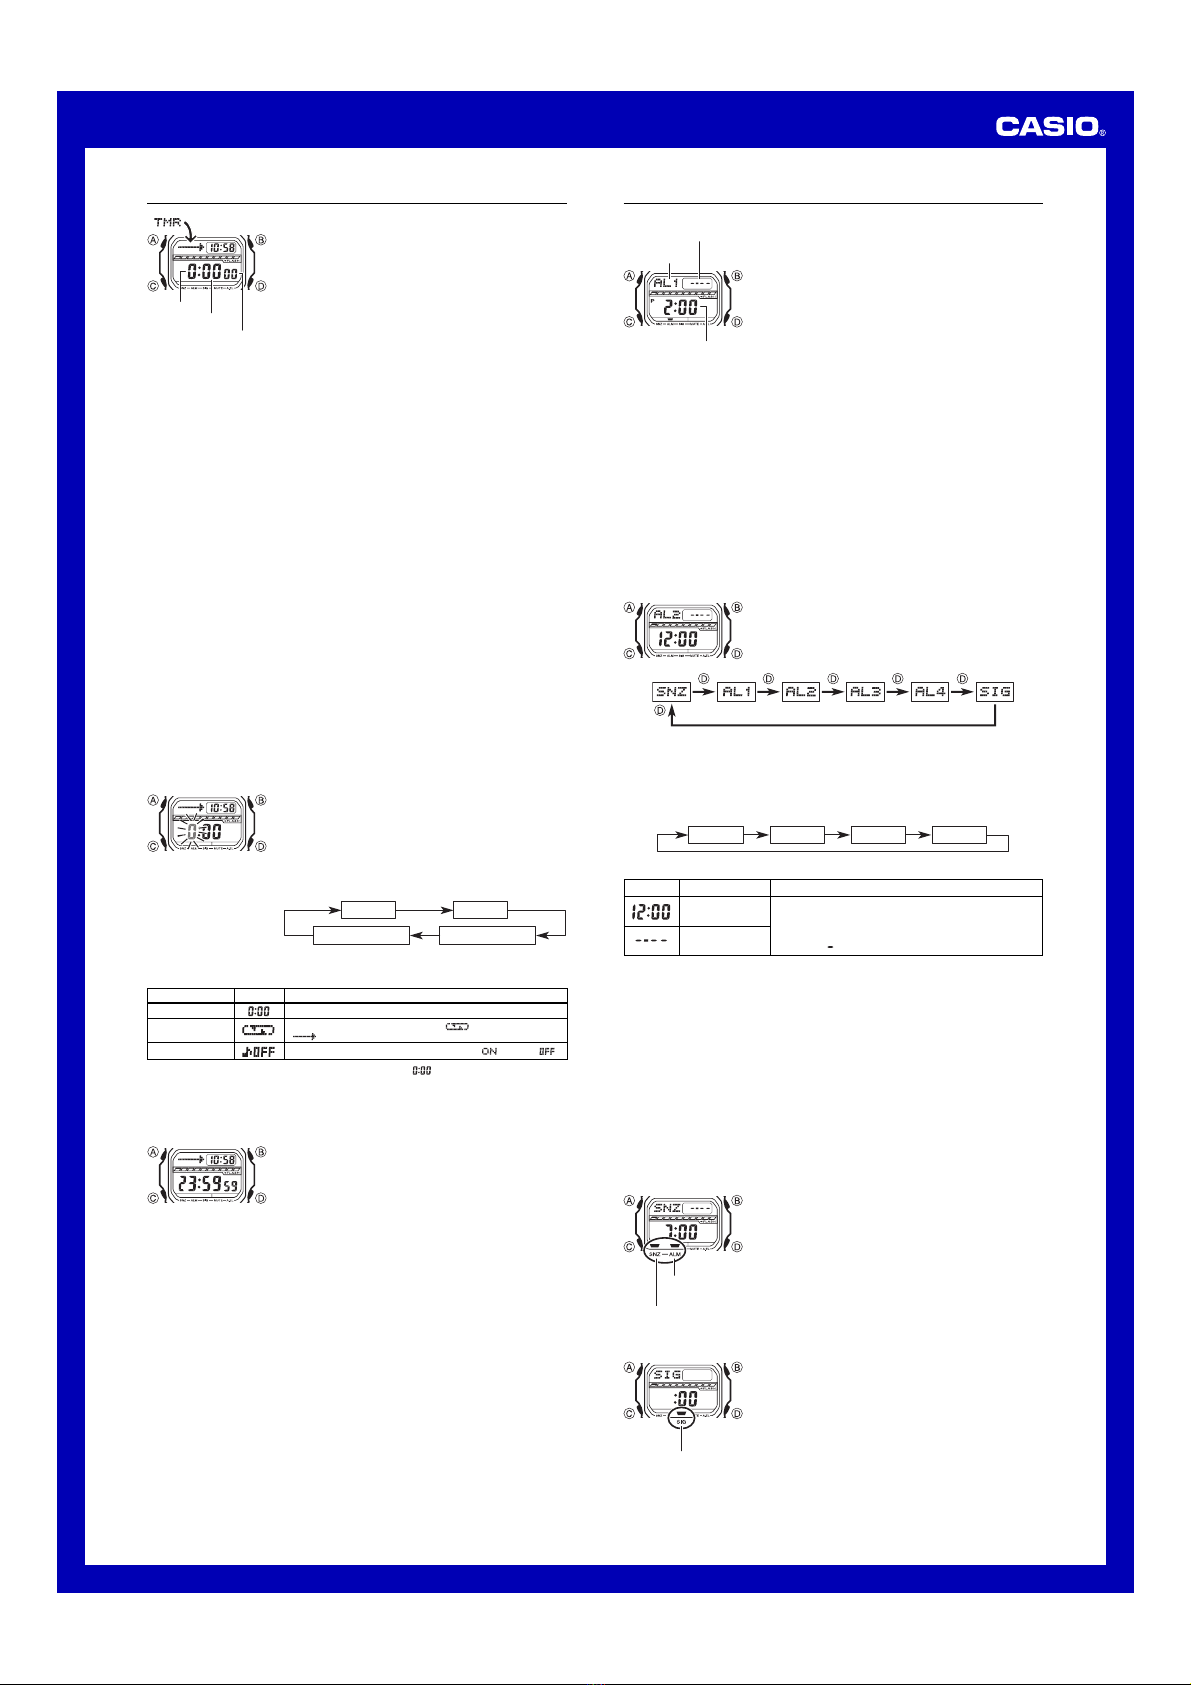
Alarm time
(Hour : Minutes)
Alarm number
Alarm date
(Month – Day)
Alarms
You can set up to five independent multi-function alarms
with hour, minutes, month, and day. When an alarm is
turned on, the alarm tone sounds when the alarm time is
reached. One of the alarms is a snooze alarm, while the
other four are one-time alarms.
You can also turn on an Hourly Time Signal that causes
the watch to beep twice every hour on the hour.
•There are five alarm screens numbered AL1, AL2,
AL3, and AL4 for the one-time alarm, a snooze
alarm screen indicated by SNZ. The Hourly Time
Signal screen is indicated by SIG.
•All of the operations in this section are performed in the
Alarm Mode, which you enter by pressing C.
Alarm Types
The alarm type is determined by the settings you make, as described below.
••
••
•Daily alarm
Set the hour and minutes for the alarm time. This type of setting causes the alarm to
sound everyday at the time you set.
••
••
•Date alarm
Set the month, day, hour and minutes for the alarm time. This type of setting causes
the alarm to sound at the specific time, on the specific date you set.
••
••
•1-Month alarm
Set the month, hour and minutes for the alarm time. This type of setting causes the
alarm to sound everyday at the time you set, only during the month you set.
••
••
•Monthly alarm
Set the day, hour and minutes for the alarm time. This type of setting causes the alarm
to sound every month at the time you set, on the day you set.
To set an alarm time
1. In the Alarm Mode, use Dto scroll through the alarm
screens until the one whose time you want to set is
displayed.
Screen To do this:
Change the hour
and minutes
Change the
month and day
Do this:
Use D(+) and B(–).
•With the 12-hour format, set the time correctly as a.m.
or p.m. (Pindicator).
•To set an alarm that does not include a month and/or
day, set for each setting.
•To set a one-time alarm, display an alarm screen AL1, AL2, AL3, or AL4.
To set the snooze alarm, display the SNZ screen.
•The snooze alarm repeats every five minutes.
2. After you select an alarm, hold down Auntil the hour setting of the alarm time
starts to flash, which indicates the setting screen.
•This operation turns on the alarm automatically.
3. Press Cto move the flashing in the sequence shown below to select other settings.
Hour Minutes Month Day
4. While a setting is flashing, use Dand Bto change it as described below.
5. Press Ato exit the setting screen.
Alarm Operation
The alarm tone sounds at the preset time for 20 seconds, regardless of the mode the
watch is in. In the case of the snooze alarm, the alarm operation is performed a total
of seven times, every five minutes, until you turn the alarm off.
•Alarm and Hourly Time Signal operations are performed in accordance with the
Timekeeping Mode time.
•To stop the alarm tone after it starts to sound, press any button.
•Performing any one of the following operations during a 5-minute interval between
snooze alarms cancels the current snooze alarm operation.
Displaying the Timekeeping Mode setting screen
Displaying the
SNZ
setting screen
To test the alarm
In the Alarm Mode, hold down Dto sound the alarm.
To turn an alarm on and off
1. In the Alarm Mode, use Dto select an alarm.
2. Press Ato toggle it on and off.
•Turning on a alarm (SNZ, AL1, AL2, AL3, or
AL4) displays the alarm on indicator on its Alarm Mode
screen.
•In all modes, the alarm on indicator is shown for any
alarm that is currently turned on.
•The alarm on indicator flashes while the alarm is
sounding.
•The snooze alarm indicator flashes while the snooze alarm
is sounding and during the 5-minute intervals between
alarms.
To turn the Hourly Time Signal on and off
1. In the Alarm Mode, use Dto select the Hourly Time
Signal (SIG).
2. Press Ato toggle it on and off.
•The Hourly Time Signal on indicator is shown on the
display in all modes while this function is turned on.
Snooze alarm
indicator
Alarm on
indicator
Hourly time signal
on indicator
3
Operation Guide 3178
Current time and date in
the zone of the selected
city code
City code
World Time
World Time shows the current time in 48 cities (29 time
zones) around the world.
•All of the operations in this section are performed in the
World Time Mode, which you enter by pressing C.
To view the time for another city code
In the World Time Mode, press Dto scroll eastwardly
through city codes.
•For full information about city codes, see the “City Code
Table”.
•If the current time for a city is wrong, check your
Timekeeping Mode time and time zone settings and
make necessary changes.
To toggle a city code time between Standard Time and Daylight Saving Time
1. In the World Time Mode, use Dto display the city code
(time zone) whose Standard Time/Daylight Saving Time
setting you want to change.
2. Hold down Afor about one second to toggle Daylight
Saving Time (DST displayed) and Standard Time (DST
not displayed).
•The DST indicator is on the display whenever you
display a city code for which Daylight Saving Time is
turned on.
•Note that the DST/Standard Time setting affects only the
currently displayed city code. Other city codes are not
affected.
Auto li
g
ht switch indicator
DST indicator
Illumination
This watch has an EL (electro-luminescent) panel that
causes the entire display to glow for easy reading in the
dark. The watch’s auto light switch turns on illumination
automatically when you angle the watch for reading
towards your face.
•The auto light switch must be turned on (indicated by
the auto light switch indicator) for it to operate.
•See “Illumination Precautions”for more important
information.
Parallel to ground More than 40
°
To illuminate the display
In any mode, press Bto turn on illumination.
•The above operation turns on illumination regardless of the current auto light switch
setting.
•You can use the procedure below to select either 3 seconds or 5 seconds as the
illumination duration. When you press B, the illumination will remain on for about
3 seconds or 5 seconds, depending on the current illumination duration setting.
To specify the illumination duration
1. In the Timekeeping Mode, hold down Auntil the
seconds start to flash, which indicates the setting
screen.
2. While the seconds are flashing, press Bto toggle the
setting between 3 seconds ( ) and 5 seconds ( ).
3. Press Ato exit the setting screen.
About the Auto Light Switch
While the auto light switch is enabled, illumination turns on whenever you position
your wrist as described below in any mode.
Moving the watch to a position that is parallel to the ground and then tilting it
towards you at more than 40 degrees causes illumination to turn on.
• Wear the watch on the outside of your wrist.
Warning!
•Always make sure you are in a safe place whenever you are reading the watch
using the auto light switch. Be especially careful when running or engaged in
any other activity that can result in accident or injury. Also take care that
sudden illumination by the auto light switch does not startle or distract others
around you.
•When you are wearing the watch, make sure that its auto light switch is turned
off before riding on a bicycle or operating a motorcycle or any other motor
vehicle. Sudden and unintended operation of the auto light switch can create
a distraction, which can result in a traffic accident and serious personal injury.
To turn the auto light switch on and off
In the Timekeeping Mode, hold down Bfor about three seconds to toggle the auto
light switch on (auto light switch indicator displayed) or off (auto light switch indicator
not displayed).
•The auto light switch indicator is on the display in all modes while the auto light
switch is turned on.
•In order to protect against running down the battery, the auto light switch turns off
automatically approximately six hours after you turn it on.
Reference
This section contains more detailed and technical information about watch operation.
It also contains important precautions and notes about the various features and
functions of this watch.
Graphic Area
The information shown in the graphic area depends on the current mode.
Graphic area
Flash Alert indicator
Mode
Timekeeping
World Time
Stopwatch (ST1 and ST2)
Countdown Timer
Alarm
Graphic Area
Timekeeping Mode seconds
Sweeps from left to right
Sweeps from right to left
No indication
Flash Alert
When Flash Alert is turned on, the illumination flashes for
the alarms, the Hourly Time Signal, the countdown alarm,
and stopwatch (ST1) auto start.
To turn Flash Alert on and off
In the Timekeeping Mode, hold down Dfor about three
seconds to toggle Flash Alert on (Flash Alert indicator
displayed) or off (Flash Alert indicator not displayed).
•Illumination flashes twice when you turn Flash Alert on
and once when turn Flash Alert off.
•While Flash Alert is turned on, the Flash Alert indicator
remains on the display in all modes.
•Note that pressing Dto toggle Flash Alert on or off will
also switch timekeeping between 12-hour and 24-hour
format.
Button Operation Tone
The button operation tone sounds any time you press one
of the watch’s buttons. You can turn the button operation
tone on or off as desired.
•Even if you turn off the button operation tone, the
alarms, the Hourly Time Signal, the countdown alarm,
and stopwatch auto start all operate normally.
To turn the button operation tone on and off
In any mode (except when a setting screen is on the
display), hold down Cto toggle the button operation tone
on (mute indicator not displayed) and off (mute indicator
displayed).
•Holding down Cto turn the button operation tone on or off also causes the watch’s
current mode to change.
•The mute indicator is displayed in all modes when the button operation tone is
turned off.
Auto Return Features
•If you leave the watch in the Alarm Mode for two or three minutes without performing
any operation, it automatically changes to the Timekeeping Mode.
•If you leave a screen with flashing digits on the display for two or three minutes
without performing any operation, the watch automatically exits the setting screen.
Scrolling
The Band Dbuttons are used in various modes and setting screens to scroll
through data on the display. In most cases, holding down these buttons during a scroll
operation scrolls at high speed.
Initial Screens
When you enter the World Time or Alarm Mode, the data you were viewing when you
last exited the mode appears first.
Timekeeping
•Resetting the seconds to 00 while the current count is in the range of 30 to 59
causes the minutes to be increased by 1. In the range of 00 to 29, the seconds are
reset to 00 without changing the minutes.
•The year can be set in the range of 2000 to 2099.
•The watch’s built-in full automatic calendar makes allowances for different month
lengths and leap years. Once you set the date, there should be no reason to change
it except after you have the watch’s battery replaced.
World Time
All World Time Mode times are calculated from the current Home City time in the
Timekeeping Mode using UTC offset values.
•The seconds count of the World Time is synchronized with the seconds count of the
Timekeeping Mode.
•The UTC offset is a value that indicates the time difference between a reference
point in Greenwich, England and the time zone where a city is located.
•The letters “UTC”is the abbreviation for “Coordinated Universal Time”, which is the
world-wide scientific standard of timekeeping. It is based upon carefully maintained
atomic (cesium) clocks that keep time accurately to within microseconds. Leap
seconds are added or subtracted as necessary to keep UTC in sync with the Earth’s
rotation.
Illumination Precautions
•The electro-luminescent panel that provides illumination loses power after very long
use.
•Illumination may be hard to see when viewed under direct sunlight.
•The watch may emit an audible sound whenever the display is illuminated. This is
due to vibration of the EL panel used for illumination, and does not indicate
malfunction.
•Illumination turns off automatically whenever an alarm sounds.
•Frequent use of illumination runs down the battery.
•The following table shows the information that appears in graphic area.
4
Operation Guide 3178
Auto light switch precautions
•Avoid wearing the watch on the inside of your wrist. Doing so causes the auto light
switch to operate when it is not needed, which shortens battery life. If you want to
wear the watch on the inside of your wrist, turn off the auto light switch feature.
•Illumination may not turn on if the face of the watch is
more than 15 degrees above or below parallel. Make
sure that the back of your hand is parallel to the ground.
•Illumination turns off after the preset illumination
duration (see “To specify the illumination duration”),
even if you keep the watch pointed towards your face.
•Static electricity or magnetic force can interfere with
proper operation of the auto light switch. If illumination
does not turn on, try moving the watch back to the
starting position (parallel with the ground) and then tilt it
back towards you again. If this does not work, drop your
arm all the way down so it hangs at your side, and then
bring it back up again.
•Under certain conditions, illumination may not turn on until about one second after
you turn the face of the watch towards you. This does not necessarily indicate
malfunction of the auto light switch.
•You may notice a very faint clicking sound coming from the watch when it is shaken
back and forth. This sound is caused by mechanical operation of the auto light
switch, and does not indicate a problem with the watch.
Specifications
Accuracy at normal temperature: ±15 seconds a month
Timekeeping: Hour, minutes, seconds, p.m. (P), month, day, day of the week
Time format: 12-hour and 24-hour
Calendar system: Full Auto-calendar pre-programmed from the year 2000 to 2099
Other: Home Time zone (selectable in 0.5-hour increments in the range of –12.0 to
+14.0); Daylight Saving Time (summer time)/Standard Time
Stopwatch (ST1)
Measuring unit: 1/100 second
Measuring capacity: 999:59'59.99''
Measuring modes: Elapsed time, split time, two finishes
Other: Auto-Start
Stopwatch (ST2)
Measuring unit: 1/100 second
Measuring capacity: 999:59'59.99''
Measuring modes: Elapsed time, split time, two finishes
Countdown Timer
Measuring unit: 1 second
Input range: 1 minute to 24 hours (1-minute increments and 1-hour increments)
Other: Auto-repeat timing; Progress beeper
Alarms: 5 multi-function* alarms (four one-time alarms; one snooze alarm);
Hourly Time Signal
*
Alarm type: Daily alarm, date alarm, 1-month alarm, monthly alarm
World Time: 48 cities (29 time zones)
Other: Daylight Saving Time/Standard Time
Illumination: EL (electro-luminescent panel); Selectable illumination duration;
Auto Light Switch
Other: Button operation tone on/off, Flash alert, Low temperature resistance
(–20°C/–4°F)
Battery: One lithium battery (Type: CR2025)
Approximately 3 years on type CR2025 (20 seconds of alarm operation per day
(with flash alert), one countdown timer operation (with progress beeper and flash
alert) per week, one stopwatch operation (with auto start and flash alert) per week,
5 seconds of illumination per day)
–11
–10
–9
–8
–7
–6
–5
–4
–3.5
–3
–1
0
+1
+2
Pago Pago
Honolulu
Anchorage
Los Angeles
Denver
Mexico City
Chicago
New York
Caracas
St. Johns
Rio De Janeiro
Buenos Aires
Praia
London
Dakar
Madrid
Paris
Monte Carlo
Rome
Berlin
Stockholm
Athens
Johannesburg
Ankara
City Code Table
City City UTC Offset/
Code GMT Differential
PPG
HNL
ANC
LAX
DEN
MEX
CHI
NYC
CCS*
YYT
RIO
BUE
RAI
LON
DKR
MAD
PAR
MCM
ROM
BER
STO
ATH
JNB
ANK
City City UTC Offset/
Code GMT Differential
NIC
HEL
CAI
JRS
MOW
JED
THR
DXB
KBL
KHI
DEL
DAC
RGN
BKK
SIN
HKG
BJS
PER
SEL
TYO
ADL
SYD
NOU
WLG
Nicosia
Helsinki
Cairo
Jerusalem
Moscow
Jeddah
Tehran
Dubai
Kabul
Karachi
Delhi
Dhaka
Yangon
Bangkok
Singapore
Hong Kong
Beijing
Perth
Seoul
Tokyo
Adelaide
Sydney
Noumea
Wellington
+2
+3
+3.5
+4
+4.5
+5
+5.5
+6
+6.5
+7
+8
+9
+9.5
+10
+11
+12
•Based on data as of March 2008.
•The rules governing global times (UTC offset and GMT differential) and summer
time are determined by each individual country.
* In December 2007, Venezuela changed its offset from –4 to –4.5. Note, however,
that this watch displays an offset of –4 (the old offset) for the CCS (Caracas,
Venezuela) city code.

This manual suits for next models

1

Other Casio Watch manuals

Casio QW-415 User manual

Casio

Casio QW-415 User manual

Casio 1949 User manual

Casio

Casio 1949 User manual

Casio 3220 User manual

Casio

Casio 3220 User manual

Casio 5536 User manual

Casio

Casio 5536 User manual

Casio EDIFICE Standard Chronograph User manual

Casio

Casio EDIFICE Standard Chronograph User manual

Casio 2519 User manual

Casio

Casio 2519 User manual

Casio MONTRE DATA-BANK User manual

Casio

Casio MONTRE DATA-BANK User manual

Casio 5576 User manual

Casio

Casio 5576 User manual

Casio 3019 User manual

Casio

Casio 3019 User manual

Casio 5659 User manual

Casio

Casio 5659 User manual

Casio 3797 User manual

Casio

Casio 3797 User manual

Casio QW-3390 Troubleshooting guide

Casio

Casio QW-3390 Troubleshooting guide

Casio GX56-1ACR User manual

Casio

Casio GX56-1ACR User manual

Casio QW-782 Configuration guide

Casio

Casio QW-782 Configuration guide

Casio 5035 User manual

Casio

Casio 5035 User manual

Casio 3149 User manual

Casio

Casio 3149 User manual

Casio 5672 User manual

Casio

Casio 5672 User manual

Casio 2369 User manual

Casio

Casio 2369 User manual

Casio AWG101 1A User manual

Casio

Casio AWG101 1A User manual

Casio M00801-EA User manual

Casio

Casio M00801-EA User manual

Casio 5192 User manual

Casio

Casio 5192 User manual

Casio 5411 User manual

Casio

Casio 5411 User manual

Casio 3311 User manual

Casio

Casio 3311 User manual

Casio 2825 User manual

Casio

Casio 2825 User manual

Popular Watch manuals by other brands

Silva SEC X Full version manual

Silva

Silva SEC X Full version manual

Zeon IN4800 CALIBRE 557 Operation manual

Zeon

Zeon IN4800 CALIBRE 557 Operation manual

Garmin Descent MK1 owner's manual

Garmin

Garmin Descent MK1 owner's manual

Timex Expedition user guide

Timex

Timex Expedition user guide

Seiko Caliber 9S85 Instruction

Seiko

Seiko Caliber 9S85 Instruction

Asus VivoWatch 5 user manual

Asus

Asus VivoWatch 5 user manual

Chase-durer COMBAT COMMAND Operation manual

Chase-durer

Chase-durer COMBAT COMMAND Operation manual

GEONAUTE SYNKRON 200 manual

GEONAUTE

GEONAUTE SYNKRON 200 manual

Citizen Eco-Drive E16 Series instruction manual

Citizen

Citizen Eco-Drive E16 Series instruction manual

Citizen JS10 manual

Citizen

Citizen JS10 manual

OneCare CareWatch user guide

OneCare

OneCare CareWatch user guide

Void CVSL-M232 manual

Void

Void CVSL-M232 manual

Bell & Ross BR V2-92 ORANGE Technical notes

Bell & Ross

Bell & Ross BR V2-92 ORANGE Technical notes

MyKronoz ZeTrack user guide

MyKronoz

MyKronoz ZeTrack user guide

Science Museum SM2498 instruction manual

Science Museum

Science Museum SM2498 instruction manual

spikenzielabs Solder:Time 495 quick start guide

spikenzielabs

spikenzielabs Solder:Time 495 quick start guide

National Geographic NG712 SERIES instruction manual

National Geographic

National Geographic NG712 SERIES instruction manual

Iradish I6 user manual

Iradish

Iradish I6 user manual

manuals.online logo
manuals.online logoBrands
  • About & Mission
  • Contact us
  • Privacy Policy
  • Terms and Conditions

Copyright 2025 Manuals.Online. All Rights Reserved.