Casio QW-1758 User manual

MODULE NO.
R
REF. NO. S/M-539
AUGUST 1996
QW-1758
ABX-67
SERVICE MANUAL
& PARTS LIST
(WITHOUT PRICE)

— 1 —
CONTENTS
1. SPECIFICATIONS ......................................................................................... 1
2. OPERATION CHART: MODULE QW-1758...................................................2
3. DRAWINGS: MODULE QW-1758..................................................................4
3-1. BLOCK DIAGRAM.............................................................................................4
3-2. CHECKING TERMINALS AND COMPONENTS...............................................5
3-3. ACCURACY SETTING SYSTEM.......................................................................5
4. EXPLODED VIEW: MODULE QW-1758........................................................6
5. PARTS LIST: MODULE QW-1758.................................................................7
6. PRECAUTIONS FOR REPAIR: MODULE QW-1758 ....................................8
6-1. AC (ALL CLEAR) AND REMOVING OF MODULE...........................................8
6-2. ACCURACY CHECKING ...................................................................................8
6-3. REPLACEMENT OF MODULE AND DIAL WITH EL........................................9
1. SPECIFICATIONS
Item Detail
Battery SR927W ×2
Battery life Approx. 2 years
Current consumption 2.00 µA maximum
Alarm system Piezo plate on Back cover
Accuracy ±20sec./month
Accuracy setting system Pattern cutting method (P1-P5)
Accuracy checking See page 8
Accuracy setting Unadjustable
Functions • Electro-luminescent backlight
• 50 pages of Telememo
8 letters and 12 nemerals per page
Auto sort function
• Calendar
Full month calendars from January 1996 to December 2020.
• 1/100 sec. stopwatch
Measuring capacity: 23:59'59.99"
Measuring mode: Net time, split time, 1st-2nd place times
• Daily alarm
• Hourly time signals
• Regular timekeeping:
(Analog) Hour and minute hands
(Digital) Hr, min, sec, am/pm, yr, mo, date, day
• Auto-calendar (pre-programmed until the year 2020)
• 12/24-hour formats
• Auto display function

— 2 —
CC CCC
C
Alarm Mode Stopwatch Mode Hand Setting ModeCalendar Mode
Telememo Mode
Timekeeping Mode
ABOUT THE BACKLIGHT
Pressing Lilluminates the display for about two seconds. If you hold down L, the light
automatically disappears after five seconds.
TELEMEMO MODE
• The backlight of this watch employs an electro-
luminescent (EL) light, which loses its illuminating
power after very long term use.
• The watch emits an audible sound whenever the
display is illuminated. This is caused because the
EL light vibrates slightly when lit. It does not indi-
cate malfunction of the watch.
• Frequent use of the backlight shortens the battery
life.
TIMEKEEPING MODE
Press Dto change the display format in the Timekeeping Mode as shown below.
Format 2
Hour Seconds
Minutes
Month Date
Format 1
D
Month
Date
Day of the week
Format 3
• Format 1 shows the day of the week, month, and day.
• Format 2 shows a full-month calendar for the current month, with the current date
flashing inside it.
• Format 3 clears the entire display.
• Holding down Bwhile using either Format 1 or Format 3 displays the full-month
calendar for the current month.
• Holding down Bwhile using Format 2 displays the full-month calendar for the follow-
ing month.
To set the time and date
1. Make sure that your watch is in the Timekeeping Mode. If not, use Cto enter the
Timekeeping Mode.
2. Hold down Awhile in the Timekeeping Mode. The seconds digits flash on the
display because they are selected.
3. Press Cto change the selection in the following sequence.
4. While the seconds digits are selected (flashing), press Dto reset the seconds to
“00”. If you press Dwhile the seconds count is in the range of 30 to 59, the seconds
are reset to “00” and 1 is added to the minutes. If the seconds count is in the range
of 00 to 29, the minutes count is unchanged.
5. While any other digits (besides seconds) are selected (flashing), press Dto increase
the number or Bto decrease it. Holding down either button changes the current
number at high speed.
While the 12/24-hour setting is selected, press Dto switch between the two formats.
6. After you set the time and date, press Ato return to the normal Timekeeping Mode
(the flashing stops).
• The day of the week is automatically set in accordance with the date.
• The date can be set within the range of January 1, 1996 to December 31, 2020.
• If you do not operate any button for a few minutes while a selection is flashing, the
flashing stops and the watch goes back to the normal Timekeeping Mode automati-
cally.
Day of the week abbreviations
Day of the week is displayed as follows.
SUN : Sunday MON : Monday TUE : Tuesday
WED : Wednesday THU : Thursday FRI : Friday
SAT : Saturday
Seconds Hour Minutes
Date YearMonth 12/24-hour
format
Caution
The following causes all data stored in memory to be deleted. Be sure to always
keep separate written copies of all important data.
• Malfunction or repairs
• Dead battery
• Battery replacement
In no event will CASIO be liable for loss of data or any damages arising out of
such loss.
The Telememo Mode lets you store up to 50 pairs of name and telephone number data.
The name can be up to 8 characters long and the numbers 12 digits each. Data is
automatically sorted into alphabetical order based on the name data. You can recall
data by scrolling through a sorted list.
To input Telememo data
Name display Name area
Telephone number
Number of items in memory
Number area
Figure a. Figure b. Figure c.
Mode indicator
Use Band D
1. Make sure that your watch is in the Telememo Mode. If not, use Cto enter the
Telememo Mode.
• Whenever you enter the Telememo Mode, the display shows how many items are
already stored in memory and how many items you can input before memory be-
comes full (Figure a.). After a few seconds, the display changes to show the item
that was selected when you last exited the Telememo Mode (Figure b.).
2. Press Band Din the Telememo Mode. The new data display (Figure c.) appears.
• If the message “FULL” appears on the display, it means that memory is full. To
store more data, you first have to delete some of the data. Use the procedure to
delete data.
3. Hold down Auntil the flashing cursor appears on the name area.
4. Use Bor Dto input letters at the cursor position. The character changes in the
following sequence. Holding down either button changes the selection at high speed.
A to Z 0 to 9
(Space) – E :
^
Press B
Press D
5. After you select the character you want, press Cto advance the cursor to the right.
• Repeat steps 4 and 5 until you complete name input.
• You can input up to 8 characters in the name area. The display shows only 4
characters, but automatically scrolls from right to left to show all of the characters
that make up the text.
6. After the name input is through, use Cto move the cursor to the number area
(Figure c.).
7. While the cursor is in the number area, use Bor Dto input numbers you want. The
character changes in the following sequence. Holding down either button changes
the selection at high speed.
– (Hyphen) 0 to 9 (Space)
Press B
Press D
8. After you select the character you want, press Cto advance the cursor to the right.
• Repeat steps 7 and 8 until you complete number input.
9. After inputting the data you want, press Ato store it into memory.
• The message “SORT” appears on the display and stays there while data is being
stored into aphabetical order. At this time the cursor appears on the display ready
for input. At this point you could return to step 4 to input more data. If you do not
want to input more data, press Aagain to return to the normal Telememo Mode
display (without flashing).
• The following shows how the display automatically changes if you do not operate
any button for a few minutes while in the Telememo Mode.
DD
Data input display
(Flashing) Normal Telememo Mode
(No flashing) Timekeeping Mode
To scroll through Telememo data
In the normal Telememo Mode (when the display is not flashing), press Dto scroll
forward or Bto scroll backward through stored data.
• The data item that is displayed when you exit the Telememo Mode will be the first
data to appear when you enter the Telememo Mode again.
2. OPERATION CHART: MODULE QW-1758
GENERAL GUIDE
• Press Cto change from mode to mode.
•If the digital display of your watch is continually changing, see “Auto Display function” for information on how to stop it.

— 3 —
To record split times
1. Press Dto start the stopwatch.
2. Press Bto display the timing up to that point. Stopwatch timing continues internally.
• At this time, the mode indicator “STW” is replaced by “SPL” on the display, indicating
that the split time is being recorded.
3. Press Bto clear the split time and to continue time measurement on the display.
• You can repeat steps 2 and 3 as many times as you want.
4. Press Dto stop the time measurement.
5. Press Bto clear the stopwatch to all zeros.
To time first and second place finishes
1. Press Dto start the stopwatch.
2. Press Bwhen the first finisher crosses the line, and record the time.
3. Press Dwhen the second finisher crosses the line.
4. Press Bto display the finishing time of the second finisher.
5. Press Bagain to clear the stopwatch to all zeros.
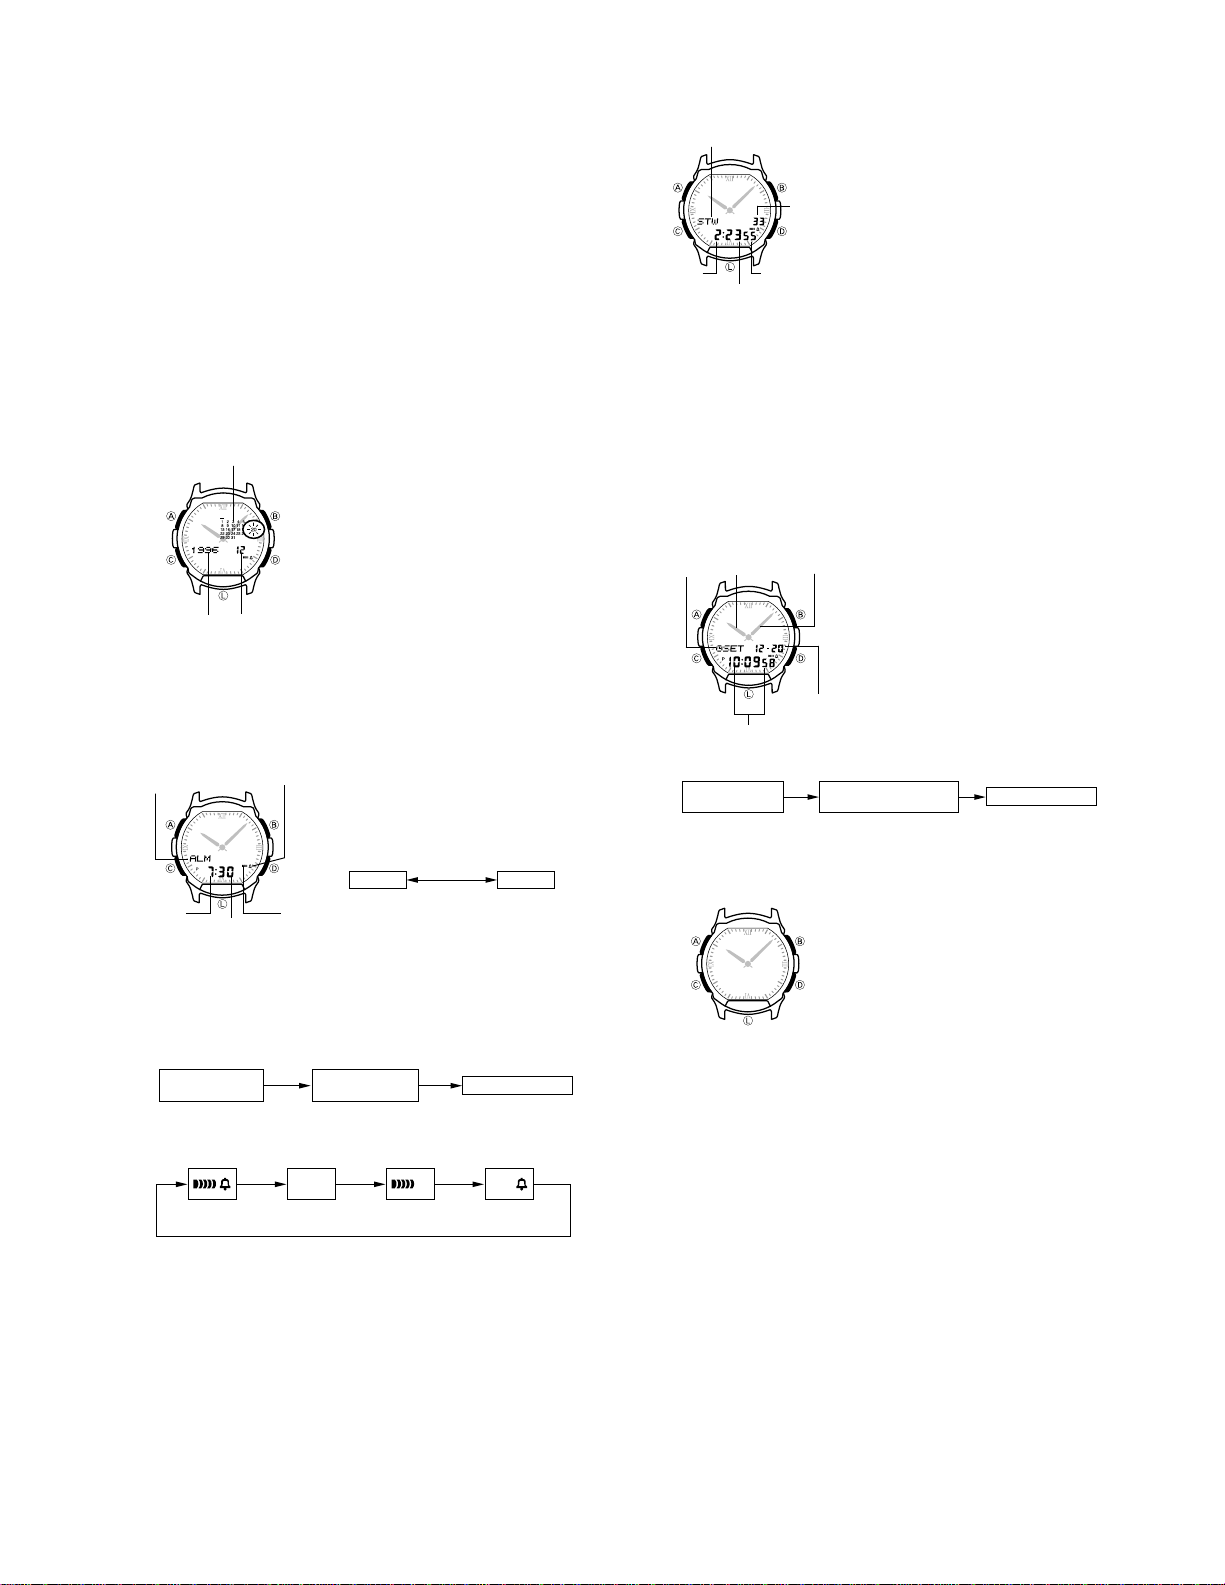
HAND SETTING MODE
Seconds
Hours
1/100
second
Minutes
Mode indicator
1. Make sure that your watch is in the Calendar Mode.
If not, use Cto enter the Calendar Mode.
• The calendar of the current month appears on the
display, with the current date flashing, whenever
you enter the Calendar Mode.
2. Pressing Dscrolls forward to the next month’s cal-
endar, and pressing Bscrolls back to the previous
month.
• Holding down either button scrolls the calendars at
high speed. After two years scroll, the watch starts
to scroll year-by-year on the January calendar (for-
ward scroll) or the December calendar (back scroll).
The Stopwatch Mode lets you measure elapsed time,
split times, and two finishes. The range of the stop-
watch is 23 hours, 59 minutes, 59.99 seconds.
To measure elapsed time
1. In the Stopwatch Mode, press Dto start the stop-
watch.
2. Press Dto stop the stopwatch.
• You can resume the measurement operation by
pressing Dagain.
3. Press Bto clear the stopwatch to all zeros.
STOPWATCH MODE
To edit Telememo data
1. In the Telememo Mode, use Bor Dto scroll through the data items and display the
one you want to edit.
2. Hold down Auntil the flashing cursor appears on the display.
3. Use Cto move the cursor to the character you want to change.
4. Use Bor Dto select the character you want.
• For details, see “To input Telememo data” (steps 4 through 5 for name input, or 7
through 8 for number).
5. After editing the data, press Ato store it.
• The message “SORT” appears on the display and stays there while data is being
stored into alphabetical order. After the sort operation is complete, the display
returns to the normal Telememo Mode display (the flashing stops).
To delete a Telememo item
1. In the Telememo Mode, use Bor Dto scroll through the name data and display the
one you want to delete.
2. Hold down Auntil the cursor appears on the display.
3. Hold down Band Duntil the message “CLR” appears on the display indicating the
data is deleted. At this time the cursor appears on the display ready for input.
Press Aagain to return to the normal Telememo Mode (without a cursor).
• If you want to input more data, start from step 3 under “To input Telememo data”.
CALENDAR MODE
The Calendar Mode lets you view full month calendars for any month from January
1996 to December 2020. The short bar in the upper left of the calendar indicates that
the first day of the week in the calendar is Sunday.
When the time shown on the display does not match
the analog setting, use this mode to correct this situa-
tion by changing the analog setting.
To set the analog time
1. Make sure that your watch is in the Hand Setting
Mode. If not, use Cto enter the Hand Setting Mode.
2. Hold down Awhile in the Hand Setting Mode until
the mode indicator starts to flash on the display.
3. Press Dto advance the hands of the analog time-
piece.
4. After you set the analog time, press Ato return to
the normal Hand Setting Mode (the flashing stops).
Minute
hand
Mode
indicator Hour
hand
Current time
Current
date
• The following shows how the display automatically changes if you do not operate
any button for a few minutes while in the Hand Setting Mode.
Hand time setting
(Flashing) Normal Hand Setting Mode
(No flashing) Timekeeping Mode
AUTO DISPLAY FUNCTION
The Auto Display function of this watch continually changes the contents of the digital
display. Note that you cannot use any of the watch’s other functions while the Auto
Display function is operating.
To turn the Auto Display on
Hold down Cfor about two or three seconds in any
mode until the watch beeps.
To turn the Auto Display off
Hold down Cfor about two or three seconds until the
watch beeps. At this time, the watch is in the Time-
keeping Mode.
Note
The Auto Display function cannot be performed while you are making settings (i.e.
while digits or other settings are flashing on the display).
Calendar
Year Month
MinutesHour
Hourly Time
Signal on indicator
ALARM MODE
When the Daily Alarm is switched on, the alarm sounds for 20 seconds at the preset
time each day.
When the Hourly Time Signal is switched on, the watch beeps every hour on the hour.
Note that the Daily Alarm and the Hourly Time Signal operate based on the digital time
setting.
To set the alarm time 1. Make sure that the watch is in the Alarm Mode. If
not, use Cto enter the Alarm Mode.
2 Hold down Awhile in the Alarm Mode until the
hour digits start to flash on the display. The hour
digits flash because they are selected. At this time
the Daily Alarm is switched on automatically.
3. Press Cto change the selection in the following
sequence.
Mode
indicator
Hour Minutes
Alarm time setting
(Flashing) Normal Alarm Mode
(No flashing) Timekeeping Mode
Both on Both off Daily Alarm
only Hourly Time
Signal only
4. Press Dto increase the selected digits and Bto decrease them. Holding down
either button changes the number at high speed.
• The format (12-hour and 24-hour) of the alarm time matches the format you select
for normal timekeeping.
• When setting the alarm time using the 12-hour format, take care to set the time
correctly as morning or afternoon (indicated as “P” on the display).
5. After you set the alarm time, press Ato return to the normal Alarm Mode (the
flashing stops).
• The following shows how the display automatically changes if you do not operate
any button for a few minutes while in the Alarm Mode.
To switch the Daily Alarm and Hourly Time Signal on and off
Press Dwhile in the normal Alarm Mode (when no digit is flashing) to change the
status of the Daily Alarm and Hourly Time Signal in the following sequence.
To stop the alarm
Press any button to stop the alarm after it starts to sound.
To test the alarm
Hold down Dwhile in the normal Alarm Mode to sound the alarm.
Alarm on
indicator

— 4 —
LC1
L1
L2
L3
L4
L5
L6
L7
L8
L9
L10
L11
L12
L13
L14
L15
L16
L17
L18
L19
L20
L21
L22
L23
L24
L25
L26
L27
LC2
LC5
L53
L52
L51
L50
L49
L48
L47
L46
L45
L44
L43
L42
L41
L40
L39
L38
L37
L36
L35
L34
L33
L32
L31
L30
L29
L28
LC4
LC3
46C2
47C2
45C2
45C1
47C1
46C1
46C5
43C2
44C2
44C1
42C2
42C1
44C5
43C1
43C5
39C2
40C2
39C1
39C5
41C1
40C1
40C5
37C2
34C2
20C5 19C5 18C5 17C1 16C1 15C1 14C1
20C4 19C4 18C4 17C3 16C3 15C3 14C36C4 7C4 8C4 9C4 10C4 11C4
20C2 19C2 18C2 17C4 16C4 15C4 14C46C2 7C2 8C2 9C2 10C2 11C2
20C1 19C1 18C1 17C2 16C2 15C2 14C26C1 7C1 8C1 9C1 10C1 11C1
15C58C5 9C5
12C5
12C1
48C2
48C1
41C2
31C4
34C4
13C5 13C1 13C2 13C4 13C3
10C5 11C5 17C5 16C5
20C3 19C3 18C36C3 7C3
6C5
C5
C3
C4
C2
C1 1234553 52 51 5049 2122 23 2425 26 2728 2930
7C5
8C3 9C3 10C3 11C3
34C1
35C5
38C2
36C2
33C2
35C2
35C1
34C5
31C2
44C5
47C1
47C4
32C1
32C5
31C3
47C5
48C3
48C4
46C4
45C5
45C1
44C4
43C3
46C3
45C4
44C3
41C5
42C1
42C4
41C3
42C3
45C4
41C4
38C5
39C1
39C4
38C3
40C3
40C4
38C4
36C5
36C1
36C4
35C3
37C3
37C4
35C4
31C3
30C1
33C4
32C3
35C5
34C3
32C4
32C2
33C1
31C5
36C1
38C1
37C1
37C5
3. DRAWINGS: MODULE QW-1758
3-1. BLOCK DIAGRAM
KI4
KI6
KI5
KI2
KI1
KI3
KI7
KI8
AC
P1
P2
P3
P4
P5
S1
S2
S3
S4
SL
XTB
XT
T1
T2
T3
BD
LD1
VDD VSS2 01VSSM VCH VSS3 VSS1 VC1 VC2
TOTAL 91PINS
BONDING 88PINS
LSI
LCD
C1
EL
C5
C7
BAT1
BAT2
C2
C3
C4
An. B
Tr2
TE
C6 R.
TB
PF
PE SF
SE
Tns1
Tr1
PZ
LTr3
Xtal
L1 L53 LC1 LC5

— 5 —
KI7
KI8
VDD
VDD
P1
P2
P3
P4
P5
VC2
VC1
VDD
VSS3
VDD VSS1
VSS2
VSS2
XTB
SE
TE
XT
VSS2LD1
VDD
VDD
VSS2
VSS2
VSS2 VDD
VDD
LD1
TE
TE
TE
TB TB TB
PE
PE SF(TB)
VCH
LBD
L
L
01
VSSM
VDD
VCH
AC
XI1
SEPF(VDD)
KI6
KI5
KI4
KI2
9. Chip capacitor
(7103 4446)
9. Chip capacitor
(7103 4446)
9. Chip capacitor
(7103 4446)
9. Chip capacitor
(7103 4446)
11. Chip capacitor
(7103 7163)
5. Coil
(7020 0490)
7. Tantalum capacitor
(7911 1253)
8. Tantalum
capacitor
(7911 1260)
10. Chip resistor
(7102 7646)
2. Transistor (7101 5630)
4. Transistor
(7101 1151)
3. Transistor
(7101 5413)
R
C5
L
C1
C3
C2
C6
C4 Tr2
Tr3
Tr1
C7
1. P.C.B. with components
(7240 9396) 28. Insulation sheet 1341-1
(7233 1666)
Xtal
Quartz oscillator
(Unrepairable)
6. Transformer
(7101 1417)
25. Adhesive
tape 1416
(7229 0623)
3-2. CHECKING TERMINALS AND COMPONENTS
3-3. ACCURACY SETTING SYSTEM
The accuracy of this module is set by Pattern Cutting method (P1 ~ P5) in the production line.
Therefore, in case a trouble occurs in the quartz oscillator or the LSI, replace the whole P.C.B. with
components with new one.
Top view of P.C.B. ass'y Bottom view of P.C.B. ass'y

— 6 —
1 (7240 9396)
P.C.B. with components
22 (7234 1148)
24 (7231 1169)
16 (7201 9385)
12 (7240 2947)
Analog block
13 (7224 1158)
29 (7207 8520)
30 (7228 0511)
17 (7230 0658)
23 (7234 1155)
21 (7231 1302)
15 (7227 0294)
14 (7224 1965)
19 (7236 0028)
20 (7231 0595)
18 (7230 0721)
Battery (SR927W)
27 (7233 1673)
LCD
Interconnector
Dial supporter
Minute hand
Hour hand
Dial with EL
Coil spring
Contact rubber
For the details of LCD, Interconnector,
Minute hand, Hour hand, Dial with EL
and Coil springs, please refer to the parts
list No. P/L-513.
Analog block is not repairable, and
therefore, individual components are not
available except Coil ass'y, and screws.
Also, lubrication is not required on this
Analog block, because all the wheels are
made of plastic.
Screw
Refer to P/L-513 for the details.
Coil spring
Refer to P/L-513 for the details.
26 (7233 0896)
4. EXPLODED VIEW: MODULE QW-1758

5. PARTS LIST : MODULE QW-1758
Note: 1. Prices and specifications are subject to change without prior notice.
2. Spare parts are classified as follows according to their importance in after-sales service.
A Rank ------------------------------- Very Important
B Rank ------------------------------- Important
C Rank ------------------------------- Less important
3. Batteries in Bulk pack on the tray will be supplied from our Overseas Spare Parts Section under charge basis.
Batteries in Blister pack will be supplied from our Sales Department.
4. As for order/supply of spare parts, refer to the separate publication "GUIDEBOOK for spare parts supply".
Item Code No. Parts Name Specification Applicable Q R
7072 3965 Module QW-1758DF-01 ABX-67 A
1 7240 9396 P.C.B. with components Q251457*1 QW-1758DF-01 1 A
2 7101 5630 Transistor 2SC4181-T1 QW-1758DF-01 1 B
3 7101 5413 Transistor 2SD1823(TX) QW-1758DF-01 1 B
4 7101 1151 Transistor 2SD1824(TX) QW-1758DF-01 1 B
5 7020 0490 Coil ELT-3K004B QW-1758DF-01 1 B
6 7101 1417 Transformer TRS5833 QW-1758DF-01 1 B
7 7911 1253 Tantalum capacitor F930J156MAA QW-1758DF-01 1 B
8 7911 1260 Tantalum capacitor F930J106MAA QW-1758DF-01 1 B
9 7103 4446 Chip capacitor CM21Y5V104P25AT QW-1758DF-01 4 B
10 7102 7646 Chip resistor ERJ6GEYJ163V QW-1758DF-01 1 B
11 7103 7163 Chip capacitor CT21Y5V684P16AT QW-1758DF-01 1 B
12 7240 2947 Analog block (C-7.1) Q220396*3 QW-1758DF-01 1 A
13 7224 1158 Coil ass'y 384 Q322564B*1S QW-1758DF-01 1 A
14 7224 1965 Hour wheel 384 Q422164A-1K QW-1758DF-01 1 B
15 7227 0294 Washer 745 Q436294A-1 QW-1758DF-01 1 C
16 7201 9385 Coil spring 384-1 Q422656A-1 QW-1758DF-01 2 B
17 7230 0658 Coil spring 1327-1 Q450867-1 QW-1758DF-01 1 B
18 7230 0721 Coil spring 1341-2 Q453360-1 QW-1758DF-01 2 B
19 7236 0028 Battery contact (-) 747 Q334236B-1 QW-1758DF-01 1 C
20 7231 0595 Terminal plate 1087 Q340734-1 QW-1758DF-01 1 C
21 7231 1302 Main plate 1341 Q150131C-1 QW-1758DF-01 1 C
22 7234 1148 Housing 1341-1 Q150129B-1 QW-1758DF-01 1 C
23 7234 1155 Housing 1341-2 Q150130B-1 QW-1758DF-01 1 C
24 7231 1169 Hour wheel holder 1341 Q351344-1 QW-1758DF-01 1 C
25 7229 0623 Adhesive tape 1416 Q450991-1 QW-1758DF-01 1 C
26 7233 0896 Insulation sheet 747-2 Q432462-1 QW-1758DF-01 2 C
27 7233 1673 Insulation sheet 1341-2 Q451788-1 QW-1758DF-01 1 C
28 7233 1666 Insulation sheet 1341-1 Q351345-1 QW-1758DF-01 1 C
29 7207 8520 Screw 354-2 Q411616-1 QW-1758DF-01 1 C
30 7228 0511 Screw 388 Q422638-1 QW-1758DF-01 1 C
Battery SR927W 2
For the prices and minimum order/supply quantities of the above parts, refer to the Parts Price List P.P.L.-513.
Notes: Q – Used quantity
R – Rank — 7 —

— 8 —
Screws
Screws
Metallic tweezers
6. PRECAUTIONS FOR REPAIR: MODULE QW-1758
6-1. AC (ALL CLEAR) AND REMOVING OF MODULE
1. Perform AC (ALL CLEAR) when inserting a new battery, or else the memories and/ or counters may give
erratic displays.
Touch the AC contact and the positive (+) side of the battery or main plate with the metallic tweezers.
The contact should be made for about two seconds.
2. On removing of the module from the case, please insert the precision screw driver between the module
and the case pointed by an arrow after removing of four screws.
6-2. ACCURACY CHECKING
Check the accuracy of the module with the quartz timer after switching the module to “ACCURACY
CHECKING MODE”.
The operations are shown below:
A) SWITCHING TO “ACCURACY CHECKING MODE”
Continuously push the A, Cand Dbuttons at the same time at the normal time keeping mode.
Then all the segments are displayed and the LCD drive signals are changed to the static drive signal
of “32 Hz” so that you can check the accuracy with the quartz timer.
B) CANCELLATION OF THE “ACCURACY CHECKING MODE”
Push any button.
Then the display is returned to its original state.
NOTE: The “ACCURACY CHECKING MODE”
will automatically return to the regular
mode in 1 ~ 2 hour(s) without any operation.
A
C
B
D

— 9 —
Precision screw driver
Pillars of Dial
Module Dial with EL
Case opener A
Dial with EL
9H 3H
6H
12H
9H 3H
6H
12H
9H 3H
6H
12H
Adhesive tape
(Q422643A-1)
Adhesive tape (Q436306A-2)
Adhesive tape
(Q422643A-1)
Module
6-3. REPLACEMENT OF MODULE AND DIAL WITH EL
On the model ABX-67 use the module QW-1758, Dial with EL is fixed to Module by 3 pcs of adhesive tapes.
And please replace Module or Dial with EL according to the following procedure.
1) Remove the hands by using Hand removing spacer. (Refer to Service bulliten WAT-189)
2) Insert the precision screw driver between Module and Dial with EL on 3 and 9 o'clock side as shown in
figure 1. And float up 2 pillars of the dial from holes of Module.
3) Insert Case opener A between Module and Dial with EL on 11,12 and 1 o'clock side as shown in figure
2. And separate Dial with EL from Module.
4) Replace Module or Dial with EL.
5) Put 3 pcs of new adhesive tapes on Module as shown in figure 3. Adhesive tapes should always be
replaced with new ones. Especially when the adhesive tapes become plumped.
Note: If the adhesive tapes aren't used for fixing of Module and Dial with EL, 2 pillars of the Dial with
EL are possible to be broken when a great shock is given to the watch.
6) Fix Dial with EL to Module. Be sure 2 terminals of EL are connected with the coil springs of the
Module.
Necessary spare parts are as follows.
Figure 1 Figure 2 Figure 3
Code No. Parts Name Specification Q
7072 3965 Module QW-1758DF-01 1
7170 0567 Dial with EL (for ABX-67) Q355609*4 1
7209 3733 Adhesive tape Q436306A-2 1
7227 0098 Adhesive tape Q422643A-1 2

MA0900661A
Table of contents
Other Casio Watch manuals

Casio
Casio MR-G 5068 User manual

Casio
Casio QW-2812 Troubleshooting guide

Casio
Casio 2332 User manual

Casio
Casio 1301 User manual

Casio
Casio QW-785 Configuration guide

Casio
Casio 4343 User manual

Casio
Casio 3469 User manual

Casio
Casio G-Shock User manual

Casio
Casio 2615 User manual

Casio
Casio QW-739 User manual
Popular Watch manuals by other brands

Patek Philippe
Patek Philippe NAUTILUS TRAVEL TIME manual

AVI-8
AVI-8 RB396 SHEILA instruction manual

Mobvoi
Mobvoi TicWatch Pro WF12096 quick guide

La Crosse Technology
La Crosse Technology WT-182 instruction manual

TMI Products
TMI Products VD37 Operation manual

U-Boat
U-Boat ITALO FONTANA Instructions for use